![- 1 package (14-16 Oreo cookies, crushed) - 4 tablespoons unsalted butter, melted - 16 ounces cream cheese, softened - 1 cup powdered sugar - 1 teaspoon vanilla extract - 2 cups heavy whipping cream - 12 Oreo cookies, finely crushed for topping - Chocolate syrup (optional for drizzling) - Mixing bowls - Hand mixer - Measuring cups and spoons - Individual cups or jars Gather these ingredients before you start. Each item plays a vital role in creating your Oreo no-bake cheesecake cups. The crushed Oreos provide a rich, chocolatey crust. The cream cheese gives the filling that creamy texture we love. You will need to melt the butter. This helps the cookie crumbs stick together. Make sure the cream cheese is softened. It blends easier and makes the filling smooth. The heavy cream is key for that light, fluffy texture. For the best results, use a hand mixer. It makes it easy to beat the cream cheese and whip the cream. Individual cups or jars are great for serving. They make each dessert look lovely and ready to enjoy. If you want to add a twist, consider the optional chocolate syrup. It makes a great drizzle and adds extra sweetness. Trust me, these little details can elevate your dessert. For the full recipe, check out the complete guide. Enjoy the fun of making this easy dessert delight! To start, gather your crushed Oreo cookies and melted butter. In a medium bowl, combine them well. You want the crumbs fully coated in butter. Next, divide this mixture into individual cups or jars. Press the crumbs down gently to create a solid base. This crust sets the stage for your cheesecake filling. Now, let’s make the filling. In a large mixing bowl, beat the softened cream cheese with a hand mixer. Your goal is to have it smooth and creamy. Slowly add the powdered sugar and vanilla extract. Keep mixing until everything is well blended. This step is key for a sweet, rich flavor. Once your crust is ready, remove the cups from the fridge. Spoon the cheesecake filling over the crust, filling each cup nearly to the top. This creates a lovely layer of creamy goodness. Finish off by sprinkling finely crushed Oreo cookies on top. This adds texture and extra Oreo flavor. Now, it’s time to chill. Cover the cups and place them in the fridge for at least 4 hours. This helps the filling set perfectly. For a fun twist, consider drizzling chocolate syrup just before you serve. It adds a delicious touch that everyone will love. Enjoy the tasty treat! For the full recipe, check out the [Full Recipe]. To get the best cheesecake, you must start with softened cream cheese. If it's too cold, it will not mix well. You want a smooth and creamy mixture. When you whip the heavy cream, make sure to get stiff peaks. Then, gently fold the whipped cream into the cream cheese mixture. This keeps it light and fluffy. A beautiful dessert is a joy to see. Use garnishes like a dollop of whipped cream and a half Oreo on top of each cup. This adds a nice touch. For serving, place the cups on a decorative platter. This makes your dessert stand out even more. If you find the cheesecake too sweet, you can adjust it. Simply lower the amount of powdered sugar. Taste as you go. You can also use less sweet toppings, like fresh fruit or dark chocolate. This way, you can create a balance that suits your taste. {{image_2}} You can change the flavor of your cheesecake cups easily. Try adding a tablespoon of cocoa powder for a richer taste. This small addition can give you a chocolate twist that is hard to resist! You can also experiment with flavored extracts. Almond extract can bring a nice nutty flavor to your cups. Just a little can make a big difference. Toppings can change the whole look and taste of your dessert. Instead of just using more Oreos, you can use crushed candies or fresh fruit. Think about strawberries or raspberries for a fruity touch. Drizzling caramel or berry sauce on top can add a sweet, sticky element. This gives your cheesecake cups a fun and unique style. If you need gluten-free options, it’s easy to adapt this recipe. Simply substitute regular Oreos with gluten-free versions. These cookies taste just as good and keep the right texture. For drizzling, you can use gluten-free melted chocolate. This way, everyone can enjoy these tasty treats without worry. For the full recipe, check the detailed instructions above. Keep your Oreo no-bake cheesecake cups covered in the refrigerator. They stay fresh for up to 3 days. Use an airtight container to keep them safe from other smells. This way, you enjoy every last bite of that creamy goodness. Can the cheesecake cups be frozen? Yes, you can! They freeze well for up to 2 months. To enjoy them later, just thaw in the fridge before serving. This keeps the texture smooth and creamy, just like when you made them fresh. Yes, but it may alter the texture slightly. Low-fat cream cheese can make the filling less rich. If you want a lighter dessert, this is a good choice. They are best consumed within 3 days if stored properly. Keep them in the fridge, covered well. This helps maintain their fresh taste and creamy texture. Yes, substitute dairy ingredients with non-dairy equivalents. Use vegan cream cheese and non-dairy whipped cream. This way, you can enjoy these delicious cups without dairy! This blog post shared a simple recipe for delicious Oreo cheesecake cups. We covered the ingredients, equipment, and easy step-by-step instructions. You learned tips for perfecting texture, presentation ideas, and ways to reduce sweetness. I introduced tasty variations, including alternative toppings and gluten-free options. Finally, we discussed storage tips to keep your treats fresh. Enjoy making these cups for your next gathering. They are sure to impress!](https://tossedrecipes.com/wp-content/uploads/2025/05/66bc6c95-abe4-4687-b596-be7c60df09da.webp)
If you’re craving a sweet treat without the fuss, you’re in luck! These Oreo No-Bake Cheesecake Cups are easy to make and oh-so-delicious. I’ll guide you through each step, from blending the creamy filling to creating a crunchy crust. Perfect for parties or a cozy night in, these cups are sure to impress everyone! Let’s dive into the ingredients and get started!
Ingredients
List of Ingredients
– 1 package (14-16 Oreo cookies, crushed)
– 4 tablespoons unsalted butter, melted
– 16 ounces cream cheese, softened
– 1 cup powdered sugar
– 1 teaspoon vanilla extract
– 2 cups heavy whipping cream
– 12 Oreo cookies, finely crushed for topping
– Chocolate syrup (optional for drizzling)
Equipment Needed
– Mixing bowls
– Hand mixer
– Measuring cups and spoons
– Individual cups or jars
Gather these ingredients before you start. Each item plays a vital role in creating your Oreo no-bake cheesecake cups. The crushed Oreos provide a rich, chocolatey crust. The cream cheese gives the filling that creamy texture we love.
You will need to melt the butter. This helps the cookie crumbs stick together. Make sure the cream cheese is softened. It blends easier and makes the filling smooth. The heavy cream is key for that light, fluffy texture.
For the best results, use a hand mixer. It makes it easy to beat the cream cheese and whip the cream. Individual cups or jars are great for serving. They make each dessert look lovely and ready to enjoy.
If you want to add a twist, consider the optional chocolate syrup. It makes a great drizzle and adds extra sweetness. Trust me, these little details can elevate your dessert. For the full recipe, check out the complete guide. Enjoy the fun of making this easy dessert delight!
Step-by-Step Instructions
Preparing the Crust
To start, gather your crushed Oreo cookies and melted butter. In a medium bowl, combine them well. You want the crumbs fully coated in butter. Next, divide this mixture into individual cups or jars. Press the crumbs down gently to create a solid base. This crust sets the stage for your cheesecake filling.
Making the Cheesecake Filling
Now, let’s make the filling. In a large mixing bowl, beat the softened cream cheese with a hand mixer. Your goal is to have it smooth and creamy. Slowly add the powdered sugar and vanilla extract. Keep mixing until everything is well blended. This step is key for a sweet, rich flavor.
Assembling the Cups
Once your crust is ready, remove the cups from the fridge. Spoon the cheesecake filling over the crust, filling each cup nearly to the top. This creates a lovely layer of creamy goodness. Finish off by sprinkling finely crushed Oreo cookies on top. This adds texture and extra Oreo flavor.
Chilling and Serving
Now, it’s time to chill. Cover the cups and place them in the fridge for at least 4 hours. This helps the filling set perfectly. For a fun twist, consider drizzling chocolate syrup just before you serve. It adds a delicious touch that everyone will love. Enjoy the tasty treat!
For the full recipe, check out the [Full Recipe].
Tips & Tricks
Perfecting the Cheesecake Texture
To get the best cheesecake, you must start with softened cream cheese. If it’s too cold, it will not mix well. You want a smooth and creamy mixture. When you whip the heavy cream, make sure to get stiff peaks. Then, gently fold the whipped cream into the cream cheese mixture. This keeps it light and fluffy.
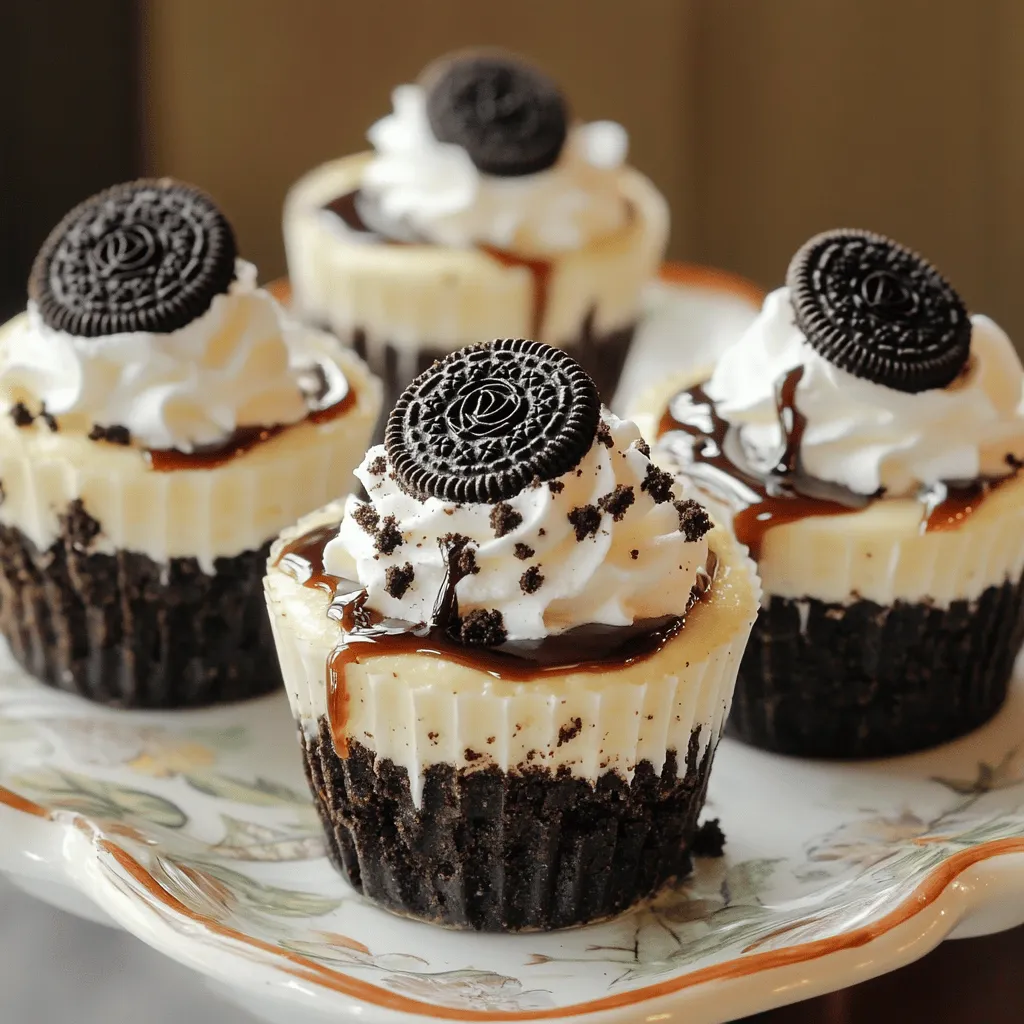
Presentation Suggestions
A beautiful dessert is a joy to see. Use garnishes like a dollop of whipped cream and a half Oreo on top of each cup. This adds a nice touch. For serving, place the cups on a decorative platter. This makes your dessert stand out even more.
Reducing Sweetness
If you find the cheesecake too sweet, you can adjust it. Simply lower the amount of powdered sugar. Taste as you go. You can also use less sweet toppings, like fresh fruit or dark chocolate. This way, you can create a balance that suits your taste.
Variations
Flavor Add-Ins
You can change the flavor of your cheesecake cups easily. Try adding a tablespoon of cocoa powder for a richer taste. This small addition can give you a chocolate twist that is hard to resist! You can also experiment with flavored extracts. Almond extract can bring a nice nutty flavor to your cups. Just a little can make a big difference.
Alternative Toppings
Toppings can change the whole look and taste of your dessert. Instead of just using more Oreos, you can use crushed candies or fresh fruit. Think about strawberries or raspberries for a fruity touch. Drizzling caramel or berry sauce on top can add a sweet, sticky element. This gives your cheesecake cups a fun and unique style.
Gluten-Free Options
If you need gluten-free options, it’s easy to adapt this recipe. Simply substitute regular Oreos with gluten-free versions. These cookies taste just as good and keep the right texture. For drizzling, you can use gluten-free melted chocolate. This way, everyone can enjoy these tasty treats without worry.
For the full recipe, check the detailed instructions above.
Storage Info
How to Store Leftovers
Keep your Oreo no-bake cheesecake cups covered in the refrigerator. They stay fresh for up to 3 days. Use an airtight container to keep them safe from other smells. This way, you enjoy every last bite of that creamy goodness.
Freezing Tips
Can the cheesecake cups be frozen? Yes, you can! They freeze well for up to 2 months. To enjoy them later, just thaw in the fridge before serving. This keeps the texture smooth and creamy, just like when you made them fresh.
FAQs
Can I use low-fat cream cheese?
Yes, but it may alter the texture slightly. Low-fat cream cheese can make the filling less rich. If you want a lighter dessert, this is a good choice.
How long do these cheesecake cups stay good?
They are best consumed within 3 days if stored properly. Keep them in the fridge, covered well. This helps maintain their fresh taste and creamy texture.
Can I make this recipe dairy-free?
Yes, substitute dairy ingredients with non-dairy equivalents. Use vegan cream cheese and non-dairy whipped cream. This way, you can enjoy these delicious cups without dairy!
This blog post shared a simple recipe for delicious Oreo cheesecake cups. We covered the ingredients, equipment, and easy step-by-step instructions. You learned tips for perfecting texture, presentation ideas, and ways to reduce sweetness. I introduced tasty variations, including alternative toppings and gluten-free options. Finally, we discussed storage tips to keep your treats fresh. Enjoy making these cups for your next gathering. They are sure to impress!
![- 1 package (14-16 Oreo cookies, crushed) - 4 tablespoons unsalted butter, melted - 16 ounces cream cheese, softened - 1 cup powdered sugar - 1 teaspoon vanilla extract - 2 cups heavy whipping cream - 12 Oreo cookies, finely crushed for topping - Chocolate syrup (optional for drizzling) - Mixing bowls - Hand mixer - Measuring cups and spoons - Individual cups or jars Gather these ingredients before you start. Each item plays a vital role in creating your Oreo no-bake cheesecake cups. The crushed Oreos provide a rich, chocolatey crust. The cream cheese gives the filling that creamy texture we love. You will need to melt the butter. This helps the cookie crumbs stick together. Make sure the cream cheese is softened. It blends easier and makes the filling smooth. The heavy cream is key for that light, fluffy texture. For the best results, use a hand mixer. It makes it easy to beat the cream cheese and whip the cream. Individual cups or jars are great for serving. They make each dessert look lovely and ready to enjoy. If you want to add a twist, consider the optional chocolate syrup. It makes a great drizzle and adds extra sweetness. Trust me, these little details can elevate your dessert. For the full recipe, check out the complete guide. Enjoy the fun of making this easy dessert delight! To start, gather your crushed Oreo cookies and melted butter. In a medium bowl, combine them well. You want the crumbs fully coated in butter. Next, divide this mixture into individual cups or jars. Press the crumbs down gently to create a solid base. This crust sets the stage for your cheesecake filling. Now, let’s make the filling. In a large mixing bowl, beat the softened cream cheese with a hand mixer. Your goal is to have it smooth and creamy. Slowly add the powdered sugar and vanilla extract. Keep mixing until everything is well blended. This step is key for a sweet, rich flavor. Once your crust is ready, remove the cups from the fridge. Spoon the cheesecake filling over the crust, filling each cup nearly to the top. This creates a lovely layer of creamy goodness. Finish off by sprinkling finely crushed Oreo cookies on top. This adds texture and extra Oreo flavor. Now, it’s time to chill. Cover the cups and place them in the fridge for at least 4 hours. This helps the filling set perfectly. For a fun twist, consider drizzling chocolate syrup just before you serve. It adds a delicious touch that everyone will love. Enjoy the tasty treat! For the full recipe, check out the [Full Recipe]. To get the best cheesecake, you must start with softened cream cheese. If it's too cold, it will not mix well. You want a smooth and creamy mixture. When you whip the heavy cream, make sure to get stiff peaks. Then, gently fold the whipped cream into the cream cheese mixture. This keeps it light and fluffy. A beautiful dessert is a joy to see. Use garnishes like a dollop of whipped cream and a half Oreo on top of each cup. This adds a nice touch. For serving, place the cups on a decorative platter. This makes your dessert stand out even more. If you find the cheesecake too sweet, you can adjust it. Simply lower the amount of powdered sugar. Taste as you go. You can also use less sweet toppings, like fresh fruit or dark chocolate. This way, you can create a balance that suits your taste. {{image_2}} You can change the flavor of your cheesecake cups easily. Try adding a tablespoon of cocoa powder for a richer taste. This small addition can give you a chocolate twist that is hard to resist! You can also experiment with flavored extracts. Almond extract can bring a nice nutty flavor to your cups. Just a little can make a big difference. Toppings can change the whole look and taste of your dessert. Instead of just using more Oreos, you can use crushed candies or fresh fruit. Think about strawberries or raspberries for a fruity touch. Drizzling caramel or berry sauce on top can add a sweet, sticky element. This gives your cheesecake cups a fun and unique style. If you need gluten-free options, it’s easy to adapt this recipe. Simply substitute regular Oreos with gluten-free versions. These cookies taste just as good and keep the right texture. For drizzling, you can use gluten-free melted chocolate. This way, everyone can enjoy these tasty treats without worry. For the full recipe, check the detailed instructions above. Keep your Oreo no-bake cheesecake cups covered in the refrigerator. They stay fresh for up to 3 days. Use an airtight container to keep them safe from other smells. This way, you enjoy every last bite of that creamy goodness. Can the cheesecake cups be frozen? Yes, you can! They freeze well for up to 2 months. To enjoy them later, just thaw in the fridge before serving. This keeps the texture smooth and creamy, just like when you made them fresh. Yes, but it may alter the texture slightly. Low-fat cream cheese can make the filling less rich. If you want a lighter dessert, this is a good choice. They are best consumed within 3 days if stored properly. Keep them in the fridge, covered well. This helps maintain their fresh taste and creamy texture. Yes, substitute dairy ingredients with non-dairy equivalents. Use vegan cream cheese and non-dairy whipped cream. This way, you can enjoy these delicious cups without dairy! This blog post shared a simple recipe for delicious Oreo cheesecake cups. We covered the ingredients, equipment, and easy step-by-step instructions. You learned tips for perfecting texture, presentation ideas, and ways to reduce sweetness. I introduced tasty variations, including alternative toppings and gluten-free options. Finally, we discussed storage tips to keep your treats fresh. Enjoy making these cups for your next gathering. They are sure to impress!](https://tossedrecipes.com/wp-content/uploads/2025/05/66bc6c95-abe4-4687-b596-be7c60df09da-300x300.webp)