
Looking for a quick and tasty meal? These Sheet Pan Fajita Veggie Quesadillas Loaded Delight are your answer! Packed with fresh veggies, bold flavors, and melted cheese, they bring a fun twist to your dinner. I’ll walk you through how to make these easy, delicious quesadillas step by step. Plus, you’ll find tips for perfecting them and customizing to your tastes. Get ready to impress your family and friends!
Ingredients
Fresh Vegetables
– 1 red bell pepper, sliced
– 1 yellow bell pepper, sliced
– 1 green bell pepper, sliced
– 1 red onion, sliced
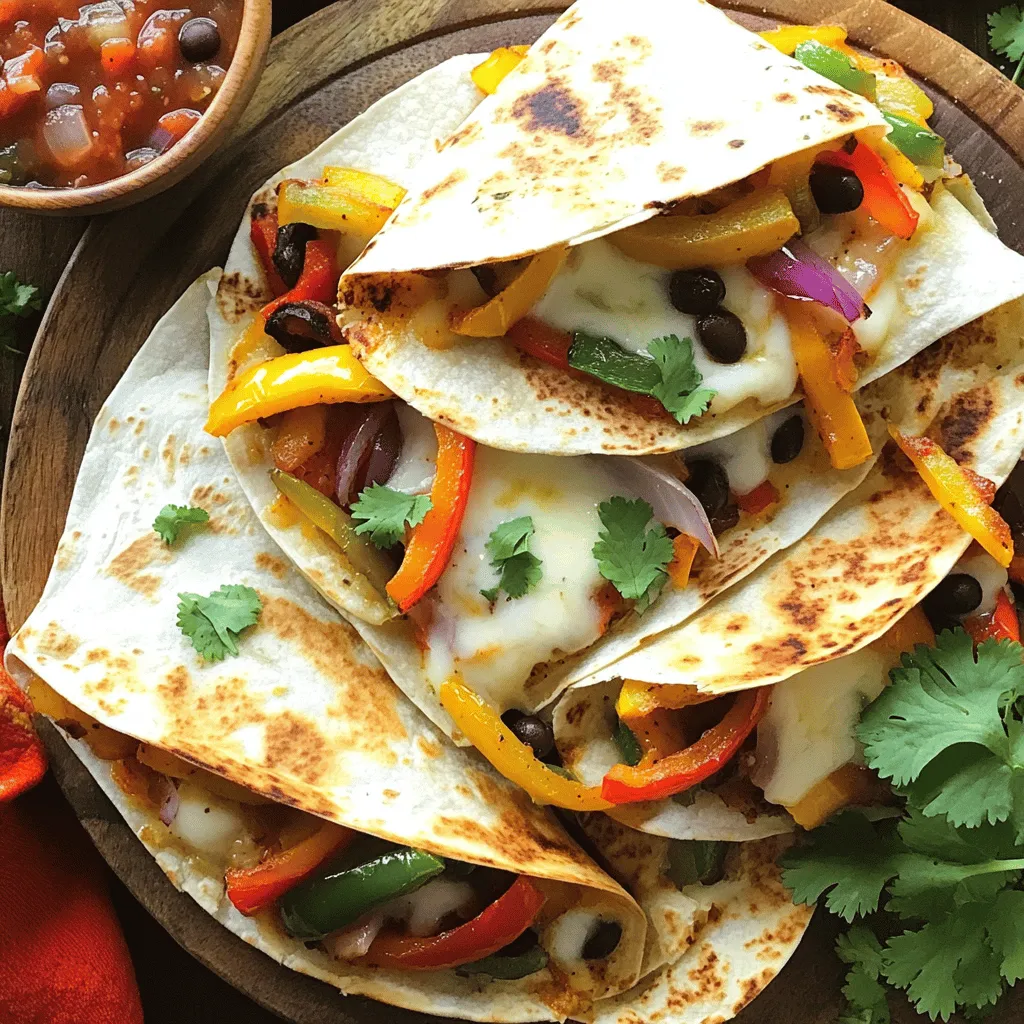
You need fresh veggies for great taste. I love the colors and crunch of bell peppers. Each adds its own flavor. The red bell pepper is sweet. The yellow adds a bit of brightness. The green has a slight bitterness. Red onion adds a nice bite. Together, they create a colorful, tasty mix.
Seasonings and Oil
– 2 tablespoons olive oil
– 1 teaspoon chili powder
– 1 teaspoon cumin
– 1/2 teaspoon garlic powder
– Salt and pepper to taste
Seasonings bring life to the dish. I use olive oil for a rich flavor. Chili powder gives a warm kick. Cumin adds earthiness that pairs well with the veggies. Garlic powder enhances the taste without being too strong. Salt and pepper tie all the flavors together.
Tortillas and Filling
– 8 whole wheat tortillas
– 2 cups shredded mozzarella cheese
– 1 cup black beans, rinsed and drained
– Fresh cilantro for garnish
Whole wheat tortillas are a healthy choice. They hold the filling well and add fiber. I use mozzarella cheese for its meltiness. It creates a gooey, cheesy center. Black beans add protein and texture. Fresh cilantro gives a pop of flavor on top. This mix makes every bite delightful!
Step-by-Step Instructions
Prepping the Oven and Veggies
– First, preheat your oven to 400°F (200°C). This makes sure your veggies roast perfectly.
– Next, slice the red, yellow, and green bell peppers, along with the red onion. Aim for even slices for uniform cooking.
Roasting the Vegetables
– In a large bowl, toss the sliced bell peppers and onion with olive oil, chili powder, cumin, garlic powder, salt, and pepper. Make sure every piece gets coated well.
– Spread the seasoned veggies on a baking sheet. Roast them in the oven for 20 minutes. Stir halfway through to ensure even roasting. You want them tender and slightly caramelized.
Assembling the Quesadillas
– After roasting, let the veggies cool for a few minutes. On a clean work surface, lay down four tortillas.
– Evenly spread the roasted vegetables, black beans, and shredded mozzarella cheese on each tortilla. This helps keep the flavors balanced.
– Place the remaining tortillas on top. Press down gently to secure all the filling inside.
Final Baking Process
– Carefully transfer the assembled quesadillas back to the baking sheet.
– Bake them for 10-12 minutes, or until the tortillas turn crispy and the cheese melts. Check for doneness by looking for a golden-brown color on the tortillas.
Tips & Tricks
Perfectly Roasted Veggies
To get the right texture, cut the veggies evenly. This step ensures they cook at the same rate. I like to use a mix of red, yellow, and green bell peppers, plus red onion. The colors make the dish pop!
Stirring during roasting is key. It helps the veggies brown and cook evenly. Halfway through the cooking time, use a spatula to turn them. This will give you tender, caramelized veggies that taste great.
Customizing Your Quesadillas
You can change the recipe to fit your taste. Try adding zucchini or mushrooms for more flavor. If you love spice, consider adding jalapeños or a dash of hot sauce. Adjust the chili powder to make it milder or more fiery.
Cheese is also flexible. While I use mozzarella, you can swap it with cheddar or pepper jack. This will change the taste and give you new options every time you make it.
Serving Suggestions
Pair your quesadillas with fresh salsa or creamy guacamole. These dips add flavor and excitement to your meal. I recommend placing them on the side for easy access.
For a beautiful dish, slice your quesadillas into triangles. Arrange them on a platter, and sprinkle fresh cilantro on top. This adds a touch of color and freshness. Enjoy your delicious creation!
Variations
Different Cheese Options
You can swap mozzarella for many cheeses. Try using Monterey Jack for a milder taste. Pepper Jack adds a nice kick with its spicy flavor. If you want a sharp bite, cheddar works well too. For vegan options, go for a plant-based cheese. Brands like Daiya or Violife melt nicely in quesadillas. Nutritional yeast can also add a cheesy flavor without dairy.
Protein Additions
Want to make your quesadillas heartier? Adding protein is a great idea. Cooked chicken or beef adds flavor and texture. If you prefer plant-based options, tofu is a solid choice. It soaks up flavors well when marinated. Beans, like black beans or pinto, are excellent vegetarian protein sources. They also keep the dish filling and nutritious.
Gluten-Free Adaptations
If you need gluten-free options, there are many tortillas available. Look for brands made from corn or almond flour. These can give you a great base for your quesadillas. To keep the flavor strong, use fresh herbs and spices. You can also add more roasted veggies to enhance taste. Gluten-free doesn’t have to mean flavor-free!
Storage Info
Storing Leftovers
To keep your quesadillas fresh, store them in an airtight container. Refrigerate them right after they cool. This helps to maintain their flavor and texture. You can keep them in the fridge for up to three days. After that, they may lose some taste and crunch.
Freezing Guidelines
If you want to save some quesadillas for later, freezing is a great option. First, let them cool completely. Then, wrap each quesadilla in plastic wrap. Place them in a freezer bag or container. This helps prevent freezer burn. You can freeze them for up to three months.
When you are ready to eat, take them out of the freezer. Unwrap them and place them on a baking sheet. Preheat your oven to 375°F (190°C). Bake for about 15-20 minutes until hot. This keeps them crispy and tasty. Enjoy your delicious quesadillas!
FAQs
Can I make these quesadillas ahead of time?
Yes, you can prep these quesadillas in advance. Start by roasting the veggies and letting them cool. Then, assemble the quesadillas as instructed. Wrap them tightly in plastic wrap or foil. You can store them in the fridge for up to two days. When you’re ready to eat, just bake them straight from the fridge. This saves time and makes dinner easy!
What are some other toppings I can use?
To make your quesadillas even better, try these toppings:
– Sliced jalapeños for heat
– Avocado or guacamole for creaminess
– Sour cream or Greek yogurt for tang
– Chopped green onions for freshness
– Shredded lettuce for crunch
– Pico de gallo for a fresh kick
Feel free to mix and match your favorites. Each adds a unique taste!
How do I know when the cheese is melted?
Check the quesadillas around the 10-minute mark. The cheese should be bubbly and slightly oozy. You can also poke a knife through to see if it flows. If it does, they are ready! A golden-brown color on the tortillas shows they are crisp and done. Enjoy the gooey, cheesy goodness!
This post covered tasty quesadillas filled with fresh veggies and cheese. You learned how to roast your vegetables, assemble quesadillas, and bake them perfectly. Customize your dish with different cheeses or proteins to suit your taste. Remember, leftovers can be stored or frozen for quick meals later. Enjoy this simple recipe to create healthy, flavorful quesadillas that anyone can make. Get creative with toppings for extra flavor, and make it your own!
