Oreo Protein Balls Easy and Tasty Snack Idea

Looking for a fun and easy snack? Oreo Protein Balls are your answer! Packed with protein and a delightful crunch, these tasty bites are perfect for a quick pick-me-up or …
Looking for a fun and easy snack? Oreo Protein Balls are your answer! Packed with protein and a delightful crunch, these tasty bites are perfect for a quick pick-me-up or …
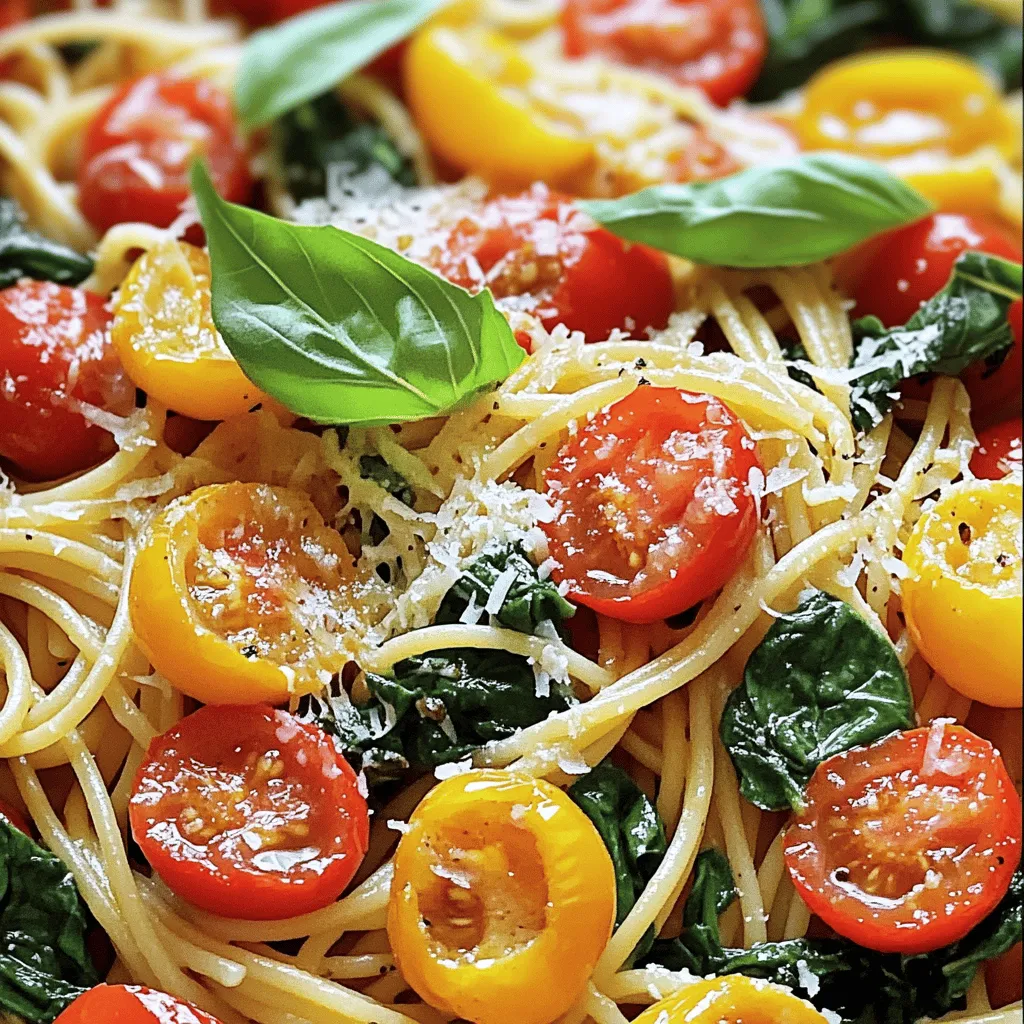
Looking for a quick and tasty dish? You’re in the right place! This Tomato Spinach Pasta recipe is simple and packed with flavor. With just a few ingredients, you’ll whip …
. To make sure your chicken cooks right, cut the breasts thin. This helps them cook faster and stay juicy. Use a meat thermometer to check the inside. Aim for 165°F (75°C). This way, your chicken will be safe and tasty. For a creamy sauce, use heavy cream when you add the broth. Stir it in slowly to keep it smooth. If the sauce is too thick, add some reserved pasta water. It will make the sauce rich and delicious. If you want a twist, try different pasta types. Whole grain or gluten-free pasta works well. They add their own flavors and textures. You can also use noodles like penne or rotini if you prefer. Need a lower-sodium option? Use homemade broth or water with herbs. This helps keep the flavor strong without too much salt. You can mix in some lemon juice for a fresh kick. Pair your Cozy Chicken Marsala Pasta with a light salad. A simple green salad with lemon vinaigrette complements the dish well. Garlic bread is also a great side. It lets you soak up that creamy sauce. For wine, try a light red like Pinot Noir. It matches the flavors of the dish nicely. If you want white, a dry Chardonnay works too. Both wines enhance the meal and make it special. For the full recipe, check out the Cozy Chicken Marsala Pasta section above. {{image_2}} You can easily change this recipe to fit your diet. For gluten-free options, use gluten-free pasta. Many brands offer great alternatives that taste similar to regular pasta. You can also make it dairy-free. Instead of heavy cream, try coconut milk or cashew cream. These substitutes still make the dish creamy and delicious. Want to boost the flavor? You can add fresh spinach or sun-dried tomatoes. Both ingredients bring a nice touch to the dish. The spinach adds color and nutrients, while sun-dried tomatoes give a sweet, tangy taste. You can also experiment with different types of mushrooms. Try shiitake or portobello for a richer flavor. Each type of mushroom adds its unique taste to the sauce. You can take this dish on a journey. For an Italian twist, add some fresh basil or a splash of white wine. This brings out the classic Italian flavors. If you want to use local ingredients, think of what's fresh in your area. Seasonal vegetables like asparagus or zucchini can add freshness. Adding local cheese instead of Parmesan can also give it a unique taste. These small changes make the dish special and personal. For a full recipe, check out the Cozy Chicken Marsala Pasta. To keep your Cozy Chicken Marsala Pasta fresh, store it in an airtight container. Make sure it cools down before sealing. The pasta can stay good in the fridge for about 3 to 4 days. Just remember, the sooner you eat it, the better it tastes! When you’re ready to enjoy your leftovers, reheat them gently. Use a pan over low heat for the best results. Add a splash of chicken broth or water to avoid dryness. Stir often to keep everything heated evenly. This method helps prevent sogginess in your pasta. For long-term storage, you can freeze the Chicken Marsala Pasta. Place it in a freezer-safe container and label it with the date. It can last for about 2 to 3 months in the freezer. When you’re ready to eat, thaw it in the fridge overnight. Reheat as mentioned above for the best taste. Chicken Marsala Pasta is a warm and tasty dish. It blends chicken, mushrooms, and pasta in a rich sauce. This dish has roots in Italian cuisine, especially from Sicily. Originally, Chicken Marsala was a main dish served with wine. Over time, it became popular worldwide, inspiring many pasta recipes. The sauce uses Marsala wine, adding depth and flavor. This comfort food is perfect for cozy nights at home. Yes, you can prepare parts of this recipe ahead of time. Cook the pasta and store it in the fridge. You can also slice the chicken and mushrooms in advance. Keep them in airtight containers to stay fresh. When you are ready to cook, just sauté the chicken and mushrooms. Then, add the broth and other ingredients. This saves time and makes dinner easy. To thicken your Marsala sauce, you have a few options. First, let the sauce simmer longer. This reduces the liquid and makes it thicker. You can also add a cornstarch slurry. Mix cornstarch with cold water, then stir it into the sauce. Another method is to use a bit of grated Parmesan cheese. This not only thickens the sauce but adds a nice flavor too. Adjust until you reach your desired thickness. This blog post covered how to make Chicken Marsala Pasta from scratch. You learned about the main ingredients, step-by-step cooking instructions, and useful tips. I shared variations to suit different diets and preferences, plus storage and reheating tips. Remember, cooking should be fun and creative. Feel free to change the recipe to make it your own. Enjoy crafting a delicious meal that brings joy to your table!](https://tossedrecipes.com/wp-content/uploads/2025/06/e53ee9a3-2c1b-4835-ace0-16652a4e2628.webp)
Welcome to cozy comfort! Today, I’ll show you how to make Chicken Marsala Pasta, a dish that wraps you in warmth with every bite. Imagine tender chicken, earthy mushrooms, and …
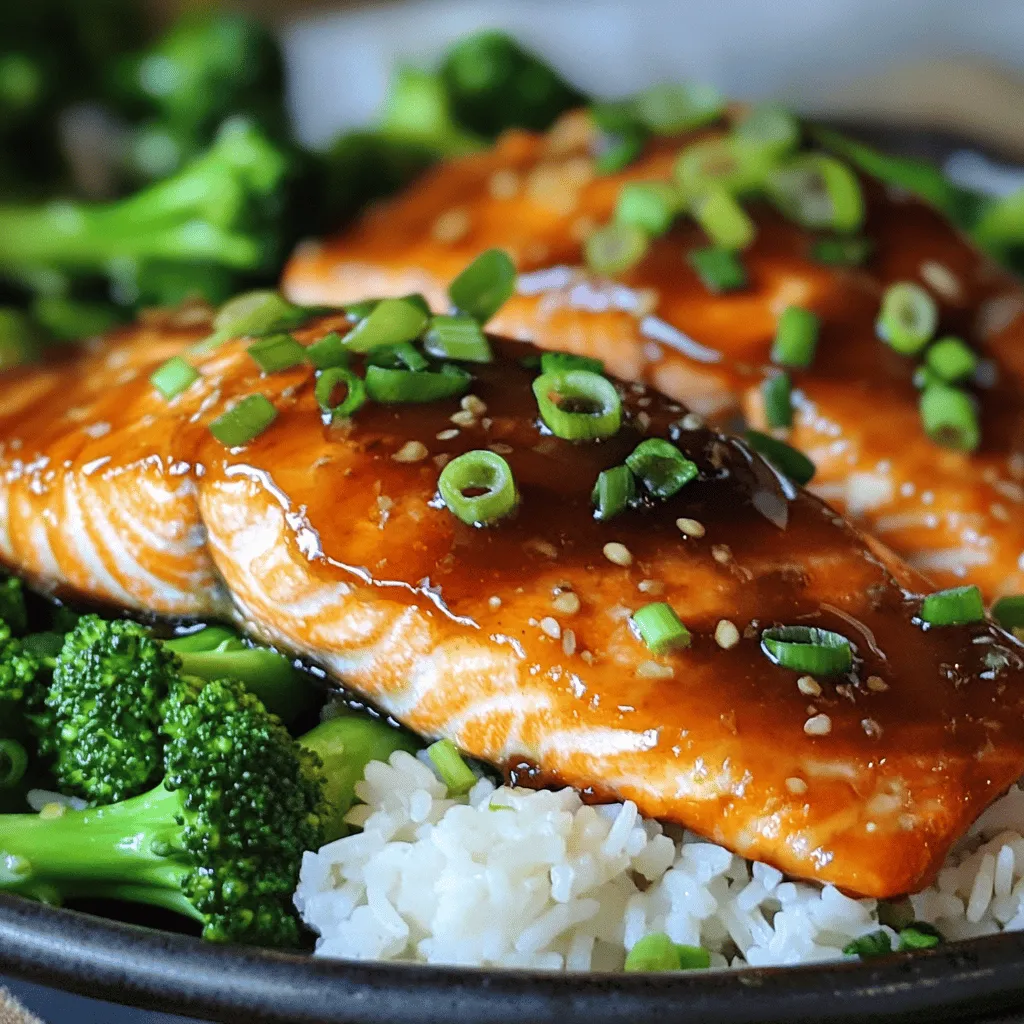
Are you ready to elevate your dinner game with a simple and tasty dish? Brown sugar glazed salmon is not just easy to make—it’s delicious! With a sweet and salty …
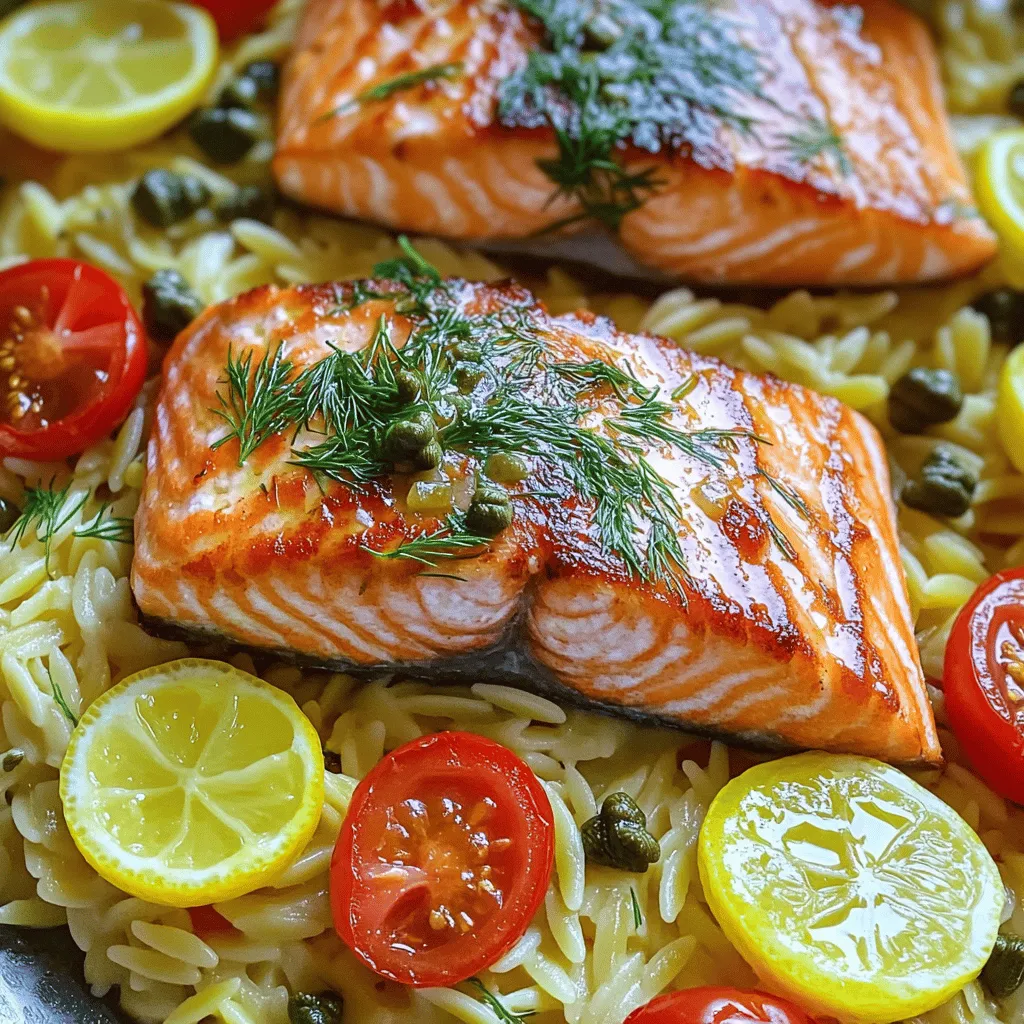
Are you ready to impress your taste buds? Seared Salmon with Lemon Orzo is a quick, delicious meal that you can whip up in no time. With tender, flaky salmon …
 for more tips on making your blackened fish tacos shine! Each serving of blackened fish tacos offers: - Calories: Approximately 400 - Protein: Around 25 grams - Fats: About 15 grams - Carbohydrates: Roughly 45 grams This makes them a balanced meal. You get a good mix of protein and carbs from the fish and tortillas. The key ingredients in these tacos provide many health perks: - White fish: Rich in lean protein and omega-3 fatty acids, which help heart health. - Cabbage: Full of fiber and vitamins, it aids digestion and boosts immunity. - Avocado: Provides healthy fats and potassium, good for heart health. - Spices: Paprika and cayenne pepper may help with metabolism and add antioxidants. These tacos can fit many diets: - Gluten-free: Use corn tortillas, which are naturally gluten-free. - Dairy-free: Skip the sour cream or Greek yogurt, or use a dairy-free alternative. With these choices, you can enjoy blackened fish tacos while meeting your dietary needs. For the complete cooking guide, check out the Full Recipe. To make your blackened fish tacos spicy, add more cayenne pepper to the spice mix. Start with an extra teaspoon and taste it. You can also serve with a spicy salsa or hot sauce on the side. This adds heat without overpowering the dish. Yes, you can prepare the blackening seasoning ahead of time. Just mix the spices in a bowl and store them in an airtight container. This makes cooking easier and saves time. You can use this blend for other recipes too! The best fish for blackening includes white fish like tilapia or cod. They have a mild flavor that absorbs the spices well. Other good options are catfish or snapper. Choose fish that cooks quickly and has a firm texture. Blackened fish tacos last about 2-3 days in the refrigerator. Store the fish and toppings separately to keep everything fresh. When ready to eat, warm the fish in a skillet. This keeps the flavor and texture just right. Yes, you can freeze blackened fish tacos. Wrap the cooked fish tightly in plastic wrap and place it in a freezer bag. They can last about 2 months. Just thaw them in the fridge overnight before reheating. You can enjoy them later without losing flavor! For a delightful experience, check out the [Full Recipe](#) for detailed instructions and visual aids. Blackened fish tacos are quick and easy to make. You will love the burst of flavors in every bite. Let’s dive into the main steps to prepare this tasty dish. First, gather your ingredients. You will need: - 1 lb white fish fillets (tilapia or cod recommended) - 2 tablespoons paprika - 1 tablespoon cayenne pepper - 1 tablespoon garlic powder - 1 tablespoon onion powder - 1 teaspoon dried thyme - 1 teaspoon dried oregano - Salt and pepper to taste - 2 tablespoons olive oil - 8 small corn tortillas - 1 cup shredded cabbage - 1 avocado, sliced - 1/2 cup cilantro, chopped - 1 lime, cut into wedges - 1/2 cup sour cream or Greek yogurt (for topping) Start by making your blackening spice mix. Mix paprika, cayenne pepper, garlic powder, onion powder, thyme, oregano, salt, and pepper in a bowl. This spice mix creates rich flavors. Next, pat your fish fillets dry. Coat both sides with the spice mix. Let them sit for 15 minutes. This time helps the fish absorb the spices. Now, heat olive oil in a skillet over medium-high heat. When the oil is hot, add the fish. Cook for 3-4 minutes on each side. Look for a golden brown color with a charred edge. While the fish cooks, warm your corn tortillas in another pan. Heat them for about 30 seconds on each side. This step makes them soft and easy to fold. Once the fish is done, take it off the heat. Let it rest for a minute. Then, flake the fish into bite-sized pieces. This makes it easy to add to your tacos. To build your tacos, start with a layer of shredded cabbage on each tortilla. Add the flaky fish on top. Then, add avocado slices and a sprinkle of cilantro. Finish your tacos with a drizzle of sour cream or Greek yogurt. Squeeze fresh lime juice on top. The lime adds a bright flavor that ties everything together. Serve your tacos right away with lime wedges on the side. Enjoy the fresh, zesty flavors in this fun meal! In this post, we covered blackened fish tacos from ingredients to cooking tips. Start with fresh fish, blend your spices, and grill to golden perfection. We explored ways to customize these tacos, including vegetarian options and storage tips. Remember, blackened fish tacos are fun to make and taste great. They are a healthy choice packed with flavor. Try these ideas and enjoy a delicious meal that everyone will love. Happy cooking!](https://tossedrecipes.com/wp-content/uploads/2025/06/d5a1022d-b266-4d3d-8dbd-64d34287e58a.webp)
Are you ready to spice up your dinner routine? Blackened fish tacos are a game changer! This recipe is simple and packed with flavor, perfect for any night of the …

If you love sweet snacks that are easy to make, you’ll adore Cherry Cheesecake Puppy Chow! This fun treat mixes crunchy, chewy, and creamy in one bowl. With simple ingredients …
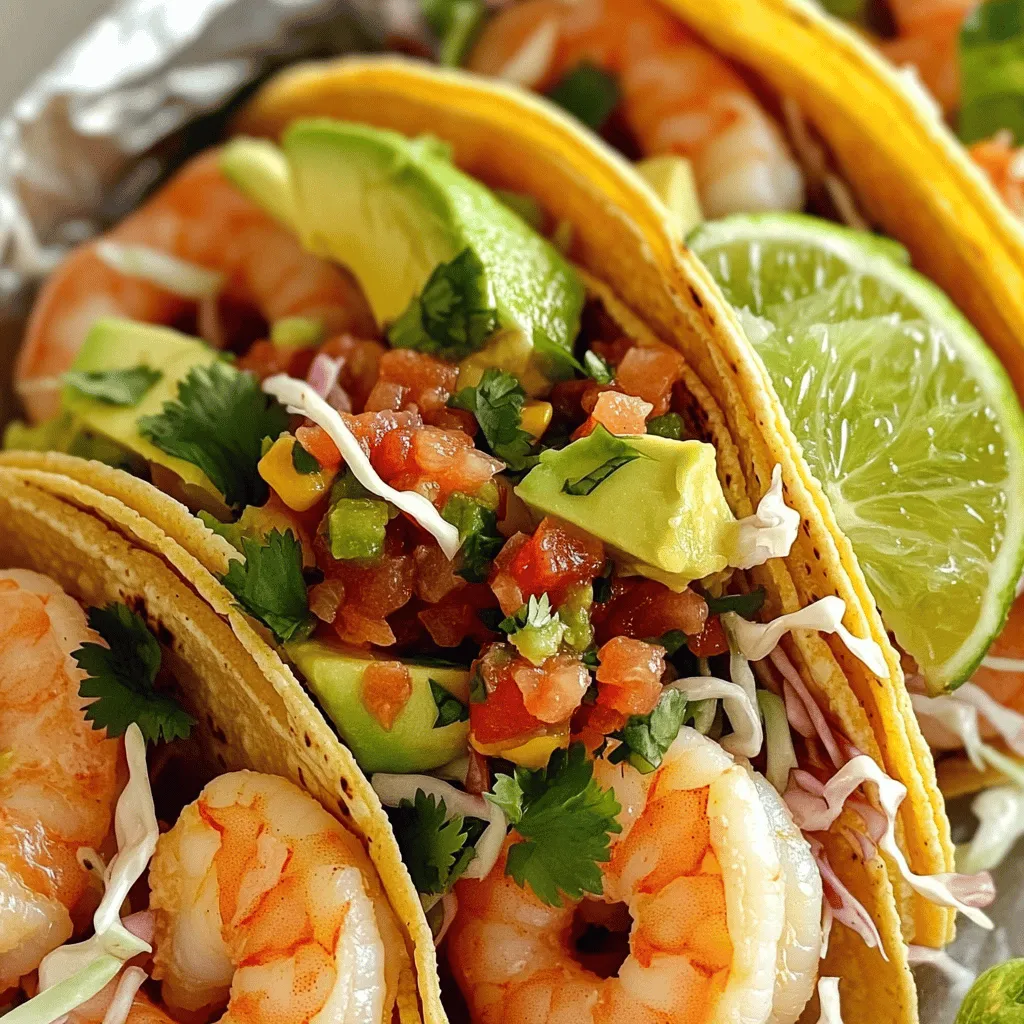
Are you ready to spice up your dinner routine? These Easy Shrimp Tacos are quick, simple, and packed with flavor. With just a handful of fresh ingredients, you can create …

Looking for a bright, fresh meal that’s packed with flavor? The Asian Chicken Crunch Salad is your answer! This salad features juicy chicken, crisp veggies, and a delightful dressing that …
![- 1 lb large shrimp, peeled and deveined - 2 tablespoons olive oil - Spices for blackening - 1 tablespoon smoked paprika - 1 teaspoon onion powder - 1 teaspoon garlic powder - 1 teaspoon cayenne pepper (adjust to taste) - ½ teaspoon dried thyme - Lime juice and cilantro for garnish To make quick and easy blackened shrimp, gather the main ingredients first. Start with one pound of large shrimp. Make sure they are peeled and deveined. Next, measure two tablespoons of olive oil. This oil helps the spices stick and adds flavor. Now, let's focus on the spice mix. You will need one tablespoon of smoked paprika. This gives a nice smoky taste. Next, include one teaspoon of onion powder and one teaspoon of garlic powder. These spices bring depth to the dish. For a kick, add one teaspoon of cayenne pepper. You can adjust this to make it milder or hotter. Add half a teaspoon of dried thyme for a lovely herbal note. Don't forget the finishing touches! Squeeze some fresh lime juice over the shrimp. Garnish with chopped cilantro for a burst of color and flavor. This quick and easy blackened shrimp dish is not only tasty but also colorful and fun to serve. For the full recipe, check the details above. Start by gathering your spices. In a mixing bowl, add the smoked paprika, onion powder, garlic powder, cayenne pepper, thyme, salt, and black pepper. Combine them well. Mixing evenly is key for a consistent flavor. You want every bite of shrimp to be packed with taste. Next, take your shrimp and pat them dry with paper towels. This step is important. Removing excess moisture helps the shrimp to sear better. Drizzle the olive oil over the shrimp. Then, sprinkle your spice blend on top. Toss the shrimp until they are evenly coated with the spices. This ensures each shrimp is bursting with flavor. Now, it’s time to cook! Preheat a large skillet over medium-high heat. Once the skillet is hot, add the shrimp in a single layer. Avoid overcrowding them; this allows for better cooking. Cook the shrimp for about 2-3 minutes on each side. You know they’re done when they turn opaque and develop a nice char. Squeeze fresh lime juice over the shrimp once cooked. Toss gently to combine. This adds a zesty kick that brightens the dish. Enjoy your blackened shrimp! For the full recipe, check the details provided earlier. The spice blend is key to great blackened shrimp. Use the right ratio for balance. Too much cayenne can overwhelm. Adjust spice levels based on your taste. If you like it spicy, add more cayenne. If not, cut back on it. You can try different spices too. A dash of cumin or coriander can add depth. Use a cast-iron skillet for the best results. It holds heat well and gives a nice char. Preheat your skillet before adding the shrimp. This helps create a great crust. Avoid overcrowding the pan; cook in batches if needed. Overcooking shrimp makes them tough. Cook just until they turn opaque and are firm to the touch. Garnish your blackened shrimp with fresh cilantro. It adds color and brightness to the dish. Serve the shrimp over rice or in tacos for a fun twist. A squeeze of lime on top adds freshness. For an attractive dish, arrange the shrimp neatly on a plate. Add lime wedges on the side for a pop of color. For the full recipe, check out the [Full Recipe]. {{image_2}} You can enjoy blackened shrimp in many ways. Grilling adds a smoky flavor. Here’s how to grill them: 1. Preheat your grill to high heat. 2. Follow the same steps to season the shrimp. 3. Place the shrimp on skewers for easy handling. 4. Grill for 2-3 minutes on each side until they get nice grill marks. If you prefer an oven-baked option, here’s what to do: 1. Preheat your oven to 400°F (200°C). 2. Spread the seasoned shrimp on a baking sheet. 3. Bake for 8-10 minutes or until they turn opaque. You can make blackened shrimp fit your diet. To create a gluten-free blackened shrimp recipe, simply check your spice labels. Most spices are gluten-free, but always verify. If you want a vegan substitute for shrimp, try using large mushrooms or tofu. Season them with the same spice blend. Cook them in a skillet just like you would with shrimp. Adding citrus zest can really boost the flavor. Try lime or lemon zest for a burst of freshness. Just sprinkle it on right before serving. You can also have fun with different herbs and spices. Swap out thyme for oregano or add basil for a unique twist. Experimenting can lead to new favorite flavors. For the full recipe, be sure to check the earlier section! To store your leftover blackened shrimp, place them in an airtight container. Ensure the shrimp cool down before sealing. This helps keep them fresh. You can store them in the fridge for up to three days. Be sure to check for any off smells before eating. You can freeze blackened shrimp for later use. Place them in a freezer-safe bag or container. Squeeze out as much air as possible to prevent freezer burn. They can last up to three months in the freezer. When you're ready to eat, thaw the shrimp in the fridge overnight. You can also run them under cold water for a quicker thaw. To reheat, warm them in a skillet over medium heat. This keeps them tender and juicy. If you want to prepare blackened shrimp in advance, here’s how. Cook the shrimp and let them cool completely. Store them in the fridge for busy weeknights. You can use them in wraps, salads, or rice bowls for quick meals. For best results, keep the shrimp separate from other ingredients. This helps maintain their flavor and texture. You can also portion them out for easy grab-and-go meals. To avoid overcooking shrimp, follow these tips: - Cooking time recommendations: Cook shrimp for about 2-3 minutes on each side. They will turn opaque and curl up when done. - Signs that shrimp are cooked perfectly: Look for shrimp that are pink and firm. If they are rubbery or tough, they are likely overcooked. Yes, you can use frozen shrimp! - Thawing frozen shrimp properly: Place the frozen shrimp in the fridge overnight. You can also run them under cold water for about 10-15 minutes. - Impact on texture and flavor: Thawed shrimp may have a slightly different texture, but they will still taste great in this recipe. Pair your blackened shrimp with tasty sides. - Ideal side dishes: Try serving with rice, coleslaw, or grilled vegetables. These will bring out the flavors. - Complementary sauces and dips: A cool avocado sauce or a tangy lime dip works well to balance the heat. This blog post covered how to make tasty blackened shrimp. We looked at the ingredients, spices, and steps to prepare and cook them. I shared tips to perfect the flavor and ways to serve your dish. Remember, you can tweak this recipe to your liking. Try different cooking methods or adjust the spice levels to suit your taste. The key is to enjoy your cooking experience and share the dish with friends or family!](https://tossedrecipes.com/wp-content/uploads/2025/06/39a74a3f-0479-4b85-a7f7-520eabf697b9.webp)
Ready to spice up your dinner? This Quick & Easy Blackened Shrimp recipe brings bold flavor to your table in under 30 minutes. With just a few simple ingredients, including …