One Skillet Salmon with Lemon Orzo Flavorful Recipe

If you’re looking for a quick, delicious meal, this One Skillet Salmon with Lemon Orzo recipe is for you! It’s packed with flavor and easy to make. In just a …
If you’re looking for a quick, delicious meal, this One Skillet Salmon with Lemon Orzo recipe is for you! It’s packed with flavor and easy to make. In just a …

Are you ready to kickstart your day with a burst of flavor and protein? In this post, I’ll show you how to make a High Protein Greek-style Breakfast Tortilla Delight …
![To make a tasty Ground Turkey Sweet Potato Skillet, gather these items: - 1 pound ground turkey - 1 large sweet potato, peeled and diced - 1 red bell pepper, chopped - 1 yellow onion, finely chopped - 2 cloves garlic, minced - 1 teaspoon smoked paprika - 1 teaspoon cumin - ½ teaspoon chili powder - Salt and pepper to taste - 2 tablespoons olive oil - 1 cup spinach, roughly chopped - Fresh cilantro for garnish - Juice of 1 lime These ingredients blend well to create a hearty meal. The sweet potato adds a nice sweetness, while the spices give it a kick. This dish is not only delicious but also healthy. A serving typically has: - Calories: 350 - Protein: 30g - Fat: 15g - Carbohydrates: 30g - Fiber: 6g These numbers can vary based on the exact amounts used and any substitutions made. It's a balanced meal perfect for any time of the day. If you need to change something, here are some easy swaps: - Ground turkey can be replaced with ground chicken or beef. - Sweet potato can be swapped for butternut squash or regular potatoes. - Spinach can be replaced by kale or Swiss chard. These substitutions keep the dish tasty while catering to your needs. Feel free to experiment! You can find the Full Recipe for more details. 1. Gather your ingredients. You need ground turkey, sweet potato, onion, and more. 2. Peel and dice the sweet potato. Make sure the pieces are even for even cooking. 3. Chop the onion and red bell pepper. Keep the pieces small so they cook fast. 4. Mince the garlic. This adds a strong flavor to your dish. 5. Measure your spices. You will use smoked paprika, cumin, and chili powder. 1. Heat olive oil in a large skillet over medium-high heat. 2. Add the sweet potato. Cook for 5-7 minutes, stirring often, until it's slightly soft. 3. Add onion and red bell pepper. Sauté for 5 minutes until softened. 4. Stir in garlic and spices. Cook for 1-2 minutes until you smell the flavors. 5. Push veggies aside. Add ground turkey and break it up with a spoon. Cook for 5-6 minutes until fully cooked. 6. Mix turkey and veggies. Make sure everything is combined and season with salt and pepper. 7. Add spinach. Cook for another 2 minutes until it wilts. 8. Remove from heat. Drizzle lime juice over the dish before serving. 9. Garnish with cilantro. This adds color and fresh flavor. - Serve this dish warm. It’s great for dinner or lunch. - Pair it with a green salad for a balanced meal. - You can also serve it in a bowl with avocado slices on top for extra creaminess. You can find the complete recipe details in the Full Recipe section. To get the best flavor, timing is key. Start by cooking the sweet potatoes first. They need about 5-7 minutes to soften. After that, add the onion and bell pepper. They should cook for about 5 minutes. You want them soft but not mushy. When you add the turkey, cook it for 5-6 minutes until it’s fully cooked. Mixing everything well at the end helps the flavors blend. One common mistake is not chopping veggies evenly. If they are uneven, some will cook faster than others. This can lead to crunchy bites when you want them soft. Another mistake is cooking on too high heat. This can burn the garlic and ruin the taste. Always keep an eye on your heat level, and stir often to avoid sticking. Want to jazz up your skillet? Try adding a splash of lime juice. It brightens the dish. You can also use fresh herbs like cilantro or parsley. They add a fresh taste. For a smoky kick, add a bit more smoked paprika. If you like heat, a few red pepper flakes can spice things up! Find your favorite combo and make it your own. For the full recipe, check out the Ground Turkey Sweet Potato Skillet. {{image_2}} To make this dish vegetarian or vegan, swap ground turkey for a plant-based option. You can use lentils, chickpeas, or crumbled tofu. These substitutes add protein and texture. If you use lentils, cook them first. For chickpeas, just add them to the skillet when you add the garlic. If you choose tofu, drain and press it to remove excess water. Then crumble it into the pan to cook. If you love heat, add some spice to your skillet! You can mix in diced jalapeños or a pinch of red pepper flakes. For a smoky flavor, try chipotle powder instead of chili powder. Adding a splash of hot sauce at the end also gives a kick. Adjust the spice level to suit your taste, but beware, it can get hot! Feel free to get creative with your vegetables. You can add zucchini, mushrooms, or even kale for extra nutrients. Just chop them into bite-sized pieces. Add heartier veggies, like carrots, early on to ensure they cook well. For softer veggies like spinach or zucchini, add them later in the cooking process. This way, they stay vibrant and flavorful. You can find the full recipe here: [Full Recipe]. After you make the ground turkey sweet potato skillet, let it cool. Place the leftovers in an airtight container. This keeps the meal fresh. Store it in the fridge for up to four days. Make sure to label the container with the date. This way, you won’t forget how long it has been there. To reheat, you can use a skillet or microwave. If you use a skillet, add a splash of water or oil. Heat over medium heat until warm. Stir it often to avoid burning. If you use a microwave, place the serving in a bowl. Cover it with a microwave-safe lid or wrap. Heat for about one to two minutes. Stir halfway for even heating. You can also freeze this meal for later. Just let it cool fully first. Use a freezer-safe container or bag. Remove as much air as you can. This helps prevent freezer burn. It can last up to three months in the freezer. When you are ready to eat, thaw it in the fridge overnight. Reheat it as mentioned before for a tasty meal. You can use ground chicken or lean ground beef. Both options work well. They give a similar taste and texture. If you want a plant-based choice, try lentils or black beans. These options add protein and flavor. Just make sure to cook them until heated through. Yes, you can use other types of potatoes. Regular potatoes or Yukon gold work nicely too. You can even try red potatoes for a bit of color. Just keep the cooking time in mind. Check the potatoes for tenderness while cooking. This dish is naturally gluten-free. Just make sure all your ingredients are labeled gluten-free. The spices and oils you choose should be safe too. Always read labels to avoid any hidden gluten. Enjoy this meal without any worries! This blog post covered key aspects of cooking your dish, from the ingredients to serving ideas. We discussed ingredient substitutions, useful tips, and storage methods. You now have practical knowledge to avoid common mistakes and enhance flavors. In summary, following these steps allows anyone to make a tasty meal. Enjoy your cooking journey and feel free to be creative with variations that suit your taste!](https://tossedrecipes.com/wp-content/uploads/2025/06/e47c1c6e-7a0e-4547-bd5d-0216ee2e92d5.webp)
Looking for a quick, tasty meal? The Ground Turkey Sweet Potato Skillet checks all the boxes! This dish combines lean turkey and sweet potatoes for a healthy, filling dinner. With …
![- 1 cup almond flour - 1/2 cup rolled oats - 1/4 cup coconut sugar - 1/4 teaspoon baking soda - 1/4 teaspoon salt - 1/3 cup unsweetened applesauce - 1/4 cup almond butter - 1 teaspoon vanilla extract - 1/2 cup dark chocolate chips - 1/4 cup chopped walnuts (optional) Each ingredient in this recipe plays a vital role. Almond flour gives a nice texture and is gluten-free. Rolled oats add fiber and help keep you full. Coconut sugar is a great choice as it has a lower glycemic index than regular sugar. This means it helps keep your blood sugar stable. Baking soda helps the cookies rise, making them soft and chewy. Salt enhances the flavors in the cookies. Almond flour is rich in vitamin E and good fats. These nutrients promote heart health. Rolled oats are not only filling but also packed with beta-glucan. This helps lower cholesterol. Coconut sugar provides minerals and is less processed compared to white sugar. This makes it a smarter choice for baking. If you need nut butter alternatives, you can use sunflower seed butter or tahini. These options still provide healthy fats and flavor. For gluten-free needs, you can use a gluten-free all-purpose flour mix instead of almond flour. This helps keep the cookies soft while meeting dietary needs. For the full recipe, check the section above. 1. First, preheat your oven to 350°F (175°C). This step warms the oven for even baking. 2. Line a baking sheet with parchment paper. This helps prevent sticking and makes cleanup easy. 3. In a large mixing bowl, combine these dry ingredients: - 1 cup almond flour - 1/2 cup rolled oats - 1/4 cup coconut sugar - 1/4 teaspoon baking soda - 1/4 teaspoon salt Mix them well until they look even. 1. In a separate bowl, whisk together the wet ingredients until smooth. Use these: - 1/3 cup unsweetened applesauce - 1/4 cup almond butter - 1 teaspoon vanilla extract This mixture adds moisture and flavor. 2. Pour the wet mixture into the dry ingredients. Stir gently until fully combined. If the dough feels too dry, add a teaspoon of water. It should be slightly sticky. 3. Now, fold in the dark chocolate chips and walnuts if you choose to add them. 1. Use a tablespoon to scoop out dough portions. Shape them into balls with your hands. 2. Place the dough balls on the baking sheet. Leave some space between each ball. 3. Flatten the balls slightly with your fingers or a fork. This helps them bake evenly. 4. Bake the cookies for 10-12 minutes. Look for golden edges but soft centers. 5. After baking, let the cookies cool on the sheet for 5 minutes. Then, transfer them to a wire rack to cool completely. For the full recipe, check out the detailed instructions. Enjoy your baking! To make your cookies moist, use almond flour and applesauce. Almond flour keeps cookies soft. Applesauce adds moisture without extra fat. Prevent overbaking by watching your cookies closely. Bake them until the edges are golden. The centers should look a little soft. They will firm up as they cool. You can add spices to boost flavor. A pinch of cinnamon or nutmeg makes a big difference. Vanilla extract also enhances the taste. Incorporate dried fruits or seeds for more texture. Chopped dates or cranberries add sweetness. Pumpkin seeds or sunflower seeds offer a nice crunch. Use a large mixing bowl for your dry ingredients. A sturdy spatula helps mix everything well. Choose a baking sheet lined with parchment paper. This helps prevent sticking and makes cleanup easy. A flat spatula is great for transferring cookies once they cool. For the full recipe, check out the details above. Enjoy your baking! {{image_2}} For those who need gluten-free cookies, there are great choices. You can use alternative flours like: - Almond flour - Coconut flour - Oat flour These flours make the cookies tasty and healthy. Almond flour adds a nutty flavor. Coconut flour is light and sweet. Oat flour gives a soft texture. If you want to make these cookies vegan, you can replace eggs easily. Use flaxseed meal or chia seeds mixed with water. This mix acts like eggs in recipes. - Combine 1 tablespoon of flaxseed meal with 2.5 tablespoons of water. - Let it sit for 5 minutes until it thickens. You can also try more plant-based ideas like using: - Maple syrup instead of coconut sugar. - Nut butter or seed butter to add richness. You can change the flavor of your cookies for fun. Try different types of chocolate like: - Milk chocolate - White chocolate - Dark chocolate You can also add flavor extracts. A splash of almond extract or peppermint extract can add a twist. These small changes can make your cookies unique. You can mix and match to find your favorite version. For the full recipe, check out the [Full Recipe]. To keep your healthy chocolate chip cookies fresh, store them in an airtight container. This method helps maintain their softness and flavor. Place parchment paper between layers to prevent sticking. Keep them at room temperature for best results. You can freeze both the cookie dough and baked cookies. To freeze cookie dough, scoop the dough into balls and place them on a baking sheet. Freeze until solid, then transfer to a freezer-safe bag. For baked cookies, allow them to cool completely, then wrap each cookie in plastic wrap. Store them in a freezer-safe container. To thaw baked cookies, simply leave them out at room temperature for about 30 minutes. For dough, place it in the fridge overnight. Bake straight from the freezer, adding a minute or two to the baking time. These cookies can last up to a week at room temperature. If you store them properly, they stay fresh and tasty. Look for signs of spoilage, like a hard texture or an off smell. If they feel dry or stale, it's time to toss them out. Enjoy these treats while they’re at their best! Can I use regular flour instead of almond flour? Yes, you can use regular flour if you prefer. However, this changes the cookie's texture. Almond flour gives a nice nutty taste. It also keeps the cookies moist and chewy. How can I make these cookies lower in sugar? You can replace the coconut sugar with a sugar substitute. Options like stevia or monk fruit work well. You can also reduce the amount of sugar in the recipe. What can I substitute for applesauce? If you don’t have applesauce, try mashed bananas. They will add a slight banana flavor. You could also use yogurt, which keeps the cookies moist. Can these cookies be made in advance? Yes! You can make the dough in advance. Just store it in the fridge for up to three days. You can also freeze the dough for up to three months. How to soften cookies when they harden? If your cookies harden, place them in a sealed bag with a slice of bread for a few hours. The moisture from the bread will soften the cookies. Best ways to serve these healthy cookies Serve these cookies warm with a glass of almond milk. They also pair well with fresh fruit like berries or sliced apples. Caloric content per cookie Each cookie contains about 120 calories. This is much lower than traditional cookies. Comparing to traditional chocolate chip cookies Regular chocolate chip cookies can have around 150-200 calories each. This makes our healthy version a better choice for snacking! For the full recipe, check out the details above. This blog post covered a healthy cookie recipe packed with nutritious ingredients. You learned about almond flour, rolled oats, and coconut sugar, along with their benefits. We discussed practical steps to make and bake the cookies perfectly, as well as variations and storage tips. Don't be afraid to experiment with flavors and substitutions. With these insights, you can now bake delicious cookies that are good for you too. Enjoy your healthy treats!](https://tossedrecipes.com/wp-content/uploads/2025/06/c7aa5b20-173a-462b-b647-6ff4e0c0a45a.webp)
Are you on the hunt for a guilt-free treat? Look no further! I’ve created the perfect healthy chocolate chip cookies recipe that satisfies your sweet tooth without the extra calories. …

Are you ready to transform your breakfast game? The Tater Tot Breakfast Bowl with Sausage Gravy Magic is a fun, hearty meal packed with flavor. Imagine crispy tater tots, savory …
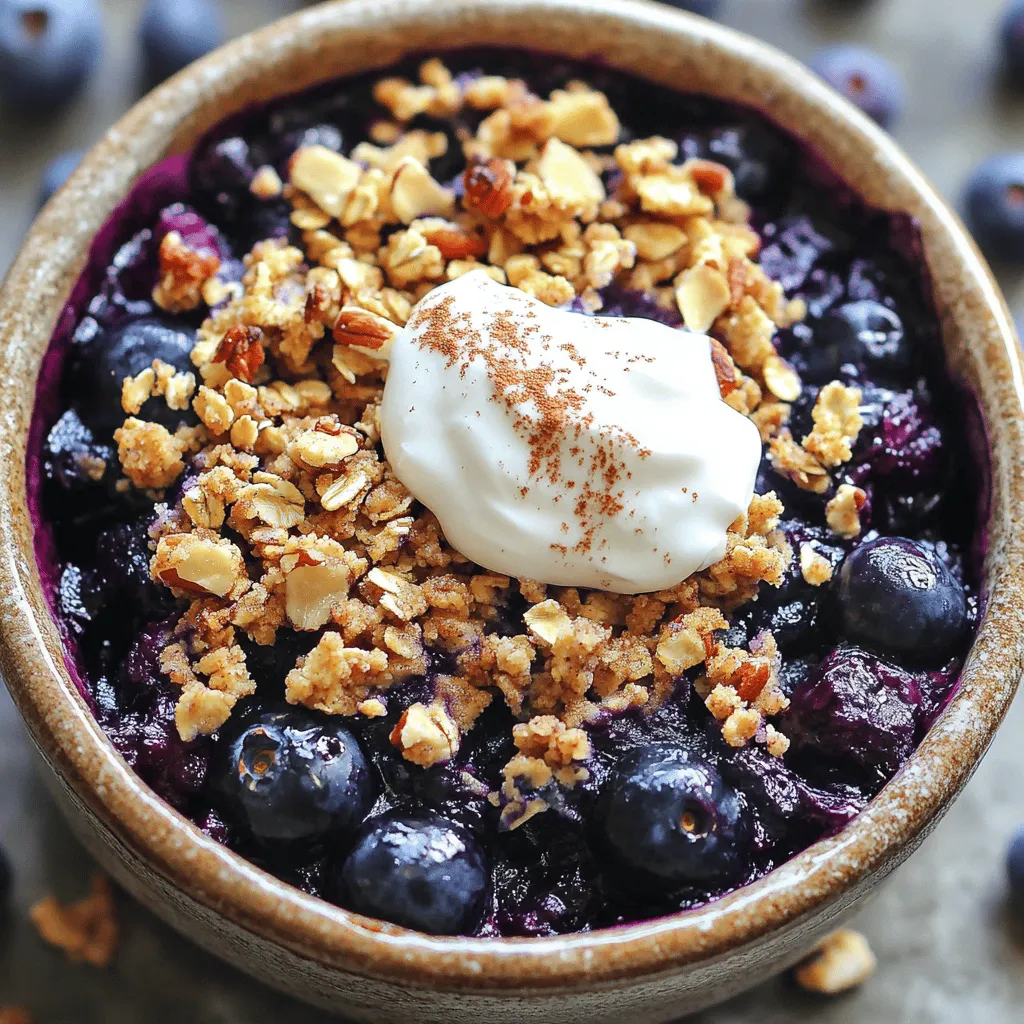
Looking for a sweet treat that won’t ruin your healthy eating goals? You’re in the right place! My Healthy Blueberry Crumble is simple and tasty, packed with benefits. Blueberries are …

Get ready for a meal that’s both cheesy and flavorful: Cheesy Garlic Chicken Wraps! This dish is perfect for a quick dinner or a satisfying lunch. With just a handful …

Are you ready to elevate your snack game? These Crispy Bang Bang Salmon Bites are easy to make and packed with flavor. In this guide, I’ll show you how to …
![To make this tasty dish, gather these main ingredients: - 2 medium sweet potatoes - 4 large eggs - 1 tablespoon coconut oil - 1 teaspoon ground cinnamon - 1 tablespoon maple syrup - 1/4 cup Greek yogurt (or dairy-free alternative) - 1/4 cup chopped pecans (or nuts of choice) - Fresh berries (strawberries, blueberries, or raspberries) for topping - Pinch of salt Sweet potatoes provide a hearty base. They are sweet and full of vitamins. Eggs add protein and richness. Coconut oil gives a nice flavor while cooking. Cinnamon adds warmth and sweetness. Maple syrup brings a touch of natural sweetness. Greek yogurt adds creaminess and tang. Pecans add crunch, and fresh berries give bright flavor. You can add a few optional toppings to enhance the dish: - Sliced bananas - Chia seeds - Shredded coconut - Honey or agave syrup - Nut butter (like almond or peanut) These toppings allow you to mix flavors and textures. Feel free to get creative with what you love. This recipe serves 2 people. Each person can enjoy a sweet potato half and two eggs. If you're serving more guests, you can easily double the recipe. You can also adjust the toppings based on personal taste. For a family breakfast, make extra sweet potatoes and toppings. This dish is filling, fun, and perfect for sharing. For the full recipe, check out Breakfast Sweet Potato Delight! Start by preheating your oven to 400°F (200°C). Next, scrub the sweet potatoes until they are clean. Use a fork to poke holes in each potato. This helps steam escape while they cook. Place the sweet potatoes on a baking sheet. Roast them in the oven for 45-50 minutes. You want them to be tender when done. Once cooked, take them out and let them cool for a few minutes. Cut each sweet potato in half lengthwise. Gently scoop out some flesh to make a small well for toppings. Save this flesh for later use. While the sweet potatoes roast, heat 1 tablespoon of coconut oil in a skillet over medium heat. Crack four large eggs into the skillet. Cook them how you like—sunny side up or scrambled. Add a pinch of salt to bring out their flavor. Keep an eye on them to avoid overcooking. Once the sweet potatoes are ready, it is time to assemble your dish. Drizzle maple syrup over the sweet potato halves. Sprinkle ground cinnamon on top for added warmth. Now, spoon a dollop of Greek yogurt into each well of the sweet potato. Place the cooked eggs on top next. Finish by adding chopped pecans and fresh berries. Serve warm, and drizzle with more maple syrup if you wish. Enjoy this easy and wholesome dish! For the complete recipe, check out the [Full Recipe]. To roast sweet potatoes well, start by selecting medium-sized ones. You want them fresh and firm. Scrub them clean and poke holes with a fork. This helps steam escape during roasting. Preheat your oven to 400°F (200°C) and place the potatoes on a baking sheet. Roast for 45-50 minutes. They should be soft when you poke them with a fork. This method gives you a sweet, tender inside with a slightly crisp skin. Cooking eggs is simple, yet there are many ways to do it. For this recipe, I like sunny-side up eggs. Start by heating coconut oil in a skillet over medium heat. Crack the eggs gently into the pan. Let them cook until the whites are firm but the yolks stay runny. If you prefer scrambled, beat the eggs in a bowl. Pour them into the hot skillet and stir gently until they are just set. Both methods add great taste to your dish. You can enhance your Breakfast Sweet Potato Delight with fun toppings. Consider adding a sprinkle of ground cinnamon for warmth. Drizzle extra maple syrup for sweetness. Fresh berries like strawberries or blueberries provide a burst of flavor and color. Chopped pecans or other nuts add a nice crunch. You can also try a dollop of Greek yogurt for creaminess. These toppings make each bite exciting and delicious. For the complete recipe, check the Full Recipe section. {{image_2}} You can easily make this dish dairy-free and gluten-free. For a dairy-free option, swap Greek yogurt for coconut yogurt. This keeps it creamy and delicious. Use gluten-free oats or a gluten-free flour blend for any flour needs. You can also add nut milk if you like it creamier. These changes keep the flavors while making it suitable for more diets. If you want a twist, try a sweet potato hash. Dice the sweet potatoes and cook them with bell peppers, onions, and spinach. This mix adds texture and color. Fry them in coconut oil until golden and crisp. Top with fried or poached eggs for a filling meal. This version gives you a savory spin on the classic sweet potato delight. For a fun breakfast, make sweet potato pancakes. Mash the cooked sweet potatoes and mix them with eggs and flour. Add a pinch of cinnamon for flavor. Cook them on a skillet until golden on both sides. Serve with maple syrup or fresh fruit. This transforms sweet potatoes into a fun pancake dish that kids will love. You can find more ideas in the [Full Recipe] section. After you make Breakfast Sweet Potato Delight, you may have leftovers. Store them in an airtight container. Place the container in the fridge. Leftover sweet potatoes will stay fresh for up to four days. If you have cooked eggs, add them to the same container. Keep the toppings separate to maintain texture and taste. To reheat sweet potatoes, you can use the oven or microwave. For the oven, preheat it to 350°F (175°C). Wrap the sweet potatoes in foil and heat for about 15 minutes. If using a microwave, place the sweet potato halves on a plate. Heat for 1-2 minutes, checking often. Avoid overheating, as this can dry them out. Sweet potatoes last about a week in a cool, dark place. Eggs can last 3-5 weeks in the fridge. Maple syrup remains good for about a year unopened. Greek yogurt lasts 1-3 weeks after opening. Always check for signs of spoilage before using any ingredient. Yes, you can use leftover sweet potatoes. They add great flavor and save time. Just make sure they are cooked and cool. Cut them in half and scoop out a bit of the flesh. This creates space for your toppings. The rest of the recipe stays the same. You can still drizzle maple syrup and add your favorite toppings. Sweet potatoes are very versatile for breakfast. Try making sweet potato hash by dicing them and cooking with onions and peppers. You can also mash them with spices and serve them on toast. Another idea is to blend them into smoothies for a creamy texture. Sweet potato pancakes are a fun option too. They are sweet and filling, perfect for any morning. To make this recipe vegan, swap the eggs for tofu or chickpea scramble. Use a dairy-free yogurt instead of Greek yogurt. You can still use sweet potatoes, coconut oil, maple syrup, and pecans. Follow the same steps for roasting sweet potatoes and assembling your dish. Your Breakfast Sweet Potato Delight will taste just as good! Check out the Full Recipe for more details. This blog post covers how to make a tasty breakfast sweet potato. You learned about key ingredients, optional toppings, and serving sizes. I shared easy steps to prep your sweet potatoes and cook eggs. You also found tips for roasting and added flavor ideas. With variations for health needs and storage tips, you can enjoy this dish in many ways. Now, you have all the tools to create a delicious breakfast. Try it out and make it your own!](https://tossedrecipes.com/wp-content/uploads/2025/06/d7252c94-96ca-45f8-9471-0a69095c7822.webp)
Are you ready to kickstart your mornings with a burst of flavor? Look no further than my Breakfast Sweet Potato Delight. This easy and wholesome dish combines sweet potatoes and …

Craving a cozy meal that’s both fun and tasty? Look no further than my Bowtie Pasta Lasagna! This dish combines the delightful shape of bowtie pasta with rich meat sauce …