Ground Beef Burrito Bowl Flavorful and Filling Recipe
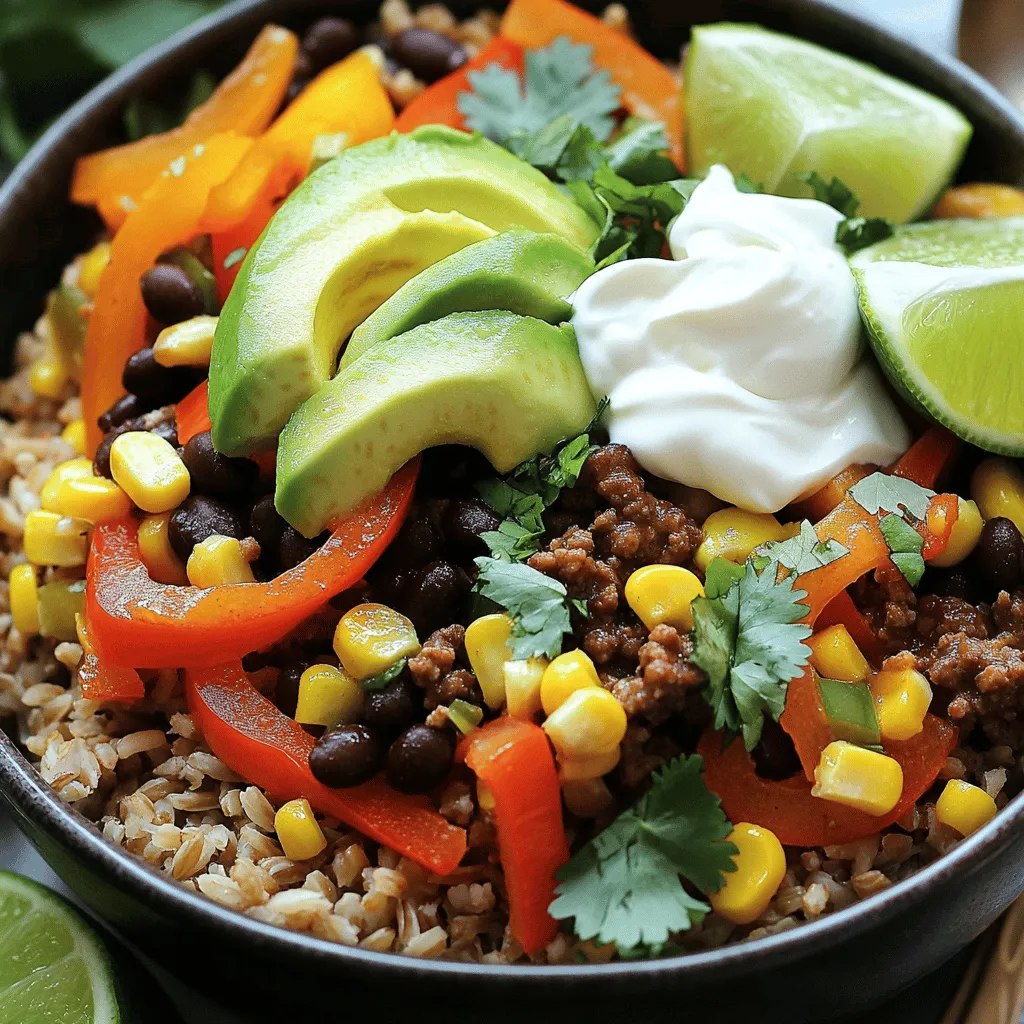
Are you craving a meal that’s both tasty and filling? This Ground Beef Burrito Bowl is your answer! Packed with flavor and easy to make, you can mix and match …
Are you craving a meal that’s both tasty and filling? This Ground Beef Burrito Bowl is your answer! Packed with flavor and easy to make, you can mix and match …

Are you ready to savor a warm, comforting meal? Hobo Casserole is your go-to dish! This Rustic Ground Beef and Potato Bake combines tender ground beef with hearty potatoes, fresh …

If you crave a snack that’s gooey, garlicky, and packed with flavor, I’ve got the perfect treat for you: Cheese Stuffed Garlic Bread Balls! Imagine warm, soft dough that bursts …
![For a tasty Ground Turkey and Peppers dish, gather these items: - 1 lb ground turkey - 2 bell peppers (one red, one yellow), chopped - 1 medium onion, diced - 3 cloves garlic, minced - 1 teaspoon cumin - 1 teaspoon smoked paprika - 1 teaspoon dried oregano - 1 tablespoon olive oil - Salt and pepper to taste - 1 cup black beans, rinsed and drained - 1 cup corn (fresh or frozen) - 1 cup diced tomatoes (canned or fresh) - Fresh cilantro for garnish - Avocado slices for topping - Lime wedges for serving This blend of ingredients brings bold flavors and colors to your table. Ground turkey is lean and easy to cook. It absorbs spices well, making it a great base for this dish. The bell peppers add sweetness and crunch. The spices like cumin and smoked paprika give the dish warmth. Fresh garlic rounds out the taste. Black beans and corn add fiber and nutrients. For a bright finish, cilantro and avocado add creaminess. Lime wedges give a fresh zing when served. Each bite is a delightful mix of flavors and textures. Check the [Full Recipe] for more details on preparation! To make this dish, start by sautéing the aromatics. Heat 1 tablespoon of olive oil in a large skillet over medium heat. Add 1 medium diced onion. Cook for about 3 to 4 minutes until it turns clear. Then, stir in 3 minced garlic cloves. Sauté for another 1 to 2 minutes until you smell the garlic. Next, it’s time to cook the ground turkey. Increase the heat to medium-high. Add 1 pound of ground turkey to the skillet. Season it with 1 teaspoon of cumin, 1 teaspoon of smoked paprika, 1 teaspoon of dried oregano, salt, and pepper to taste. Stir the turkey well and cook until it turns brown, about 6 to 8 minutes. Make sure it cooks all the way through. Now, let’s combine the main ingredients. Add in 2 chopped bell peppers—one red and one yellow. Then, mix in 1 cup of rinsed black beans, 1 cup of corn, and 1 cup of diced tomatoes. Stir everything together so it’s well mixed. Cook for another 5 to 7 minutes. This will help the peppers soften and the flavors blend nicely. Adjust the seasoning if needed. Once done, remove the skillet from the heat. Let it cool for a few minutes before serving. For the full recipe, check out the details above. How to ensure turkey is not dry? To keep your turkey juicy, don’t overcook it. Use a meat thermometer to check for doneness. Aim for 165°F in the center. Cooking it too long can dry it out. Sautéing the turkey on medium heat helps keep it moist. Importance of seasoning Seasoning is key to flavor. Use salt and pepper generously. Don’t forget spices like cumin and smoked paprika. These add depth and warmth. Taste as you cook, and adjust seasoning to your preference. This makes a huge difference in the final dish. Adjusting cooking times for different ingredients Different ingredients cook at different rates. Start with onions and garlic, as they need time to soften. Then add turkey, which cooks quickly. Bell peppers should go in last, so they stay crisp. Keep an eye on timing to ensure everything is cooked just right. Ideal side dishes This dish pairs well with rice or quinoa. You can also serve it with a side salad. These options add freshness and balance to your meal. If you want something heartier, consider cornbread or tortillas for a fun twist. Best ways to present the dish Presentation matters! Serve the dish in bowls. Top it with fresh cilantro and avocado slices. Add lime wedges on the side for a zesty finish. This not only looks great but also enhances the flavors. Enjoy your culinary creation! {{image_2}} If you're looking for gluten-free options, this dish fits the bill! All the ingredients are naturally gluten-free. Just make sure your spices, like cumin and smoked paprika, are also gluten-free. For those wanting vegetarian substitutes, you can swap ground turkey for plant-based crumbles or diced mushrooms. These options give a nice texture and work well with the spices. To spice things up, you can try adding more flavors. A dash of cayenne pepper brings heat, while a sprinkle of Italian seasoning adds depth. Experimenting with fresh herbs like basil or thyme can also brighten the dish. You can use different cooking methods too. Try baking the mixture in the oven for a lovely roasted flavor. You could also grill the peppers for a smoky touch. Each method adds its unique twist to this tasty meal. For the full recipe, check out Turkey & Pepper Fiesta! After enjoying your turkey and peppers, store leftovers in airtight containers. Glass or BPA-free plastic containers work well. Make sure to let the dish cool first before sealing. In the refrigerator, this meal lasts about 3 to 4 days. If you want to keep it longer, freeze it for up to 3 months. Just label the containers with the date. This way, you can enjoy your tasty meal later. To reheat your dish, use a skillet for best flavor. Heat it on medium-low heat. Stir often to avoid burning. You can also use the microwave. Place your portion in a microwave-safe dish. Cover it with a damp paper towel. Heat for 1 to 2 minutes, stirring halfway through. Check the temperature to ensure it's hot. Make sure it reaches 165°F for safety. This keeps your meal moist and tasty. Can I use frozen ground turkey? Yes, you can use frozen ground turkey. Just thaw it in the fridge overnight. You can also use the microwave for quick thawing. Make sure to cook it right after thawing for safety. What can I substitute for bell peppers? If you don’t have bell peppers, you can use zucchini or mushrooms. These veggies add great flavor and texture. You can also try using diced tomatoes for more moisture. How do I know when the turkey is fully cooked? Ground turkey is fully cooked when it reaches 165°F. Use a meat thermometer to check the temperature. The meat should be brown with no pink left. Always ensure it is cooked through for safety. For the full recipe, check out the Turkey & Pepper Fiesta. Enjoy your cooking! This blog post outlined the key steps to make a tasty ground turkey dish. We started with a list of essential ingredients, from ground turkey and spices to fresh veggies. I also shared tips for cooking and serving for the best flavor. You learned about different variations for dietary needs and flavor boosts. Finally, I covered storage tips for leftovers and reheating methods. Enjoy your cooking journey, and don’t hesitate to try new ideas to make this dish your own!](https://tossedrecipes.com/wp-content/uploads/2025/06/64cd4a64-5aa7-4d74-943a-3c58a61aa725.webp)
Are you ready to spice up your dinner routine? In this post, I’ll show you how to make Ground Turkey and Peppers, a flavorful dish that’s both nutritious and easy …

Are you ready to impress your family with a sweet and creamy treat? This Easy King’s Hawaiian Cheesecake Danish Delight will be your new go-to dessert! Using soft King’s Hawaiian …

Looking to impress your guests with a fresh and easy snack? Cucumber sandwiches are the perfect choice! They are light, crisp, and full of flavor. In this blog post, I’ll …
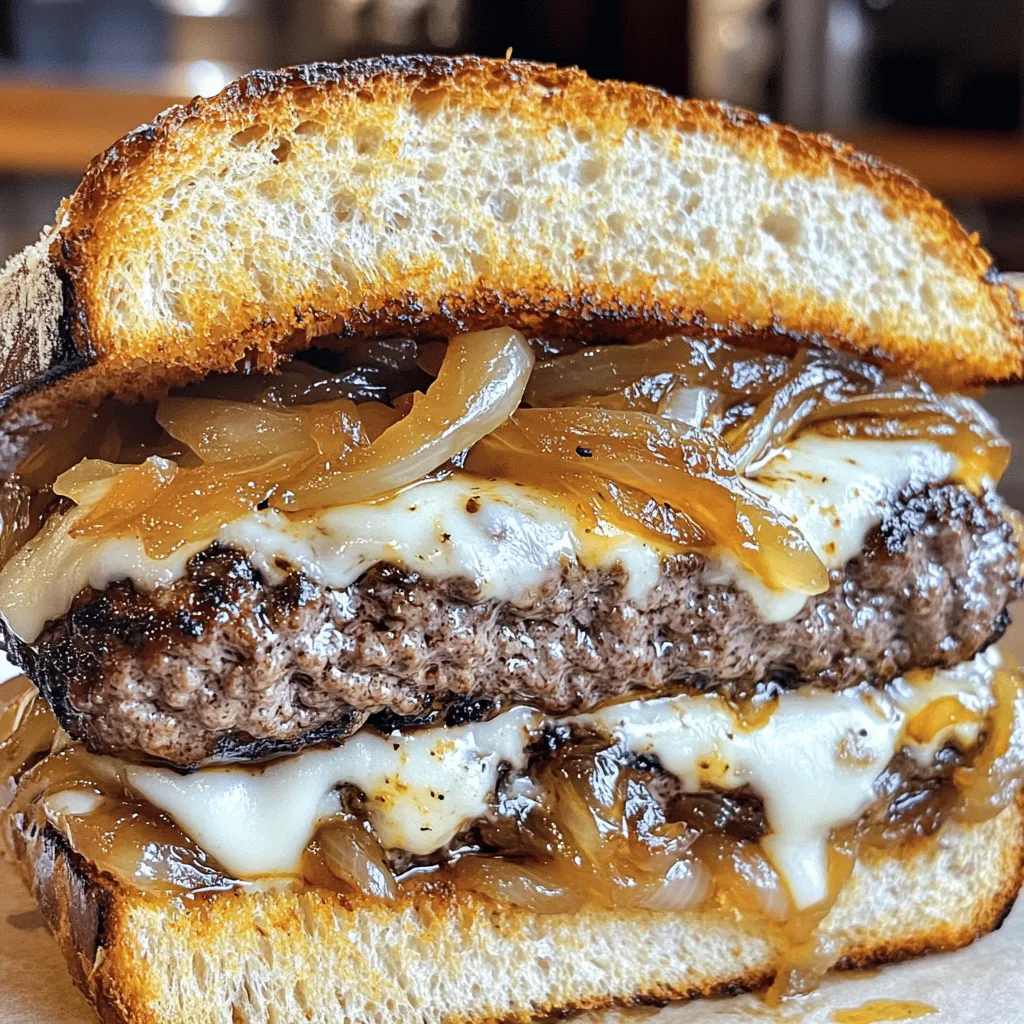
Are you craving a meal that is both tasty and comforting? The classic patty melt is your answer! With its juicy beef patty, sweet caramelized onions, and melted Swiss cheese, …
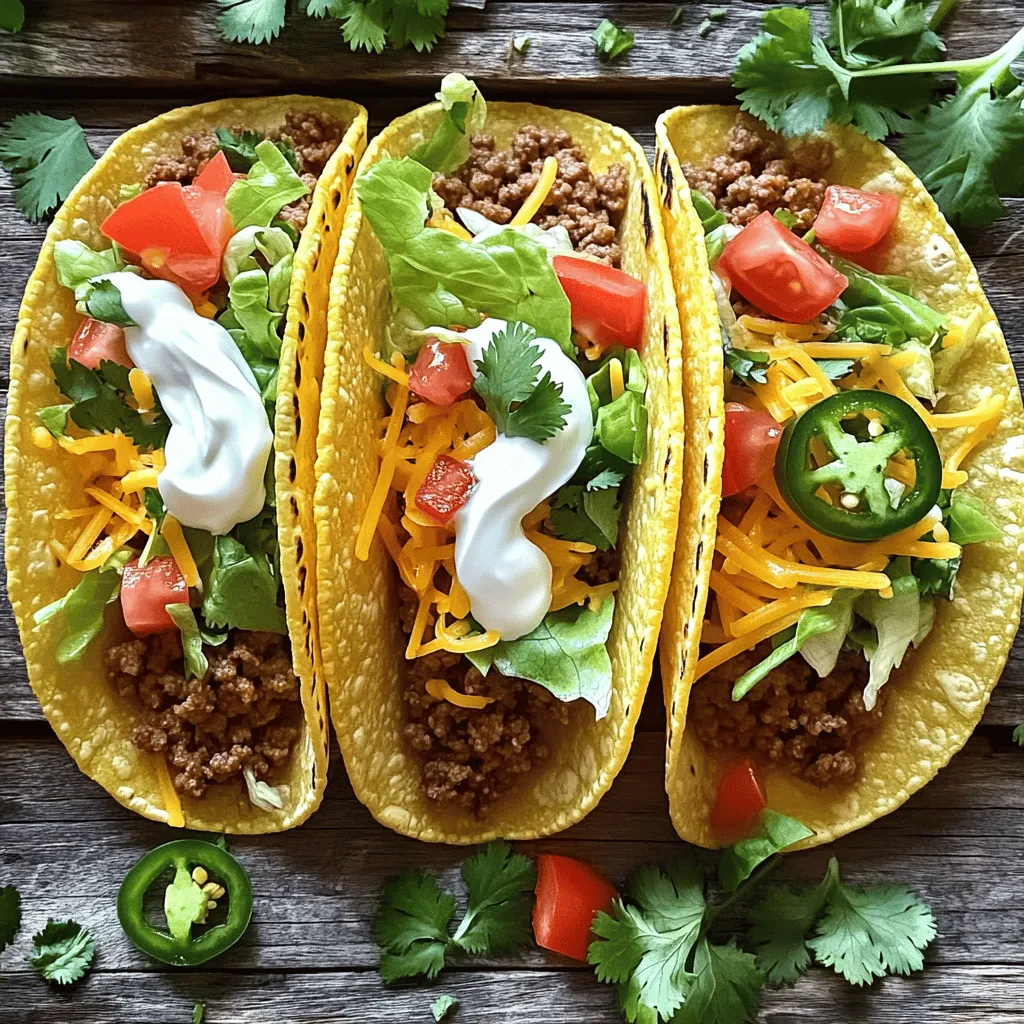
Looking for a delicious meal that’s easy to make? These crispy baked ground beef tacos are here to save your dinner. With just a few simple ingredients, you can enjoy …
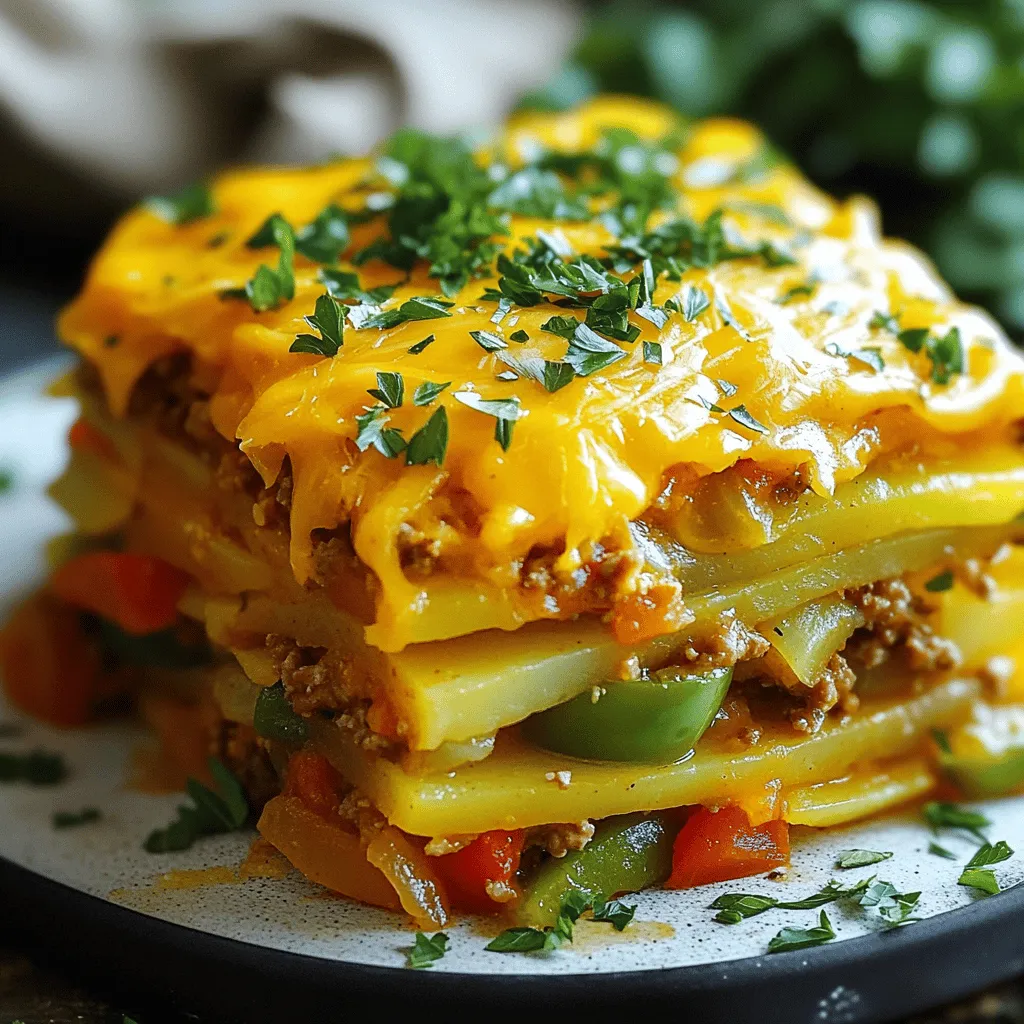
If you’re looking for a warm, hearty meal that’s easy to make, you’ll love my Hobo Casserole with Ground Beef & Potatoes recipe. This dish combines simple ingredients for a …
![- 2 cups Fritos corn chips - 1 can (15 oz) chili (no beans preferred) - 1 cup shredded cheddar cheese - 1 cup iceberg lettuce, shredded - 1 medium tomato, diced - 1/2 cup red onion, finely chopped - 1/4 cup jalapeño slices (optional) - 1/2 cup sour cream - 1 tablespoon taco seasoning (optional) - Salt and pepper to taste When I make Fritos Chili Cheese Salad, I love how all these ingredients come together. The Fritos corn chips provide a great crunch. The chili adds warmth and richness. I prefer using chili without beans for a smoother texture. The cheddar cheese melts just enough to add creaminess without losing its shape. I like to layer the iceberg lettuce first. It creates a nice bed for the chili and helps keep everything fresh. Fresh diced tomatoes and red onion bring color and crunch. If you like heat, jalapeño slices are a fun touch. They add a nice kick. Don’t forget the sour cream! It cools down the spice and adds a tangy flavor. Taco seasoning can enhance the taste even more. Finally, salt and pepper round out the dish. These simple ingredients make a tasty meal or snack. If you want the full details, check the [Full Recipe]. - Heat the chili over medium heat. - Stir occasionally until warmed through. Start by opening your can of chili. Pour it into a medium saucepan. Turn the heat to medium. Stir the chili gently. This helps it warm evenly. Keep an eye on it. You want it hot but not boiling. A few minutes should do the trick. - Layer shredded lettuce in a large serving bowl. - Pour warmed chili over the lettuce. Take a large serving bowl. Add the shredded lettuce at the bottom. Make sure it covers the bottom well. This lettuce will add freshness. Once the chili is warm, pour it over the lettuce. This creates a hearty base for your salad. - Sprinkle cheddar cheese over the chili. - Top with diced tomatoes and red onion. - Optional: Add jalapeño slices. Now, grab your shredded cheddar cheese. Sprinkle it over the warm chili. This will make it slightly melt and taste great. Next, add the diced tomatoes. They add color and freshness. Then, sprinkle the finely chopped red onion. It gives a nice crunch. If you like some heat, add jalapeño slices on top. - Dollop sour cream on top. - Sprinkle with taco seasoning, salt, and pepper. - Add Fritos just before serving for crunch. For the final touch, add a dollop of sour cream. This adds creaminess to the salad. Next, sprinkle taco seasoning, salt, and pepper. This boosts the flavor. Just before serving, add the Fritos. This keeps them crunchy and adds a nice texture. Enjoy your Fritos Chili Cheese Salad! For the complete recipe, check the Full Recipe. You can make this salad your own easily. Try different cheeses, like pepper jack or mozzarella. Each cheese brings a new taste. You can also add avocado for creaminess or black olives for a salty bite. Both options boost flavor and nutrition. Mixing in fresh herbs like cilantro can add a nice touch, too. If you want to prep this salad early, it’s simple. Store the salad parts separately. Keep the Fritos in a bag to stay crunchy. Layer the chili, cheese, and veggies in a container. This way, you can assemble it quickly before serving. Just remember to add the Fritos right before eating to keep them crunchy. You can make your salad look great with a few tricks. Use a clear bowl to show off the layers. This adds visual appeal. You can also serve it in individual cups for fun. Add a sprinkle of fresh herbs on top for color. A dollop of sour cream in the center adds flair. For a festive touch, use colorful plates to make the meal pop. {{image_2}} You can easily make a vegetarian Fritos Chili Cheese Salad. Just swap the chili for a meatless kind. Look for brands that offer hearty veggie chili. You can also add more vegetables, like black beans, corn, or bell peppers. These options add flavor and boost nutrition. If you love heat, here are some tips. Add diced jalapeños or serrano peppers to the salad. You could also mix in hot sauce for an extra kick. Brands like Sriracha or Frank’s RedHot work well. Just be careful not to overdo it; you want to enjoy the flavor. Want a lighter salad? Try baked Fritos instead of regular ones. They keep the crunch but cut down on fat. You can also use a lower-fat cheese or Greek yogurt instead of sour cream. These swaps make the salad tasty and a bit healthier without losing that great flavor. Feel free to explore your own variations! For the full recipe, check out the Fritos Chili Cheese Salad. To keep your Fritos Chili Cheese Salad fresh, store leftovers in an airtight container. This helps prevent moisture from making the chips soggy. You can use glass or plastic containers, but make sure they seal tightly. If you plan to save the salad, store the Fritos separately. This keeps their crunch intact. To reheat your chili, pour it into a saucepan over medium heat. Stir it often until it is warm. Avoid boiling, as this can change the flavor. When serving, layer your salad again. Add the fresh ingredients first, then the reheated chili, cheese, and toppings. Remember to add the Fritos last to keep them crispy. In the fridge, the salad lasts about three days. Always check for spoilage signs. Look for changes in color or texture. If it smells off, it’s best to throw it away. Fresh ingredients like lettuce and tomato can spoil faster, so use them wisely. Yes, you can use different types of chili. I recommend: - Turkey chili for a leaner option. - Vegetarian chili for a meatless meal. - Spicy chili for those who love heat. Choose a chili that matches your taste. The flavor of the chili is key to the salad's success. A thick, hearty chili works best. You can easily make this salad gluten-free. Here are some options for corn chips: - Look for gluten-free Fritos or other corn chips. - Check labels on brands to ensure they are gluten-free. - You can also use tortilla strips made from corn tortillas. Make sure to avoid any chips made with wheat. This way, everyone can enjoy the salad. This salad goes well with many sides. Here are some great pairings: - Cornbread for a sweet, soft contrast. - Fresh fruit salad to balance the flavors. - Grilled veggies for a healthy option. For drinks, consider: - Iced tea for a refreshing touch. - Lemonade for a citrusy kick. - A light beer for those who enjoy a cold drink. These choices enhance the meal and make it even more enjoyable. This Fritos Chili Cheese Salad combines easy steps and fresh flavors. You learned how to layer ingredients, customize options, and store leftovers. Whether you prefer mild or spicy, this dish offers something for everyone. Enjoy the crunch of Fritos alongside tasty chili and fresh veggies. Simplify your meal prep with these tips, and create a fun, colorful salad for your next gathering. Try it out and discover your favorite twist on this classic dish!](https://tossedrecipes.com/wp-content/uploads/2025/06/1cb75c05-9eec-4afd-91f7-28b88e199959.webp)
Are you ready to enjoy a crunchy and flavorful delight? Fritos Chili Cheese Salad is simple to make and bursting with taste. With layers of warm chili, fresh veggies, gooey …