Korean Baked Cauliflower Flavorful Dish to Enjoy
![- Cauliflower florets - Marinade components: gochujang, soy sauce, maple syrup, sesame oil - Aromatics: garlic, ginger, green onions To start, you need a large head of cauliflower. Cut it into bite-sized florets. These will be the star of our dish. Next, we create a tasty marinade. You will need gochujang, soy sauce, maple syrup, and sesame oil. Each ingredient brings a unique flavor. Gochujang adds heat, while soy sauce gives depth. Maple syrup balances the spice with sweetness. Sesame oil adds a nutty aroma. Add garlic and ginger for an extra kick. The garlic brings warmth, while ginger adds zest. Finally, sprinkle chopped green onions on top for a fresh finish. - Additional spices or herbs - Recommended garnish options - Accompaniments for serving For more flavor, think about adding spices or herbs. You can use chili flakes for extra heat or fresh cilantro for freshness. For a garnish, sesame seeds will add a nice crunch. You can also serve Korean Baked Cauliflower with rice or noodles. This makes a great meal or side dish. To see the full recipe, check [Full Recipe]. Preparing the cauliflower florets Start by washing your cauliflower. Cut a large head into small florets. Make sure the pieces are even in size. This helps them cook uniformly. Making the marinade In a bowl, mix together the olive oil, gochujang, soy sauce, maple syrup, sesame oil, minced garlic, grated ginger, rice vinegar, salt, and pepper. Whisk these ingredients until they blend well. Baking instructions for perfect texture Preheat your oven to 425°F (220°C). Spread the marinated cauliflower florets on a baking sheet lined with parchment paper. Bake them for about 25 to 30 minutes. Tips for flipping and checking doneness Flip the cauliflower halfway through baking. This ensures they cook evenly and get crispy edges. Check for tenderness by piercing with a fork. They should be soft but not mushy. Garnishing with sesame seeds and green onions Once the cauliflower is done, take it out of the oven. Sprinkle sesame seeds and chopped green onions on top. This adds flavor and makes it look great. Serving suggestions and presentation tips Serve the cauliflower hot. It can be a side dish or a main meal. Pair it with rice or noodles for a full meal. Enjoy the beautiful colors and delicious flavors on your plate. For the full recipe, click here. To boost the taste of Korean Baked Cauliflower, marinate it well. Mix your marinade thoroughly. Let it sit for at least 30 minutes. If you can, let it marinate overnight. This time allows the flavors to soak in deeply. For cooking, set your oven to 425°F (220°C). This temperature gives a crispy outside and tender inside. If you like it crispier, you can cook it for a few extra minutes. Just keep an eye on it. Use a sturdy baking sheet. A heavy pan helps the cauliflower bake evenly. Lining it with parchment paper makes cleanup easy. Parchment also prevents sticking. You’ll need a large bowl for mixing the marinade. A whisk or a fork works well for blending. Tongs will help toss the cauliflower without making a mess. If your cauliflower turns out soggy, check the marinade amount. Too much liquid can cause sogginess. You can also use a higher oven temperature or bake it longer. For spice balance, taste the marinade before adding the cauliflower. If it’s too spicy, add a little maple syrup. This helps create a nice sweet and spicy blend. Adjusting the gochujang will help you control the heat and flavor. {{image_2}} You can make Korean Baked Cauliflower fit your taste. If you love spice, add more gochujang. Start with an extra tablespoon. Mix it in with the marinade. For less heat, use less gochujang. You can also swap it for a mild chili paste. This way, you keep all the flavor without the heat. If you need gluten-free options, use tamari instead of soy sauce. It gives the same taste without the gluten. For those who follow a vegan diet, maple syrup works great. You can skip honey and stick to plant-based ingredients. This dish remains tasty and suitable for everyone. You can get creative with your vegetables. Try broccoli or Brussels sprouts instead of cauliflower. They roast well and soak up all the flavors. For a new twist, use different sauces. Teriyaki or peanut sauce can add a fun flair. Experimenting with these swaps can lead to new favorites. Check out the Full Recipe for all the details on making this dish! To keep your Korean Baked Cauliflower fresh, store leftovers in a container. Use an airtight container to prevent moisture loss. This helps keep the cauliflower from getting dry. Glass or BPA-free plastic containers work best. Always let the dish cool to room temperature before sealing the container. When it comes to reheating, there are a couple of great methods. You can use the oven or a skillet. For the oven, set it to 350°F (175°C). Place the cauliflower in a baking dish and cover it with foil. Heat for about 10-15 minutes. For a skillet, add a little oil over medium heat. Toss the cauliflower until warm. Avoid microwaving as it can make the dish mushy. Yes, you can freeze Korean Baked Cauliflower! To freeze, let it cool completely. Place the cauliflower in a freezer-safe bag or container. Squeeze out excess air to prevent freezer burn. When you're ready to eat it, thaw in the fridge overnight. Reheat in the oven or skillet for the best taste. What is gochujang, and can I substitute it? Gochujang is a spicy Korean chili paste. It adds heat and depth to dishes. If you can't find it, try sriracha or red pepper flakes mixed with a bit of sugar. This will mimic the sweetness and heat of gochujang. How can I make this dish ahead of time? You can prepare the cauliflower and marinade a day early. Just store them separately in the fridge. When ready, toss them together and bake as directed in the Full Recipe. Is Korean Baked Cauliflower healthy? Yes! Korean Baked Cauliflower is a healthy dish. It is low in calories and high in fiber. This makes it good for digestion and overall health. What are its nutritional benefits? Cauliflower is rich in vitamins C and K. It also has antioxidants that help fight inflammation. The olive oil and sesame oil provide healthy fats, which are good for your heart. What dishes or sides go well with this recipe? This dish pairs well with rice, quinoa, or steamed vegetables. You can also serve it with a light salad for a fresh touch. It makes a great side or a main dish. Popular drinks to serve alongside Korean Baked Cauliflower Korean Baked Cauliflower goes nicely with green tea or a light beer. You can also enjoy it with sparkling water for a refreshing drink. This blog post walked you through making Korean Baked Cauliflower. We explored the key ingredients and how to prepare them. You learned step-by-step how to bake cauliflower for the best results. I shared helpful tips to enhance the flavors and avoid common issues. Finally, we discussed variations and storage methods for your leftovers. Now, it’s all about enjoying this tasty dish. Make it your own with the variations suggested. You’ll love the flavor and freshness it brings to your meals.](https://tossedrecipes.com/wp-content/uploads/2025/06/3384a6a4-aa92-4062-9523-9ba209ba08e3.webp)
Looking for a tasty way to enjoy healthy cauliflower? Try my Korean Baked Cauliflower! This dish packs a punch with flavors from gochujang, soy sauce, and sesame oil, making it …
Looking for a tasty way to enjoy healthy cauliflower? Try my Korean Baked Cauliflower! This dish packs a punch with flavors from gochujang, soy sauce, and sesame oil, making it …

Looking for a quick and tasty meal? Try these delicious peanut chicken wraps! They are easy to make and packed with flavor. With grilled chicken, fresh veggies, and a creamy …
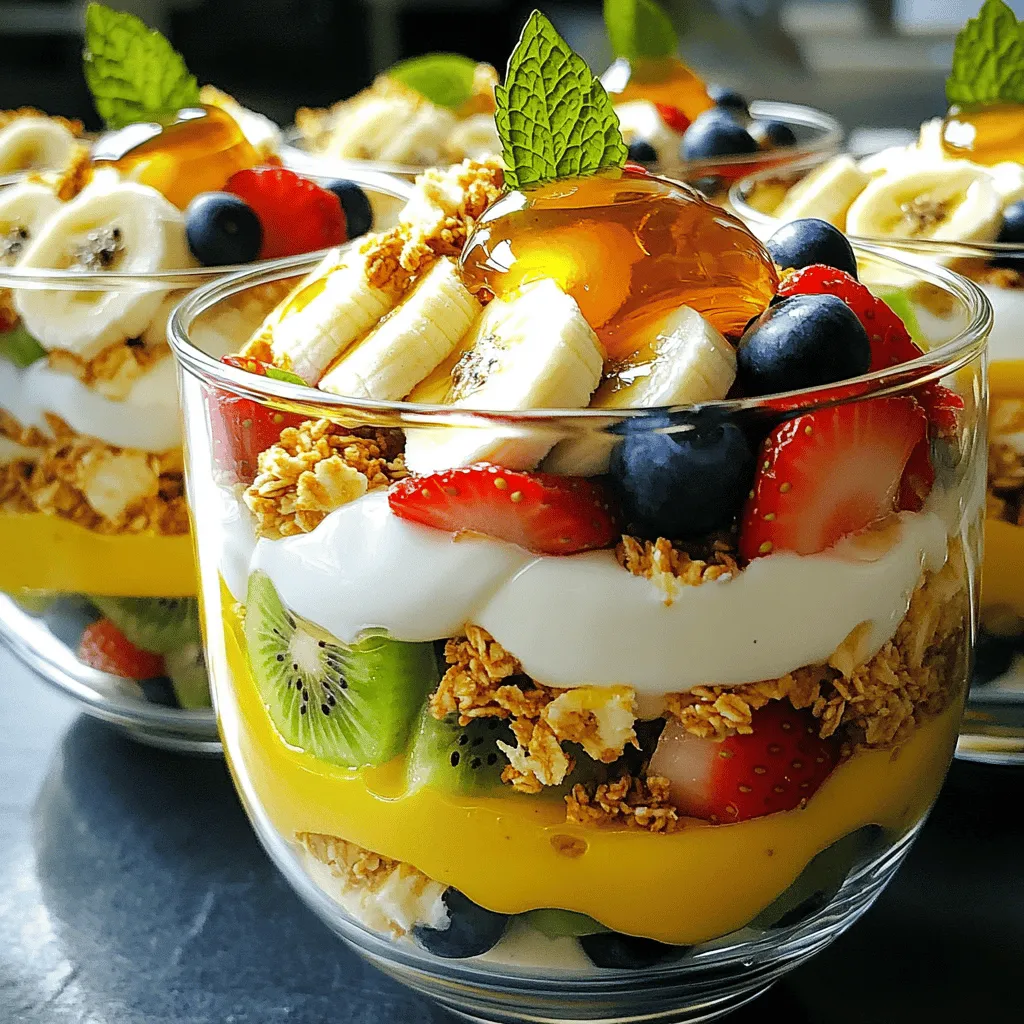
Looking for a quick and tasty snack? Honey Yogurt Fruit Salad is perfect for you! It’s colorful, fresh, and easy to make. Plus, it’s a great way to enjoy your …
![For a tasty fall fruit salad, you will need: - 2 crisp apples, diced (such as Honeycrisp or Fuji) - 1 cup fresh cranberries, rinsed - 1 cup ripe pears, diced - 1 cup grapes, halved - 1/2 cup pomegranate seeds These fruits create a lovely mix of sweet and tart. Apples and pears add crunch, while cranberries give a burst of flavor. Grapes are juicy and fun to eat. Pomegranate seeds add color and a bit of chew. You can make your fall fruit salad even better by adding: - 1/4 cup walnuts, chopped - 1/4 cup maple syrup - 1 tablespoon fresh lemon juice Chopped walnuts add a nice crunch. Maple syrup gives a sweet touch. A splash of lemon juice keeps the fruits bright and fresh. To dress your salad, you will need: - 1 teaspoon ground cinnamon - Pinch of salt Cinnamon brings warmth and spice to the salad. A pinch of salt balances the sweetness and enhances all the flavors. For the full recipe, check the details above. Start by washing all the fruits. Use two crisp apples and dice them into small pieces. I love Honeycrisp or Fuji apples for their sweetness. Next, rinse one cup of fresh cranberries. Cut one cup of ripe pears into small cubes. Halve one cup of grapes and toss them into a large mixing bowl. Lastly, gently fold in half a cup of pomegranate seeds. This adds a pop of color and flavor to your salad. In a small bowl, whisk together the dressing. Combine one-fourth cup of maple syrup with one tablespoon of fresh lemon juice. Add one teaspoon of ground cinnamon and a pinch of salt. Mix until all ingredients blend well. This sweet and tangy dressing will enhance your fruit salad. Drizzle the dressing over the fruit mixture in the large bowl. Toss gently to coat all the fruits evenly. Sprinkle one-fourth cup of chopped walnuts on top for a nice crunch. Give the salad one last gentle toss to mix everything together. Now, cover the bowl and chill it in the refrigerator for at least 30 minutes. This waiting time lets the flavors meld beautifully. Enjoy your fresh and flavorful treat! For the full recipe, click [Full Recipe]. Choose fruits that are in season for the best taste. For this salad, I love using crisp apples, ripe pears, and juicy grapes. Look for firm apples like Honeycrisp or Fuji. Select pears that yield slightly when pressed. Fresh cranberries should be bright and firm. When buying grapes, pick plump, unblemished ones. Seasonal fruits not only taste better but also add color. To boost the flavor, add a splash of fresh lemon juice. The citrus brightens the whole salad. A sprinkle of ground cinnamon adds warmth and spice. For presentation, use a festive bowl. Layer the fruits for a beautiful look. Top with extra pomegranate seeds for a pop of color. A sprinkle of chopped walnuts gives a nice crunch. You want your salad to be as tasty as it is pretty. Kids love fun shapes and colors. Use cookie cutters to create fun fruit shapes. Mix in some mini marshmallows for sweetness. You can even let kids help with mixing. They may be more excited to eat what they made. Consider serving the salad in fun, themed cups. This makes it feel special and more appealing. A colorful, fun fruit salad is a hit with kids. For more details on how to create this delicious dish, check out the Full Recipe. {{image_2}} You can change this salad to fit your taste. Try adding bananas or citrus fruits. Sliced strawberries add brightness too. For nuts, consider almonds or pecans. They give crunch and flavor. Each fruit or nut brings its own twist. Make it yours by mixing what you love. If you want a sweet treat, turn this salad into a dessert. Add a dollop of whipped cream or yogurt. Drizzle some chocolate sauce on top for extra sweetness. You can also sprinkle granola for a crunchy layer. This makes a fun dessert that kids will enjoy. While cinnamon is great, you can try other spices. Nutmeg or ginger adds warmth and depth. A splash of vanilla extract can also enhance the flavors. You might even mix in some fresh mint for a refreshing note. Experiment and find your favorite combinations. For the full recipe, check out the Autumn Harvest Fruit Salad. Store your fall fruit salad in an airtight container. This keeps the fruit fresh and prevents browning. You can use a glass or plastic container with a tight lid. If you have any nuts, keep them in a separate bag. Adding them right before serving helps keep them crunchy. When stored properly, your fall fruit salad lasts about three days in the fridge. After that, the fruit may start to lose its crispness. If you notice any browning or mushy spots, it’s best to toss it out. Always check for freshness before eating. Before serving leftovers, give the salad a gentle toss. This helps mix the flavors again. If the fruit looks a bit dry, you can add a splash of lemon juice or maple syrup. This will brighten the flavors and make it taste fresh. Enjoy your salad again with a new twist! This Fall Fruit Salad is packed with nutrients. Apples are great for your heart. Pears boost your digestion. Cranberries help fight infections. Grapes are full of antioxidants. Pomegranate seeds add vitamins and minerals. Walnuts provide healthy fats. Maple syrup gives a natural sweetness. Together, these fruits support overall health and taste great. Yes, you can make this salad ahead of time. Prepare the fruit and dressing separately. Mix them just before serving. Chilling the salad for 30 minutes helps the flavors blend. If you make it too early, the fruit may get mushy. Store leftovers in the fridge for up to three days. You can use many dressings for fruit salad. Try yogurt for a creamy option. Honey adds more sweetness without the syrup. Citrus dressings with orange or lime juice brighten the flavors. A simple balsamic glaze brings a unique twist. Experiment with your favorites to find what you love best. This blog post shared how to make a tasty Fall Fruit Salad. We covered key ingredients, from required fruits to dressings. You learned how to prepare, mix, and chill for maximum flavor. I shared tips on picking the best fruits and even making it kid-friendly. You can customize it with extras, like nuts or dessert elements. Remember, storing leftovers properly can keep your salad fresh. Enjoy creating your own unique salad this season!](https://tossedrecipes.com/wp-content/uploads/2025/06/5c8eed1f-957b-4ffc-9a87-5414514064ce.webp)
As the leaves turn and the air cools, savor the season with a vibrant Fall Fruit Salad. This fresh and flavorful treat combines the best of autumn’s bounty. You’ll discover …
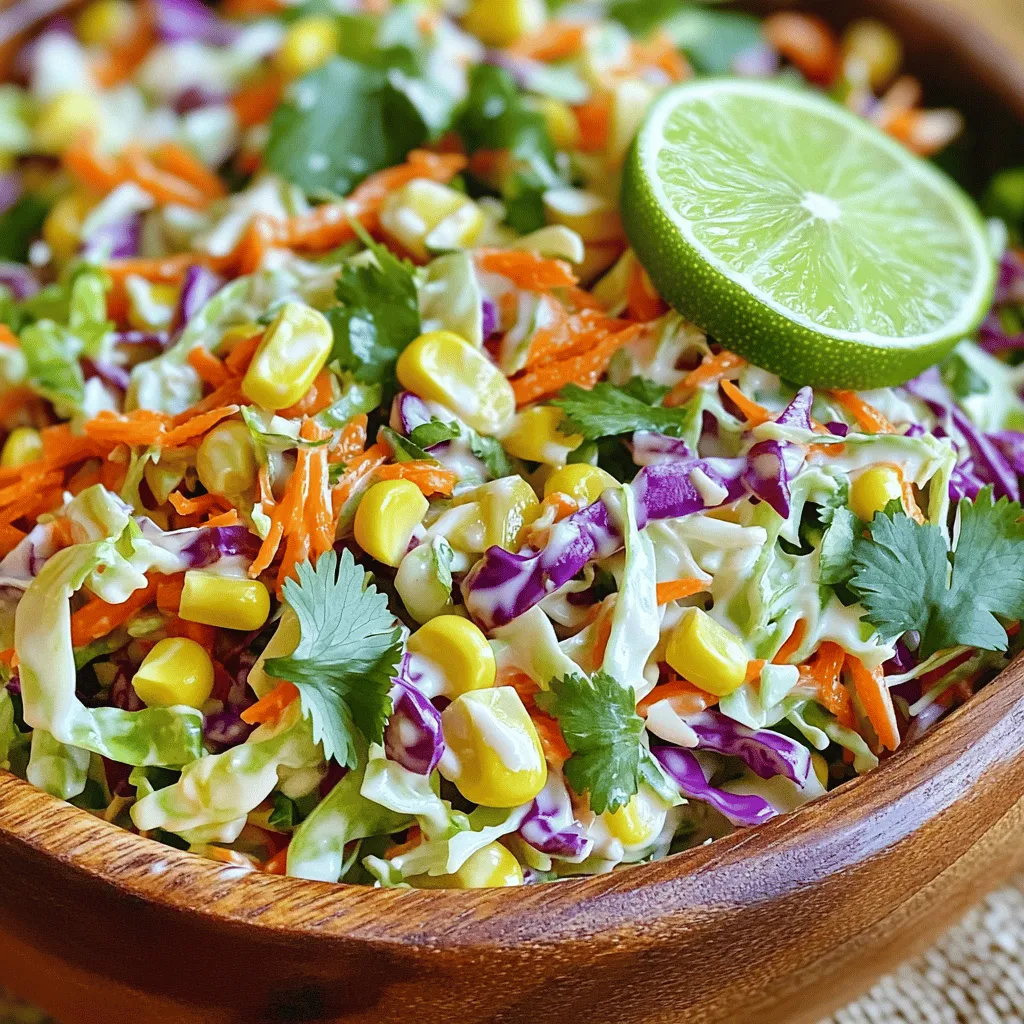
Looking for a fresh and tasty side dish? You’ll love this Easy Mexican Coleslaw! It’s bright, colorful, and packed with crunch. Whether you’re grilling, having tacos, or need a zesty …

Are you ready to wake up to something delicious? This Cinnamon Roll French Toast recipe is both easy and delightful! With just a few common ingredients, you can transform simple …
![- 1 cup low-fat Greek yogurt - 1 tablespoon honey (or to taste) - 1 cup canned mandarin oranges, drained - 1 cup fresh pineapple, diced - 1 cup strawberries, hulled and sliced - 1 cup mini marshmallows (optional for sweetness) - ½ cup shredded coconut (unsweetened) - 1 teaspoon vanilla extract - Fresh mint leaves for garnish (optional) These ingredients create a light and tasty fruit salad. The Greek yogurt gives it a creamy base. Honey adds sweetness, while the fruits bring a burst of flavor. You can use mini marshmallows to make it sweeter, but they are optional. If you want to change things up, you can swap Greek yogurt for any yogurt you like. Try dairy-free options like coconut or almond yogurt. For sweeteners, use maple syrup or agave. If you want to switch fruits, you can add blueberries, mangoes, or even kiwi. This salad is flexible and lets you play with flavors. - Mixing bowl - Spatula or spoon - Measuring cups - Plastic wrap Having the right tools makes cooking easier. A mixing bowl is key for combining your ingredients. Use a spatula or spoon for gentle mixing. Measuring cups help ensure you get the right amounts. Finally, plastic wrap keeps your salad fresh while it chills in the fridge. For the Full Recipe, you can see the complete steps to make this delicious Skinny Ambrosia Fruit Salad. To start, gather your ingredients. In a large mixing bowl, combine 1 cup of low-fat Greek yogurt, 1 tablespoon of honey, and 1 teaspoon of vanilla extract. Stir these together well until you get a smooth and creamy mix. This base adds rich flavor and a nice creamy texture. Next, gently fold in the fruits. Add 1 cup of drained canned mandarin oranges, 1 cup of diced fresh pineapple, and 1 cup of hulled and sliced strawberries. If you want extra sweetness, add 1 cup of mini marshmallows. For a tropical twist, include ½ cup of unsweetened shredded coconut. Mix slowly to coat the fruit with the yogurt dressing without breaking it apart. After mixing, cover the bowl with plastic wrap. Refrigerate the salad for at least 30 minutes. This chilling time lets the flavors meld together, making each bite tastier. When ready to serve, give the salad a gentle stir to mix again. Serve it in small bowls or a large dish. For a nice touch, garnish with fresh mint leaves if you like. This adds color and a fresh scent. Mixing gently is crucial. It keeps the fruit intact and maintains the salad's light feel. Too much stirring can mush the fruit. Before serving, ensure the salad is cold. This makes it refreshing, especially on warm days. Enjoy the bright flavors and creamy texture of your Skinny Ambrosia Fruit Salad! For the complete recipe, refer to the [Full Recipe]. To cut calories and sugar, use less honey. You can also skip the mini marshmallows. They add sweetness but pack on extra sugar. Using fresh fruits can help too. They bring natural sweetness to the salad. For protein-rich options, swap Greek yogurt for protein-fortified versions. You could also stir in some cottage cheese. Both options boost the protein without adding too many calories. Add a burst of flavor by using citrus zest. Lemon or lime zest adds a fresh kick. A little zest goes a long way in brightening the taste. Consider adding nuts or seeds for crunch. Almonds, walnuts, or chia seeds are great choices. They give your salad a nice texture and healthy fats too. Get creative with how you serve the salad. Use small cups or clear bowls to show off the colors. Layering the fruits makes it look fancy. Choose colorful fruits to make your salad pop. Red strawberries, orange mandarins, and yellow pineapple create a vibrant look. They not only taste good but also make the dish visually appealing. Check out the full recipe for more ideas! {{image_2}} Mixing fruits can make your Skinny Ambrosia Fruit Salad exciting. You can use seasonal fruits based on what is fresh. In summer, berries shine bright. Think blueberries, raspberries, and blackberries for vibrant colors. In fall, apples and pears add a crisp bite. For tropical vibes, consider mangoes or kiwi. These fruits add sweetness and a fun twist. You can even add some passion fruit for a unique flavor. Each mix brings a new taste and look to your salad. If you want a vegan version, swap Greek yogurt for almond or coconut yogurt. These options still give you a creamy texture. For sweetness, use maple syrup instead of honey. This keeps it plant-based and delicious. If gluten is a concern, you’re in luck! All the ingredients in this salad are naturally gluten-free. You can enjoy it without worry. Just be sure to check your yogurt and marshmallows if they are certified gluten-free. You can make themed ambrosia salads for special events. For holidays, add colors to match the season. For Halloween, use oranges, blackberries, and purple grapes. For Christmas, think red and green with cherries and kiwi. Color-themed salads are fun too! Create a rainbow salad with a mix of colorful fruits. Each layer adds a new hue and flavor. This makes your dish as pretty as it is tasty. For more ideas, check the Full Recipe and let your creativity flow! To keep your Skinny Ambrosia Fruit Salad fresh, use an airtight container. Glass containers work well because they do not absorb smells. Before sealing, make sure the salad is cool. This keeps moisture from forming inside the lid. If you plan to eat it later, cover the container tightly with plastic wrap. To maintain freshness, store the salad in the fridge. Avoid leaving it out for long periods. The yogurt can spoil if it sits too long. If you have leftover salad, eat it within three days for the best taste. The optimal time to enjoy your ambrosia salad is within three days. After this, the fruits may lose their texture and flavor. Check for signs of spoilage before eating. If you see any mold or the salad smells sour, it is best to throw it away. Fresh fruits will start to brown and become mushy after a few days. If you have leftover salad, consider remixing it. You can add more fresh fruit for a new twist. Chopped apples or bananas can bring in new flavors. Another fun idea is to use it as a topping for yogurt or pancakes. You could also blend it into a smoothie for a refreshing drink. For a creative twist, try adding leftover ambrosia to baked goods. You can mix it into muffin batter or use it as a filling for cakes. This way, you reduce waste while enjoying tasty treats. Skinny Ambrosia Fruit Salad has about 150 calories per serving. This number can vary based on the fruits you choose. Here’s a quick breakdown of the calories in each ingredient: - 1 cup low-fat Greek yogurt: 100 calories - 1 tablespoon honey: 64 calories - 1 cup canned mandarin oranges: 60 calories - 1 cup fresh pineapple: 82 calories - 1 cup strawberries: 50 calories - 1 cup mini marshmallows: 100 calories (optional) - ½ cup shredded coconut: 200 calories You can adjust the amounts to fit your needs. Yes, you can prepare this salad a day in advance. Just mix the fruits and yogurt base, then store it in the fridge. To keep it fresh, cover it well. If you want a nice crunch, add mini marshmallows just before serving. This will help them stay soft. If Greek yogurt isn't your favorite, you can use regular yogurt or dairy-free yogurt. Almond, coconut, or soy yogurts work great. Choose a type that fits your taste and diet. These alternatives will still give you that creamy texture. Absolutely! Kids love the sweet flavors and fun textures. To make it more appealing, you can cut the fruits into smaller pieces. You can also let them help with the mixing. It’s a fun way to get kids excited about healthy food. To boost protein, you can add nuts like almonds or walnuts. Chia seeds are also a great choice. You can mix in a scoop of protein powder into the yogurt. This keeps the salad tasty while increasing its nutrition. Yes, you can use canned fruits. They save time, but fresh fruit usually has better taste and texture. Canned fruits may be sweeter, so check the labels for added sugars. If you go canned, drain and rinse the fruits to reduce extra syrup. This blog post covered easy steps to make a tasty ambrosia fruit salad. You need basic ingredients like Greek yogurt, fruits, and maybe some marshmallows. Remember, you can swap out ingredients to fit your taste. Think about serving it cool for the best flavor. Add a sprinkle of nuts for crunch and color for beauty. With the right tips, you can make delicious variations, store it well, and enjoy leftovers. Enjoy this fun, healthy dish with friends or family!](https://tossedrecipes.com/wp-content/uploads/2025/06/5e2e1739-102e-4422-ac59-59a313e883ae.webp)
Looking for a delicious and guilt-free treat? My Skinny Ambrosia Fruit Salad is the perfect answer! Packed with fresh fruits, creamy Greek yogurt, and a hint of sweetness, this salad …
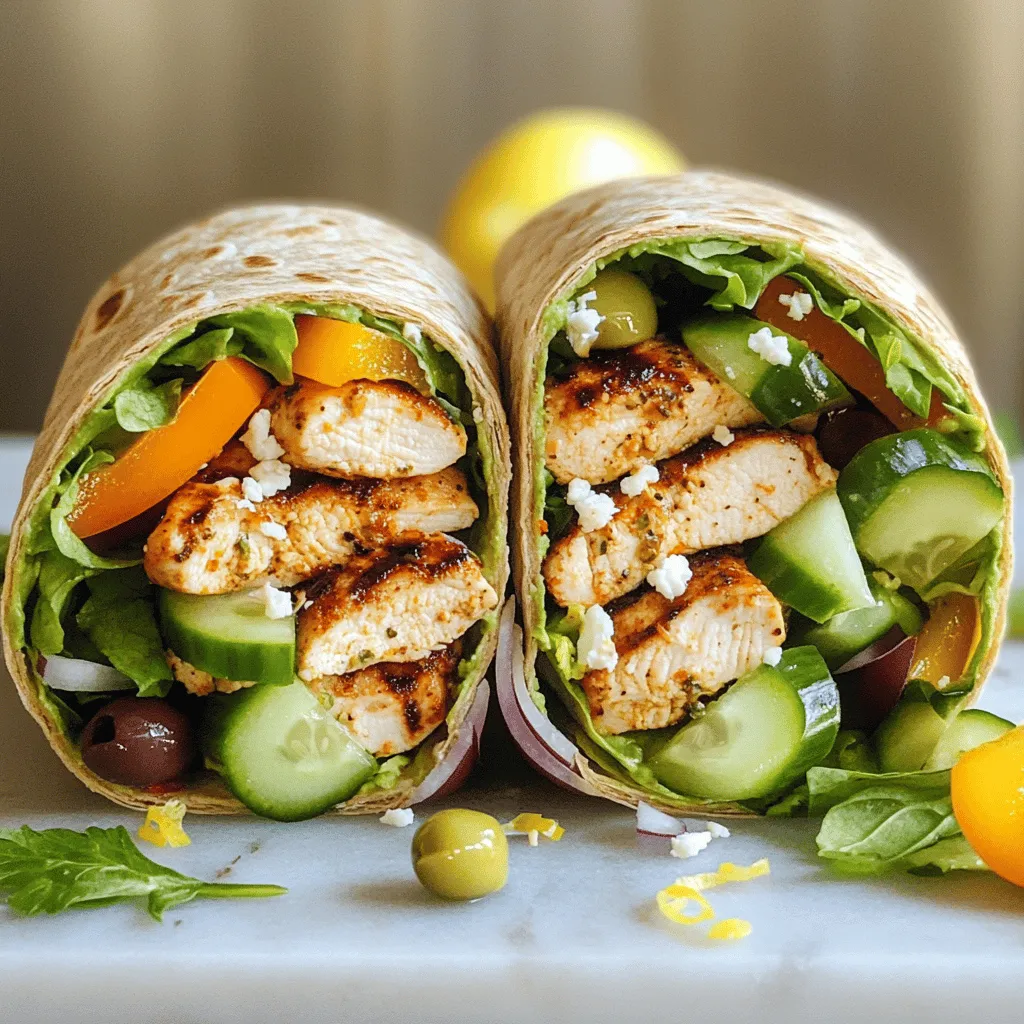
Looking for a quick, delicious meal? You’ve come to the right place! Mediterranean Chicken Wraps are bursting with flavor and fresh ingredients. This meal is easy to make and perfect …
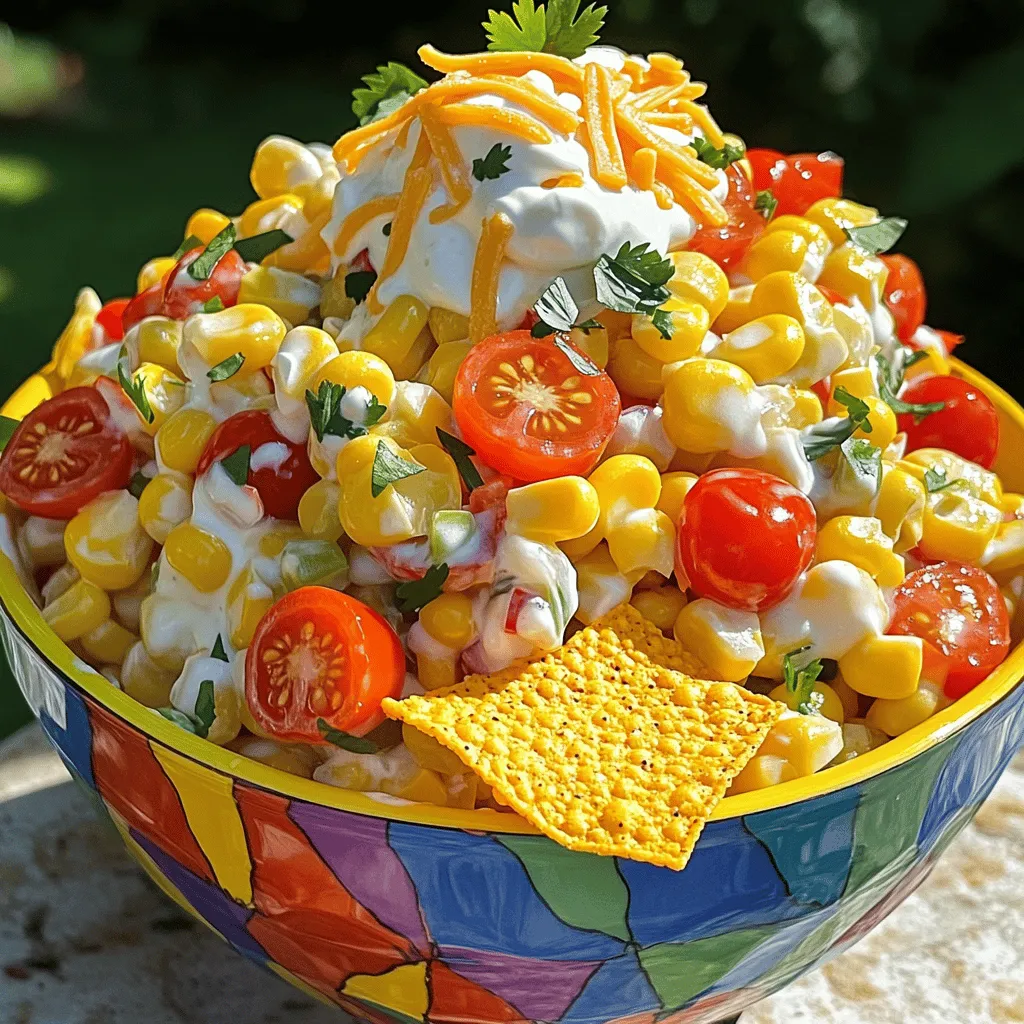
Looking for a fun, easy dish to impress your friends? My Easy Frito Corn Salad is the perfect fit. Packed with fresh corn, juicy tomatoes, and crunchy Fritos, this recipe …
![- 4 large russet potatoes - 1 cup sour cream - 1 cup shredded cheddar cheese - 4 tablespoons unsalted butter, melted - 1/4 cup crispy bacon bits - 1/2 cup green onions, chopped - 1/2 teaspoon garlic powder - 1/2 teaspoon smoked paprika - Salt and pepper to taste - 1 cup mini marshmallows - 1/2 cup chocolate chips In this recipe, we start with russet potatoes. They are perfect because they are fluffy. I use four large potatoes, which serve my family well. Next, I add sour cream and shredded cheddar cheese. These ingredients make the filling creamy and rich. Melted butter adds flavor and helps everything stick together. If you want to make it special, add crispy bacon bits and chopped green onions. They give a nice crunch and a fresh taste. For seasoning, I use garlic powder and smoked paprika. These spices enhance the flavor without overpowering it. Don't forget to add salt and pepper to taste. Finally, the fun part: toppings! I use mini marshmallows and chocolate chips. They create a sweet surprise on top of the savory potatoes. The combination of flavors makes each bite exciting. For the full recipe, check out the detailed steps to make these delicious Mississippi Mud Potatoes. - Preheat the oven to 375°F (190°C). - Wash and scrub the russet potatoes, then pierce with a fork. First, I set my oven to 375°F. This is the perfect heat to bake our potatoes. I wash the russet potatoes well. A good scrub is key; it helps remove dirt. Then, I pierce each potato with a fork. This step is important. It lets steam escape while they bake. - Place the potatoes directly on the oven rack and bake for 45-60 minutes. - Check for tenderness with a fork. Next, I place the potatoes on the oven rack. I bake them for about 45 to 60 minutes. I check for tenderness with a fork. If it slides in easily, they are done. The potatoes should feel soft when I press them gently. - Combine the sour cream, melted butter, cheese, green onions, bacon bits, garlic powder, smoked paprika, salt, and pepper in a bowl. - Mix well before proceeding to the next steps. While the potatoes bake, I prepare the filling. In a bowl, I combine sour cream, melted butter, cheese, green onions, bacon bits, garlic powder, smoked paprika, salt, and pepper. I mix it all well. This makes a creamy and tasty filling for our potatoes. - Cut each baked potato in half and scoop out the flesh. - Mix with the sour cream mixture and refill the potato skins. Once the potatoes cool, I cut each one in half. I scoop out the inside, leaving some for structure. I take the scooped-out potato and mix it with the creamy filling. Then, I refill the potato skins with this tasty mixture. - Top with mini marshmallows and chocolate chips. - Bake for an additional 15-20 minutes until marshmallows are golden. Now, I top each potato half with mini marshmallows and sprinkle chocolate chips on top. I return them to the oven for another 15 to 20 minutes. I watch for the marshmallows to turn golden. This sweet touch makes the dish special. You can find the Full Recipe for all these steps and more. To know if your potatoes are perfectly cooked, poke them with a fork. If the fork goes in easily, they are ready. Leaving some potato flesh inside helps keep the shape. It also adds a nice texture to the filling. To kick up the flavor, try adding spices like onion powder or cayenne pepper. You can also mix in different cheeses. Gouda or pepper jack can add a fun twist. For family gatherings, serve the potatoes on a large platter. This makes them easy to share. Garnish with extra green onions or crispy bacon on top. A sprinkle of fresh herbs adds a pop of color and taste. {{image_2}} You can easily make this dish vegetarian. Simply swap out the bacon for more veggies. Try adding bell peppers, mushrooms, or spinach. These options add color and flavor. They also keep the dish hearty. You still get a rich taste without meat. For a fun twist, explore sweet variations. Top your potatoes with different items. You might use caramel sauce or peanut butter. These toppings add a unique flavor that contrasts the savory base. You can even sprinkle nuts or coconut on top. Experimenting with sweet flavors can surprise your family. You can cook these potatoes in a microwave or an air fryer. For the microwave, poke holes in the potatoes first. Cook them for about 10-12 minutes. Check if they're soft and adjust time as needed. If using an air fryer, set it to 400°F (200°C). Cook for 35-40 minutes for a crispy skin. Both methods save time while still delivering great taste. To keep your Delicious Mississippi Mud Potatoes fresh, store them in the fridge. Use an airtight container to prevent any odors from seeping in. These potatoes last about 3 to 5 days in the fridge. If you want them to taste great later, try to eat them within this time. You can freeze these loaded potatoes if you have leftovers. First, let them cool completely. Then, wrap each potato tightly in plastic wrap. Place them in a freezer-safe bag or container. They can last up to 3 months in the freezer. When ready to eat, thaw them overnight in the fridge. For the best taste, reheat the potatoes in the oven. Preheat your oven to 350°F (175°C). Place the potatoes on a baking sheet and cover them with foil to keep them moist. Heat for about 20 minutes or until warm. You can also microwave them, but the oven gives a better texture. Enjoy your tasty meal! I recommend using large russet potatoes. They have a fluffy texture after baking. This makes them perfect for holding the creamy filling. You can also try Yukon Gold potatoes. They have a buttery flavor and work well too. Yes, you can prepare them ahead of time. Bake the potatoes and mix the filling. Store them in the fridge. When you're ready to eat, just assemble and bake them. This meal is great for busy days. To make it gluten-free, use gluten-free bacon bits if you choose to add them. All other ingredients are naturally gluten-free. Check your sour cream and any toppings for gluten-free labels. This ensures a safe dish for everyone. Yes, you can use Greek yogurt instead of sour cream. It adds creaminess and a bit of tang. You could also try cream cheese for a richer flavor. Just mix it well with the other ingredients. Yes, you can use regular marshmallows. Just cut them into smaller pieces. This will help them melt evenly on top of the potatoes. The mini marshmallows are easier, but regular ones work too. For the best results, keep an eye on them while baking. For the full recipe, check out the details above. Delicious Mississippi Mud Potatoes mix sweet and savory in a fun way. You start with russet potatoes, bake them, and then fill them with tasty toppings. Here’s how to make these tasty treats. 1. What potatoes should I use? Use large russet potatoes. They have a fluffy texture when baked. This makes them perfect for loading with creamy goodness. 2. How do I prepare the potatoes? Preheat your oven to 375°F (190°C). Wash the russet potatoes well. Pierce each potato several times with a fork. This helps steam escape while baking. 3. How long do I bake the potatoes? Place the potatoes directly on the oven rack. Bake for 45-60 minutes. Check if they are soft by poking them with a fork. 4. What goes in the filling? In a bowl, mix sour cream, melted butter, shredded cheddar cheese, and chopped green onions. For fun, add crispy bacon bits if you like. Season with garlic powder, smoked paprika, salt, and pepper. 5. What do I do after baking? Let the baked potatoes cool a bit. Cut each potato in half lengthwise. Scoop out the insides, leaving a thin layer for support. Mix the scooped potato with your filling until smooth. 6. How do I assemble the potatoes? Spoon the filling back into each potato half. Make it nice and mounded. Top with mini marshmallows and sprinkle chocolate chips on top. 7. Final baking step? Return the filled potatoes to the oven for another 15-20 minutes. Bake until the marshmallows are golden and the tops are crispy. This recipe is simple and fun. Try it for a family meal or a get-together. Enjoy your Delicious Mississippi Mud Potatoes! For the complete recipe, check out the [Full Recipe]. You learned how to make Mississippi Mud Potatoes, mixing tasty ingredients like cheese and marshmallows. We covered each step, from baking the potatoes to adding optional flavors. Remember, you can change this recipe by using different cheeses or spices. With careful storage tips, your leftovers will stay fresh. Try these tips to impress friends and family at your next meal. Enjoy exploring new flavors and make this recipe your own. Make eating fun while enjoying each bite of these loaded potatoes!](https://tossedrecipes.com/wp-content/uploads/2025/06/cfa1b49a-c375-494f-86be-52196da54298.webp)
Looking for a fun, hearty dish that’s perfect for any family meal? Let me introduce you to Delicious Mississippi Mud Potatoes! This simple yet crowd-pleasing recipe blends classic flavors with …