Oven Roasted Garlic Cabbage Steaks Flavorful Delight
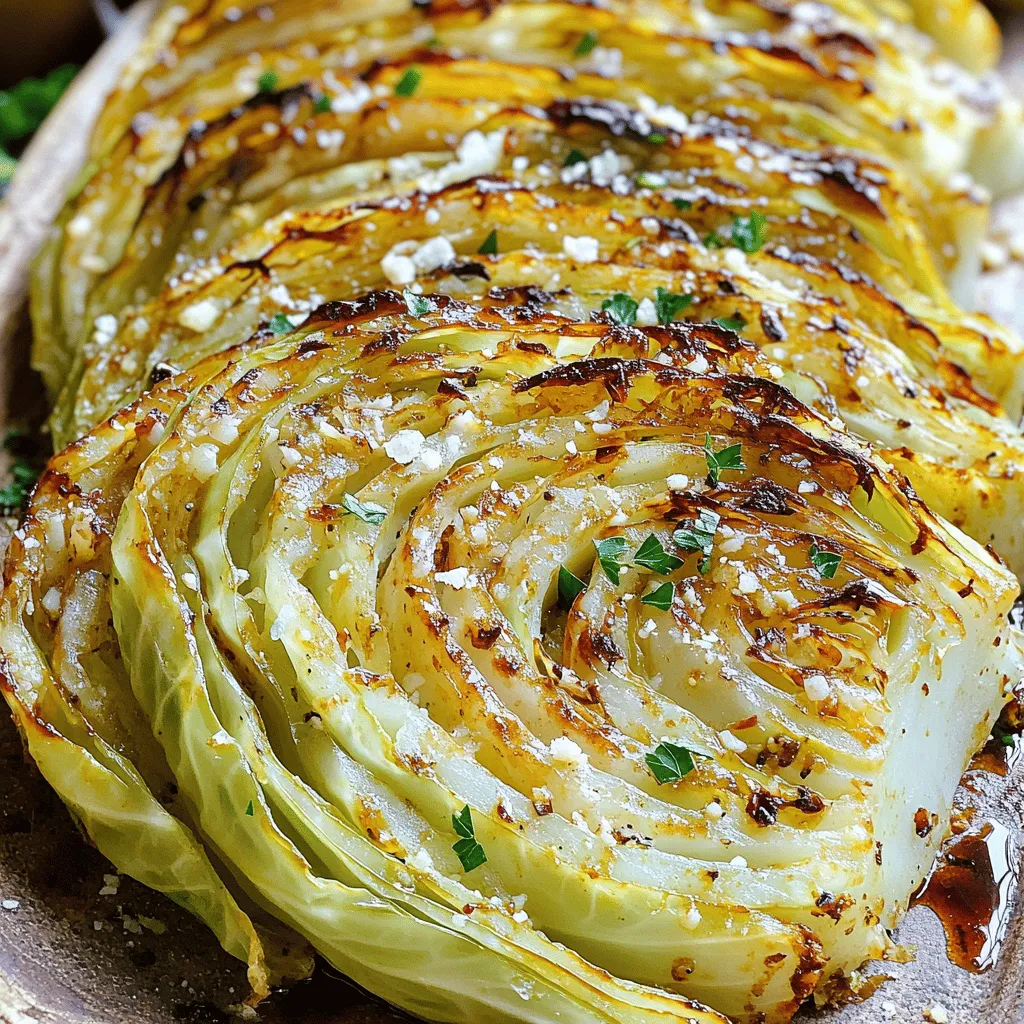
Are you ready to discover a new way to enjoy cabbage? In this blog, I’ll show you how to make Oven Roasted Garlic Cabbage Steaks, a simple yet flavorful dish. …
Are you ready to discover a new way to enjoy cabbage? In this blog, I’ll show you how to make Oven Roasted Garlic Cabbage Steaks, a simple yet flavorful dish. …
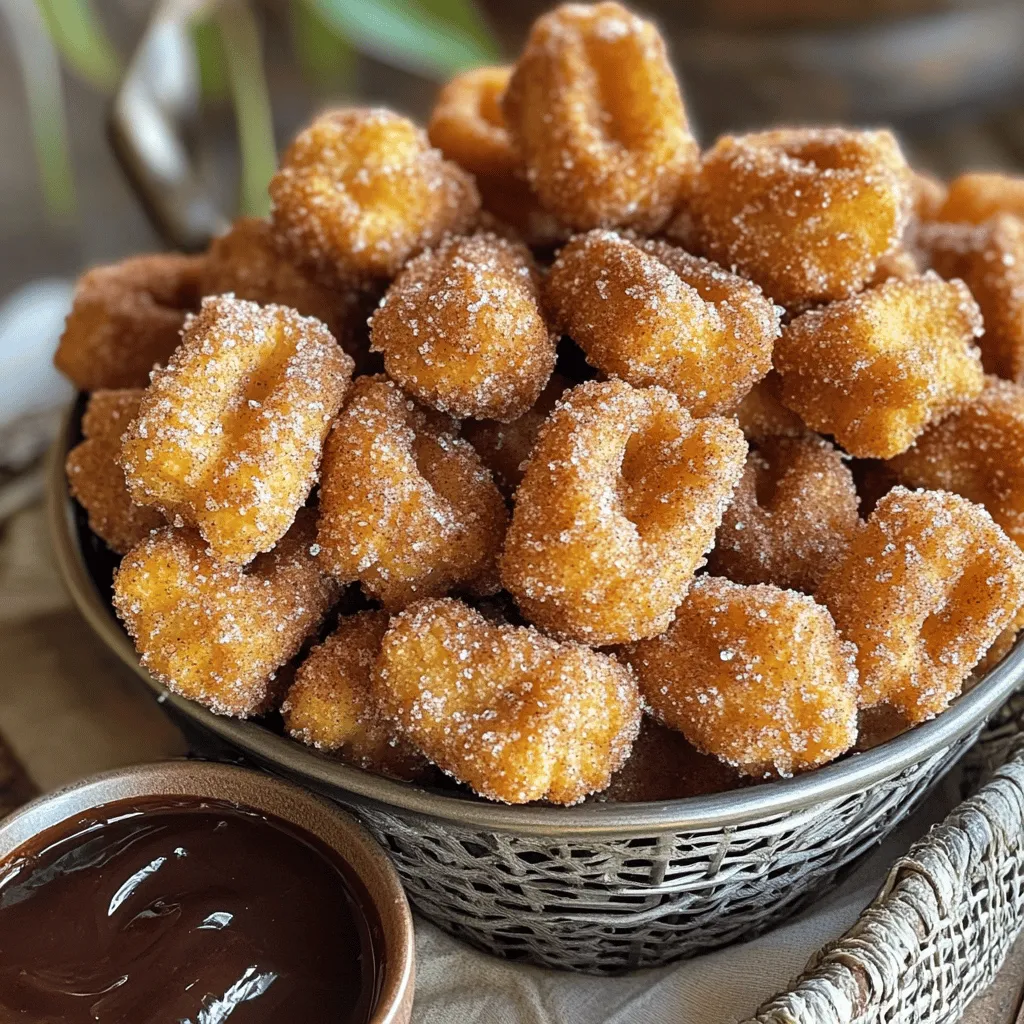
Looking for a delicious snack that’s both easy to make and hard to resist? You’re in the right place! Crispy Air Fryer Churro Bites are perfect for any occasion. With …
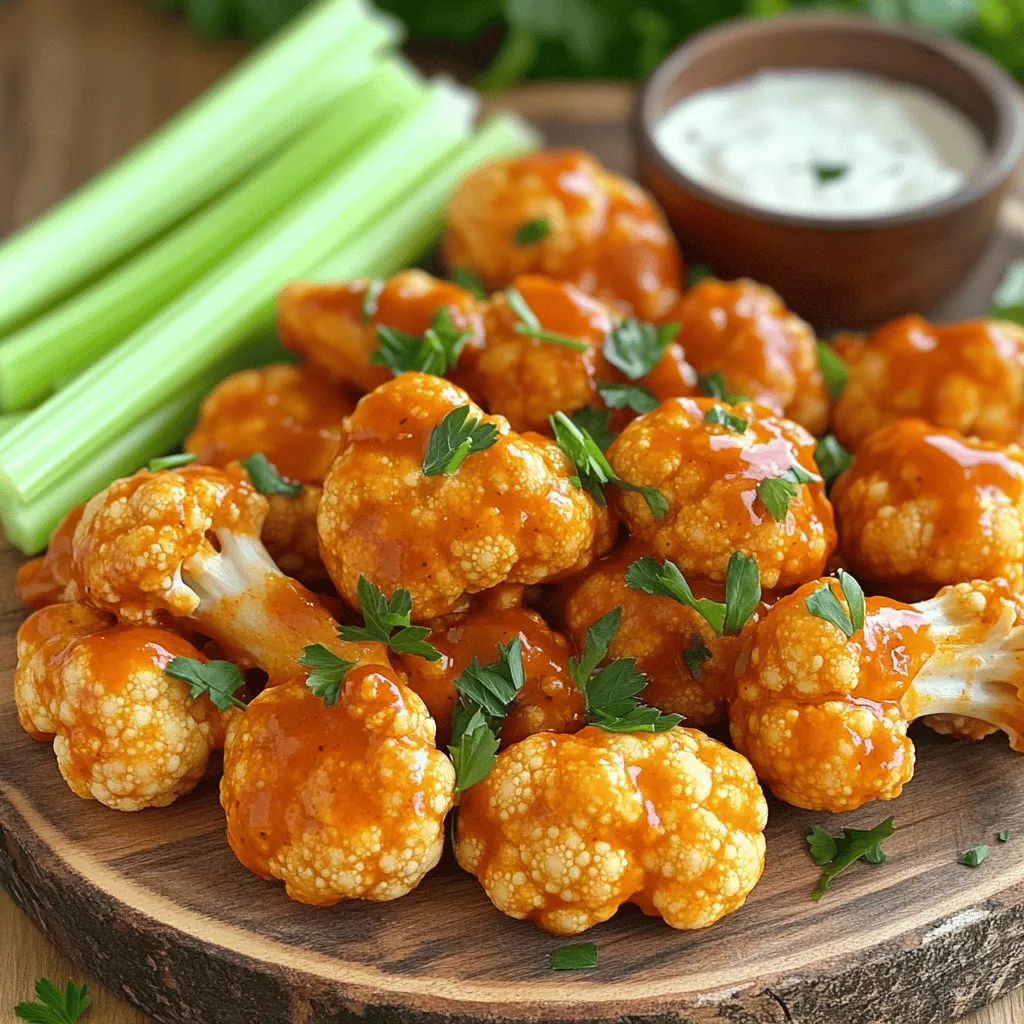
Are you ready for a tasty twist on a classic favorite? Buffalo Cauliflower Wings are not only delicious but also easy to make! In this recipe, I’ll guide you through …
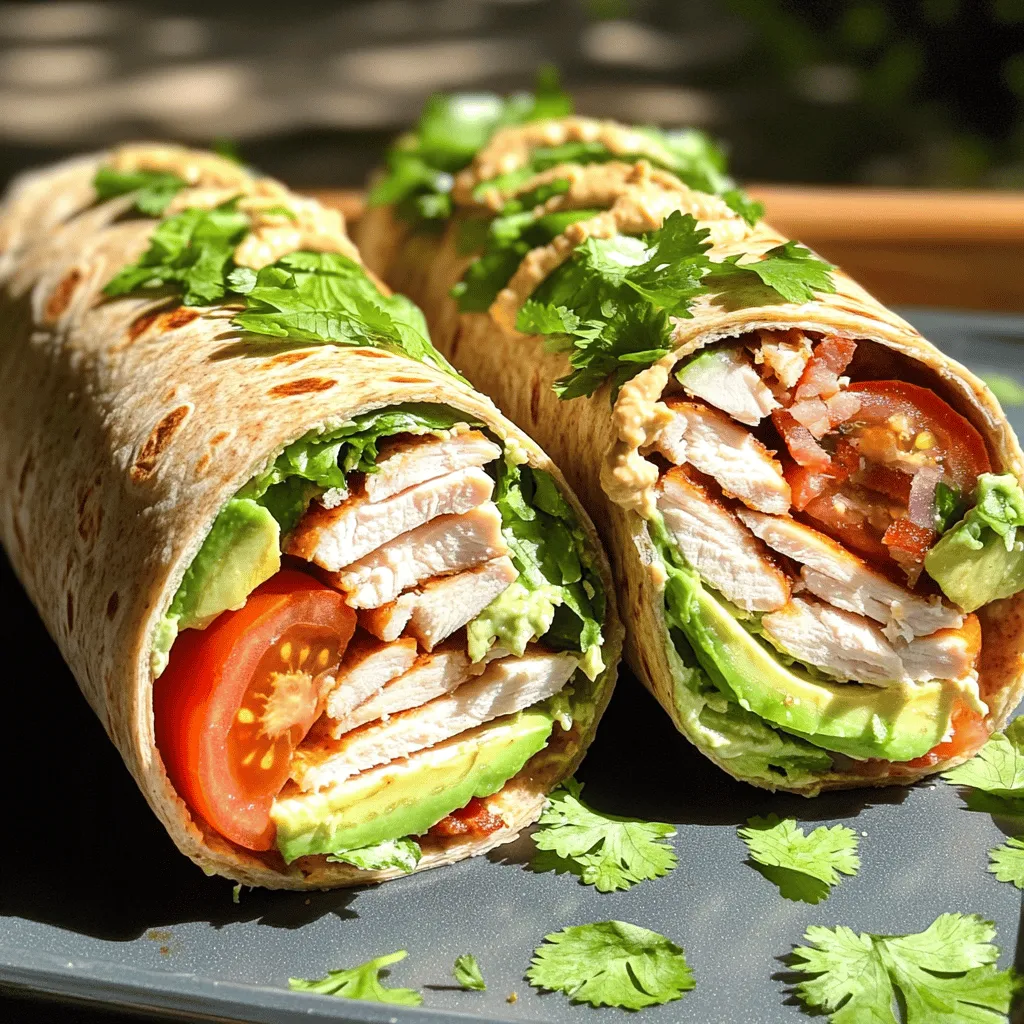
If you’re looking for a quick, tasty meal, California Turkey Club Wraps are a fantastic choice! These wraps combine savory turkey, creamy avocado, and fresh veggies, all wrapped in a …
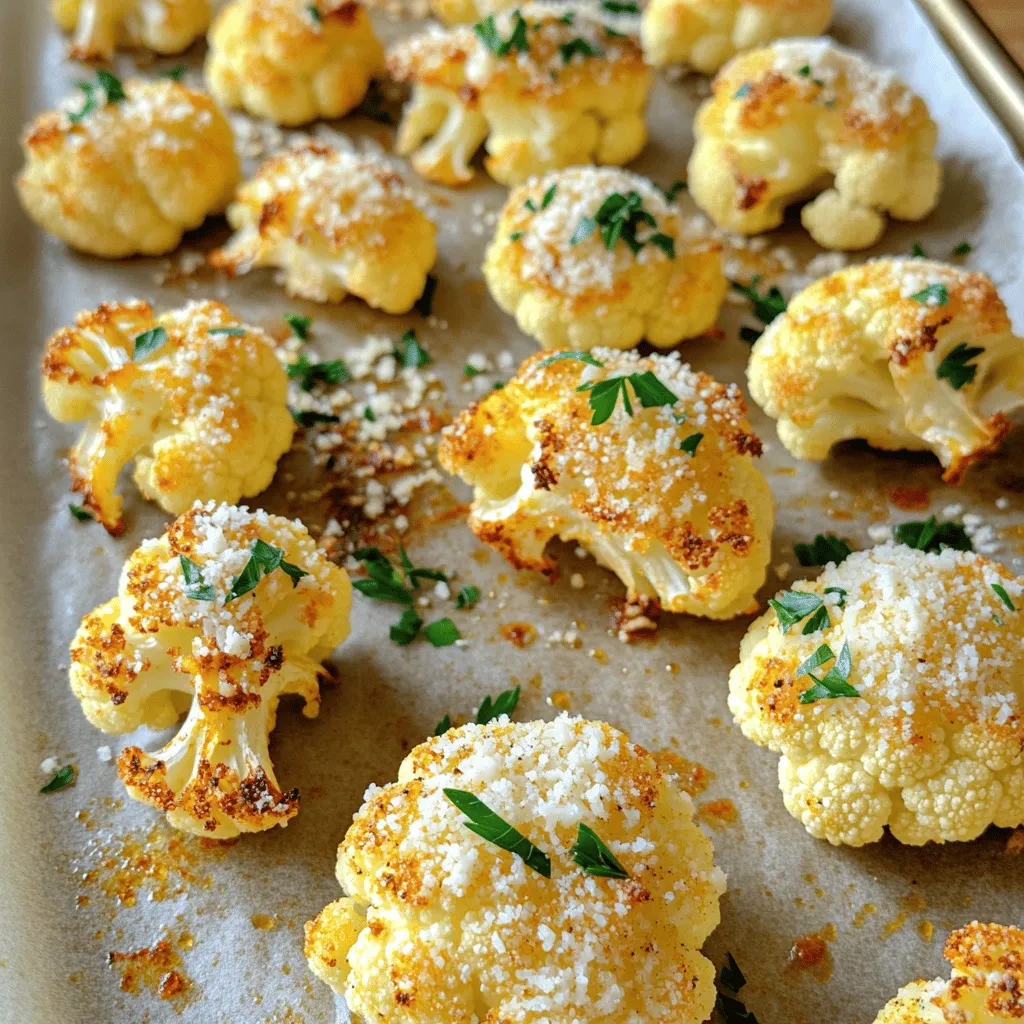
If you’re searching for a tasty and healthy dish, you’ve found it! Crispy Parmesan Roasted Cauliflower is packed with flavor and crunch. With simple ingredients and easy steps, you can …
![To make the best banana pudding cupcakes, you need the following ingredients: - 1 cup ripe bananas (about 2 medium), mashed - 1/3 cup vegetable oil - 1 cup granulated sugar - 2 large eggs - 1 teaspoon vanilla extract - 1 teaspoon baking powder - 1/2 teaspoon baking soda - 1/4 teaspoon salt - 1 1/2 cups all-purpose flour - 1 cup buttermilk (or substitute with milk + 1 tablespoon vinegar) - 1 box (3.4 oz) instant vanilla pudding mix - 1 cup whipped cream (store-bought or homemade) - 1 cup crushed vanilla wafer cookies - Sliced bananas for decoration You can swap some ingredients for different flavors or dietary needs. Here are some options: - Replace vegetable oil with melted coconut oil for a tropical taste. - Use brown sugar instead of granulated sugar for a deeper flavor. - For a dairy-free version, use almond milk in place of buttermilk. - You can use dairy-free whipped cream if you want a vegan option. - Instead of vanilla wafer cookies, try crushed graham crackers for a different crunch. Fresh ingredients are key to making these cupcakes shine. Ripe bananas add natural sweetness and moisture. Fresh eggs improve the texture of your cupcakes. Using fresh baking powder helps the cupcakes rise well. Fresh buttermilk ensures a rich flavor. By using good-quality ingredients, you enhance the taste and texture of your cupcakes. Trust me, fresh ingredients make a big difference! For the full recipe, check out the details above. Start by gathering all your ingredients. This makes the process smooth. You’ll need ripe bananas, oil, sugar, eggs, vanilla, and dry goods like flour and baking powder. Remember, using ripe bananas is key. They add sweetness and flavor. Make sure to mash them well, so they blend easily into the batter. 1. Preheat the Oven: Set your oven to 350°F (175°C). This step is crucial for even baking. 2. Mix Wet Ingredients: In a big bowl, whisk together mashed bananas, vegetable oil, and sugar until smooth. Then, add the eggs and vanilla extract. Mix until combined. 3. Combine Dry Ingredients: In another bowl, mix flour, baking powder, baking soda, and salt. Slowly add the dry mix to the wet mixture. Alternate this with buttermilk. Start and end with the dry mix. Stir gently until just mixed. 4. Bake the Cupcakes: Fill each cupcake liner two-thirds full with batter. Bake for 18-20 minutes. Use a toothpick to check if they’re done. If it comes out clean, they are ready. Let them cool in the pan for 5 minutes, then move to a wire rack. In a medium bowl, follow the package directions for the instant vanilla pudding. Use cold milk to mix. Once it thickens, gently fold in whipped cream. This creates a light and fluffy frosting. Make sure it’s mixed well but still airy. Now, you’re ready to assemble the cupcakes. Cut a small well in the center of each cupcake. Fill with the banana pudding mixture and top with the pudding frosting. Decorate with crushed vanilla wafers and a slice of banana. For the full recipe, check out the detailed steps above. Enjoy your sweet creation! To get fluffy banana pudding cupcakes, you need the right mix of ingredients. Start with ripe bananas. They add natural sweetness and moisture. Use room temperature eggs and buttermilk; this helps the batter blend well. When mixing, do not overmix. Stir until just combined. This keeps the cupcakes light and airy. One big mistake is using bananas that are not ripe enough. They won’t give the best flavor. Also, don’t skip the baking powder. It helps the cupcakes rise. Another error is filling the liners too full. Fill them only two-thirds full; this allows room for rising. Lastly, always wait for the cupcakes to cool completely before frosting. This keeps the frosting from melting away. To highlight the banana flavor, serve the cupcakes with fresh banana slices on top. You can also add a drizzle of caramel sauce for extra sweetness. If you want some crunch, sprinkle more crushed vanilla wafers on top. These simple touches make your cupcakes look pretty and taste even better. For the full recipe, check out the link above. {{image_2}} You can get creative with these cupcakes. Instead of whipped cream, try using cream cheese frosting for a tangy twist. You can also add a drizzle of caramel or chocolate sauce for extra flavor. For a fun crunch, sprinkle chopped nuts on top or use crushed graham crackers instead of vanilla wafers. If you want a fruity kick, add some diced strawberries or blueberries. Each option brings a new taste and texture to the classic banana pudding cupcakes. Making these cupcakes gluten-free is simple. Just swap all-purpose flour for a gluten-free baking mix. For a vegan version, replace eggs with flaxseed meal mixed with water. Use a plant-based milk like almond or oat milk instead of buttermilk. Lastly, choose a vegan whipped topping to complete your frosting. These swaps keep the cupcake delicious while catering to different diets. Banana pudding cupcakes stand out among other flavors. They offer a unique blend of sweetness and creaminess. While chocolate cupcakes are rich and indulgent, and vanilla cupcakes are classic, banana pudding cupcakes combine rich banana flavor with a light, fluffy texture. They can feel more refreshing compared to heavier options. If you want a twist on the traditional cupcake, these are the way to go. They are perfect for parties or as a sweet treat anytime. For the complete recipe, check out the [Full Recipe]. To keep your banana pudding cupcakes fresh, store them in an airtight container. This step locks in moisture and flavor. If you plan to eat them soon, just place them on your kitchen counter. Make sure they are completely cool before you store them. If you leave them warm, they might get soggy. When stored properly, banana pudding cupcakes last about three days at room temperature. If you want them to stay fresh longer, move them to the fridge. In the fridge, they can last up to a week. Just remember that cold air can dry them out, so always seal them well. If you want to save your cupcakes for later, they freeze well. To freeze, first, let them cool completely. Wrap each cupcake in plastic wrap, then place them in a freezer-safe bag. They will stay good for about three months in the freezer. When you're ready to eat them, thaw them overnight in the fridge. After thawing, frost them with the banana pudding mixture for the best taste. For the full recipe, check out the section above! To make banana pudding cupcakes from scratch, follow these key steps. First, gather your ingredients. You’ll need ripe bananas, sugar, eggs, and flour. Start by mixing the wet ingredients. Combine mashed bananas, oil, and sugar in a bowl. Add eggs and vanilla, then mix well. Next, mix the dry ingredients in another bowl. Combine flour, baking powder, baking soda, and salt. Slowly add this to the wet mix, alternating with buttermilk. Once mixed, fill cupcake liners and bake at 350°F for 18-20 minutes. Let them cool before frosting with banana pudding. For the full recipe, check out the detailed instructions. Yes, you can and should use ripe bananas for this recipe. Ripe bananas provide natural sweetness and moisture. They are easier to mash and blend into the batter. As bananas ripen, their starches turn into sugars, enhancing flavor. This makes your cupcakes extra delicious. Look for bananas with brown spots on the skin. They are perfect for baking. The best way to frost banana pudding cupcakes is to use a piping bag. First, prepare your frosting by mixing instant vanilla pudding with whipped cream. This creates a light and fluffy frosting. Once your cupcakes are cool, cut out a small well in the center of each. Fill each well with banana pudding. Then, using the piping bag, frost the top generously. You can add crushed vanilla wafers and a banana slice as a nice touch. This adds flavor and makes your cupcakes look great! In this blog post, we explored banana pudding cupcakes, from essential ingredients to storage tips. I shared ingredient lists, substitutions, and the significance of freshness. You learned how to prep, bake, and frost these treats. We also discussed helpful tips to ensure fluffy cupcakes and common mistakes to avoid. Remember, experimenting with toppings can lead to new favorites. Proper storage keeps your cupcakes fresh and tasty. Embrace these tips, and create delightful banana pudding cupcakes that everyone will enjoy!](https://tossedrecipes.com/wp-content/uploads/2025/05/5017b9bf-4f7d-4f64-a032-83e36481e17f.webp)
Get ready to elevate your dessert game with the best banana pudding cupcakes! With their moist texture and creamy frosting, these treats are a flavor explosion you won’t want to …
![- 4 medium-sized potatoes, boiled and mashed - 1 cup finely chopped spinach - 1 cup grated cheese (cheddar or your choice) - 1/2 cup finely chopped onions - 2 cloves garlic, minced - 1 teaspoon paprika - 1/2 teaspoon black pepper - Salt to taste - 1/2 cup breadcrumbs (for coating) - 1/4 cup all-purpose flour (for dusting) - Oil for frying To make stuffed potato cakes, you need precise amounts. Here’s a guide: - Potatoes: 4 medium-sized will yield a good amount of cake. - Spinach: 1 cup adds color and nutrients. Adjust more or less based on your taste. - Cheese: Choose 1 cup of your favorite cheese for a creamy texture. - Onions: 1/2 cup gives a nice bite. You can use less if you prefer. - Garlic: 2 cloves add strong flavor; feel free to reduce. - Paprika and black pepper: Just a teaspoon and half a teaspoon bring warmth. - Salt: Add to taste, but start with 1/2 teaspoon. - Breadcrumbs: 1/2 cup is enough for a crispy outside. - Flour: Use 1/4 cup to dust the cakes, helping them hold together. - Oil: Enough for frying, about 1/2 inch deep in the pan. You can swap ingredients if needed. Here are some ideas: - Potatoes: Sweet potatoes work well for a different taste. - Spinach: Kale or Swiss chard can replace spinach. - Cheese: Try feta or mozzarella for a twist. - Onions: Green onions or leeks can add a milder flavor. - Garlic: Garlic powder can substitute fresh garlic if necessary. - Breadcrumbs: Use crushed cornflakes for a gluten-free option. - Flour: Almond or coconut flour can be great for gluten-free diets. For the full recipe, check out the [Full Recipe]. To start, gather your ingredients. You need fresh potatoes, spinach, cheese, onions, garlic, and spices. First, boil the potatoes until they are soft. This usually takes about 15 minutes. After boiling, mash them in a large bowl. Next, add the chopped spinach, grated cheese, onions, garlic, paprika, black pepper, and salt. Mix everything well with a fork or your hands until it is even. Now it's time to shape the potato mixture. Divide it into 8 to 10 equal parts. Roll each part into a patty shape. This makes them easy to fry later. To help them stick together, dust each patty lightly with all-purpose flour. Finally, roll them in breadcrumbs for a crispy finish. Next, heat oil in a frying pan over medium heat. You want enough oil to cover the bottom of the pan. Once the oil is hot, carefully place the potato cakes in the pan. Fry them for about 4 to 5 minutes on each side. They should turn a nice golden brown color. Make sure not to crowd the pan. This helps them cook evenly. When they are done, place them on a paper towel to drain any extra oil. For serving, arrange the potato cakes on a nice platter. You can add a side of tangy yogurt or sour cream for dipping. This adds a creamy contrast to the crispy cakes. To make your dish pop, sprinkle some fresh herbs like cilantro or parsley on top. This gives it a lovely color and fresh taste. Enjoy your delicious stuffed potato cakes! For the full recipe, check out the details above. To make great stuffed potato cakes, avoid a few common mistakes. - Use starchy potatoes, like russets. They give a fluffy texture. - Don’t over-mash the potatoes. A few lumps add character. - Make sure the filling is not too wet. This keeps the cakes from falling apart. - Let the patties chill for 10 minutes before frying. This helps them hold their shape. When it comes to frying, you have two main options: pan-frying and deep-frying. - Pan-frying: Use a non-stick skillet with enough oil to cover the bottom. This method gives a nice, crispy edge while using less oil. - Deep-frying: Heat oil in a deep pot. This method cooks the cakes evenly and gives a great crunch. However, it requires more oil and careful monitoring. You can easily amp up the flavor of your potato cakes. - Add fresh herbs like chives or dill for a bright taste. - Mix in spices like cumin or chili powder for a kick. - Try incorporating cooked bacon or sausage for a meaty twist. - A splash of lemon juice can add freshness. For the full recipe on making these delightful stuffed potato cakes, check out the Full Recipe. {{image_2}} You can get creative with your stuffed potato cakes! Try adding different fillings. Here are some ideas: - Meats: Cooked bacon, sausage, or chicken can add a nice kick. - Vegetables: Diced bell peppers, mushrooms, or zucchini work great. - Spices: Experiment with cumin, chili powder, or fresh herbs for a new taste. Mix and match these options to find your favorite flavors. The sky’s the limit! You can make stuffed potato cakes to fit special diets. For a vegetarian version, skip the meat and add more veggies. Use plant-based cheese for a vegan take. If you need gluten-free options, replace breadcrumbs with ground oats or gluten-free breadcrumbs. Always read labels carefully to ensure they fit your needs. Seasonal vegetables can change the game for your potato cakes. In spring, use fresh peas or asparagus. Summer brings zucchini and corn, while fall is perfect for squash or pumpkin. In winter, try root vegetables like carrots or parsnips. Using what’s in season makes your cakes more flavorful and fresh. For the full recipe, you can refer back to the earlier section. Enjoy experimenting with these variations! To keep your stuffed potato cakes fresh, let them cool first. Place them in an airtight container. You can refrigerate them for up to three days. For longer storage, freeze them in a single layer. Once frozen, move them to a freezer bag. This helps save space and keeps them from sticking together. To enjoy crispy potato cakes again, reheat them in a skillet. Use medium heat and add a little oil. Cook for about three to five minutes on each side. This method keeps the outside crispy. You can also bake them at 375°F for about 10-15 minutes. This option works well if you prefer a healthier approach. Stuffed potato cakes last for about three days in the fridge. In the freezer, they can stay good for up to three months. Just remember to label your containers. This way, you can keep track of what you have and when you made it. Enjoy your delicious potato cakes later, just like they were fresh! For the full recipe, check out the details above. You need about 15 minutes to prep. Cooking takes around 15 minutes. So, total time is 30 minutes. You can enjoy stuffed potato cakes in no time! Yes, you can bake them for a healthier option. Preheat your oven to 400°F (200°C). Lightly coat the cakes with oil and place them on a baking sheet. Bake for about 20-25 minutes, flipping halfway. This method still gives you a tasty treat with less oil! Serve your stuffed potato cakes on a platter. Pair them with tangy yogurt or sour cream for dipping. You can also add a side of fresh salad for a nice crunch. Garnish with herbs like cilantro or parsley for a pop of color. Check out the Full Recipe for more ideas! This blog post covered everything you need to know about making stuffed potato cakes. You learned about the key ingredients, measurements, and possible substitutes for any diet. The step-by-step instructions guide you through preparation and cooking. Plus, the tips and variations help you create different flavors. Lastly, we discussed storing leftovers and reheating for the best texture. Enjoy your cooking adventure and have fun experimenting with these tasty dishes!](https://tossedrecipes.com/wp-content/uploads/2025/05/e468ec84-6ae1-4e84-9fed-f7a4b5463452.webp)
Craving a simple and tasty meal? Let’s dive into the world of stuffed potato cakes! This delightful recipe combines creamy potatoes, fresh spinach, and gooey cheese into a crispy treat. …
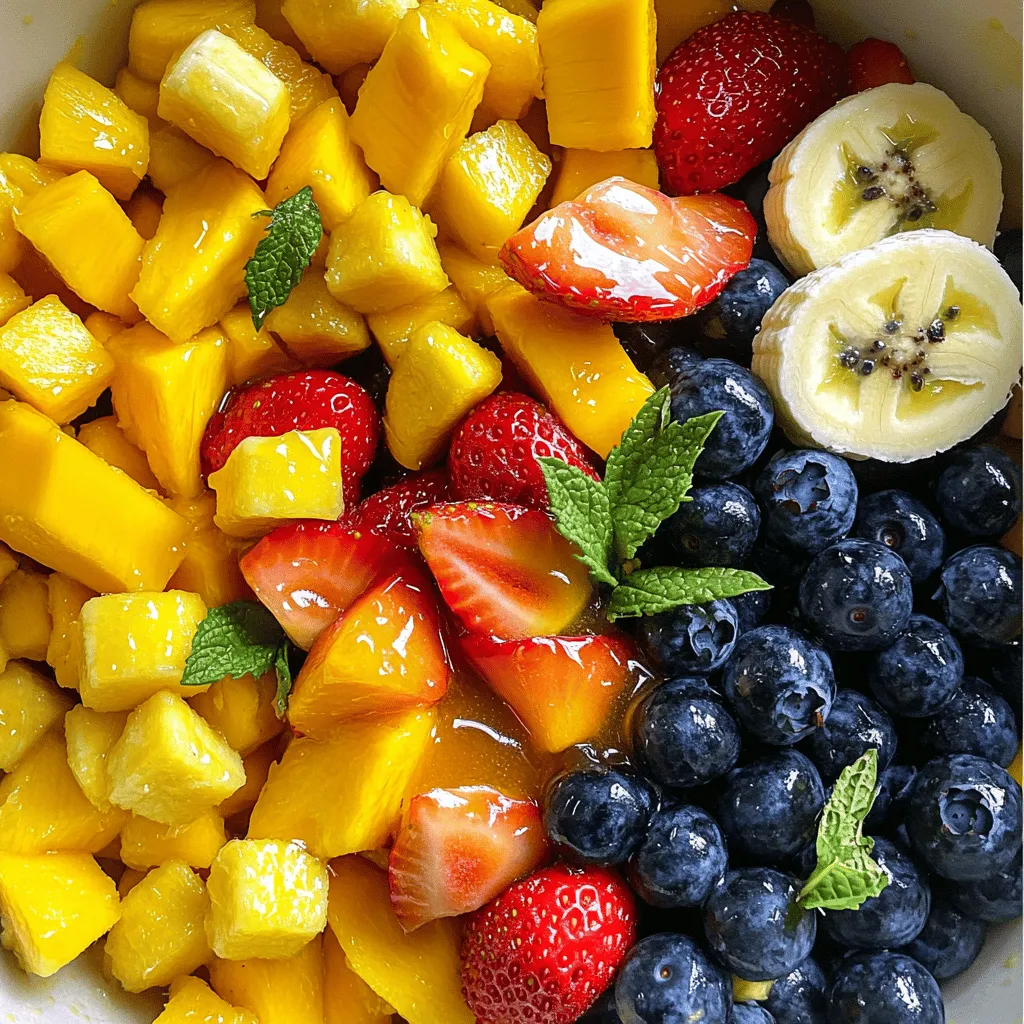
Welcome to my kitchen! Today, we’re diving into a bright and refreshing treat: Fruit Salad with Honey Lime Dressing. This recipe is perfect for hot days or a light snack. …
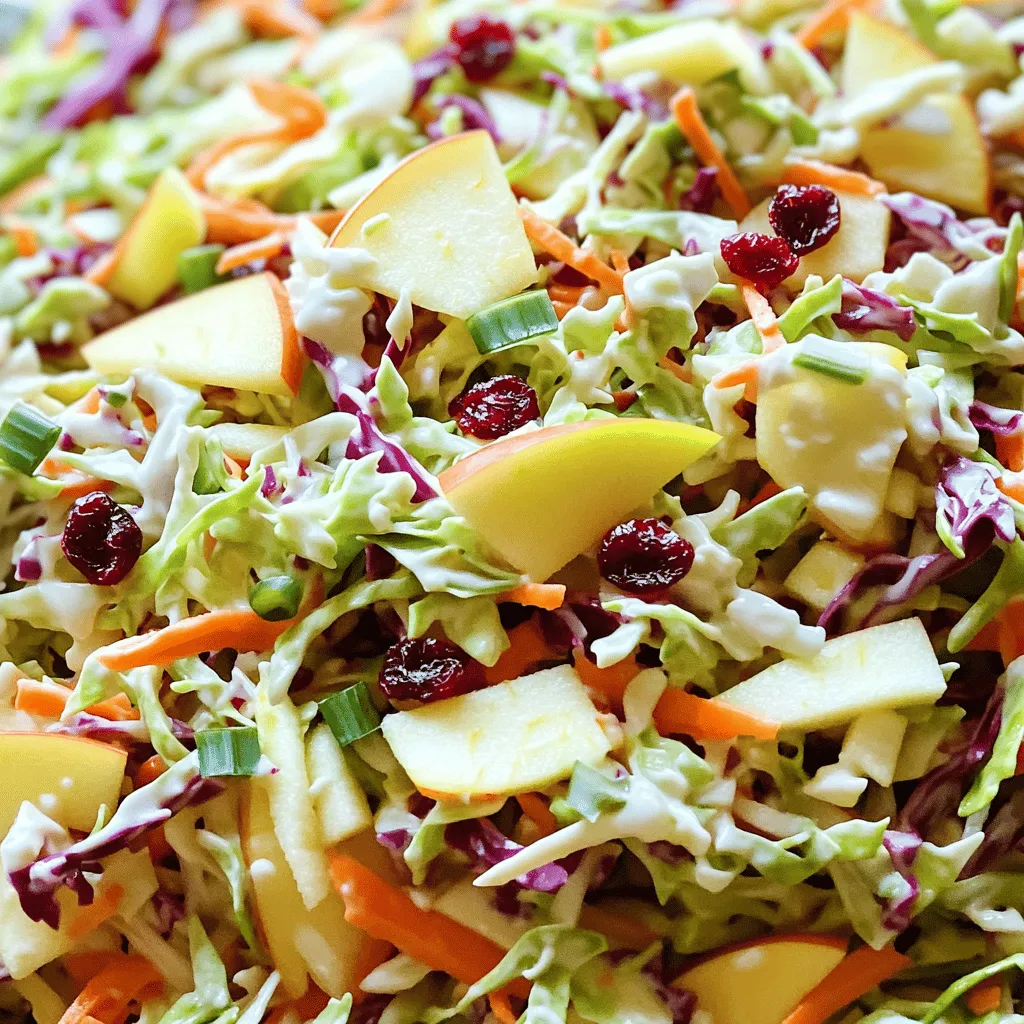
Are you ready to add a splash of color and crunch to your meals? This Cranberry Apple Coleslaw is not just a salad; it’s a delicious blend of fresh ingredients …
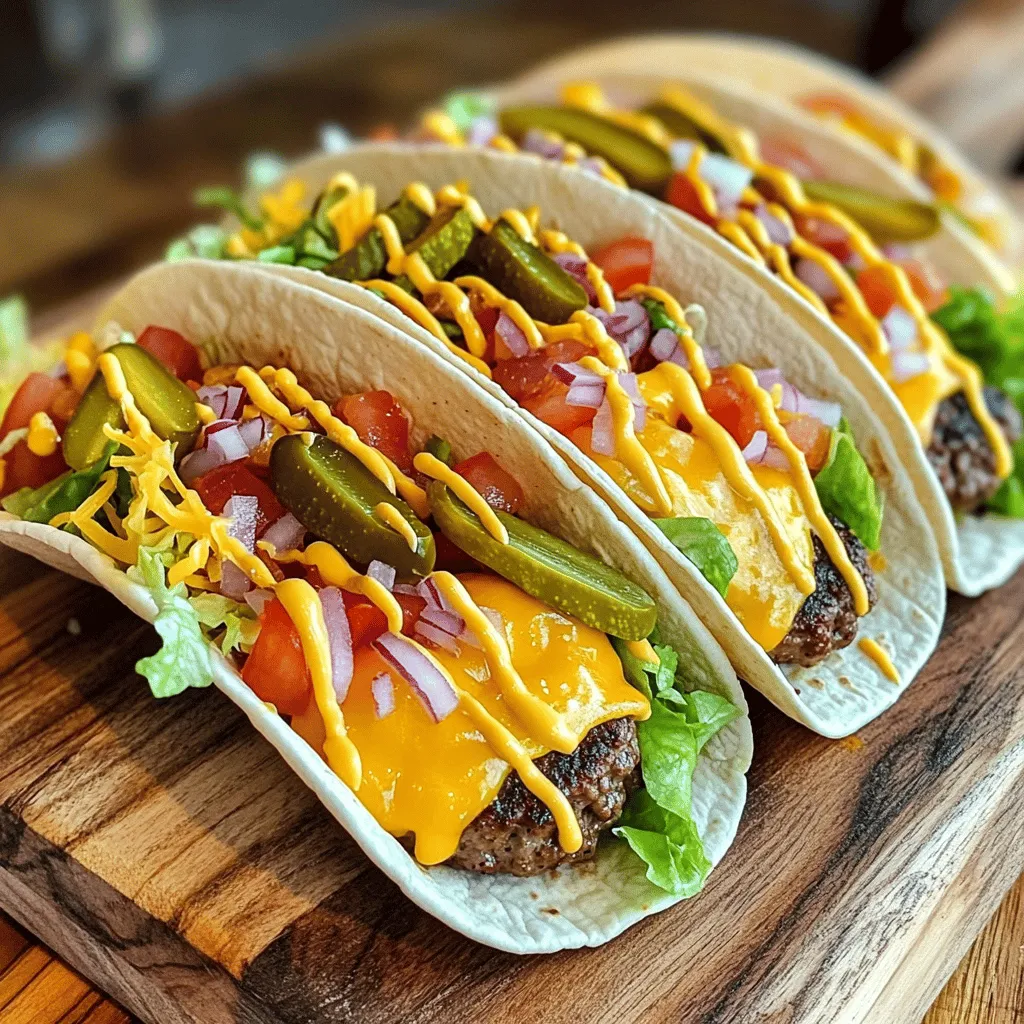
If you crave a fun twist on taco night, let’s dive into Smash Burger Tacos! These tasty treats combine the juicy goodness of smash burgers with the hand-held delight of …