Skip to content
Tossed Recipes
  • Home
  • Appetizers
  • Desserts
  • Salads
  • Breakfast
  • Dinner
  • Privacy Policy
  • Contact
  • About

Chef Jamie

Meal Prep Teriyaki Chicken Bowls Savory and Simple

January 5, 2026May 7, 2025 by Chef Jamie
- 2 lbs chicken breast, cut into bite-sized pieces - 1 cup teriyaki sauce (store-bought or homemade) - 4 cups broccoli florets - 2 cups brown rice (uncooked) - 1 red bell pepper, sliced - 2 carrots, julienned - 2 tablespoons olive oil - Salt and pepper to taste - 1 tablespoon sesame seeds (for garnish) - 2 green onions, sliced (for garnish) You need these ingredients to make the teriyaki chicken bowls. The chicken gives a great base, while the teriyaki sauce adds sweet and savory flavors. The veggies add color and crunch. Don’t skip the garnishes; they make the dish look nice and taste better. - Homemade teriyaki sauce - Different vegetables - Proteins You can use homemade teriyaki sauce for a fresh taste. Feel free to switch up the veggies, too. Try snap peas or bell peppers for variety. If you want more protein, you can add tofu or shrimp. This flexibility helps you make the recipe your own. {{ingredient_image_1}} - Start by rinsing the brown rice under cold water. This helps remove excess starch. - Combine the rice with 4 cups of water and a pinch of salt in a pot. - Bring the water to a boil, then reduce the heat to a simmer. - Cover and cook for about 40-45 minutes until the rice is tender. - Fluff the rice with a fork and set it aside. - Heat olive oil in a large skillet over medium-high heat. - Once the oil is hot, add the diced chicken pieces. - Season the chicken with salt and pepper for flavor. - Sauté the chicken until browned and fully cooked, about 7-10 minutes. - Pour the teriyaki sauce over the cooked chicken in the skillet. - Stir to coat all the chicken pieces evenly. - Cook for an additional 2-3 minutes to thicken the sauce slightly. - Choose vegetables like broccoli, red bell pepper, and carrots. - Sauté the vegetables over medium heat for about 5-7 minutes. - Cook until they are bright and slightly tender but still crisp. - Grab meal prep containers or bowls for assembly. - Start by portioning out the cooked brown rice evenly. - Top the rice with teriyaki chicken and the sautéed vegetables. - Finish by sprinkling sesame seeds on each bowl for crunch. - Add sliced green onions for a burst of flavor and color. - Cooling and storing techniques: After cooking, let your bowls cool down completely. This prevents moisture buildup, which can make your meal soggy. Once cool, seal the containers tightly. Store in the fridge for up to five days for best freshness. - Choosing the right containers: Use clear, BPA-free containers. Glass or high-quality plastic are great choices. They help you see your meals easily and keep flavors locked in. - Suggestions for additional seasonings: Try adding garlic powder or ginger for extra flavor. A splash of lime juice can brighten up the dish. If you like heat, sprinkle in some red pepper flakes. - Pairing options with sauces: Teriyaki sauce is great, but don’t stop there! You can mix in a bit of sweet chili sauce or soy sauce for a different twist. - Time-saving tips: Cook your rice in a big batch. This saves time for future meals. You can also chop veggies ahead of time and store them in the fridge. - Prepping ingredients in advance: Marinate the chicken a day before for deeper flavor. Prepare all your ingredients on your day off. This makes cooking quick and easy during the week. Pro Tips Marinate for More Flavor: For even juicier and more flavorful chicken, marinate the chicken pieces in teriyaki sauce for at least 30 minutes before cooking. Quick Vegetable Prep: To save time, use pre-cut vegetables or frozen stir-fry mixes. They are just as nutritious and can be cooked quickly. Storage Tips: Use airtight containers to store the meal prep bowls; this will keep your food fresh longer in the refrigerator. Reheating Instructions: When reheating, add a splash of water to the bowl and cover it to maintain moisture and prevent the chicken from drying out. {{image_2}} You can swap chicken for other proteins. Try beef, pork, or shrimp. Use tofu for a vegetarian option. Tempeh is another great choice for plant-based meals. Each protein brings its own flavor, so feel free to experiment. Switch brown rice for quinoa or cauliflower rice. Quinoa adds a nutty taste and is high in protein. Cauliflower rice is a low-carb alternative. Both options fit into gluten-free diets. They also add variety to your meal prep. Seasonal vegetables can brighten your bowls. In spring, use asparagus or snap peas. Summer brings zucchini and bell peppers. Fall is perfect for roasted sweet potatoes or Brussels sprouts. Mix and match for unique flavors and colors. This way, you keep meals fresh and fun! To keep your teriyaki chicken bowls fresh, store them in airtight containers. Let them cool completely before sealing. This helps prevent moisture buildup. You can store them in the fridge for up to five days. After that, the chicken may lose flavor and texture. When it’s time to eat, reheat your bowls in the microwave. Cover them with a damp paper towel to keep moisture in. Microwave on medium power in one-minute bursts. Stir in between to ensure even heat. This method helps preserve the chicken's juiciness and keeps the veggies crisp. Yes, you can freeze teriyaki chicken bowls! Just make sure to use freezer-safe containers. Portion them out before freezing for easy meals later. To thaw, place the bowl in the fridge overnight. Reheat it in the microwave, following the previous reheating tips. This way, you can enjoy your meal prep even weeks later! Meal prep teriyaki chicken bowls can stay fresh in the fridge for up to 5 days. Make sure to store them in airtight containers. If you want to keep them longer, you can freeze them. In the freezer, they will last about 2 to 3 months. Just remember to thaw them in the fridge before reheating. Yes, you can easily make teriyaki chicken bowls dairy-free. Most teriyaki sauces do not contain dairy. Make sure to check the labels if you buy it. For a homemade sauce, use soy sauce, honey, and ginger. You can also skip any dairy-based garnishes, like cream or cheese. You can use either store-bought or homemade teriyaki sauce for this recipe. Store-bought sauces save time and are usually tasty. If you prefer making your own, mix soy sauce, sugar, and cornstarch. Both options work well, so choose what you like best. To keep your vegetables crisp, sauté them just until they are tender, not mushy. Make sure they cool before sealing the containers. When reheating, use a microwave-safe dish and heat them just enough. This way, your veggies stay vibrant and full of flavor. In summary, you can easily create delicious teriyaki chicken bowls at home. You need chicken, teriyaki sauce, veggies, and rice for a simple meal. Optional ingredients can enhance flavors and offer variety. These bowls are quick to prepare and perfect for meal prep. Use the tips for storing and reheating to enjoy your dish later. With these guidelines, you can confidently explore different flavors and ingredients to suit your taste. Enjoy the journey of making tasty meals that fit your lifestyle!

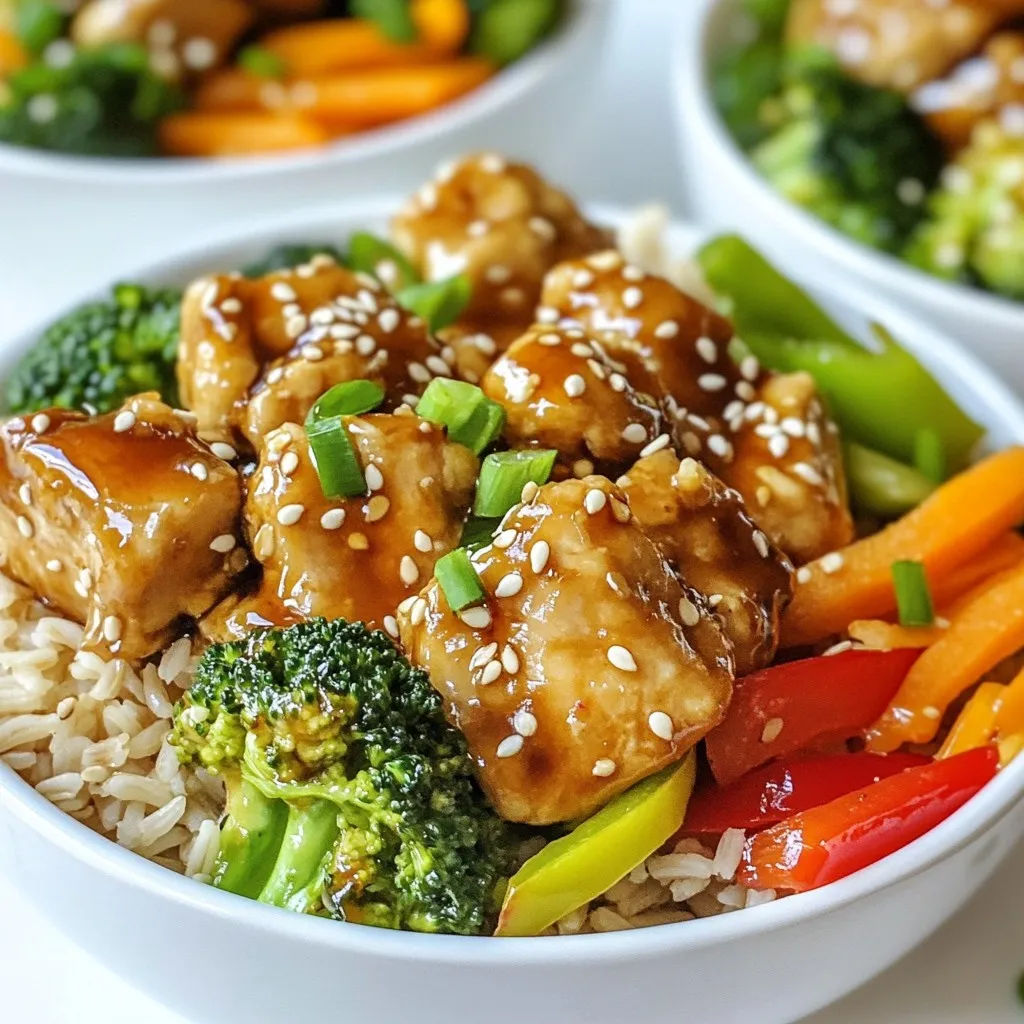
Looking for an easy, tasty meal prep idea? Meal Prep Teriyaki Chicken Bowls are perfect for you! This dish is packed with flavor and nutrients, making it great for lunch …

Read more

Categories Dinner

Spinach Artichoke Chicken Bake Simple and Tasty Meal

January 4, 2026May 4, 2025 by Chef Jamie
To make Spinach Artichoke Chicken Bake, you'll need these key items: - 4 boneless, skinless chicken breasts - 1 cup frozen spinach, thawed and drained - 1 cup canned artichoke hearts, drained and roughly chopped - 1 cup cream cheese, softened - 1/2 cup sour cream - 1 cup mozzarella cheese, shredded - 1/2 cup grated Parmesan cheese - 2 cloves garlic, minced - 1 teaspoon onion powder - Salt and pepper to taste - 1 tablespoon olive oil - Fresh parsley, chopped (for garnish) These ingredients come together to create a creamy and flavorful dish that is sure to please. You can make this dish even better with some optional add-ins. Consider adding: - Chopped sun-dried tomatoes for a touch of sweetness - Sliced black olives for a salty kick - Cooked and crumbled bacon for added richness - Fresh herbs like basil or thyme for extra flavor These additions can enhance the taste and make the meal more unique. When it comes to spinach, you can choose between fresh and frozen. Frozen spinach is convenient and saves time. It’s already chopped and ready to use. Just remember to thaw and drain it well. Fresh spinach works too. You can sauté it quickly before adding it to the mix. Both options will give you a tasty dish, so pick what suits you best. {{ingredient_image_1}} Start by preheating your oven to 375°F (190°C). This step is key for even cooking. While the oven heats, grease a baking dish with olive oil. This helps prevent sticking and adds flavor. In a large bowl, mix the softened cream cheese, sour cream, mozzarella cheese, Parmesan cheese, minced garlic, onion powder, and a pinch of salt and pepper. Stir until smooth and creamy. Next, fold in the drained spinach and chopped artichokes. Make sure they blend well with the cheese mix. Now, it's time to prepare the chicken. Place the chicken breasts side by side in the greased baking dish. Sprinkle salt and pepper on both sides of the chicken. This adds taste and helps the chicken cook well. Spread the spinach and artichoke mixture evenly on top of the chicken. Cover the baking dish with aluminum foil to keep moisture in. Bake it in the preheated oven for 25 to 30 minutes. This keeps the chicken juicy. After 25 minutes, take off the foil. Continue to bake for another 10 to 15 minutes. You want the chicken to reach an internal temperature of 165°F (74°C). This ensures it’s safe to eat. Look for a bubbly and golden brown top. Once done, let it cool for a few minutes. Garnish with fresh chopped parsley for a pop of color. To make this dish shine, start with quality chicken. Use fresh, boneless and skinless chicken breasts. This keeps the meat juicy. I recommend thawing the spinach well. Drain it thoroughly to avoid excess moisture. A creamy texture is key, so mix the cheeses well. Blend until smooth for the best results. One common mistake is not seasoning well. Don’t forget to add salt and pepper to the chicken. Another error is overbaking the dish. Keep an eye on the time. Use a meat thermometer to check for doneness. You want an internal temperature of 165°F. Lastly, avoid overloading the dish with too much spinach. Balance is crucial for flavor. To elevate this dish, consider adding a splash of lemon juice for brightness. Fresh herbs like thyme or basil can add depth. For a kick, red pepper flakes work wonders. You can also mix in some grated cheese on top before baking for a golden crust. Don't shy away from experimenting with these additions to find your perfect flavor! Pro Tips Choose Fresh Ingredients: Whenever possible, opt for fresh spinach and artichokes instead of frozen or canned for a more vibrant flavor and texture. Customize Your Cheese: Feel free to experiment with different cheese blends, such as adding creamier goat cheese or tangy feta for a unique twist. Don’t Overcook the Chicken: Ensure the chicken reaches an internal temperature of 165°F (74°C) to keep it juicy and tender; use a meat thermometer for accuracy. Make Ahead and Freeze: Prepare the dish ahead of time and freeze before baking. Simply thaw and bake when you're ready for a quick meal. {{image_2}} You can make this dish meat-free. Simply swap chicken with hearty vegetables. Try using zucchini, eggplant, or mushrooms. These veggies can soak up the creamy sauce. Just ensure to bake them until tender. This way, you keep all the rich flavors. If you want to change the sauce, pick different cheeses. You can use ricotta for a lighter texture. Creamy goat cheese adds a tangy flavor. For a dairy-free option, try cashew cream. Blend soaked cashews with water for smoothness. Each choice will give you a unique taste. For a kick, add some heat! Mix in red pepper flakes or diced jalapeños. You can also use spicy cheese like pepper jack. These spices will spice up the whole dish. Adjust the heat to your taste for the perfect balance. After cooking, let the Spinach Artichoke Chicken Bake cool. Place leftovers in an airtight container. Store them in the fridge for up to three days. Make sure to keep the dish sealed well. This helps prevent it from drying out or taking on other smells. If you want to save some for later, you can freeze it. Cut the chicken bake into portions. Wrap each piece tightly in plastic wrap. Then place them in a freezer-safe bag or container. You can freeze it for up to three months. Label the container with the date. This way, you know when you made it. To reheat, take a portion from the fridge or freezer. If frozen, let it thaw overnight in the fridge first. Preheat your oven to 350°F (175°C). Place the chicken bake in an oven-safe dish. Cover it with foil to keep it moist. Heat for about 20-25 minutes. If it was frozen, it may take a bit longer. Make sure it reaches an internal temperature of 165°F (74°C). Enjoy your tasty meal again! It takes about 25 to 30 minutes to bake chicken breasts at 375°F (190°C). This time helps the chicken cook evenly. After that, remove the foil and bake for an extra 10 to 15 minutes. Look for the chicken to reach an internal temperature of 165°F (74°C). This ensures it is safe to eat. Yes, you can use fresh spinach! Fresh spinach gives a nice texture. If you choose fresh, use about two cups. Wash and chop the fresh spinach before adding it to the mix. Sauté the spinach briefly to remove excess water. This step helps keep the dish from getting soggy. This chicken bake pairs well with many sides. Here are some tasty options: - Garlic bread - A fresh green salad - Steamed broccoli - Rice or quinoa - Roasted vegetables These sides add flavor and balance to the meal. Enjoy your cooking! You learned about the main ingredients for a tasty Spinach Artichoke Chicken Bake. We discussed options for fresh and frozen items, and how to add more flavor. The step-by-step guide made baking easy, and I shared tips to avoid mistakes. You can also try fun variations, like vegetarian options or creamy sauces. Finally, we covered storage tips to keep your dish fresh. Use these insights to create a dish your family will love. Enjoy cooking!

Are you ready to enjoy a simple and tasty meal? Spinach Artichoke Chicken Bake combines creamy flavors with juicy chicken for a dish everyone will love. In this post, I’ll …

Read more

Categories Dinner

Crockpot Coconut Lime Chicken Easy Family Meal Delight

January 5, 2026April 25, 2025 by Chef Jamie
- 4 boneless, skinless chicken breasts - 1 can (14 oz) coconut milk - Juice of 2 limes - Zest of 1 lime - 2 tablespoons honey - 4 cloves garlic, minced - 1 teaspoon ground ginger - 1 teaspoon cumin - 1 teaspoon salt - ½ teaspoon black pepper - Fresh cilantro, for garnish - Lime wedges, for serving When you measure, keep it simple. If you have different limes, that's fine. You can use any size lime for juice and zest. For honey, try maple syrup if you want a vegan choice. If you need less fat, use light coconut milk. You can also swap the chicken for tofu or jackfruit for a plant-based option. A good crockpot is key for this recipe. I recommend one with a timer. This makes cooking easy. You will also need a whisk for mixing. A cutting board and sharp knife help with prep. Keep forks handy for shredding the chicken. A set of measuring cups makes it easier to get the right amounts. {{ingredient_image_1}} To start, gather all your ingredients. You need: - 4 boneless, skinless chicken breasts - 1 can (14 oz) coconut milk - Juice of 2 limes - Zest of 1 lime - 2 tablespoons honey - 4 cloves garlic, minced - 1 teaspoon ground ginger - 1 teaspoon cumin - 1 teaspoon salt - ½ teaspoon black pepper - Fresh cilantro, for garnish - Lime wedges, for serving In a bowl, whisk the coconut milk, lime juice, lime zest, honey, garlic, ginger, cumin, salt, and pepper. Mix until smooth. This sauce is key for the flavor. Now, place the chicken breasts in your crockpot. Pour the coconut lime sauce over the chicken. Make sure each piece is coated well. Cover the crockpot. Cook on low for 6-7 hours or on high for 3-4 hours. The chicken will be tender and full of flavor. When the chicken is done, use two forks to shred it right in the crockpot. Mix the chicken with the sauce. This helps soak up all the rich flavor. Serve the coconut lime chicken on plates. Garnish with fresh cilantro and add lime wedges for extra zing. Enjoy your delightful meal! To make your Crockpot Coconut Lime Chicken shine, use fresh ingredients. Fresh limes bring bright flavor. Always zest before juicing for stronger taste. Mix the ingredients well to blend the flavors. The goal is a creamy sauce that coats the chicken. Adjust the honey to your taste. More honey means sweeter chicken. If you like spice, add a pinch of red pepper flakes. They will add warmth without overpowering the dish. One mistake is overcooking the chicken. Cooking for too long can make it dry. Check the chicken at the lower cooking time. If it shreds easily, it's done. Another mistake is not seasoning enough. The coconut milk is rich but needs flavor. Don't skip the salt and pepper. Lastly, avoid adding too much liquid. The coconut milk is already a lot. Stick to the recipe for the best results. Serve your Crockpot Coconut Lime Chicken over rice or quinoa. The sauce pairs well with grains. You can also use it in tacos. Just add some tortillas and your favorite toppings. Fresh cilantro and lime wedges add flavor and color. For a side dish, try a simple salad. A crisp salad balances the rich chicken. Your family will love this meal, and it’s easy to make. Pro Tips Marinate for Extra Flavor: For a deeper flavor, marinate the chicken in the coconut lime sauce for at least 1 hour before cooking. Use Fresh Ingredients: Fresh lime juice and zest will enhance the brightness of the dish, making it more flavorful than using bottled alternatives. Serve with Rice: This coconut lime chicken pairs beautifully with jasmine rice or quinoa to soak up the delicious sauce. Experiment with Spices: Feel free to add a pinch of red pepper flakes for a spicy kick or substitute the cumin with curry powder for a different flavor profile. {{image_2}} For a kick, add heat to your dish. You can mix in 1-2 chopped jalapeños or a teaspoon of red pepper flakes. This gives your chicken a bold and zesty flavor. The heat pairs well with the creamy coconut. Adjust the spice level based on your taste. You can make a plant-based version easily. Replace chicken with chickpeas or tofu. Use the same coconut milk and lime mix. Cook the chickpeas or tofu in the crockpot for about 4-5 hours on low. This option is tasty and keeps the same flavors. Want more depth? Add fresh herbs like basil or mint. You can also mix in a tablespoon of soy sauce for a savory twist. Another idea is to use pineapple chunks for sweetness. These simple changes can make your dish even more exciting. Explore these variations and make the recipe your own! After you enjoy your meal, store leftovers in an airtight container. Place the chicken and sauce together for the best flavor. You can keep it in the fridge for up to four days. For longer storage, consider freezing. To reheat, use a microwave or stovetop. If using the microwave, heat it in short bursts. Stir after each burst to ensure even heating. On the stovetop, warm it in a pan over low heat. Add a splash of coconut milk if it seems dry. If you want to save some for later, freezing is easy. Let the chicken cool completely. Then, place it in a freezer-safe bag. Squeeze out the air and seal it tight. You can freeze it for up to three months. When ready to eat, thaw it overnight in the fridge before reheating. Yes, you can use frozen chicken. Just add an extra hour to the cooking time. This makes the chicken safe to eat and still tender. However, make sure to ensure the chicken is cooked through. Use a meat thermometer to check the internal temperature, which should be 165°F. Yes, you can cook this dish in the oven. Preheat your oven to 375°F. Place the chicken and sauce in a baking dish and cover it with foil. Bake for about 45 minutes to an hour. Check the chicken to ensure it is tender. This chicken pairs well with rice or quinoa. You can also serve it with fresh veggies or a simple salad. The creamy coconut lime sauce adds flavor to any side dish. For a more tropical touch, consider serving it with pineapple or mango salsa. The chicken is done when it is tender and easy to shred. Use a meat thermometer to check the temperature. It should read 165°F. If you don’t have a thermometer, look for the chicken to be white throughout, not pink. You now know how to make delicious Crockpot Coconut Lime Chicken. We covered the key ingredients and even the perfect cooking steps. I shared tips to avoid common mistakes. You also learned fun variations and storage tips to keep your meal fresh. Enjoy making this dish your own. Remember, with each try, you’ll become a better cook and impress your family and friends. Happy cooking!

Are you ready for a meal that’s easy, tasty, and loved by everyone? My Crockpot Coconut Lime Chicken is just what you need! This dish combines juicy chicken, zesty lime, …

Read more

Categories Dinner

Thai Peanut Chicken Flavorful and Simple Recipe

January 5, 2026April 25, 2025 by Chef Jamie
- 500g chicken breast, cut into bite-sized pieces - 1 bell pepper, sliced (red or yellow) - 1 medium onion, sliced - 2 cloves garlic, minced - 1 tablespoon ginger, minced - 1 cup broccoli florets - 1 carrot, julienned - 1 cup snap peas - ½ cup creamy peanut butter - 3 tablespoons soy sauce - 2 tablespoons honey - 1 tablespoon lime juice - 1 teaspoon chili paste (adjust to taste) - Fresh cilantro - Chopped peanuts - 2 tablespoons vegetable oil I love using chicken breast in this dish. It cooks fast and stays juicy. Choose a bell pepper, any color works great. The onion adds a sweet taste, while garlic and ginger give a nice kick. Broccoli, carrots, and snap peas add crunch and color. Peanut butter is the star of the sauce. It gives creaminess and richness. Soy sauce adds saltiness, and honey brings a touch of sweetness. Lime juice adds brightness, while chili paste gives it some heat. For garnishes, fresh cilantro adds a fresh flavor. Chopped peanuts add a nice crunch. You can mix and match veggies, too. Just make sure you enjoy what you put in your dish. {{ingredient_image_1}} Start with 500g of chicken breast. Cut it into bite-sized pieces. Heat 2 tablespoons of vegetable oil in a large skillet over medium-high heat. Add the chicken to the skillet. Stir-fry it for about 5 to 7 minutes. The chicken should turn golden brown and be fully cooked. Once done, remove it from the skillet and set it aside on a plate. Now, it's time for the veggies. In the same skillet, add sliced onion and bell pepper. Toss in 2 minced cloves of garlic and 1 tablespoon of minced ginger. Sauté these for 2 to 3 minutes until they are slightly tender. Then, add 1 cup of broccoli florets, julienned carrot, and 1 cup of snap peas. Stir-fry for another 3 to 4 minutes. This helps keep the veggies vibrant and crisp-tender. While the vegetables cook, let’s make the peanut sauce. In a bowl, mix ½ cup of creamy peanut butter, 3 tablespoons of soy sauce, 2 tablespoons of honey, 1 tablespoon of lime juice, and 1 teaspoon of chili paste. Whisk these together until smooth. If you like it spicier, add more chili paste to taste. Now, return the cooked chicken to the skillet with the vegetables. Pour the peanut sauce over everything. Stir it all together until well coated. Heat it for about 2 to 3 minutes until everything is warm and flavors blend nicely. Taste it and adjust the seasoning if needed. Add more soy sauce or chili paste to make it just right. - Use vegetable oil for frying. It has a high smoke point. - Avoid olive oil, as it can burn easily. - Keep your heat medium-high. This helps cook the chicken fast. - Don’t overcrowd the skillet. Cook in batches if needed. - For crisp veggies, cook them just until tender. - Sauté them in the right order. Start with onions, then add peppers. - For a thicker sauce, add more peanut butter. - To thin it out, add water or more lime juice. - Taste as you mix. This helps you adjust the flavor. - Want more heat? Add extra chili paste. - For a sweeter sauce, increase the honey amount. - Try adding a splash of coconut milk for a twist. - Serve over steamed rice or noodles for a complete meal. - For a fresh touch, add cucumber slices on the side. - Garnish with fresh cilantro and chopped peanuts for crunch. - Use a colorful plate to make your dish pop. - Arrange the chicken and veggies in a circle. - Drizzle extra sauce on top for a beautiful finish. Pro Tips Use Fresh Ingredients: Fresh vegetables will enhance the flavor and texture of your Thai peanut chicken, making it more vibrant and delicious. Adjust Spice Levels: Feel free to modify the amount of chili paste to suit your heat preference. Start with less and add more as needed. Meal Prep Friendly: This dish can be made in advance and stored in the refrigerator. Reheat it for a quick and tasty meal throughout the week. Garnish for Flavor: Don't skip the cilantro and chopped peanuts on top; they add freshness and a delightful crunch to the dish. {{image_2}} If you need gluten-free options, try tamari instead of regular soy sauce. Tamari is a great choice. It tastes similar but has no gluten. For those who follow a vegan or vegetarian diet, substitute chicken with tofu or tempeh. Both options soak up the peanut sauce well and add protein. To give your Thai peanut chicken a kick, add more chili paste. You can also sprinkle in some red pepper flakes for extra heat. If you prefer sweetness, add a bit more honey. Feel free to mix in different vegetables too! Zucchini, bell peppers, or bok choy can all work well. Just make sure to cook them until they are crisp-tender. You can serve Thai peanut chicken over rice or noodles for a filling meal. Both options soak up the sauce nicely. If you want something lighter, try it in wraps or lettuce cups. This makes for a fun, fresh way to enjoy the dish. Plus, it's perfect for sharing! Store leftover Thai peanut chicken in an airtight container. This keeps it fresh and tasty. Let it cool before sealing to avoid steam buildup. In the fridge, it lasts up to three days. When you want to reheat, use a skillet over medium heat. This helps keep the chicken and veggies tender. Add a splash of water or broth to prevent drying. Stir until heated through, about 5 minutes. You can freeze Thai peanut chicken for up to three months. Divide it into portions before freezing. Use freezer-safe bags or containers. Remove as much air as you can to avoid freezer burn. To thaw, place it in the fridge overnight. For a quick method, use the microwave on the defrost setting. Once thawed, reheat in a skillet for the best texture. In the fridge, Thai peanut chicken lasts about three days. If you freeze it, it can last up to three months. Always check for any off smells or changes in texture before eating. Thai Peanut Chicken is a tasty dish that features chicken and vegetables. It has a creamy peanut sauce that is both sweet and savory. You’ll enjoy flavors from garlic, ginger, and a hint of lime. The dish is colorful, easy to make, and great for family meals. Yes, you can! This recipe works well with pork, shrimp, or tofu. Each meat brings its own taste. Just adjust the cooking time. For shrimp, cook until pink. For tofu, choose firm or extra-firm and sauté until golden. The spice level can vary. This dish gets heat from chili paste. If you prefer less spice, use less chili paste. You can always add more later. Taste the sauce before serving to find your perfect heat. You can serve it with rice or noodles. Steamed jasmine rice goes well with it. You might also enjoy it with a fresh salad or spring rolls. These sides balance the rich flavors of the chicken. To make it healthier, you can use less peanut butter or choose a natural version. Swap regular soy sauce for low-sodium soy sauce. You can also add more vegetables, like spinach or zucchini, for extra nutrients. This article covers how to make Thai Peanut Chicken from scratch. We discussed essential ingredients, how to prep chicken, sauté vegetables, and create a smooth peanut sauce. You also learned tips for storing leftovers and meal variations. In conclusion, this dish is both fun and easy to make. Feel free to experiment with flavors and ingredients to match your taste. Enjoy your cooking adventure and delight in every bite of your Thai Peanut Chicken!

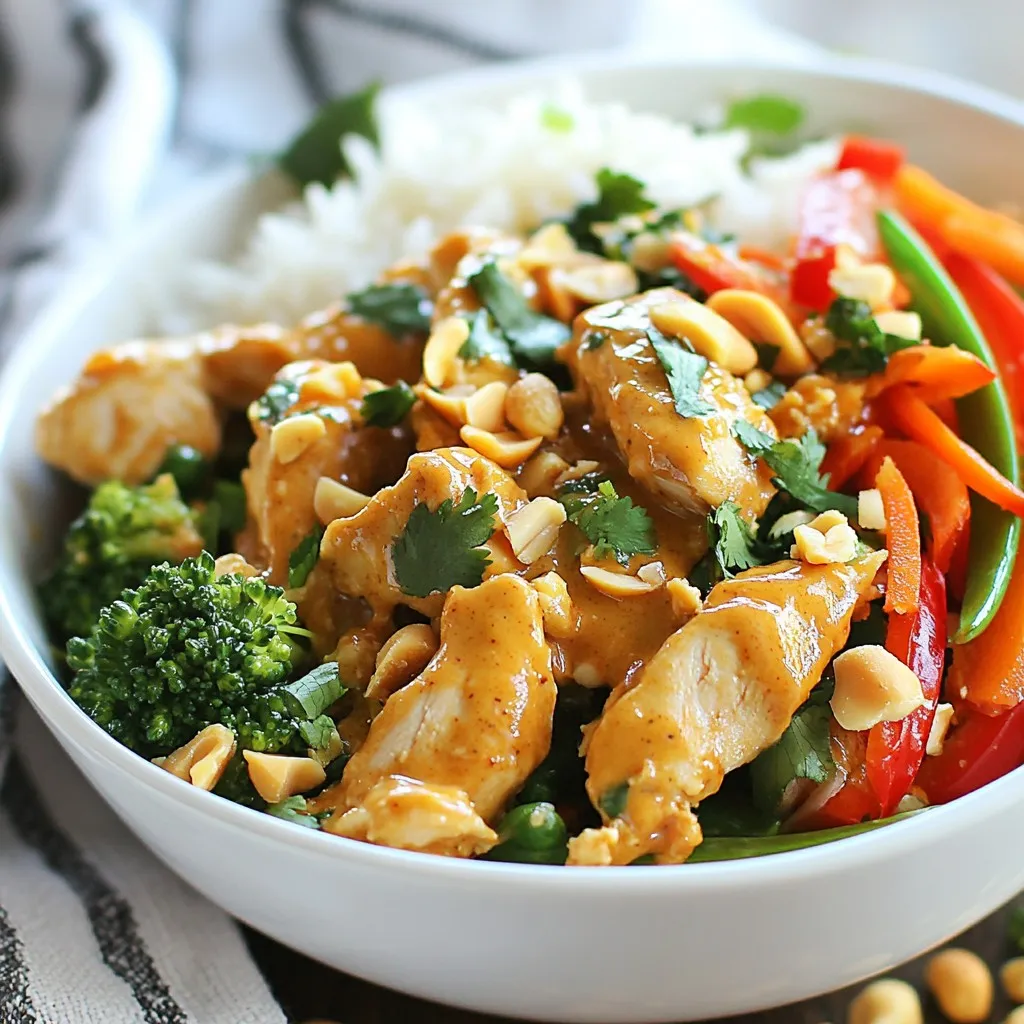
Craving a dish that is both tasty and easy to make? Look no further! My Thai Peanut Chicken recipe combines juicy chicken with fresh veggies and a creamy peanut sauce. …

Read more

Categories Dinner

Loaded Taco Stuffed Peppers Tasty and Simple Recipe

November 13, 2025April 23, 2025 by Chef Jamie
- 4 large bell peppers (any color) - 1 lb ground turkey or beef - 1 cup cooked rice (white or brown) - 1 can (15 oz) black beans, drained and rinsed - 1 cup corn (fresh, canned, or frozen) - 1 packet taco seasoning - 1 cup salsa - 1 cup shredded cheddar cheese - 1/2 cup chopped fresh cilantro - 1 avocado, diced (for topping) - Sour cream (for serving, optional) - Lime wedges (for serving) Using fresh and colorful ingredients makes these Loaded Taco Stuffed Peppers shine. Bell peppers are the star here, and they come in many colors. You can use red, yellow, or green. Each brings a unique flavor. Meat is another key part; you can choose ground turkey or beef. Both add a rich taste. For those who want a plant-based meal, try lentils or a mix of beans instead. Adding cooked rice gives these peppers a nice texture. You can use white or brown rice based on your taste. Black beans and corn add fiber and sweetness. They balance the heat from the taco seasoning perfectly. The salsa adds moisture and flavor. I recommend a chunky salsa for extra bite. Shredded cheddar cheese melts beautifully on top and makes the dish even better. Fresh cilantro adds a burst of freshness, while diced avocado provides creaminess. Finally, serving with a dollop of sour cream and lime wedges gives a nice tang. These ingredients work together to create a tasty and satisfying meal. {{ingredient_image_1}} - Preheat the oven to 375°F (190°C). - Slice off the tops of the bell peppers. Remove all seeds and membranes. Place them in a baking dish, standing upright. - In a large skillet, cook 1 pound of ground turkey or beef over medium heat until it is fully browned. This takes around 5-7 minutes. Drain any extra fat. - Stir in 1 packet of taco seasoning and ½ cup of salsa. Mix well and cook for an extra 2-3 minutes. - Take the skillet off the heat. Add 1 cup of cooked rice, 1 can of black beans (drained and rinsed), and 1 cup of corn. Mix everything well. Then, fold in half of the shredded cheddar cheese. - Use a spoon to fill each bell pepper with the meat and rice mix. Pack it down gently. - Pour the rest of the salsa over the stuffed peppers. Cover the baking dish with foil. - Bake the covered peppers in the oven for 25-30 minutes. - After this time, remove the foil. Sprinkle the remaining cheese on top of the peppers. Bake uncovered for another 10 minutes or until the cheese is melted and bubbly. - To avoid soggy peppers, bake them uncovered for the last 10 minutes. This helps crisp them up. - For best texture, bake the stuffed peppers for 25-30 minutes covered, then 10 minutes uncovered. - Serve your Loaded Taco Stuffed Peppers with a side of tortilla chips and guacamole. - For garnish, try diced jalapeños or a sprinkle of feta cheese for added flavor. - Use cauliflower rice instead of regular rice for a low-calorie choice. - To make it vegetarian, swap the meat for lentils or mushrooms for a hearty filling. Pro Tips Choose Colorful Peppers: Using a mix of red, yellow, and green bell peppers not only adds visual appeal but also a slight variation in flavor. Customize Your Filling: Feel free to add any leftover vegetables or grains you have on hand to the filling for added nutrition and flavor. Adjust Spice Levels: If you prefer a spicier dish, consider adding jalapeños or using a spicy taco seasoning mix to the filling. Perfect Cheese Melt: For an extra gooey cheese topping, broil the stuffed peppers for the last 2-3 minutes of baking after removing the foil. {{image_2}} You can change up the protein in your stuffed peppers. Ground turkey or beef works well, but chicken is a great option too. If you want a plant-based meal, try lentils or black beans. They give a nice texture and flavor. You can also swap the rice for other grains. Quinoa is a tasty choice. It adds a nutty flavor and boosts protein. Farro is another option, offering a chewy texture and earthy taste. Both grains add more nutrition to your meal. To kick up the flavor, try different seasonings or salsas. Taco seasoning is classic, but you can use cumin, paprika, or chili powder for a twist. They add depth to the dish. If you love heat, add jalapeños or a pinch of chili powder. This will give your peppers a spicy kick. You can also use a spicy salsa for extra zing. Adjust the heat to fit your taste. When serving, try layering the filling in bowls. This looks great and is easy to eat. You can arrange the peppers on a platter for a colorful display. You can also serve the pepper halves on a plate. This makes them easy to grab and enjoy. Garnishing with fresh cilantro and diced avocado adds a nice touch. It makes your dish look even more inviting. Store your leftover loaded taco stuffed peppers in an airtight container. Place them in the fridge. They stay fresh for about 3 to 4 days. If you want to keep them longer, try freezing them. Wrap each pepper tightly in plastic wrap and place them in a freezer bag. They will stay good in the freezer for up to 3 months. For reheating, the best method is the oven. Preheat it to 350°F (175°C). Place the peppers on a baking dish and cover them with foil. Heat for about 20-25 minutes. You can also use the microwave. Place the pepper on a plate and cover it with a damp paper towel. Heat for 2-3 minutes. This keeps them moist and tasty. Loaded taco stuffed peppers last about 3 to 4 days in the fridge. In the freezer, they can be stored for up to 3 months. Just remember to label your containers with the date. This way, you know when to use them. Enjoy your delicious leftovers! Yes, you can make these stuffed peppers ahead. Prepare them and store them in the fridge. Just keep them covered. Bake them when you are ready to eat. This saves time on busy days. To add spice, use spicy taco seasoning. You can also add diced jalapeños to the meat mix. For extra heat, drizzle hot sauce on top before serving. Adjust the heat level to your taste. You can replace rice with quinoa for a nutty flavor. Cauliflower rice is a great low-carb option. You can also use farro for a chewier texture. Each option will change the dish's taste and texture. Yes, you can use dairy-free cheese. Look for brands that melt well. Nutritional yeast is a good choice for a cheesy flavor without dairy. This way, everyone can enjoy the meal. In summary, Loaded Taco Stuffed Peppers are easy to make and delicious. You'll stuff bell peppers with a tasty mix of ground meat, rice, beans, and spices. Bake them for melty cheese perfection. Remember, you can customize the recipe with different ingredients or healthier swaps. Think of these stuffed peppers as a fun dish for any meal. Enjoy experimenting with flavors and combinations. Whether for a weeknight dinner or a party, these peppers are sure to impress!

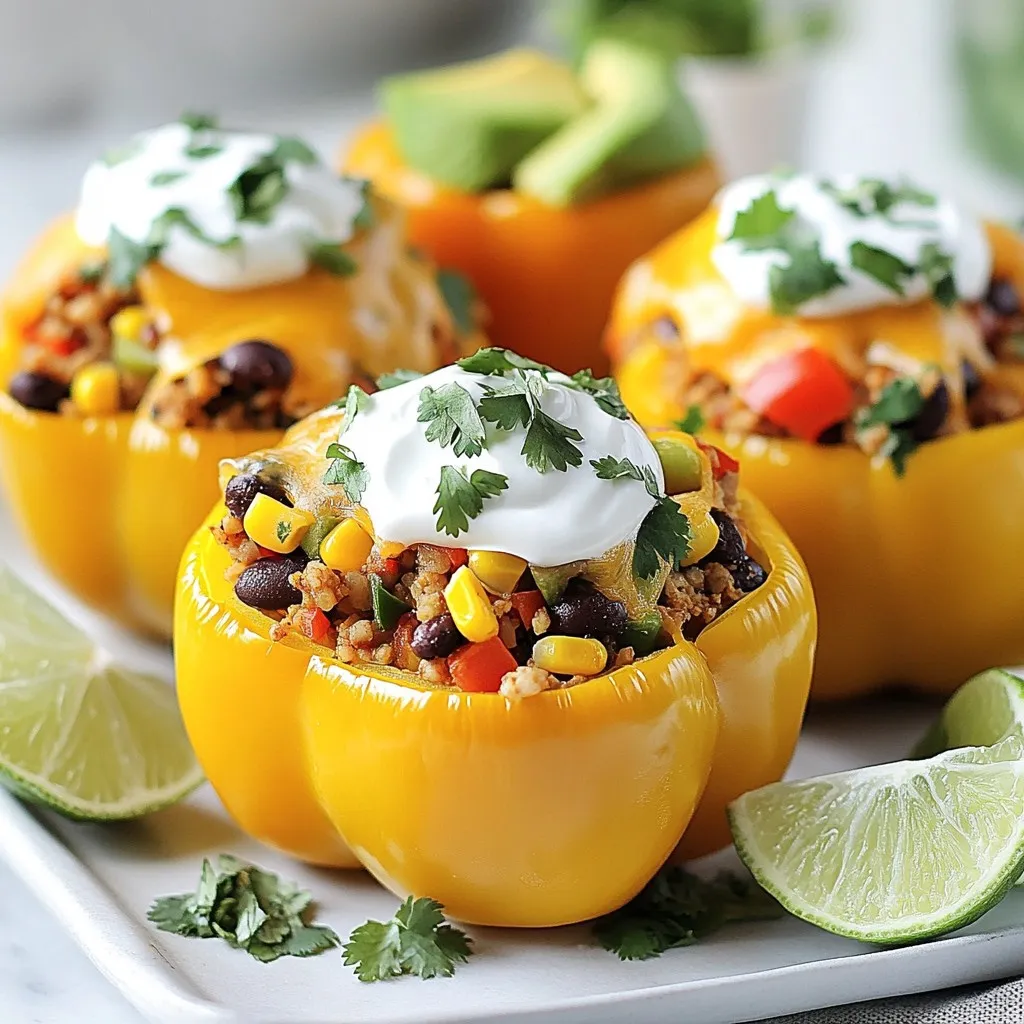
Are you craving a fun and tasty dinner? Loaded Taco Stuffed Peppers are the answer! This simple recipe is perfect for busy weeknights and will delight everyone at your table. …

Read more

Categories Dinner

Spicy Salmon Sushi Bake Flavorful and Easy Recipe

January 5, 2026April 14, 2025 by Chef Jamie
For this dish, you need 2 cups of sushi rice and 2 1/2 cups of water. Sushi rice is sticky and perfect for holding together. Rinsing the rice helps remove excess starch. This step makes the rice fluffy and light. To create the spicy mayo, gather 1/2 cup of mayonnaise and 2 tablespoons of sriracha. You can adjust the sriracha to suit your taste. Mixing these two gives a creamy, spicy kick that pairs well with salmon. You will need 1 pound of fresh salmon fillet, with skin removed. This fish is rich in flavor and healthy fats. For toppings, prepare 1 sliced avocado, 2 chopped green onions, and 1 tablespoon of sesame seeds. The nori strips add a nice crunch. You can also serve with pickled ginger and extra sriracha if you like more heat. {{ingredient_image_1}} Start by rinsing the sushi rice. Use cold water until it runs clear. This step helps remove extra starch. Next, combine the rinsed rice with 2 1/2 cups of water in a pot. Bring the pot to a boil. Once it boils, lower the heat and cover it. Let it simmer for 20 minutes. After that, remove it from the heat. Keep it covered for an extra 10 minutes. This helps the rice become fluffy and sticky. While the rice rests, take your salmon fillet. Season it with soy sauce for flavor. Place it on a baking sheet lined with parchment paper. Bake it in a preheated oven at 350°F (175°C) for 12-15 minutes. The salmon should be fully cooked and flaky. Once done, take it out and let it cool slightly. After cooling, flake the salmon into small pieces. Mix half of the spicy mayo with the salmon. In a baking dish, spread the cooked sushi rice evenly. Use a spatula to press it down gently. Next, layer the flaked salmon over the rice. Spread the remaining spicy mayo on top of the salmon. Now, put the dish back in the oven for another 10-15 minutes. You want the top to be crispy and golden. After baking, let it cool for a few minutes. Slice it into squares, then top with sliced avocado and chopped green onions. Finally, sprinkle sesame seeds on top and add nori strips as a garnish. Enjoy this tasty dish warm! To get the best sushi rice, start by rinsing it well. Rinse it until the water runs clear. This removes extra starch. Next, use the right water-to-rice ratio. I find that 2 1/2 cups of water for 2 cups of rice works great. Cook it on low heat. Let it sit covered after cooking to make it fluffy. This resting time helps the rice absorb steam for better texture. If you love heat, increase the sriracha. Start with 2 tablespoons, and taste as you mix. You can always add more later. If you want it milder, reduce the sriracha or mix in more mayonnaise. You can also add toppings like pickled ginger to balance the spice. It gives a nice tang and cools the heat. To keep your salmon tender, don’t overbake it. Bake at 350°F for 12 to 15 minutes. Make sure to season it with soy sauce before baking. This adds flavor and moisture. After baking, let the salmon cool slightly before flaking. Mixing it with the spicy mayo also helps keep it moist. Enjoy your delicious creation! Pro Tips Choose the Right Salmon: Opt for fresh, high-quality salmon for the best flavor and texture in your sushi bake. Adjust the Spice: Feel free to modify the amount of sriracha based on your heat preference; start with less and add more if desired. Cooling Time is Key: Allow the sushi bake to cool for a few minutes before slicing to help it hold its shape better. Experiment with Toppings: Try adding other toppings like cucumber, jalapeños, or crunchy tempura bits for added texture and flavor. {{image_2}} You can switch salmon for other fish. Tuna or crab work well. They add a new flavor. Just remember to mix them with spicy mayo too. Shrimp is another great option. You can bake shrimp for a quick meal. It will taste amazing! For a meat-free meal, use tofu. Firm tofu absorbs flavors well. Marinate it in soy sauce and bake until golden. You can also use mushrooms, like shiitake or portobello. They give a rich taste. Combine them with the spicy mayo for a lovely finish. You can change the spicy mayo to suit your taste. Try adding wasabi for an extra kick. Or use garlic or ginger for depth. For a sweeter twist, mix in some mango or pineapple. Each change can create a unique dish that keeps things exciting! You can keep leftovers in the fridge. Store them in an airtight container. This helps keep the sushi bake fresh. It stays good for up to three days. When you're ready to eat, just check for any off smells. If you want to save some for later, freezing works too. Cut the sushi bake into portions. Wrap each piece tightly in plastic wrap. Then, place them in a freezer bag. This keeps them fresh for up to a month. Thaw them in the fridge when you’re ready to enjoy again. To reheat, you can use the oven. Preheat it to 350°F (175°C). Place the sushi bake in a baking dish. Cover it with foil to keep it moist. Heat for about 15-20 minutes. You can also use a microwave. Heat it in short bursts to avoid drying it out. Check every 30 seconds until warm. Enjoy your tasty leftovers! Yes, you can use cooked salmon. This option saves time and adds flavor. Just make sure the salmon is flaky and not too dry. You can mix it with the spicy mayo as you would with fresh salmon. This makes it easy to prepare and still delicious. To make the spicy salmon sushi bake gluten-free, swap regular soy sauce for gluten-free soy sauce. Many brands offer great tasting options. Always check labels to confirm there are no hidden gluten ingredients. With this simple swap, you can enjoy the dish without worry. You can serve this dish with pickled ginger and extra sriracha for a kick. A fresh salad or steamed vegetables pair well too. Rice crackers or seaweed snacks add a nice crunch. Choose sides that balance flavors and textures for a complete meal. You can make a tasty sushi bake at home. We covered key ingredients, like sushi rice, fresh salmon, and spicy mayo. I provided step-by-step instructions, including how to prepare the rice and bake the salmon. With helpful tips for the right texture and spice level, you'll perfect your dish. Don't forget the variations and storage info for leftovers. Try new proteins or vegetarian options for fun twists. Enjoy your cooking adventure!

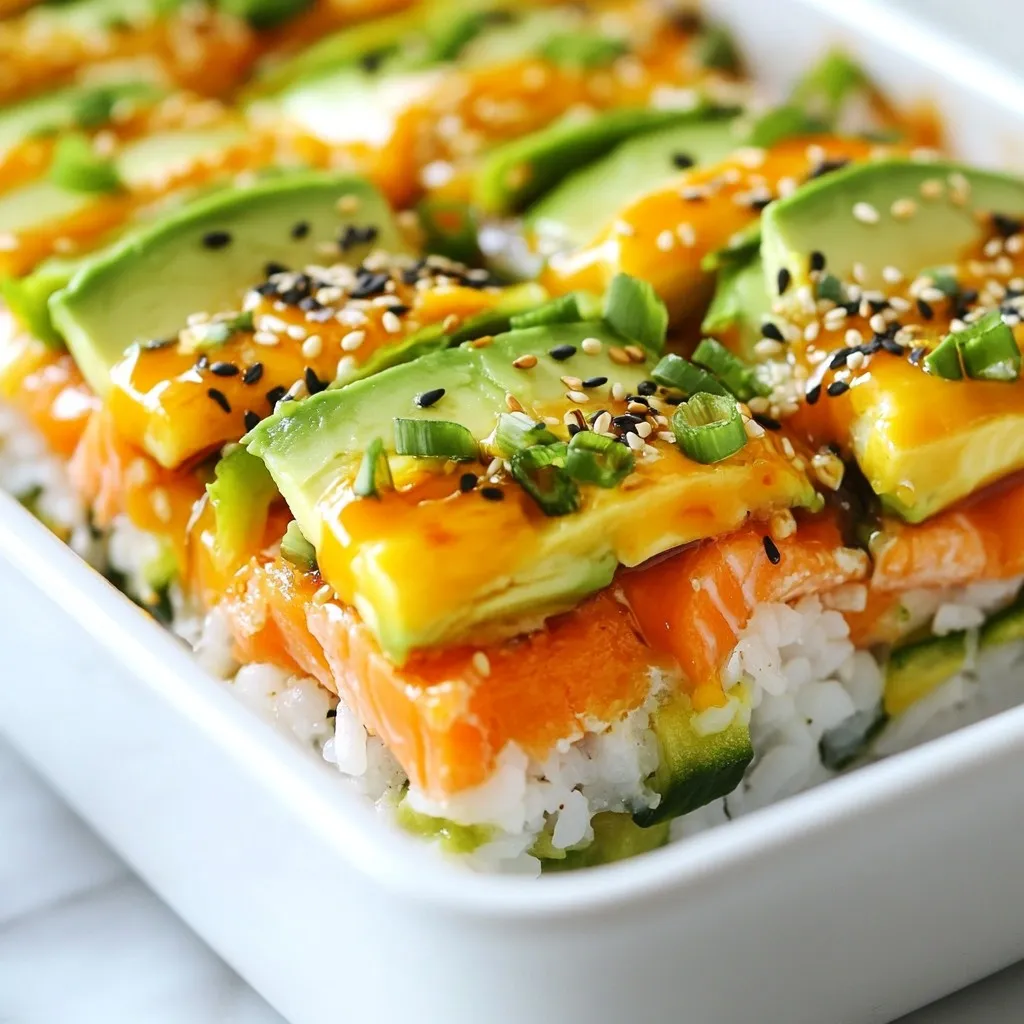
If you love sushi but want a fun twist, try this Spicy Salmon Sushi Bake! It’s an easy and tasty dish that lets you enjoy all the flavors of sushi …

Read more

Categories Dinner

Oven Baked Cheesy Tacos Flavorful Family Favorite

November 11, 2025April 14, 2025 by Chef Jamie
The key to great Oven Baked Cheesy Tacos is fresh, flavorful ingredients. Here’s what you need: - 12 soft corn tortillas - 1 pound ground beef (or substitute with ground turkey or plant-based meat) - 1 tablespoon taco seasoning - 1 cup black beans, drained and rinsed - 1 cup corn, frozen or canned - 2 cups shredded cheddar cheese - 1 cup salsa - 1 avocado, diced - 1 cup sour cream - Fresh cilantro, chopped (for garnish) - Lime wedges (for serving) Each ingredient plays a role in creating a tasty dish. The ground beef provides a hearty base. Taco seasoning adds that classic flavor we all love. Black beans and corn give it extra texture and nutrition. The cheese melts beautifully, making every bite creamy. Salsa brings a zesty kick, while avocado and sour cream add freshness. Finally, cilantro and lime brighten up the dish. Mix and match these ingredients based on your preference. You can easily swap the meat or adjust the toppings. This flexibility makes it perfect for everyone in the family. Enjoy gathering these ingredients and get ready for a fun cooking experience! {{ingredient_image_1}} 1. Preheat the oven and prepare the baking dish. Set your oven to 375°F (190°C). While it heats, spray a 9x13 inch baking dish with cooking spray. This keeps the tacos from sticking. 2. Cook the ground beef until browned. In a large skillet, add 1 pound of ground beef. Cook it over medium heat. Break it apart with a spoon as it cooks. This should take about 5-7 minutes. 3. Mix in taco seasoning, black beans, and corn. Once the beef is browned, stir in 1 tablespoon of taco seasoning, 1 cup of black beans, and 1 cup of corn. Cook everything for an extra 2-3 minutes. This helps all the flavors blend nicely. 1. Assemble tortillas and meat mixture in the baking dish. Start by placing the soft corn tortillas on the bottom of the dish. Overlap them slightly. This forms a solid base for your tacos. 2. Repeat the layering process with remaining ingredients. Spoon the meat mixture evenly over the tortillas. Then, pour 1 cup of salsa on top. Sprinkle half of the 2 cups of shredded cheddar cheese over this layer. - Add another layer of tortillas, followed by more meat mixture, salsa, and cheese. Repeat until all ingredients are used. Make sure the top layer is tortillas with the rest of the cheese on top. 1. Cover and bake. Use aluminum foil to cover the baking dish. Bake in the oven for 25 minutes. 2. Remove foil and finish baking. After 25 minutes, take off the foil. Bake for another 10-15 minutes. Look for bubbly, lightly golden cheese. 3. Cooling and topping before serving. After baking, let the dish cool for 5 minutes. Top with diced avocado and fresh cilantro. This adds flavor and color. Serve with sour cream and lime wedges on the side for extra zing! To make your cheesy tacos really shine, choose the right cheese. I love using sharp cheddar because it adds a rich flavor. You can also mix in Monterey Jack for extra creaminess. To achieve that golden cheesy crust, sprinkle the cheese evenly. When baking, make sure to cover the dish with foil for part of the time. This helps the cheese melt nicely. Remove the foil for the last few minutes. Let the cheese bubble and turn golden. Adjusting taco seasoning can help match your heat preference. Start with one tablespoon and taste the mix. If you want more heat, add a little cayenne or chili powder. You can also add spicy elements. Diced jalapeños or a splash of hot sauce can kick the flavor up a notch. Just make sure to ask your family how hot they like it! These tacos are great with sides! I recommend serving them with a fresh salad or Mexican rice. Guacamole also pairs well for extra creaminess. For drinks, try a cold soda or a fruity mocktail. A light beer can also complement the flavors nicely. Enjoy your meal with family and friends! Pro Tips Use Fresh Ingredients: Opt for fresh vegetables and herbs for garnish, as they enhance the flavors and presentation of your dish. Customize Your Fillings: Feel free to add additional ingredients like jalapeños, black olives, or bell peppers to the meat mixture for a personalized touch. Experiment with Cheese: Try mixing different types of cheese, such as Monterey Jack or pepper jack, for a unique flavor profile. Let It Rest: Allow the dish to cool for a few minutes after baking to help the layers set, making it easier to serve. {{image_2}} You can swap the ground beef for ground turkey. Turkey is leaner and adds a lighter taste. If you want a plant-based option, use plant-based meat. It gives you the same texture without meat. You can also try chicken or pork for a different flavor. Each protein adds its own twist to the dish. For a vegetarian version, skip the meat and use beans. Black beans work great here. They add protein and fiber. You can also add veggies like bell peppers or zucchini. These add color and crunch. For a vegan option, use plant-based sour cream and cheese. This way, everyone can enjoy these tasty tacos. While soft corn tortillas are excellent, try hard taco shells for a crunchier bite. Hard shells hold fillings well, making them fun to eat. You can also explore different tortilla types. Whole wheat tortillas add fiber and nutrients. If you need gluten-free options, look for gluten-free tortillas. They keep the taco experience delicious and safe for everyone. Store any leftover cheesy tacos in an airtight container. This keeps them fresh. You can refrigerate them for up to three days. When you’re ready to eat, just take them out. If they smell good and look fine, they should be safe to eat. To freeze your tasty tacos, let them cool first. Then, wrap them tightly in plastic wrap. Place the wrapped tacos in a freezer bag. Make sure to squeeze out all the air. They can stay in the freezer for up to three months. When you want to eat them, thaw them in the fridge overnight. For reheating, use the oven for the best results. Preheat the oven to 350°F (175°C). Place the tacos in a baking dish. Cover them with foil to keep them moist. Bake for 15 to 20 minutes. This way, they stay warm and tasty. To avoid sogginess, do not add extra sauce before reheating. Enjoy your cheesy tacos just like when they were fresh! Yes, you can make these tacos ahead of time. Prepare the meat mixture and layer the tacos in the baking dish. Cover the dish with plastic wrap and store it in the fridge. You can bake them the next day. Just add a few extra minutes to the baking time. This method saves time and makes dinner easy. To make these tacos gluten-free, choose soft corn tortillas. Many brands offer gluten-free options. Always check the label to ensure they meet your needs. You can also use lettuce wraps for a fresh twist. This option is low in carbs and gluten-free. If you want heat, add diced jalapeños to the meat mix. You can also use spicy taco seasoning. For more flavor, try adding a splash of hot sauce to the salsa. You can even sprinkle crushed red pepper flakes on top before serving. Adjust the spice to fit your taste! Oven-baked cheesy tacos are simple and fun to make. You learned about tasty ingredients, how to cook them, and the best ways to serve. I shared tips to customize your tacos and keep leftovers fresh. With different meat options and storage tips, you can enjoy these tacos anytime. Now, get creative and make them your own! Experiment with flavors and enjoy this dish with friends and family. Tacos are perfect for any occasion.

Looking for a fun family meal that everyone will love? Oven Baked Cheesy Tacos are your answer! This dish is packed with flavor and easy to make, making it a …

Read more

Categories Dinner

Sheet Pan Chicken Kabobs Flavorful and Easy Meal

January 7, 2026April 12, 2025 by Chef Jamie
- 1.5 lbs chicken breast, cut into 1-inch cubes - 1 red bell pepper, cut into 1-inch pieces - 1 yellow bell pepper, cut into 1-inch pieces - 1 red onion, cut into wedges - 1 zucchini, sliced into half-moons - 3 tablespoons olive oil - 2 tablespoons lemon juice For this dish, I focus on chicken and fresh veggies. The chicken breast gives a tasty base. I love adding red and yellow bell peppers. They add sweetness and color. The red onion brings a nice bite, while zucchini adds a soft texture. Olive oil and lemon juice help blend the flavors and keep everything moist. - 3 cloves garlic, minced - 2 teaspoons dried oregano - 1 teaspoon paprika - 1 teaspoon cumin - Salt and pepper to taste The seasonings are key for flavor. Garlic infuses a rich taste. Oregano brings a hint of earthiness. Paprika adds warmth and a bit of smokiness. Cumin gives a unique touch. I always recommend adjusting salt and pepper to suit your taste. These seasonings make the chicken kabobs shine. - Skewers (wooden or metal) - Parchment paper for baking If you want to use skewers, wooden ones need soaking for 30 minutes. This helps prevent burning. Parchment paper makes cleanup easy. I love using it for roasting. It keeps the pan clean and allows for more even cooking. {{ingredient_image_1}} 1. Preheat the oven and prepare the baking sheet: Set your oven to 400°F (200°C). Line a baking sheet with parchment paper. This makes for easy cleanup later. 2. Make the marinade mixture: In a large bowl, mix together the olive oil, lemon juice, minced garlic, dried oregano, paprika, cumin, salt, and pepper. Stir until everything blends well. This marinade adds great flavor to the chicken. 1. Combine chicken with marinade: Add the 1.5 lbs of chicken breast cubes to the bowl. Toss the chicken in the marinade until each piece is covered. 2. Recommended marination time: Let the chicken sit in the marinade for at least 15 minutes. For more flavor, you can marinate it in the fridge for up to 2 hours. 1. Arranging chicken and vegetables on the baking sheet: Take the marinated chicken and arrange it on the parchment-lined baking sheet. Add the red and yellow bell peppers, red onion, and zucchini around the chicken. Spread them out in a single layer for even cooking. 2. Roasting time and technique: Place the baking sheet in the oven and roast for about 20-25 minutes. Flip the chicken and vegetables halfway through the cooking time. This helps everything cook evenly. The chicken should be fully cooked and reach an internal temperature of 165°F (74°C). 3. Instructions for broiling for extra char: For an extra char, turn on the broiler for 2-3 minutes at the end of cooking. Keep a close eye on it to prevent burning. This step adds a nice crisp to the kabobs. Now you have a delicious, easy meal ready to serve! To get the best flavor from your chicken, marinate it well. I like to use a mix of olive oil, lemon juice, garlic, and herbs. This blend adds a nice kick. For the tastiest chicken, marinate for at least 15 minutes. If you have more time, let it sit for up to 2 hours in the fridge. This longer marination gives the chicken a deeper flavor. When cooking, arrange the chicken and veggies in a single layer. This helps everything cook evenly. Flip them halfway through to avoid burning. Keep an eye on the cooking time. The chicken needs to reach an internal temperature of 165°F (74°C). A quick check with a meat thermometer ensures it’s done. This way, you avoid undercooked or dry chicken. Serving the kabobs is fun and easy. I recommend placing them on a large platter. A colorful display of chicken and veggies looks great. For garnish, sprinkle fresh parsley on top. Add lemon wedges on the side for a pop of color. This makes the dish look fresh and inviting. You’ll impress your guests with this simple touch. Pro Tips Marinate Longer for Flavor: For the best flavor, marinate the chicken for at least 2 hours in the refrigerator. The longer it marinates, the more flavorful it becomes. Cut Vegetables Uniformly: Ensure that all vegetables are cut into similar sizes to promote even cooking. This way, everything will be perfectly tender at the same time. Use High-Quality Olive Oil: Invest in a good quality olive oil for the marinade. A premium oil will enhance the flavor of the chicken and vegetables. Experiment with Seasonings: Feel free to experiment with different spices and herbs. Adding a pinch of chili flakes or fresh herbs can elevate the dish even further! {{image_2}} You can switch up the veggies in these kabobs. Try mushrooms or cherry tomatoes for fun flavors. You can also use other proteins. Shrimp or beef work great too. Just adjust cooking times to ensure everything cooks well. Want some heat? Add chili powder or diced jalapeños for a spicy kick. Fresh herbs like basil or thyme can also give new tastes. Consider using different sauces, like teriyaki or barbecue, to mix things up. If you have an air fryer, you can use it for these kabobs. Set it to 375°F and cook in batches for about 15 minutes. For grilling, soak wooden skewers first. Then, cook on medium heat, turning until the chicken is cooked through. These methods keep your kabobs juicy and full of flavor. To store leftovers in the refrigerator, let the kabobs cool first. Place them in an airtight container. This keeps them fresh and prevents odors from mixing. I find glass containers work best because they do not stain or hold smells. You can also use plastic containers if that's what you have. Just make sure they seal well. For long-term storage, you can freeze the kabobs. Wrap them tightly in plastic wrap and then place them in a freezer bag. This helps avoid freezer burn. When you want to eat them, thaw the kabobs in the fridge overnight before reheating. To reheat, place them in the oven at 350°F (175°C) for about 15-20 minutes. This keeps them juicy and warm throughout. In the fridge, the dish lasts about 3 to 4 days. If you freeze them, they can last for up to 3 months. Always check for any signs of spoilage before eating. If they smell off or look strange, it’s best to toss them. Keeping track of storage times helps ensure you enjoy your kabobs at their best! You can make chicken kabobs without skewers by using a sheet pan. This method is simple. Just marinate the chicken and vegetables as usual. Instead of threading them onto skewers, spread them out on a baking sheet. This way, the chicken and veggies roast evenly. You get all the great flavors without the fuss of skewers. Yes, you can prep kabobs ahead of time. Marinate the chicken and cut the veggies a few hours before cooking. Store them in the fridge until you're ready to bake. If you want to prep even earlier, marinate the chicken the night before. This makes dinner quick and easy. Just remember to let them sit at room temperature for about 15 minutes before cooking. Sheet pan chicken kabobs pair well with many sides. Here are some great options: - Rice or quinoa: They soak up the juices well. - Fresh salad: A simple green salad adds crunch. - Grilled corn: Sweet corn complements the flavors nicely. - Pita bread: Soft pita is perfect for dipping. These sides create a balanced meal that everyone will enjoy. This blog post walks you through making delicious chicken kabobs, highlighting main ingredients, seasonings, and cooking tips. I shared preparation steps, marination advice, and variations to suit your taste. Remember to experiment with different ingredients and cooking methods. Proper storage tips ensure your kabobs stay fresh, making them perfect for meal prep. By following these steps, you can enjoy flavorful kabobs that impress at any meal. Happy cooking!

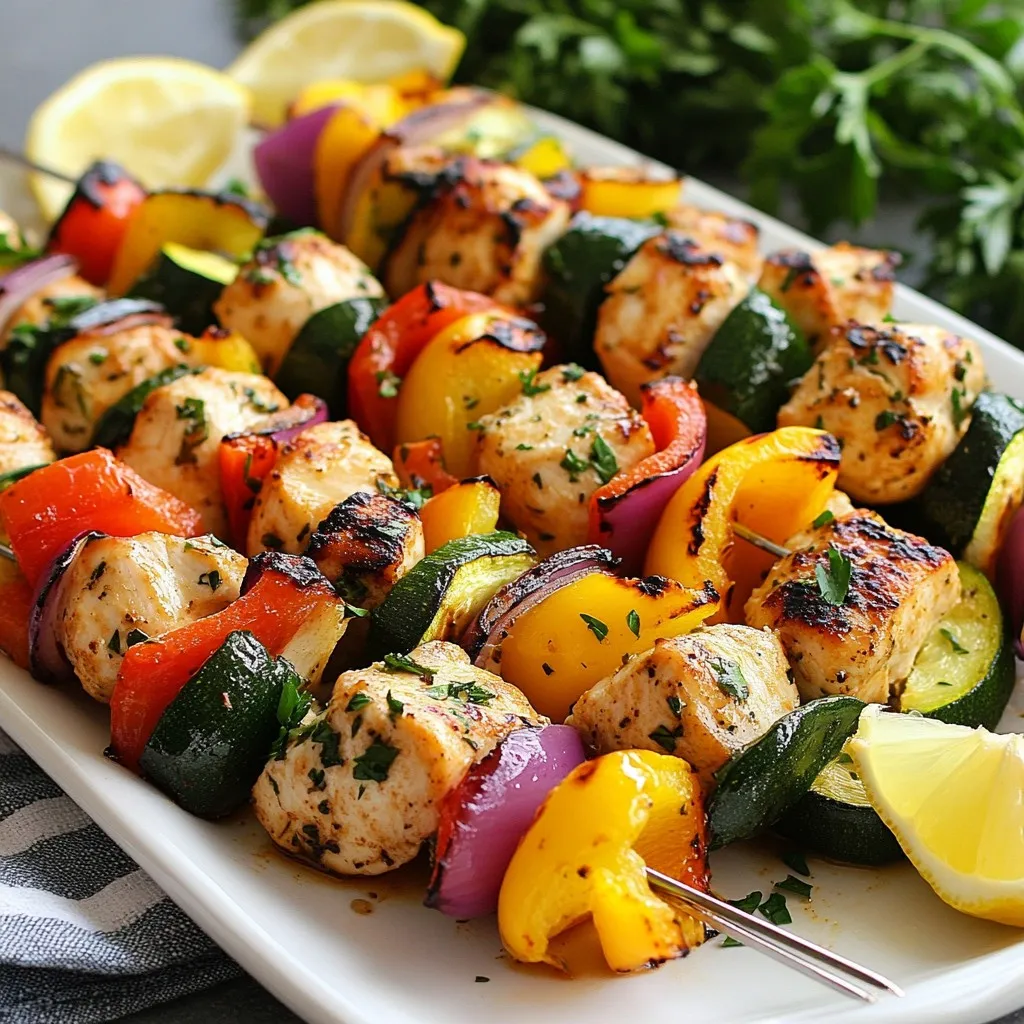
Looking for a simple, tasty dinner? You’ve come to the right place! My Sheet Pan Chicken Kabobs are packed with flavor and easy to make. You’ll toss chicken and fresh …

Read more

Categories Dinner

Mouthwatering Mango Salsa Fish Tacos Delightful Meal

January 4, 2026April 10, 2025 by Chef Jamie
- Fish and Marinade Components - 1 lb firm white fish (like cod or tilapia), cut into strips - 1 tablespoon olive oil - 1 teaspoon cumin - 1 teaspoon paprika - Salt and pepper to taste - Mango Salsa Ingredients - 1 ripe mango, diced - 1 small red onion, finely chopped - 1 jalapeño, deseeded and minced - Juice of 1 lime - 1/4 cup fresh cilantro, chopped - Tortilla and Serving Items - 8 small corn tortillas - 1 avocado, sliced (for serving) - Optional: lime wedges (for serving) These ingredients come together to create a fresh and vibrant dish. The firm white fish gives a nice texture, while the spices add warmth. The mango salsa brings a sweet and zesty kick. Together, they make a perfect taco filling. You can easily find these ingredients at your local grocery store. Each element plays a key role in creating the perfect flavor balance. Enjoying these tacos will surely make your meal special! {{ingredient_image_1}} First, mix your marinade. In a bowl, combine 1 tablespoon olive oil, 1 teaspoon cumin, 1 teaspoon paprika, salt, and pepper. Stir well. Next, cut 1 pound of firm white fish, like cod or tilapia, into strips. Add the fish to the marinade. Make sure each piece is coated evenly. Let it marinate for about 15 minutes. This step helps the fish absorb the spice flavors. Now, it’s time to cook the fish. Preheat a non-stick skillet over medium-high heat. Once the skillet is hot, add the marinated fish strips. Cook for 3 to 4 minutes on each side. The fish should be opaque and flake easily with a fork. Remove the fish from heat. To make the salsa, gather your ingredients. Dice 1 ripe mango into small pieces. Finely chop 1 small red onion. Mince 1 jalapeño after removing the seeds. In a bowl, mix the mango, onion, and jalapeño together. Add the juice of 1 lime and 1/4 cup of chopped fresh cilantro. Stir well and season with salt to taste. Allow the salsa to sit for a few minutes. This helps the flavors come together. Now, let’s warm the tortillas. Take another skillet and lightly toast 8 small corn tortillas over medium heat. Warm them for about 30 seconds on each side. This makes them soft and easy to fold. To assemble the tacos, place some cooked fish on each tortilla. Top each taco with a generous spoonful of mango salsa. For an extra touch, add slices of avocado on top. You can serve the tacos with lime wedges on the side for a zesty finish. Enjoy your delicious creation! To achieve perfect flakiness in your fish, choose firm white fish, like cod or tilapia. Make sure to cut it into strips. This helps it cook evenly. Marinate the fish for at least 15 minutes to soak in those tasty spices. When cooking, use medium-high heat and do not overcrowd the pan. This keeps the fish from steaming. Common mistakes to avoid include cooking fish too long. Overcooked fish becomes dry and tough. Also, avoid skipping the marination step. It adds flavor and helps the fish stay moist. To amp up your mango salsa, try adding diced bell peppers or a pinch of salt. These add more color and taste. You can also mix in some chopped tomatoes for extra freshness. If you like heat, keep the seeds in the jalapeño. For storage, keep salsa in an airtight container. It stays fresh in the fridge for about two days. If you notice it getting watery, just drain the excess juice before serving. This keeps the salsa vibrant and tasty! Pro Tips Fish Freshness: Ensure your fish is as fresh as possible for the best flavor and texture. Look for clear eyes and a mild scent. Spice Variation: Feel free to experiment with different spices like chili powder or garlic powder to customize the flavor of your fish. Perfectly Ripe Mango: Choose a mango that gives slightly to pressure for the best sweetness and texture in your salsa. Warm Tortillas: Always warm your tortillas just before assembling to prevent them from breaking and to enhance their flavor. {{image_2}} You can easily make these tacos gluten-free. Choose corn tortillas, as they are naturally gluten-free. Just check the label to be sure. The fish and salsa ingredients are already gluten-free too. Enjoy a delicious meal without worry! To make this recipe vegan, swap the fish for grilled jackfruit or tofu. Marinate them just like the fish for great flavor. Use the same mango salsa to keep the dish fresh and vibrant. This way, you still enjoy tasty tacos. While mango shines in this salsa, feel free to experiment with other fruits. Pineapple adds a sweet and tangy twist. Peach can give a lovely summertime flavor. Even strawberries can surprise you with their sweetness. Mix and match for a fruity fiesta! You control the heat in your salsa! For a milder taste, skip the jalapeño or use a small amount. If you crave spice, add more jalapeño or even some diced serrano peppers. Adjust the heat to match your mood and enjoy your perfect taco experience! To keep your fish tacos fresh, store them in airtight containers. This helps prevent them from drying out. You should separate the fish, tortillas, and mango salsa. This keeps each part at its best. For the fish, wrap it in plastic wrap or foil. Store it in the fridge for up to two days. The tortillas can stay in a sealed bag. They will stay fresh for about three days. You can keep the mango salsa in a small container. It will last for up to three days too. To reheat the fish, use a skillet over medium heat. This method keeps the fish moist and flaky. Cook for about two minutes on each side. Make sure it is heated through but not overcooked. For tortillas, you can warm them in a dry skillet. Heat them for about 30 seconds on each side. This will keep them soft and pliable. Enjoy your tacos as if they were just made! For fish tacos, I recommend using firm white fish. Cod and tilapia are great choices. They cook well and have a mild flavor. You can also try snapper or mahi-mahi for a different taste. These fish hold up nicely in tacos and pair perfectly with mango salsa. Yes, you can make mango salsa ahead of time. Mix the diced mango, red onion, jalapeño, lime juice, and cilantro a few hours before serving. This lets the flavors blend together. Just keep the salsa in the fridge in an airtight container. It stays fresh for up to two days. To add some heat, try these ideas. Include more jalapeño in the salsa. You can also use a serrano pepper for a kick. Another option is to sprinkle cayenne pepper on the fish. If you like sauces, drizzle some hot sauce on top before serving. Adjust the heat to your taste! This blog post guided you through making delicious fish tacos. We explored key ingredients like the fish and mango salsa, then detailed step-by-step instructions for preparation and assembly. I shared tips for perfecting the cooking process and how to enhance the salsa's flavor. You also learned about dietary variations and storage tips. Remember, experimenting with flavors and ingredients can lead to your ideal taco. Enjoy the process and savor each bite!

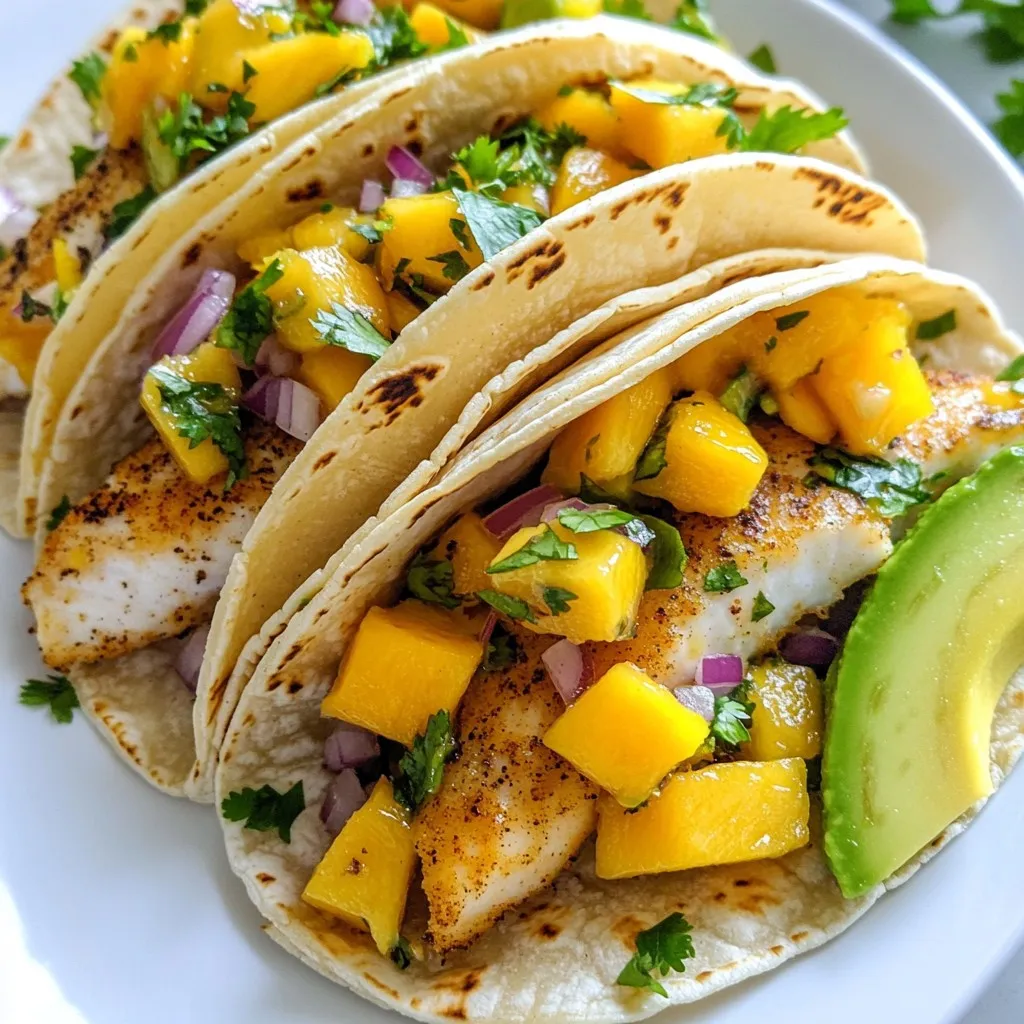
Looking to spice up your dinner routine? Try my Mouthwatering Mango Salsa Fish Tacos! This dish combines flaky fish with sweet mango salsa for a taste that bursts in your …

Read more

Categories Dinner

Instant Pot Beef Stew Comforting and Hearty Recipe

January 4, 2026April 9, 2025 by Chef Jamie
- 2 lbs beef chuck, cut into 1-inch cubes - 4 medium carrots, sliced - 3 medium potatoes, diced - 1 large onion, chopped - 3 cloves garlic, minced - 4 cups beef broth - 2 tablespoons tomato paste - 2 tablespoons Worcestershire sauce The main ingredients create the heart of the stew. Beef chuck is perfect. It has great flavor and tenderness when cooked. I love using fresh carrots and potatoes. They add texture and sweetness. Onions and garlic give depth to the stew. - 1 teaspoon dried thyme - 1 teaspoon smoked paprika - 2 tablespoons olive oil - Salt and pepper to taste Seasonings bring the dish to life. Dried thyme adds a nice herbal note. Smoked paprika gives a hint of smokiness. Olive oil helps to brown the meat and vegetables. Salt and pepper enhance all the flavors. - 1 tablespoon cornstarch (for thickening) - Fresh parsley, chopped (for garnish) For those who like it thick, cornstarch is great. You mix it with water to make a slurry. Fresh parsley adds a pop of color and freshness. It makes the dish look nice and adds flavor. {{ingredient_image_1}} To start, set your Instant Pot to 'Sauté' mode. Add 2 tablespoons of olive oil and let it heat until it shimmers. This step is key for flavor. Next, add 2 lbs of beef chuck, cut into 1-inch cubes. Work in batches and sear the beef until it is browned on all sides, which takes about 5-7 minutes. Once done, remove the beef and set it aside. In the same pot, add the chopped onion. Cook it until it becomes translucent, about 3-4 minutes. This helps build the base flavor. Then, add 3 cloves of minced garlic and cook for another minute. The garlic will add a nice kick to the stew. Now it’s time to bring everything together. Return the browned beef to the pot. Mix in 4 medium sliced carrots, 3 diced potatoes, and pour in 4 cups of beef broth. Add 2 tablespoons of tomato paste and 2 tablespoons of Worcestershire sauce for depth. Sprinkle in 1 teaspoon of dried thyme, 1 teaspoon of smoked paprika, and toss in a bay leaf. Season with salt and pepper to taste, then stir to combine. Close the lid of the Instant Pot, making sure the valve is set to 'Sealing'. Select 'Manual' and set the timer for 35 minutes. This step locks in all the flavors and tenderizes the beef. After cooking is complete, let the pressure release naturally for 10 minutes. This allows the flavors to meld. After 10 minutes, switch to a 'Quick Release' to let out any remaining steam. Always be careful when releasing pressure. If you want a thicker stew, mix 1 tablespoon of cornstarch with 2 tablespoons of water to make a slurry. Set the Instant Pot to 'Sauté' again and stir in the slurry. Let it simmer for a few minutes until it thickens to your liking. Before serving, discard the bay leaf and taste for seasoning. Adjust with more salt and pepper if needed. Finally, garnish with fresh chopped parsley for a pop of color and flavor. For a great stew, use beef chuck. It has lots of flavor and becomes tender when cooked. Cut the beef into 1-inch cubes. This size helps it cook evenly and quickly. If you want even more tenderness, marinate the beef in some broth and spices. This adds flavor and helps break down the meat fibers. Want to change the taste? Add herbs and spices! Fresh thyme, rosemary, or bay leaf can bring a new twist. You can also try adding chili powder for some heat. For a different sauce flavor, swap Worcestershire sauce with soy sauce or balsamic vinegar. Each choice makes the stew unique. To get a thick stew, use cornstarch. Mix it with water to make a slurry. Stir this into the stew at the end. It gives a nice, rich texture. To keep veggies crisp, add them later in the cooking process. This way, they won’t turn mushy. Try adding carrots and potatoes halfway through. This keeps them tender but firm. Pro Tips Brown the Meat Well: Searing the beef until it's nicely browned enhances the flavor of the stew, creating a rich depth that makes the dish truly hearty. Use Fresh Herbs: For a burst of flavor, consider adding fresh thyme or parsley instead of dried herbs. They can elevate the taste and aroma of your stew. Let it Rest: After cooking, letting the stew sit for a few minutes allows the flavors to meld together, resulting in a more cohesive and delicious dish. Customize Your Vegetables: Feel free to swap in your favorite root vegetables like parsnips or turnips. This allows you to tailor the stew to your taste preferences. {{image_2}} You can switch up the veggies in your beef stew. Adding or substituting different vegetables can bring exciting flavors. Here are some great choices: - Mushrooms: They add a nice umami taste. - Peas: Sweet and bright, they balance the stew. - Celery: Offers a crunchy texture and fresh flavor. - Green beans: These can add color and a slight snap. Consider seasonal veggies too. In the fall, use squash or parsnips. In spring, try asparagus or baby carrots. Each season brings a chance to refresh your dish. You can easily adjust the recipe to fit your needs. If you need gluten-free options, skip the Worcestershire sauce or find a gluten-free brand. For a low-sodium stew, use low-sodium beef broth. You can also cut back on added salt. These small changes keep the dish tasty while meeting dietary needs. If you want a lighter stew, you can swap beef for chicken or turkey. These meats cook faster, so reduce the pressure cooking time to around 25 minutes. For a vegetarian or vegan version, use hearty vegetables like mushrooms and lentils. Replace beef broth with vegetable broth. This way, you create a filling and comforting stew that everyone will enjoy. To keep your beef stew fresh, store it in an airtight container. Let the stew cool first. It stays good in the fridge for about 3 to 4 days. This way, you can enjoy it later. Just be sure to check for any bad smell or mold before eating. To freeze beef stew, let it cool completely. Pour it into freezer-safe containers or bags. Leave space at the top for expansion. The stew can last for up to 3 months in the freezer. When you're ready to eat, thaw it overnight in the fridge. Reheat beef stew on the stove for best results. Use a pot over medium heat and stir often. This helps keep the texture nice. You can also use the microwave. Just heat it in short bursts, stirring in between. Avoid overheating, as it can make the meat tough. Enjoy each bite of your comforting stew! Yes, you can use frozen beef. Just remember to adjust the cooking time. If the beef is frozen, add about 10 extra minutes to the pressure cooking time. The beef will still turn out tender and flavorful. The stew is done when the beef is fork-tender. You should be able to break it apart easily. The vegetables should also be soft but not mushy. The total cooking time is about 35 minutes in the Instant Pot. Beef stew pairs well with several sides. You can serve it with crusty bread for dipping. Mashed potatoes are a nice touch too. A simple salad can add freshness to the meal. To spice up your beef stew, add red pepper flakes or hot sauce. You can also use spicy smoked paprika instead of regular paprika. Another option is to stir in diced jalapeños for some heat. Yes, you can make this stew ahead of time. It tastes even better the next day! Just let it cool, then store it in the fridge for up to three days. You can also freeze it for later. In this post, we explored how to make a delicious beef stew in an Instant Pot. We covered the main ingredients like beef chuck, vegetables, and broth, plus seasonings that enhance flavor. I provided clear steps for cooking, from searing the meat to thickening the stew at the end. Remember, you can customize the recipe to fit your taste, whether by altering vegetables or using different proteins. Enjoy crafting this hearty meal, and don’t hesitate to experiment, as the best stew is the one made your way!

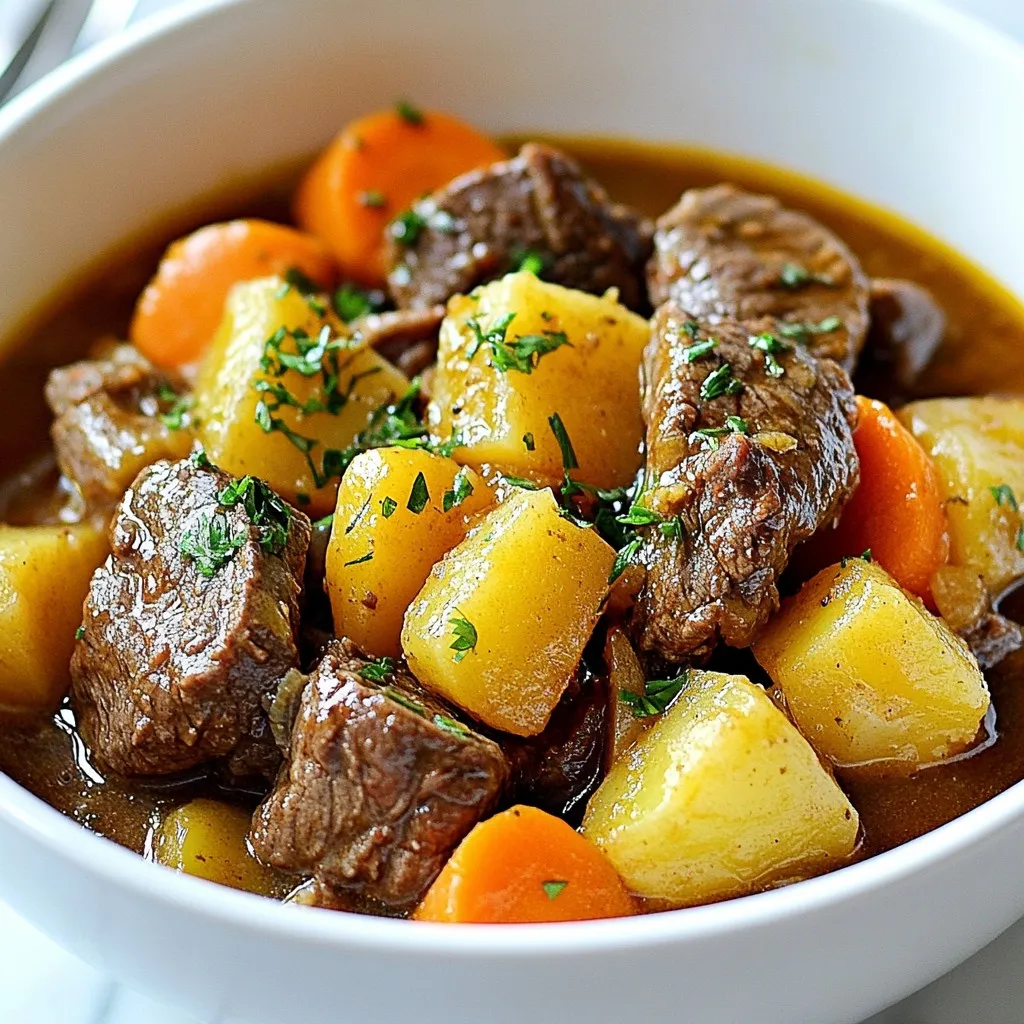
Are you ready to enjoy a warm, filling meal? My Instant Pot Beef Stew is the perfect comfort food for any day. With tender beef, fresh veggies, and rich broth, …

Read more

Categories Dinner
Older posts
Newer posts
← Previous Page1 … Page129 Page130 Page131 … Page134 Next →

TOSSED RECIPES

Simple meals, bold taste. Quick recipes made for real life — always fresh, always delicious. 🌿🍴

PAGES

Home About Contact Privacy Policy Terms & Conditions Cookie Policy GDPR Policy Copyright Policy Disclaimer

CATEGORIES

Appetizers Desserts Salads Breakfast Dinner

Contact

  • Pinterest
  • Mail
Copyright © 2026 Tossed Recipes. All rights reserved.