Skip to content
Tossed Recipes
  • Home
  • Appetizers
  • Desserts
  • Salads
  • Breakfast
  • Dinner
  • Privacy Policy
  • Contact
  • About

Chef Jamie

Baked Protein Pancake Bowls Healthy and Delicious Meal

November 14, 2025April 2, 2025 by Chef Jamie
- 1 cup rolled oats - 1 scoop vanilla protein powder - 1 teaspoon baking powder - 1/2 teaspoon cinnamon - 1 cup almond milk (or any milk of choice) - 1 large banana, mashed - 1 tablespoon maple syrup (optional) - 1/4 cup berries (blueberries, raspberries, or diced strawberries) - 2 tablespoons nut butter (peanut butter or almond butter) - Toppings: Greek yogurt, sliced banana, extra berries, and chopped nuts Each serving of Baked Protein Pancake Bowls provides a good balance of nutrients. You get about: - Calories: 220 - Protein: 15 grams - Carbohydrates: 30 grams - Dietary Fiber: 5 grams - Sugars: 5 grams - Fat: 7 grams This meal is high in protein and fiber, which keeps you full and satisfied. You can easily swap ingredients to fit your taste or diet. Try these: - Oats: Use quick oats for a softer texture. - Protein Powder: Any flavor works; chocolate is a fun choice! - Almond Milk: Use cow's milk or soy milk instead. - Banana: Applesauce can replace the banana for a different flavor. - Nut Butter: Try sunflower seed butter for a nut-free option. These substitutions keep the meal tasty while catering to your needs. {{ingredient_image_1}} 1. Preheat the Oven: Set your oven to 350°F (175°C). Grease or line a baking dish with parchment paper. 2. Mix Dry Ingredients: In a large bowl, add 1 cup of rolled oats, 1 scoop of vanilla protein powder, 1 teaspoon of baking powder, and 1/2 teaspoon of cinnamon. Stir these well. 3. Prepare Wet Ingredients: In another bowl, mash 1 large banana. Add 1 cup of almond milk and 1 tablespoon of maple syrup if you want sweetness. Mix until smooth. 4. Combine Ingredients: Add the wet mix to the dry mix. Stir until you have a thick batter. Gently fold in 1/4 cup of berries, like blueberries or raspberries. 5. Pour Batter: Pour the pancake batter into your prepared baking dish. Spread it out evenly. 6. Bake: Place the dish in the oven. Bake for 25-30 minutes. The pancake should be set and the edges golden. 7. Cool and Slice: Take it out and let it cool for a few minutes. Cut into bowls. 8. Top Your Bowls: Serve your pancake bowls with Greek yogurt. Add extra berries, banana slices, and a drizzle of nut butter for great flavor. Enjoy your healthy and delicious meal! To make the best baked protein pancake bowls, start with good oats. I use rolled oats for a chewy texture. Next, choose a protein powder you love. Vanilla adds great flavor. Use fresh baking powder for a good rise. Mix the wet and dry ingredients gently to keep the batter light. Finally, fold in your berries carefully. This keeps them whole and juicy. One common mistake is overmixing the batter. This can make your pancake bowls tough. Another mistake is not measuring the baking powder. Too little won’t help the pancakes rise. Also, don’t skip greasing your dish or using parchment paper. This prevents sticking. Lastly, check your oven temperature. An oven that is too hot can burn the edges before the middle cooks. You can boost flavor by adding spices. Try a pinch of nutmeg or vanilla extract. For more sweetness, add extra maple syrup. Using ripe bananas helps too. They add natural sugar and moisture. For a creamier texture, use full-fat almond milk. You can also experiment with different nut butters. Each one adds a unique taste. Finally, don’t forget your toppings. Greek yogurt, fresh fruit, and nuts make a tasty finish. Pro Tips Use Overripe Bananas: Overripe bananas are sweeter and more flavorful, making them perfect for your pancake mixture. Experiment with Protein Powder: Different brands of protein powder may yield varying textures. Choose one that suits your taste and dietary needs. Customize Your Berries: Feel free to mix and match berries based on your preference or what's in season for a fresh twist. Store Leftovers Properly: Keep any leftover pancake bowls in an airtight container in the fridge for up to three days, reheating as needed. {{image_2}} You can easily switch up the flavor of your baked protein pancake bowls. Try adding different fruits like apples or peaches. You can also mix in a tablespoon of cocoa powder for a chocolatey twist. For a tropical flavor, use coconut milk and add pineapple chunks. These changes keep your breakfasts exciting and fun! If you need gluten-free options, use gluten-free oats instead of regular rolled oats. For a vegan version, substitute the protein powder with a plant-based protein powder. You can replace the almond milk with oat or soy milk. Simply omit the Greek yogurt or use a dairy-free yogurt for a creamy topping. These swaps make it easy for everyone to enjoy! Toppings can elevate your pancake bowls. Some of my favorites are Greek yogurt, honey, or maple syrup. You can also try nut butter, seeds, or granola for crunch. Fresh fruits like bananas, strawberries, or a sprinkle of cinnamon add flavor and color. Get creative with your toppings to make each bowl unique and tasty! To store your leftover baked protein pancake bowls, let them cool first. Then, cut them into slices. Use an airtight container to keep them fresh. Place a piece of parchment paper between layers to avoid sticking. Store in the fridge for up to three days. You can freeze these pancake bowls for longer storage. After cooling, slice them and wrap each slice in plastic wrap. Place all wrapped slices in a freezer-safe bag. Remove as much air as possible. You can freeze them for up to two months. Label the bag with the date so you know when you made them. When you're ready to eat, take a slice from the fridge or freezer. If it's frozen, let it thaw in the fridge overnight. Heat in the microwave for 30-60 seconds. If you prefer, warm them in the oven at 350°F (175°C) for about 10 minutes. You can top them again with yogurt or fresh fruit after reheating. Enjoy your tasty meal! To make baked protein pancake bowls gluten-free, simply replace rolled oats with gluten-free oats. Ensure your protein powder is also gluten-free. You can find many brands that cater to this need. Always check labels to be sure. With these swaps, you can enjoy a tasty and safe meal. Yes, you can use different types of protein powder. Options include whey, pea, or soy protein. Each type may change the flavor slightly. For example, chocolate protein adds a rich taste. Experiment to find what you like best. Just keep the same amount as in the recipe. You will know your pancake bowls are done when they are set and slightly golden on the edges. Insert a toothpick in the center; it should come out clean. If it has wet batter, bake a little longer. Keep an eye on them to avoid overbaking. Enjoy your delicious creation! This article covered all you need to know about baked protein pancake bowls. We learned about key ingredients, their nutrition, and tasty substitutions. I shared step-by-step instructions, tips to enhance your dish, and different flavor options. You now have storage tips for leftovers and answers to common questions. Remember, these pancake bowls are versatile and fun. Enjoy making them your own! Keep experimenting with flavors and toppings to find your favorite mix. Happy cooking!

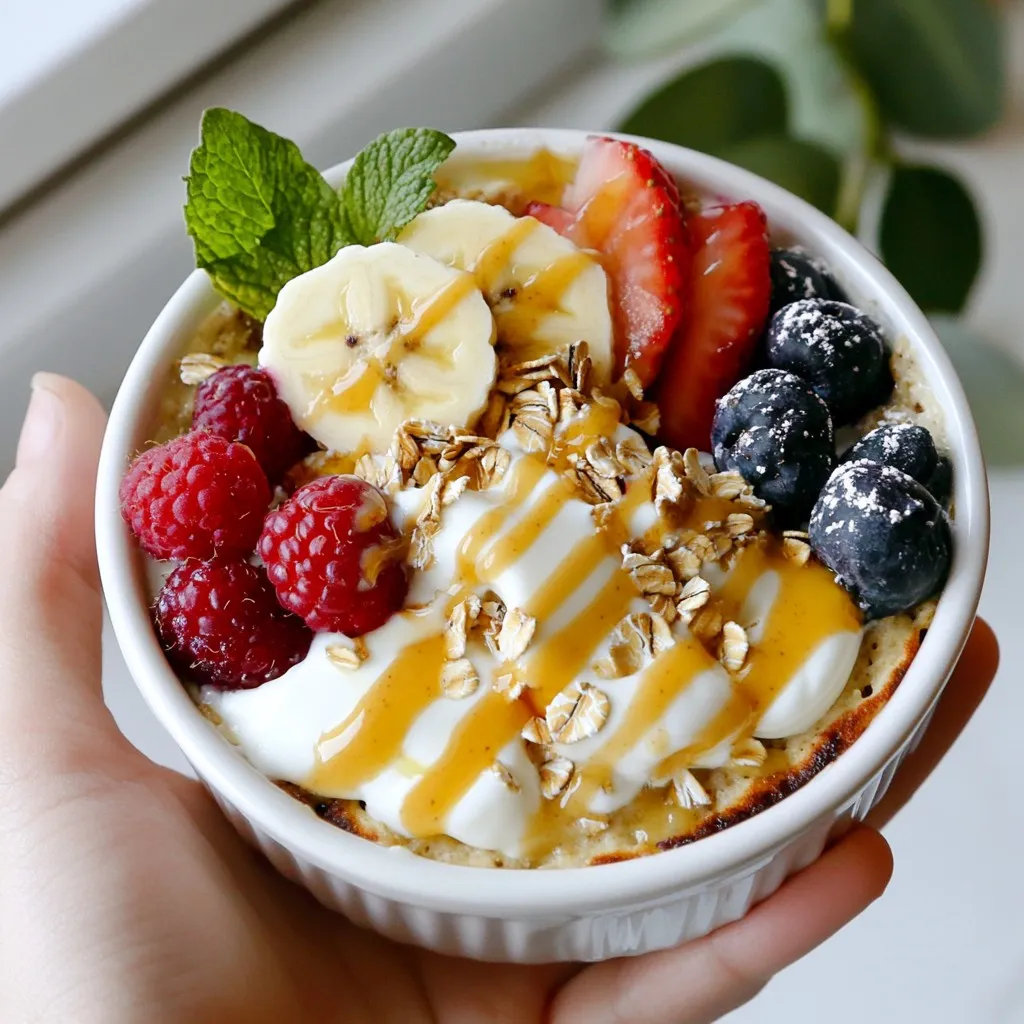
Baked protein pancake bowls are the perfect, healthy meal for any time of day! They are easy to make, packed with protein, and oh so delicious. I will guide you …

Read more

Categories Breakfast

Air Fryer Garlic Parmesan Wings Crispy and Flavorful

November 13, 2025April 2, 2025 by Chef Jamie
- 2 lbs chicken wings, separated into flats and drumettes - 2 tablespoons olive oil - 1 teaspoon garlic powder - 1 teaspoon onion powder - 1 teaspoon smoked paprika - 1 teaspoon salt - ½ teaspoon black pepper - ½ cup grated Parmesan cheese - 2 tablespoons fresh parsley, chopped (for garnish) - Optional: Fresh lemon wedges for serving When making Air Fryer Garlic Parmesan Wings, I start with fresh chicken wings. You can buy them whole, then separate them into flats and drumettes. This gives you the best texture and flavor. Use about 2 pounds of wings for a hearty meal. Next, I add olive oil. This helps the seasonings stick to the wings and makes them crispy. Just two tablespoons work great. Now, let’s talk about the seasonings. I use simple seasonings that pack a punch. Garlic powder adds richness. Onion powder gives a savory taste. Smoked paprika adds a hint of spice and color. You’ll also need salt and black pepper for balance. The star of this dish is the grated Parmesan cheese. Half a cup makes the wings cheesy and flavorful. Lastly, I like to sprinkle fresh parsley on top for color and freshness. If you want a tangy kick, serve with lemon wedges. These ingredients come together to create mouthwatering wings that everyone will love! {{ingredient_image_1}} First, grab a large bowl. In this bowl, combine 2 tablespoons of olive oil with 1 teaspoon of garlic powder, 1 teaspoon of onion powder, 1 teaspoon of smoked paprika, 1 teaspoon of salt, and ½ teaspoon of black pepper. Mix these well so all the flavors blend together. Once you have your seasoning mixture ready, add 2 pounds of chicken wings. Toss the wings in the bowl until they are fully coated in the seasoning. This step is key for great flavor. Now, it's time to cook! Preheat your air fryer to 400°F (200°C). This usually takes about 5 minutes. While it heats up, place the seasoned wings in the air fryer basket. Make sure to arrange them in a single layer to ensure crispiness. Do not overcrowd the basket. Cook the wings for 25 minutes. Halfway through, shake the basket gently. This helps the wings cook evenly and get that perfect crunch. After 25 minutes, check the wings to see if they are golden brown and crispy. If they need more time, feel free to add an extra 5 minutes. Once they are done, transfer the wings to a large bowl. While they are still hot, sprinkle ½ cup of grated Parmesan cheese over them. Toss the wings to coat them evenly with the cheese. For a fresh finish, garnish with 2 tablespoons of chopped parsley. Serve hot with optional lemon wedges on the side. Enjoy your tasty creation! To get those wings nice and crispy, do not overcrowd the air fryer basket. If you stack too many wings, they won’t cook evenly. Each wing needs space to crisp up. Aim for a single layer in the basket for best results. Adjust the cooking time if you want extra crispiness. The recipe suggests 25 minutes, but you can add 5 more if needed. Just keep an eye on them. They should turn golden brown and crunchy. Want to boost the flavor? Try adding a pinch of cayenne for heat or some lemon zest for brightness. You can also mix in some Italian herbs like basil or oregano. These little tweaks can take your wings to the next level. Coating the wings evenly is key. Make sure every wing gets a good toss in the seasoning mix. This way, each bite is packed with flavor. For dipping, ranch and blue cheese work great. You can also try a spicy sriracha sauce for a kick. Pair your wings with celery sticks or a fresh salad. These sides balance the richness of the garlic parmesan. You can also serve them with crispy fries or onion rings for a fun meal. Pro Tips Dry the Wings: Pat the chicken wings dry with paper towels before seasoning. This helps achieve maximum crispiness during air frying. Use High-Quality Parmesan: For the best flavor, use freshly grated Parmesan cheese instead of pre-packaged. The fresh cheese melts and adheres better to the wings. Don’t Overcrowd: Cook the wings in batches if necessary. Overcrowding the air fryer can lead to uneven cooking and soggy wings. Experiment with Seasonings: Feel free to customize the seasoning blend. Adding cayenne pepper or your favorite dry rub can give the wings an extra kick. {{image_2}} You can change the taste of garlic parmesan wings with fun twists. One option is buffalo-style garlic parmesan wings. You mix hot sauce with the garlic and cheese. This gives a spicy kick to your wings. The heat from the sauce nicely balances the creamy parmesan. Another great choice is lemon pepper garlic parmesan wings. For this, add lemon zest and pepper to the garlic mix. The bright lemon flavor gives a fresh twist. This version is perfect for spring and summer gatherings. You get the same crispy texture but with a zesty bite. If you don't have an air fryer, you can still make tasty wings. Oven-baking is a classic method. Preheat your oven to 425°F (220°C). Spread the seasoned wings on a baking sheet. Bake them for about 30-35 minutes. Flip the wings halfway through for even cooking. Grilling is another awesome way to cook wings. It adds a smoky flavor that many love. Heat your grill to medium-high. Place the wings on the grill and cook for about 20-25 minutes. Turn them often to avoid burning. You will get crispy, charred wings that are full of flavor. To keep your garlic Parmesan wings fresh, store them in the refrigerator. First, let the wings cool to room temperature. Then, place them in an airtight container. This helps maintain their flavor and texture. You can also wrap them tightly in aluminum foil or plastic wrap. For best results, eat the leftovers within three days. The best way to reheat wings is in your air fryer. Set it to 350°F (175°C) for about 5 to 7 minutes. This method keeps them crispy and delicious. If you don’t have an air fryer, you can use the oven. Preheat it to 350°F (175°C) and place the wings on a baking sheet. Bake for about 10 to 15 minutes, checking often. You can also use a microwave, but this may make the wings a bit soggy. Heat them for about 1 to 2 minutes, but be cautious. Enjoy your wings hot and tasty! You should air fry chicken wings for 25 minutes at 400°F (200°C). This time gives you crispy wings. Make sure to shake the basket halfway through to cook them evenly. If you want extra crispiness, add 5 more minutes. Yes, you can use frozen chicken wings! Just add 5-10 minutes to the cooking time. Start with 30 minutes at 400°F (200°C). Check them for doneness. They should be golden and crispy. Always ensure they are fully thawed for even cooking. Garlic parmesan wings go well with many sides. Here are some great choices: - Celery sticks with ranch dressing - Fresh salad with vinaigrette - Crispy fries or potato wedges - Garlic bread for a tasty touch - Cold drinks like beer or lemonade These sides enhance the flavor and make your meal even better! This blog focused on making crispy garlic Parmesan chicken wings using an air fryer. We discussed the key ingredients, step-by-step instructions, and helpful tips to ensure perfect wings. You learned about different flavor options, storage methods, and reheating tips. In the end, cooking wings can be fun and easy. With these steps and ideas, you can impress family and friends. Enjoy your tasty wings!

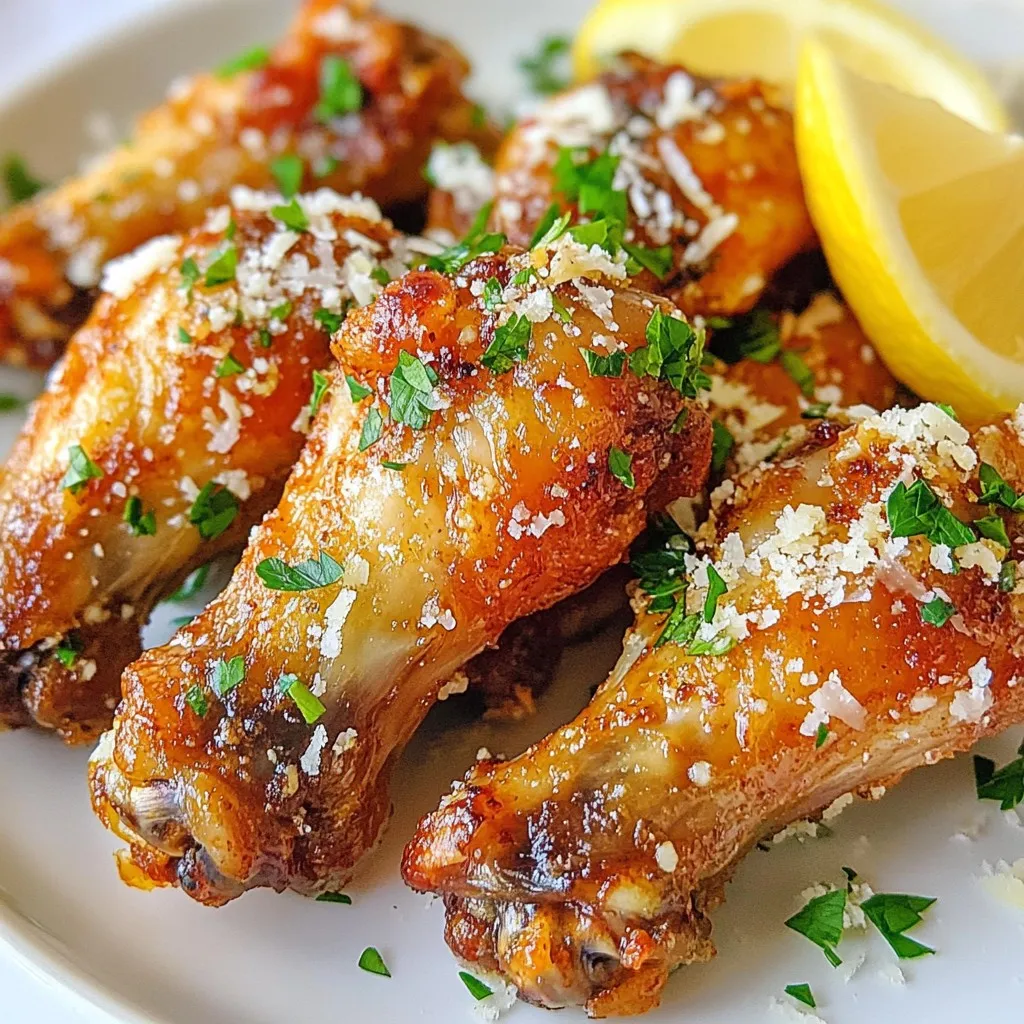
Are you ready to elevate your snack game? My Air Fryer Garlic Parmesan Wings are crispy, flavorful, and a total crowd-pleaser. In just a few simple steps, you’ll learn how …

Read more

Categories Appetizers

Savory Air Fryer Buffalo Cauliflower Recipe to Enjoy

November 14, 2025April 2, 2025 by Chef Jamie
- 1 large head of cauliflower, cut into bite-sized florets - 1 cup all-purpose flour - 1/2 cup water - 1 teaspoon garlic powder - 1 teaspoon onion powder - 1 teaspoon smoked paprika - 1/2 teaspoon salt - 1/4 teaspoon black pepper - 1/2 cup buffalo sauce (store-bought or homemade) - 1 tablespoon olive oil - Fresh parsley, chopped (for garnish) - Optional: celery sticks and ranch dressing for serving When I make Air Fryer Buffalo Cauliflower, I love using fresh and simple ingredients. Start with one large head of cauliflower. Cut it into bite-sized florets so they cook evenly. You want a nice crunch! Next, I prepare the batter. I mix 1 cup of all-purpose flour with 1/2 cup of water in a bowl. Then, I add some spices for flavor. I use 1 teaspoon of garlic powder, onion powder, and smoked paprika. I also add 1/2 teaspoon of salt and 1/4 teaspoon of black pepper. This mix gives the cauliflower a tasty coat. Now, it's time for the star of the show: the buffalo sauce! I use 1/2 cup of buffalo sauce. You can buy it or make your own. It adds the heat and tang we crave. To help the cauliflower crisp up, I add 1 tablespoon of olive oil. For garnish, I chop fresh parsley. This adds a pop of color and freshness. You can serve the cauliflower with celery sticks and ranch dressing. They balance the heat and add extra flavor. Enjoy your time cooking this simple and fun dish! {{ingredient_image_1}} First, rinse the large head of cauliflower under cool water. This helps remove dirt. Then, cut it into bite-sized florets. Aim for uniform pieces to ensure even cooking. After cutting, pat the florets dry with a paper towel. This step is key to achieving crispiness later on. Next, grab a mixing bowl. In it, combine 1 cup of all-purpose flour and 1/2 cup of water. Add 1 teaspoon of garlic powder, 1 teaspoon of onion powder, 1 teaspoon of smoked paprika, 1/2 teaspoon of salt, and 1/4 teaspoon of black pepper. Whisk the mixture until smooth. Ensure there are no lumps. A well-mixed batter will coat the cauliflower perfectly. Now, dip each cauliflower floret into the batter. Make sure they are fully coated. Let any excess batter drip off before placing them in the air fryer. Preheat your air fryer to 390°F (200°C) for about 5 minutes. While it heats up, lightly grease the air fryer basket with 1 tablespoon of olive oil. Once preheated, arrange the coated florets in a single layer. You may need to cook in batches, depending on your air fryer size. Cook the cauliflower for 12–15 minutes. Halfway through, shake the basket for even crispiness. The florets should look golden and crispy when done. Once cooked, transfer the cauliflower to a large bowl. Drizzle 1/2 cup of buffalo sauce over them. Gently toss to coat every piece evenly. For extra flavor, return the sauced cauliflower to the air fryer for another 3–5 minutes. This helps set the sauce. When finished, take out the cauliflower and place it on a serving platter. Garnish with chopped fresh parsley for a pop of color. Serve hot with celery sticks and ranch dressing for dipping. Enjoy your tasty and spicy snack! To get that perfect crunch, dry the cauliflower well before cooking. After rinsing, use a paper towel to pat the florets dry. This step helps the batter stick and keeps excess moisture away. Next, focus on the batter consistency. Mix flour, water, and seasonings until smooth. A thick batter sticks better, so avoid making it too runny. If your air fryer is small, cook in batches. This ensures each cauliflower floret gets enough hot air to crisp up. Overcrowding the basket can lead to soggy pieces. Keep an eye on the time; it should take about 12 to 15 minutes. Shake the basket halfway through to help all sides crisp evenly. Garnishing adds a nice touch. After cooking, sprinkle fresh parsley over the cauliflower. It brightens the dish and adds color. Serve with celery sticks for crunch and ranch dressing for dipping. This pairing cools the heat and enhances the flavor. Your dish will look great and taste even better! Pro Tips Choose Fresh Cauliflower: Always opt for firm, fresh cauliflower with tight florets for the best texture and flavor. Adjust Spice Level: If you prefer a milder version, reduce the amount of buffalo sauce or opt for a milder variety. Batch Cooking: If you're making a large quantity, cook in batches to ensure all florets are evenly crispy. Perfectly Set Sauce: For an extra punch of flavor, let the sauced cauliflower rest for a few minutes before serving. {{image_2}} You can use different sauces to change the taste of your buffalo cauliflower. If you want a milder flavor, try using barbecue sauce or a honey mustard sauce. These sauces still add great taste without the heat. For those who love spice, try adding a bit of sriracha or a spicy garlic sauce. Mixing buffalo sauce with honey can also balance the heat with sweetness. Are you looking for gluten-free options? You can make a gluten-free batter by using almond flour or chickpea flour instead of all-purpose flour. Just mix it with water and seasonings as you would with regular flour. This way, you can enjoy the dish without gluten. To make your buffalo cauliflower even more exciting, add extra spices or herbs. Try adding cayenne pepper for extra heat or smoked paprika for a rich taste. Fresh herbs like cilantro or dill can also brighten up the flavors. Mixing in nutritional yeast can give it a cheesy flavor without dairy. Each of these options can create a unique twist on the classic recipe. To keep your buffalo cauliflower fresh, store it in an airtight container. Place parchment paper between layers to avoid sogginess. Refrigerate it within two hours of cooking. This helps maintain its flavor and texture for up to three days. To reheat buffalo cauliflower, use the air fryer. Set it to 350°F (175°C) for about 5–7 minutes. This method keeps the cauliflower crispy. You can also use an oven. Preheat it to 350°F (175°C) and bake for 10 minutes. Avoid the microwave, as it can make the cauliflower soft. Yes, you can freeze buffalo cauliflower! First, let it cool completely. Then, spread the florets on a baking sheet and freeze for about an hour. Once frozen, transfer them to a freezer bag. This way, they can last up to three months. When ready to eat, bake from frozen at 400°F (200°C) for 15–20 minutes. You can store Air Fryer Buffalo Cauliflower in the fridge for up to three days. Keep it in an airtight container to keep it fresh. If you want to enjoy it later, ensure it cools before sealing. This helps it stay crispy longer. Yes, you can make Air Fryer Buffalo Cauliflower in advance. Prepare it up to the point before adding the buffalo sauce. Store the plain cauliflower in the fridge. When ready to eat, just toss it in the sauce and air fry it for a few minutes. This keeps the flavors fresh and tasty. - Side dish suggestions: Air Fryer Buffalo Cauliflower pairs well with a fresh salad, roasted veggies, or crispy potato wedges. Try serving it with a side of celery sticks for extra crunch. - Appropriate dipping sauces: A creamy ranch dressing is perfect for dipping. You can also try blue cheese dressing for a classic touch. If you like spice, serve it with extra buffalo sauce on the side. Air Fryer Buffalo Cauliflower is simple and fun to make. We covered ingredients, step-by-step cooking, and tips to keep it crispy. Enjoying this dish is easy with variations and storage tips. Whether you prefer spicy or mild sauces, there’s a version for you. Don't forget to try different dips for extra flavor. Making this dish will impress your friends and family. Now, grab some cauliflower and start cooking today!

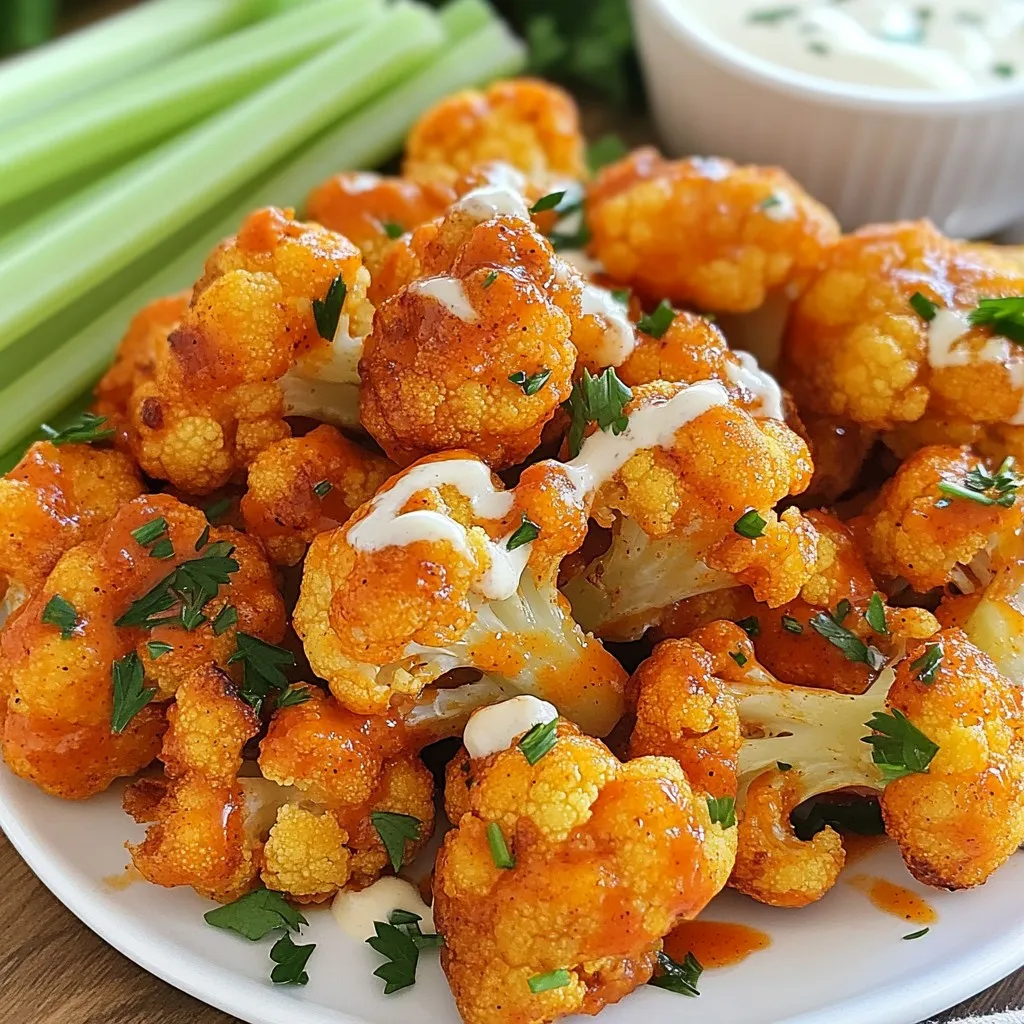
Are you ready to spice up your snacking? This Savory Air Fryer Buffalo Cauliflower Recipe delivers bold flavors and crispy texture in every bite. Perfect as a game-day treat or …

Read more

Categories Appetizers

Creamy Oven-Baked Chicken Thighs Flavorful Delight

January 12, 2026March 28, 2025 by Chef Jamie
- 4 bone-in, skin-on chicken thighs - 1 cup heavy cream - 1 cup chicken broth - 2 tablespoons olive oil - 4 cloves garlic, minced - 1 tablespoon Dijon mustard - 1 teaspoon smoked paprika - 1 teaspoon dried thyme - Salt and pepper to taste - Fresh parsley, chopped (for garnish) Gather these ingredients before you start cooking. The chicken thighs give the dish a rich flavor. Heavy cream makes it creamy and smooth. Chicken broth adds depth and moisture. These three main ingredients work together perfectly. Next, we have the additional ingredients. Olive oil helps to cook the garlic. Garlic brings a lovely aroma and taste. Dijon mustard adds a tangy kick. Smoked paprika gives a hint of smokiness. Dried thyme brings herbaceous notes. Salt and pepper enhance all the flavors. Lastly, fresh parsley brightens the dish as a garnish. Make sure to measure everything out. It will save time later and ensure perfect results. Each ingredient plays a key role in your creamy oven-baked chicken thighs. Now you’re ready to cook! {{ingredient_image_1}} 1. First, preheat your oven to 375°F (190°C). This helps cook the chicken evenly. 2. In a skillet, add 2 tablespoons of olive oil over medium heat. Once hot, add 4 minced garlic cloves. Sauté for about 1 minute. The garlic should smell great but not burn. 3. In a bowl, mix 1 cup of heavy cream and 1 cup of chicken broth. Add 1 tablespoon of Dijon mustard, 1 teaspoon of smoked paprika, and 1 teaspoon of dried thyme. Season with salt and pepper to taste. Whisk until smooth. This creamy mixture will coat the chicken and add flavor. 1. Take a baking dish and arrange 4 chicken thighs skin-side up. Make sure they fit well without crowding. 2. Pour the creamy mixture around the chicken. Ensure the thighs are coated but not submerged. This helps keep the skin crispy while cooking. 3. Place the dish in the oven and bake for about 40 to 45 minutes. Use a meat thermometer to check for an internal temperature of 165°F (74°C). This tells you the chicken is safely cooked. 1. For crispy skin, turn your oven to broil. Broil the chicken thighs on high for 3 to 5 minutes at the end of baking. Keep an eye on them to avoid burning. 2. After broiling, remove the chicken from the oven. Let it rest for a few minutes. This helps the juices settle. 3. Before serving, garnish with freshly chopped parsley. This adds color and freshness. Serve the chicken on a platter with extra creamy sauce spooned over the top. Enjoy! To make sure your chicken thighs stay creamy, use heavy cream. This thick cream makes a rich sauce. Mix it well with chicken broth and seasonings. This blend keeps the sauce smooth and tasty. The best internal temperature for chicken is 165°F (74°C). Use a meat thermometer to check. Insert it into the thickest part of the thigh. This step ensures you cook the chicken safely and perfectly. Pair your creamy chicken thighs with roasted veggies or mashed potatoes. These sides complement the dish and add color to your plate. For a fresh touch, serve with a salad or steamed broccoli. To impress your guests, use a large platter for presentation. Arrange the chicken thighs with the creamy sauce on top. Sprinkle fresh parsley for a bright finish. This simple touch makes the meal feel special and inviting. Pro Tips Perfect Browning: For even better flavor, sear the chicken thighs skin-side down in the skillet for 3-4 minutes before baking to achieve a golden, crispy skin. Flavor Infusion: Marinate the chicken in the creamy mixture for 1-2 hours in the refrigerator to allow the flavors to penetrate the meat more deeply. Herb Variations: Experiment with different herbs like rosemary or oregano for a unique twist on the traditional flavor profile. Resting Time: Let the chicken rest for about 5 minutes after baking to allow the juices to redistribute for a more succulent bite. {{image_2}} You can change the flavor of creamy oven-baked chicken thighs. Try using different herbs and spices. For a fresh twist, add rosemary or oregano. These herbs give a lovely aroma. If you want a kick, use cayenne pepper. This spice adds heat without overpowering the dish. Another option is to substitute for lighter cream options. You can use half-and-half instead of heavy cream. This change will lower the fat but still keep a creamy texture. Coconut milk also works well for a dairy-free version. It adds a hint of sweetness that pairs nicely with the savory chicken. You can also switch the chicken thighs for boneless ones. Boneless chicken cooks faster. Just be sure to adjust the cooking time. Bake boneless thighs for about 25 to 30 minutes. Check that the internal temperature reaches 165°F (74°C). Adding vegetables to the mixture makes this dish even better. You can add carrots, potatoes, or green beans. Toss them in the creamy sauce before baking. This addition creates a one-pan meal. Plus, the veggies soak up all the delicious flavors. To store creamy chicken thighs, first let them cool down. Place the chicken in an airtight container. Make sure to add some of the creamy sauce on top. This helps keep the chicken moist. You can also use a glass dish with a lid. These containers work well for keeping flavors intact. When reheating, use the oven for the best results. Preheat your oven to 350°F (175°C). Place the chicken in a baking dish and cover it with foil. This keeps the chicken moist and helps with creaminess. Heat for about 20 minutes or until warm. You can also use a microwave if you're in a hurry. Just cover the dish with a microwave-safe lid. Heat in short bursts, stirring often, to keep the sauce creamy. Can I use chicken breasts instead of thighs? Yes, you can use chicken breasts. They cook faster than thighs. The dish may be less juicy. Thighs have more fat, which adds flavor. If using breasts, check them often to avoid drying out. How do I know when the chicken is done? The chicken is done when it reaches 165°F (74°C). Use a meat thermometer to check. Insert it into the thickest part of the thigh. If the juices run clear, it’s also a good sign. What can I use instead of heavy cream? You can use half-and-half or coconut cream. Both options will add creaminess. If you want a lighter taste, try plain yogurt. Just mix it well with broth before adding. Is it possible to make this dish dairy-free? Yes, you can make it dairy-free! Use almond milk or oat milk instead of heavy cream. Make sure to add some cornstarch to thicken the sauce. This keeps the creamy texture you love. This blog post outlines a rich and tasty creamy chicken thighs recipe. We covered the key ingredients, from chicken and cream to seasonings like garlic and thyme. I shared step-by-step instructions for prepping, baking, and finishing your dish. We explored tips for perfect texture and serving ideas. You learned about variations to make the recipe your own and how to store leftovers. Use these insights to create a dish that impresses. Cook with confidence, and enjoy sharing this meal with others. Your kitchen adventures await!

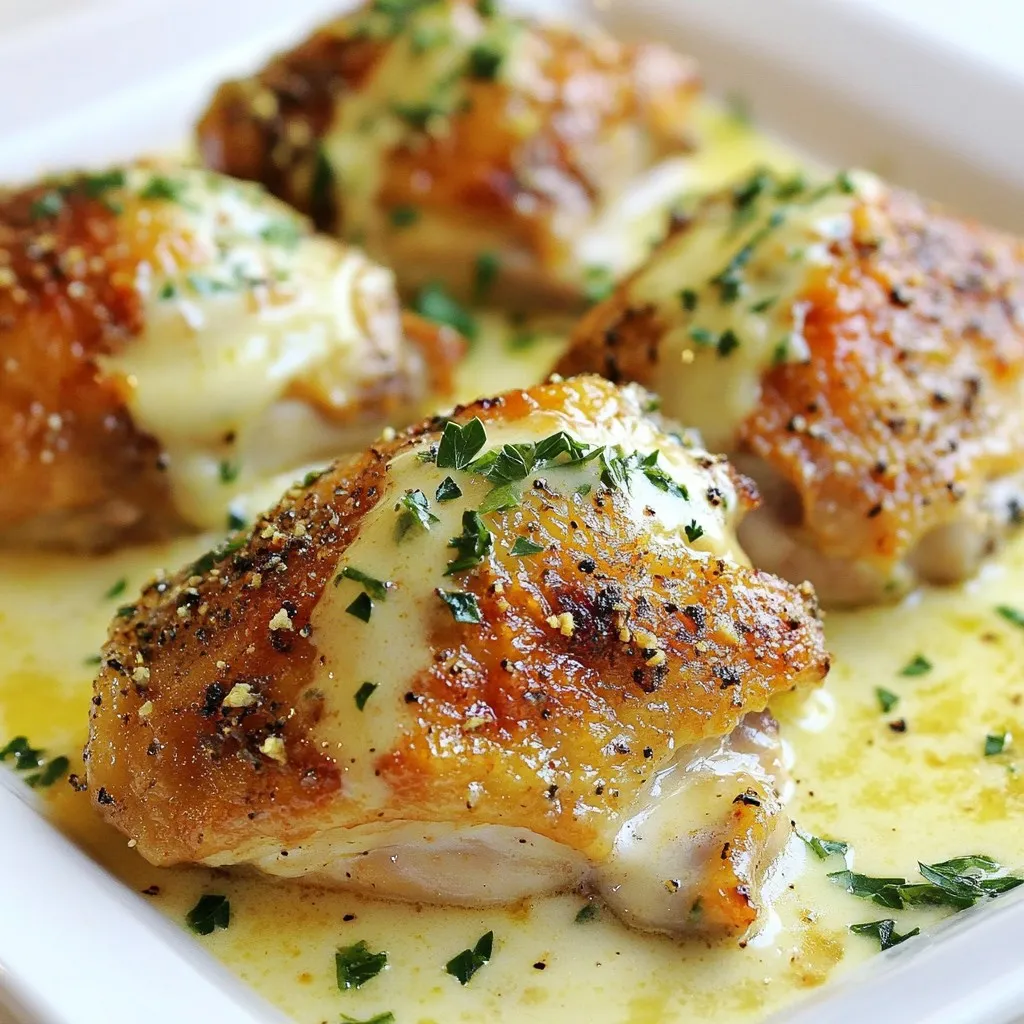
Are you ready to elevate your dinner game? In this post, I’ll share how to make creamy oven-baked chicken thighs that are a flavorful delight. With just a few simple …

Read more

Categories Dinner

Whole30 Buffalo Chicken Stuffed Peppers Tasty Meal

November 14, 2025March 24, 2025 by Chef Jamie
- Ground chicken and its preparation - You need 1 pound of ground chicken. Cook it until it’s brown in a skillet. This gives a nice flavor and texture. Make sure to break it into small pieces as it cooks. - Whole30 compliant hot sauce options - Use 1/4 cup of hot sauce that meets Whole30 rules. Look for brands without added sugars or artificial ingredients. This sauce brings the buffalo flavor that makes these peppers special. - Fresh herbs for garnish - Use 1/4 cup of chopped fresh cilantro and 1/4 cup of sliced green onions. These herbs add a fresh taste and bright color. They make your dish look good too. Just sprinkle them on top before serving. This mix of ingredients creates a tasty and healthy meal. You can enjoy these stuffed peppers without worry. {{ingredient_image_1}} First, you need to preheat your oven to 375°F (190°C). This temperature is key for cooking the peppers just right. If your oven is too cool, the peppers won’t soften well. On the other hand, if it’s too hot, they might burn. To make clean-up easy, line your baking dish with parchment paper. This way, any drips or spills will not stick to the dish. You can simply toss the paper when you’re done! Next, let’s prep the bell peppers. Start by washing them well under cold water. This removes any dirt or pesticides. Then, slice off the tops of the peppers and remove the seeds and membranes inside. This step is important because the seeds can be bitter. You can use any color of bell pepper you like, such as red, yellow, or green. Each adds a unique flavor! Now it’s time to cook the chicken. Heat one tablespoon of olive oil in a large skillet over medium heat. When the oil is hot, add the finely chopped onion and minced garlic. Sauté them for about three minutes until the onion turns translucent. Next, crank up the heat to medium-high and add one pound of ground chicken. Cook it for about five to seven minutes. Stir the chicken often to break it into small pieces. Make sure it cooks all the way through; there should be no pink left! After the chicken is done, mix in the cauliflower rice, hot sauce, smoked paprika, onion powder, salt, and pepper. Cook this mixture for another three to four minutes until it’s well combined and heated through. Now you’re ready to stuff those peppers! To boost the buffalo chicken flavor, adjust the spices. You can add more smoked paprika for a deeper taste. A pinch of cayenne can add heat if you like it spicy. Mixing in some celery or carrots gives a fresh crunch. These veggies can balance the heat while adding texture. Prepare your ingredients a day ahead for easy cooking. Chop the onion and garlic, and store them in the fridge. You can also cook the ground chicken mix beforehand. Store the mixture in an airtight container. Assemble the stuffed peppers when you're ready to bake. This saves time on busy nights. Serve these stuffed peppers with a crisp salad. A side of carrot sticks or cucumber slices pairs well too. For utensils, use a fork and a knife for easy eating. Enjoy every bite of this flavorful meal! Pro Tips Choose Your Peppers Wisely: Select firm and vibrant bell peppers to ensure they hold their shape while baking and provide a satisfying crunch. Customize the Spice Level: Adjust the amount of hot sauce based on your preference; for a milder flavor, start with less and add more as needed. Make Ahead: Prepare the stuffed peppers in advance and store them uncooked in the fridge for up to a day. Just bake them when you're ready to serve! Garnish for Flavor: Don't skip the garnish! Fresh cilantro and green onions add a burst of flavor and color to your dish. {{image_2}} You can switch the ground chicken for other proteins. Ground turkey works well. It has a mild flavor and cooks similarly. If you prefer beef, use lean ground beef for a richer taste. For a unique twist, try shredded chicken or even pulled pork. If you want vegan options, use lentils or chickpeas. These beans add great texture. You can also mash cauliflower instead of rice for a lighter filling. While bell peppers are tasty, try other vegetables too. Zucchini or eggplant can be fun bases. They hold up well and soak up flavors. You can also use portobello mushrooms for a meaty texture. Get creative with flavors! Add different spices like cumin or chili powder. You can even mix in some diced tomatoes for a fresh taste. Each variation can give your dish a new life. To keep your Whole30 Buffalo Chicken Stuffed Peppers fresh, use airtight containers. Glass containers work great. They help keep the peppers moist and tasty. Make sure to let them cool down before sealing. If you want to freeze them, wrap each pepper in plastic wrap. Then, put them in a freezer-safe bag. This keeps out air and prevents freezer burn. They can stay in the freezer for up to three months. When it's time to reheat, you have options. To keep the peppers moist, use the oven. Preheat it to 350°F (175°C). Place the peppers in a baking dish and cover with foil. Heat for about 20 minutes. If you're in a rush, the microwave works too. Just heat them for 2-3 minutes. Check if they are warm throughout. Enjoy your meal without losing that delicious flavor! Yes, you can make these stuffed peppers ahead of time. Prepare the filling first. Cook the chicken, onions, and spices as directed. Then, let the mixture cool. Stuff the peppers and cover them with plastic wrap. Store them in the fridge for up to 24 hours. When you are ready to eat, bake them as instructed. They may need a few extra minutes in the oven if they are cold from the fridge. This method saves time and keeps flavors fresh. If you want alternatives to cauliflower rice, try these options: - Riced broccoli - Finely chopped zucchini - Shredded carrots - Riced turnips These substitutions keep the dish compliant with Whole30. Choose any that you like best. Each option brings its own flavor and texture. Yes, stuffed peppers fit the Whole30 guidelines. This recipe uses ground chicken, fresh vegetables, and Whole30 compliant hot sauce. The peppers themselves are a great low-carb option. All ingredients support the Whole30 plan, making this dish a healthy choice. Enjoy these stuffed peppers guilt-free while following your Whole30 journey. In this blog post, we explored making Whole30 Buffalo Chicken Stuffed Peppers. You learned about the key ingredients, from ground chicken to fresh herbs. We followed step-by-step instructions for prepping and cooking, including tips for perfect flavor. Variations let you mix proteins and peppers for more fun. Lastly, we covered storage and reheating tips for leftovers. Buffalo chicken peppers are tasty and easy. With this recipe, you can create a healthy meal sure to impress. Enjoy your cooking adventure!

Looking for a meal that’s both satisfying and Whole30-compliant? You’ll love these Whole30 Buffalo Chicken Stuffed Peppers! In this easy recipe, I’ll show you how to combine juicy ground chicken …

Read more

Categories Dinner

Cheesy Garlic Chicken Wraps Simple and Tasty Meal

January 7, 2026March 17, 2025 by Chef Jamie
- 2 cups cooked chicken, shredded - 1 cup cream cheese, softened - 1 cup shredded mozzarella cheese - 2 cloves garlic, minced - 1 tablespoon fresh parsley, chopped The main ingredients are key to making these wraps tasty. Use cooked chicken to save time. Shredded chicken mixes well with cream cheese and mozzarella cheese. These cheeses add creaminess and flavor. Fresh garlic gives a strong taste. Parsley adds a nice touch of color and freshness. - 4 large tortillas (flour or whole wheat) - 1 cup baby spinach - 1/2 cup cherry tomatoes, halved - 1 teaspoon smoked paprika - Salt and pepper to taste - Olive oil for cooking Tortillas serve as the wrap base. You can choose flour or whole wheat based on your taste. Baby spinach adds crunch and nutrients. Cherry tomatoes bring a pop of color and sweetness. Smoked paprika adds depth and a hint of smoke. Don't forget salt and pepper to enhance all the flavors. A little olive oil helps crisp the wraps when cooking. {{ingredient_image_1}} First, gather your ingredients in a bowl. You need 2 cups of shredded chicken, 1 cup of cream cheese, and 1 cup of shredded mozzarella cheese. Mix these together well. Then, add 2 minced garlic cloves, 1 tablespoon of chopped parsley, and 1 teaspoon of smoked paprika. Season with salt and pepper to your taste. This cheesy filling is rich and full of flavor. Now it’s time to assemble your wraps. Lay out 4 large tortillas on a clean surface. Take a portion of the cheesy chicken mixture and spread it evenly on each tortilla. Leave about an inch of space at the edges. Next, add a handful of baby spinach and a few halved cherry tomatoes on top of the filling. This adds crunch and color to your dish. Heat a skillet over medium heat and drizzle in some olive oil. Place the wraps seam-side down in the skillet. Cook them for 3 to 4 minutes until they turn golden brown. Flip the wraps carefully and cook the other side for another 3 to 4 minutes. The cheese should melt, and the tortillas should be crispy. Once done, remove the wraps from the skillet and let them cool slightly before slicing in half. To make your wraps shine, choose the right seasonings. I love using smoked paprika. It adds a nice depth to the chicken. You can also try garlic powder or onion powder for extra flavor. If you have leftover chicken, use it! Shred it and mix it into the cheese blend. This saves time and tastes great. You can use rotisserie chicken too. It has great flavor and makes cooking easier. Crispy wraps are a must. To get this, heat your skillet well before adding the wraps. Use medium heat and a splash of olive oil. This helps make the outside nice and crunchy. To avoid soggy tortillas, don’t overload them with filling. Keep a good balance. Also, let the wraps cool a bit after cooking. This way, steam won’t make them soft. Enjoy your crispy, cheesy garlic chicken wraps! Pro Tips Use Leftover Chicken: This recipe is perfect for using up leftover rotisserie chicken, saving both time and effort. Customize Your Veggies: Feel free to add any vegetables you enjoy, such as bell peppers or onions, to the cheesy filling for extra flavor and nutrition. Cooking Method: For a healthier option, you can bake the wraps instead of frying. Just place them on a baking sheet and bake at 375°F (190°C) for 15-20 minutes until golden and crispy. Make Ahead: These wraps can be assembled ahead of time and stored in the refrigerator for up to a day. Just cook them when you’re ready to eat! {{image_2}} You can switch up the flavor of your cheesy garlic chicken wraps in fun ways. Try using different cheeses like cheddar or pepper jack. These cheeses add a unique taste and kick. You can also add spices like Italian seasoning or chili flakes for an extra zing. If you want a lighter option, swap the chicken for grilled veggies. Zucchini, bell peppers, and mushrooms work great. They add color and flavor. Plus, grilled veggies bring a nice crunch to each bite. If you need gluten-free options, use gluten-free tortillas. These wraps still taste great and hold all your fillings. For those who are vegan, you can replace the chicken with chickpeas or tofu. Use vegan cream cheese and dairy-free cheese for a tasty twist. These changes keep the meal delicious while meeting your dietary needs. To store your cheesy garlic chicken wraps, first let them cool down. Place them in an airtight container. This keeps them fresh. You can also wrap them in plastic wrap. Make sure they are sealed well. In the fridge, they last about 3 to 4 days. If you plan to eat them later, use the freezer instead. For freezing, wrap each wrap tightly in foil or plastic wrap. This helps prevent freezer burn. Place the wrapped wraps in a freezer bag. Be sure to label the bag with the date. They can stay frozen for up to 2 months. When you're ready to eat, take one out. To reheat, you can use the oven or a skillet. If using the oven, preheat it to 375°F (190°C). Bake for about 15-20 minutes. If using a skillet, heat it over medium heat. Cook until warm, about 5-7 minutes. Enjoy your cheesy garlic chicken wraps anytime! You can boost the spice with a few simple steps. Try adding some crushed red pepper flakes to the cheesy mixture. You can also mix in diced jalapeños for a fresh kick. If you want more heat, consider using pepper jack cheese instead of mozzarella. For a smoky flavor, add a bit more smoked paprika. These small changes will make your wraps flavorful and exciting. Yes, you can! Make the cheesy filling a day before. Store it in the fridge in an airtight container. Assemble the wraps just before you cook them. This keeps the tortillas fresh and avoids sogginess. If you must prepare them all at once, wrap them tightly in foil. This helps keep them warm until serving. Pair your wraps with fun sides and dips. A fresh salad adds crunch and color. Try a light dressing with lemon and olive oil. You can serve salsa or guacamole for a tasty dip. Marinara sauce is also a great choice. It adds flavor and moisture to each bite. These sides make your meal complete and enjoyable. In this article, we explored how to make Cheesy Garlic Chicken Wraps. You learned about key ingredients like chicken, cream cheese, and spices. We discussed easy steps for preparation, assembly, and cooking. I shared tips to enhance flavor and achieve crispy wraps. Plus, we covered variations, storage tips, and common questions. Now, it’s time to enjoy your delicious wraps! Try customizing them to fit your taste. These wraps are simple, tasty, and perfect for any meal. Happy cooking!

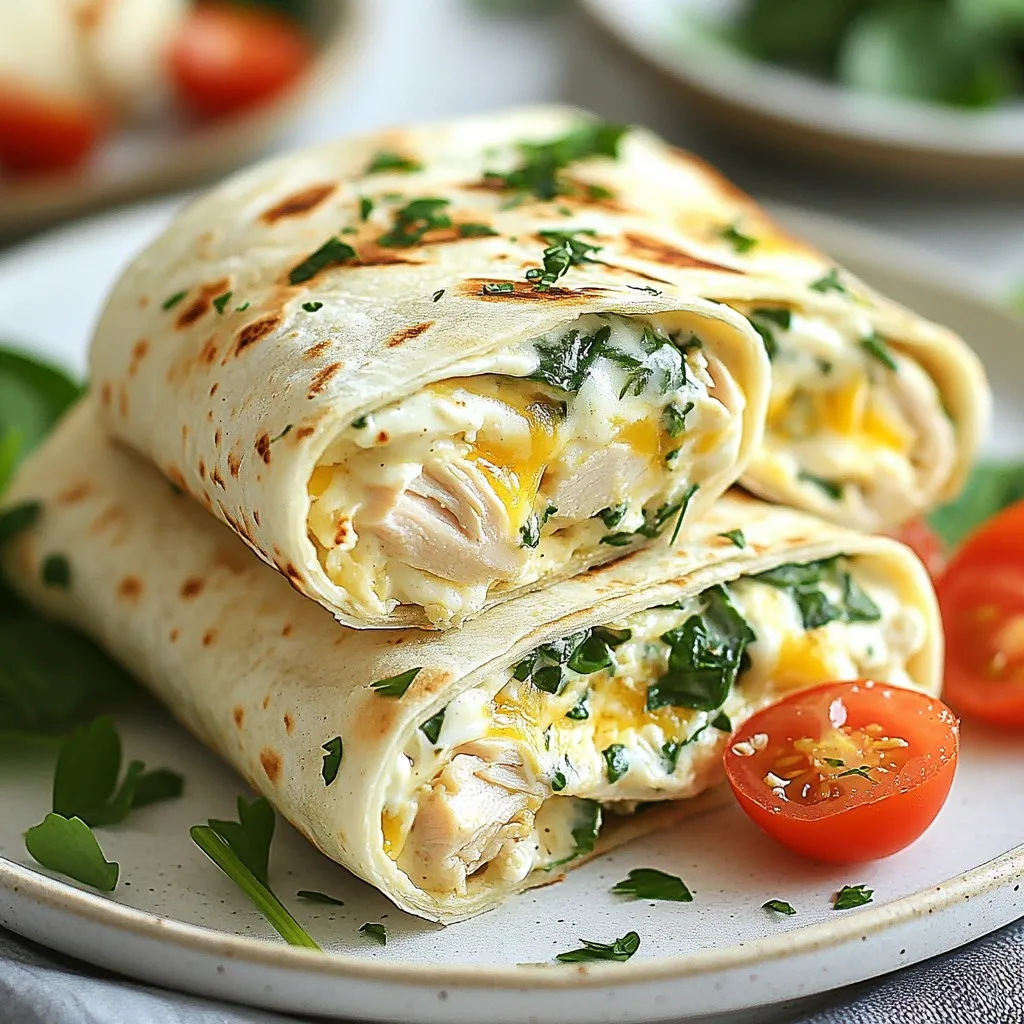
If you’re looking for a simple, tasty meal that’s easy to make, you’ve hit the jackpot! Cheesy Garlic Chicken Wraps pack a flavor punch with tender chicken, creamy cheeses, and …

Read more

Categories Dinner

Savory Chicken Broccoli Stir Fry Quick and Easy Meal

January 13, 2026March 14, 2025 by Chef Jamie
To make a tasty Chicken Broccoli Stir Fry, gather these main ingredients: - 1 lb (450g) boneless, skinless chicken breast, thinly sliced - 2 cups broccoli florets - 1 red bell pepper, sliced - 1 cup snap peas - 3 cloves garlic, minced - 1 tablespoon fresh ginger, grated - 3 tablespoons soy sauce - 2 tablespoons sesame oil - 1 tablespoon honey - 1 teaspoon cornstarch - 1 tablespoon water - Salt and pepper to taste These ingredients create a balance of flavors. The chicken gives protein, while the veggies add crunch and color. To make your dish look great, consider these optional garnishes: - Sesame seeds - Chopped green onions Garnishes not only add flavor. They also enhance the dish's visual appeal. You can switch some ingredients for variety or dietary needs: - Use tofu instead of chicken for a vegetarian option. - Swap snap peas with green beans for a different crunch. - Try coconut aminos instead of soy sauce for a gluten-free choice. These substitutions keep the dish interesting and adaptable. You can enjoy it your way! {{ingredient_image_1}} Start by slicing the chicken breast into thin pieces. In a bowl, mix the chicken with one tablespoon of soy sauce. Add a pinch of salt and pepper. Make sure the chicken is well coated. Let it marinate for at least 15 minutes. This step adds flavor and helps tenderize the chicken. You can prepare the sauce while the chicken marinates. In a small bowl, combine the remaining soy sauce, sesame oil, honey, cornstarch, and water. Whisk the mixture until smooth. This sauce will add a sweet and savory taste to your stir fry. Set it aside until you are ready to cook. Heat a large non-stick skillet or wok over medium-high heat. Once hot, add the marinated chicken. Stir-fry the chicken for about 5 to 7 minutes. Cook until it is golden brown and no longer pink. Remove the chicken from the pan and set it aside. Next, add a bit more sesame oil if needed. Sauté minced garlic and grated ginger for about 30 seconds. This step brings out their flavors. Then, add broccoli, red bell pepper, and snap peas. Stir-fry these veggies for 4 to 5 minutes until they are tender-crisp. Finally, return the cooked chicken to the pan. Pour the prepared sauce over the mix. Toss everything together for an additional 2 to 3 minutes. This allows the sauce to thicken and coat your chicken and veggies nicely. To make a great stir fry, heat is key. Use a large skillet or wok. Preheat it well before adding any food. This helps cook your chicken and veggies fast, keeping them juicy. Stir constantly to avoid burning. The goal is to cook quickly while keeping flavors fresh. For tender-crisp veggies, cut them into small, even pieces. This ensures even cooking. Add the vegetables to the pan in a specific order. Start with the hardest ones, like broccoli. Cook them for a minute before adding softer ones like snap peas. This method keeps your veggies bright and crunchy. The sauce can be adjusted to suit your taste. Start with the basic mix of soy sauce, sesame oil, honey, and cornstarch. If you want it sweeter, add more honey. Prefer a saltier taste? Increase the soy sauce. You can even add chili sauce for some heat. Taste the sauce before mixing it with the chicken and veggies. Adjust as needed, and enjoy your perfect stir fry! Pro Tips Marinate for Flavor: Allow the chicken to marinate longer than 15 minutes if possible. This enhances the flavor and tenderness of the meat. High Heat Cooking: Stir-frying works best at high heat. Ensure your skillet or wok is hot enough before adding ingredients to achieve that perfect sear. Veggie Crunch: To keep your vegetables crunchy, avoid overcooking them. Aim for tender-crisp by cooking them just until bright in color. Garnish for Appeal: A sprinkle of sesame seeds and chopped green onions not only adds flavor but also enhances the visual appeal of your dish. {{image_2}} You can switch the chicken for other proteins. Try thinly sliced beef or shrimp. Tofu is also a great choice for a plant-based dish. Each protein will bring a different flavor. Adjust cooking times based on what you choose. Beef may need a bit longer, while shrimp cooks fast. Keep the rest of the recipe the same for a quick meal. If you want a vegetarian or vegan dish, replace the chicken with tofu. Use firm tofu for the best texture. Press it to remove extra water, then cut it into cubes. You can also use tempeh or seitan for extra protein. For a vegan sauce, swap honey with maple syrup. This keeps the sweet flavor without any animal products. Feel free to add more veggies. Carrots, bell peppers, or mushrooms work well. They add color and nutrients to your stir fry. You can also use leafy greens like spinach or kale. Just toss them in near the end of cooking. This helps them stay bright and fresh. More veggies mean more flavor and health benefits. To store leftover stir fry, let it cool first. Then, place it in an airtight container. Make sure to seal the container well to keep out air. You can keep it in the fridge for up to three days. If you want to enjoy it later, freezing is a good choice too. When reheating your stir fry, use the stovetop for the best taste. Heat a bit of oil in a pan over medium heat. Add the stir fry and cook until it’s hot. Stir it often to ensure even heating. You can also use a microwave, but it may not taste as fresh. If you use the microwave, heat in short bursts and stir in between. Freezing is great for saving stir fry. First, let it cool completely. Then, portion it into freezer-safe bags or containers. Remove as much air as you can to prevent freezer burn. You can freeze it for up to three months. To eat, thaw in the fridge overnight before reheating. This keeps the flavors fresh and tasty. Chicken Broccoli Stir Fry lasts about 3 to 4 days in the fridge. Store it in an airtight container. Make sure it cools down before sealing it. When you're ready to eat, just reheat it in a pan or microwave. This keeps the flavors fresh and tasty. Yes, you can use frozen broccoli for this recipe. Just remember to thaw it first. This helps avoid extra water in your stir fry. Stir-fry it for a shorter time, about 3 to 4 minutes. This way, it stays bright and crunchy. You can customize this stir fry in many fun ways. Here are some ideas: - Add proteins: Try shrimp, beef, or tofu. - Mix veggies: Use bell peppers, carrots, or mushrooms. - Change sauces: Swap soy sauce for teriyaki or oyster sauce. - Spice it up: Add chili flakes or sriracha for heat. These changes add variety and keep meals exciting! You learned how to make a tasty Chicken Broccoli Stir Fry. We covered essential ingredients and optional garnishes. I detailed simple steps to marinate chicken, mix sauce, and cook everything right. You also discovered tips for perfecting your dish and making it your own. Remember, this dish is flexible. You can swap proteins or add veggies. Keep the leftovers fresh by storing them correctly. Enjoy this fun, easy meal anytime you want! Now, go ahead and stir-fry your own delicious feast!

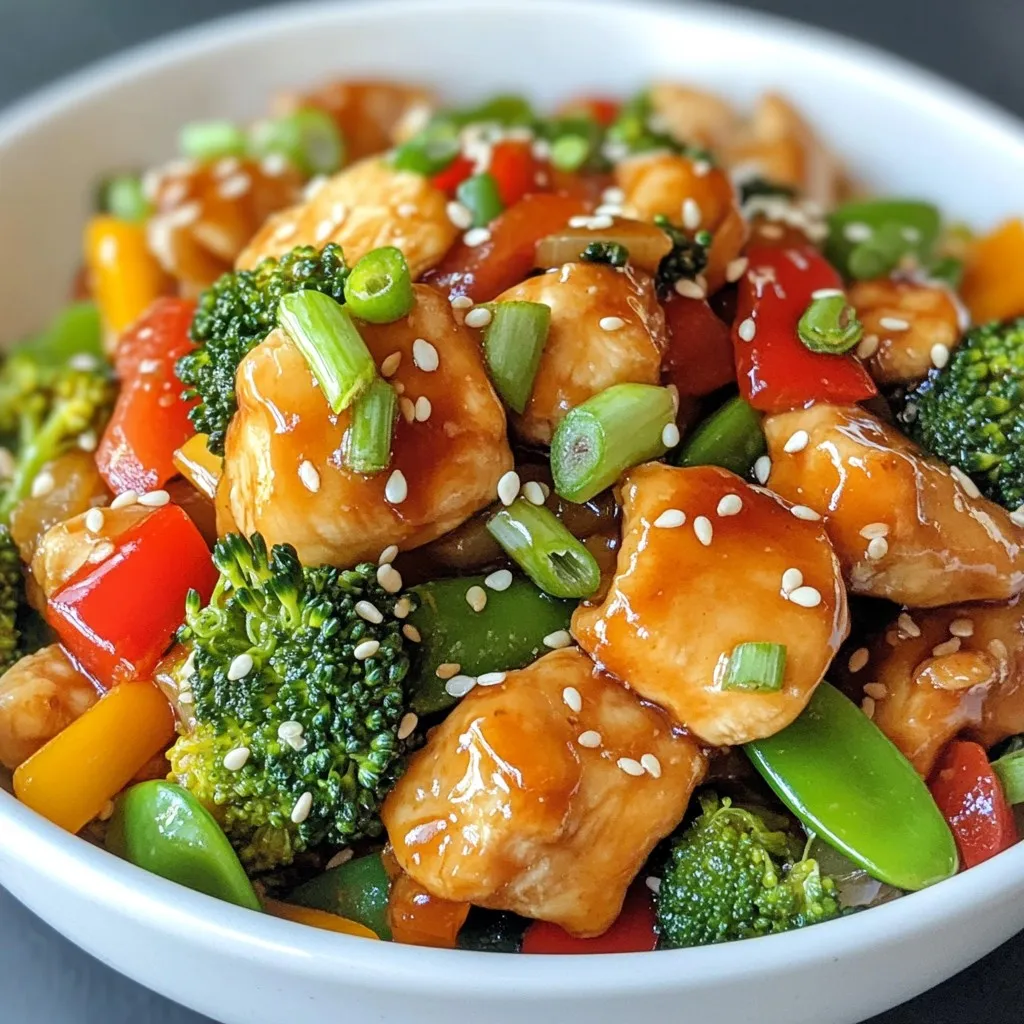
Looking for a quick and tasty meal? You’ve come to the right place! My Savory Chicken Broccoli Stir Fry is just what you need. Not only is this dish simple …

Read more

Categories Dinner

Italian Tortellini Pasta Salad Flavorful and Fresh Dish

January 5, 2026March 14, 2025 by Chef Jamie
To make a delicious Italian tortellini pasta salad, you need fresh and tasty ingredients. Here’s what you will need: - 12 oz cheese tortellini - 1 cup cherry tomatoes, halved - 1 cup cucumber, diced - 1/2 cup bell pepper (red or yellow), diced - 1/4 cup red onion, finely chopped - 1/2 cup black olives, sliced - 1/3 cup Italian dressing - 1/4 cup fresh basil, chopped - Salt and pepper to taste - Grated Parmesan cheese for garnish Each of these items adds flavor and color to your salad. The cheese tortellini gives it a nice, filling base. I love using cherry tomatoes and cucumbers for their crunch. Bell peppers bring sweetness, while red onion adds a bit of sharpness. Don’t forget the black olives! They add a briny taste that works well. The Italian dressing coats everything in zesty goodness. Fresh basil brightens it all up. Finally, sprinkle some grated Parmesan on top for that creamy finish. Gather these ingredients, and you are ready to create a fresh, flavorful dish. {{ingredient_image_1}} Start by filling a pot with water. Add a pinch of salt for flavor. Bring the water to a boil. Once boiling, add 12 ounces of cheese tortellini. Cook it according to the package instructions until it is al dente. This usually takes around 3 to 5 minutes. Drain the tortellini in a colander. Rinse it under cold water to stop the cooking. This keeps the pasta firm and fresh. While the tortellini cools, grab a large mixing bowl. Cut 1 cup of cherry tomatoes in half and add them to the bowl. Dice 1 cup of cucumber and add that too. Next, chop 1/2 cup of bell pepper, either red or yellow. Finely chop 1/4 cup of red onion for a nice kick. Finally, slice 1/2 cup of black olives. Toss all these fresh veggies together in the bowl. Now it’s time to bring the salad together. Add the cooled tortellini to the vegetable mix. Drizzle 1/3 cup of Italian dressing over everything. Sprinkle in salt and pepper to taste. Toss gently but thoroughly. You want all the ingredients coated with the dressing. Then, add 1/4 cup of chopped fresh basil. This adds a lovely aroma and flavor. To let the flavors blend, cover the bowl with plastic wrap. Place it in the refrigerator for at least 30 minutes. This cooling time helps the salad taste better. When you’re ready to serve, give it a final toss. If you want, sprinkle some grated Parmesan cheese on top before serving. This adds a creamy touch to your dish. When selecting tortellini, I recommend cheese-filled options for the best flavor. Fresh tortellini tastes great but frozen ones work too. Check the package for cooking times. Aim for al dente, which means it should be firm yet tender. This texture holds up well in the salad. Fresh herbs can elevate your tortellini salad. I love using basil for its sweet, peppery kick. Chop it finely and mix it in before serving. You can also try parsley or oregano for different flavors. Just be careful not to overpower the dish. A little goes a long way! This salad is versatile and can be served in many ways. Try it as a side dish at your next barbecue or picnic. You can also serve it as a light lunch. Pair it with crusty bread and a nice drink. For a heartier meal, add grilled chicken or shrimp on top. Pro Tips Use Fresh Ingredients: Always opt for fresh vegetables and herbs to enhance the flavor and nutrition of your salad. Chill Before Serving: Letting the salad sit in the refrigerator for at least 30 minutes allows the flavors to meld beautifully. Customize Your Dressing: Feel free to experiment with different types of Italian dressings or even make your own for a personal touch. Garnish for Presentation: A sprinkle of grated Parmesan cheese on top not only adds flavor but also makes the salad visually appealing. {{image_2}} You can boost your tortellini salad with protein. Try adding grilled chicken, shrimp, or even salami. These options add flavor and make the dish more filling. For a vegetarian choice, chickpeas work great. They add texture and protein without meat. If you want a plant-based option, consider adding tofu. While Italian dressing is a classic, feel free to switch it up. A balsamic vinaigrette offers a sweet tang. If you like spicy, try a chipotle dressing. For a creamy touch, ranch or Caesar dressing can work well too. Experimenting with different dressings keeps the salad fresh and exciting. Incorporate seasonal ingredients for a fresh twist. In summer, add fresh corn or ripe avocados for creaminess. In fall, consider roasted butternut squash or apples for sweetness. You can also swap vegetables based on what's fresh at the market. This approach not only enhances flavor but also keeps your salad vibrant and colorful. Store your Italian tortellini pasta salad in a clean, airtight container. This keeps it fresh. Place it in the fridge right after it cools down. Avoid leaving it out at room temperature for more than two hours. This helps prevent bad bacteria from growing. Your tortellini salad will stay good in the fridge for about three to five days. If you notice any off smells or colors, it’s best to toss it out. Trust your senses to judge freshness. You can freeze this salad, but some ingredients may change texture. For best results, freeze only the plain tortellini. Store it in a freezer-safe bag or container. It will last for about three months in the freezer. When you are ready to eat it, thaw it in the fridge overnight before mixing it with the fresh veggies and dressing again. Yes, you can use store-bought Italian dressing. It saves time and adds good flavor. Just choose a dressing that you enjoy. Homemade dressing is great too if you have the time. No, this recipe is not gluten-free. The cheese tortellini contains wheat. However, you can find gluten-free tortellini at many stores. Just check the labels to make sure. Yes, you can make this pasta salad in advance. It tastes even better after sitting in the fridge. I suggest making it a few hours ahead or even a day before serving. Just keep it covered. Some great side dishes include garlic bread or a fresh green salad. You could also serve it with grilled chicken or shrimp. These sides complement the tortellini well and make a nice meal. This blog post covered a tasty tortellini pasta salad. We discussed key ingredients, cooking steps, and useful tips. Adding protein or fresh herbs enhances the taste. You learned about storage and answered common questions. Now you can create a delightful dish that fits any meal. Enjoy experimenting with flavors and share your tasty results!

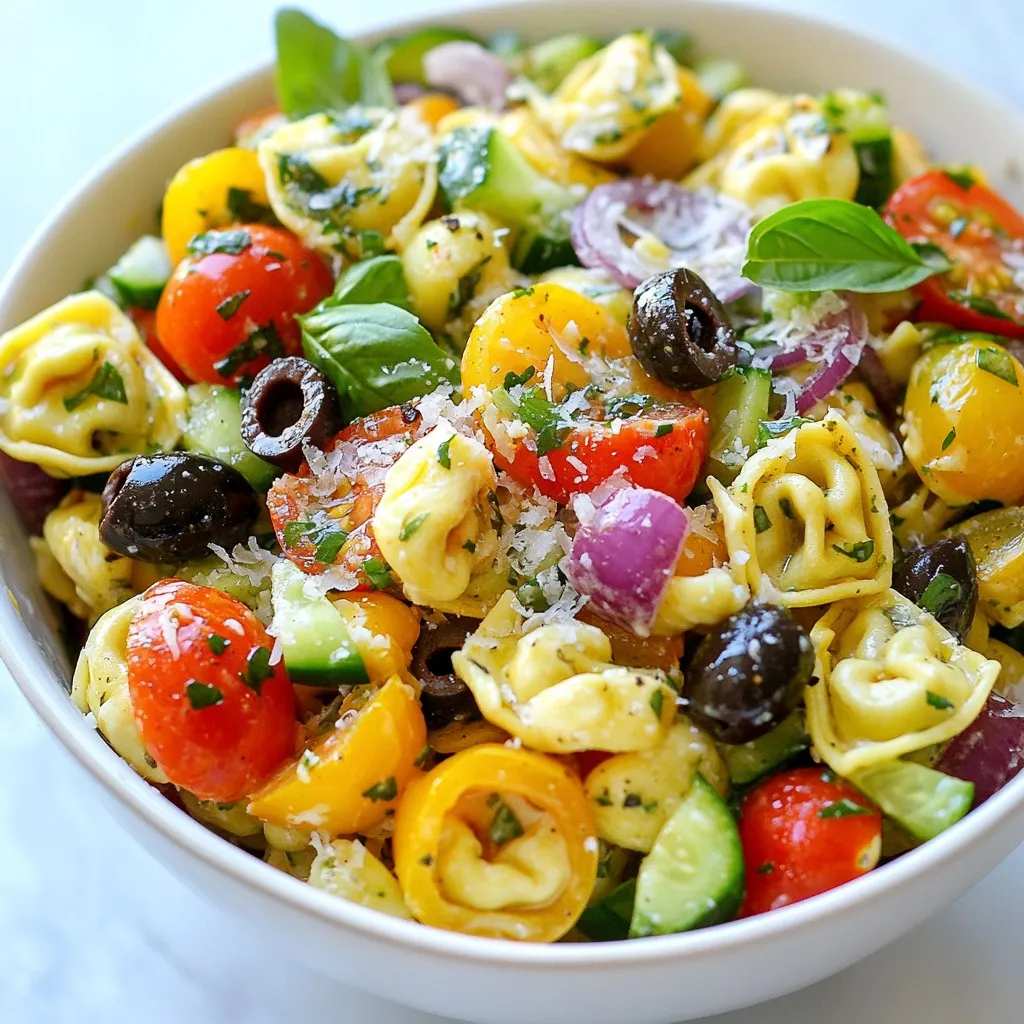
Looking for a dish that bursts with flavor and feels fresh? You’re in the right place! My Italian Tortellini Pasta Salad combines cheesy tortellini, crisp veggies, and zesty dressing. It’s …

Read more

Categories Salads

Mediterranean Quinoa Salad Fresh and Healthy Recipe

January 4, 2026March 11, 2025 by Chef Jamie
To make a fresh Mediterranean Quinoa Salad, gather these ingredients: - 1 cup quinoa, rinsed - 2 cups vegetable broth or water - 1 cup cherry tomatoes, halved - 1 cucumber, diced - 1/2 red onion, finely chopped - 1/2 cup Kalamata olives, pitted and halved - 1/2 cup crumbled feta cheese - 1/4 cup fresh parsley, chopped - 1/4 cup fresh mint, chopped - 3 tablespoons olive oil - 2 tablespoons lemon juice - 1 teaspoon dried oregano - Salt and pepper to taste You can swap some ingredients if needed. Here are a few ideas: - Instead of quinoa, use farro or bulgur for a different grain. - Any olives can replace Kalamata olives in a pinch. - Feta cheese can be traded for goat cheese for a tangy flavor. - If you don’t like cucumber, try bell peppers or zucchini instead. Using fresh herbs adds brightness and flavor. They taste more vibrant than dried herbs. For this salad, fresh parsley and mint are best. However, if you only have dried herbs, use them. Just remember that dried herbs are stronger. Use about one-third of the amount when substituting. For example, if the recipe calls for 1/4 cup of fresh parsley, use about 1 tablespoon of dried parsley. {{ingredient_image_1}} First, gather your ingredients. You need one cup of quinoa and two cups of vegetable broth or water. In a medium saucepan, bring the broth or water to a boil. Once it boils, add the rinsed quinoa. Lower the heat, cover the pot, and let it simmer for about 15 minutes. After 15 minutes, check to see if the liquid is gone. If it is, remove it from the heat. Let it sit covered for another five minutes. This step helps the quinoa become fluffy. After five minutes, fluff it with a fork. Let it cool completely before mixing with other ingredients. While the quinoa cools, wash and chop your vegetables. You will need one cup of halved cherry tomatoes, one diced cucumber, and half a finely chopped red onion. Also, prepare half a cup of pitted and halved Kalamata olives. For some fresh taste, chop a quarter cup of fresh parsley and a quarter cup of fresh mint. Place all these chopped vegetables into a large mixing bowl. This adds color and flavor to the salad. Now, let’s make the dressing. In a small bowl, combine three tablespoons of olive oil and two tablespoons of lemon juice. Add one teaspoon of dried oregano, and season with salt and pepper to taste. Whisk the dressing until it blends well. This dressing adds a zesty kick to your salad. Once done, you will pour it over the quinoa and vegetable mix. Toss everything gently to coat well. This step ensures every bite is delicious and flavorful. To make fluffy quinoa, rinse the grains well. This removes the bitter coating called saponin. Next, bring water or broth to a boil. Use 2 cups of liquid for 1 cup of quinoa. After adding quinoa, reduce the heat. Cover it and let it simmer for about 15 minutes. Once the liquid is gone, let it sit for 5 minutes, covered. Then fluff it gently with a fork. This makes the quinoa light and airy. Herbs and spices can make your salad pop! Fresh parsley and mint add bright flavors. Dried oregano gives a nice Mediterranean touch. You can also use basil or dill for a twist. Don’t be shy with salt and pepper. They enhance all the tastes in the salad. Try adding a pinch of garlic powder for more depth. Serving your salad well makes it look fresh and inviting. Use a big, colorful bowl to show off the vibrant ingredients. Garnish with extra herbs on top. A few crumbles of feta cheese add a nice touch too. Serve the salad chilled for the best taste. You can also place lemon wedges on the side. This allows guests to add a splash of lemon juice as they like. Pro Tips Tip Title 1: Rinse the quinoa thoroughly before cooking to remove its natural bitterness and enhance the flavor of your dish. Tip Title 2: Let the quinoa cool completely before mixing with the vegetables to prevent them from wilting. Tip Title 3: For an extra burst of flavor, marinate the chopped vegetables in a little olive oil and lemon juice before adding them to the quinoa. Tip Title 4: This salad can be made ahead of time and stored in the fridge; it tastes even better after the flavors have had time to meld. {{image_2}} You can add more protein to your Mediterranean quinoa salad. Grilled chicken works well. It adds flavor and makes the salad more filling. Simply cook the chicken, let it cool, and chop it into bite-sized pieces. For a plant-based option, use chickpeas. Rinse and drain a can of chickpeas, then mix them in. Both options boost the protein content and keep you satisfied longer. Feta cheese gives the salad a salty, creamy taste. If you want to switch it up, try goat cheese. It has a tangy flavor that complements the salad well. Another option is mozzarella. Use mini mozzarella balls for a fun twist. You can even skip cheese if you prefer a vegan salad. This salad is flexible with vegetables. In summer, add bell peppers for crunch. In fall, roasted sweet potatoes bring warmth and sweetness. During winter, try adding shredded carrots for color and nutrition. No matter the season, feel free to mix and match based on what’s fresh. This keeps your salad exciting and new every time you make it. To keep your Mediterranean quinoa salad fresh, store it in an airtight container. This prevents air from spoiling the salad. Place it in the fridge right after serving. If you have leftovers, make sure they cool completely before sealing. This helps maintain the best texture. Your quinoa salad lasts about 3 to 5 days in the fridge. When stored well, the flavors blend nicely. However, check for any signs of spoilage before eating. If the salad looks or smells off, it's best to toss it. Always give it a quick stir to check the texture too. Freezing quinoa salad is a great option if you want to save it longer. First, pack it in a freezer-safe container. Leave some space on top for expansion. It can last up to 3 months in the freezer. When ready to eat, thaw it in the fridge overnight. You might need to add a splash of olive oil or lemon juice to freshen it up. Yes, you can make this salad ahead of time. It tastes even better after resting. Prepare it in the morning and let it chill in the fridge. The flavors blend nicely as it sits. Just keep the dressing separate until you are ready to eat. This helps keep the veggies crisp and fresh. This salad pairs well with many dishes. You can serve it with grilled chicken or fish. It also goes great with pita bread or hummus. Try it alongside roasted vegetables for a full meal. You can even enjoy it as a light lunch or a snack. Yes, this Mediterranean Quinoa Salad is gluten-free. Quinoa is a naturally gluten-free grain. It is a great option for those who avoid gluten. Just make sure your broth or any other ingredients are also gluten-free. Enjoy this healthy salad without worry! This blog post shared the key steps to make a great Mediterranean quinoa salad. We covered essential ingredients, cooking methods, and tips for storage. Each part helps you create a tasty dish. Always enjoy fresh flavors and easy swaps based on what you have at home. Remember, this salad is fun to make and share. Use these tips to impress your friends and family with your cooking skills!

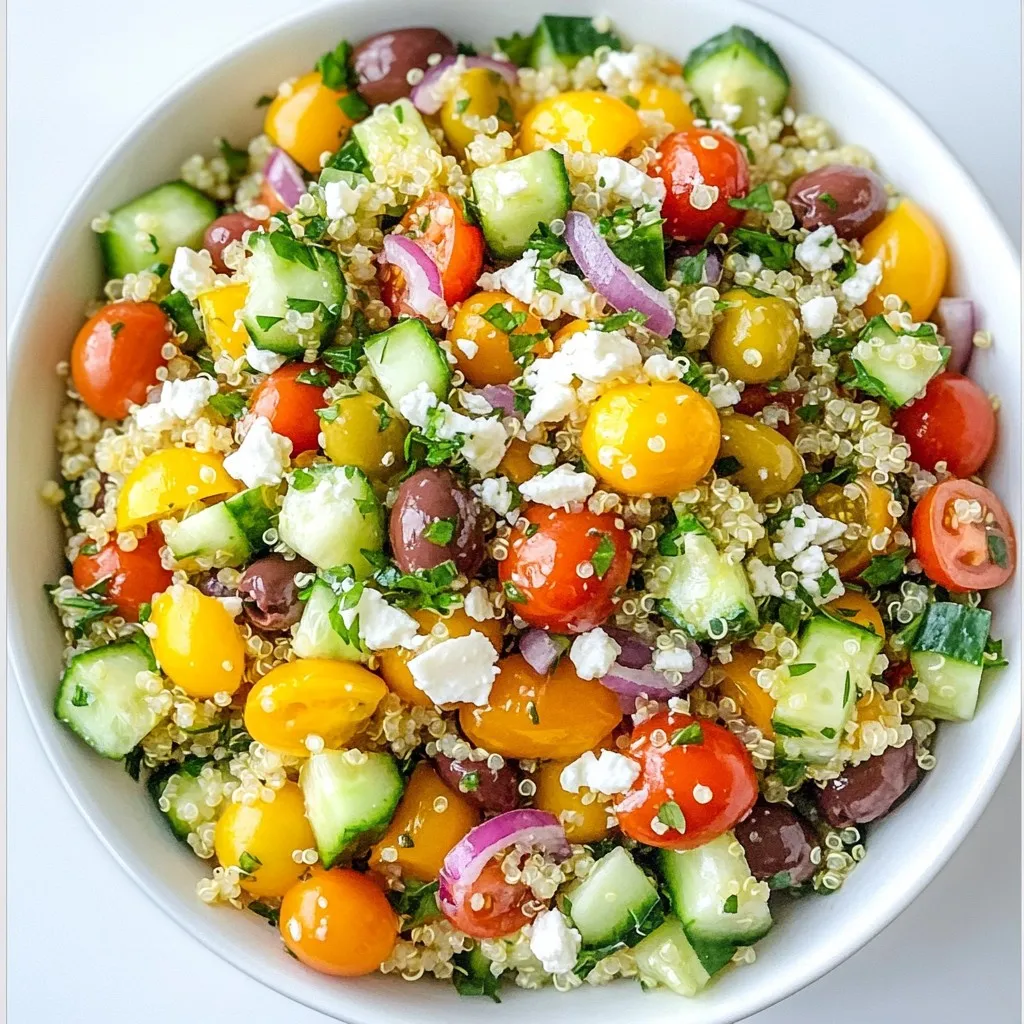
Looking for a fresh and healthy dish that bursts with flavor? Try my Mediterranean Quinoa Salad! This vibrant salad combines nutritious ingredients and simple steps for a quick meal that …

Read more

Categories Salads

Juicy Birria Tacos Flavorful and Easy Recipe

January 5, 2026March 8, 2025 by Chef Jamie
- 2 lbs beef chuck roast, cut into chunks - 1 lb beef short ribs - 4 cloves garlic, minced - 2 tablespoons chili powder - 1 tablespoon ground cumin - 1 teaspoon dried oregano - 1 teaspoon smoked paprika - 1 teaspoon salt - ½ teaspoon black pepper - 4 cups beef broth - 4 dried guajillo chiles, stems and seeds removed - 2 dried ancho chiles, stems and seeds removed - 2 medium onions, chopped (one for sauce, one for tacos) - 2 bay leaves - 2 tablespoons vegetable oil - 12 corn tortillas - Fresh cilantro, chopped for garnish - Lime wedges, for serving - Blender - Large pot or Dutch oven - Skillet To make juicy birria tacos, you need quality meat. Beef chuck roast and short ribs give the best flavor and texture. The chiles add a rich, smoky taste. Guajillo and ancho chiles are classic choices. They enhance the dish with unique flavors. You also need spices. Chili powder, cumin, oregano, smoked paprika, salt, and black pepper create a tasty blend. Garlic is key for depth. Don't forget the onions! They add sweetness and a nice base for the sauce. Essential garnishes include fresh cilantro and lime wedges. They brighten up the tacos and add freshness. For equipment, a blender makes smooth marinades. A large pot or Dutch oven is perfect for slow cooking. Lastly, a skillet is great for toasting the tortillas. Gather these ingredients and tools. You are ready to create delicious birria tacos! {{ingredient_image_1}} To start, we need to prepare the chiles. First, boil water in a small pot. Add the guajillo and ancho chiles. Let them soak for about 15 minutes. This will soften them. Once soft, drain and set them aside. Next, we blend the marinade. In a blender, combine the soaked chiles, minced garlic, chili powder, ground cumin, dried oregano, smoked paprika, salt, and black pepper. Pour in 1 cup of beef broth. Blend until smooth. This rich marinade will add great flavor to the meat. Now, let's cook the meat. In a large pot or Dutch oven, heat vegetable oil over medium-high heat. Add the beef chuck and short ribs. Sear the meat on all sides until browned. This step locks in the juices. Once browned, remove the meat and set it aside. It's time to combine the ingredients in the pot. In the same pot, add chopped onions. Sauté until they are translucent. Return the seared meat to the pot. Add the blended chili paste, bay leaves, and the remaining beef broth. Stir well to mix everything together. Now we need to simmer the meat. Bring the mixture to a boil. Then reduce the heat to low. Cover and let it simmer for about 2 to 3 hours. The meat should become fork-tender. If you prefer, use a slow cooker on low for 6 to 8 hours. Once the meat is cooked, it's time to shred it. Remove the meat from the pot with a slotted spoon. Use two forks to shred the meat. Discard any bones and bay leaves. Return the shredded meat to the broth for extra flavor. This step helps keep the meat juicy and delicious. To boost the flavor of your birria, consider enhancing the marinade. You can add a touch of orange juice for brightness. A splash of vinegar can also add a nice tang. When searing the meat, make sure the pot is hot. This helps lock in the juices. Sear the meat until it gets a nice brown color on all sides. This step adds depth to the taste. Toasting your tortillas is key. Use a dry skillet over medium heat. Toast each side for about 30 seconds. This makes them warm and flexible. For the best flavor, choose corn tortillas. They have a nice taste that pairs well with birria. Look for fresh, thick ones for added durability. Pair your tacos with fresh sides. Chopped onions and cilantro add crunch and flavor. A side of pickled radishes gives a tangy kick. For drinks, try a light Mexican beer or a refreshing agua fresca. These drinks complement the rich flavors of the tacos perfectly. Enjoy them with lime wedges for that extra zest! Pro Tips Marinate the Meat: For even more flavor, marinate the meat in the blended chili mixture overnight in the refrigerator before cooking. Use a Pressure Cooker: If you're short on time, using a pressure cooker can significantly reduce the cooking time to about 1 hour while still achieving tender meat. Adjust Spice Levels: Feel free to adjust the amount of chili powder or add some chipotle peppers if you prefer a spicier birria. Serve with Toppings: Enhance your tacos with toppings like diced radishes, avocado slices, or crumbled queso fresco for extra flavor and texture. {{image_2}} You can switch up the meat in your birria tacos. If you prefer chicken, use boneless thighs for a juicy option. Chicken cooks faster, so adjust your cooking time accordingly. For pork lovers, pork shoulder works well. It gives a rich flavor and tender texture. For a vegetarian twist, consider using jackfruit or mushrooms. Jackfruit has a meaty texture and absorbs flavors well. Mushrooms like portobello or oyster provide a savory taste. Cook them in the same marinade for a delicious veggie birria. Do you prefer mild or spicy? You can control the heat in your birria tacos. For a mild version, use fewer chiles. Just skip one guajillo or ancho chile. You still get great flavor without too much heat. For spice lovers, add extra chili powder or diced jalapeños. Consider using fresh chiles for more heat. You can also try unique spices like smoked chipotle for a smoky kick or cumin for earthiness. Birria tacos aren’t the only way to enjoy this dish. You can make birria burritos by wrapping the meat and toppings in a larger tortilla. This makes for a hearty meal. Quesadillas are another option. Just add cheese and cook until melty, then fill with the birria meat. Don't forget about toppings! Try avocado slices for creaminess. Pickled onions add a tangy crunch. You can also add crumbled queso fresco for extra flavor. Each topping brings a new twist to your birria experience! After enjoying your juicy birria tacos, store any leftovers right away. Cool the meat and broth first, then place them in airtight containers. You can keep them in the fridge for up to three days. If you want to store them longer, freeze the meat and broth separately. In the freezer, they last for about three months. To reheat the meat, place it in a pot over low heat. Add a bit of the broth to keep it moist. Stir often until warm. For the broth, heat it in a separate pot over medium heat. This keeps the flavor strong. You can also use the microwave, but be careful not to overheat. To store the consomé, let it cool in a container. You can keep it in the fridge for three days. If freezing, pour it into ice cube trays. Once frozen, transfer the cubes to a freezer bag. This way, you can use small amounts when you need them. Always label your containers with the date for easy tracking. Corn tortillas work best for birria tacos. They hold the juicy meat well. Look for soft, fresh tortillas. They add a nice flavor and texture. If you need gluten-free options, choose corn tortillas. They are naturally gluten-free and perfect for this dish. To make your tacos spicy, add more chiles. You can use extra guajillo or ancho chiles. Mix in chili powder or cayenne pepper. Taste the marinade before cooking. Adjust the spice level to your liking. Remember, you can always add more spice, but you cannot take it away! Yes, you can use a slow cooker for birria. It makes the meat tender and juicy. Cook on low for 6 to 8 hours. This method lets the flavors blend well. Just follow the same steps for the marinade and meat. Enjoy the rich taste of slow-cooked birria tacos! This guide covered everything you need for juicy birria tacos. You learned about key ingredients, necessary tools, and step-by-step cooking methods. I shared tips for flavor, tortilla prep, and even creative variations. Remember, you can switch meats or adjust spice levels to suit your taste. Storing leftovers properly keeps the flavors intact. With these insights, you can now enjoy delicious birria tacos that impress. Get ready to share delicious meals with friends and family. Happy cooking!

Are you ready to savor the rich flavors of Juicy Birria Tacos? I’ll guide you through an easy recipe that transforms simple ingredients into a delicious meal. From the tender …

Read more

Categories Dinner
Older posts
Newer posts
← Previous Page1 … Page130 Page131 Page132 … Page134 Next →

TOSSED RECIPES

Simple meals, bold taste. Quick recipes made for real life — always fresh, always delicious. 🌿🍴

PAGES

Home About Contact Privacy Policy Terms & Conditions Cookie Policy GDPR Policy Copyright Policy Disclaimer

CATEGORIES

Appetizers Desserts Salads Breakfast Dinner

Contact

  • Pinterest
  • Mail
Copyright © 2026 Tossed Recipes. All rights reserved.