Skip to content
Tossed Recipes
  • Home
  • Appetizers
  • Desserts
  • Salads
  • Breakfast
  • Dinner
  • Privacy Policy
  • Contact
  • About

Chef Jamie

Cheeseburger Soup Tasty and Hearty Comfort Meal

January 12, 2026January 28, 2025 by Chef Jamie
For a rich and creamy cheeseburger soup, you will need: - 1 pound ground beef - 1 medium onion, chopped - 3 cloves garlic, minced - 2 medium potatoes, diced - 4 cups beef broth - 1 cup milk - 1 cup shredded cheddar cheese - 1 tablespoon Worcestershire sauce - 1 teaspoon dijon mustard - Salt and pepper to taste - 2 tablespoons olive oil - 1/2 cup sour cream - Fresh parsley, chopped for garnish These ingredients come together to create a soup that feels like a warm hug. You can make your soup even better with some fun toppings: - Extra shredded cheddar cheese - Crispy bacon bits - Chopped green onions - Pickles or relish - A dollop of sour cream Feel free to mix and match your toppings. They add flavor and crunch! You can swap some ingredients if you want to try something new: - Use ground turkey for a lighter option. - Substitute vegetable broth for a vegetarian twist. - Omit the milk for a dairy-free version or use almond milk. - Try adding different cheese like pepper jack for a kick. These changes keep the soup tasty while fitting your needs. Enjoy customizing your cheeseburger soup! {{ingredient_image_1}} First, gather all your ingredients. You will need: - 1 pound ground beef - 1 medium onion, chopped - 3 cloves garlic, minced - 2 medium potatoes, diced - 4 cups beef broth - 1 cup milk - 1 cup shredded cheddar cheese - 1 tablespoon Worcestershire sauce - 1 teaspoon dijon mustard - Salt and pepper to taste - 2 tablespoons olive oil - 1/2 cup sour cream - Fresh parsley, chopped for garnish Next, chop the onion and mince the garlic. Dice the potatoes into small pieces. This helps them cook faster. In a large pot or Dutch oven, heat the olive oil over medium heat. Add the chopped onion and minced garlic. Sauté them for about 3-4 minutes until the onion looks clear. Now, add the ground beef to the pot. Break it apart with a spatula as it cooks. Cook until it turns brown, which takes about 6-8 minutes. If there's extra fat, drain it away. Then, stir in the diced potatoes, beef broth, Worcestershire sauce, and dijon mustard. Bring this mixture to a boil. After it boils, lower the heat and let it simmer. Cook for 15-20 minutes until the potatoes become tender. After the potatoes are soft, stir in the milk, shredded cheddar cheese, and sour cream. Mix until the cheese melts and the soup is creamy. This should take about 5 minutes. Season the soup with salt and pepper. Taste it to see if you like the flavor. Adjust the seasoning to fit your preference. Finally, remove the pot from heat. Ladle the soup into bowls. Garnish each bowl with fresh parsley. Serve it warm and enjoy this hearty meal! When you start, use a large pot. This helps to cook everything well. Heat the olive oil first. This step adds flavor. Sauté the onion and garlic until soft. This takes about three to four minutes. Cook the beef until browned. Break it up as it cooks. Drain any excess fat to keep it light. If you want a thicker soup, mash some potatoes. Use a fork or a potato masher. This makes the soup creamy without extra steps. You can also add more cheese. Stir in extra cheddar at the end. It will melt and thicken the soup. Another option is to mix a little cornstarch with water. Add this mixture to the soup as it simmers. Serve your soup hot in bowls. A sprinkle of fresh parsley adds color. Pair it with crusty bread for dipping. You can also add extra cheese on top. This makes it even more delicious! If you like spice, serve with hot sauce on the side. Enjoy this cozy meal with family or friends. Pro Tips Use Fresh Ingredients: Fresh, high-quality ingredients can significantly enhance the flavor of your soup. Opt for fresh herbs and vegetables whenever possible. Customize the Cheese: While cheddar is classic, feel free to experiment with different cheeses like gouda or pepper jack for a unique twist on flavor. Make It Ahead: This soup can be made in advance and stored in the refrigerator for up to 3 days. Reheat gently on the stovetop for the best flavor. Thicker Soup Option: If you prefer a thicker consistency, consider mashing some of the potatoes in the soup or adding a cornstarch slurry while it simmers. {{image_2}} You can make a tasty vegetarian version of cheeseburger soup. Swap ground beef for plant-based meat. You can use lentils or mushrooms for a hearty texture. Add vegetable broth instead of beef broth. Use all the same veggies, like onions and potatoes. This method keeps soup flavors rich and warm. You will still enjoy creamy cheddar cheese. Want to boost the flavor? Consider adding extra ingredients. A splash of hot sauce can add heat. You can mix in chopped pickles for a tangy twist. Fresh herbs like thyme or basil also work well. Sauteed bell peppers add a crunchy texture. You could even toss in some bacon bits for a smoky flavor. Each add-in makes the soup unique and fun. If you prefer a low-carb soup, swap potatoes for cauliflower. Cauliflower mashes well and adds creaminess. You can also skip the milk and sour cream. Use cream cheese instead for a rich texture. This keeps the soup thick and satisfying. You still get the cheeseburger vibe without the carbs. It’s a great option for those watching their carbs. To store your cheeseburger soup, let it cool first. Then, pour it into an airtight container. This helps keep the soup fresh. You can store it in the fridge for up to three days. If you want to keep it longer, freezing is a great option. When you want to reheat your soup, pour it into a pot. Heat it on medium until hot. Stir it often to avoid sticking. You can also use a microwave. Just place it in a microwave-safe bowl and heat for one to two minutes. Stir halfway for even heating. To freeze the soup, first cool it to room temperature. Transfer it to freezer-safe containers or bags. Leave some space at the top because the soup will expand as it freezes. You can store it in the freezer for up to three months. When ready to eat, thaw it overnight in the fridge before reheating. This keeps the flavor and texture just right. Yes, you can use chicken instead of beef. Ground chicken works well. It gives a lighter flavor. You can follow the same steps in the recipe. Cook the chicken until it is no longer pink. This will take about 6-8 minutes. Then, add the broth and other ingredients. The soup will still taste great! To make your cheeseburger soup spicier, add some hot sauce. A few dashes can give it a kick. You can also mix in chopped jalapeños. If you like more heat, use pepper jack cheese. This will add flavor and spice. Taste as you go to find your perfect level of heat. Serve cheeseburger soup hot in bowls. Garnish it with fresh parsley for color. I also love adding extra cheese on top. Pair it with crusty bread for dipping. This makes a hearty meal even better. It’s perfect for a cozy night in. This blog post shared a complete guide on making cheeseburger soup. We covered all the key ingredients, from the main components to optional toppings. I provided step-by-step instructions, along with tips to enhance flavor and texture. You can customize the soup with vegetarian and low-carb options. In conclusion, with just a few simple steps, you can create a tasty dish. Enjoy experimenting with your own twists to make it uniquely yours. Happy cooking!

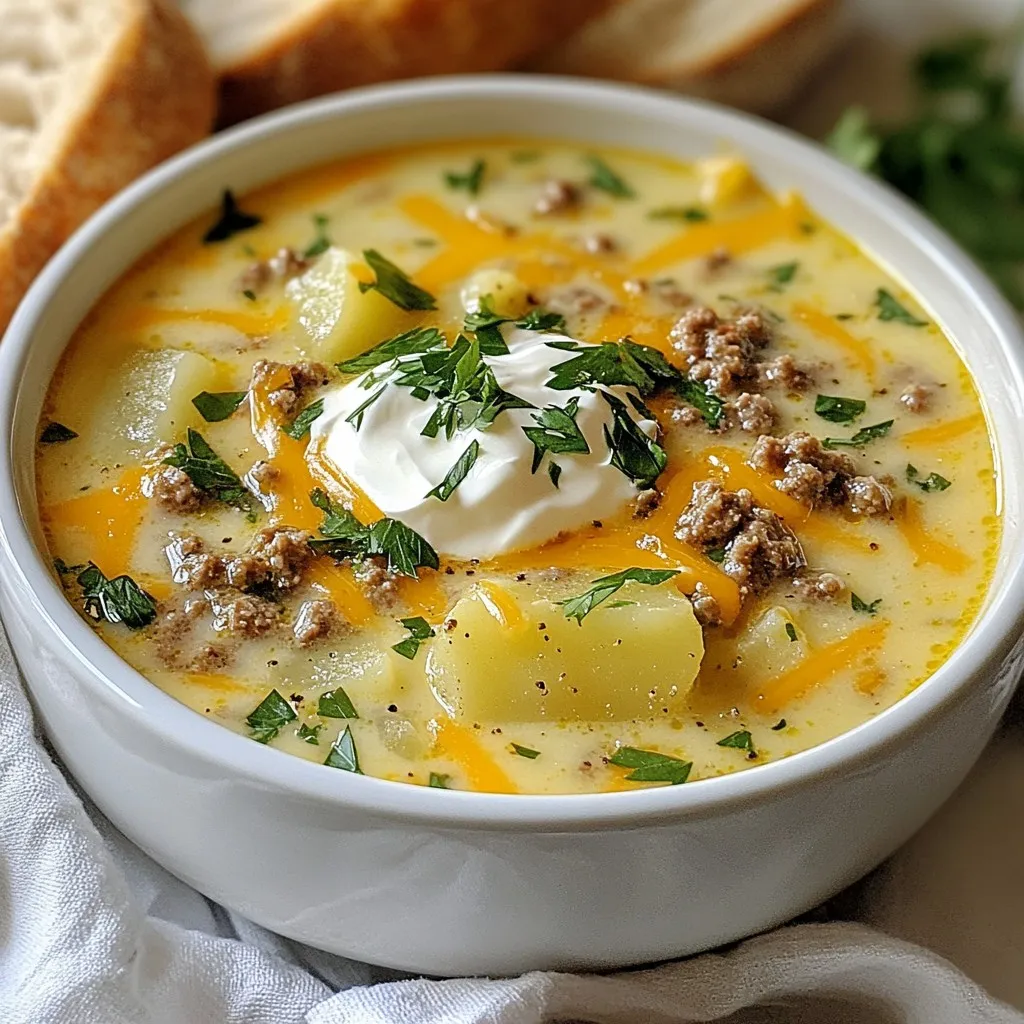
Are you craving a warm, cheesy delight? Look no further than cheeseburger soup! This dish brings the classic flavors of a cheeseburger into a creamy, hearty bowl. Perfect for chilly …

Read more

Categories Dinner

Smashburger Quesadillas Packed with Flavorful Fillings

November 11, 2025January 27, 2025 by Chef Jamie
- 1 pound ground beef - 4 large flour tortillas - 1 cup shredded cheddar cheese - 1 cup shredded Monterey Jack cheese The main ingredients create the base of our smashburger quesadillas. The ground beef is the star. It brings a rich, savory flavor. The flour tortillas hold everything together. They add a nice bite. The cheese varieties melt beautifully and add creaminess. Cheddar and Monterey Jack blend well for a tasty kick. - 1/2 cup diced tomatoes - 1/4 cup pickles, diced - 1/4 cup diced red onion - 1 tablespoon onion powder - 1 tablespoon garlic powder - 1 teaspoon smoked paprika - Salt and pepper to taste Diced tomatoes and pickles add freshness and crunch. The red onion gives a bit of bite. Seasonings like onion powder, garlic powder, and smoked paprika enhance the beef’s flavor. Salt and pepper round out the taste, making every bite delicious. - 1/4 cup mayonnaise - 1 tablespoon ketchup The dipping sauce is simple yet tasty. Mixing mayonnaise and ketchup creates a creamy, tangy dip. This sauce pairs perfectly with the crispy quesadilla. It adds a nice contrast to the warm flavors. Enjoy this quick and easy dip with each bite! {{ingredient_image_1}} - In a mixing bowl, combine 1 pound ground beef with 1 tablespoon onion powder, 1 tablespoon garlic powder, 1 teaspoon smoked paprika, and salt and pepper to taste. - Mix well until everything is evenly combined. - Divide this seasoned beef into four equal parts. - Shape each part into a small, flat patty. This helps achieve that smashburger effect. - Heat a skillet over medium-high heat. - Once hot, press each patty onto the skillet. - Cook for 3-4 minutes on one side until it’s browned. - Flip and cook the other side for another 3-4 minutes. - The patties should be fully cooked through. Remove them and let them cool for a bit. - Grab a large flour tortilla. - On one half, layer 1/2 cup shredded cheddar cheese and 1 cup shredded Monterey Jack cheese. - Add one smashburger patty on top. - Sprinkle 1/2 cup diced tomatoes, 1/4 cup diced pickles, and 1/4 cup diced red onion over the patty. - Top with more cheese and fold the tortilla in half. - In the same skillet, add a little cooking oil. - Place the folded quesadilla in the skillet. - Cook for 3-4 minutes on one side until crispy and golden. - Flip it and cook the other side for another 3-4 minutes. - Remove and let cool for a minute. - Cut it into wedges and enjoy! To avoid soggy tortillas, I recommend using a small amount of oil in your skillet. Heat it until hot before adding the quesadilla. This way, the tortilla gets crispy. Use medium-high heat to achieve that perfect golden-brown color. Flip the quesadilla gently to keep all the fillings inside. Adding spices can elevate your quesadilla. Besides the onion and garlic powders, try a pinch of chili powder or cumin for a kick. For sauces, consider hot sauce for heat or barbecue sauce for sweetness. You can also add extra fillings like cooked bacon or sautéed peppers for more flavor. When cutting the quesadilla, use a sharp knife or pizza cutter. Cut it into wedges for easy serving. For visual appeal, place the wedges on a colorful plate. Add a small bowl of dipping sauce in the center. Garnish with fresh herbs like cilantro for a pop of color. Pro Tips Use Fresh Ingredients: Always opt for fresh ground beef and vegetables to enhance the flavor of your quesadillas. Even Cooking: Ensure your skillet is hot enough before adding the quesadilla to achieve a crispy texture on both sides. Experiment with Cheese: Feel free to mix different types of cheese such as pepper jack or gouda for an extra flavor twist. Customize Your Fillings: Add your favorite toppings like jalapeños or avocado for a personalized touch to your quesadillas. {{image_2}} You can switch up the meat in your quesadillas. Ground turkey or chicken works great. If you prefer a meat-free option, try black beans or lentils. Each choice adds a unique taste and texture. Ground turkey has a mild flavor, while chicken can give a nice bite. When using beans or lentils, season them well to add flavor. Cheese makes quesadillas special. You can use a mix of cheeses for more flavor. Try pepper jack for a spicy kick or gouda for a smoky taste. Blend different cheeses like feta or provolone to surprise your taste buds. The melting cheese holds the fillings together, creating a delicious bite. Add fun flavors by including jalapeños or hot sauce. These ingredients bring heat and excitement. You can also try adding barbecue sauce or salsa for a twist. Experiment with fresh herbs like cilantro or green onions for extra brightness. Tweak the flavors to suit your own taste, and make this dish your own! To store leftovers, let the quesadillas cool first. Wrap each one in plastic wrap or foil. Place them in an airtight container. This keeps them fresh for up to three days in the fridge. When you're ready to eat, you can enjoy them warm and crispy! For the best taste, reheat the quesadillas in a skillet. Heat the skillet over medium heat. Cook each side for about three minutes. This keeps the outside crispy and warm. You can also use an oven. Preheat it to 375°F (190°C) and bake for about ten minutes. This method also helps maintain that great crunch. To freeze quesadillas, wrap each one in plastic wrap. Then, place them in a freezer bag. Make sure to remove as much air as possible. They can stay fresh for up to three months. To reheat, take them out of the freezer and let them thaw in the fridge overnight. Then, follow the skillet method to enjoy a hot, crispy quesadilla again! A serving of Smashburger Quesadillas has about 600 calories. You get protein from the beef and cheese. Each quesadilla packs around 30 grams of protein. The cheese adds calcium, which is good for your bones. Plus, the tomatoes and pickles give you some vitamins. Keep in mind that these quesadillas have fats from the cheese and oil, so enjoy them in moderation. Yes, you can prep these quesadillas ahead of time. Cook the beef and let it cool down. Assemble the quesadillas but don’t fry them yet. Wrap them in plastic wrap and store them in the fridge. When you’re ready, just heat a skillet and fry them until crispy. This saves time when you want a quick meal. Yes, you can find gluten-free tortillas at most stores. Look for brands made from rice or corn. Just ensure they are labeled gluten-free. Be careful about cross-contamination if you have a gluten allergy. Always check the labels to keep your meal safe and tasty. Smashburger quesadillas are fun and tasty. We covered the main ingredients like ground beef, flour tortillas, and cheese. I shared steps for cooking and assembling, plus tips to avoid sogginess. Experiment with different meats and cheeses to find your favorite blend. You can store leftovers carefully and enjoy them later. Smashburger quesadillas are easy to customize for any taste. Try them today and enjoy a new twist on a classic dish!

Want a dish that’s easy to make and full of bold flavors? Smashburger quesadillas are just the ticket! With savory ground beef, melty cheese, and delicious toppings, these quesadillas take …

Read more

Categories Appetizers

Savory Sweet Potato Taco Bowls Delightful and Easy

January 5, 2026January 22, 2025 by Chef Jamie
- 2 medium sweet potatoes, peeled and diced - 1 tablespoon olive oil - 1 teaspoon smoked paprika - 1 teaspoon cumin - 1/2 teaspoon chili powder - Salt and pepper to taste - 1 can black beans, drained and rinsed - 1 cup corn kernels (fresh or frozen) - 1 avocado, sliced - 1 cup cherry tomatoes, halved - 1 cup diced red onion - Fresh cilantro, chopped (for garnish) - 1 lime, cut into wedges These sweet potato taco bowls pack a punch of nutrition. Each serving has about: - Calories: 350 - Protein: 12g - Fat: 14g - Carbohydrates: 50g - Fiber: 12g This dish offers a good balance of carbs, fiber, and healthy fats. Sweet potatoes provide vitamin A, while black beans add protein and iron. You can easily swap ingredients based on your taste or what you have. Here are some ideas: - Sweet Potatoes: Try butternut squash or regular potatoes. - Olive Oil: Avocado oil or coconut oil work well too. - Black Beans: Use pinto beans or chickpeas for a twist. - Corn: Zucchini or bell peppers can replace corn if desired. - Avocado: Sour cream or Greek yogurt can add creaminess. These changes keep the bowls tasty and fun! {{ingredient_image_1}} First, preheat your oven to 425°F (220°C). This hot oven helps the sweet potatoes cook well. Next, peel and dice the two medium sweet potatoes into small cubes. In a large bowl, mix the sweet potato cubes with one tablespoon of olive oil. Add one teaspoon of smoked paprika, one teaspoon of cumin, and half a teaspoon of chili powder. Don’t forget to sprinkle in some salt and pepper to taste. Toss everything together until the sweet potatoes are fully coated. Spread the seasoned sweet potatoes on a baking sheet in a single layer. Make sure they have space around them. This helps them roast evenly. Place the baking sheet in the oven. Roast the sweet potatoes for 25 to 30 minutes. Flip them halfway through to brown all sides. Check if they are tender and lightly browned when done. While the sweet potatoes roast, it’s time to warm the black beans and corn. Use a small saucepan and set it over medium heat. Pour in one can of drained and rinsed black beans and one cup of corn kernels. Stir them occasionally. Heat them for about 5 to 7 minutes until they are warmed through. Now, let’s put the taco bowls together. Grab some serving bowls. Start with a base layer of the roasted sweet potatoes. Next, add the warmed black beans and corn on top. Make sure to distribute the layers evenly for a great mix of flavors. The fun part is adding fresh toppings. Slice one avocado and layer it on next. Then add one cup of halved cherry tomatoes and one cup of diced red onion. These toppings add color and flavor. Finally, sprinkle fresh chopped cilantro over the top. Squeeze lime juice from lime wedges over everything for a zesty finish. Enjoy your delicious and easy sweet potato taco bowls! To roast sweet potatoes well, start with good prep. Peel and dice two medium sweet potatoes into even cubes. This helps them cook evenly. Toss the sweet potatoes in a bowl with olive oil, smoked paprika, cumin, chili powder, salt, and pepper. The oil helps them crisp up. Spread them on a baking sheet in a single layer. Roast at 425°F for 25-30 minutes. Flip them halfway through to brown all sides. You'll know they're done when they are tender and golden brown. Sweet potatoes are very versatile. Besides the spices in the recipe, you can try other flavors. Add garlic powder for more depth. Try a splash of lime juice for a fresh taste. You can also mix in some maple syrup for sweetness. Pairing sweet potatoes with tangy toppings like pickled onions adds a great contrast. Fresh herbs like cilantro or parsley brighten up the dish too. These taco bowls are great on their own, but you can add more. Serve them with a dollop of sour cream or Greek yogurt for creaminess. Crumbled feta or goat cheese adds a nice tang. For crunch, top with tortilla chips or toasted nuts. You can also pair these bowls with a side salad for a fresh touch. If you're feeling adventurous, serve with a spicy salsa or hot sauce for an extra kick. Pro Tips Perfectly Roasted Sweet Potatoes: Ensure the sweet potatoes are cut into even-sized pieces for uniform cooking and browning. Enhance Flavor with Toppings: Experiment with additional toppings like feta cheese or jalapeños for a personalized touch. Meal Prep Friendly: These taco bowls can be prepared in advance and stored in the fridge for up to 3 days, making them perfect for meal prep. Fresh Lime Zest: Add a sprinkle of lime zest along with the juice for an extra burst of citrus flavor that brightens the dish. {{image_2}} Sweet potato taco bowls are great for everyone. To make them vegetarian, skip any meat. Use black beans and corn for protein. Add extra veggies like bell peppers or zucchini for a colorful touch. You can also try tofu for a vegan option. Just cube and sauté it with spices, then mix it in. If you love meat, add cooked chicken or beef. Shredded chicken works well. For beef, try ground beef or steak. Cook the meat with spices like cumin and chili powder. This adds flavor and makes your bowls hearty. You can also mix in shrimp or fish for a seafood twist. For low-carb or keto diets, swap sweet potatoes for cauliflower rice. This keeps the bowl light but still delicious. You can also reduce the corn or omit it altogether. Focus on high-protein toppings like chicken, beef, or cheese. Adding avocado boosts healthy fats, making your meal filling and tasty. To store leftovers, place them in an airtight container. Make sure to cool the taco bowls first. This helps keep the flavors fresh. Store them in the fridge for up to three days. Avoid mixing toppings in the container. This keeps each component tasty. To reheat, use the microwave or oven. If using a microwave, place the bowl on a microwave-safe dish. Heat in short bursts, about one minute at a time. Stir between heating to warm evenly. For the oven, preheat to 350°F (175°C). Place the bowl on a baking sheet and cover with foil. Heat for 10-15 minutes until hot. You can freeze the sweet potatoes and beans. First, let them cool completely. Then, place them in freezer-safe bags. Remove as much air as possible before sealing. They can last up to three months in the freezer. When ready to eat, thaw overnight in the fridge. Reheat as mentioned before. Yes, you can make Sweet Potato Taco Bowls ahead of time. Prepare the sweet potatoes and toppings separately. Store them in airtight containers in the fridge. When ready to eat, warm the sweet potatoes and assemble your bowls. This saves time and keeps the meal fresh. The best toppings for Sweet Potato Taco Bowls include: - Sliced avocado - Cherry tomatoes - Diced red onion - Fresh cilantro - Lime wedges These toppings add flavor and freshness, making your bowl vibrant and tasty. To make Sweet Potato Taco Bowls spicier, add more chili powder or diced jalapeños. You can also use spicy salsa or hot sauce as a topping. These options will kick up the heat and add zest to your meal. Yes, Sweet Potato Taco Bowls are healthy. Sweet potatoes are full of vitamins and fiber. Black beans add protein and more fiber. The fresh veggies boost nutrients. This meal is balanced and good for you. Absolutely! You can use other vegetables. Try bell peppers, zucchini, or spinach. Just roast them along with the sweet potatoes. This adds variety and flavor to your taco bowls. Feel free to get creative with seasonal veggies! Sweet potato taco bowls are tasty and easy to make. We covered the key ingredients, from sweet potatoes to fresh toppings. Roasting sweet potatoes brings out their flavor, while various proteins add a nice touch. You can adapt recipes to your needs, making them vegetarian or low-carb. In the end, these bowls are great for any meal. They are simple, healthy, and fun to prepare. Enjoy making your own versions and exploring new flavors!

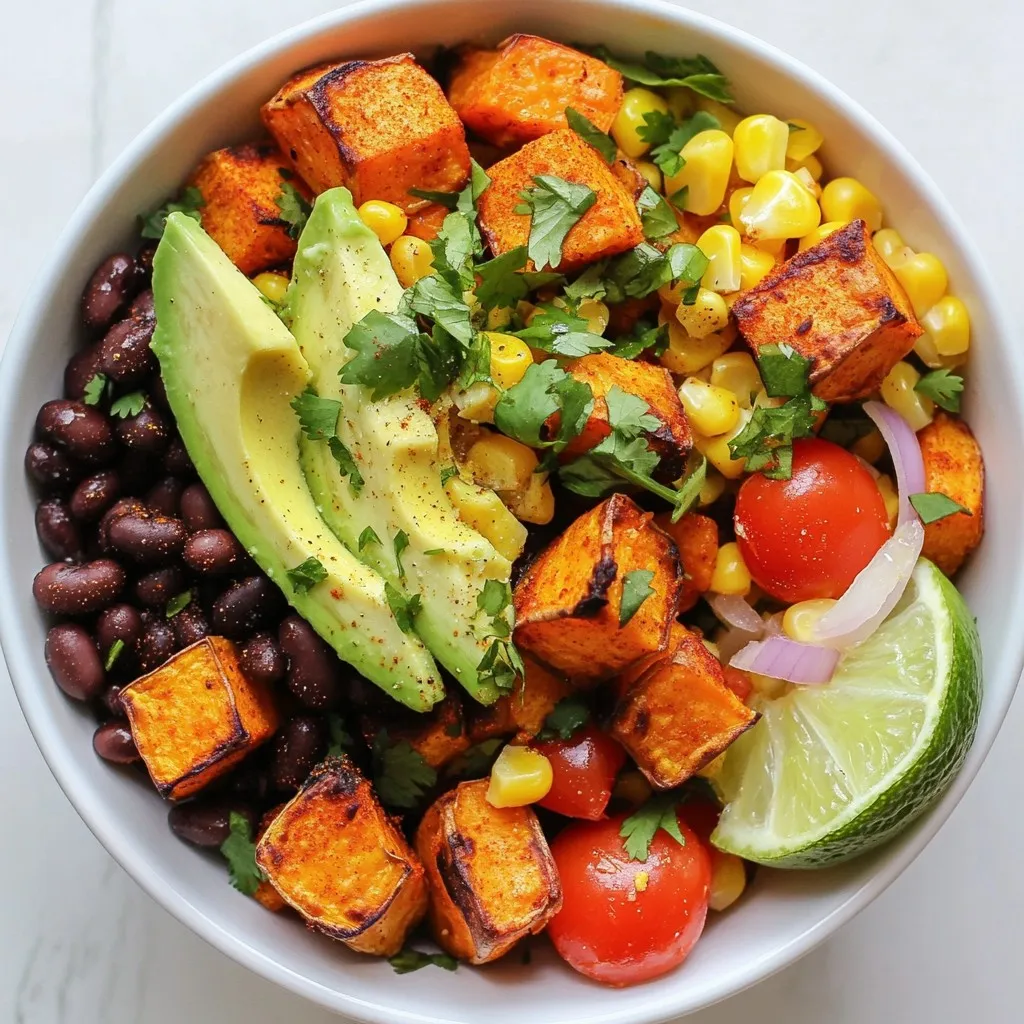
Looking for a fun and tasty meal? Sweet Potato Taco Bowls are here to save the day! These bowls mix sweet, savory, and spicy in every bite. I’ll share easy …

Read more

Categories Dinner

Brown Sugar Overnight Oats Delicious and Easy Recipe

November 14, 2025January 21, 2025 by Chef Jamie
To make brown sugar overnight oats, you will need: - 1 cup rolled oats - 2 cups unsweetened almond milk (or any milk of choice) - 2 tablespoons brown sugar - 1 teaspoon ground cinnamon - 1 teaspoon vanilla extract - A pinch of salt You can make your oats even better with these toppings: - Sliced bananas - Chopped nuts (like walnuts or pecans) - A drizzle of honey - Fresh berries If you want to switch things up, here are some ideas: - Use any type of milk, like oat or soy milk. - Swap brown sugar for maple syrup for a different sweet taste. - For a nut-free option, skip the nuts or use seeds instead. These choices keep the recipe tasty and fun while fitting your needs. Enjoy your oats! {{ingredient_image_1}} To start, gather your ingredients. You need rolled oats, almond milk, brown sugar, ground cinnamon, vanilla extract, and a pinch of salt. In a medium bowl, mix these together. Pour in 1 cup of rolled oats and 2 cups of almond milk. Add 2 tablespoons of brown sugar, 1 teaspoon of ground cinnamon, and 1 teaspoon of vanilla extract. Finally, include a pinch of salt. Stir until the brown sugar dissolves and everything blends well. Now, it’s time to transfer this mixture into jars. Use four small jars or containers with lids. Spoon the oat mixture into each jar. Leave a little space at the top to add toppings later. Make sure to divide the mixture evenly. This way, every jar has the same taste and texture. Once your jars are filled, cover them tightly with lids. Place the jars in the refrigerator. Let them chill overnight or for at least four hours. This chilling time allows the oats to soak up the milk. In the morning, your oats will be soft and creamy. Before serving, stir the oats well. If you like them thinner, add a splash of almond milk. Now, they are ready for tasty toppings! To make the best brown sugar overnight oats, use rolled oats. They absorb the liquid well. Quick oats can turn mushy, so stick with rolled. The key is to mix well. Make sure the brown sugar dissolves fully. This adds sweetness in every bite. You can make these oats up to four days ahead. Just store them in jars with lids. This is great for busy mornings. Just grab a jar and go! Remember, the longer they sit, the creamier they get. If you want a thinner texture, add more milk when you serve. Top your oats with fun add-ins. Sliced bananas are sweet and soft. Chopped nuts add a nice crunch. A drizzle of honey brings extra sweetness. Fresh berries add color and flavor. Feel free to mix and match your toppings based on what you like. Enjoy your tasty and easy breakfast! Pro Tips Use Steel-Cut Oats for a Chewier Texture: If you prefer a heartier bite, swap rolled oats for steel-cut oats. Just remember to adjust the soaking time as they may require longer to soften. Experiment with Sweeteners: While brown sugar adds a rich flavor, try substituting with maple syrup, agave nectar, or a sugar alternative to suit your dietary needs. Make it a Meal Prep Star: Prepare multiple jars at once to enjoy a quick, nutritious breakfast throughout the week. They can last up to 5 days in the fridge. Customize Your Toppings: Get creative! Mix and match your favorite toppings like yogurt, nut butter, or seeds to keep each morning exciting and delicious. {{image_2}} You can change the flavor of your overnight oats in fun ways. Try adding cocoa powder for a chocolate twist. Mix in peanut butter for a nutty taste. If you love fruits, add applesauce or pumpkin puree. You can also use different sweeteners like maple syrup. Each choice gives a new spin to your oats. If you need a diet change, you can adjust this recipe easily. Use oat milk or coconut milk for a dairy-free option. For a gluten-free version, make sure to pick gluten-free oats. If you want lower sugar, use less brown sugar or try stevia. These swaps keep your oats tasty and fit your needs. Seasons bring fresh ingredients perfect for your oats. In spring, add fresh strawberries or blueberries for sweetness. In summer, enjoy peaches or plums. Fall is great for adding diced apples or pumpkin spice. Winter calls for cozy flavors like nutmeg or warm spices. Each season offers new tastes to explore. To keep your brown sugar overnight oats fresh, store them in airtight containers. Glass jars work well and make a nice presentation. Make sure to seal the lids tightly. This helps keep out air and moisture, which can spoil your oats. You can also layer your toppings separately to add just before eating. You can keep your overnight oats in the fridge for up to five days. They taste best within the first three days. If you want to store them longer, you can freeze them. Just put the oats in a freezer-safe container. They will last for about three months in the freezer. Thaw them in the fridge overnight when you’re ready to eat. If you like your oats warm, you can reheat them. Simply take them out of the fridge. Place them in a bowl and add a splash of almond milk. Stir well and heat in the microwave for about 30 seconds to one minute. Make sure to watch them closely, so they don’t overheat. Enjoy your warm, delicious oats! Yes, you can use quick oats. Quick oats will soften faster than rolled oats. This means your oats may be mushier. If you like a firmer texture, stick with rolled oats. Rolled oats give a nice chewiness, which I enjoy. You can keep your overnight oats for up to five days. Just make sure they stay in a sealed container. If you notice any change in smell or color, it's best to toss them. Fresh oats taste better and are safer. Absolutely! You can use almond milk, coconut milk, or oat milk. These options are great for a creamy texture. Just pick a milk that suits your taste. Non-dairy options also work well for those who are lactose intolerant. Overnight oats are very healthy. They are high in fiber and keep you full longer. They also contain vitamins and minerals. The oats help with digestion and can lower cholesterol. With added toppings like fruits and nuts, you boost your nutrient intake. In this blog post, we explored everything about making overnight oats. We covered the key ingredients, optional toppings, and swaps. You learned how to prepare, assemble, and chill your oats. I shared tips to perfect your recipe and serve it well. Variations for flavors and dietary needs mean you can always change it up. Finally, we discussed storage tips and answered common questions. With this guide, you can create delicious and healthy breakfast options. Enjoy your overnight oats adventure!

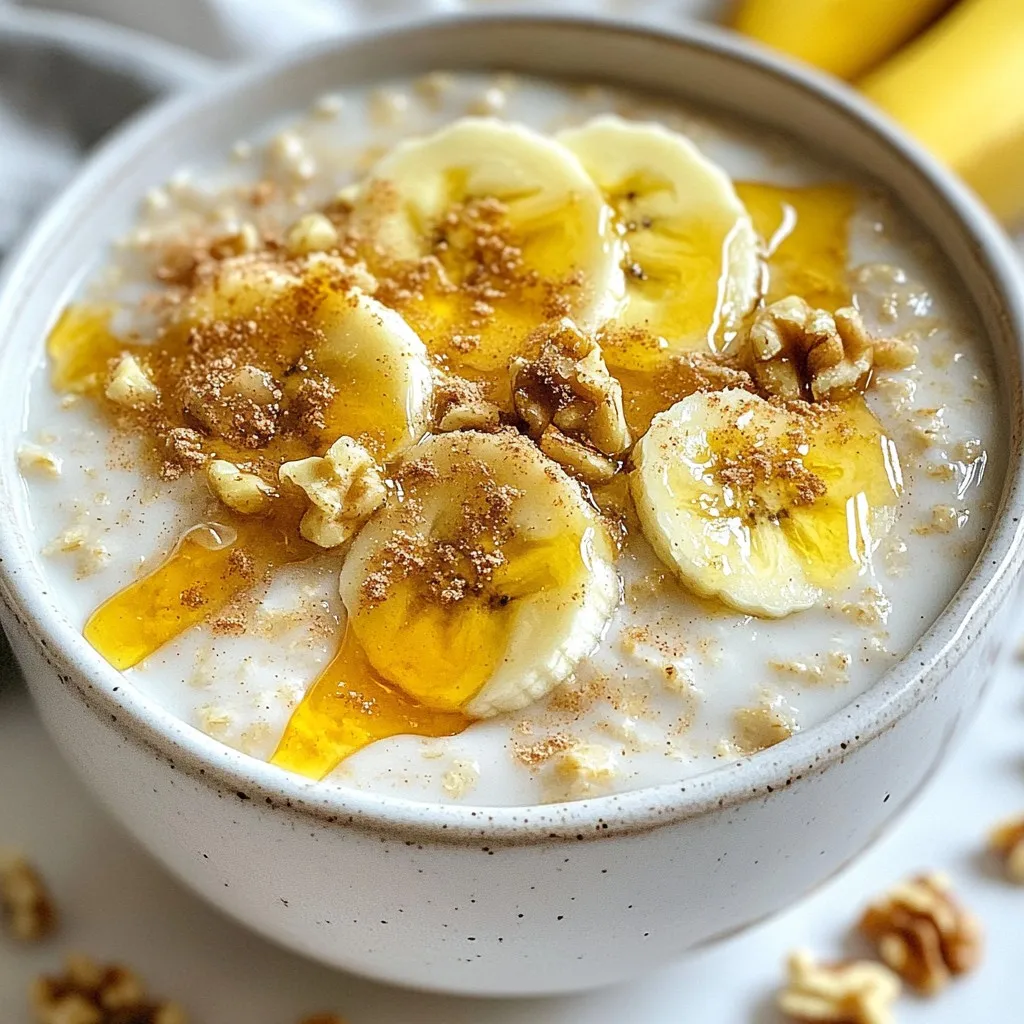
Looking for a quick and tasty breakfast? Try my Brown Sugar Overnight Oats! This recipe is simple, delicious, and perfect for busy mornings. With just a few ingredients, you can …

Read more

Categories Breakfast

Caprese Stuffed Chicken Breast Savory Dinner Delight

January 4, 2026January 18, 2025 by Chef Jamie
- 2 large chicken breasts - 1 cup cherry tomatoes, halved - 1 cup fresh mozzarella cheese, halved - ½ cup fresh basil leaves, chopped - 2 cloves garlic, minced - 2 tablespoons balsamic glaze - 2 tablespoons olive oil - Salt and pepper to taste - 1 teaspoon dried oregano - This dish has around 400 calories per serving. - Each serving contains about 40 grams of protein, 15 grams of carbs, and 20 grams of fat. - If you need an alternative for mozzarella, use goat cheese or feta. - For fresh basil, you can try parsley or spinach. - If you don’t have balsamic glaze, regular balsamic vinegar works well. {{ingredient_image_1}} - Preheating the oven: Start by setting your oven to 375°F (190°C). This helps the chicken cook evenly. - Preparing the stuffing mixture: In a medium bowl, mix 1 cup of halved cherry tomatoes, 1 cup of halved fresh mozzarella, ½ cup of chopped basil, and 2 cloves of minced garlic. Add 2 tablespoons of olive oil, 2 tablespoons of balsamic glaze, 1 teaspoon of dried oregano, and a pinch of salt and pepper. Stir until all the flavors blend well. - How to create a pocket in chicken breasts: Take 2 large chicken breasts and lay them flat. Carefully cut a pocket in each breast by slicing them horizontally. Be careful not to cut all the way through. You want to create a deep pocket for your stuffing. - Tips for even stuffing: Stuff each chicken breast with the mixture you made earlier. Divide the stuffing evenly. Use toothpicks or kitchen twine to close the openings, keeping the filling secure. - Cooking time and temperature: Place the stuffed chicken breasts in a baking dish. Bake them for 25-30 minutes. Ensure your oven stays at the same temperature. - Signs that the chicken is fully cooked: Check if the chicken reaches an internal temperature of 165°F (74°C). The juices should run clear when you cut into the chicken. To keep your chicken moist, always use a meat thermometer. This helps you know when it's done. Cook the chicken to 165°F (74°C) for safety. If you want more flavor, drizzle olive oil on the chicken before cooking. When securing the chicken, you can use toothpicks or kitchen twine. Toothpicks are quick and easy. Just remember to remove them before serving. Kitchen twine can hold the filling better, but it takes a bit longer to tie. Choose what works best for you! For serving, slice the chicken on a diagonal. This makes it look fancy and lets the filling show. Place it on a colorful plate for contrast. Add a salad or roasted veggies on the side for a complete meal. To garnish, sprinkle fresh basil on top. A drizzle of balsamic glaze adds a nice touch. This makes the dish pop with color and flavor. Avoid overstuffing the chicken. If you add too much filling, it may spill out while cooking. Aim for just enough to fill the pocket without bursting. To prevent undercooking, check the chicken’s internal temperature. If you cook it too long, the chicken can dry out. Always keep an eye on the time and use a thermometer for best results. Pro Tips Use Fresh Ingredients: The quality of tomatoes, mozzarella, and basil can significantly enhance the flavor of your dish, so opt for the freshest you can find. Don’t Overstuff: While it's tempting to fill the chicken breasts to the brim, overstuffing can cause the filling to spill out during cooking. Aim for a generous but manageable amount. Let It Rest: After baking, allow the chicken to rest for a few minutes. This helps the juices redistribute, ensuring a moist and flavorful bite. Experiment with Flavors: Feel free to add other ingredients like sun-dried tomatoes or pesto to the stuffing for a unique twist on the classic Caprese flavor. {{image_2}} You can easily change the flavors in Caprese stuffed chicken. Adding spinach or arugula gives a fresh twist. These greens add color and nutrients. You can mix them into the cheese and tomato filling. Using different types of cheese can also change the dish. Try using feta or goat cheese for a tangy flavor. You can even mix mozzarella with provolone for a richer taste. Each cheese brings its unique flair to the chicken. You can grill or bake your stuffed chicken. Grilling gives a smoky flavor. It also adds nice grill marks. Bake the chicken for a classic approach. Baking keeps the chicken juicy and tender. If you have an air fryer, it’s a great option too. Cook at 375°F for about 15-20 minutes. This method makes the chicken crispy outside while staying moist inside. Pair your Caprese stuffed chicken with fresh veggies or a crisp salad. Roasted asparagus or a side of garlic bread works great too. These sides balance the rich flavors of the chicken. To make it a full meal, serve it with pasta or quinoa. A light pasta with olive oil and herbs complements the dish well. Add a glass of white wine for a delightful dinner experience. To store leftovers, let the chicken cool first. Place it in an airtight container. This keeps the chicken fresh. You can store it in the fridge for up to three days. If you want to enjoy it later, make sure to use a good storage container. Glass or plastic containers with tight lids work best. For reheating, the oven is the best choice. Preheat your oven to 350°F (175°C). Place the chicken in a baking dish. Cover it with foil to keep moisture in. Heat for about 15 to 20 minutes. You can also use the microwave. Just cover the chicken and heat in short bursts. This helps maintain flavor and texture. Check it often to avoid overcooking. To freeze Caprese stuffed chicken, wrap each piece in plastic wrap. Then, place them in a freezer bag. Remove as much air as possible. You can freeze it for about three months. When ready to eat, thaw it in the fridge overnight. For reheating, use the oven method again for the best results. How do I know when the chicken is done? The chicken is done when it reaches 165°F (74°C) inside. Use a meat thermometer for best results. If you don’t have one, cut into the chicken. The juices should run clear, and the meat should no longer be pink. Can I make this ahead of time? Yes, you can make this dish ahead of time. Prepare the chicken and stuff it, then cover and refrigerate it. Bake it the next day for a quick meal. Is there a vegetarian version of this recipe? Yes, you can use portobello mushrooms instead of chicken. Stuff the mushrooms with the Caprese mixture. Bake them for a tasty vegetarian meal. What can I use instead of chicken breasts? You can use chicken thighs or even turkey breasts. Both will work well and add different flavors to the dish. Just adjust the cooking time as needed. What is the best way to ensure the chicken stays moist? To keep the chicken moist, do not overcook it. Use a meat thermometer to check the temperature. Brining the chicken briefly before cooking can also help lock in moisture. How many calories are in Caprese Stuffed Chicken Breast? One serving of Caprese Stuffed Chicken Breast has about 400 calories. This can vary based on the size of the chicken and how much cheese you use. This blog post covered the essentials for making Caprese Stuffed Chicken. We explored the tasty ingredients, including chicken, mozzarella, and fresh basil. I provided step-by-step instructions for preparation, stuffing, and baking. Remember tips to keep the chicken moist and avoid common mistakes. Variations for flavors and cooking methods can offer new ideas. Lastly, I shared helpful storage and reheating tips. With this knowledge, you can confidently create a delicious meal that impresses everyone. Enjoy your cooking and make this dish your own!

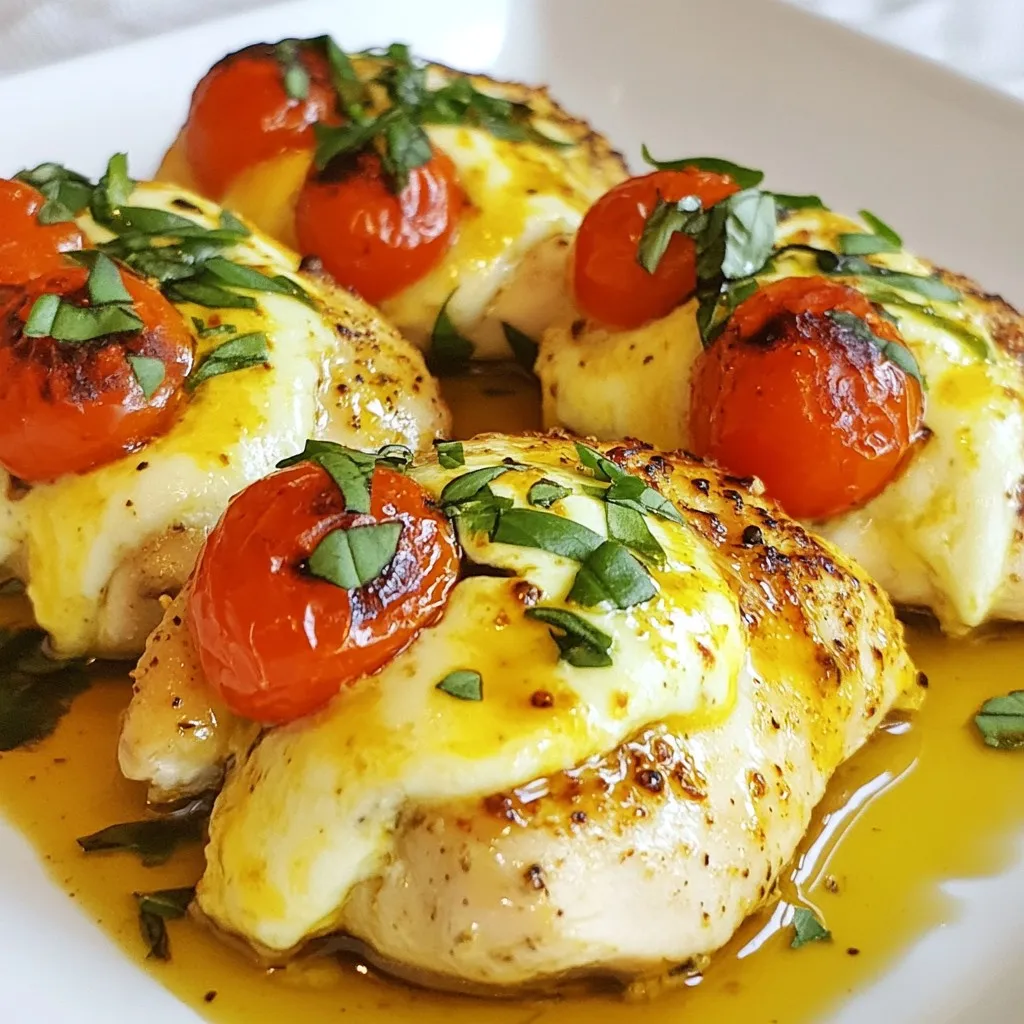
Looking for a quick and tasty dinner idea? You’ve found it! This Caprese Stuffed Chicken Breast recipe brings cozy Italian flavors to your table in no time. Picture juicy chicken, …

Read more

Categories Dinner

Lemon Herb Chicken and Rice Flavorful Easy Recipe

November 14, 2025January 15, 2025 by Chef Jamie
- 4 boneless, skinless chicken thighs - 1 cup long-grain rice - 2 cups chicken broth - 1 teaspoon dried thyme - 1 teaspoon dried rosemary - 1 teaspoon paprika - 1 large onion, diced - 3 cloves garlic, minced - 1 lemon (zest and juice) - 2 tablespoons olive oil - Fresh parsley, chopped (for garnish) Gathering the right ingredients is key for this dish. Start with boneless chicken thighs. They stay juicy and tender. Next, grab long-grain rice to soak up all the flavors. Using chicken broth instead of water adds depth to the rice. For spices, dried herbs work best. Use thyme and rosemary for a warm taste. A pinch of paprika adds color and a subtle kick. Fresh ingredients bring life to your meal. Dice a large onion and mince three cloves of garlic for a rich base. A lemon is essential for zest and juice, giving the dish a bright flavor. Don’t forget olive oil for cooking and a drizzle at the end. Lastly, sprinkle fresh parsley on top for a pop of color and freshness. This mix of ingredients creates a balanced and delightful meal. Enjoy the process of selecting them, as it sets the stage for your Lemon Herb Chicken and Rice. {{ingredient_image_1}} To start, gather your marinade ingredients. You will need olive oil, lemon juice, lemon zest, minced garlic, dried thyme, dried rosemary, paprika, salt, and pepper. Mix these in a bowl until combined. Coat the chicken thighs well with this mixture. Make sure every piece gets some love. Then, place the chicken in the fridge for at least 30 minutes. This helps the flavors soak in. Next, heat a little olive oil in a large skillet over medium heat. Wait until the oil is hot. Then, add your marinated chicken thighs. Sear them until they are golden brown, about 5-7 minutes per side. Once done, remove the chicken from the skillet and set it aside. This step seals in the juices. In the same skillet, add your diced onion. Sauté it until it turns translucent, which takes about 3-4 minutes. Then, add the rice and stir it around for 2 minutes. This step coats the rice with all those yummy flavors. Next, pour in 2 cups of chicken broth and bring it to a boil. Return the seared chicken to the skillet, nestling it into the rice. Lower the heat, cover the skillet, and let it simmer for about 20 minutes. This allows the rice to cook and absorb all the good flavors from the chicken. To boost flavor, make a marinade with olive oil, lemon juice, and spices. Use fresh garlic, thyme, and rosemary for the best taste. Coat the chicken thighs well. For deep flavor, marinate for at least 30 minutes, but one hour is even better. To prevent overcooking the rice, use a timer. Once you add the broth, let it boil before covering it. Keep the heat low while it simmers. This helps the rice absorb all the flavors. For juicy chicken, sear each side for 5-7 minutes. Then, simmer with the rice, so it cooks perfectly. Garnish your dish with fresh parsley and lemon slices for a bright look. Serve on a large platter to make it feel special. Drizzle with pan juices to add shine and extra flavor. This not only tastes great but also looks appealing! Pro Tips Marinate Longer for Flavor: For even more flavorful chicken, marinate the thighs overnight. This allows the herbs and lemon to fully penetrate the meat. Use Fresh Herbs: Substitute dried herbs with fresh ones if available. Fresh thyme and rosemary add a vibrant flavor and aroma to the dish. Check Rice Doneness: If the rice isn't fully cooked after 20 minutes, add a little more chicken broth and cover it again to finish cooking. Rest Before Serving: Let the dish rest for a few minutes after cooking. This helps the flavors meld together and makes for a more enjoyable meal. {{image_2}} You can change the rice in this recipe for a twist. Quinoa works great here. It cooks fast and adds a nice nutty taste. You can also try couscous. It cooks quickly and soaks up flavors well. If you prefer brown rice, that’s a good choice too. Just know it takes longer to cook. Aim for 40-50 minutes if you use brown rice. To make this dish even better, add some veggies. Bell peppers and peas can brighten the meal. They add color and nutrients. You can also spice it up! Adding chili flakes gives a nice kick. If you love herbs, fresh basil or parsley can boost flavor too. If you want to swap the chicken, use chicken breasts or thighs. They cook well and stay juicy. For a vegetarian option, try tofu or chickpeas. Tofu soaks up flavors and adds protein. Chickpeas are hearty and fill you up. Both options keep this dish tasty and satisfying. Lemon herb chicken and rice lasts in the fridge for up to four days. To keep it fresh, store it in an airtight container. This will help seal in moisture and flavor. Always let the dish cool before sealing. If you want to keep it longer, consider freezing it instead. You can freeze individual portions of lemon herb chicken and rice. Use freezer-safe containers or bags. Be sure to label them with the date. For best results, consume within three months. When you want to eat it, thaw it in the fridge overnight. You can also use the microwave for a quicker thaw. To keep the flavor and texture, reheat in the oven or on the stove. If using the oven, cover the dish with foil at 350°F for about 20 minutes. For the stove, add a splash of broth to prevent drying out. Always check that the chicken is heated to 165°F before serving. Handle leftovers safely by not leaving them out for more than two hours. You can pair this dish with many sides. Here are some tasty options: - Steamed broccoli - Roasted carrots - Green salad with vinaigrette - Garlic bread - Sautéed green beans These sides add color and flavor to your meal. They also balance the lemony taste of the chicken. Yes, you can use brown rice. However, it takes longer to cook. Here are some tips: - Use 2 ½ cups of chicken broth for 1 cup of brown rice. - Cook the rice for about 40-45 minutes instead of 20 minutes. - Check if the rice is tender before serving. Brown rice adds a nice nutty flavor. It also boosts the fiber in your meal. To check if the chicken is done, use these tips: - Cut into the thickest part of the thigh. The meat should be white, not pink. - Use a meat thermometer. The internal temperature should reach 165°F (75°C). - Juices should run clear when you cut into it. These methods help ensure your chicken is safe and delicious. Enjoy your meal with confidence! This recipe combines chicken, rice, and bright flavors. You learned to marinate the chicken and cook the rice perfectly. Using fresh herbs and spices enhances taste. Variations give you options for dietary needs. Proper storage keeps leftovers tasty. I hope you enjoy cooking this dish and sharing it with others. Experiment with flavors, and make it your own. Happy cooking!

Are you ready to transform your dinner routine? My Lemon Herb Chicken and Rice is a simple, flavorful dish that brings zest to your table. With tender chicken thighs, fragrant …

Read more

Categories Dinner

BBQ Chicken Quesadillas Flavorful and Easy Recipe

January 4, 2026January 13, 2025 by Chef Jamie
- 2 cups cooked chicken, shredded - 1 cup BBQ sauce (your favorite brand) - 1 cup shredded cheddar cheese - 1 cup shredded mozzarella cheese - 4 large flour tortillas - 1/2 cup red onion, thinly sliced - 1/2 cup bell peppers (mixed colors), sliced - 2 tablespoons olive oil - Fresh cilantro, for garnish - Sour cream and guacamole, for serving The main ingredients give the quesadillas their core flavor. Cooked chicken adds protein. BBQ sauce brings sweetness and tang. Cheddar and mozzarella create a cheesy delight. Flour tortillas wrap everything together. You can use optional ingredients to enhance taste. Red onion adds a sharp bite. Bell peppers give color and crunch. Olive oil helps cook veggies. Fresh cilantro brightens the dish. Serving suggestions like sour cream and guacamole add creamy richness. Feel free to mix and match these ingredients. Your BBQ chicken quesadillas can be as simple or complex as you want. Enjoy exploring flavors! {{ingredient_image_1}} Start by combining the shredded chicken with BBQ sauce in a bowl. Mix well until the chicken is fully coated. Set this mixture aside for later. Next, heat one tablespoon of olive oil in a large skillet over medium heat. Add the thinly sliced red onion and bell peppers to the skillet. Sauté these veggies for about 3 to 4 minutes. You want them to be tender and slightly caramelized. Once done, remove them from the skillet and set aside. Now, wipe the skillet clean and add another tablespoon of olive oil. Place one flour tortilla in the skillet. Sprinkle half of the cheddar and mozzarella cheese over the tortilla. Then, add half of the BBQ chicken mixture and half of the sautéed veggies on top. Place another tortilla on top. Cook this quesadilla for about 3 to 4 minutes until the bottom is golden brown. Carefully flip it over and cook for another 3 to 4 minutes. You want the other side to be golden and the cheese to melt. Remove the quesadilla from the skillet and let it cool for a minute. Cut it into wedges. Repeat these steps with the remaining ingredients to make a second quesadilla. For serving, garnish each quesadilla with fresh cilantro. Serve with sides of sour cream and guacamole. This adds a nice touch and gives you extra flavors. Enjoy your delicious BBQ chicken quesadillas! To get the best flavor, sauté your veggies well. Heat the olive oil over medium heat. Add the red onion and bell peppers. Cook them for about 3-4 minutes. They should be soft and a bit caramelized. This step adds sweetness and depth. For crispy quesadillas, use a hot skillet. After adding the first tortilla, layer half the cheese. Then, add the BBQ chicken and veggies. Top with another tortilla. Cook until golden brown on both sides. This method gives you a crunchy outside and melted cheese inside. Spice up your BBQ chicken quesadillas with extra flavors. You can add smoked paprika for a warm, smoky taste. A dash of cayenne pepper adds heat. You can also drizzle some hot sauce for a kick. When it comes to cheese, don’t stick to just cheddar and mozzarella. Try pepper jack for spice or Gouda for a rich flavor. Mixing different cheeses enhances the taste and makes the quesadillas more interesting. Pro Tips Use Leftover Chicken: Save time and enhance flavor by using leftover rotisserie chicken for a quicker meal. Cheese Options: Experiment with different types of cheese, like pepper jack for a spicy kick or gouda for a smoky flavor. Cooking Method: For a crispier quesadilla, consider using a panini press instead of a skillet. Serving Suggestions: Pair with a fresh salsa or an avocado salad for a refreshing contrast to the richness of the quesadillas. {{image_2}} You can change the meat in BBQ chicken quesadillas. Pulled pork or beef works great. These meats bring their own taste and texture. They also pair well with BBQ sauce. Try using the same method to prepare them. For a vegetarian option, use black beans or grilled mushrooms. These options still give a hearty feel. You can also add extra cheese for creaminess. BBQ sauce comes in many flavors. You can choose sweet BBQ or spicy BBQ. Sweet BBQ adds a nice caramelized taste. Spicy BBQ gives a kick that wakes up your taste buds. You can also mix sauces for a unique flavor. Adding different vegetables or herbs can change the taste. Try corn, zucchini, or spinach for added nutrition. Fresh herbs like cilantro or parsley add a fresh touch. Don’t be afraid to experiment. Your BBQ chicken quesadillas can become your signature dish! To keep your BBQ chicken quesadillas fresh, wrap them tightly in plastic wrap or foil. You can also use an airtight container. This will prevent them from drying out. Store them in the fridge for up to 3 days. If you want to keep them longer, consider freezing them. They can last up to 2 months in the freezer. Just make sure to label them with the date. When it's time to enjoy your leftovers, the best way to reheat them is in a skillet. Heat the skillet over medium heat. Place the quesadilla in the skillet and cook for 2-3 minutes on each side. This method keeps the tortilla crispy and the cheese melty. You can also use a microwave if you're in a hurry. Place the quesadilla on a microwave-safe plate. Heat it for 30-60 seconds. However, this may make the tortilla a bit soft. If you want the best taste, stick with the skillet! Can I use store-bought BBQ chicken? Yes, you can use store-bought BBQ chicken. It saves time and still tastes great. Just shred it and mix it with your favorite BBQ sauce. This makes the recipe quick and easy for busy days. What is the best type of cheese for quesadillas? Cheddar and mozzarella are my top picks. Cheddar gives a sharp flavor, while mozzarella melts nicely. You can also mix in some pepper jack for a kick. How do I make BBQ sauce from scratch? To make BBQ sauce, mix these ingredients in a bowl: - 1 cup ketchup - 1/4 cup apple cider vinegar - 1/4 cup brown sugar - 1 tablespoon Worcestershire sauce - 1 teaspoon garlic powder - 1 teaspoon onion powder - Salt and pepper to taste. Stir well and adjust to your taste. Can I prepare these quesadillas in advance? Yes, you can prep these quesadillas ahead of time. Assemble them, but don’t cook yet. Wrap them in plastic wrap and store in the fridge. When you’re ready, just cook them in the skillet until golden and melty. This blog post covered everything you need to make delicious BBQ chicken quesadillas. We explored the main and optional ingredients, shared step-by-step cooking instructions, and provided tips to enhance the flavors. You can customize these quesadillas with different meats or vegetables to match your taste. In conclusion, you can easily create this fun meal. Enjoy experimenting with flavors and find what you love best. Happy cooking!

Looking for a quick and tasty meal? BBQ Chicken Quesadillas are your answer! Packed with tender chicken, gooey cheese, and zesty BBQ sauce, these quesadillas are easy to make and …

Read more

Categories Appetizers

Garlic Parmesan Pasta Rich and Creamy Dish

January 4, 2026January 13, 2025 by Chef Jamie
- 12 oz fettuccine or spaghetti pasta - 4 tablespoons unsalted butter - 6 cloves garlic, minced - 1 cup heavy cream - 1 cup grated Parmesan cheese - 1/2 teaspoon red pepper flakes - Fresh parsley, chopped - Zest of 1 lemon - Salt and black pepper to taste When cooking for different servings, adjust the pasta. Use 3 oz per person. For cheese, try mozzarella or pecorino. If you need gluten-free options, choose rice or corn pasta. These keep the dish tasty and safe for all diets. {{ingredient_image_1}} To start, fill a large pot with water. Bring it to a boil. You need to add salt to the water. This helps flavor the pasta. Use about 1 tablespoon of salt for every 4 quarts of water. Next, add your fettuccine or spaghetti. Cook it according to the package instructions. Aim for al dente pasta, which means it should be firm but not hard. This usually takes about 8-10 minutes. Before you drain the pasta, remember to reserve 1 cup of pasta water. This water will help make the sauce creamy later. Drain the rest of the water and set the pasta aside. In a large skillet, melt 4 tablespoons of unsalted butter over medium heat. Once it melts, add 6 cloves of minced garlic. Sauté the garlic for about 1-2 minutes. You want it to be fragrant and slightly golden. Be careful not to let it burn, as burnt garlic can taste bitter. Now, slowly pour in 1 cup of heavy cream. Stir well to combine. Let it simmer for about 3-5 minutes. This helps the sauce thicken a bit. Next, gradually whisk in 1 cup of grated Parmesan cheese. Keep stirring until the cheese melts and the sauce is smooth. If the sauce gets too thick, add a little of that reserved pasta water. This will help get the right consistency. Once your sauce is ready, it’s time to mix it with the pasta. Add the drained pasta to the skillet with the sauce. Toss it well to coat the pasta evenly. If the sauce seems too thick, add more reserved pasta water until it looks just right. Finally, add salt, black pepper, and any red pepper flakes if you like a bit of heat. Make sure everything is well seasoned and mixed. Heat for another minute, then it's ready to serve! Using fresh garlic makes a big difference. Fresh garlic gives a strong and bright taste. Jarred garlic lacks the same punch. Always choose fresh for the best flavor. Adding herbs makes your dish pop. Fresh parsley or basil adds a nice touch. You can also try thyme or oregano. These herbs pair well with garlic and cheese. Want some heat? Use red pepper flakes. They add spice without overpowering. Start with a small amount and taste as you go. To make a creamy sauce, use low heat. High heat can make the cream separate. Stir often to blend the ingredients well. This ensures a smooth and rich sauce. Be careful with garlic. Burnt garlic tastes bitter. Sauté it until golden but not dark brown. This step is key for the best flavor. For perfect pasta texture, cook until al dente. This means it should be firm to the bite. Remember to reserve some pasta water. It helps adjust the sauce later. Garnish with fresh parsley. It adds color and freshness to your dish. A sprinkle on top makes the pasta look inviting. For a beautiful plate, use a large bowl. Twirl the pasta in the center and let it shine. You can also add extra cheese on top for a nice touch. A sprinkle of lemon zest can brighten the dish. It adds a fresh and zesty note. Just a little goes a long way in enhancing flavor. Pro Tips Use Fresh Garlic: For the best flavor, use fresh garlic instead of pre-minced garlic. Fresh garlic has a stronger aroma and taste that enhances the dish. Reserve Pasta Water: Always reserve some pasta water before draining. This starchy water can be used to adjust the sauce's consistency and help it cling to the pasta. Adjust Spice Level: If you prefer a milder dish, reduce or omit the red pepper flakes. Conversely, if you love heat, feel free to add more! Garnish Generously: Don't skip the fresh parsley and extra Parmesan for garnish. They add color and additional flavor that elevates the presentation and taste. {{image_2}} Adding protein to your Garlic Parmesan Pasta can make it heartier. Here are some easy options: - Grilled Chicken: Slice cooked chicken and mix it in for a tasty twist. The chicken adds texture and keeps the dish filling. - Incorporating Shrimp or Seafood: Cook shrimp in the sauce for a rich flavor. You can also add scallops or crab for something special. - Vegetarian Options with Mushrooms: Sauté mushrooms in butter for a savory touch. They add depth and flavor without meat. Veggies can brighten your Garlic Parmesan Pasta. Consider these additions: - Spinach or Kale: Stir in fresh spinach or kale for a healthy boost. They cook down nicely and add color. - Roasted Tomatoes or Bell Peppers: Toss in roasted tomatoes or bell peppers for a sweet touch. Their natural sugars enhance the dish. - Broccoli or Peas: Add steamed broccoli or peas for crunch. Both veggies pair well with the creamy sauce. Changing up the flavors can create a new experience. Here are some ideas: - Adding Different Cheeses: Try gouda, mozzarella, or even feta for a unique taste. Each cheese brings its own flair. - Using a Different Type of Pasta: Penne or rigatoni can give different shapes and textures. Both hold sauce well. - Infusing with Lemon or Basil: A little lemon zest brightens the dish. Fresh basil adds a fragrant note that elevates the flavors. To store Garlic Parmesan Pasta, let it cool down first. Place it in an airtight container. This keeps moisture in and prevents the pasta from drying out. Glass or plastic containers work well. Make sure to seal it tightly. This method will keep your pasta fresh for a few days. You can freeze Garlic Parmesan Pasta for later use. First, let it cool completely. Then, transfer the pasta to a freezer-safe bag or container. Remove as much air as possible. Label the bag with the date. To reheat, thaw it in the fridge overnight. Then, heat it gently in a pan. Add a splash of cream or water to restore creaminess. Refrigerated leftovers last for about 3 to 5 days. Check for signs of spoilage before eating. Look for a sour smell or mold on the pasta. If you see any, throw it away. Always trust your senses; they guide you well in the kitchen. Can I make Garlic Parmesan Pasta ahead of time? Yes, you can make Garlic Parmesan Pasta ahead of time. Cook the pasta and sauce separately. Store each in a container in the fridge. When you want to serve it, just heat both and mix them together. How can I make it dairy-free? To make this dish dairy-free, swap heavy cream for coconut cream. Use nutritional yeast instead of Parmesan. This gives a cheesy flavor without dairy. What to serve with Garlic Parmesan Pasta? Garlic Parmesan Pasta pairs well with a fresh salad or grilled vegetables. You can also serve it with garlic bread. The bread helps to soak up the creamy sauce. Why is my sauce not creamy? If your sauce is not creamy, it could be too thick. Add a bit of reserved pasta water slowly to thin it out. Stir well until you reach your desired creaminess. How do I prevent pasta from sticking together? To prevent sticking, stir the pasta often while it cooks. After draining, toss it with a little olive oil. This helps keep the noodles separate. What can I use instead of heavy cream? You can use cashew cream or almond milk mixed with a bit of flour. This gives you a creamy texture without heavy cream. How much Parmesan cheese is needed for best taste? I recommend using one cup of grated Parmesan cheese. This amount gives a rich flavor without overpowering the dish. You can add more if you love cheese! You now have the tools to make delicious Garlic Parmesan Pasta. We covered key ingredients, from pasta to cheese. I shared steps for cooking and tips to enhance flavors. You can customize your dish with proteins and veggies. Storing and reheating tips help maintain taste and texture. Remember, a little attention to detail goes a long way. Enjoy your cooking journey and impress everyone with your skills!

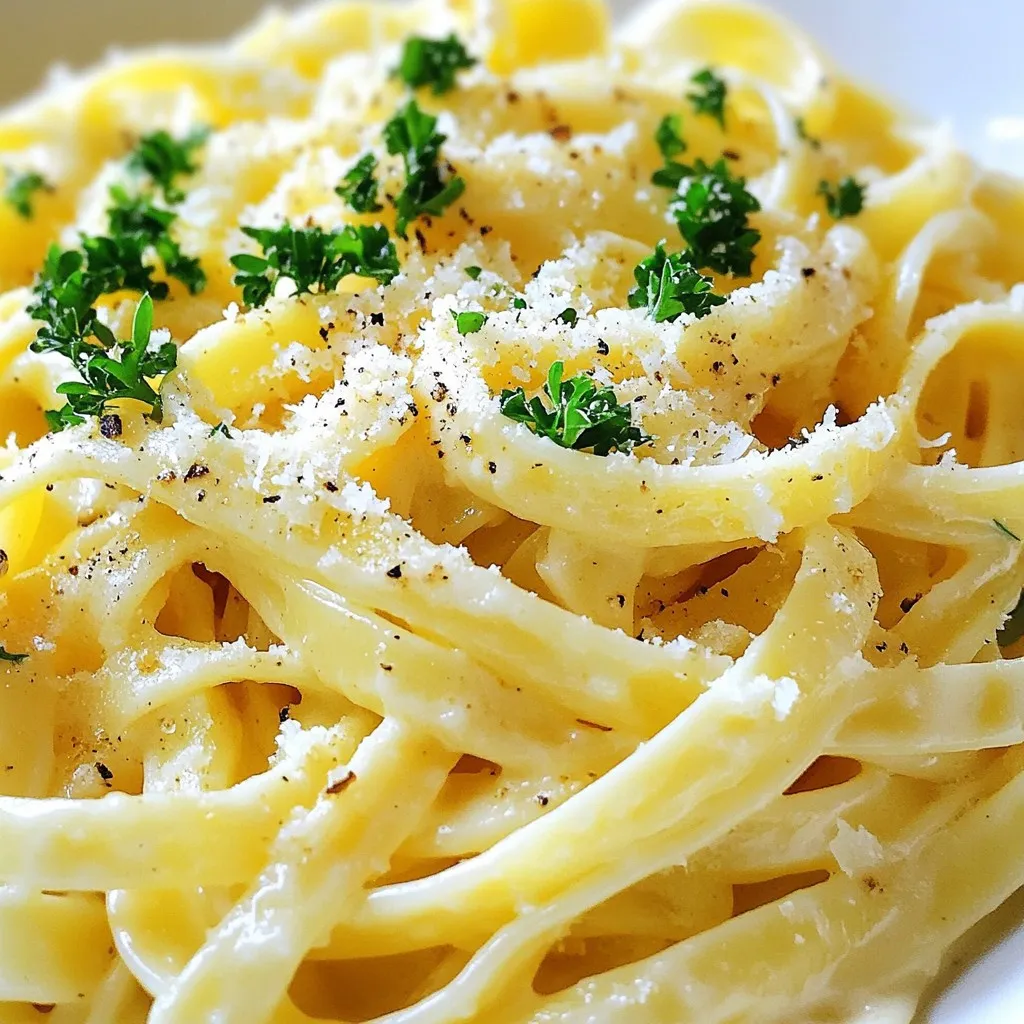
Are you ready to whip up a dish that’s rich, creamy, and oh-so-delicious? Garlic Parmesan Pasta is the answer to your weeknight dinner dilemmas. With just a few simple ingredients, …

Read more

Categories Dinner

Cowboy Butter Chicken Tortellini Flavor Boost Meal

January 9, 2026January 10, 2025 by Chef Jamie
- 1 pound cheese tortellini - 2 chicken breasts, cubed - 1/4 cup unsalted butter - 4 cloves garlic, minced - 2 teaspoons smoked paprika - 1 tablespoon Worcestershire sauce - 1/4 cup fresh parsley, chopped - Grated Parmesan cheese for serving In this recipe, cheese tortellini serves as the hearty base. You can use fresh or frozen tortellini, but I prefer fresh for its tender bite. The chicken adds protein and flavor. I choose boneless, skinless breasts and cube them for even cooking. The unsalted butter brings richness to the dish and helps sauté the chicken. For seasonings, garlic is a must. It adds a warm, aromatic flavor. Smoked paprika brings a subtle smokiness. Worcestershire sauce adds depth and a slight tang. These flavors work together to elevate the dish. Garnishes like fresh parsley brighten the plate. They add color and a fresh taste. Grated Parmesan cheese offers a salty finish. Each ingredient plays a role in making this meal special. Enjoy every bite! {{ingredient_image_1}} - Bring a large pot of salted water to a boil. - Add 1 pound of cheese tortellini to the boiling water. - Cook according to package instructions until al dente. - Drain the tortellini and set it aside. - In a large skillet, melt 1/4 cup of unsalted butter over medium heat. - Add 2 cubed chicken breasts to the skillet. - Cook the chicken for 5-7 minutes until it turns golden brown. - Stir occasionally to ensure even cooking. - Add 4 minced garlic cloves to the skillet. - Cook for another minute until the garlic smells great. - Stir in 2 teaspoons of smoked paprika, 1 teaspoon of chili powder, 1 tablespoon of Worcestershire sauce, 1 tablespoon of Dijon mustard, 1/2 teaspoon of salt, and 1/2 teaspoon of black pepper. - Mix well to coat the chicken evenly with the spices. - Pour in 1/2 cup of heavy cream into the skillet. - Stir until the sauce becomes smooth and creamy. - Let the sauce simmer for 2-3 minutes to thicken slightly. - Add 1 cup of halved cherry tomatoes and the cooked tortellini to the skillet. - Gently toss everything together to coat in the sauce. - Remove from heat and stir in 1/4 cup of chopped fresh parsley. - Serve warm, topped with grated Parmesan cheese for extra flavor. When making tortellini, you have two choices: fresh or frozen. Fresh tortellini cooks fast. It needs just 3 to 4 minutes in boiling water. Frozen tortellini takes longer, about 5 to 7 minutes. Always check the package for the perfect cooking time. This way, you avoid mushy pasta. To add more flavor to your chicken, consider spices. You can use garlic powder or onion powder. Paprika adds a nice touch, too. Make sure to cook the chicken until it is golden brown. This keeps it juicy and tender. Cooking it for about 5 to 7 minutes works well. Stir often to avoid burning. If you want a thicker sauce, use a quick trick. Add a bit more cream or a touch of cornstarch mixed with water. This thickens the sauce nicely. For flavor balance, taste as you go. You can add salt or lemon juice to brighten the dish. This keeps the flavors lively and fresh. Pro Tips Use Fresh Tortellini: Fresh cheese tortellini will enhance the flavor and texture of the dish compared to frozen varieties. Customize the Spice Level: Feel free to adjust the amount of chili powder to suit your heat preference, or add a pinch of cayenne for an extra kick. Let the Sauce Simmer: Allowing the sauce to simmer for a few extra minutes can deepen the flavors and create a richer consistency. Garnish Generously: Adding a generous sprinkle of grated Parmesan and fresh parsley not only enhances flavor but also adds a beautiful presentation to the dish. {{image_2}} You can switch up the protein in Cowboy Butter Chicken Tortellini. Shrimp adds a sweet flavor and cooks quickly. Just sauté it in the butter until pink. Beef also works well. Use ground beef or strips, and cook until brown. For a vegetarian twist, try using mushrooms or chickpeas. Both absorb flavors well and add a nice texture. This way, you can enjoy a hearty meal without meat. Adding different vegetables can really enhance this dish. Spinach wilts nicely and adds color. Bell peppers add crunch and sweetness. You can also toss in zucchini or asparagus for a fresh taste. Using flavored tortellini is another fun way to boost flavor. Try spinach or roasted garlic tortellini. They bring extra depth to the dish. For those needing gluten-free options, use gluten-free tortellini. Many brands offer great flavors that work well in this recipe. You can also choose gluten-free pasta shapes like penne. If you want a dairy-free meal, substitute heavy cream with coconut cream or cashew cream. These options keep the sauce creamy without dairy. Just adjust the seasoning to match your taste. After you enjoy your Cowboy Butter Chicken Tortellini, store any leftovers in the fridge. Use an airtight container to keep it fresh. It’s best to refrigerate within two hours of cooking. Make sure the dish is cool before sealing it up. This helps avoid sogginess. If you want to freeze it, let the dish cool first. Place it in a freezer-safe container. Seal it tightly to prevent freezer burn. Label the container with the date for easy tracking. When it’s time to enjoy your leftovers, reheating is key. The best method is to use the stove. Place the tortellini in a skillet over medium heat. Add a splash of water or cream to keep it moist. Stir often to avoid sticking. If you prefer using the microwave, place the tortellini in a microwave-safe bowl. Cover it with a lid or microwave-safe wrap. Heat in short bursts, stirring in between. This helps keep the flavor while avoiding a soggy texture. Your Cowboy Butter Chicken Tortellini is best enjoyed fresh. However, it stays tasty in the fridge for about 3-4 days. Keep an eye on the color and smell. If it looks off or smells sour, it’s time to toss it. When frozen, it can last up to 3 months. To check if it’s spoiled, look for ice crystals or an odd smell. If any of these signs appear, it’s safest to discard it. Enjoy this dish while it’s fresh for the best taste! If you cannot find cheese tortellini, there are several great options. You can use: - Spinach tortellini for a fresh taste. - Mushroom tortellini for an earthy flavor. - Pasta shells or farfalle for a different shape. - Any small pasta like orecchiette or ditalini. These choices will still pair well with the rich sauce. Yes, you can prepare Cowboy Butter Chicken Tortellini in advance. Here are some tips for storage and reheating: - Storage: Let the dish cool before placing it in an airtight container. It will stay fresh in the fridge for about 3 days. - Freezing: You can freeze the dish for up to a month. Just make sure to store it in a freezer-safe container. - Reheating: When you’re ready to enjoy, reheat in a skillet over low heat. Add a splash of cream or broth to keep it moist. This dish has a mild heat. The smoked paprika and chili powder give it warmth, but it won't burn your tongue. If you like more spice, consider adding red pepper flakes or more chili powder. Adjust to your taste and enjoy! This blog post shared a tasty recipe for Cowboy Butter Chicken Tortellini. You learned about key ingredients, cooking steps, and helpful tips. We also explored delicious variations to fit your needs. Remember, you can easily customize flavors or use different proteins. Proper storage and reheating methods will keep your meal fresh. Enjoy experimenting in the kitchen! This dish will surely please your taste buds and impress your family. Cook with confidence, and have fun making it your own.

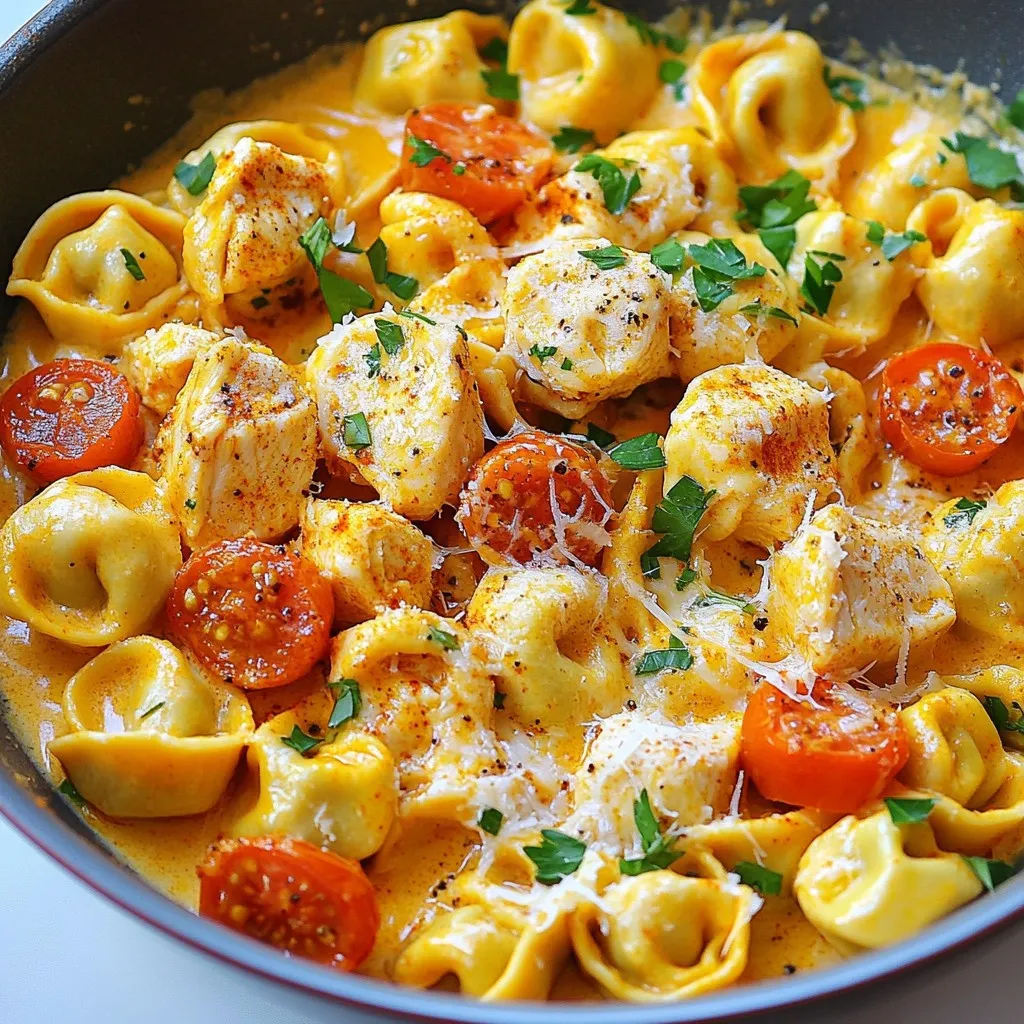
Are you ready to take your meal game to the next level? This Cowboy Butter Chicken Tortellini is rich, creamy, and packed with flavor! With simple ingredients and quick steps, …

Read more

Categories Dinner

One-Pan Butter Parmesan Pasta Simple and Savory Dish

November 11, 2025December 31, 2024 by Chef Jamie
To make One-Pan Butter Parmesan Pasta, you will need simple and fresh ingredients. Here’s the list: - 12 oz (340g) spaghetti or fettuccine - 4 cups vegetable broth - 4 tablespoons unsalted butter - 1 cup heavy cream - 1 cup freshly grated Parmesan cheese - 3 cloves garlic, minced - 1 teaspoon onion powder - 1/2 teaspoon red pepper flakes - Salt and pepper to taste - Fresh parsley, chopped (for garnish) - Zest of 1 lemon (optional, for brightness) Each ingredient plays a key role in flavor. The pasta absorbs the broth and cream, creating a rich taste. The butter adds a smooth texture, while garlic and onion powder bring warmth and depth. Red pepper flakes add a gentle heat, balancing the dish. Fresh parsley and lemon zest brighten everything up, making it feel vibrant. Gather these ingredients before you start cooking. You'll find it easier to follow the steps and create a delightful meal. This dish is perfect for busy weeknights or when you want something tasty without a lot of fuss. {{ingredient_image_1}} First, take a large, deep skillet or pan. Place it over medium heat. Add 4 tablespoons of unsalted butter. Let it melt completely. Once melted, add 3 cloves of minced garlic. Sauté for about 1 minute. This step adds a nice aroma to the dish. Be careful not to burn the garlic. Next, pour in 4 cups of vegetable broth. Bring the broth to a gentle boil. Once boiling, add 12 ounces of spaghetti or fettuccine. Ensure the pasta is fully submerged in the broth. Reduce the heat to medium-low. Cover the pan and cook for about 10-12 minutes. Stir occasionally until the pasta is al dente and most broth is absorbed. After the pasta cooks, stir in 1 cup of heavy cream. Then, add 1 teaspoon of onion powder and 1/2 teaspoon of red pepper flakes. Cook for an additional 2-3 minutes. This step thickens the sauce slightly and enhances the flavor. Remove the pan from heat. Mix in 1 cup of freshly grated Parmesan cheese. Stir until it melts and creates a creamy sauce. Season with salt and pepper to taste. If you want a pop of flavor, sprinkle some lemon zest. Finally, garnish with chopped fresh parsley before serving. Enjoy your delicious one-pan butter Parmesan pasta! To get pasta just right, timing is key. Start by cooking the spaghetti or fettuccine in the vegetable broth. Keep an eye on the clock, and stir it often. Check for doneness at around 10 minutes. The pasta should be firm but not hard. If you bite it, it should have a slight chew. This is called al dente. Remember, it will cook a bit more after you remove it from heat. You can boost the taste with a few extras. Adding lemon zest gives a fresh kick. Just grate the outer peel of the lemon. It brightens the dish. You might also add cooked chicken or shrimp for protein. Mixing in sautéed spinach or cherry tomatoes adds color and nutrients. Feel free to adjust the red pepper flakes for heat. Make it just how you like! Some common errors can spoil your dish. First, don’t overcook the pasta. It can turn mushy. Also, avoid adding all the salt at once. Taste as you go. If you add too much early, you can’t take it back. Lastly, be careful not to skip the cream. It makes the sauce rich and creamy. Follow these tips for a delicious meal! Pro Tips Use Fresh Ingredients: Freshly grated Parmesan cheese and high-quality butter will enhance the flavor of your pasta dish significantly. Adjust the Creaminess: If you prefer a lighter sauce, you can reduce the amount of heavy cream or substitute it with milk to make the dish less rich. Add Vegetables: Consider adding spinach, cherry tomatoes, or broccoli to the dish for extra nutrition and color. Stir them in during the last few minutes of cooking. Perfect Pasta Cooking: Stir the pasta occasionally while it cooks to prevent it from sticking together and ensure even cooking. {{image_2}} You can easily add protein to your One-Pan Butter Parmesan Pasta. Some great choices are chicken, shrimp, or even tofu. Simply cook the protein in the same pan as the butter. - For chicken: Dice it into small pieces and sauté until golden brown. - For shrimp: Add them just after the garlic, cooking until they turn pink. - For tofu: Use firm tofu, diced, and sauté until crispy. This makes the dish more filling and flavorful. Veggies can brighten your dish and add nutrition. I love adding spinach, broccoli, or bell peppers. - Spinach: Toss it in just before serving. - Broccoli: Steam it separately and mix it in at the end. - Bell peppers: Sauté with garlic for extra flavor. These options create a colorful and healthy meal. If you need a gluten-free option, swap regular pasta for gluten-free pasta. Many brands offer great choices that cook well. You can also use zucchini noodles for a low-carb version. - Zucchini noodles: Make sure to sauté them quickly to avoid sogginess. - Gluten-free pasta: Follow package instructions for cooking times. These alternatives keep the dish delicious and friendly for different diets. Store any leftover One-Pan Butter Parmesan Pasta in an airtight container. Make sure to let it cool before sealing. This helps keep the pasta fresh. You can keep it in the fridge for up to three days. Label the container with the date. This way, you will know when to eat it. When you are ready to eat the leftovers, reheating is easy. Place the pasta in a skillet over low heat. Add a splash of vegetable broth or cream to help it not dry out. Stir it often until it is warm. This should take about five to seven minutes. You can also use a microwave. Heat in short bursts, stirring in between, until hot. If you want to keep it longer, freezing is a great option. Transfer the cooled pasta to a freezer-safe container. Leave some space at the top for expansion. It can stay in the freezer for up to two months. To enjoy, thaw it overnight in the fridge. Reheat as mentioned earlier for the best taste. It takes about 25 minutes to make One-Pan Butter Parmesan Pasta. You spend 10 minutes prepping and 15 minutes cooking. This quick dish is perfect for busy weeknights. Yes, you can use other types of pasta. Fettuccine, penne, or even gluten-free pasta all work well. Just make sure to adjust the cooking time based on the pasta shape. One-Pan Butter Parmesan Pasta is great for meal prep. It stores well in the fridge for up to three days. Just reheat it on the stove or in the microwave. You can serve this pasta with a simple salad or garlic bread. A light green salad adds freshness. Garlic bread makes it a comforting meal. Enjoy! In this blog post, we explored how to make One-Pan Butter Parmesan Pasta. You learned about the simple ingredients, easy steps, and helpful tips for success. We even discussed how to add protein or veggies for variety. Remember to store any leftovers properly for later use. This dish is quick and full of flavor. Now, you can enjoy a tasty meal that’s easy to share. Try it out and impress your friends and family with your cooking skills!

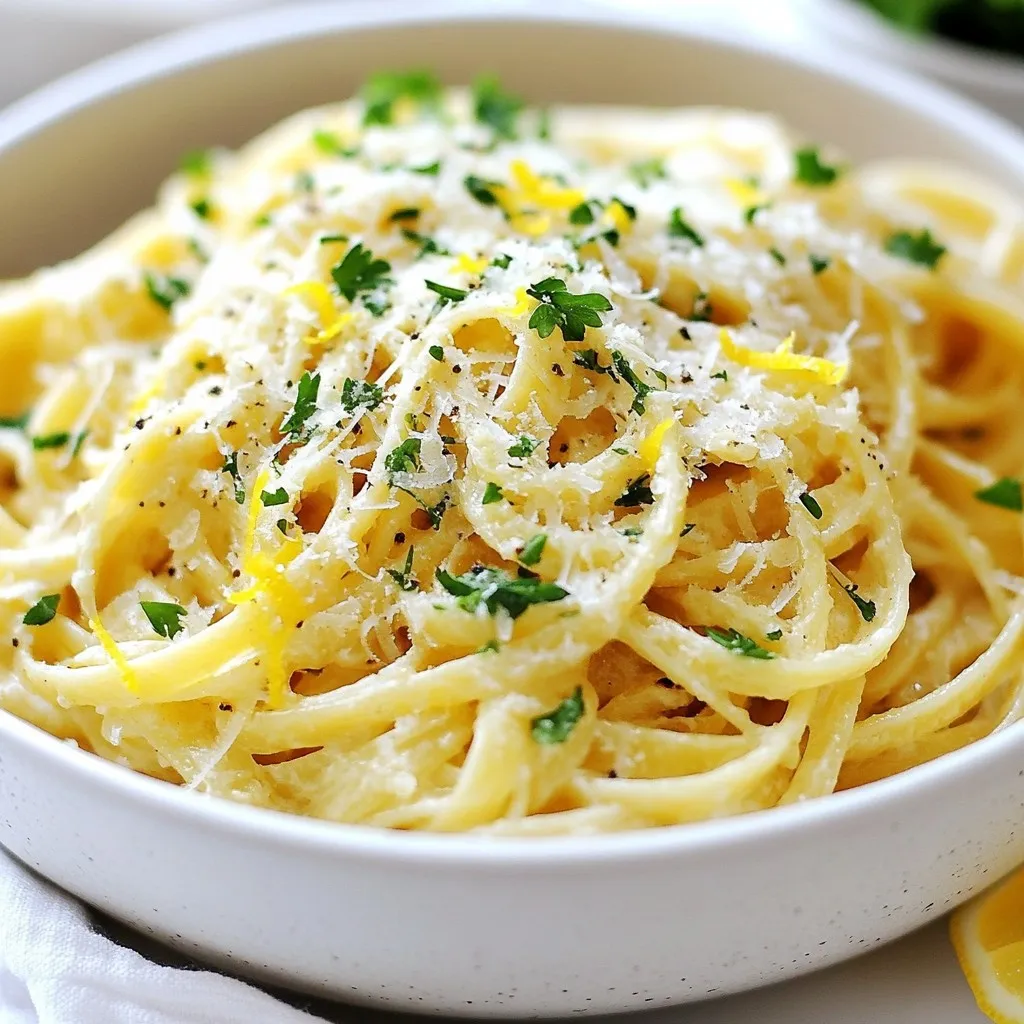
Do you crave a quick and tasty meal? Try my One-Pan Butter Parmesan Pasta! This simple dish packs rich flavor into just one pan. With easy-to-find ingredients like spaghetti, butter, …

Read more

Categories Dinner
Older posts
Newer posts
← Previous Page1 … Page132 Page133 Page134 Next →

TOSSED RECIPES

Simple meals, bold taste. Quick recipes made for real life — always fresh, always delicious. 🌿🍴

PAGES

Home About Contact Privacy Policy Terms & Conditions Cookie Policy GDPR Policy Copyright Policy Disclaimer

CATEGORIES

Appetizers Desserts Salads Breakfast Dinner

Contact

  • Pinterest
  • Mail
Copyright © 2026 Tossed Recipes. All rights reserved.