Skip to content
Tossed Recipes
  • Home
  • Appetizers
  • Desserts
  • Salads
  • Breakfast
  • Dinner
  • Privacy Policy
  • Contact
  • About

Chef Jamie

Million Dollar Chicken Casserole Easy Family Meal

September 21, 2025 by Chef Jamie
To create a delicious Million Dollar Chicken Casserole, you will need: - 3 cups cooked chicken, shredded - 1 cup cooked white rice - 1 can (10.5 oz) cream of chicken soup - 1 cup sour cream - 1 cup shredded cheddar cheese - 1 cup frozen mixed vegetables (peas, carrots, corn) - 1 teaspoon garlic powder - 1 teaspoon onion powder - 1 teaspoon dried thyme - Salt and pepper to taste - 1 cup crushed buttery crackers (like Ritz) - 2 tablespoons melted butter The cream of chicken soup and sour cream add a rich, creamy texture. The shredded cheddar cheese gives a nice melt and sharp flavor. Adding frozen mixed vegetables brings nutrition and color. Garlic powder, onion powder, and thyme enhance the dish's overall taste with aromatic notes. The buttery crackers on top create a crunchy, golden crust that contrasts with the creamy filling. If you have dietary needs, there are easy substitutes you can make: - Use gluten-free crackers instead of buttery crackers for a gluten-free option. - Swap the sour cream for Greek yogurt for a tangy flavor and less fat. - If you're dairy-free, choose plant-based cheese and sour cream. - For a vegetarian option, replace the chicken with a mix of beans or lentils. These swaps keep the casserole tasty and enjoyable for everyone! To make the base mixture, start by gathering your ingredients. You will need cooked chicken, cooked rice, cream of chicken soup, sour cream, shredded cheddar cheese, and frozen mixed veggies. In a large bowl, add 3 cups of shredded chicken and 1 cup of cooked rice. Next, mix in 1 can of cream of chicken soup and 1 cup of sour cream. Then, stir in 1 cup of shredded cheddar cheese and 1 cup of frozen mixed vegetables. Now, season the mixture with 1 teaspoon of garlic powder, 1 teaspoon of onion powder, and 1 teaspoon of dried thyme. Add salt and pepper to taste. Mix everything well until it is all combined. This base is creamy and full of flavor. Once your base mixture is ready, it's time to layer it in the baking dish. First, grease a 9x13 inch baking dish to prevent sticking. Pour the chicken mixture into the dish and spread it evenly. This ensures that every bite is tasty. In a small bowl, take 1 cup of crushed buttery crackers and mix it with 2 tablespoons of melted butter. This will give your casserole a nice crunch. Evenly sprinkle this cracker mix over the top of the chicken mixture. This layer adds texture and flavor. Now, preheat your oven to 350°F (175°C). Once it's heated, place your casserole in the oven. Bake it for 25 to 30 minutes. You will know it’s done when it is hot and bubbly, and the top is golden brown. After baking, let the casserole cool for a few minutes before serving. This helps the layers set and makes it easier to cut. For a nice touch, serve it warm, garnished with fresh parsley. Enjoy your meal! Shredding chicken can be easy if you follow a few steps. First, use cooked chicken. I like to use rotisserie chicken for its flavor. Let the chicken cool for a few minutes. Grab two forks and pull the chicken apart. You can also use your hands if you like it easier. Make sure to shred it into bite-sized pieces. This helps it mix well with other ingredients. To boost flavors, use fresh herbs when possible. Dried thyme is great, but fresh thyme adds more taste. You can also add a splash of lemon juice for zing. If you enjoy spice, sprinkle in some red pepper flakes. Mix in some sautéed onions and garlic for depth. Experiment with different cheeses, like pepper jack or mozzarella, for a fun twist. Every oven heats a bit differently. If your oven runs hot, check the casserole a few minutes early. For slower ovens, you might need to add a few extra minutes. The goal is for it to be hot and bubbly. Look for a golden-brown crust on top. Use a food thermometer to check the center; it should reach 165°F. This way, you ensure it cooks evenly every time. {{image_2}} You can easily change this recipe to fit your taste. Try adding fresh herbs like parsley or basil. They will boost the flavor and make it lively. You can also mix in different veggies. Bell peppers, zucchini, or broccoli can add crunch and color. If you want more creaminess, you can blend in some cream cheese. This will make the dish richer and extra tasty. Want to switch up the protein? Use cooked turkey instead of chicken. Turkey gives a nice flavor and is a great way to use leftovers. You can also try shredded pork or beef for a hearty meal. For a lighter option, consider using canned tuna. It adds a different taste and is quick to use. For gluten-free eaters, swap the crackers for gluten-free ones. You can find many options in stores. For a vegetarian twist, replace the chicken with cooked lentils or chickpeas. This will make the dish filling and healthy. You can also add more veggies like spinach or mushrooms. These options help everyone enjoy this casserole without missing out. After you enjoy your meal, let the casserole cool. Place the leftover chicken casserole in an airtight container. This keeps it fresh. Store it in the fridge for up to three days. If you use a glass dish with a lid, that works great too! When you’re ready to reheat, preheat your oven to 350°F (175°C). Place the casserole in the oven for about 20 minutes. Cover it with foil to keep it moist. If you want, add a sprinkle of cheese on top for extra flavor. You can also use a microwave, but be careful. Heat it in short bursts to avoid drying it out. To freeze, first cool the casserole completely. Then, cut it into servings. Wrap each piece tightly in plastic wrap. Place the wrapped pieces in a freezer bag or container. Label it with the date. This way, you can enjoy it for up to three months. When you’re ready to eat, thaw it in the fridge overnight before reheating. Yes, you can prepare this casserole a day ahead. Just mix all the ingredients and place them in the baking dish. Cover it with plastic wrap and store it in the fridge. When you’re ready to bake, take it out, remove the wrap, and let it sit for about 20 minutes. Bake it as directed. This way, you save time on busy days. This casserole pairs well with a simple green salad. The crisp greens and fresh veggies balance the rich flavors of the dish. You can also serve it with steamed broccoli or garlic bread for a heartier meal. Feel free to add fruits like apples or grapes for a sweet touch. Absolutely! You can swap sour cream for Greek yogurt. It adds protein and lowers fat. Use brown rice instead of white for more fiber. You can also add extra veggies, like spinach or bell peppers, to boost nutrition. Adjust the cheese to reduce calories if needed. These simple changes keep the taste while making it healthier. This blog post shared everything you need for a great Million Dollar Chicken Casserole. We covered ingredients, step-by-step instructions, and helpful tips. You learned how to customize the dish and store leftovers properly. I hope you feel ready to create your own version. Remember, cooking can be fun and rewarding. Enjoy sharing this dish with family and friends, and feel free to make it your own. Happy cooking!

Looking for a quick and tasty family meal? The Million Dollar Chicken Casserole is your answer! This dish combines creamy flavors, tender chicken, and a crunchy topping, making it a …

Read more

Categories Dinner

One Skillet Creamy Tuscan Gnocchi Delightful Dish

September 19, 2025 by Chef Jamie
- 1 package (16 oz) potato gnocchi - 2 tablespoons olive oil - 3 cloves garlic, minced - 1 cup cherry tomatoes, halved - 2 cups fresh spinach These main ingredients create a base full of flavor. The potato gnocchi gives the dish its heartiness. Olive oil adds richness, while garlic brings a warm aroma. Cherry tomatoes add sweetness and color. Fresh spinach adds a vibrant green and healthy touch. - 1 cup heavy cream - 1/2 cup grated Parmesan cheese - 1/2 teaspoon Italian seasoning The creamy sauce is key to this dish. Heavy cream makes it rich and smooth. Parmesan cheese adds a salty, nutty flavor. Italian seasoning gives it a classic touch. Together, these ingredients make a sauce that clings to the gnocchi. - Salt and pepper to taste - Fresh basil leaves for garnish Seasoning is vital for taste. Salt enhances flavors, while pepper adds a hint of spice. Fresh basil leaves make a lovely garnish. They add color and fresh aroma. This simple touch elevates the dish's look and taste. - First, heat 2 tablespoons of olive oil in a large skillet over medium heat. - Next, add 3 minced garlic cloves and sauté for about 30 seconds. You want the garlic fragrant, but not burnt. - Add 1 cup of halved cherry tomatoes to the skillet. Cook these for about 3-4 minutes until they soften. You should see them release their juices. - Now, stir in 2 cups of fresh spinach. Cook this until it wilts, which takes about 2-3 minutes. The bright green color will make your dish pop! - While the spinach wilts, cook 1 package (16 oz) of potato gnocchi according to the package instructions. Once done, drain the gnocchi. - Reduce the heat to low and pour in 1 cup of heavy cream into the skillet. Stir well until it’s smooth. - Add the drained gnocchi to the skillet along with 1/2 cup of grated Parmesan cheese and 1/2 teaspoon of Italian seasoning. Toss everything together evenly. - Season with salt and pepper to taste. Let the skillet simmer for 2-3 minutes. This lets the flavors meld together. - Finally, remove the skillet from the heat. Garnish with fresh basil leaves before serving. Enjoy your meal! To make gnocchi just right, start with good quality potato gnocchi. Cook it until it floats in boiling water. This usually takes just a few minutes. Don't overcook them; they should be soft but not mushy. After cooking, drain them well to avoid a watery dish. You can toss them in a little olive oil to keep them from sticking together. This small step makes a big difference! To give the dish a unique twist, try adding fresh herbs. Chopped parsley or thyme can brighten the sauce. You can also use crushed red pepper for a kick. If you like a nutty flavor, consider adding a sprinkle of nutmeg. Each of these options adds depth to your creamy sauce. Don't be afraid to experiment with spices that you love! One Skillet Creamy Tuscan Gnocchi pairs well with a fresh salad. A simple arugula salad dressed with lemon juice complements the rich flavors. You can also serve it alongside grilled chicken or shrimp for protein. Garlic bread makes a great side too. It helps soak up all that delicious sauce! {{image_2}} If you want a vegan version of this dish, you can swap out the cream and cheese. Use coconut milk or cashew cream instead of heavy cream. For cheese, use nutritional yeast or a vegan cheese substitute. These options keep the dish creamy and tasty without dairy. You can add more veggies to this recipe. Consider bell peppers, zucchini, or mushrooms. They add more color and nutrients. Just sauté them along with the garlic and tomatoes. You can also use frozen peas for a quick addition. They cook fast and add a nice sweetness. To make this dish heartier, add protein. Cooked chicken, shrimp, or sausage work well. Just add them after the garlic and tomatoes. If you want a plant-based option, try chickpeas or lentils. They boost protein and keep the meal filling. To store your leftover One Skillet Creamy Tuscan Gnocchi, first let it cool. Place it in an airtight container. This helps keep the flavors fresh. Store it in the fridge for up to three days. When you want to eat it again, remember that the sauce may thicken as it cools. You can add a splash of cream or water to loosen it up. To reheat the dish, use a skillet over low heat. Add a little olive oil or butter to prevent sticking. Stir it gently and add a splash of water or cream. This keeps the dish creamy and prevents it from drying out. Heat until it’s warm. You want to enjoy every bite just as you did first! If you want to freeze this dish, start by letting it cool completely. Portion it into smaller containers for easier thawing. Seal them tightly and label with the date. It can last up to two months in the freezer. To thaw, move it to the fridge overnight. Reheat as mentioned before. Enjoy the creamy goodness even after freezing! Gnocchi is a type of pasta made mainly from potatoes. It can also include flour, eggs, or ricotta cheese. The most common type is potato gnocchi, which is soft and fluffy. When cooked, gnocchi has a light texture and absorbs flavors well. You can find different types of gnocchi, like those made from sweet potatoes or spinach, adding more color and taste. Yes, you can prepare parts of this dish ahead. You can cook the gnocchi and store it in the fridge. Just keep it covered. You can also prepare the sauce in advance and store it separately. When you are ready to eat, reheat the sauce and add the gnocchi. This way, you save time and enjoy a quick meal. You can easily change the flavors to suit your taste. Here are some ideas: - Add proteins: Cooked chicken or shrimp can boost the meal. - Use different veggies: Mushrooms, zucchini, or bell peppers can add variety. - Change the cheese: Try different cheeses like feta or mozzarella for new tastes. - Spice it up: Add red pepper flakes for heat or fresh herbs for freshness. These tweaks can make the dish your own! This article has covered a delicious gnocchi recipe. We explored the main ingredients, creamy sauce, and ways to enhance flavor. I shared step-by-step instructions and useful tips for perfecting your dish. You learned about variations to fit dietary needs and how to store leftovers properly. Cooking gnocchi is simple and fun. With this guide, you can create a meal that impresses. Enjoy experimenting with flavors and serving it to friends and family. Happy cooking!

Craving an easy and tasty meal? Look no further than this One Skillet Creamy Tuscan Gnocchi! In just one skillet, you can whip up a rich, creamy sauce with tender …

Read more

Categories Dinner

Viral TikTok Baked Feta Tomato Pasta Recipe Delight

September 19, 2025 by Chef Jamie
- 1 block (8oz) feta cheese - 2 cups cherry tomatoes, halved - 3 cloves garlic, minced - 1/4 cup extra virgin olive oil - 1 teaspoon dried oregano - 1/2 teaspoon red pepper flakes (adjust to taste) - 12 oz pasta (penne or fusilli) - Fresh basil leaves for garnish - Zest of 1 lemon In this recipe, the main ingredients are simple yet packed with flavor. Feta cheese is the star of the dish. It melts beautifully, adding creaminess to the pasta. Cherry tomatoes add sweetness and a pop of color. Minced garlic gives a wonderful aroma and taste. The additional ingredients enhance the dish. Extra virgin olive oil adds richness, while oregano and red pepper flakes bring warmth and depth. You can adjust the red pepper flakes to match your spice level. For the pasta, I recommend penne or fusilli. These shapes hold the sauce well, making each bite enjoyable. Fresh basil leaves and lemon zest brighten the dish and add a fresh finish. As you gather these ingredients, think about how they come together. Each brings its unique taste, creating a delightful meal that everyone will love. 1. Preheat the oven to 400°F (200°C). This helps the feta and tomatoes cook perfectly. 2. Prepare the baking dish. In a 9x13 inch dish, place the block of feta cheese in the center. Surround it with the halved cherry tomatoes and minced garlic. This mixture is key to the dish's flavor. 1. Season the mixture. Drizzle the extra virgin olive oil over the feta and tomatoes. 2. Sprinkle the spices. Add dried oregano, red pepper flakes, salt, and pepper on top. This adds depth to the dish. 3. Bake the dish. Place it in the oven and bake for 25-30 minutes. You want the feta to soften and turn golden, while the tomatoes blister. This creates a rich, creamy sauce. 1. Cook the pasta. Follow the package instructions until it is al dente. Make sure to reserve 1 cup of pasta water before draining. 2. Combine the baked ingredients. Once the feta and tomatoes are done, remove the dish from the oven. Use a fork to mash the feta with the tomatoes, garlic, and olive oil until creamy. 3. Mix with pasta. Add the drained pasta to the dish, mixing well. Slowly add reserved pasta water until the sauce reaches your desired consistency. Adjust the seasoning if needed. This step is important to ensure every bite is flavorful. To make your dish shine, spice levels matter. I love using red pepper flakes. Start with 1/2 teaspoon. You can add more if you want more heat. Taste as you go. This method keeps your dish tasty yet balanced. Pasta texture is key. Aim for al dente pasta, which means it still has a slight bite. When cooking, follow the package instructions carefully. Always save some pasta water before draining. This water helps make the sauce creamy and smooth. Garnishing makes a big difference! Fresh basil leaves add color and flavor. Just sprinkle them on top. Lemon zest brings a bright touch. Use a microplane to finely grate the zest before adding. For serving, use deep bowls. This helps keep the sauce contained. Drizzle a little olive oil on top for richness. If you like cheese, add freshly grated parmesan for extra flavor. Your dish will look and taste amazing! {{image_2}} You can change this dish to fit your taste. Using different types of cheese can add new flavors. For example, goat cheese works well. It has a tangy taste that pairs nicely with tomatoes. You might also try mixing in some mozzarella for a creamier texture. Adding vegetables can really enhance this dish. Spinach is a great choice. It cooks down and blends well with the sauce. Bell peppers add a nice crunch and sweetness. Feel free to toss in other veggies like zucchini or mushrooms for extra color and nutrition. If you need gluten-free options, you can use gluten-free pasta. Many brands offer good choices that taste great. Look for pasta made from rice or lentils for a healthy twist. For those who follow a vegan diet, there are cheese alternatives available. Many brands make vegan feta that can work well in this recipe. You can also use cashew cheese for a creamy texture. Just keep in mind that the flavor may change slightly, but it can still be delicious! After you finish this tasty dish, store any leftovers in airtight containers. This helps keep the flavors fresh. Make sure to let the pasta cool down before sealing the container. The pasta will last in the fridge for about three to five days. If you want to enjoy it later, just reheat it. You can freeze this baked pasta for up to three months. To freeze, let it cool and then transfer it into freezer-safe containers. Be sure to label them with the date. When you are ready to eat, thaw it overnight in the fridge. Reheat in the oven at 350°F (175°C) until hot, about 20-25 minutes. You can also reheat it in the microwave, but this may change the texture a bit. Add a splash of water to keep it moist. To make the sauce creamy, you can adjust the pasta water. After cooking your pasta, save about one cup of the water. When you mix the baked feta and tomatoes with your pasta, add the reserved pasta water slowly. Stir well and check the creaminess. If it’s too thick, add more water a bit at a time until you get the smooth texture you want. This helps keep the sauce light and flavorful without making it too watery. Yes, you can use frozen tomatoes. They will change the texture a bit. Frozen tomatoes often become softer when cooked. This can be nice for creating a sauce, but it may lack the fresh taste of ripe tomatoes. If you use frozen, let them thaw and drain some liquid before baking. This helps avoid excess water in your pasta dish. This pasta dish goes well with simple sides. A fresh salad with greens, like arugula or spinach, adds a nice crunch. You could also serve crusty bread on the side. The bread is great for mopping up the creamy sauce. For a heartier option, try garlic bread or a light soup. These choices will complement the rich flavors of the pasta nicely. This blog post covered a delightful baked feta tomato pasta recipe. We explored main ingredients like feta cheese, cherry tomatoes, and garlic, along with tasty extras and garnishes. I shared step-by-step instructions for preparation and cooking, along with tips to perfect the dish. You learned about variations, including ingredient swaps and dietary options. Finally, I provided storage tips to keep leftovers fresh. Enjoy this easy recipe that brings vibrant flavors to your table. Your culinary adventure awaits as you make this dish your own!

Are you ready to uncover the secret behind the Viral TikTok Baked Feta Tomato Pasta that has swept social media? This dish combines creamy feta, sweet tomatoes, and garlic for …

Read more

Categories Dinner

Air Fryer Buffalo Chicken Meatballs Tasty and Easy Recipe

September 19, 2025 by Chef Jamie
To make tasty buffalo chicken meatballs, you need these main ingredients: - 1 lb ground chicken - 1/2 cup breadcrumbs - 1/4 cup grated Parmesan cheese - 1/4 cup finely chopped green onions - 1/2 teaspoon garlic powder - 1/2 teaspoon onion powder - 1/2 teaspoon smoked paprika - Salt and pepper to taste - 1/3 cup buffalo sauce (plus extra for serving) - 1 egg, beaten Each ingredient brings flavor and helps the meatballs hold together. The ground chicken is the star. It provides lean protein and a great base. The breadcrumbs and egg help bind the meatballs, so they don’t fall apart. Parmesan cheese adds a nice salty kick, while green onions give a fresh taste. The spices make every bite exciting. You can add more ingredients for extra flavor if you like: - Chopped fresh herbs (like parsley or cilantro) - A dash of hot sauce for more heat - Diced jalapeños for spice - Cream cheese for a richer texture These optional ingredients let you customize your meatballs. Use what you love to make them your own. To cook these meatballs, you will need some basic gear: - Air fryer - Large mixing bowl - Measuring cups and spoons - Mixing spoon or spatula - Baking sheet or plate for raw meatballs This gear makes the cooking process smooth and easy. An air fryer is key to getting that crispy outside while keeping the inside juicy. The mixing bowl is where all the magic happens. With the right tools, you’ll create a delicious dish in no time. To start, gather all your ingredients. You need 1 pound of ground chicken, 1/2 cup of breadcrumbs, and 1/4 cup of grated Parmesan cheese. Add 1/4 cup of finely chopped green onions, 1/2 teaspoon of garlic powder, and 1/2 teaspoon of onion powder. Don’t forget 1/2 teaspoon of smoked paprika, along with salt and pepper to taste. Finally, use 1/3 cup of buffalo sauce and 1 beaten egg. In a large mixing bowl, combine the ground chicken, breadcrumbs, Parmesan cheese, green onions, garlic powder, onion powder, smoked paprika, salt, and pepper. Mix everything until it blends well. Then, pour in the beaten egg and buffalo sauce. Stir again until all the ingredients are combined. This mixture will make about 20 meatballs. Next, preheat your air fryer to 380°F (193°C) for about 5 minutes. While it heats, form the mixture into small meatballs, about 1 inch in size. Once your air fryer is ready, place the meatballs in the basket. Make sure not to overcrowd them. You might have to cook them in batches. Cook the meatballs for 10-12 minutes. Check for a golden brown color and ensure they’re fully cooked. Shake the basket halfway through to help the meatballs cook evenly. After cooking, carefully remove them from the air fryer. If you want extra flavor, toss them in more buffalo sauce. Now it’s time to serve! Place the warm meatballs on a platter. You can drizzle more buffalo sauce on top if you like. I recommend serving extra buffalo sauce on the side for dipping. These meatballs are perfect for parties or any game day. Enjoy the spicy kick with friends or family! To get the best texture, use fresh ground chicken. This keeps the meatballs moist. Adding breadcrumbs helps bind the mix. Don't add too many breadcrumbs, or the meatballs can be dry. Mixing in chopped green onions adds a nice crunch. Remember to form the meatballs gently. Overworking them will make them tough. Aim for about 1-inch in size. This size cooks evenly and stays juicy. One common mistake is overcrowding the air fryer. Leave space around the meatballs. This helps them cook evenly. Another mistake is not preheating the air fryer. Preheating to 380°F (193°C) ensures the meatballs cook right. Also, avoid skipping the egg. The egg helps hold the mix together and keeps it moist. Lastly, don't forget to shake the basket halfway. This helps brown all sides. You can boost the flavor easily. Try adding chopped celery or carrots for crunch. A pinch of cayenne pepper gives a nice kick. If you love cheese, mix in some shredded cheddar. For a twist, use ranch seasoning instead of garlic powder. Don’t forget to serve with extra buffalo sauce for dipping. This makes the dish even more fun! {{image_2}} You can spice up these meatballs with different sauces. Instead of buffalo sauce, try BBQ sauce for a sweet twist. You could also use teriyaki sauce for a tasty Asian flair. For a creamy option, ranch dressing works great. Each sauce gives a unique flavor to the meatballs. Experiment and find your favorite! You can change the meatball mix to suit your taste. Use ground turkey or lean beef instead of chicken. For a healthier option, mix in finely chopped vegetables like spinach or bell peppers. If you love cheese, add mozzarella or feta for extra creaminess. These simple swaps let you make your own special meatballs. These meatballs fit any event. For game day, serve them with extra buffalo sauce and toothpicks. You can also use them as sliders on mini buns for a fun twist. Pair the meatballs with a salad for a light meal or serve them over pasta for a hearty dinner. No matter the occasion, these meatballs will impress your guests! To store leftover meatballs, let them cool first. Place the meatballs in a clean, airtight container. Make sure to separate layers with parchment paper to prevent sticking. Store them in the fridge for up to four days. This keeps them fresh and ready for snacks or meals. Reheat the meatballs in the air fryer for a quick and easy fix. Set the air fryer to 350°F (175°C). Heat for about 5 to 7 minutes. You can also microwave them. Place the meatballs on a microwave-safe plate and cover with a damp paper towel. Heat for about 1 to 2 minutes, checking to avoid overcooking. To freeze meatballs, place them on a baking sheet in a single layer. Freeze them for about an hour until they are firm. Once frozen, transfer the meatballs into a freezer bag. Label the bag with the date. They can last up to three months in the freezer. To cook from frozen, air fry them at 380°F (193°C) for about 15-18 minutes. I cook buffalo chicken meatballs in an air fryer for 10 to 12 minutes. Set the temperature to 380°F (193°C). The meatballs should look golden brown and feel firm when done. I recommend shaking the basket halfway through cooking. This helps them cook evenly. Yes, you can use other meats! Ground turkey or pork works well in this recipe. Just keep in mind that the flavor and texture may change. You can also try using plant-based ground meat for a vegetarian option. Adjust the cooking time if needed based on the meat you choose. Buffalo chicken meatballs pair great with several sides. You can serve them with celery sticks and carrot sticks for crunch. They also go well with a creamy ranch or blue cheese dip. Try them on a sub roll for a tasty meatball sandwich. Enjoy them during game day or at parties! In this post, we explored how to make tasty air fryer buffalo chicken meatballs. You learned about the main and optional ingredients, the cooking gear you need, and the step-by-step process. I also shared tips to help perfect the meatballs and variations to keep things exciting. Don't forget how to store leftovers for quick meals later. By following these tips, you can make delicious meatballs that suit any occasion. Enjoy creating this easy and flavorful dish!

If you crave flavor and ease in the kitchen, you’ll love my Air Fryer Buffalo Chicken Meatballs recipe. These meatballs pack a spicy punch and are simple to whip up! …

Read more

Categories Appetizers

Sun Dried Tomato Spinach Tortellini Skillet Delight

September 19, 2025 by Chef Jamie
- 12 oz cheese tortellini (fresh or frozen) - 1 cup sun-dried tomatoes, packed in oil, drained and roughly chopped - 3 cups fresh spinach - 2 cloves garlic, minced - 1 small onion, diced - 1 cup vegetable broth (low-sodium) - 1 teaspoon Italian seasoning - 2 tablespoons olive oil - 1/2 cup grated Parmesan cheese (plus more for serving) - Salt and pepper to taste - Red pepper flakes (optional, for a spicy kick) This dish is full of fresh flavors. The cheese tortellini brings a soft bite, while sun-dried tomatoes pack a punch of sweetness. Fresh spinach adds a bright color and a touch of earthiness. Garlic and onion create a lovely base. For the seasonings, Italian seasoning ties everything together. Olive oil provides a rich flavor. Parmesan cheese adds creaminess. Salt and pepper enhance all the tastes. If you like heat, red pepper flakes can give it a fun kick. When you have all these ingredients ready, you create a simple yet delicious meal that impresses everyone at the table! Start by boiling a large pot of salted water. This helps the tortellini taste great. Once the water boils, add 12 ounces of cheese tortellini. If you use fresh tortellini, cook for about 3-4 minutes. If frozen, follow the package instructions. After cooking, drain the tortellini in a colander and set it aside. In a large skillet, heat 2 tablespoons of olive oil over medium heat. Add 1 small diced onion and cook it for about 3-4 minutes. You want it to be soft and translucent. Then, add 2 minced garlic cloves, stirring for about 1 minute. You’ll know it’s ready when it smells wonderful. Now, stir in 1 cup of chopped sun-dried tomatoes and 1 teaspoon of Italian seasoning. Cook this mixture for 2 minutes to let the flavors mix well. Next, pour in 1 cup of low-sodium vegetable broth. Bring it to a gentle simmer and let it cook for about 3-5 minutes to reduce slightly. Add 3 cups of fresh spinach to the skillet. Stir until it wilts, which takes about 2 minutes. Then, gently fold in your cooked tortellini, mixing everything together. Make sure the tortellini is well coated in the sauce. Finally, sprinkle in 1/2 cup of grated Parmesan cheese. Stir until the cheese melts and blends into the dish. Taste your creation and adjust the flavors with salt, pepper, and red pepper flakes if you want some heat. Cook for another minute to heat everything through. - Choosing quality tortellini: Always pick fresh or high-quality frozen tortellini. Fresh tortellini tastes better and cooks faster. Look for brands that use real cheese and good ingredients. Frozen options should still have a nice texture and flavor. - Tips for sautéing vegetables perfectly: Use medium heat to avoid burning. Start with the onion, cooking until it turns clear. This takes about 3-4 minutes. Then, add garlic for one minute until it smells great. This step builds a strong flavor base for your dish. - Suggested spices or herbs: Italian seasoning is a great choice here. It adds a classic taste. You can also try fresh basil or parsley for a pop of color and flavor. If you want a kick, add red pepper flakes. Just a pinch can make a big difference. - Ideas for adding protein: To make this dish heartier, consider adding cooked chicken or shrimp. Both pair well with the flavors. You can simply sauté them in the skillet before adding other ingredients. This way, you boost the protein without changing the dish too much. - Best sides to pair with the dish: A light salad is a perfect side. Try a simple arugula salad with lemon juice and olive oil. It balances the rich flavors of the skillet. You could also serve warm bread to soak up the sauce. - Ideas for garnishing: Top your tortellini with more grated Parmesan cheese. A sprinkle of fresh herbs can make it look nice, too. For a spicy touch, add a few red pepper flakes on top. These small details can elevate your dish’s presentation. {{image_2}} You can make this dish gluten-free. Simply use gluten-free tortellini. Many brands offer great options that taste good. For the broth, choose a gluten-free vegetable broth. Check labels to ensure it fits your needs. To make this dish vegetarian, replace the cheese with a plant-based option. Nutritional yeast works well for a cheesy flavor. If you want it vegan, use vegetable broth without any animal products. You can also add more vegetables. Try bell peppers, zucchini, or mushrooms for extra color and taste. Feel free to switch up the leafy greens. Kale is a great alternative to spinach. It adds a nice texture and flavor. You can also try different types of sun-dried tomatoes. Some come with herbs or spices that can boost the dish's taste. Experiment to find your favorite mix! To store leftovers, let the skillet cool first. Then, place it in an airtight container. This keeps the meal fresh. Glass or BPA-free plastic containers work best. Make sure to seal it well to prevent air from entering. If you want to freeze portions, divide the tortellini into single servings. Place each in a freezer-safe bag. Remember to remove excess air before sealing. For reheating, thaw overnight in the fridge. Heat in a pan on low. Add a splash of vegetable broth for moisture. In the fridge, your dish stays good for about 3 to 5 days. For frozen leftovers, they last up to 2 months. Check for any off smells or mold. If it looks or smells strange, it’s best to throw it away. Making this dish takes about 25 minutes. You spend 10 minutes prepping your ingredients. The cooking time is around 15 minutes. This quick meal is perfect for busy days. You can have dinner ready in no time. Yes, you can use frozen spinach. Just thaw and drain it first. This way, you remove excess water. The flavor will be great, but fresh spinach adds a nice texture. You can swap it in without worry. This dish pairs well with a simple salad or garlic bread. A fresh green salad adds crunch and color. Garlic bread brings a warm, cozy feel. You can also serve it with roasted veggies for more nutrition. Absolutely! You can make it ahead of time. Just store it in an airtight container. When you’re ready to eat, heat it on the stove or microwave. This dish stays tasty for several days in the fridge. Enjoy it for lunch or dinner throughout the week. This blog post shared a simple yet delicious Sun-Dried Tomato Spinach Tortellini Skillet recipe. It covered ingredients, cooking steps, tips for the best results, and variations. You can easily switch ingredients or make it gluten-free or vegan. Storing leftovers is also a breeze. For tasty meals, keep this recipe in mind. You’ll impress family and friends with little effort. Enjoy cooking and make it your own!

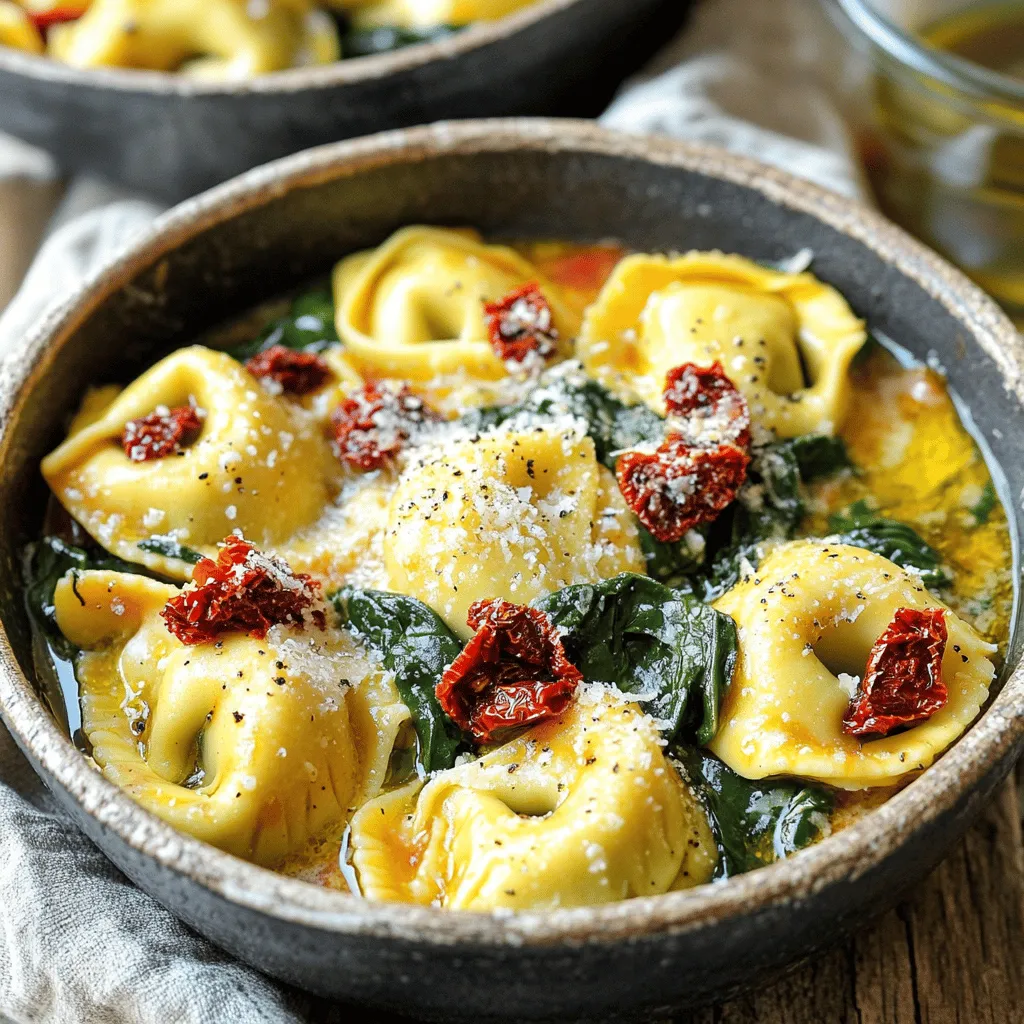
Are you ready to elevate your dinner game? My Sun Dried Tomato Spinach Tortellini Skillet Delight is quick, easy, and bursting with flavor. This one-pan dish combines cheesy tortellini, vibrant …

Read more

Categories Dinner

Pumpkin Spice Protein Bars No Bake Simple Recipe

September 19, 2025 by Chef Jamie
To make these tasty pumpkin spice protein bars, gather these key items: - 1 cup rolled oats - 1/2 cup protein powder (vanilla or unflavored) - 1/2 cup pure pumpkin puree - 1/4 cup almond or peanut butter - 1/4 cup maple syrup or honey - 1 teaspoon pumpkin spice mix (or to taste) - 1/2 teaspoon vanilla extract - 1/4 teaspoon salt These ingredients work together to create a delicious base. The oats provide texture, while the pumpkin gives moisture and flavor. The protein powder adds a healthy boost. You can make these bars your own with some optional goodies: - 1/4 cup chopped nuts (walnuts or pecans) - 1/4 cup dark chocolate chips (optional) Adding nuts gives a nice crunch. Chocolate chips bring a hint of sweetness that pairs well with pumpkin spice. Each bar offers a great mix of nutrients. Here’s what you can expect per serving: - Calories: 150 - Protein: 7g - Carbohydrates: 20g - Dietary Fiber: 3g - Sugars: 5g These protein bars are a healthy snack. They are perfect for a quick boost of energy. Enjoy them after a workout or as a midday treat! To make these pumpkin spice protein bars, gather your ingredients and tools. You need a large bowl, a spatula, and a baking dish. This recipe takes about 10 minutes to prepare. In a large mixing bowl, add 1 cup of rolled oats and 1/2 cup of protein powder. These will form the base. Stir them together until they are well mixed. This step helps the oats and protein powder blend nicely. In another bowl, mix together 1/2 cup of pure pumpkin puree, 1/4 cup of almond or peanut butter, and 1/4 cup of maple syrup (or honey). Add in 1 teaspoon of pumpkin spice mix, 1/2 teaspoon of vanilla extract, and 1/4 teaspoon of salt. Stir until the mixture is smooth and creamy. This mix gives the bars their delicious flavor. Pour the wet mixture into the bowl with the dry ingredients. Stir everything together until well blended. Next, fold in 1/4 cup of chopped nuts and 1/4 cup of dark chocolate chips, if you want. Line an 8x8 inch baking dish with parchment paper. Press the mixture firmly into the dish with a spatula or your hands. Refrigerate for at least 1 hour. This helps the bars set. Once firm, lift them out using the parchment paper and cut them into squares. To get a smooth mixture, make sure to blend the wet ingredients well. Use a whisk to mix the pumpkin puree, nut butter, and syrup. This helps to avoid lumps. If you find lumps, mix again until smooth. Mixing the dry ingredients first helps too. This keeps everything well combined. For the best texture, press the mixture firmly into the baking dish. Use your hands or a spatula to pack it down. This helps the bars hold together once set. Adding chopped nuts adds crunch, but don't go overboard. Too many can lead to a crumbly texture. To serve these bars, cut them into squares or rectangles. Arrange them on a rustic wooden board for a cozy look. Drizzle a bit of maple syrup on top for sweetness. Sprinkle some pumpkin spice for flair. This makes them look festive and inviting. You can pair them with a cup of tea or coffee for a perfect snack. {{image_2}} You can switch up the flavors in your pumpkin spice protein bars. Try adding different nut butters, like cashew or sunflower seed butter. You can also use flavored protein powder, like chocolate or cinnamon. For a fruit twist, mix in dried cranberries or raisins. These small changes can make a big difference in taste. Making these bars gluten-free is easy! Just use certified gluten-free rolled oats. For a vegan version, choose a plant-based protein powder and maple syrup instead of honey. You can also swap the almond butter for a nut-free option like tahini. These changes keep the bars tasty for everyone. If you want to go beyond basic pumpkin spice, add in some fun flavors. A pinch of ginger or nutmeg can give a warm kick. You can also mix in a tablespoon of cocoa powder for a chocolatey twist. Try adding orange zest for a bright note. Each twist adds a unique spin to the classic recipe. To keep your pumpkin spice protein bars fresh, store them in an airtight container. This will prevent them from drying out and losing their tasty flavor. You can stack the bars, but make sure to place parchment paper between them. This way, they won’t stick together. These protein bars stay fresh in the fridge for up to one week. If you notice any change in smell or texture, it’s best to throw them out. Always check them before you enjoy a snack. If you want to keep your bars longer, freezing is a great option. Wrap each bar in plastic wrap, then place them in a freezer-safe bag. They can last for up to three months in the freezer. When you’re ready to eat one, just take it out and let it thaw in the fridge overnight. Enjoy your tasty treat anytime! Yes, you can use any nut butter you like. Almond butter, cashew butter, or sunflower seed butter all work well. Just choose one that fits your taste or diet. Each nut butter adds a unique flavor and texture. To make these bars vegan, use maple syrup instead of honey. Choose a plant-based protein powder too. Almond or sunflower seed butter is a great swap for peanut butter. This way, you keep all the yummy flavors while making it vegan-friendly. Yes, you can substitute maple syrup with agave syrup or honey. If you want a lower glycemic option, try using date syrup. Each option will still give the bars the right sweetness and moisture. The bars are set when they feel firm to touch. After chilling for at least one hour, check if they hold their shape. If they still feel soft, let them chill longer. You want them to be easy to cut without falling apart. You can enjoy these bars straight from the fridge as a snack. They taste great with a cup of coffee or tea. You can also crumble them over yogurt or oatmeal for added texture. For a fun twist, drizzle melted dark chocolate on top before serving. These bars are easy to make with just a few steps. We covered ingredients, tips, and variations to suit your taste. You can mix and match flavors and make them fit any diet. With the right storage, these tasty treats stay fresh. Remember, adapt the recipe to make it yours. Enjoy the sweet and healthy snacks you can create!

Looking for a tasty snack that’s easy to make? These no-bake pumpkin spice protein bars are the answer! Packed with flavor and good-for-you ingredients, this simple recipe will satisfy your …

Read more

Categories Desserts

Caramel Apple Crisp with Oat Streusel Delight

September 19, 2025 by Chef Jamie
- 6 medium-sized apples (Granny Smith or Honeycrisp), peeled and sliced - 1 cup granulated sugar - 1 cup brown sugar, packed - 1 cup caramel sauce (store-bought or homemade) - 1 cup rolled oats - 1 cup all-purpose flour - 1 teaspoon ground cinnamon - 1/2 teaspoon nutmeg - 1/2 cup unsalted butter, melted - 1/2 teaspoon salt - Chopped nuts (walnuts or pecans), for topping (optional) When choosing apples, I love using Granny Smith or Honeycrisp. Granny Smith apples are tart and give a nice contrast to the sweet caramel. Honeycrisp apples are sweet and juicy, making them a great choice too. For the caramel sauce, you can use store-bought for ease, or try making your own. Homemade caramel adds a rich flavor. If you make it, use high-quality sugar and butter for the best taste. If you want to reduce sugar, you can cut back on the granulated and brown sugars. Use half a cup of each instead of a full cup. You can also swap out the all-purpose flour for gluten-free flour if needed. If you are nut-free, just leave out the chopped nuts. The oat streusel will still taste amazing without them. Remember, cooking is flexible! Start by peeling and slicing 6 medium apples. I love using Granny Smith or Honeycrisp. They give a nice tart flavor. In a large bowl, mix the sliced apples with ½ cup of granulated sugar, ½ cup of brown sugar, ½ teaspoon of cinnamon, and a pinch of nutmeg. Toss the apples well, so they are fully coated. Pour 1 cup of caramel sauce over the apple mix and stir gently. Spread this mixture evenly in a greased 9x13-inch baking dish. In another bowl, combine 1 cup of rolled oats, 1 cup of all-purpose flour, and the remaining sugars. Add 1 teaspoon of cinnamon and ½ teaspoon of salt. Mix these dry ingredients well. Pour in ½ cup of melted butter and stir until the mixture is crumbly. If you want a crunchier topping, fold in some chopped nuts like walnuts or pecans. Preheat your oven to 350°F (175°C). Once ready, spread the oat streusel topping evenly over the apples. Bake for 35 to 40 minutes. Keep an eye on it; you want the top to turn golden brown and the apples to bubble. Let it cool for a few minutes before serving. Enjoy it warm with vanilla ice cream and a drizzle of extra caramel sauce. Don’t forget a sprinkle of cinnamon for that extra touch! To make your caramel apple crisp shine, use a mix of apples. Granny Smith adds tartness, while Honeycrisp brings sweetness. This combo creates a balanced flavor. Make sure to slice your apples thin for even cooking. Toss them with sugar and spices to coat well. This step enhances their taste. When adding caramel, don't be shy. A generous pour ensures every bite is sweet and gooey. Serve your warm caramel apple crisp with a scoop of vanilla ice cream. The cold ice cream melts into the crisp, creating a creamy delight. Drizzle extra caramel sauce on top for a sweet touch. A sprinkle of cinnamon adds flavor and charm. For a fun twist, add chopped nuts for crunch. You can also serve it in individual ramekins for a nice presentation. One common mistake is using only one type of apple. This can make your crisp taste flat. Another pitfall is overbaking. Check the crisp after 35 minutes. If it looks golden, it's done! Don’t skip the cooling step either. Letting it rest makes it easier to serve. Lastly, avoid using cold butter in the streusel. Melted butter ensures a crumbly texture that’s perfect for topping. {{image_2}} You can easily make this crisp nut-free. Simply leave out the chopped nuts. The oat streusel still tastes great without them. If you want some crunch, use seeds instead. Sunflower seeds or pumpkin seeds work well. They add flavor and a nice texture. To make this recipe gluten-free, swap the all-purpose flour for a gluten-free blend. Make sure to choose one that measures cup-for-cup like regular flour. Check that your oats are certified gluten-free, too. This way, you can enjoy the crisp without worry. You can change the flavor of your caramel apple crisp by adding spices. Try a pinch of cloves or allspice for a warm touch. You can also add a splash of vanilla extract to the apples. For a fruity twist, mix in some dried cranberries or raisins. These additions make the dish even more exciting! To keep your caramel apple crisp fresh, let it cool down first. Once it’s cool, cover it tightly with plastic wrap or foil. Store it in the fridge for up to five days. This way, the flavors stay rich and tasty. You can freeze caramel apple crisp for later! First, let it cool completely. Then, cut it into servings. Wrap each piece in plastic wrap and place them in a freezer bag. It can last up to three months in the freezer. When you’re ready to enjoy it, just thaw it in the fridge overnight. To reheat, preheat your oven to 350°F (175°C). Place the crisp in an oven-safe dish. Cover it with foil to keep it moist. Heat for about 20 minutes or until warm. You can also microwave individual servings for about 30 seconds. Enjoy it warm with a scoop of vanilla ice cream for the best taste! Yes, you can use different apples. I like Granny Smith or Honeycrisp. They give a nice tartness. If you prefer sweeter apples, try Fuji or Gala. These apples also hold their shape well. Mix different types for more flavor. Each apple adds its own taste and texture. Making caramel sauce at home is simple. You need sugar, butter, and cream. Start by melting sugar in a pan over low heat. Stir until it turns golden brown. Then, add butter and stir until melted. Gradually mix in cream until smooth. Let it cool before using. You can store leftovers in the fridge. I recommend a 9x13-inch baking dish. This size fits the apple mixture and oat streusel perfectly. It allows even baking and gives you nice portions. If you don't have this size, a similar-sized dish will work too. Just keep an eye on the baking time. You learned about making a delicious caramel apple crisp. We covered the best ingredients, tips for prepping, and how to bake it perfectly. I shared ways to avoid common mistakes and suggested tasty variations. Finally, store leftover crisp right and enjoy it later. With these tips, you can impress anyone with your baking. Get ready to savor every bite of your crisp creation. Happy baking!

Get ready to indulge in a sweet treat with my Caramel Apple Crisp with Oat Streusel Delight! This dish combines tender apples, rich caramel, and a crunchy oat topping that …

Read more

Categories Desserts

Slow Cooker Loaded Baked Potato Soup Rich and Creamy

September 19, 2025 by Chef Jamie
For this rich and creamy slow cooker loaded baked potato soup, gather these simple ingredients: - 4 large russet potatoes, peeled and diced - 1 medium onion, finely chopped - 3 cloves garlic, minced - 4 cups vegetable broth - 1 cup heavy cream - 1 cup shredded cheddar cheese - 1/2 cup sour cream - 4 slices of cooked turkey bacon, crumbled - 1 teaspoon smoked paprika - Salt and pepper to taste - 1/4 cup chopped green onions for garnish I always recommend using fresh ingredients when making this soup. Fresh potatoes and onions offer the best flavor. Frozen potatoes can work, but they may change the soup's texture. Fresh garlic gives you a strong taste that adds depth. So, stick to fresh for the best outcome. When it comes to brands, I have my favorites. For broth, I like low-sodium vegetable broth from Swanson or Pacific Foods. For cheese, Tillamook's shredded cheddar melts well and tastes great. For sour cream, Daisy is my go-to. Each of these brands adds a rich flavor to your soup, making it truly delicious. To start, gather your ingredients. You need: - 4 large russet potatoes, peeled and diced - 1 medium onion, finely chopped - 3 cloves garlic, minced - 4 cups vegetable broth - 1 cup heavy cream - 1 cup shredded cheddar cheese - 1/2 cup sour cream - 4 slices of cooked turkey bacon, crumbled - 1 teaspoon smoked paprika - Salt and pepper to taste - 1/4 cup chopped green onions for garnish First, wash the potatoes well. Peeling them helps create a smooth soup. Dice potatoes into small cubes. Chop your onion finely. Mince the garlic cloves until they’re small. Set these aside to keep things organized. Now, it’s time to cook! Place the diced potatoes, chopped onion, and minced garlic into your slow cooker. Pour in the vegetable broth. Make sure the broth covers the veggies completely. Add smoked paprika, salt, and pepper. Stir it all together well. Cover the slow cooker. Cook on low for 6 to 8 hours. Check for tenderness. The potatoes should be soft and easy to mash. Once they are ready, use a potato masher to mash them slightly. This makes the soup creamy but still leaves some chunkiness. Next, stir in the heavy cream and shredded cheddar cheese. Mix until the cheese melts and everything is combined. This step adds richness to the soup. After mixing, add the sour cream and half of the crumbled turkey bacon. Stir until everything is well blended. Taste your soup. If it needs more flavor, add salt and pepper. Let the soup simmer on warm for about 15 more minutes. This helps all the flavors meld together. When ready to serve, ladle the soup into bowls. Top each bowl with the remaining turkey bacon, extra shredded cheese, and chopped green onions. A dollop of sour cream on top adds a creamy touch. Enjoy your rich and creamy soup! To get that rich and creamy texture, start by mashing the cooked potatoes. Use a potato masher right in the slow cooker. Mash just enough to break up the potatoes but leave some chunks. This gives your soup a great mouthfeel. After you mash, stir in heavy cream and cheese. This addition makes the soup extra smooth and rich. Don’t skip the smoked paprika! It adds a wonderful depth of flavor. I also love to use fresh cracked black pepper. It brings a nice kick. Taste your soup before serving. Adjust the salt and pepper to your liking. A little extra cheese or sour cream can also enhance the flavor. You can add a splash of hot sauce for those who like it spicy. Keep your slow cooker clean and in good shape. After each use, wash the pot with warm, soapy water. Avoid using metal utensils to protect the non-stick coating. If food sticks, soak the pot rather than scrub hard. Regular care helps your slow cooker last longer and cook better. {{image_2}} You can easily add protein to the soup. Cooked turkey bacon gives a nice crunch. You can also use diced ham or cooked chicken. For a plant-based option, try adding black beans or lentils. These will add heartiness and flavor. To make this soup vegetarian, skip the turkey bacon and use vegetable broth. For a vegan version, swap heavy cream for coconut cream and use a dairy-free cheese. This keeps the soup rich and creamy without animal products. Want to enhance the flavor? Add smoked paprika for a nice kick. You can also mix in some cooked corn or diced bell peppers. Fresh herbs like thyme or rosemary can give it a fresh taste. A splash of hot sauce can add warmth, too. Storing leftover soup is easy. Let the soup cool to room temperature first. Then, use an airtight container to store it. This helps keep the soup fresh. You can keep it in the fridge for up to four days. Make sure to label the container with the date. When you want to enjoy your soup again, take it out of the fridge. Pour the soup into a pot over medium heat. Stir often to avoid burning. You can also heat it in the microwave. Use a microwave-safe bowl and cover it loosely. Heat in short bursts, stirring in between. This keeps it from getting too hot in spots. Freezing soup is a great way to save it for later. Use freezer-safe containers or bags. Leave some space at the top for expansion. The soup can last up to three months in the freezer. When ready to eat, thaw it in the fridge overnight. Then, reheat it on the stove or in the microwave. Enjoy your creamy soup anytime! Yes, you can use other potatoes. Yukon golds or red potatoes work well. They add a different texture. Keep in mind that the taste may change slightly. To make this soup gluten-free, use gluten-free vegetable broth. Check all your ingredients too. Most items in this recipe are naturally gluten-free. Great toppings include crumbled bacon, cheese, and green onions. You can also add sour cream for extra creaminess. Consider adding some chili flakes for heat. You can prepare this soup a day before you plan to serve it. Just let it cool and store it in the fridge. Reheat it on the stove or in the slow cooker. Pair this soup with a simple green salad or garlic bread. You can also serve it with sandwiches for a complete meal. This blog post covered all you need to make delicious loaded baked potato soup. We explored the best ingredients, from fresh to frozen, and reviewed brands for great flavor. The step-by-step instructions guide you through prepping, cooking, and finishing your soup right. Plus, tips on achieving the perfect texture and seasoning enhance the taste even more. Don’t forget about variations and smart storage ideas. Now you can enjoy this hearty meal anytime. Happy cooking!

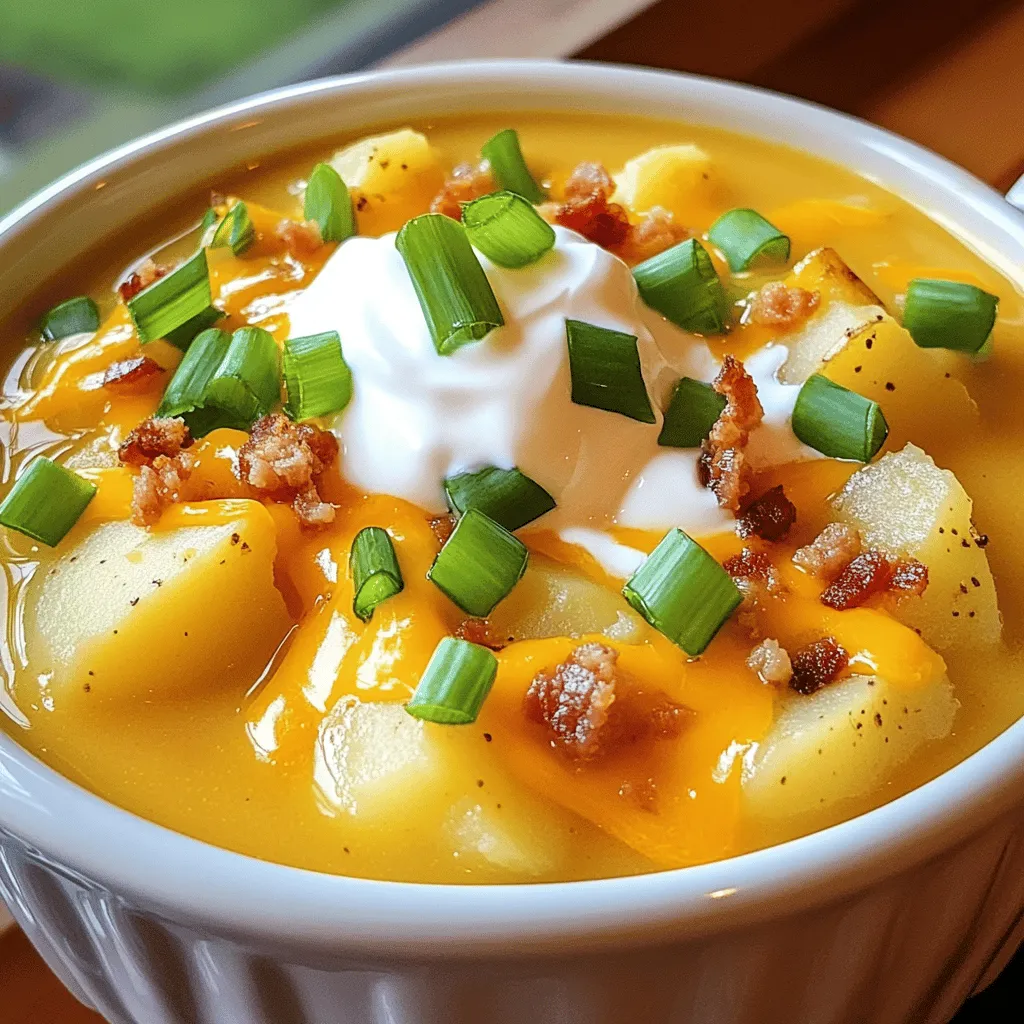
Craving a warm, hearty dish? Let me introduce you to my Slow Cooker Loaded Baked Potato Soup. This rich and creamy delight is perfect for cozy nights or busy days. …

Read more

Categories Dinner

Greek Yogurt Brownie Batter Dip High Protein Treat

September 19, 2025 by Chef Jamie
- 1 cup plain Greek yogurt - 1/2 cup almond butter (or any nut butter of your choice) - 1/3 cup cocoa powder - 1/4 cup honey or maple syrup - 1 teaspoon vanilla extract - 1/4 teaspoon salt - 1/4 cup mini chocolate chips - Fresh fruits (like strawberries or apple slices) for dipping This recipe is simple and fun. You will need plain Greek yogurt as the base. It makes the dip smooth and adds protein. Nut butter adds creaminess and flavor. I like almond butter, but peanut butter works too. Next, cocoa powder gives that rich chocolate taste. You can choose honey or maple syrup to sweeten it up. I love vanilla extract for a warm note. A pinch of salt balances the flavors perfectly. Don’t forget the mini chocolate chips! They add little bites of joy. For dipping, fresh fruits like strawberries or apple slices are tasty choices. You can also use graham crackers or pretzels for a crunchy contrast. - Mixing Yogurt and Nut Butter Start with a medium mixing bowl. Add 1 cup of plain Greek yogurt and 1/2 cup of almond butter. Use a spatula to mix them well. You want it smooth and creamy. - Incorporating Dry Ingredients Next, add in 1/3 cup of cocoa powder, 1/4 cup of honey or maple syrup, 1 teaspoon of vanilla extract, and a pinch of 1/4 teaspoon salt. Stir until all the dry ingredients blend in. Check for any lumps and make sure it is nice and smooth. - Folding in Chocolate Chips Now it’s time for the fun part! Gently fold in 1/4 cup of mini chocolate chips. For a little extra treat, keep a few chips aside to sprinkle on top later. This adds a nice look and extra sweetness. - Final Tasting and Adjustments Grab a spoon and taste your dip. If you want it sweeter, add a bit more honey or maple syrup. Mix again and taste until it’s just right for you. - Transferring to Serving Bowl Finally, scoop the brownie batter dip into a serving bowl. Sprinkle the reserved chocolate chips on top for a final touch. Now it's ready for you to enjoy with fresh fruits, graham crackers, or pretzels! This Greek yogurt brownie batter dip is not just tasty; it’s also healthy. Each serving packs a punch with high protein and essential nutrients. Let’s break it down. - Calories: Each serving has about 180 calories. This is a good number for a sweet treat. Greek yogurt is a star ingredient here. It has more protein than regular yogurt. Each cup of Greek yogurt offers around 20 grams of protein. This helps you feel full and satisfied. The almond butter adds even more protein, making each bite a powerhouse. In this dip, you get a nice mix of macronutrients. Here’s how it looks: - Protein: 20 grams from yogurt and nut butter. - Fat: About 10 grams mainly from almond butter. - Carbohydrates: Roughly 27 grams, coming from honey and chocolate chips. This balance makes the dip a great choice for energy without the sugar crash. Using Greek yogurt in this recipe offers major benefits: - High Protein: It aids in muscle repair and keeps you full. - Probiotics: These help your gut health and digestion. - Lower Sugar: Greek yogurt often has less sugar than regular yogurt. By choosing Greek yogurt, you make this dip a healthier option. It’s a guilt-free way to enjoy dessert while getting nutrients. {{image_2}} Sweetness Adjustments You can change the sweetness easily. If you like it sweeter, add more honey or maple syrup. Start with a teaspoon. Mix well and taste. If you want less sweetness, skip the extra sweetener. This dip can also be great with less sugar! Texture Modifications For a creamier dip, use more Greek yogurt. You can also add a bit of milk or almond milk to thin it out. If you prefer a thicker dip, use more almond butter. This gives it a nice, rich texture. Presentation Ideas Serve your dip in a fun bowl. You can sprinkle extra chocolate chips on top. Add fresh fruits around the bowl for a pop of color. Use a fancy spoon for serving. This makes it look more special and inviting! You can switch nut butters to change the taste. Almond butter is great, but peanut butter adds a fun flavor. If you want something different, try cashew butter or sunflower seed butter. Each nut butter brings its own special taste and texture. You can also play with flavors. A drop of peppermint extract creates a minty twist. This adds a refreshing taste to your dip. You can use flavored nut butters too. For example, chocolate almond butter pairs well with the cocoa. If you need a dairy-free option, coconut yogurt is perfect. It has a creamy texture and a mild flavor. It makes the dip light and fluffy. Just swap the Greek yogurt for coconut yogurt. This keeps the dip rich while being vegan-friendly. Feel free to mix these ideas. Try different nut butters and flavors to find your favorite. Each change can make your Greek yogurt brownie batter dip unique and exciting! Yes, you can use non-Greek yogurt. However, it won’t be as thick. Greek yogurt adds creaminess and protein. If you choose regular yogurt, consider straining it to get a thicker texture. To make this dip vegan, swap Greek yogurt for dairy-free yogurt. Use almond or cashew yogurt for a great taste. Replace honey with maple syrup. This keeps the sweetness while staying plant-based. The dip lasts about 3 to 5 days in the fridge. Store it in an airtight container. Make sure to check for freshness before serving. If it smells off or changes color, toss it out. You have many fun options for dippers! Fresh fruits like strawberries and apple slices work great. You can also use graham crackers or pretzels for a nice crunch. Get creative and enjoy! This blog post shared a simple recipe for a tasty dip. We explored key ingredients like Greek yogurt, nut butter, and cocoa powder. You learned how to mix and enhance flavors, along with helpful tips and variations. This dip is not only delicious but also nutritious. You can modify it with different nut butters or make it vegan. Remember, the best part of this recipe is your creativity. Enjoy making this snack and share it with friends!

Are you ready to indulge guilt-free? My Greek Yogurt Brownie Batter Dip is the perfect high-protein treat for anyone craving something sweet! With rich flavors and creamy texture, this dip …

Read more

Categories Desserts

Crispy Chicken Fajita Sheet Pan Easy Weeknight Meal

September 19, 2025 by Chef Jamie
- 1.5 pounds boneless, skinless chicken thighs, sliced - 2 bell peppers (red and yellow), sliced - 1 red onion, sliced - 3 tablespoons olive oil - 2 tablespoons fajita seasoning (store-bought or homemade) - 1 teaspoon garlic powder - 1 teaspoon smoked paprika - Salt and pepper to taste - Fresh cilantro, chopped (for garnish) - Lime wedges (for serving) - Tortillas (for serving) Gather these ingredients for a tasty, easy meal. Chicken thighs give the dish a juicy flavor. The bell peppers add sweetness and color. Slicing the red onion brings a nice crunch. Using olive oil helps the spices stick to the chicken. Fajita seasoning makes it bold and flavorful. Garlic powder and smoked paprika add depth. You can adjust salt and pepper to your liking. Don't forget the fresh cilantro! It brightens the dish. Serve with lime wedges for a zesty kick. Warm tortillas complete this meal. You can also try making your tortillas if you're feeling adventurous! - Preheat oven to 425°F (220°C). - Prepare the baking sheet with parchment paper. - Combine chicken, bell peppers, and onion in a bowl. - Add olive oil and seasonings, toss to coat. To start, you want to make sure your oven is nice and hot at 425°F. This high heat helps the chicken get crispy. Line a large baking sheet with parchment paper. This step makes cleanup easy and keeps things from sticking. Next, grab a big bowl. Put the sliced chicken thighs in the bowl. Then, add the sliced bell peppers and onion. The colors make this dish pop! Drizzle in the olive oil. Now, sprinkle in the fajita seasoning, garlic powder, smoked paprika, salt, and pepper. Mix it all together until every piece is coated well. This step is crucial for full flavor. - Spread mixture on baking sheet. - Bake for 20-25 minutes, stirring halfway. After mixing, spread the chicken and veggies on the parchment-lined sheet. Make sure they are in a single layer. This helps them cook evenly. Now, pop the sheet into the preheated oven. Set a timer for 20 to 25 minutes. Halfway through, take it out and stir the mixture. This helps everything cook and crisp up nicely. When the timer goes off, check that the chicken is cooked through. It should reach an internal temperature of 165°F (75°C). The edges should look crispy and golden. Let it rest for a few minutes before serving. Enjoy your crispy chicken fajitas with warm tortillas and fresh lime! To get that crispy chicken, focus on two key techniques. First, use a hot oven. Set it to 425°F (220°C). This high heat helps the chicken cook quickly while browning the edges. Second, spread the chicken and veggies in a single layer on the baking sheet. This allows hot air to circulate. If they are too close, they will steam instead of crisp. You can elevate the flavor of your fajitas with a few extra spices. Try adding chili powder or cumin for a deeper taste. If you want a zesty kick, squeeze in some lime juice before serving. Customize your fajita seasoning by mixing in your favorite spices. You can even create your own blend with paprika, garlic powder, and a pinch of cayenne for heat. This way, every bite bursts with flavor. {{image_2}} You can switch chicken for shrimp or tofu. Shrimp cooks fast, about 10-15 minutes at 425°F. Tofu takes longer, around 25-30 minutes. Just make sure everything is crispy and cooked through. To make a vegetarian version, use only vegetables. Bell peppers, onions, and zucchini work great. You can add black beans or cheese for more protein. This makes the meal filling and tasty. You can try different sauces with your fajitas. A lime crema adds creaminess. Mix sour cream with lime juice and zest. For spice, blend in some hot sauce or jalapeños. These sauces enhance the dish and let you explore new flavors. To store leftovers in the fridge, let the chicken fajitas cool before sealing them. Use an airtight container to keep them fresh. You can store the fajitas for up to three days. Make sure to eat them before they start to lose quality. You can freeze the fajita mix if you have extra. Place the cooled chicken and veggies in a freezer-safe bag. Squeeze out the air to avoid freezer burn. The fajitas can last up to three months in the freezer. When you're ready to enjoy them, thaw the mix in the fridge overnight. To reheat, place it in a skillet over medium heat. Stir until it's hot throughout. You can also use the oven. Just bake them at 350°F (175°C) until warmed. Enjoy your crispy chicken fajitas any time! Yes, you can swap out the veggies in this recipe. Here are some great substitutes: - Zucchini, sliced - Mushrooms, sliced - Corn, fresh or frozen - Broccoli florets - Asparagus, chopped These options work well and add new flavors. Feel free to mix and match based on what you have at home. To add more heat, try these tips: - Use spicy fajita seasoning or add cayenne pepper. - Add jalapeños or serrano peppers, sliced. - Toss in some crushed red pepper flakes. - Serve with a spicy salsa or hot sauce. These changes boost the heat and make each bite exciting! Pair your fajitas with these sides for a full meal: - Mexican rice for a hearty touch. - Refried beans for added protein. - A fresh salad with lime dressing. - Guacamole and chips for fun snacking. These options complement the fajitas and make for a satisfying dinner. This recipe brings together juicy chicken thighs and colorful veggies for a tasty meal. You learned how to prep, mix, and bake efficiently. Remember to customize with spices or veggies you love. Crispiness matters, so spread out ingredients well. Store any leftovers properly, whether in the fridge or freezer. Enjoy sharing these fajitas with friends or family. With a few simple steps, you can make a fun and delicious feast any time!

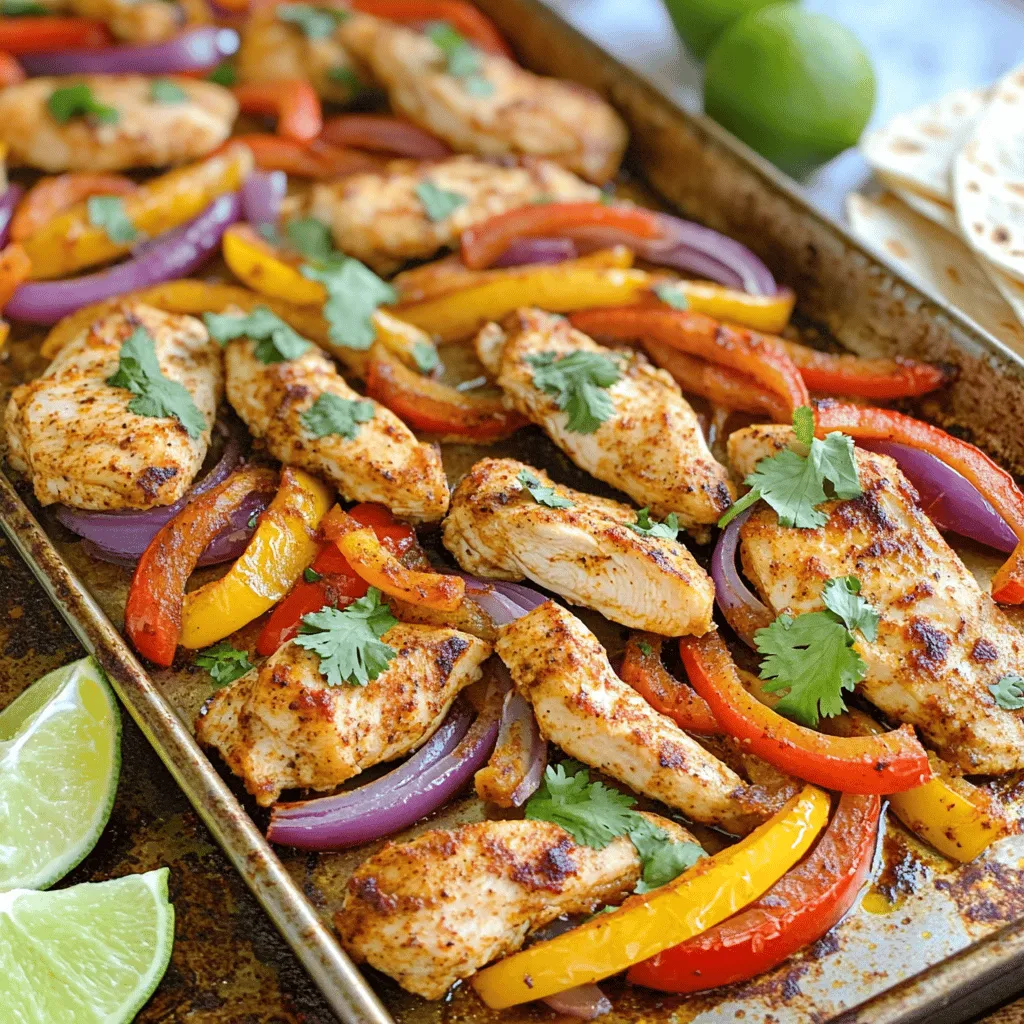
Are you looking for a quick, tasty dinner? My Crispy Chicken Fajita Sheet Pan recipe is the answer. It’s packed with flavor and takes just 30 minutes to prepare. With …

Read more

Categories Dinner
Older posts
Newer posts
← Previous Page1 … Page26 Page27 Page28 … Page134 Next →

TOSSED RECIPES

Simple meals, bold taste. Quick recipes made for real life — always fresh, always delicious. 🌿🍴

PAGES

Home About Contact Privacy Policy Terms & Conditions Cookie Policy GDPR Policy Copyright Policy Disclaimer

CATEGORIES

Appetizers Desserts Salads Breakfast Dinner

Contact

  • Pinterest
  • Mail
Copyright © 2026 Tossed Recipes. All rights reserved.