Skip to content
Tossed Recipes
  • Home
  • Appetizers
  • Desserts
  • Salads
  • Breakfast
  • Dinner
  • Privacy Policy
  • Contact
  • About

Chef Jamie

Honey Garlic Shrimp Tacos Flavorful and Easy Recipe

November 12, 2025September 19, 2025 by Chef Jamie
For these tasty tacos, you need some key ingredients: - 1 lb large shrimp, peeled and deveined - 3 tablespoons honey - 3 cloves garlic, minced - 2 tablespoons soy sauce - 1 tablespoon lime juice - 1 teaspoon ground cumin - 8 small corn or flour tortillas These items give the shrimp a sweet and savory flavor. The honey adds sweetness, while the garlic gives a nice kick. Soy sauce brings saltiness, and lime juice adds brightness. Cumin adds warmth and depth. You can make your tacos even better with these optional toppings: - 1 avocado, sliced - 1 cup red cabbage, shredded - Fresh cilantro leaves for garnish - Lime wedges for serving The avocado adds creaminess and helps balance the flavors. Red cabbage gives a nice crunch and color. Cilantro adds freshness, and lime wedges provide extra zing. To make these tacos, you need a few simple tools: - Medium bowl for mixing the marinade - Non-stick skillet for cooking the shrimp - Another skillet for warming tortillas These items help keep cooking easy. A non-stick skillet ensures your shrimp won’t stick, making cleanup a breeze. Use a medium bowl to mix the marinade well, so every shrimp gets coated. {{ingredient_image_1}} Start by making the marinade for the shrimp. In a medium bowl, mix 3 tablespoons of honey, 3 cloves of minced garlic, 2 tablespoons of soy sauce, 1 tablespoon of lime juice, and 1 teaspoon of ground cumin. Whisk these ingredients well. Once mixed, add 1 pound of peeled and deveined shrimp to the bowl. Toss the shrimp until they are fully coated in the marinade. Let the shrimp marinate for 15 to 20 minutes. This step adds great flavor. Heat a non-stick skillet over medium-high heat. When the skillet is hot, add the marinated shrimp along with the marinade. Cook the shrimp for 3 to 4 minutes. Stir occasionally to ensure even cooking. You will know they are done when they turn pink and opaque. At this point, taste and season with salt and pepper. This brief cooking time keeps the shrimp juicy and tender. While the shrimp cook, warm up your tortillas. You can use either corn or flour tortillas. Place them in another skillet over low heat or wrap them in foil and heat them in the oven. Once warmed, it's time to assemble the tacos. On each tortilla, layer shredded red cabbage, cooked shrimp, and slices of avocado. Finish with fresh cilantro leaves on top. Serve the tacos with lime wedges on the side for a bright twist. Enjoy your delicious honey garlic shrimp tacos! To make the best honey garlic shrimp, focus on the marinade. The right mix of honey, garlic, soy sauce, lime juice, and cumin is key. Make sure to whisk them well. This mix adds sweet and savory flavors. Let the shrimp sit in the marinade for 15-20 minutes. This step builds flavor. If you have time, try marinating longer. Just don’t go over 30 minutes, or the shrimp might get mushy. When cooking shrimp, use high heat for the best results. Start with a hot skillet. This helps the shrimp cook quickly and evenly. Cook for about 3-4 minutes until they turn pink. Stir often to avoid burning. If they sit too long, they can become chewy. Keep an eye on them and season with salt and pepper right before they finish cooking. This simple step enhances the taste. Warm tortillas make a big difference in your tacos. You can heat them in a skillet or oven. If using a skillet, keep the heat low. Warm the tortillas for about 30 seconds per side. If you prefer the oven, wrap them in foil and bake at 350°F for 10 minutes. This way, they stay soft and pliable. Warm tortillas hold fillings better and make every bite more enjoyable. Pro Tips Marinate for Flavor: Let the shrimp marinate for at least 20 minutes to absorb all the flavors of the honey, garlic, and soy sauce. Cooking Temperature: Ensure your skillet is hot before adding the shrimp; this helps achieve a nice sear and locks in moisture. Fresh Ingredients: Use fresh lime juice and ripe avocados to enhance the overall flavor and texture of your tacos. Garnish with Care: Add cilantro just before serving to keep it fresh and vibrant; it adds a burst of flavor to every bite. {{image_2}} You can swap shrimp with other seafood. Try scallops or fish for a different taste. Chicken or tofu also works well for a more filling option. Each protein brings its own flavor and texture. Just adjust the cooking time based on what you choose. The honey garlic marinade is delicious, but you can change it up. Use orange juice instead of lime juice for a fruity twist. Add sriracha for heat or swap honey with maple syrup for a unique touch. A splash of coconut aminos can give a rich umami flavor too. Play around with spices like paprika or chili powder for extra depth. While avocado and cabbage are great, you can mix toppings for fun. Try diced mango or pineapple for a sweet kick. Pickled red onions add a zesty crunch, while jalapeños give heat. Feta cheese can add a creamy element. Experiment with toppings to find your favorite combination! To store leftover tacos, first, separate the shrimp from the tortillas. Place the shrimp in an airtight container. Cover it tightly to keep the shrimp fresh. Store the tortillas in a separate bag or container. This keeps them from getting soggy. You can keep both in the fridge for up to three days. When you’re ready to eat, reheat the shrimp first. Heat a pan over medium heat. Add the shrimp and cook for about two minutes. Stir gently until they are hot. For the tortillas, warm them in a dry skillet. Heat them for about 30 seconds on each side. This brings back their soft texture. If you want to freeze shrimp tacos, do it carefully. Freeze the shrimp after marinating. Place them in a freezer-safe bag. Remove as much air as possible. You can freeze shrimp for up to three months. Tortillas can also be frozen. Just stack them with parchment paper in between and place them in a bag. Yes, you can use frozen shrimp. Just thaw them before cooking. Place the shrimp in a bowl and run cold water over it. This helps them thaw quickly. Pat them dry with a paper towel before marinating. This way, they will soak up the flavors better. You can serve these tacos with a side of rice or beans. A fresh salad also works well. If you like crunch, try tortilla chips with salsa or guacamole. These sides add more flavor and make your meal more filling. To add heat, use spicy chili flakes or hot sauce. You can mix these into the marinade for a nice kick. Jalapeños are another great choice. Slice them and add them to the tacos. Adjust the spice level based on your taste. Enjoy the heat! In this blog post, we explored how to make delicious honey garlic shrimp tacos. We covered the key ingredients, from shrimp to tasty toppings. I shared step-by-step instructions and handy tips for cooking and assembling your tacos. Variations let you try new flavors, ensuring you never get bored. Plus, we discussed how to store leftovers and answered common questions. Remember, cooking is fun and creative. Enjoy the process and make these tacos your own!

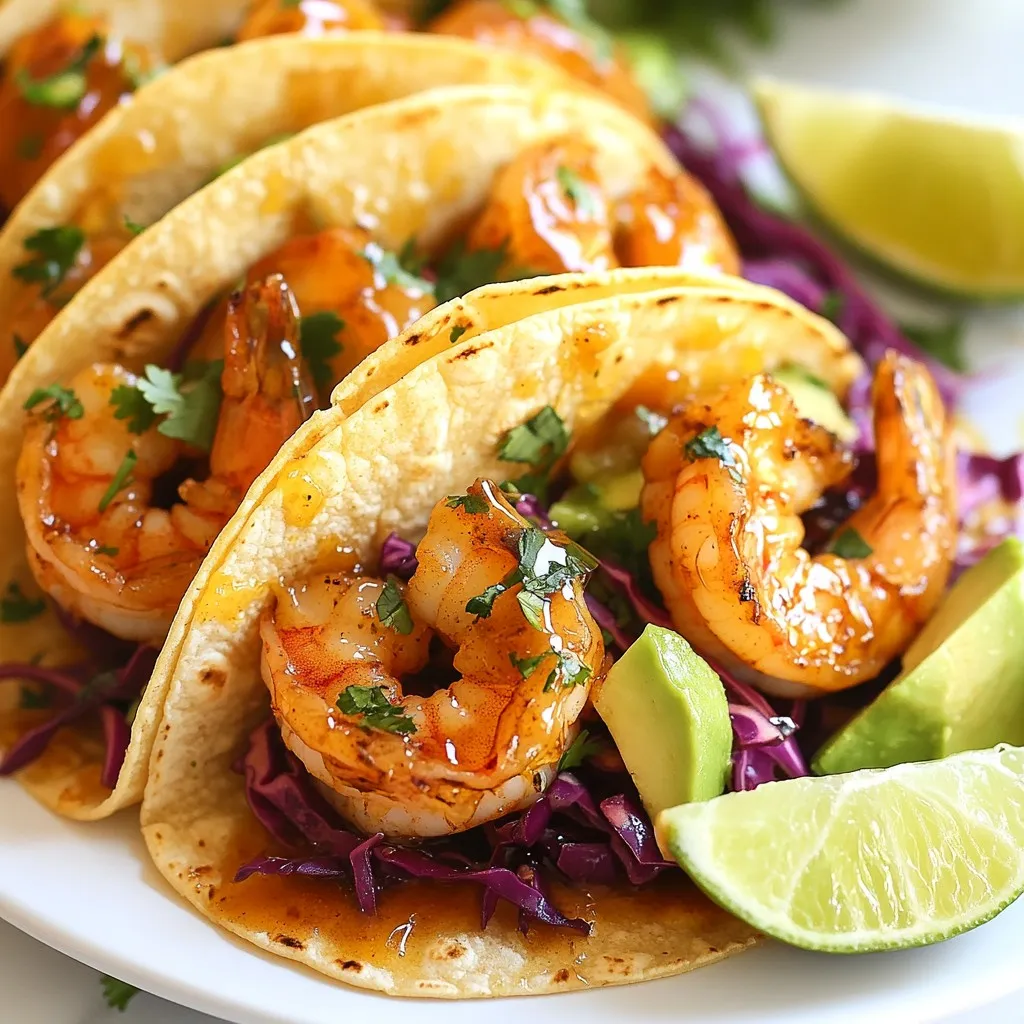
Craving a meal that’s quick, tasty, and fun? Dive into my Honey Garlic Shrimp Tacos recipe. These tacos bring together sweet and savory flavors for a delight in every bite. …

Read more

Categories Dinner

Oreo Cookies and Cream Brownies Delightful Dessert Treat

September 17, 2025 by Chef Jamie
- 1 cup unsalted butter - 2 cups granulated sugar - 1 cup brown sugar - 4 large eggs - 2 teaspoons vanilla extract - 1 cup all-purpose flour - 1 cup unsweetened cocoa powder - 1 teaspoon baking powder - 1/2 teaspoon salt - 1 cup semi-sweet chocolate chips - 15 Oreo cookies, roughly chopped - 1 cup heavy cream - 8 oz cream cheese - Additional Oreo cookies for topping You can swap unsalted butter with coconut oil for a dairy-free option. Use a vegan cream cheese to replace regular cream cheese. For those needing gluten-free options, almond flour or a gluten-free all-purpose flour works well. When picking eggs, look for ones with a clean shell and a recent sell-by date. For cocoa powder, choose a brand that is rich and dark for the best flavor. High-quality chocolate chips will enhance the taste of your brownies and make them more delicious. 1. Preheat and prepare the baking pan: Start by preheating your oven to 350°F (175°C). Next, grease a 9x13-inch baking pan or line it with parchment paper. This helps with easy removal later. 2. Melt butter and mix sugars: In a medium saucepan, melt 1 cup of unsalted butter over low heat. Once melted, take it off the heat. Stir in 2 cups of granulated sugar and 1 cup of packed brown sugar. Mix until smooth and well combined. 3. Combining wet and dry ingredients: Add 4 large eggs to the butter-sugar mixture, one at a time. Mix well after each egg. Then, stir in 2 teaspoons of vanilla extract. In a separate bowl, whisk together 1 cup of all-purpose flour, 1 cup of unsweetened cocoa powder, 1 teaspoon of baking powder, and 1/2 teaspoon of salt. Gradually add this dry mix to the wet ingredients. Stir until just combined. 4. Incorporating chocolate chips and Oreos: Now, fold in 1 cup of semi-sweet chocolate chips and 15 roughly chopped Oreo cookies. Mix until the Oreo pieces are evenly distributed throughout the batter. 5. Duration and temperature guidance: Pour the brownie batter into your prepared pan. Spread it evenly. Bake in the preheated oven for 30 to 35 minutes. 6. Checking for doneness with a toothpick: To check if the brownies are done, insert a toothpick into the center. It should come out mostly clean with a few moist crumbs. If it comes out with wet batter, bake a bit longer. - Overmixing the batter: Mix only until combined. Overmixing can make brownies tough. - Not following cooling times: Allow brownies to cool in the pan for 10 minutes. This helps them set and makes cutting easier. - Adding espresso powder: A teaspoon of espresso powder boosts the chocolate flavor. It makes the brownies richer without tasting like coffee. - Drizzling chocolate sauce before serving: A drizzle of chocolate sauce adds a sweet touch. It also makes your brownies look fancy and will impress your guests. - Plating tips for presentation: Serve brownies on a large platter. Add whole Oreo cookies around them at angles for a fun look. - Pairing with ice cream or whipped cream: These brownies are great with vanilla ice cream. A dollop of whipped cream also adds a nice touch. {{image_2}} You can make Oreo Cookies and Cream Brownies even better! Adding nuts gives a nice crunch. Try walnuts or pecans for a fun twist. Crushed almonds also work great. Swapping in different cookies can change the whole flavor. Instead of Oreos, use chocolate chip cookies or peanut butter cookies. You can mix and match to find your favorite. If you want a vegan version, there are easy swaps. Use plant-based butter and replace eggs with flaxseed meal. You can use a non-dairy cream cheese for the topping too. It still tastes great! For a healthier brownie, try reducing the sugar. Swap out half the sugar for applesauce. You can also use whole wheat flour instead of white flour. These changes keep the brownies tasty and a bit lighter. Seasonal spices can add warmth to your brownies. Adding cinnamon or nutmeg makes them cozy in the fall. You can also try pumpkin spice for a fun twist. For holidays, get festive with toppings. Use crushed peppermint for winter treats or colorful sprinkles for birthdays. You can even use themed cookie cutters to shape the brownies. To keep your Oreo cookies and cream brownies fresh, place them in an airtight container. You can store them at room temperature for up to three days. Just make sure they are completely cool before sealing. If you live in a humid area, the fridge is a better option. Brownies may dry out at room temperature if the air is too moist. You can freeze brownies for longer storage. First, cut them into squares. Wrap each square in plastic wrap. Then, place the wrapped squares in a freezer-safe bag. They can last up to three months in the freezer. To defrost, take them out and leave them at room temperature for about an hour. You can also microwave them for 10-15 seconds if you want them warm. Oreo cookies and cream brownies stay fresh for about three days at room temperature. In the fridge, they last about a week. Look for signs of spoilage, such as a change in texture or smell. If they feel dry or crumbly, it’s best to toss them. Enjoy your brownies while they are soft and tasty! You can tell the brownies are done by checking a few signs. First, look for a slight crust on top. The edges should pull away from the pan a bit. Also, insert a toothpick into the center. If it comes out mostly clean with a few moist crumbs, your brownies are ready. Remember, overbaking can lead to dry brownies, so keep an eye on them. Yes, you can make these brownies ahead of time! To do this, bake the brownies and let them cool completely. Once cool, cover them tightly with plastic wrap or aluminum foil. You can store them at room temperature for up to three days. For longer storage, place them in the fridge for about a week. This way, you can enjoy them fresh any time. If you don’t have Oreo cookies, you have fun options! You can use any chocolate sandwich cookie. Some popular choices are Hydrox cookies or generic brands. If you want a twist, try other cookies like chocolate chip or peanut butter cookies. These swaps can give your brownies a unique taste while still being delicious. You now have a complete guide to making delicious brownies. From the key ingredients to baking tips, I've shared everything you need. Remember to choose quality ingredients for the best results. Don't rush the process; let your brownies cool properly. With the tips and variations, you can customize your treat. Enjoy experimenting and finding your perfect flavor combo. Happy baking!

Are you ready for a dessert that combines rich brownies with delightful Oreo cookies? My Oreo Cookies and Cream Brownies are a sweet dream come true. With each bite, you’ll …

Read more

Categories Desserts

Honey Garlic Butter Roasted Carrots Simple Delight

September 17, 2025 by Chef Jamie
To make honey garlic butter roasted carrots, gather these items: - 1 lb (450g) baby carrots, peeled - 3 tablespoons unsalted butter, melted - 3 tablespoons honey - 3 cloves garlic, minced - 1 teaspoon fresh thyme leaves (or ½ teaspoon dried thyme) - Salt and pepper to taste These ingredients form the base of the dish. Each one adds flavor and sweetness to the carrots. For a fresh touch, consider these garnishes: - Fresh parsley, chopped Adding parsley brightens the dish and adds color. It also enhances the flavor, making it delightful. If you need to swap ingredients, here are some ideas: - Use olive oil instead of butter for a vegan option. - Maple syrup can replace honey for a different sweet flavor. - Dried thyme works if you don’t have fresh thyme. These swaps keep the essence of the dish intact. You can enjoy it even with different items. You start by preheating your oven to 425°F (220°C). This high heat helps the carrots roast well. Next, in a large bowl, mix together three tablespoons of melted unsalted butter, three tablespoons of honey, and three minced garlic cloves. Also, add one teaspoon of fresh thyme leaves, along with salt and pepper to taste. Whisk everything until it's well blended. Now, take one pound of peeled baby carrots and add them to the bowl. Toss the carrots in the mixture, making sure they are coated evenly. Once the carrots are coated, spread them out on a baking sheet lined with parchment paper. It’s key to keep them in a single layer so they roast evenly. Place the baking sheet in the preheated oven. Roast the carrots for 20 to 25 minutes. Halfway through, stir the carrots for even cooking. You want them tender and a little caramelized. The high heat brings out their natural sweetness. When the carrots are done roasting, take them out of the oven. Let them cool for a few minutes, then taste them. Adjust the seasoning if needed. If you like, transfer the roasted carrots to a serving dish and garnish with chopped fresh parsley. This adds a nice touch and a pop of color. Enjoy your honey garlic butter roasted carrots! To get those nice, caramelized edges, choose small, fresh baby carrots. They cook evenly and stay sweet. After mixing the butter, honey, garlic, and thyme, coat the carrots well. Lay them out in a single layer on your baking sheet. This helps them roast nicely without steaming. Stir them halfway through roasting. This ensures every side gets that lovely caramelization. Want to kick up the flavor? Try adding a pinch of cayenne pepper for heat. A squeeze of lemon juice before serving brings brightness. You can swap thyme for rosemary or oregano for a different twist. If you love nuts, sprinkle some chopped walnuts or almonds on top after roasting. They add crunch and a nice contrast to the soft carrots. Avoid overcrowding the baking sheet. If the carrots are too close, they won’t caramelize well. Also, watch your roasting time. Too long can lead to mushy carrots. Finally, don't skip tasting before serving. Adjust the salt and pepper to your liking. A little tweak can make a big difference in flavor! {{image_2}} You can make honey garlic butter roasted carrots even better by adding more flavors. Try mixing in some sliced onions or bell peppers. They add sweetness and a nice crunch. You could also add other herbs, like rosemary or oregano, for a twist. If you want heat, sprinkle in some red pepper flakes. This adds a fun kick to each bite. If you want to change the sweet taste, use maple syrup instead of honey. Maple syrup gives a rich flavor that pairs well with garlic. You can also try agave nectar or brown sugar. Each sweetener adds its own unique touch. Just keep the amount the same as honey in the recipe for great results. Carrots are great, but other veggies work well, too. You can roast parsnips, sweet potatoes, or even Brussels sprouts. They all soak up the honey garlic butter flavor. Just cut them to a similar size as baby carrots. This way, they cook evenly and get tender. Mixing different vegetables makes your dish colorful and tasty! You can store leftover honey garlic butter roasted carrots in an airtight container. Keep them in the fridge for up to four days. If you plan to eat them later, wait until they cool before storing. This helps keep their flavor and texture. To reheat, simply place the carrots in a microwave-safe dish. Heat them in the microwave for 1-2 minutes. You can also reheat in the oven. Preheat your oven to 350°F (175°C). Spread the carrots on a baking sheet and warm them for about 10 minutes. This will help keep them tender and tasty. You can freeze honey garlic butter roasted carrots, but they may lose some texture. To freeze, let the carrots cool completely. Then, place them in a freezer bag. Remove as much air as possible before sealing. They can last for up to three months in the freezer. When ready to eat, thaw in the fridge overnight and reheat. Roast your carrots for 20 to 25 minutes. This time gives them a nice, tender feel. Check them after 20 minutes. If they are not soft yet, let them roast a bit longer. Stir them halfway through. This helps them cook evenly and get that lovely caramelization. Yes, you can use regular carrots. Just cut them into sticks or rounds. Aim for similar sizes to baby carrots. This ensures they cook at the same rate. The taste will still be sweet and buttery. These carrots pair well with many dishes. Try serving them with grilled chicken or fish. They also taste great with rice or quinoa. You can even add them to salads for a pop of color and flavor. To cook carrots evenly, follow these tips: - Cut them into uniform sizes for even roasting. - Stir them halfway through cooking. - Spread them in a single layer on the baking sheet. These steps will help you achieve that perfect tender bite every time. This blog post covered the ingredients needed for honey garlic butter roasted carrots, including key items and substitutions. I shared step-by-step cooking methods and tips for achieving the best flavor. We explored variations to keep your dish exciting and discussed how to store leftovers properly. Remember, roasted carrots can be simple yet delicious. With practice, you'll master this tasty side dish. Enjoy experimenting with flavors and making it your own!

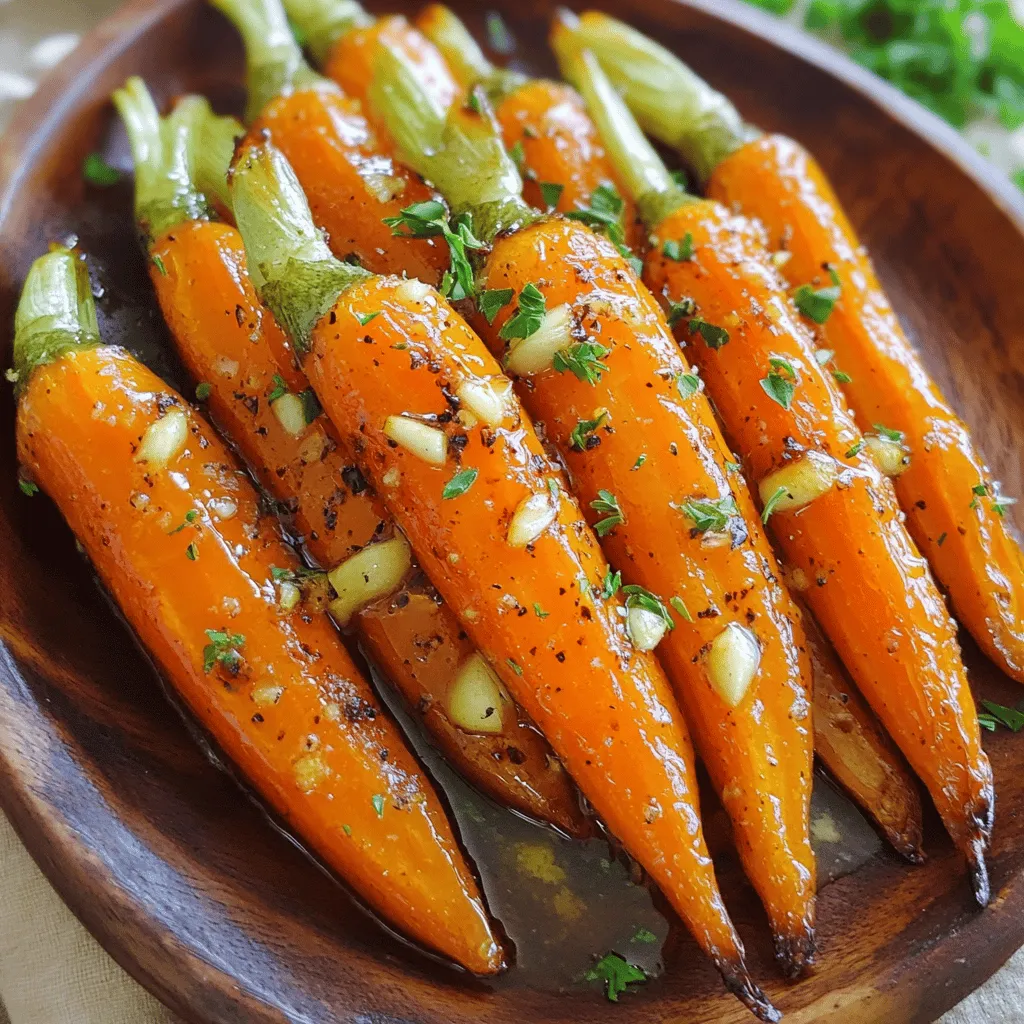
Welcome to a tasty journey with Honey Garlic Butter Roasted Carrots! This dish is a simple delight, packing sweet and savory flavors into a bright side dish. You’ll find easy …

Read more

Categories Dinner

Pumpkin Spice Latte Cupcakes Rich and Flavorful Treat

September 17, 2025 by Chef Jamie
To make these tasty cupcakes, you need some key ingredients: - 1 ½ cups all-purpose flour - 1 teaspoon baking powder - ½ teaspoon baking soda - ½ teaspoon salt - 1 tablespoon pumpkin spice mix - ½ cup unsalted butter, softened - 1 cup granulated sugar - 2 large eggs - 1 cup canned pumpkin puree - ½ cup brewed coffee, cooled - 1 teaspoon vanilla extract - ½ cup cream cheese, softened (for frosting) - 2 cups powdered sugar (for frosting) - 2 tablespoons milk (adjust for consistency) These items create a rich and moist cupcake base. The pumpkin puree gives the cupcakes a soft texture while the brewed coffee adds depth to the flavor. You can customize your cupcakes with a few optional ingredients: - Nuts like walnuts or pecans for crunch - Chocolate chips for sweetness - A dash of espresso powder for extra coffee flavor These additions can make your cupcakes even more special and fun! When it comes to toppings, you have many options: - Extra pumpkin spice for a warm touch - Whipped cream for a light finish - Chopped nuts for a crunchy contrast These toppings not only look great but also enhance the taste. Experiment with different combinations to find your favorite! First, set your oven to 350°F (175°C). This heat works best for cupcakes. Next, line a muffin tin with cupcake liners. This step keeps the cupcakes from sticking. In a medium bowl, whisk together the dry ingredients. Combine 1 ½ cups of all-purpose flour, 1 teaspoon of baking powder, ½ teaspoon of baking soda, ½ teaspoon of salt, and 1 tablespoon of pumpkin spice mix. Mix well and set this bowl aside. Take a large bowl and add ½ cup of softened unsalted butter. Then, add 1 cup of granulated sugar. Use an electric mixer to beat them together. Mix until it turns light and fluffy. This makes the cupcakes soft. Add 2 large eggs to the butter and sugar mix. Mix well after each egg. Next, stir in 1 cup of canned pumpkin puree, ½ cup of cooled brewed coffee, and 1 teaspoon of vanilla extract. Blend until everything is smooth. Now, gradually add the dry mix from the first bowl. Stir until just combined. Avoid overmixing. Divide the batter evenly among the cupcake liners. Fill each liner about ¾ full for the best rise. Bake them for 18-20 minutes. Use a toothpick to check for doneness. If it comes out clean, the cupcakes are ready. Let them cool in the tin for 5 minutes. Then, transfer them to a wire rack to cool completely. While the cupcakes cool, make the frosting. In a bowl, beat together ½ cup of softened cream cheese and 2 cups of powdered sugar. Mix until smooth. If the frosting is too thick, add 2 tablespoons of milk. This helps get a spreadable texture. Once the cupcakes are cool, take your frosting and spread it generously on top. Use a knife or a spatula for an even layer. For a finishing touch, sprinkle some extra pumpkin spice on top. This adds flavor and makes them look great! To get soft and fluffy cupcakes, use room temperature ingredients. This helps them mix better. When creaming butter and sugar, beat until it's light and airy. This step is key. Avoid overmixing when you add dry ingredients. Just mix until combined to keep the cupcakes tender. Bake at 350°F (175°C) for 18-20 minutes. Check with a toothpick; it should come out clean. Start with the dry ingredients. Whisk flour, baking powder, baking soda, salt, and pumpkin spice together. This blends the leavening agents evenly. In a separate bowl, cream the softened butter with sugar. Add eggs one at a time. Mix well after each one. Then add pumpkin puree, cooled coffee, and vanilla. Combine slowly with dry ingredients. This keeps your batter smooth and lump-free. Once cupcakes cool completely, it's time to frost. Use softened cream cheese for smooth frosting. Beat it with powdered sugar until it's creamy. Add milk slowly for the right thickness. Use a spatula to spread the frosting evenly. For flair, sprinkle extra pumpkin spice on top. This adds flavor and makes your cupcakes look great! {{image_2}} You can add chocolate to these cupcakes for a richer taste. Start by mixing in half a cup of cocoa powder with your dry ingredients. This will give you a deep, chocolatey flavor that pairs well with the pumpkin spice. You can also fold in chocolate chips into the batter. This adds little bursts of chocolate in every bite. The result is a cupcake that satisfies both pumpkin spice and chocolate lovers. For a gluten-free option, swap the all-purpose flour with a gluten-free blend. Look for one that contains xanthan gum. This helps mimic the texture of regular flour. Make sure to check that your baking powder and other ingredients are also gluten-free. The flavor will remain the same, and you will still enjoy that warm pumpkin spice taste in each cupcake. To make these cupcakes vegan, replace the eggs with flax eggs. Mix one tablespoon of ground flaxseed with three tablespoons of water and let it sit for five minutes. This will create a gel-like texture that binds the ingredients. Use plant-based butter instead of regular butter. Opt for a dairy-free milk, like almond or oat milk, in place of regular milk for the frosting. These small changes make a delicious, vegan-friendly treat without losing any flavor. To store leftover cupcakes, place them in an airtight container. This keeps them fresh and moist. You can also use plastic wrap if you don’t have a container. Make sure to let the cupcakes cool completely before wrapping them. Store them at room temperature for up to three days. If you want to keep them longer, consider freezing. You can freeze the cupcakes or the frosting. To freeze cupcakes, wrap each one in plastic wrap. Place them in a freezer bag or container. They can last up to three months in the freezer. For the frosting, store it in an airtight container. You can freeze it for up to two months. When you're ready to use them, thaw them in the fridge overnight. To keep cupcakes fresh, avoid exposure to air. Always seal them tightly. Keep them away from direct sunlight and heat. If you want to keep the frosting creamy, store it separately until you're ready to frost. This way, your cupcakes will stay delicious and moist for a longer time. To boost the pumpkin flavor, add more canned pumpkin puree. You can use up to 1 ½ cups for a stronger taste. Adding more pumpkin spice mix will also help, about 1 ½ tablespoons. This gives the cupcakes a richer pumpkin essence. Yes, you can use coffee substitutes. Options like brewed chai or hot chocolate can work well. You can also try using strong tea or espresso for a different flavor. Just ensure it is cooled before mixing into the batter. The best way to frost these cupcakes is to use an offset spatula. Start from the center and work your way to the edges. This method gives a nice swirl. You can also use a piping bag for a more decorative touch. If you want a different frosting, try buttercream or whipped cream. For a lighter option, use Greek yogurt mixed with powdered sugar. Each option will give a unique taste while still complementing the pumpkin flavor. These cupcakes can last up to four days when stored in an airtight container. If you want to keep them longer, freeze them. They will last up to three months in the freezer. Just thaw them overnight in the fridge before serving. In this post, we covered how to make delicious Pumpkin Spice Latte Cupcakes. You learned about key ingredients and also optional ones for your unique touch. We shared easy steps for baking and tips for perfect frosting. Variations like gluten-free and vegan options allow everyone to enjoy them. Remember, store leftovers right and they’ll stay fresh longer. These cupcakes are a fun way to celebrate the fall season, so get baking! Enjoy each bite of your creation!

If you love fall flavors, these Pumpkin Spice Latte Cupcakes are for you! They blend the rich taste of pumpkin, warm spices, and coffee, making each bite a treat. I’ll …

Read more

Categories Desserts

Classic Snickerdoodle Blondies Irresistible Treat Recipe

September 17, 2025 by Chef Jamie
To make classic snickerdoodle blondies, gather these key ingredients: - 1 cup unsalted butter, melted - 2 cups brown sugar, packed - 1 tablespoon vanilla extract - 2 large eggs - 2 cups all-purpose flour - 1 teaspoon baking powder - 1 teaspoon baking soda - 1 teaspoon cream of tartar - ½ teaspoon salt - 1 teaspoon ground cinnamon (plus extra for topping) These ingredients work together to create rich, sweet blondies with a soft texture. The brown sugar gives a deep flavor, while the cinnamon adds warmth. Want to make your blondies even better? Try these optional add-ins: - ½ cup white chocolate chips - ½ cup chopped pecans Adding white chocolate chips gives a creamy touch. Chopped pecans add a nice crunch and nutty flavor. Sometimes, you may not have all the ingredients on hand. Here are some easy swaps: - Use margarine instead of unsalted butter. - Swap brown sugar for granulated sugar for a lighter flavor. - Omit cream of tartar and add an extra teaspoon of baking powder. These substitutions can still yield tasty blondies. Be creative, and use what you have! Start by preheating your oven to 350°F (175°C). This ensures even baking. Grease a 9x13 inch baking pan. You can also line it with parchment paper. This helps in easy removal later. In a large bowl, mix 1 cup of melted butter with 2 cups of brown sugar. Whisk them together until smooth. Then, add 1 tablespoon of vanilla extract and 2 large eggs. Beat this mixture until it looks well blended. In another bowl, whisk together 2 cups of all-purpose flour, 1 teaspoon of baking powder, 1 teaspoon of baking soda, 1 teaspoon of cream of tartar, and ½ teaspoon of salt. Add 1 teaspoon of ground cinnamon for that warm flavor. Gradually mix the dry ingredients into the wet ingredients. Stir just until combined; don't overmix. If you want extra flavor, fold in ½ cup of white chocolate chips and ½ cup of chopped pecans. Spread the blondie batter evenly in the prepared pan. Smooth the top and sprinkle a bit of extra ground cinnamon over it. Bake in the oven for 25-30 minutes. To check if they are done, insert a toothpick in the center. If it comes out clean, they are ready. Let the blondies cool in the pan for about 10 minutes. After that, transfer them to a wire rack to cool completely before cutting into squares. Enjoy your delicious treat! To get that ideal blondie texture, follow a few simple steps. First, do not overmix the batter. Mix just until the dry and wet ingredients blend. This keeps your blondies soft and chewy. Also, use melted butter instead of softened. Melted butter adds richness and helps create the perfect moistness. Make sure to bake them until just set. A toothpick should come out clean but not dry. For great snickerdoodle flavor, use fresh ground cinnamon. It makes a big difference in taste. I also add cream of tartar, which gives that classic tang. This balances the sweetness from the brown sugar. If you want extra flavor, add white chocolate chips or chopped pecans. They enhance the richness of the blondies. Don't forget to sprinkle cinnamon on top before baking. It adds a nice touch! I recommend using a 9x13 inch pan for even cooking. Glass or metal pans work great. Glass pans heat evenly and give a nice, golden crust. If using metal, line it with parchment paper for easy removal. Make sure to grease the pan well if not using parchment. This helps the blondies come out cleanly and keeps their shape. {{image_2}} Want to add more sweetness? Mix in some chocolate chips. Use about ½ cup of semi-sweet or milk chocolate chips. You can fold them in when you mix the batter. The chocolate pairs well with the cinnamon flavor. It adds a rich taste to the classic snickerdoodle. Trust me; you will love this twist! If you need a nut-free option, skip the pecans. The blondies will still taste great without them. You can also use sunflower seed butter instead of butter for a nut-free spread. This keeps the rich flavor while avoiding nuts. Everyone can enjoy these treats! You can make these blondies fit the season! For fall, add ½ cup of pumpkin puree and a pinch of nutmeg. This adds warmth and spice. For a fresh twist in spring or winter, try adding mint extract. About one teaspoon should do the trick. You can even mix in crushed peppermint candies for a fun crunch. These flavors will surprise your friends and family! To keep your snickerdoodle blondies fresh, store them in an airtight container. This helps prevent them from drying out. Place parchment paper between layers if you stack them. This will keep the tops from sticking. You can freeze these blondies for longer storage. First, let them cool completely. Then, wrap each piece in plastic wrap. Place the wrapped blondies in a freezer-safe bag or container. They will stay fresh for up to three months. Fresh snickerdoodle blondies last about a week at room temperature. If you store them in the fridge, they can last up to two weeks. Just remember to keep them in an airtight container. This will keep them soft and tasty for longer. Blondies and brownies both use similar ingredients. The main difference is the flavor. Blondies have brown sugar and vanilla, giving them a sweet, caramel taste. Brownies, on the other hand, use cocoa powder or melted chocolate, giving them a rich chocolate flavor. Blondies are often softer and chewier than brownies. They are a great choice if you want a sweet treat without chocolate. Yes, you can use store-bought chocolate chips! They are a quick and easy option. You can add them to your blondie batter for extra sweetness. Just fold them in gently after mixing the wet and dry ingredients. If you want to try something new, use white chocolate chips or even butterscotch chips. They add a fun twist to the classic snickerdoodle flavor. To check if your blondies are done, insert a toothpick into the center. If it comes out clean or with a few moist crumbs, they are ready. If there is wet batter on the toothpick, bake them a little longer. Keep an eye on the edges, too. They should look slightly golden and set. Remember, they will continue to cook a bit while cooling in the pan. To cut your blondies evenly, let them cool for at least 10 minutes in the pan. Then, transfer them to a wire rack to cool completely. Use a sharp knife for clean cuts. You can score the top lightly before cutting to guide your knife. Try cutting them into squares or rectangles. This method helps ensure each piece is the same size for sharing. You now have all you need to make snickerdoodle blondies. We covered the key ingredients, from essentials to fun add-ins. I guided you through easy steps for mixing, baking, and cooling. You learned tips for the perfect texture and flavor. You can try tasty variations and know how to store them well. Remember, baking is fun! Enjoy your time in the kitchen as you create these treats. You'll impress your friends and family, and they'll keep asking for more. Happy baking!

If you love sweet treats, you’re in for a real delight! Classic Snickerdoodle Blondies blend the rich, butter flavor of blondies with the cinnamon twist of snickerdoodles. This easy recipe …

Read more

Categories Desserts

Garlic Parmesan Roasted Brussels Sprouts Delight

September 17, 2025 by Chef Jamie
To make these delightful Brussels sprouts, gather these key ingredients: - 1 lb Brussels sprouts, trimmed and halved - 4 cloves garlic, minced - 1/4 cup grated Parmesan cheese - 3 tablespoons olive oil - 1 teaspoon balsamic vinegar - 1/2 teaspoon salt - 1/4 teaspoon black pepper These ingredients create a savory blend that enhances the taste of Brussels sprouts. If you want to kick up the taste, consider adding: - 1/4 teaspoon red pepper flakes (for a spicy kick) - Fresh parsley, finely chopped (for garnish) These optional ingredients add depth and color to your dish. When picking Brussels sprouts, look for firm, bright green ones. Avoid any that feel soft or have yellow leaves. Smaller sprouts often taste sweeter. You can also check for freshness by looking at the stem. It should be moist, not dried out. Fresh sprouts will elevate your dish and make it even more enjoyable. First, set your oven to 425°F (220°C). This high heat helps the Brussels sprouts get crispy. While the oven warms, line a baking sheet with parchment paper. This makes cleanup easy and helps prevent sticking. Grab a large bowl and add 1 lb of halved Brussels sprouts. Next, add 4 minced garlic cloves, 3 tablespoons of olive oil, and 1 teaspoon of balsamic vinegar. Sprinkle in 1/2 teaspoon of salt, 1/4 teaspoon of black pepper, and optional red pepper flakes for heat. Toss everything well. Make sure all the Brussels sprouts get a nice coating. Spread the coated Brussels sprouts in a single layer on your baking sheet. Avoid crowding them. This ensures they roast well. Place the sheet in the oven and roast for 20-25 minutes. Stir halfway through to help them brown evenly. After that, take them out and sprinkle 1/4 cup of grated Parmesan cheese on top. Put them back in the oven for 5 more minutes. The cheese will melt and become golden. Enjoy your Garlic Parmesan Roasted Brussels sprouts! To get that sweet, crispy look, space your Brussels sprouts well. Overcrowding makes them steam, not roast. Make sure they sit in a single layer on the baking sheet. Use high heat, around 425°F (220°C). This helps them brown and caramelize. Stir them halfway through cooking for even browning. You want the outer leaves to crisp up and turn golden. Taste is personal, and you can change the seasonings. Start with salt and black pepper, but feel free to add more. If you love heat, the red pepper flakes are a great choice. You can also mix in some garlic powder for extra garlic flavor. A squeeze of lemon juice after roasting adds a nice zing. Leftover Brussels sprouts can shine in many meals. Chop them up and toss them in a salad. They also work well in stir-fries or frittatas. Mix with pasta for a quick dish. You can even blend them into a soup for added nutrition. Don’t let them go to waste; they are so versatile! {{image_2}} You can switch the Parmesan for different cheeses. Try using Pecorino Romano for a sharper taste. Feta adds a creamy and tangy twist. If you love blue cheese, crumble it on top for bold flavor. Each cheese brings a new character to the dish. Experiment to find your favorite! To make this dish vegan, swap the Parmesan for nutritional yeast. Nutritional yeast gives a cheesy taste without dairy. You can also use vegan cheese shreds if you prefer. The garlic and spices will still shine through. Enjoy the same delicious flavors while keeping it plant-based! You can mix Brussels sprouts with other veggies. Carrots, sweet potatoes, or bell peppers work great. Just cut them to similar sizes for even cooking. Toss them with the same oil and spices. This adds color and flavor to your meal. A roasted medley keeps things exciting on your plate! After you enjoy your Garlic Parmesan Roasted Brussels Sprouts, store any leftovers in the fridge. Use an airtight container to keep them fresh. They can last for about 3 to 4 days. When you store them, ensure they cool down first. This helps keep their taste and texture. To reheat your Brussels sprouts, use the oven for the best results. Preheat the oven to 350°F (175°C). Spread the sprouts on a baking sheet. Heat them for about 10 to 15 minutes until warm. This method helps them stay crispy. You can also use a microwave, but they may get a bit soft. You can freeze Garlic Parmesan Brussels Sprouts if you want to save them for later. First, let them cool completely. Then, spread them in a single layer on a baking sheet. Freeze for about 1 hour. After that, transfer them to a freezer bag or container. They will last for up to 3 months. When ready to eat, thaw in the fridge overnight and reheat in the oven for that crispy texture again. Yes, you can prepare Garlic Parmesan Roasted Brussels Sprouts ahead of time. Cook them fully, then let them cool. Store them in an airtight container in the fridge for up to three days. When you are ready to serve, reheat them in the oven at 350°F (175°C) for about 10-15 minutes. This keeps them warm and crispy. If you need a substitute for Parmesan cheese, try using nutritional yeast. It provides a cheesy flavor without dairy. You can also use Pecorino Romano for a sharper taste. Grated Asiago works well too, offering a great texture. If you are vegan, there are many vegan cheese options available. To make Brussels sprouts less bitter, trim and halve them before cooking. Soaking them in cold water for about 30 minutes can help reduce bitterness. Adding a bit of sweetness, like balsamic vinegar or honey, balances the flavors. Roasting them until golden also brings out their natural sweetness. In this post, we explored Garlic Parmesan Roasted Brussels Sprouts. You learned about key ingredients, selection tips, and techniques for roasting. The step-by-step guide helps you create crispy, tasty sprouts. We also covered ways to customize flavors and suggested storage tips for leftovers. With these insights, you can enjoy making Brussels sprouts anytime. Use these tricks to impress family and friends with your delicious dish. Cooking should be fun and flavorful, so get started today!

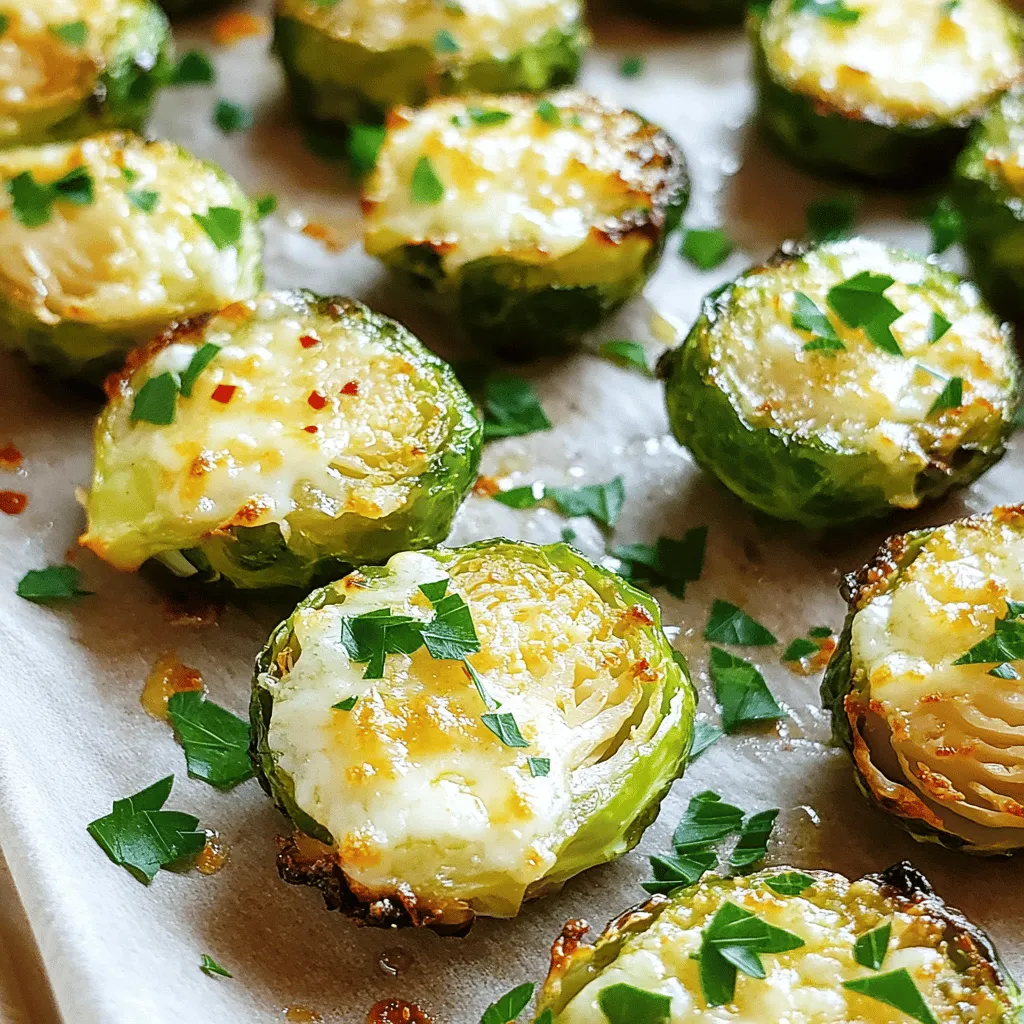
Looking for a tasty side dish that will impress your family? Garlic Parmesan Roasted Brussels Sprouts Delight is your answer! These sprouts are crispy, savory, and full of flavor. I’ll …

Read more

Categories Appetizers

Peanut Butter Banana Smoothie Bowl Energizing Delight

September 17, 2025 by Chef Jamie
- 2 ripe bananas (frozen and sliced) - 1 cup of unsweetened almond milk (or choice of milk) - 3 tablespoons natural peanut butter - 1 tablespoon honey or maple syrup (optional) - 1/2 teaspoon vanilla extract - Recommended toppings: granola, fresh banana, chia seeds, shredded coconut, fresh berries To make a Peanut Butter Banana Smoothie Bowl, you need simple, tasty ingredients. Start with two ripe bananas, frozen and sliced. They give your smoothie bowl a creamy texture. Next, grab one cup of unsweetened almond milk. You can use any milk you like. Then, add three tablespoons of natural peanut butter. It adds a rich, nutty flavor. You might want a little sweetness, so consider one tablespoon of honey or maple syrup. This step is optional, depending on your taste. Don't forget half a teaspoon of vanilla extract. It brings out the flavors nicely. Now it's time for toppings! Use granola for crunch, fresh banana slices for extra fruit, chia seeds for nutrition, shredded coconut for sweetness, and fresh berries for color. These toppings make your bowl look pretty and add great taste. - First, grab your blender. - Add 2 ripe bananas that are frozen and sliced. - Pour in 1 cup of almond milk. - Spoon in 3 tablespoons of natural peanut butter. - Add 1/2 teaspoon of vanilla extract. - If you like a bit of sweetness, add 1 tablespoon of honey or maple syrup. - Blend on high speed until it is smooth and creamy. - Stop to scrape down the sides if needed. - To get a thick but pourable texture, use frozen bananas. - If it’s too thick, add a little more almond milk. - Blend again to mix it well. - You want it creamy, but easy to pour. - Pour the smoothie into a bowl. - Use a spatula to spread it evenly. - Make the top smooth for a pretty look. - You can now add your favorite toppings. - Sprinkle granola, arrange sliced bananas, or add chia seeds. - Try some shredded coconut and fresh berries too. - For extra flavor, drizzle a bit of peanut butter on top. - Now grab your spoon and enjoy! To get the best smoothie, frozen bananas are key. They add coldness and creaminess. Fresh bananas will make your smoothie too runny. Slice and freeze ripe bananas ahead of time. When you blend, start at a low speed. This helps mix the ingredients without splattering. Gradually increase to high speed. Stop to scrape down the sides if needed. The mix should be thick but still pourable. Add more almond milk if it’s too thick. You can make this smoothie even better with optional ingredients. A tablespoon of honey or maple syrup adds sweetness. A dash of vanilla extract brings a lovely depth. Mix these in the blender with the other ingredients for a smooth taste. For toppings, layer them nicely. Start with granola for crunch. Then add sliced bananas and chia seeds. Finish with shredded coconut and fresh berries for color and taste. Making your smoothie bowl look great is fun! Use a spatula to spread the smoothie evenly in the bowl. You can create swirls or patterns. For color contrast, use bright toppings like berries. The mix of colors makes your bowl more appealing. Consider mixing textures too. Crunchy granola feels great against the creamy smoothie. Your bowl will be a feast for the eyes and the taste buds! {{image_2}} You can change the almond milk to any milk you like. Try oat milk or coconut milk for a fun twist. If you want to switch nut butter, almond butter or cashew butter works great too. Each nut butter will give a new flavor to your bowl. Want to boost nutrition? Add a handful of spinach or a scoop of protein powder. Both blend well and add health benefits without changing taste. Seasonal fruits also enhance flavor. In summer, add fresh peaches or berries. In fall, try diced apples or pears for a cozy touch. You can add more crunch with nuts like almonds or walnuts. Seeds, like pumpkin or sunflower seeds, add a nice texture too. For something sweet, use dried fruits like raisins or cranberries. If you’re feeling festive, create a holiday theme with colored toppings, like red strawberries and green kiwi for a fun look! If you have leftover smoothie bowl, store it in an airtight container. This keeps it fresh and tasty. Place it in the fridge for up to 24 hours. If you plan to eat it later, avoid adding toppings until you are ready. This way, they stay crunchy and bright. For a sweeter touch, you can mix in a little honey or maple syrup before serving. Freezing is a great option for smoothie bowl parts. You can freeze the smoothie base in ice cube trays. This makes it easy to use later. To thaw, just pop out the cubes and let them sit at room temperature for about 10 to 15 minutes. You can also blend them again for a creamy texture. If you want toppings, freeze sliced bananas or berries separately. Just thaw them before serving for a fresh taste. Most ingredients in your smoothie bowl last a while. Bananas are best when used within 3 to 7 days at room temp. If you freeze ripe bananas, they last for 2 to 3 months. Natural peanut butter stays good for about 6 months when stored in the fridge. Almond milk can last up to a week once opened. Keep an eye on dates, and always check for any signs of spoilage before using. A smoothie bowl is a thick, creamy blend of fruits and liquids. You pour it into a bowl and add toppings. It is a fun, colorful way to enjoy a smoothie. Smoothie bowls are often thicker than regular smoothies, making them perfect for eating with a spoon. You can use different fruits and liquids to create your own flavor. Yes, you can make a smoothie bowl ahead of time! Blend the ingredients and store it in the fridge. Just remember to keep it in a sealed container. It will stay fresh for about a day. If you want to save time, you can prep your toppings in advance too. Just wait to add them until you're ready to eat. This smoothie bowl is quite healthy! Here are the key benefits: - Bananas: They are high in potassium and fiber. This helps with digestion and heart health. - Peanut Butter: It offers protein and healthy fats. This keeps you full longer. - Almond Milk: It is low in calories and dairy-free. Great for those who are lactose intolerant. A serving has about 300-400 calories, depending on toppings. To make it even healthier, consider using less honey or maple syrup. Adding fresh fruits and seeds boosts the nutrients too! A peanut butter banana smoothie bowl is both simple and delicious. You need just a few ingredients and steps. Combine frozen bananas, almond milk, and peanut butter for a creamy blend. Adjust the thickness and add toppings for fun. Explore variations and storage tips to enjoy later. This smoothie bowl is tasty and healthy. It’s perfect for any time of day. Now, you can easily make your own delicious smoothie bowl at home!

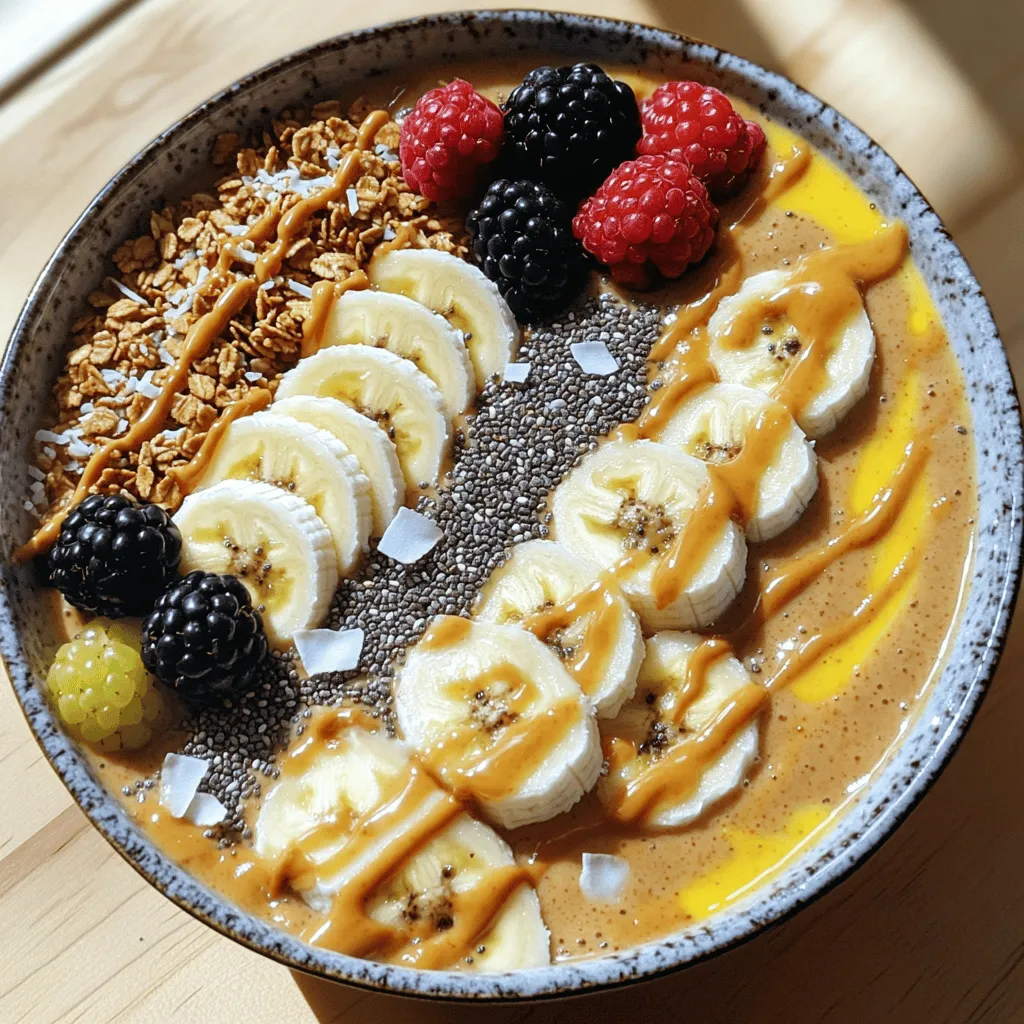
Are you ready to fuel your day with a tasty twist? The Peanut Butter Banana Smoothie Bowl is a perfect blend of creamy goodness and energy-boosting ingredients. I’ll guide you …

Read more

Categories Breakfast

Teriyaki Glazed Salmon Bowls Easy and Healthy Meal

September 17, 2025 by Chef Jamie
- 2 salmon fillets (about 6 oz each) - 1/3 cup low-sodium soy sauce - 2 tablespoons honey - 1 tablespoon rice vinegar - 1 cup broccoli florets - 1 carrot, julienned - 1/2 cup edamame (shelled) - 1 tablespoon sesame seeds - 1 tablespoon sesame oil - 1 teaspoon fresh ginger, grated - 2 cloves garlic, minced - 1 cup quinoa, rinsed When I create my Teriyaki Glazed Salmon Bowls, I start with fresh ingredients. The salmon fillets are the star of the dish. They have a rich flavor and are easy to cook. Low-sodium soy sauce gives the sauce a salty kick without being too overpowering. Honey adds sweetness that balances the salt. Rice vinegar brightens the flavors and adds a hint of acidity. Next, I focus on vegetables. Broccoli florets bring a nice crunch and vibrant color. I like to julienne the carrot for a pop of orange. Edamame adds protein and a nice texture. I often sprinkle sesame seeds on top for a nutty finish. For the cooking essentials, sesame oil provides a unique flavor. Fresh ginger and garlic create depth in the sauce. Quinoa serves as a hearty base. It absorbs flavors well and is a great source of nutrients. Gathering these ingredients makes preparing this meal fun and easy. You’ll enjoy every bite while knowing you made a healthy choice! To make the teriyaki sauce, gather these ingredients: - 1/3 cup low-sodium soy sauce - 2 tablespoons honey - 1 tablespoon rice vinegar - 1 tablespoon sesame oil - 1 teaspoon fresh ginger, grated - 2 cloves garlic, minced Combine all the ingredients in a small saucepan. Heat the mixture over medium heat. Stir until the honey dissolves. Let it simmer for 5-7 minutes. This will thicken the sauce nicely. Remove it from heat and set aside to cool. For the quinoa, you need: - 1 cup quinoa, rinsed - 2 cups water or vegetable broth In a medium pot, combine the quinoa with water or broth. Bring it to a boil. Once boiling, reduce the heat to low. Cover the pot and let it simmer for about 15 minutes. The quinoa is done when it is fluffy and all liquid is absorbed. Set it aside. You will need these vegetables: - 1 cup broccoli florets - 1 carrot, julienned - 1/2 cup edamame (shelled) Steam the broccoli florets for about 5 minutes. They should be tender and bright green. In another pan, sauté the carrots and edamame for 2-3 minutes. Season them lightly with salt and pepper. For the salmon, you will need: - 2 salmon fillets (about 6 oz each) - Salt and pepper to taste Preheat a grill or a non-stick skillet over medium-high heat. Season the salmon fillets with salt and pepper. Place the fillets skin-side down in the skillet. Brush them generously with the teriyaki sauce you made. Cook for about 4-5 minutes, then flip them. Brush the other side with sauce and cook for another 4-5 minutes until done. You want the internal temperature to reach 145°F. To assemble the bowls, start with: - Cooked quinoa - Steamed broccoli - Sautéed carrots - Sautéed edamame - Teriyaki-glazed salmon In each bowl, place a scoop of quinoa as the base. Layer in the steamed broccoli, sautéed carrots, and edamame. Finally, add a piece of the teriyaki-glazed salmon on top. Drizzle any extra teriyaki sauce over each bowl for extra flavor. To make the teriyaki sauce just right, you can adjust the sweetness and saltiness. If you like it sweeter, add more honey. For a saltier flavor, use a bit more soy sauce. I suggest simmering the sauce for about 5-7 minutes. This time will help it thicken, making it stick to the salmon better. To check if your salmon is done, look for a flaky texture. The inside should be opaque and reach 145°F. I prefer grilling or searing the salmon. These methods give it a nice char and keep it moist. Brush the teriyaki sauce on both sides while cooking for the best flavor. For side dishes, pair your bowl with steamed vegetables, like broccoli or carrots. You can also add a salad for extra crunch. If you have leftovers, store them in an airtight container. They will stay fresh for up to three days in the fridge. Reheat gently to keep the salmon tender. {{image_2}} You can switch out salmon for chicken or tofu. This change makes it easy to enjoy the dish in different ways. If you use chicken, cut it into strips. Cook it for about 6-8 minutes, or until it's no longer pink inside. For tofu, use firm tofu and cut it into cubes. Sauté it for 4-5 minutes until golden. Adjust the cooking time based on what you choose. Quinoa is great, but you can use other grains too. Brown rice is a hearty choice, and it adds fiber. Cauliflower rice is a low-carb option that tastes great. You can also use farro or barley for a nutty flavor. Just make sure to follow the cooking instructions for each grain to get the best results. Want to kick up the taste? Add your favorite spices or herbs. A pinch of red pepper flakes can give some heat. Fresh cilantro or basil adds a nice twist. You might also try adding a splash of orange juice for a citrus kick. Incorporating exotic ingredients like miso paste or gochujang can take this dish to a whole new level. Experiment and find the combination you love! After you enjoy your meal, let any leftovers cool down. Place the salmon, quinoa, and veggies in airtight containers. This keeps them fresh. Store them in the fridge for up to three days. If you want them to last longer, consider freezing. To reheat the quinoa, add a splash of water in a pot. Heat it over low until warm. For the salmon, the best way is in the oven. Preheat it to 350°F (175°C). Wrap the salmon in foil to keep it moist. Heat for about 10 minutes. This method keeps the flavors strong. Yes, you can freeze teriyaki glazed salmon. Wrap the salmon tightly in plastic wrap, then place it in a freezer bag. Remove as much air as possible. For quinoa and veggies, use separate containers. Store them for up to three months. Just remember to label everything with the date. Yes, fresh salmon works great! Look for salmon that is bright in color and smells fresh. You want fillets that are firm and free of any brown spots. If you can, buy wild-caught salmon. It has better flavor and texture. Use fillets about 6 ounces each for best results. To make this dish gluten-free, use tamari instead of soy sauce. Tamari has a similar taste but is made without wheat. You can also look for gluten-free soy sauce brands at your store. Always read labels to ensure they are gluten-free. You can add many veggies to your salmon bowl. Some great options are bell peppers, snap peas, or zucchini. Feel free to use seasonal vegetables. They add color and nutrients. You can also try adding avocado for a creamy texture. The prep time is about 15 minutes. Cooking takes around 25 minutes. So, the total time is about 40 minutes. This includes making the teriyaki sauce, cooking quinoa, and preparing the salmon and veggies. These bowls pair well with a simple salad or some steamed rice. You could also serve them with pickled vegetables for a tangy touch. If you want more protein, try adding edamame or tofu. They make the meal even more filling. This blog post walks you through making Teriyaki Glazed Salmon Bowls. We discussed key ingredients like salmon, soy sauce, and vegetables. You learned step-by-step instructions to prepare the sauce, cook quinoa, and glaze the salmon. Final thoughts: this dish is easy to make and full of flavor. Don’t hesitate to experiment with proteins and grains. Enjoy your healthy meal and the satisfaction of cooking!

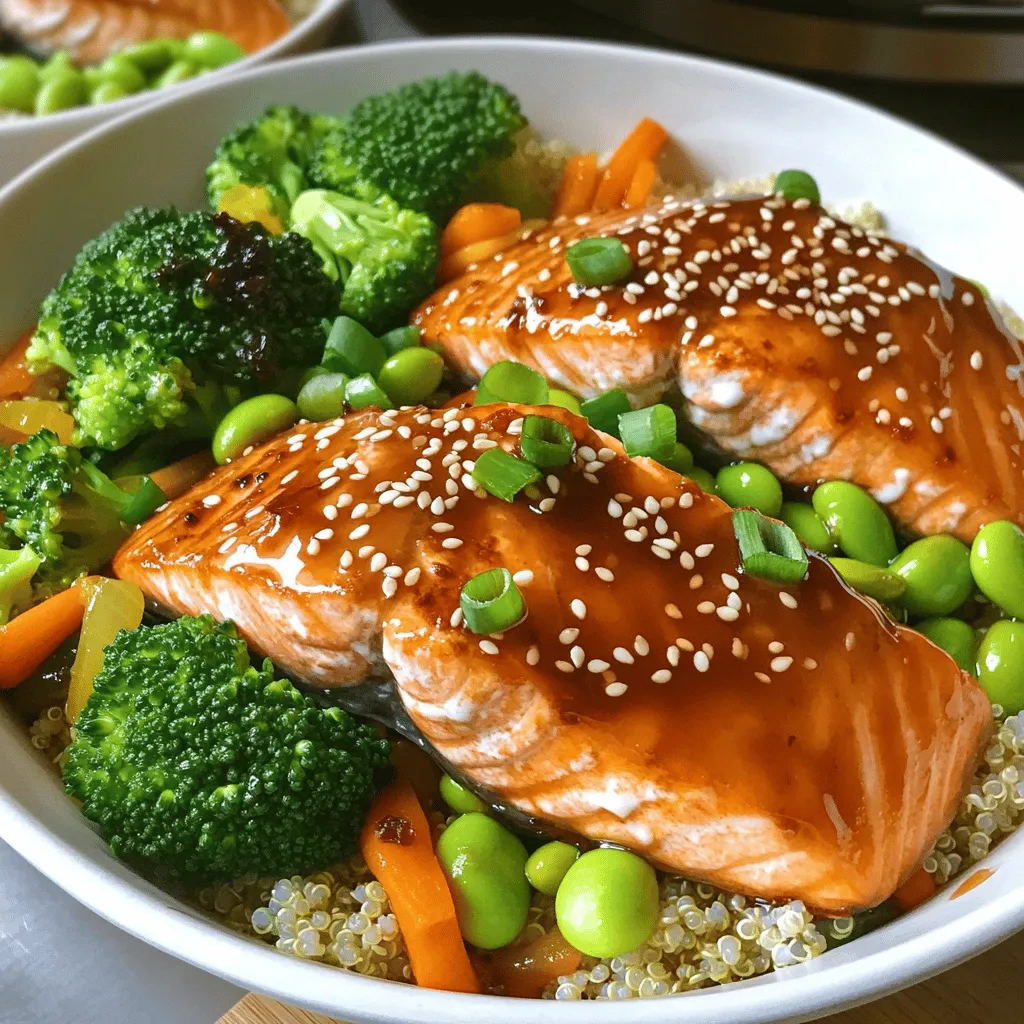
Craving a quick, tasty meal? Try my Teriyaki Glazed Salmon Bowls! This dish is easy to make and packed with flavor. With tender salmon glazed in a sweet teriyaki sauce, …

Read more

Categories Dinner

Everything Bagel Cucumber Bites Fresh and Flavorful Treat

September 17, 2025 by Chef Jamie
- 1 large cucumber - 4 oz cream cheese, softened - 1 tablespoon sour cream - 1 tablespoon fresh dill, chopped - 2 teaspoons lemon juice - 1/4 teaspoon garlic powder - 1/4 teaspoon onion powder - Everything bagel seasoning (to taste) - Cherry tomatoes, halved (for garnish) The key to making Everything Bagel Cucumber Bites is fresh, simple ingredients. You need a large cucumber as your base. This veggie adds crunch and keeps the bites light. Next, you’ll use cream cheese, which gives a rich and creamy texture. Softened cream cheese blends well with sour cream. Sour cream adds tanginess to the mix. Fresh dill is vital. It brightens the dish and adds herbal notes. Lemon juice gives a fresh zing. Garlic powder and onion powder add depth and flavor. Everything bagel seasoning brings it all together with its mix of seeds and salt. Finally, you’ll use cherry tomatoes for garnish. They add color and sweetness. - Calories per serving: Approximately 50 calories - Macronutrient breakdown: - Fat: 4g - Carbohydrates: 3g - Protein: 1g These bites are not just tasty; they are also light and healthy. With about 50 calories per serving, they fit well in most diets. The low carbs make them great for snacking. The fat comes mainly from the cream cheese, which keeps them creamy and satisfying. Enjoy these bites without guilt! - Cutting the cucumber Start by washing the large cucumber. Cut it into 1-inch thick slices. This size is perfect for topping. Place the slices on a serving platter. - Making the cream cheese mixture In a mixing bowl, add 4 oz of softened cream cheese. Then, mix in 1 tablespoon of sour cream. Add 1 tablespoon of fresh dill, chopped. Squeeze in 2 teaspoons of lemon juice. Now, sprinkle in 1/4 teaspoon of garlic powder and onion powder. Mix everything until it's smooth and creamy. - Assembling the cucumber bites Take a spoon or piping bag and fill each cucumber slice with the cream cheese mixture. Be generous! After that, sprinkle everything bagel seasoning on top. Finally, place a halved cherry tomato on each bite for color and taste. - Presentation tips Arrange the cucumber bites on a colorful platter. Add some fresh herbs around them for a pop of green. This makes your dish look extra special. - Pairing ideas with dips or drinks Serve these bites with a tasty dip, like tzatziki or hummus. They also pair well with sparkling water or a light white wine. These drinks enhance the fresh flavors of the cucumber bites. For this recipe, I recommend using English cucumbers. They are long, thin, and have fewer seeds. Their skin is also tender, making them perfect for bites. Regular cucumbers can work too, but they may be more watery. To get the best flavor, pick cucumbers that feel firm and have a smooth skin. You can prep these bites a day in advance. Make the cream cheese mixture and slice the cucumbers. Store the cream cheese mix in the fridge. Keep the cucumber slices in a sealed bag with a damp paper towel. This keeps them fresh and crisp. When ready to serve, just assemble the bites. This saves time and keeps the flavors bright. Feel free to get creative with spices or herbs. Add a pinch of cayenne for heat or mix in some chives for a fresh twist. You can even swap out dill for basil or parsley. Experimenting with flavors can lead to fun new bites. Tailoring these treats to your taste makes them even better! {{image_2}} You can change the cream cheese flavor to match your taste. Try adding fresh herbs like chives or basil for a garden touch. For a kick, mix in diced jalapeños. This adds heat and a fun twist to every bite. You can even try flavored cream cheese spreads from the store, like garlic or onion. Seasonal veggies can boost flavor and color. Think of adding diced bell peppers for crunch or shredded carrots for sweetness. In summer, try a slice of radish for extra zing. These add-ins keep the bites fresh and exciting throughout the year. You can also use different toppings like avocado or sliced olives for even more variety. If you have dietary needs, you can still enjoy these bites. For gluten-free options, ensure your everything bagel seasoning is gluten-free. For a vegan twist, use plant-based cream cheese and dairy-free sour cream. This keeps all the creamy goodness without the dairy. You can also swap the cucumber for sliced zucchini for a crunchy base. To keep your Everything Bagel Cucumber Bites fresh, store them in an airtight container. Place a layer of parchment paper between the bites to avoid sticking. They stay good in the fridge for up to two days. If you have extra cream cheese mixture, store it separately. This way, you can make fresh bites whenever you want! You cannot freeze Everything Bagel Cucumber Bites. The cucumber will lose its crunch and become mushy. Cream cheese does not freeze well either. It's best to enjoy these bites fresh. If you want to prep ahead, make the cream cheese mixture and store it in the fridge. Just slice the cucumber and assemble when you’re ready to serve! Yes, you can use low-fat cream cheese. It makes the bites lighter. The flavor may be less rich but still tasty. You can balance this by adding more seasoning. Try mixing in a bit of fresh herbs for extra flavor. To make this recipe vegan, use dairy-free cream cheese. There are many great brands available. You can also try blended silken tofu as a base. Add some lemon juice and spices to mimic the creaminess of cheese. Yes, you can serve Everything Bagel Cucumber Bites at room temperature. Just keep them cool until serving. If they sit out for too long, the cream cheese may soften too much. Chilling them first helps keep their shape and flavor. In this post, we explored a tasty recipe for Everything Bagel Cucumber Bites. You learned the ingredients, health facts, and how to prepare them. The tips helped you choose the best cucumbers and customize the flavors. We also covered storage and variations for dietary needs. These cucumber bites are fresh and fun. They make a great snack or party treat. Try them out, and enjoy all the delicious ways to serve and share!

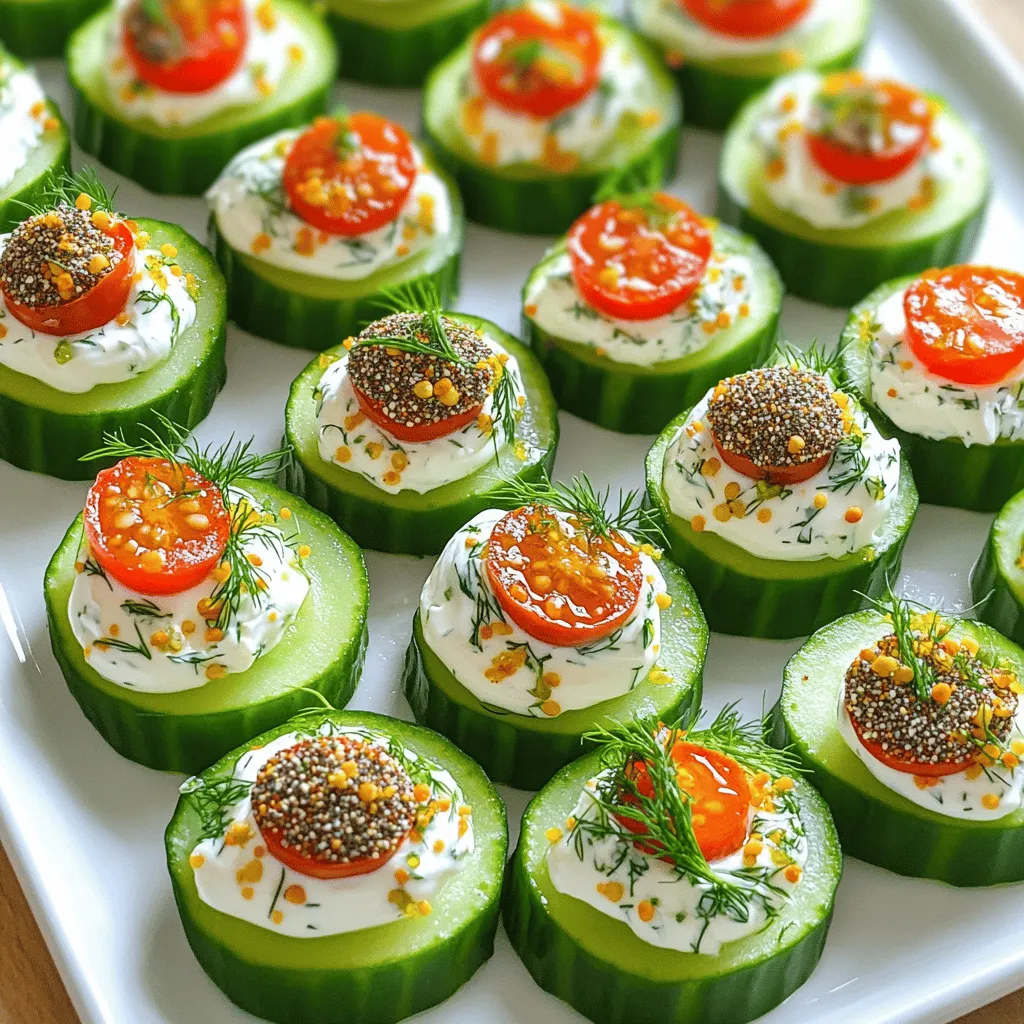
Looking for a fresh and fun snack? Everything Bagel Cucumber Bites are the perfect choice! With crisp cucumbers and creamy toppings, they’re bursting with flavor. In this post, I’ll share …

Read more

Categories Appetizers

Blueberry Lemon Cheesecake Bars Delightful Dessert Option

September 17, 2025 by Chef Jamie
- 1 ½ cups graham cracker crumbs - ½ cup unsalted butter, melted - 1 tablespoon sugar - 2 (8 oz) packages cream cheese, softened - 1 cup granulated sugar - 2 large eggs - 2 teaspoons vanilla extract - Zest of 1 lemon - ¼ cup fresh lemon juice - 1 ½ cups fresh blueberries - Optional: powdered sugar for dusting Each ingredient plays a key role in our blueberry lemon cheesecake bars. The measurements are precise to ensure a perfect balance of flavors and textures. - Graham cracker crumbs provide a crunchy base. - Unsalted butter helps bind the crust. - Sugar sweetens the crust and filling. - Cream cheese creates the creamy texture in the bars. - Granulated sugar adds sweetness to the filling. - Eggs help set the filling as it bakes. - Vanilla extract adds depth to the flavor. - Lemon zest brightens the taste. - Lemon juice gives a fresh, tangy kick. - Fresh blueberries add bursts of flavor and color. - Powdered sugar is optional for a lovely presentation. Each ingredient contributes to the delightful taste and texture of the cheesecake bars. - Graham cracker crumbs make a crunchy crust, perfect for holding the filling. - Cream cheese is the star. It gives the bars their rich, creamy taste. - Lemon zest and juice bring a fresh, tangy flavor that brightens every bite. - Blueberries add sweetness and a pop of color, making the bars visually appealing. - Eggs are essential for binding the filling together, ensuring it sets well. Understanding these ingredients helps you see how they work together to create a delicious dessert. Enjoy making these blueberry lemon cheesecake bars! Start by preheating your oven to 350°F (175°C). This temperature helps set the crust perfectly. Next, take an 8x8 inch baking pan. Line it with parchment paper, leaving some overhang. This makes it easy to lift out the bars later. In a medium bowl, combine 1 ½ cups of graham cracker crumbs, ½ cup of melted unsalted butter, and 1 tablespoon of sugar. Mix it well until the crumbs coat evenly. This mixture will form a tasty crust. Now, press the mixture firmly into the bottom of your lined baking pan. Make sure it’s even. Bake it in the oven for 10 minutes. While it bakes, the crust will firm up. After baking, let it cool slightly. In a large mixing bowl, beat 2 packages (8 oz each) of softened cream cheese. Mix until it’s smooth and creamy. Then, gradually add in 1 cup of granulated sugar. Keep mixing until it is fluffy, around 2 minutes. Next, add in 2 large eggs one at a time. Mix on low speed after each egg to avoid splatter. Now, add 2 teaspoons of vanilla extract, the zest of 1 lemon, and ¼ cup of fresh lemon juice. Mix this well until all ingredients blend nicely. Finally, gently fold in 1 ½ cups of fresh blueberries. Be careful not to crush them. This keeps the blueberries whole and juicy. Now it’s time to bake. Pour the cheesecake mixture over the cooled crust in the baking pan. Spread it evenly to cover the crust. Bake in the oven for 25-30 minutes. Look for the center to be set and the edges to turn lightly golden. Once done, take it out and let it cool at room temperature for about 1 hour. After that, refrigerate the bars for at least 4 hours or overnight. This helps them set completely. When ready, use the parchment paper overhang to lift the cheesecake bars out of the pan. Slice them into squares. Enjoy your delightful blueberry lemon cheesecake bars! To get the right texture, start with room temperature cream cheese. Cold cream cheese does not mix well. Beat it until smooth before adding other ingredients. Mix the sugar in slowly to ensure it blends well. When you add the eggs, do it one at a time. This helps keep the texture creamy. The final mix should be fluffy and light. Fold in the blueberries gently. You want them to stay whole. This adds a nice burst of flavor. Overmixing can ruin your bars. Once you add the eggs, mix on low speed. If you overmix, your cheesecake can crack while baking. Make sure to let the crust cool slightly before adding the filling. If it’s too hot, it can make your filling runny. Lastly, don’t skip the chilling time. These bars need to set properly in the fridge. Skipping this step can lead to a mushy texture. To make your bars look great, dust them with powdered sugar before serving. This adds a beautiful finish. Garnish each square with a fresh blueberry and a thin slice of lemon. This brightens up the look and adds a pop of color. Serve them on a nice plate for that extra touch. A well-presented dessert can impress your guests! {{image_2}} You can switch out blueberries for other fruits. Raspberries, strawberries, or blackberries all work well. Each fruit brings its own flavor. Raspberries add tartness, while strawberries bring sweetness. Just remember to use fresh fruit for best results. If using frozen fruit, make sure to thaw and drain excess liquid. To make these bars gluten-free, simply use gluten-free graham cracker crumbs. Many brands offer tasty options. You can also make your own by grinding gluten-free cookies. The rest of the recipe stays the same. Just ensure all ingredients are gluten-free, like sugar and butter. Adding spices can elevate your bars. A pinch of cinnamon or nutmeg can add warmth. You can also mix in lemon extract for a stronger citrus flavor. To make it richer, add a little sour cream to the cream cheese mixture. These tweaks create a unique twist on the classic recipe. To keep your blueberry lemon cheesecake bars fresh, store them in the fridge. Use an airtight container to protect them from absorbing other smells. If you use parchment paper, keep it to help the bars breathe a bit. This method helps them stay moist and tasty. When stored correctly, these cheesecake bars last about 5 days in the fridge. After baking, let them cool and set for at least 4 hours. Then, cut them into squares and place them in your container. Keep an eye on them, and enjoy them while they are fresh! You can freeze these bars if you want to save some for later. First, let them cool completely. Then, wrap each square tightly in plastic wrap. Place them in a freezer-safe bag or container. They will stay good for up to 3 months. When you're ready to eat them, thaw them in the fridge overnight. Enjoy the sweet, tangy flavor even after freezing! Yes, you can use frozen blueberries. Just make sure to thaw them first. Drain any excess juice to prevent a watery cheesecake. Frozen blueberries can be a great option when fresh ones aren’t available. They still provide that lovely taste and color. You will know the bars are done when the edges turn a light golden color. The center should be set but may still jiggle slightly. Keep an eye on them while baking. If the top looks too brown, cover with foil. These cheesecake bars pair well with many items. You can serve them with whipped cream for extra creaminess. A scoop of vanilla ice cream adds a nice touch too. A side of fresh fruit, like more blueberries or strawberries, can brighten your plate. We covered everything you need to make delicious cheesecake bars. You learned about the key ingredients and their roles, along with how to prepare the crust and filling. I shared tips to get the right texture and avoid mistakes. You now know about tasty variations and how to store your bars. My final thought is that with practice, your cheesecake bars will impress everyone. Enjoy experimenting and sharing your sweet treats!

Looking for a sweet treat that brightens your day? Blueberry Lemon Cheesecake Bars are a perfect match! These bars blend creamy cheesecake with fresh, zesty lemon and juicy blueberries. You’ll …

Read more

Categories Desserts
Older posts
Newer posts
← Previous Page1 … Page27 Page28 Page29 … Page134 Next →

TOSSED RECIPES

Simple meals, bold taste. Quick recipes made for real life — always fresh, always delicious. 🌿🍴

PAGES

Home About Contact Privacy Policy Terms & Conditions Cookie Policy GDPR Policy Copyright Policy Disclaimer

CATEGORIES

Appetizers Desserts Salads Breakfast Dinner

Contact

  • Pinterest
  • Mail
Copyright © 2026 Tossed Recipes. All rights reserved.