Skip to content
Tossed Recipes
  • Home
  • Appetizers
  • Desserts
  • Salads
  • Breakfast
  • Dinner
  • Privacy Policy
  • Contact
  • About

Chef Jamie

No Bake Pumpkin Spice Oreo Truffles Delightful Treat

September 12, 2025 by Chef Jamie
- 1 package (15.35 oz) Pumpkin Spice Oreo cookies - 8 oz cream cheese, softened - 1 teaspoon vanilla extract - 1 teaspoon pumpkin pie spice - 1 cup white chocolate chips - 2 tablespoons coconut oil (optional, for thinning) - Extra crushed Pumpkin Spice Oreos for coating When choosing cream cheese, look for full-fat versions for a rich taste. Softened cream cheese makes mixing easy. If you want a lighter option, use reduced-fat cream cheese. For the chocolate, white chocolate chips work best for this recipe. You can also use melting wafers, which melt smoothly. If you want a dairy-free option, check for dairy-free white chocolate. Pumpkin Spice Oreos bring a warm and cozy flavor to these truffles. They have a mix of pumpkin and spice notes that give a great autumn taste. The cream cheese adds a creamy texture, making the truffles rich and delightful. Vanilla extract enhances the overall flavor, while pumpkin pie spice adds extra warmth. Each bite bursts with seasonal goodness. To start, grab a food processor. Add the Pumpkin Spice Oreos. Pulse them until they turn into fine crumbs. This step is key for the smooth texture of the truffles. If you don’t have a processor, put the Oreos in a bag and crush them with a rolling pin. Just make sure they are finely crushed. Next, take a mixing bowl. Combine the Oreo crumbs, softened cream cheese, vanilla extract, and pumpkin pie spice. Use a spatula or your hands to mix it all well. Keep mixing until a dough forms. This dough should be thick and easy to handle. Now, it’s time to shape the truffles. Scoop out small portions of the dough. Roll them into balls, about one inch wide. Place each ball on a parchment-lined baking sheet. Once you have all the balls made, put the sheet in the freezer. Let them chill for about 30 minutes. This makes them firm and easier to coat later. While the truffles chill, melt the white chocolate chips. Use a microwave-safe bowl for this. Heat in 30-second intervals, stirring in between until smooth. If you want a thinner coating, add coconut oil. Once melted, remove the truffles from the freezer. Dip each one into the melted chocolate using a fork. Let the excess chocolate drip off, then place them back on the parchment. While the chocolate is still wet, sprinkle extra crushed Oreos on top. Finally, refrigerate the truffles for 15-20 minutes until the chocolate is set. To get the best texture in your truffles, use softened cream cheese. This helps mix the dough easily. Make sure to crush the Pumpkin Spice Oreos finely. A food processor works best for this. You want a crumbly texture that holds together. After mixing, chill the truffles for at least 30 minutes before coating. This helps them firm up nicely. One common mistake is not chilling the truffles long enough. If they are too soft, the chocolate coating will slide off. Another mistake is using cold cream cheese. This makes it hard to blend. Ensure you use high-quality white chocolate. Cheap chocolate can clump or not melt smoothly. Lastly, don’t skip the crushed Oreo topping. It adds flavor and a nice look! You will need a few tools to make this recipe easy. A food processor helps crush the cookies. Use a mixing bowl for combining the ingredients. A baking sheet lined with parchment paper is key for easy cleanup. For dipping, a fork works well. If you have a microwave-safe bowl, use it for melting chocolate. These tools make the process smooth and fun! {{image_2}} You can switch up the flavor of your truffles by using different Oreo flavors. Try using mint Oreos for a fresh twist or peanut butter Oreos for a rich taste. Each change gives a fun new flavor to enjoy. Mixing flavors keeps things exciting and fun for everyone. If you need vegan options, use vegan cream cheese and dark chocolate. This way, everyone can enjoy the treat. For gluten-free adjustments, choose gluten-free Oreo cookies. These small swaps keep the taste while meeting dietary needs. It’s great to have choices for all kinds of eaters! These truffles pair well with warm drinks like apple cider or coffee. They also look great on a festive platter, perfect for any party. Add some sprinkles or extra crushed Oreos on top for a fun touch. You could even serve them with a scoop of vanilla ice cream for a delightful dessert. The options are endless! To keep your no bake pumpkin spice Oreo truffles fresh, store them in an airtight container. Line the container with parchment paper to prevent sticking. Make sure to layer the truffles, adding parchment between each layer. This keeps them from clumping together. Place the container in the fridge for the best taste and texture. When stored correctly, these truffles last up to one week in the fridge. If you notice any change in smell or texture, it’s best to throw them away. Trust your senses; they rarely lie. For the freshest taste, enjoy them within the first few days. If you want to keep your truffles longer, freezing is a great option. First, freeze the truffles on a baking sheet for about one hour. Once they are firm, transfer them to a freezer-safe bag. Make sure to remove as much air as possible. They can last up to three months in the freezer. When ready to eat, let them thaw in the fridge overnight. Yes, you can make these truffles ahead of time. They stay fresh for about a week in the fridge. Just store them in an airtight container. This makes them perfect for parties or gatherings. You can also freeze them for up to three months. Just let them thaw in the fridge before serving. You can tell the chocolate is set when it feels firm to the touch. It should not be sticky or glossy. If it looks dull, it's ready. Let the truffles chill in the fridge for about 15-20 minutes to help the chocolate set faster. If you can't find Pumpkin Spice Oreos, use regular Oreos. You can also try gingerbread cookies or even chocolate cookies. Just keep the same amount to get the right texture. Adding a pinch of pumpkin spice to the dough can help bring that fall flavor back. To remove truffles easily, let them chill fully. Once the chocolate sets, they should lift off smoothly. If they stick, gently slide a small spatula underneath each truffle. This will help release them without breaking. You now have all the tools to make delicious no-bake Pumpkin Spice Oreo truffles. We've covered the ingredients, steps, and tips needed for success. Remember, using the right ingredients and tools can make a big difference. You can even try different flavors and dietary options to fit your needs. Store your truffles properly to enjoy them longer. With these handy tips, you’re set to impress anyone with your sweet treats! Enjoy every bite of your creation!

Get ready to indulge in a sweet treat this fall! I’ll show you how to make No Bake Pumpkin Spice Oreo Truffles that are easy, fun, and oh-so-delicious. These little …

Read more

Categories Desserts

Warm Cinnamon Apple Crisp Bars Tasty and Easy Treat

September 12, 2025 by Chef Jamie
To make these tasty Warm Cinnamon Apple Crisp Bars, gather these simple ingredients: - 2 cups rolled oats - 1 cup all-purpose flour - 1/2 cup brown sugar - 1/2 cup granulated sugar - 1 teaspoon ground cinnamon - 1/2 teaspoon salt - 1/2 cup unsalted butter, melted - 2 cups Granny Smith apples, peeled, cored, and diced - 1 tablespoon lemon juice - 1 teaspoon vanilla extract - 1 tablespoon cornstarch These ingredients create a perfect balance of sweet and tart. The rolled oats give the bars a hearty texture. The Granny Smith apples add a nice tang. For this recipe, you will need a few key tools: - A 9x13 inch baking dish - Mixing bowls - A spoon for mixing - A measuring cup and spoons - A knife for chopping apples - An oven for baking These tools help you combine and bake your ingredients with ease. You can make your bars even better with some tasty toppings: - Vanilla ice cream on top - A sprinkle of extra cinnamon - Chopped nuts for crunch Serve the bars warm for the best taste. Pairing them with ice cream makes it a special treat. Enjoy! To start, preheat your oven to 350°F (175°C). This step is key for even baking. Next, grease a 9x13 inch baking dish. You can also use parchment paper for easy removal later. In a large bowl, combine 2 cups of rolled oats, 1 cup of all-purpose flour, 1/2 cup of brown sugar, 1/2 cup of granulated sugar, 1 teaspoon of ground cinnamon, and 1/2 teaspoon of salt. Mix these dry ingredients well. Then, pour in 1/2 cup of melted unsalted butter. Stir until the mixture looks crumbly. Set aside about 1 cup of this mixture for the topping. Press the rest firmly into the bottom of your prepared dish. This will be your crisp base. Now it's time to make the apple filling. In a separate bowl, take 2 cups of Granny Smith apples, which you should peel, core, and dice. Add 1 tablespoon of lemon juice to help keep the apples fresh. Then, mix in 1 teaspoon of vanilla extract and 1 tablespoon of cornstarch. Toss everything together until the apples are well coated. This mixture will add a nice sweet and tangy flavor to your bars. Spread the apple filling evenly over the oat crust in your baking dish. Make sure the apples are spread out well. Next, crumble the reserved oat mixture on top of the apples. This will create a delicious crispy layer. Now, pop the dish into the oven and bake for 25-30 minutes. Keep an eye on it! You want the top to turn golden brown and the apples to get tender. Once done, let the bars cool in the dish for about 10 minutes. Then, slice them into squares. Enjoy your warm cinnamon apple crisp bars! To make the oat mixture great, focus on texture. Use rolled oats, as they add chewiness. Combine them with flour, sugars, cinnamon, and salt. This mix brings out a warm, sweet flavor. When you pour in melted butter, mix until crumbly. This helps bind the bars. Remember to save about one cup for the topping. A good texture makes all the difference. Selecting the right apples is key. I love using Granny Smith apples for their tartness. They balance the sweetness of the sugars well. Toss the diced apples with lemon juice to brighten their flavor. Adding vanilla extract enhances the aroma. Cornstarch helps thicken the apple filling, making it less runny. This mix makes every bite flavorful and juicy. After baking, let the bars cool for about 10 minutes. This cooling time helps them set properly. Cut them into squares for easy serving. Warm bars taste best, especially with a scoop of vanilla ice cream. The cold cream melts slightly, creating a wonderful contrast. A sprinkle of cinnamon on top adds a nice touch. Enjoy these bars fresh for the best taste! {{image_2}} You can make these Warm Cinnamon Apple Crisp Bars gluten-free. Simply swap the all-purpose flour for a gluten-free blend. Most blends work well, but check for one that mimics regular flour. Ensure all other ingredients are also gluten-free. This way, everyone can enjoy this tasty treat! While apples are classic, feel free to mix it up! You can use pears, peaches, or even berries. Just remember to adjust the sugar based on the fruit's sweetness. For example, berries may need less sugar since they are sweet naturally. Experimenting with fruit can bring new flavors to your bars! Want to boost the flavor? Try adding nuts or oats for crunch. Walnuts or pecans work great in the topping. You can also add a hint of nutmeg or ginger for a warm spice twist. A splash of maple syrup can add extra sweetness too. These little changes can create a new taste every time! To keep your Warm Cinnamon Apple Crisp Bars fresh, store them in an airtight container. Place parchment paper between layers to avoid sticking. They can stay at room temperature for up to three days. If you want them to last longer, refrigerate them. They will stay good in the fridge for about a week. When you are ready to enjoy your bars again, preheat your oven to 350°F (175°C). Place the bars on a baking sheet. Heat them for about 10-15 minutes. This warms them up and makes them taste fresh again. You can also microwave a single bar for 20-30 seconds. Just keep an eye on it to avoid overheating. If you want to freeze the bars, first let them cool completely. Cut them into squares and wrap each one in plastic wrap. Then, place them in a freezer-safe bag or container. They can stay in the freezer for up to three months. When you want to eat them, thaw them in the fridge overnight. Reheat as needed for a warm treat. Yes, you can use other apples. I like Granny Smith for their tartness. You can try Honeycrisp, Fuji, or Gala apples. Each type adds its own flavor. Just pick apples you enjoy. These bars last about four days at room temperature. If you store them in the fridge, they can stay fresh for a week. Just make sure to keep them in an airtight container. Yes, you can make these bars ahead of time. They are great for meal prep. Just bake them and let them cool. Then cut and store them for later. You can use all-purpose flour instead of cornstarch. You can also use arrowroot powder. Both options work well to thicken the apple filling. Yes, you can make this recipe vegan. Use vegan butter in place of regular butter. You can also swap out the granulated sugar for coconut sugar. These changes keep the bars delicious and plant-based. You learned how to make apple crisp bars with simple steps. We covered key ingredients, tools, and tasty toppings. I shared tips on perfecting the oat mix and enhancing flavor. You also saw different fruit options and how to store leftovers. Experiment with this recipe and enjoy the sweet rewards. Try your favorite flavors and share with others. Now it’s time for you to bake these delicious bars and make memories!

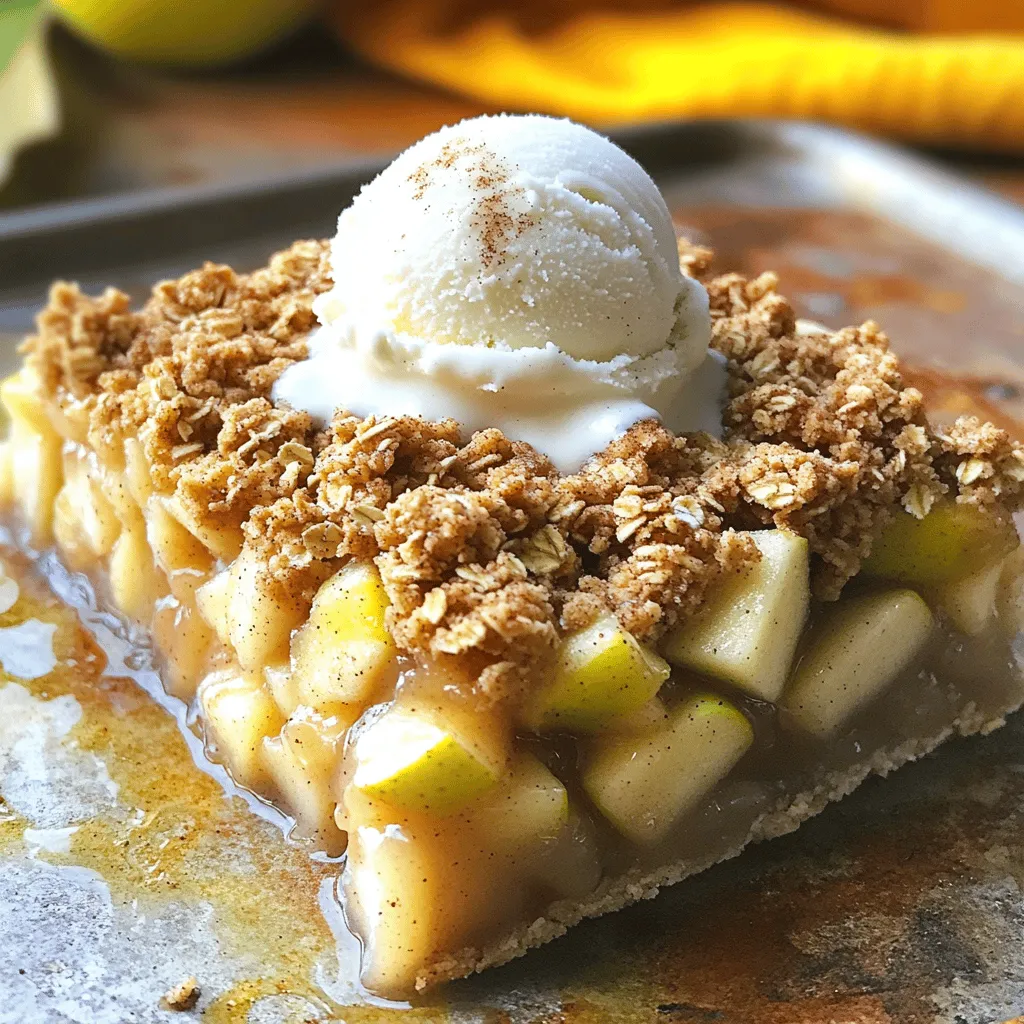
Are you ready to dive into the cozy world of Warm Cinnamon Apple Crisp Bars? These bars are the perfect blend of sweet apples and crunchy topping, making them a …

Read more

Categories Desserts

Sheet Pan Lemon Pepper Shrimp Broccoli Delight

September 12, 2025 by Chef Jamie
- 1 lb large shrimp, peeled and deveined - 2 cups broccoli florets - 3 tablespoons olive oil - 2 tablespoons lemon juice - 1 tablespoon lemon zest - 1 teaspoon freshly cracked black pepper - 1 teaspoon garlic powder - 1/2 teaspoon onion powder - Salt to taste - Optional: Fresh parsley for garnish - Baking sheet - Mixing bowl - Measuring spoons Gathering the right ingredients is key to making this dish shine. First, you need the shrimp. Look for large shrimp that are fresh, peeled, and deveined. They should be plump and firm. Next, grab some bright green broccoli florets. They add color and nutrition. Don't forget the olive oil; it helps everything cook well and adds flavor. For the zest, fresh lemons will brighten the dish. Lemon juice and lemon zest both bring a lively taste. You'll need a few seasonings: black pepper, garlic powder, and onion powder. They make the shrimp and broccoli pop with flavor. A pinch of salt will balance everything out. Fresh parsley is optional but brings a lovely touch to the plate. For tools, a baking sheet is a must. It holds all the ingredients as they roast. A mixing bowl helps you combine everything easily. Lastly, use measuring spoons to ensure you get the right amounts. Now you're ready to cook! - Preheat your oven to 400°F (200°C). - In a large mixing bowl, combine 1 lb of peeled and deveined shrimp with 2 cups of broccoli florets. - Drizzle 3 tablespoons of olive oil and 2 tablespoons of lemon juice over the shrimp and broccoli. - Add 1 tablespoon of lemon zest, 1 teaspoon of black pepper, 1 teaspoon of garlic powder, 1/2 teaspoon of onion powder, and salt to taste. - Toss the mixture well until the shrimp and broccoli are fully coated. - Arrange the shrimp and broccoli evenly on a sheet pan, making sure they are in a single layer. - Roast in the oven for about 12-15 minutes. The shrimp will turn pink and opaque, while the broccoli will become tender-crisp. To check if shrimp are done, look for two key signs. First, they should be pink. Second, they should be opaque. This usually takes about 12 to 15 minutes in the oven. If you see these changes, your shrimp are ready. An even layer on the sheet pan is very important. This helps them cook evenly. If they overlap, some shrimp may not cook well. Spread them out nicely for the best results. For serving, I love using a large platter. It makes the dish look more inviting. You can also serve them on individual plates. Drizzle some extra lemon juice over the top. This adds flavor and a bright look. A sprinkle of lemon zest makes it even prettier. Garnish with fresh parsley for a pop of color. It gives a nice touch and a fresh taste. Adding more greens is a great way to boost the dish. You can toss in spinach or snap peas with the broccoli. This adds nutritional variety and color. Consider low-sodium options for seasonings. You can find salt-free lemon pepper blends at many stores. These help keep the dish healthy while still tasting great. {{image_2}} You can swap in other veggies for great taste. Asparagus and bell peppers work well. Both add color and flavor to your dish. They roast nicely and pair well with shrimp. If you want to change the oil, try avocado oil. It has a mild taste and is healthy. This swap keeps your dish just as tasty. Want some heat? Add red pepper flakes or sriracha for a spicy kick. Just a pinch can make a big difference. It adds warmth without taking over the lemon flavor. For herbs, consider cilantro or dill. Both herbs give your dish a fresh twist. They also add a nice pop of color. If you need gluten-free options, you’re in luck! This dish is naturally gluten-free. Just make sure your seasoning blends are also gluten-free. For a low-carb version, skip the broccoli and add more shrimp. Zucchini or cauliflower can also replace broccoli. Both options are low in carbs and work well with lemon pepper flavors. To keep your Lemon Pepper Shrimp and Broccoli fresh, store leftovers in an airtight container. This will help prevent odors and keep the dish tasty. You can refrigerate it for up to three days. Make sure it cools down to room temperature before sealing it in. If you want to save some for later, you can freeze this meal. First, let it cool completely. Then, place it in a freezer-safe bag or container. Squeeze out as much air as you can. This will help avoid freezer burn. You can freeze it for up to three months. To reheat, thaw it overnight in the fridge. Then, warm it up in the oven at 350°F (175°C) until heated through, about 15-20 minutes. To make cooking easier, prep your ingredients ahead of time. You can peel and devein the shrimp a day before. Also, you can wash and cut the broccoli into florets. Store these in the fridge. This way, when you're ready to cook, everything is ready to go. Batch cooking is another great idea. Make a large batch and portion it out for quick meals during the week. You can enjoy this dish without the fuss of daily cooking! Shrimp cook very fast. It usually takes about 12 to 15 minutes in the oven. You want them pink and opaque. If you pan-fry, it only takes about 5 to 7 minutes. Just make sure not to overcook them. Overcooked shrimp turn rubbery. Keep an eye on them! Yes, you can use frozen shrimp! Just make sure to thaw them first. You can do this by placing them in cold water for about 15 minutes. Pat them dry before you mix them with the broccoli and spices. Frozen shrimp are just as tasty as fresh! This dish pairs well with many sides. You can serve it with rice or quinoa for a filling meal. A fresh salad adds a nice crunch too. If you want more protein, grilled chicken or tofu works great. You can even serve it with crusty bread to soak up the flavors! In this article, we covered a simple and tasty shrimp dish. You learned about the key ingredients, step-by-step cooking, tips for success, and ways to customize it. Roasting shrimp with broccoli is easy, healthy, and delicious. You can also make it your own by experimenting with flavors and swapping ingredients. Whether you’re meal prepping or looking for a quick dinner, this recipe fits well. Enjoy your cooking and the tasty rewards that follow!

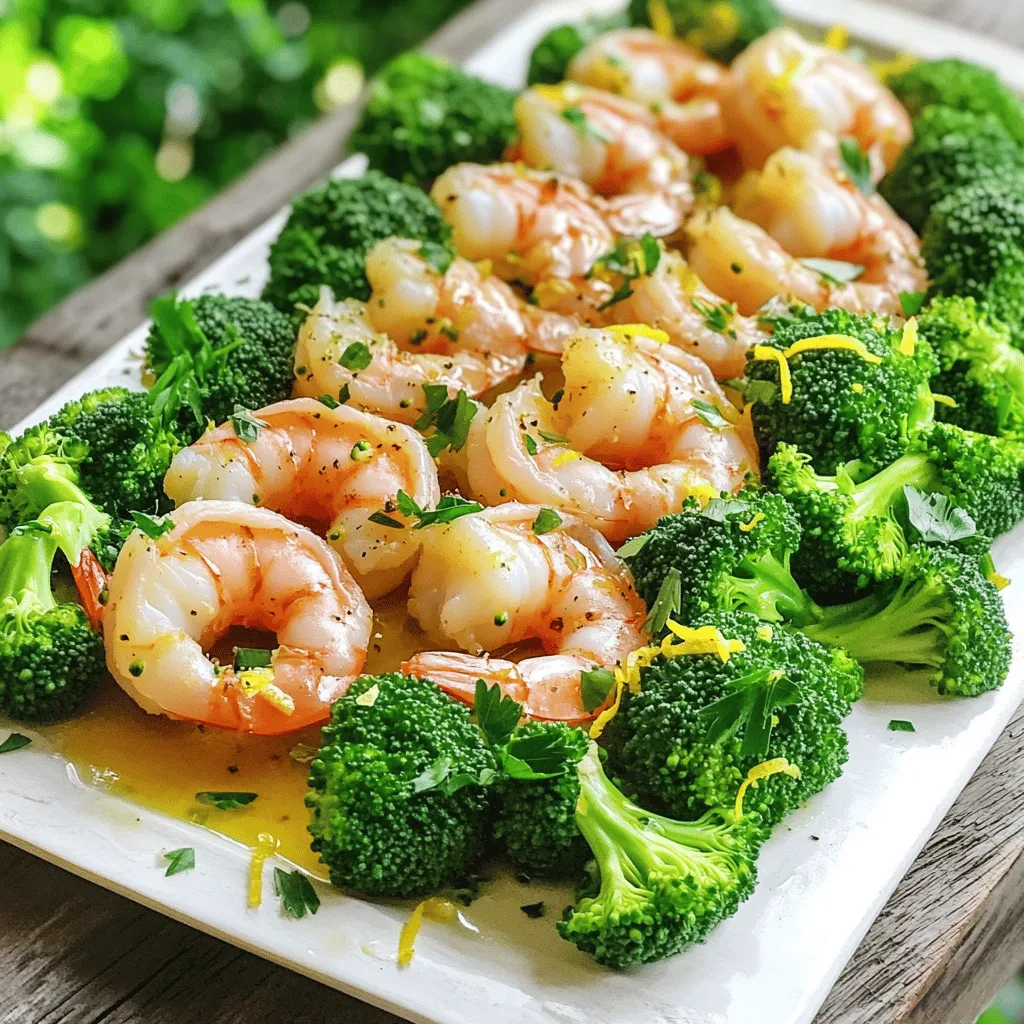
Ready for a quick, tasty dinner? My Sheet Pan Lemon Pepper Shrimp Broccoli Delight is your go-to! It combines juicy shrimp and crisp broccoli, all seasoned with zesty lemon and …

Read more

Categories Dinner

Air Fryer Sweet Chili Chicken Wings Crispy Delight

September 12, 2025 by Chef Jamie
- 2 pounds chicken wings - 1/2 cup sweet chili sauce - 2 tablespoons soy sauce - 1 tablespoon garlic powder - 1 teaspoon smoked paprika - 1/2 teaspoon black pepper - 1/2 teaspoon salt - 1 tablespoon cornstarch - Fresh cilantro, chopped - Lime wedges - Patting the chicken wings dry: Start by using paper towels to pat the chicken wings dry. This removes extra moisture and helps them get crispy in the air fryer. - Marinate in sweet chili and soy sauce mixture: In a large bowl, mix sweet chili sauce, soy sauce, garlic powder, smoked paprika, black pepper, and salt. Add the dried wings to this mix. Make sure they are well coated. Cover the bowl and let it sit for at least 30 minutes. For even more flavor, let it marinate for up to 2 hours in the fridge. - Coating wings with cornstarch: After marinating, sprinkle cornstarch over the wings. Toss them to coat evenly. This helps create a crunchy texture when cooked. - Preheating air fryer to the right temperature: Set your air fryer to 400°F (200°C) and let it preheat. This step ensures the wings cook evenly. - Cooking time and flipping for even crispiness: Place the wings in a single layer in the air fryer basket. Cook them for 25-30 minutes. Halfway through, flip the wings to make sure they get crispy on all sides. Check that the internal temperature reaches 165°F (74°C) for safety. - Glazing the wings with extra sweet chili sauce: In the last 5 minutes of cooking, drizzle more sweet chili sauce over the wings. This gives them a sticky and flavorful glaze. - Serving with garnishes: Once cooked, take the wings out of the air fryer. Garnish them with chopped cilantro. Serve with lime wedges on the side for a fresh burst of flavor. To get crispy wings, start by drying them well. Moisture makes wings soggy. Use paper towels and pat them dry. This step is very important. Next, sprinkle cornstarch over the wings. Toss them to coat evenly. Cornstarch absorbs moisture and creates a crunchy crust. Marinating is key for tasty wings. I suggest marinating for at least 30 minutes. If you have time, let them sit for up to 2 hours. This longer time allows the flavors to sink in. You can boost the taste by adding lime juice or ginger to the marinade. Both add a zesty kick! Every air fryer is a bit different. If your model runs hot, check the wings early. You might need to adjust the cooking time. Cook in batches if you have a small air fryer. This ensures all wings cook evenly and get crispy. Don't crowd the basket; give them space to breathe! {{image_2}} You can change the flavor of your wings easily. For a spicy kick, add hot sauce to the marinade. Just mix it in with the sweet chili sauce. You will love the heat! For a fresh twist, use orange juice. This gives your wings a bright, citrus flavor. Just replace some of the sweet chili sauce with orange juice for a unique taste. If you don’t have an air fryer, you can bake the wings in the oven. Set your oven to 400°F (200°C). Spread the wings on a baking sheet and cook for 40-45 minutes. Flip them halfway for even crispiness. Grilling is another fun way to cook wings outdoors. Preheat your grill to medium-high heat and cook the wings for 25-30 minutes. Make sure to flip them to avoid burning. Not all sauces are created equal. If you need a gluten-free option, use gluten-free soy sauce. It works just as well in the marinade. You can also try other sauces. Teriyaki sauce or barbecue sauce can give your wings a different flavor. Just mix them in like you would with sweet chili sauce. To keep your air fryer sweet chili chicken wings fresh, cool them first. Let the wings sit at room temperature for no more than two hours. This helps keep bacteria away. Use airtight containers for storage. Glass or plastic containers work well. Make sure to label them with the date. This way, you know when to eat them. You can freeze chicken wings for future meals. After cooling, place the wings in freezer-safe bags. Remove as much air as possible to prevent freezer burn. Label the bags with the date. To thaw, put the wings in the fridge overnight. This keeps them safe and tasty. If you're in a hurry, you can use cold water. Just submerge the bag in cold water for about an hour. The best way to reheat wings is in the air fryer. Preheat it to 350°F (175°C). Place the wings in the basket and heat them for about 8-10 minutes. This keeps them crispy. If you don’t have an air fryer, you can use an oven. Set it to 350°F (175°C) and place the wings on a baking sheet. Heat them for 10-15 minutes. You can also use the microwave, but this may make the wings soft. Cook chicken wings in the air fryer for 25-30 minutes at 400°F (200°C). Flip the wings halfway through. This helps them cook evenly and get crispy. Make sure they reach an internal temperature of 165°F (74°C) before serving. Yes, you can use frozen chicken wings! Increase the cooking time to about 30-40 minutes. Cook them at the same temperature, 400°F (200°C). You should not need to thaw them first. Just be sure to check that they are fully cooked before serving. Sweet chili chicken wings pair well with many sides. Here are some great options: - Fresh vegetable sticks (like carrots and celery) - Creamy ranch or blue cheese dip - Crispy potato wedges - A side salad with tangy dressing - Steamed rice or quinoa These sides balance the sweet and spicy flavors of the wings. Enjoy them with lime wedges for an extra zing! You now have everything you need to make delicious sweet chili chicken wings. We discussed key ingredients, preparation steps, cooking methods, and helpful tips to achieve crispy perfection. You can also explore fun variations and proper storage for leftovers. Experiment with different flavors and cooking methods to find your favorite. Enjoy your tasty wings, and impress friends and family with your new skills!

Looking to make the perfect wings? My Air Fryer Sweet Chili Chicken Wings are a crispy delight! With just a few simple ingredients like chicken wings and sweet chili sauce, …

Read more

Categories Appetizers

Protein Cottage Cheese Chocolate Mousse Delight

September 12, 2025 by Chef Jamie
To make the Protein Cottage Cheese Chocolate Mousse, you will need some simple and tasty ingredients. Here’s a list to help you gather what you need: - 1 cup cottage cheese (low-fat or full-fat) - ¼ cup unsweetened cocoa powder - ¼ cup honey or maple syrup - 1 teaspoon vanilla extract - ½ cup Greek yogurt - 2 tablespoons almond milk (or any milk of choice) - A pinch of sea salt - Dark chocolate shavings or fresh berries for garnish Each ingredient plays a key role in this recipe. Cottage cheese gives the mousse its base and adds protein. Cocoa powder brings rich chocolate flavor. Honey or maple syrup adds sweetness without refined sugar. Greek yogurt helps make the mousse creamy and smooth. Almond milk keeps the mix light, while sea salt enhances all the flavors. You can choose between low-fat or full-fat cottage cheese based on your taste. The same goes for the sweetener. I often switch between honey and maple syrup, depending on what I have on hand. For the garnish, dark chocolate shavings add a nice touch. Fresh berries add color and a fruity flavor. Both options make the mousse look fancy and fun. With these ingredients, you can create a delicious and healthy dessert that everyone will love! 1. Combine ingredients in a blender or food processor Start by adding your cottage cheese, cocoa powder, honey or maple syrup, vanilla extract, Greek yogurt, almond milk, and a pinch of sea salt into the blender. This mix gives the mousse its rich and smooth base. 2. Blend until smooth and creamy Blend on high for about 2-3 minutes. Stop every so often to scrape down the sides. This helps everything mix evenly. You want a nice, creamy texture. 3. Adjust sweetness if needed Taste your mousse. If it needs more sweetness, add a bit more honey or maple syrup. Blend again briefly to mix in the extra sweetness. It’s all about your taste! 4. Transfer to serving dishes Once it's smooth, scoop the mousse into individual dishes or cups. This makes it easy to serve later, and it looks great too! 5. Refrigerate for texture enhancement Cover the dishes with plastic wrap or lids. Place them in the fridge for at least 30 minutes. This helps the mousse set and lets the flavors blend better. You’ll love how cool and creamy it gets! - Choosing the right cottage cheese Use low-fat or full-fat cottage cheese based on your taste. Low-fat gives a lighter texture, while full-fat adds richness. I prefer full-fat for a creamier mousse. - Alternate sweeteners for variations Honey and maple syrup work well. You can also try agave or stevia for a lower-calorie option. Each sweetener changes the flavor a bit, so pick what you love. - How to achieve the perfect consistency Blend the mixture until it is smooth and creamy. If it feels too thick, add a splash of almond milk. This simple trick makes the mousse silkier. - Creative presentation ideas Serve the mousse in small cups or jars. Add a sprig of mint on top for color. You can also layer the mousse with berries for a beautiful look. - Accompaniments to serve with mousse Pair it with fresh fruit, like strawberries or raspberries. A handful of nuts can add a nice crunch. You can also serve it with cookies for a fun treat. {{image_2}} You can easily change this mousse by swapping out ingredients. Here are some great ideas: - Alternative protein sources: Instead of cottage cheese, try silken tofu. It gives a smooth texture and works well. - Dairy-free options: Use plant-based yogurt or nut milk. Almond milk or coconut milk are both tasty choices. - Flavor variations: Want a different taste? Add a bit of espresso for a coffee kick. You can also try spices like cinnamon or nutmeg for a warm flavor. Making this mousse fit your diet is easy. Here are some options: - Vegan mousse: Use silken tofu and maple syrup. This keeps it creamy and sweet without any animal products. - Gluten-free mousse: All the ingredients in this recipe are gluten-free. So, you can enjoy it without worry. Feel free to mix and match these ideas. You can create a mousse that fits your taste and diet. Enjoy experimenting! To store unused mousse, first cover it tightly. You can use plastic wrap or a lid. This keeps the mousse fresh and prevents it from absorbing other flavors in the fridge. The mousse lasts about 3 to 5 days in the fridge. For longer storage, you can freeze it. Just scoop the mousse into airtight containers. Be sure to leave space for expansion. The mousse can stay in the freezer for up to 2 months. When you take the mousse out of the fridge, it may seem a bit firm. To revive the mousse texture, let it sit at room temperature for about 10 minutes. Then, stir gently with a spatula or spoon. This helps it become creamy again. If it feels too thick, you can mix in a splash of almond milk. This will help restore its smoothness. Enjoy your mousse as if it was freshly made! Can I use flavored cottage cheese? Yes, you can use flavored cottage cheese. It adds a twist to the mousse. Try vanilla or strawberry for a fun flavor. Just keep in mind that it might change the sweetness and chocolate balance. How can I make this mousse dairy-free? To make the mousse dairy-free, swap cottage cheese for silken tofu. Use coconut yogurt instead of Greek yogurt. Choose almond milk or any plant-based milk. This keeps the creaminess and flavor while being dairy-free. Is it possible to use a sugar substitute? Yes, sugar substitutes work well. You can use stevia, erythritol, or monk fruit sweetener. Adjust the amount based on the product's sweetness. Taste the mousse and adjust as needed for the best flavor. What can I use as a garnish besides berries or chocolate? You have many options for garnish! Try crushed nuts for crunch, shredded coconut for flavor, or a drizzle of nut butter for richness. A sprig of mint adds a fresh touch too. Get creative with your garnishes! This mousse recipe is simple and fun to make. You learned about key ingredients, step-by-step instructions, and helpful tips. You can even explore flavor variations to fit your taste. Remember to store any leftovers properly to enjoy later. With these ideas, you can impress friends and family with a tasty treat. Don't be afraid to experiment and make this mousse your own. I hope you enjoy making and sharing it!

Are you ready to indulge in a healthy dessert that won’t ruin your diet? This Protein Cottage Cheese Chocolate Mousse is simple, creamy, and packed with protein. I’ll guide you …

Read more

Categories Desserts

One-Pot Creamy White Chicken Chili Flavorful Dinner

September 11, 2025 by Chef Jamie
- 1 pound boneless, skinless chicken breasts, diced - 1 can (15 oz) white beans, drained and rinsed - 1 can (10 oz) diced green chilies - 1 medium onion, chopped - 3 cloves garlic, minced - 1 teaspoon ground cumin - 1 teaspoon chili powder - ½ teaspoon smoked paprika - 4 cups chicken broth - 1 cup heavy cream - 1 cup corn kernels - Salt and pepper to taste - 2 tablespoons olive oil - Optional toppings: chopped cilantro, avocado slices, lime wedges, shredded cheese The key to a great One-Pot Creamy White Chicken Chili lies in its ingredients. Start with chicken, the star of this dish. It adds protein and richness. I prefer boneless, skinless chicken breasts for their mild flavor and quick cooking time. Next, add white beans like cannellini or great northern. They bring creaminess and help thicken the chili. Diced green chilies add a mild kick and depth. Don't forget the onion and garlic; they build a flavorful base. Spices are essential. Ground cumin and chili powder offer warm notes. A hint of smoked paprika gives a subtle smoky flavor. For the broth, use chicken broth for a rich taste, and then stir in heavy cream for that creamy texture. Finally, include corn for sweetness and added texture. To finish off, consider optional toppings. Chopped cilantro adds freshness. Avocado slices bring creaminess, while a squeeze of lime juice adds brightness. A sprinkle of shredded cheese ties it all together. These ingredients work in harmony to create a comforting and delicious meal. 1. Start by heating olive oil in a large pot over medium heat. 2. Add the chopped onion. Sauté it for about 3-4 minutes. Wait until it turns translucent. 3. Next, stir in the minced garlic. Cook for an additional minute until you smell its aroma. 4. Now, add your diced chicken breasts to the pot. Cook them until they are no longer pink, which takes about 5-7 minutes. 5. Sprinkle in ground cumin, chili powder, and smoked paprika. Stir well to coat the chicken in spices. 6. Pour in the chicken broth and bring the mixture to a boil. 7. Once it boils, reduce the heat to low. Add the white beans, diced green chilies, and corn. 8. Let it simmer for about 15-20 minutes. This allows the flavors to meld together. 1. Stir in the heavy cream and let it simmer for an additional 5 minutes. 2. Season with salt and pepper to taste. 3. Remove from heat and check the seasoning. Adjust if needed. By following these steps, you will create a creamy, rich chili that warms the soul. Enjoy it with your favorite toppings! To ensure your chicken is thoroughly cooked, use a meat thermometer. Chicken should reach 165°F (75°C) for safety. When you add the chicken to the pot, cook it until it turns white and no longer pink. This usually takes about 5 to 7 minutes. Seasoning is key in this dish. Start with the spices: ground cumin, chili powder, and smoked paprika. These add depth and warmth to your chili. Taste as you go. Adjust with salt and pepper to make the flavors pop. For an ideal presentation, serve the chili in bowls. Garnish with chopped cilantro and avocado slices on top. A squeeze of lime adds brightness to each bite. Don’t forget to sprinkle shredded cheese for a creamy touch. Pair your chili with tortilla chips for a crunchy contrast. They also make a great dip! If you want more heat, try adding sliced jalapeños or a dash of hot sauce as optional toppings. These little extras can elevate your meal and make it even more fun. {{image_2}} You can easily make this dish vegetarian or vegan. Replace the chicken with diced tofu or tempeh. Use vegetable broth instead of chicken broth. This gives you the same creamy texture without meat. Try different beans for a fun twist. Black beans, pinto beans, or kidney beans all work well. They add unique flavors and textures. You can mix and match your favorite beans to keep it interesting! Spices are key to making this chili stand out. Add a pinch of cayenne pepper for heat. You can also try adding oregano or coriander for more depth. Experiment with your favorite spices to find what you love. You can boost the veggie count, too. Chopped bell peppers or zucchini add color and nutrition. Toss in some spinach or kale for extra greens. These additions make your chili even heartier and more satisfying. If you like it spicy, add jalapeños or serrano peppers. You can either chop them and cook with the onions, or add them fresh as a topping. Adjust the heat level to your taste. To keep your One-Pot Creamy White Chicken Chili fresh, let it cool first. Once cooled, scoop it into an airtight container. Seal it well to avoid spills. You can refrigerate the chili for up to four days. If you want to save it longer, freeze it. Use freezer-safe bags or containers. Leave some space for expansion as it freezes. When you’re ready to eat, thaw frozen chili in the fridge overnight. To reheat, pour the chili into a pot on the stove. Heat it over medium until warm. Stir it often to avoid sticking. You can also use a microwave. Place it in a bowl and cover it. Heat in short bursts, stirring in between, until hot. Refrigerated One-Pot Creamy White Chicken Chili lasts for about four days. If you freeze it, it can keep for up to three months. For the best taste, eat it within two months. Always check for off smells or changes in color before eating. Can I use frozen chicken in this recipe? Yes, you can use frozen chicken. Just make sure to cook it a bit longer. Start by adding the frozen chicken straight to the pot. Cook until it reaches an internal temperature of 165°F. This method works well, and it saves time! How can I thicken my chili? To thicken your chili, you have a few options. You can add more beans or use a potato masher to break some beans down. Another option is to let it simmer longer. The liquid will reduce, making the chili thicker. You can also use a cornstarch slurry. Mix 1 tablespoon of cornstarch with 2 tablespoons of cold water, then stir it in. What can I serve with white chicken chili? White chicken chili pairs well with many sides. Consider serving it with tortilla chips for a crunchy contrast. You can also serve it with cornbread or a fresh salad. Add some toppings like chopped cilantro, avocado, or cheese for extra flavor. These options will make your meal even more enjoyable! This blog post covered the simple steps to make a creamy white chicken chili. We explored key ingredients like chicken and spices, plus tips for cooking and serving. Remember to customize your dish with your favorite toppings or spice level. Making this chili is easy and fun. You can adjust it to fit your taste. Enjoy cooking and sharing this dish with others. Your next meal can be warm and delicious!

Looking for a comforting, easy dinner? Try my One-Pot Creamy White Chicken Chili! This simple recipe brings together tender chicken, creamy beans, and zesty spices in one pot. Whether you’re …

Read more

Categories Dinner

No-Bake Pumpkin Pie Cheesecake Bars Easy and Delicious

September 11, 2025 by Chef Jamie
To make these bars, you need simple ingredients. Here’s what you will need: - 1 1/2 cups graham cracker crumbs - 1/4 cup granulated sugar - 1/2 cup unsalted butter, melted - 16 oz cream cheese, softened - 3/4 cup powdered sugar - 1 teaspoon vanilla extract - 1 cup canned pumpkin puree - 1 teaspoon ground cinnamon - 1/2 teaspoon ground nutmeg - 1/4 teaspoon ground ginger - 1/4 teaspoon salt - 1 cup whipped cream (for topping) - Additional ground cinnamon for garnish These ingredients work together to create a smooth and creamy dessert. The pumpkin and spices give it that classic fall flavor. While the main ingredients shine, you can add some optional ones for a twist: - A splash of maple syrup for sweetness - Chopped nuts like pecans or walnuts for crunch - A dash of vanilla bean paste for a richer flavor These extras can elevate your bars and make them even more delicious. Before you start, gather these tools: - A 9x9 inch baking pan - Medium and large mixing bowls - Electric mixer or whisk - Spatula for spreading - Plastic wrap or aluminum foil for chilling Having the right tools makes the process smooth. This way, you can focus on creating these tasty bars without stress. Start by gathering your ingredients. Grab 1 1/2 cups of graham cracker crumbs, 1/4 cup of granulated sugar, and 1/2 cup of melted unsalted butter. In a medium bowl, mix the graham cracker crumbs and sugar together. Pour the melted butter in and stir until it looks like wet sand. Once mixed, press it firmly into the bottom of a 9x9 inch baking pan. This forms a nice, even crust for your bars. Next, you’ll make the creamy filling. Take 16 oz of softened cream cheese and place it in a large mixing bowl. Use an electric mixer to beat the cream cheese until it’s smooth. Gradually add 3/4 cup of powdered sugar and 1 teaspoon of vanilla extract. Mix until the filling is creamy and fully combined. This step is key for a rich texture. Now, it’s time to add the star ingredient: pumpkin! Stir in 1 cup of canned pumpkin puree. Then add 1 teaspoon of ground cinnamon, 1/2 teaspoon of ground nutmeg, 1/4 teaspoon of ground ginger, and 1/4 teaspoon of salt. Mix everything together until it’s well blended and smooth. The spices will give your cheesecake bars that warm, fall flavor. Pour the pumpkin cheesecake filling over the graham cracker crust. Use a spatula to spread it evenly across the crust. Make sure the top is smooth so each bar looks nice when you cut it. This is where your delicious bars start to take shape! Cover the pan with plastic wrap or aluminum foil. Place it in the fridge for at least 4 hours. This allows the cheesecake to firm up so you can slice it easily. It’s a good time to clean your kitchen and maybe plan your next meal! Once the bars are set, lift them out of the pan using the edges of the foil or parchment paper. Cut them into squares or rectangles. For a tasty finish, top each bar with a spoonful of whipped cream and a sprinkle of ground cinnamon. This adds a nice touch and makes them look even more inviting! To get the best crust, use fresh graham cracker crumbs. I like to crush them finely. Mix them with granulated sugar for a sweet touch. Next, add melted butter to the mixture. It should feel like wet sand. Press this mix firmly into the bottom of your pan. Make sure it is even and packed tight. This helps the crust hold its shape when sliced. Start with softened cream cheese. It blends better and creates a smooth texture. Use an electric mixer to beat it until creamy. Gradually add powdered sugar and vanilla extract. This step adds sweetness without lumps. Stir in the pumpkin puree and spices next. Mix until everything is well combined. The key is to keep mixing until it looks smooth. Presentation makes a big difference. Top each bar with a spoonful of whipped cream. This adds a light and fluffy touch. For extra flair, sprinkle ground cinnamon on top. It gives a nice pop of color and flavor. You can also add a few pecans or walnuts for crunch. These simple touches make your bars look fancy and inviting. {{image_2}} You can change the flavors of your cheesecake bars easily. Use crushed cookies instead of graham crackers for a new base. Try Oreo or gingersnap cookies for a fun twist. If you want a dairy-free option, swap cream cheese with a plant-based cream cheese. This keeps it creamy while fitting different diets. You can also use maple syrup instead of granulated sugar for a richer taste. Toppings can really change your bars. Whipped cream is great, but you can go beyond that. Try adding caramel sauce for a sweet touch. You might also sprinkle chopped nuts for crunch or drizzle chocolate sauce for richness. Fresh fruit like pomegranate seeds or pears can add color and flavor too. These toppings make each bite special and unique. These bars fit every season with some easy swaps. In fall, serve them with spiced apple slices. In winter, add a touch of peppermint extract to the filling. For spring, try a light berry topping for freshness. In summer, serve with a scoop of ice cream to keep it cool. Each season brings new ways to enjoy these no-bake pumpkin pie cheesecake bars, keeping them exciting all year round. To keep your No-Bake Pumpkin Pie Cheesecake Bars fresh, place them in an airtight container. If you don’t have one, wrap them tightly in plastic wrap. Store them in the fridge for up to five days. Make sure the bars are cool before sealing them. This helps keep them firm and tasty. If you want to save the bars for later, you can freeze them. Cut the bars into squares first. Then, wrap each piece in plastic wrap. Place the wrapped bars in a freezer-safe bag or container. They can last up to three months in the freezer. When you are ready to eat them, just let them thaw in the fridge overnight. These cheesecake bars are best served cold, so reheating is not necessary. However, if you prefer a warm treat, you can place a bar on a plate and microwave it for about 10-15 seconds. Be careful not to overheat. Enjoy it while it’s warm, but remember, the texture will be different. Yes, you can use fresh pumpkin. Just cook and puree it first. Make sure it is smooth and not too watery. Canned pumpkin is often easier, but fresh can taste great too! These bars last for about 5 days in the fridge. Keep them covered to avoid drying out. The flavors may get better as they sit! Yes, you can make these bars a day or two ahead. They need time to chill and set. Just make sure to cover them well in the fridge. You can use Greek yogurt or a vegan cream cheese. These swaps change the taste a bit, but they still work well. Just pick one that you enjoy! The bars are not gluten-free because of the graham crackers. However, you can use gluten-free graham cracker crumbs. This way, everyone can enjoy the treat! You can reduce or omit the sugar. Use a sugar substitute if you want sweetness. Just keep in mind that it may change the texture a little. Adjust to your taste! You can create delicious no-bake pumpkin pie cheesecake bars with simple steps. We explored key ingredients, tools, and helpful tips for the perfect dessert. Don’t forget the variations and storage info for best results. These bars are easy to make and offer room for creativity. Enjoy making them with family and friends! You’ll impress everyone with your tasty creation.

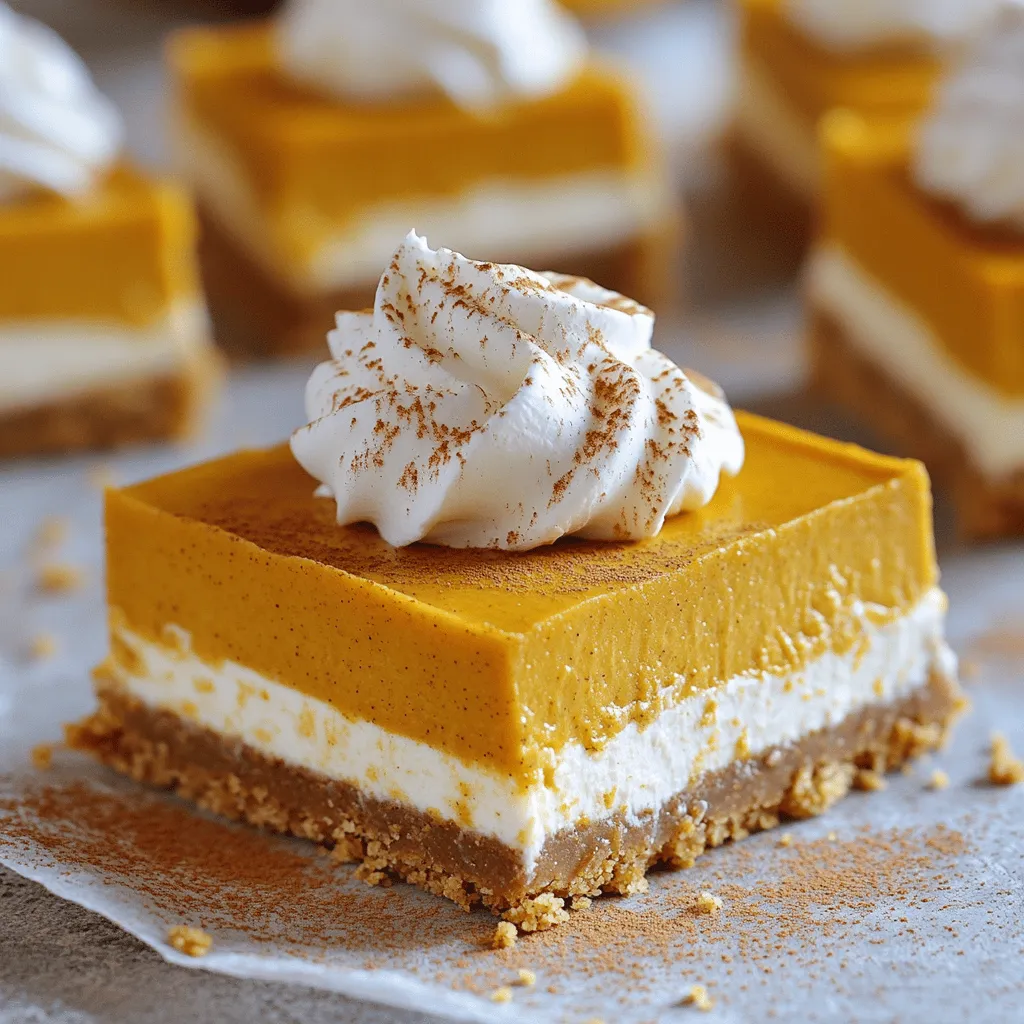
Looking for a quick and tasty dessert? I’ve got the perfect treat for you: No-Bake Pumpkin Pie Cheesecake Bars. These bars combine creamy cheesecake and pumpkin spice, all without turning …

Read more

Categories Desserts

Creamy Lemon Dill Salmon Orzo Tasty Dinner Idea

September 11, 2025 by Chef Jamie
- 2 salmon fillets (4-6 oz each) - 1 cup orzo pasta - 2 tablespoons olive oil - 3 cloves garlic, minced - 1 cup vegetable or chicken broth - 1 cup heavy cream - Juice and zest of 1 lemon - 2 tablespoons fresh dill, chopped - Salt and pepper to taste - Spinach (optional, for extra greenery) - Lemon wedges (for serving) Gathering your ingredients is the first step to making creamy lemon dill salmon orzo. I love to use fresh salmon fillets for their rich flavor. The orzo pasta adds a nice texture. Olive oil gives a great base for cooking, while garlic adds that delicious aroma. I recommend using either vegetable or chicken broth. This adds depth to the sauce. Heavy cream makes everything rich and smooth. The lemon juice and zest bring brightness to the dish. Fresh dill adds a lovely herbal note. Don’t forget your seasoning: salt and pepper can elevate all these flavors. If you want a pop of color, consider adding spinach. It wilts nicely and adds nutrients. Lastly, serve with lemon wedges for an extra squeeze of citrus at the end. Make sure to have everything ready before you start cooking. This will keep your prep smooth and quick. Enjoy the process! - Start by boiling a pot of water. Add a generous pinch of salt. - Once the water is boiling, add 1 cup of orzo pasta. - Cook for about 8-10 minutes until the orzo is al dente. - Drain the orzo in a colander and set it aside. - Heat a large skillet over medium heat. Add 2 tablespoons of olive oil. - Season both sides of 2 salmon fillets with salt and pepper. - When the oil is hot, place the salmon skin-side down in the skillet. - Cook for 4-5 minutes on each side. The salmon should flake easily when done. - Remove the salmon from the skillet and set it aside. - In the same skillet, lower the heat to medium-low. Add 3 cloves of minced garlic. - Sauté the garlic for about 1 minute. It should smell fragrant but not brown. - Pour in 1 cup of vegetable or chicken broth. Bring it to a gentle simmer. - Stir in 1 cup of heavy cream, along with the juice and zest of 1 lemon. - Add 2 tablespoons of chopped fresh dill to the sauce. Let it simmer for 3-4 minutes until slightly thickened. - Taste the sauce and adjust with salt and pepper as needed. - Add the drained orzo to the sauce. You can also stir in spinach if you like. - Gently fold in the flaked salmon pieces. Be careful not to break them too much. - Once everything is heated through, serve the orzo on plates. - Drizzle with extra sauce and garnish with lemon wedges and more dill for freshness. To get the best texture from your salmon, use fresh fillets. I recommend cooking with the skin on. This helps keep the fish moist. Start by heating the oil in your skillet. Cook the salmon skin-side down first. This gives a nice crust and keeps the fish together. After about four to five minutes, flip it. Cook until it’s flaky but not dry. If you want to remove the skin, slide a spatula between the skin and the fish. It should come off easily. The sauce should be rich but not too thick. If it’s too thick, add a splash more cream or broth. Stir well and taste. You can always add more lemon juice or zest for brightness. Fresh dill adds a nice touch too. If you want extra flavor, try adding a pinch of garlic powder or a dash of white wine. These can boost the taste without making it too heavy. For side dishes, think light and fresh. A simple green salad pairs well with this meal. You can also serve it with steamed asparagus or roasted broccoli. To make your dish pop, garnish with more fresh dill and lemon wedges. This will make your plate look bright and inviting. A sprinkle of cracked pepper adds a nice finish. Enjoy your meal, knowing you made something truly special! {{image_2}} If you want to switch things up, consider these easy swaps: - Alternative fish options: Try using trout or halibut instead of salmon. Both fish have a nice texture and flavor. - Gluten-free orzo alternatives: You can use rice or quinoa for a gluten-free meal. They cook similarly and still pair well with the sauce. You can tweak the flavors to match your taste: - Other herb options besides dill: Fresh parsley or basil can add a new twist. They bring a bright taste that works well with lemon. - Citrus variations: Lime or orange juice can replace lemon juice. Each adds a unique flavor profile to your dish. Boost the nutrition of this dish with some extra ingredients: - Vegetable options for added health: Spinach is a great choice, but you can also add peas or broccoli. They add color and nutrients. - Protein enhancements: Add cooked shrimp or chickpeas for more protein. This makes the dish heartier and more filling. After you enjoy your creamy lemon dill salmon orzo, you might have some left. To store it, let it cool down first. Place the leftovers in an airtight container. This helps keep the flavors fresh. You can refrigerate it for up to three days. If you want it to last longer, you can freeze it. Just remember that freezing may change the texture a bit. When it’s time to heat up your leftovers, you want to keep them tasty. The best way to reheat orzo is on the stove. Add a splash of broth or water to keep it moist. Stir it gently over low heat. This helps avoid that soggy feeling. You can also use the microwave. Heat in short bursts, checking often. Stir between sessions to help with even heating. Enjoy your meal as if it was fresh! To check if salmon is cooked, look for flakiness. When you poke it with a fork, it should easily break apart. The salmon should also reach an internal temperature of 145°F. If it is opaque and firm, it is done. This ensures it is safe to eat and still juicy. Yes, you can use frozen salmon. Thaw it overnight in the fridge for best results. If you need it quick, place it in a sealed bag and submerge it in cold water for about 30 minutes. Cook it as you would fresh salmon. Just add a few extra minutes to the cooking time. If you need a substitute for heavy cream, try using half-and-half or whole milk. For a dairy-free option, use coconut milk or cashew cream. These alternatives keep the dish creamy and still delicious. Adjust the amount to find the right texture for your sauce. You can prep this dish ahead of time. Cook the orzo and store it in a sealed container in the fridge. Sear the salmon and make the sauce, then cool them before storing. When you’re ready to serve, just reheat everything together and combine it. Yes, you can freeze the orzo dish. First, let it cool completely. Then, place it in an airtight container. It can last for up to three months in the freezer. To enjoy later, thaw it overnight in the fridge and reheat gently on the stove. This blog post breaks down how to make creamy lemon dill salmon orzo. You learned about the necessary ingredients, step-by-step cooking instructions, and tips for perfect salmon. We explored fun variations and how to store leftovers effectively. In making this dish, you can adjust flavors or try different ingredients. The key is to enjoy the cooking process and share the dish with others. With practice, it can become a favorite meal for you and your loved ones.

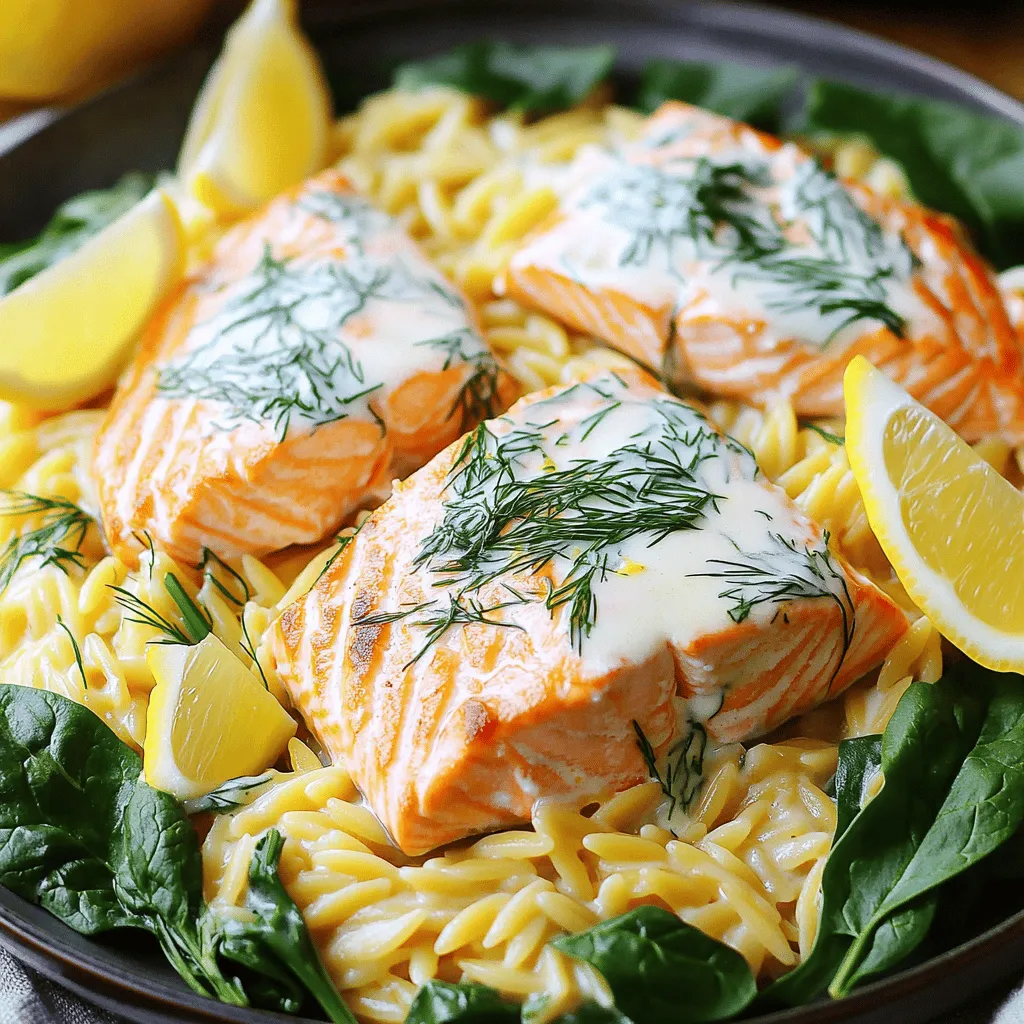
Looking for a delicious and easy dinner idea? Try my Creamy Lemon Dill Salmon Orzo! This dish brings together flaky salmon, tender orzo, and a rich, zesty sauce. It’s quick …

Read more

Categories Dinner

Air Fryer Garlic Parmesan Brussels Sprouts Delight

September 11, 2025 by Chef Jamie
- 1 lb Brussels sprouts, trimmed and halved - 3 tablespoons olive oil - 4 cloves garlic, minced - 1/2 cup grated Parmesan cheese - 1 teaspoon dried Italian herbs - Salt and pepper to taste - Fresh parsley, chopped for garnish Gather these simple ingredients for a delicious dish. First, choose fresh Brussels sprouts. They should be firm and bright green. Trim the ends and slice them in half. This helps them cook evenly. Next, grab your olive oil. It adds flavor and helps the sprouts crisp up. The garlic gives a strong and tasty kick. Mince it well so it spreads flavor throughout. Parmesan cheese adds a salty and creamy taste. The dried Italian herbs bring an extra layer of flavor. Use a mix of oregano, thyme, and basil for the best results. Salt and pepper will enhance all the flavors. Finally, fresh parsley adds a pop of color. Chop it finely for the best look. With these ingredients, you are ready to make a tasty batch of air fryer garlic Parmesan Brussels sprouts. - Preheat air fryer to 375°F (190°C). - Toss Brussels sprouts with olive oil in a bowl. To start, you need to preheat your air fryer. Set it to 375°F (190°C) and wait about 5 minutes. This step helps cook the sprouts evenly. While it heats, take 1 pound of Brussels sprouts. Trim the ends and slice them in half. In a large bowl, add these sprouts. Pour in 3 tablespoons of olive oil. Use your hands or a spoon to toss them. Make sure each sprout gets a nice coat of oil. This helps them crisp up nicely. - Add garlic and herbs to Brussels sprouts. - Incorporate Parmesan cheese gently. Now, let’s add flavor! Mince 4 cloves of garlic and toss them into the bowl with the sprouts. Next, sprinkle in 1 teaspoon of dried Italian herbs. You can use a mix of oregano, thyme, and basil. Add salt and pepper to taste. Mix everything well so the garlic and herbs spread evenly among the sprouts. For that cheesy goodness, add 1/2 cup of grated Parmesan cheese. Gently fold it in. You want the cheese to coat the sprouts without crushing them. - Arrange Brussels sprouts in air fryer basket. - Air fry for 15-18 minutes, shaking halfway through. Time to cook! Place the seasoned Brussels sprouts in the air fryer basket. Make sure they fit in a single layer. If your basket is small, you may need to cook in batches. Set the timer for 15-18 minutes. Halfway through, give the basket a good shake. This helps them cook evenly and get that perfect crisp. When they turn golden brown, they are ready to enjoy! To get the best texture, coat the Brussels sprouts evenly. Start by mixing them with olive oil in a bowl. Make sure every sprout gets a nice layer of oil. This helps them cook well in the air fryer. Next, add garlic and seasonings. Stir well so that the flavors blend. If you want them crispier, adjust the cooking time. Cook for 15-18 minutes. Shake the basket halfway through. This keeps them from sticking and helps them turn golden brown. These Brussels sprouts pair well with many dishes. Serve them alongside roasted chicken or grilled fish. They add a nice crunch and flavor. You can also use them as a side for pasta. For sauces, try a creamy ranch or a zesty lemon vinaigrette. These sauces enhance the taste without overpowering it. You might also enjoy them with a spicy aioli for a kick. Enjoy these tasty Brussels sprouts however you like! {{image_2}} You can spice up your Brussels sprouts for a new twist. Adding chili flakes brings heat. Just a pinch can make a big difference. You can also try different cheeses. Grated Pecorino Romano or feta works great. Each cheese adds a unique taste. This keeps your dish fresh and exciting. If you follow a vegan diet, don't worry! You can still enjoy these sprouts. Use vegan cheese substitutes instead of Parmesan. Nutritional yeast is a popular choice. It gives a cheesy flavor without dairy. For gluten-free options, this recipe is naturally gluten-free. Just check your cheese labels to ensure they are gluten-free too. Enjoy your Brussels sprouts without worry! After cooking, let the Brussels sprouts cool down. Store them in an airtight container. Keep them in the fridge for up to three days. When reheating, use the air fryer for best results. Set your air fryer to 350°F (175°C). Reheat for about 5-7 minutes. This keeps the sprouts crispy and tasty. If you want to freeze the leftovers, start by letting them cool completely. Spread them in a single layer on a baking sheet. Freeze for about an hour. Once frozen, transfer the sprouts to a freezer-safe bag. Make sure to remove as much air as possible. You can keep them in the freezer for up to three months. When ready to eat, just reheat them in the air fryer. They’ll still be crispy and delicious! To keep Brussels sprouts crispy, make sure to coat them lightly in oil. Too much oil makes them soggy. Use a good air fryer that circulates hot air well. Ensure you cook them in a single layer. If they overlap, they will steam and lose their crispiness. Shake the basket halfway through cooking to help them brown evenly. Yes, you can use frozen Brussels sprouts, but there are some tips. First, thaw them in the fridge overnight. Pat them dry with a towel to remove excess moisture. This helps them crisp up better. You may need to add a few extra minutes to the cooking time. Always check for that lovely golden color. If you need a substitute for Parmesan cheese, try nutritional yeast for a vegan option. It gives a cheesy flavor without dairy. You can also use Pecorino Romano for a stronger taste. Grated cheddar works as well, but it melts differently and may not get as crispy. Choose based on your taste and dietary needs. This blog post walks through a simple and tasty method for making Brussels sprouts. We covered key ingredients, detailed cooking steps, and tips for storage and variations. You can easily adjust flavors and make it fit your diet. Remember, good food can be fun and healthy. Enjoy experimenting with these sprouts for a great side dish!

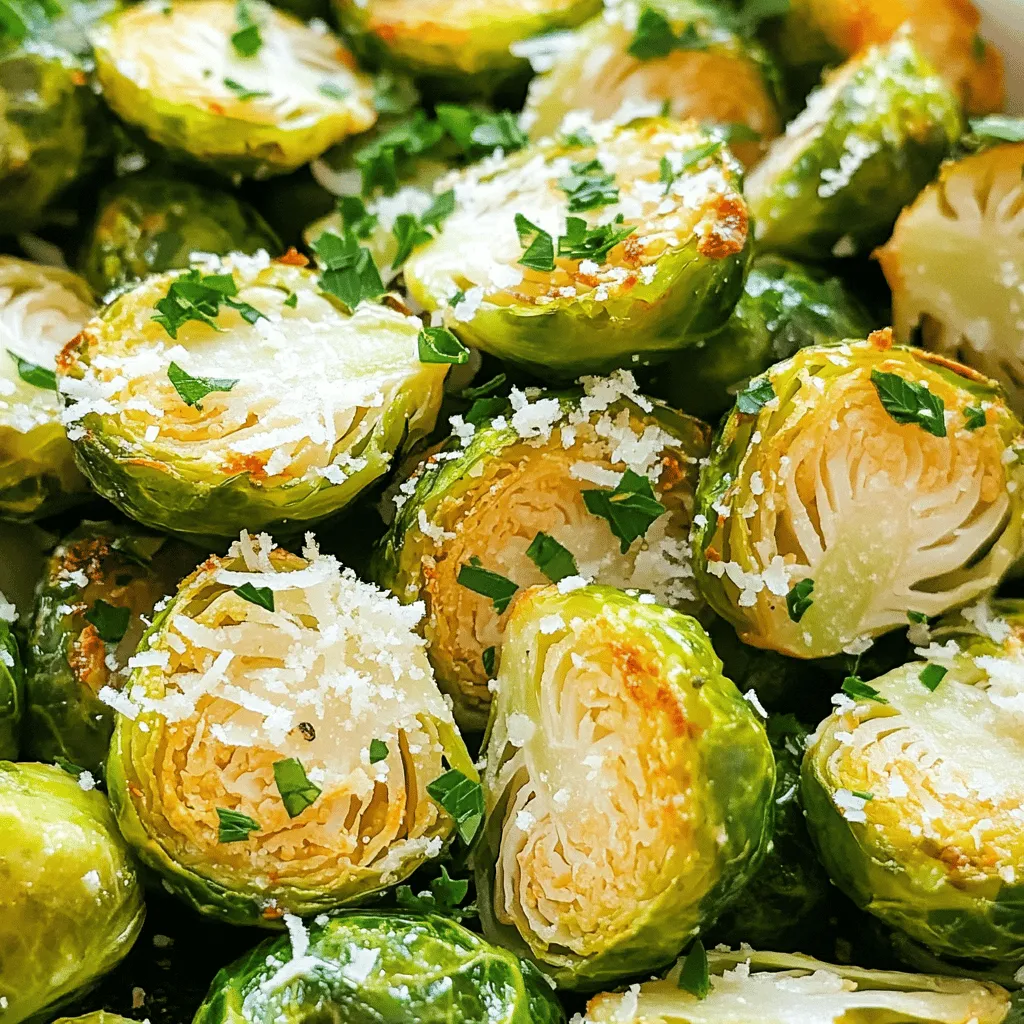
Are you ready to transform your Brussels sprouts into a crunchy, cheesy delight? With the air fryer, you can achieve perfectly crispy Garlic Parmesan Brussels Sprouts in no time. This …

Read more

Categories Appetizers

Caramel Pecan Cinnamon Roll Bake Irresistible Treat

September 11, 2025 by Chef Jamie
To make this delicious treat, gather these key ingredients: - 2 cans (12.4 oz each) refrigerated cinnamon rolls - 1 cup pecans, roughly chopped - 1/2 cup caramel sauce, plus extra for drizzling - 1/2 cup brown sugar - 1 teaspoon ground cinnamon - 4 tablespoons unsalted butter, melted - 3 large eggs - 1/2 cup milk - 1 teaspoon vanilla extract - Pinch of salt These ingredients create a rich and sweet experience. The cinnamon rolls serve as a soft base. The pecans add crunch and flavor, while the caramel brings sweetness. You can enhance your bake with a few extra toppings. Consider adding: - Whipped cream for a light, airy touch - Chopped apples for a fruity twist - A sprinkle of powdered sugar for a pretty finish - Chocolate chips for a sweet surprise These additions can elevate your dish. Feel free to mix and match based on your taste. If you need to swap ingredients, here are some ideas: - Use walnuts instead of pecans for a different nut flavor. - Swap brown sugar with white sugar for a lighter taste. - You can replace milk with almond milk for a dairy-free option. - Use maple syrup instead of caramel for a unique sweetness. These substitutions can keep the recipe flexible and fun. Adjust based on what you have at home. First, preheat your oven to 350°F (175°C). Grease a 9x13-inch baking dish with cooking spray or butter. This helps the bake not stick. Open the two cans of cinnamon rolls and set the icing aside for later. Cut each roll into quarters. This makes it easier to mix and bake evenly. In a large bowl, toss the chopped pecans, quartered cinnamon rolls, brown sugar, and ground cinnamon together. Mix until everything is well coated. This adds flavor to each bite. Spread half of the cinnamon roll mixture evenly in the prepared baking dish. Drizzle half of the caramel sauce on top. Then, add the rest of the cinnamon roll mixture and drizzle the remaining caramel sauce over it. In another bowl, whisk together the melted butter, eggs, milk, vanilla extract, and a pinch of salt. Pour this mixture evenly over the cinnamon roll bake. Using a knife, gently swirl through the mixture. This ensures the flavors mix well. Bake in the preheated oven for about 25-30 minutes. Look for a golden brown color to know it is done. Once out of the oven, allow it to cool for 5-10 minutes. Drizzle the reserved icing and extra caramel sauce on top before serving. Enjoy this tasty treat warm! To get the perfect texture in your Caramel Pecan Cinnamon Roll Bake, use fresh cinnamon rolls. Their dough should be soft and tender. Cut the cinnamon rolls into quarters for easy mixing. This helps each piece soak up the liquid better. Make sure to mix the eggs, milk, and butter well. This ensures even moisture throughout the bake. Swirl gently with a knife before baking. This helps the flavors blend without breaking the rolls too much. To save time, you can prepare this dish the night before. Cut the cinnamon rolls and mix them with the pecans, brown sugar, and cinnamon. Place this mixture in the baking dish and cover it. You can whisk the wet ingredients separately and store them in the fridge. In the morning, simply pour the wet mix over the cinnamon rolls and bake. This makes breakfast easy and fast! Serve the Caramel Pecan Cinnamon Roll Bake warm for the best taste. Drizzle extra caramel sauce on top right before serving. A dollop of whipped cream or a scoop of vanilla ice cream also makes it special. Pair it with fresh fruit, like berries or sliced bananas. This adds color and freshness to your plate. Coffee or hot tea works well as a drink choice. Enjoy this delightful dish with family and friends for a cozy meal! {{image_2}} You can change this recipe for different seasons. For fall, add pumpkin puree. Mix in half a cup of pumpkin for a warm flavor. You can also use pumpkin spice instead of ground cinnamon. For a fresh twist in spring, try adding apple slices. Sauté the apple slices with a bit of butter and brown sugar before mixing them in. This makes your bake taste like a warm apple pie! If you need a nut-free option, simply leave out the pecans. Instead, you can add more cinnamon rolls. You can also try using chocolate chips. They add a sweet twist without nuts. Just toss in half a cup of chocolate chips with the cinnamon rolls. This change still gives you that gooey, sweet delight! Want to make this recipe vegan? Swap the eggs with flax eggs. Mix one tablespoon of flaxseed meal with two and a half tablespoons of water. Let it sit for five minutes to thicken. You can also replace the milk with almond or oat milk. Use a vegan caramel sauce for drizzling. This way, you get the same delicious taste without any animal products! After enjoying your Caramel Pecan Cinnamon Roll Bake, store any leftovers in an airtight container. Keep them in the fridge for up to three days. Make sure to let the bake cool down before placing it in the container. This keeps it fresh and tasty. You can freeze the leftover bake for later. Cut it into pieces and wrap each piece in plastic wrap. Then, place the wrapped pieces in a freezer-safe bag. They can last in the freezer for up to two months. When you want to enjoy it again, simply thaw it in the fridge overnight. To reheat your Caramel Pecan Cinnamon Roll Bake, preheat your oven to 350°F (175°C). Place a piece on a baking sheet and cover it with foil. Heat for about 10-15 minutes until warm. You can also microwave individual pieces for about 30 seconds to 1 minute. Just don’t forget to add a drizzle of caramel sauce on top before serving! Yes, you can use homemade cinnamon rolls. They might taste even better! Just cut them into quarters like the refrigerated rolls. Be sure to adjust baking time if needed. Homemade rolls tend to be more fluffy and may need a bit longer to bake through. Check for a golden brown color on top. You can also insert a toothpick into the center. If it comes out clean, it's done! The bake should feel firm but soft. A slight jiggle is normal. This bake pairs well with fresh fruit, like berries or banana slices. A dollop of whipped cream or a scoop of vanilla ice cream adds a nice touch too. You could also serve it with coffee or a warm cup of tea. It will stay fresh in the fridge for about 3 to 4 days. Just cover it well to keep it moist. You can reheat it in the microwave for a quick treat. This post covered everything you need for a Caramel Pecan Cinnamon Roll Bake. We discussed required ingredients, optional toppings, and how to make swaps if needed. I shared step-by-step instructions for prep, layering, and baking. Plus, tips for texture, make-ahead options, and serving ideas were included. Variations like seasonal flavors and vegan options can help keep it fresh. Finally, I provided storage tips to ensure your leftovers stay tasty. Enjoy making this dish and experimenting with your own twists!

Are you ready for a warm, gooey delight that will brighten your mornings? My Caramel Pecan Cinnamon Roll Bake is the perfect treat for breakfast or brunch. Imagine fresh cinnamon …

Read more

Categories Desserts
Older posts
Newer posts
← Previous Page1 … Page31 Page32 Page33 … Page134 Next →

TOSSED RECIPES

Simple meals, bold taste. Quick recipes made for real life — always fresh, always delicious. 🌿🍴

PAGES

Home About Contact Privacy Policy Terms & Conditions Cookie Policy GDPR Policy Copyright Policy Disclaimer

CATEGORIES

Appetizers Desserts Salads Breakfast Dinner

Contact

  • Pinterest
  • Mail
Copyright © 2026 Tossed Recipes. All rights reserved.