Skip to content
Tossed Recipes
  • Home
  • Appetizers
  • Desserts
  • Salads
  • Breakfast
  • Dinner
  • Privacy Policy
  • Contact
  • About

Chef Jamie

Strawberry Shortcake Icebox Cake Easy and Delicious Recipe

August 28, 2025 by Chef Jamie
- 2 cups fresh strawberries, hulled and sliced - 1/4 cup sugar Fresh strawberries make this cake bright and sweet. Choose ripe, red berries for the best flavor. The sugar helps the strawberries release their juices, creating a tasty syrup. - 1 teaspoon vanilla extract - 1 cup heavy whipping cream - 1/2 cup powdered sugar - 1 package (14 oz) of store-bought shortcake cookies (or ladyfingers) Vanilla extract adds a warm flavor to both the cream and strawberries. Heavy whipping cream is essential for a rich, fluffy texture. Powdered sugar sweetens the cream without making it grainy. Store-bought shortcake cookies save you time and still taste great. - Fresh mint leaves for garnish Mint leaves add a pop of color and freshness. They make your dessert look pretty and give it a nice aroma. You can also drizzle extra strawberry juice on top for more flavor. First, I take 2 cups of fresh strawberries. I hull and slice them into thin pieces. Then, I place them in a medium bowl. I add 1/4 cup of sugar to the bowl. Next, I gently toss the strawberries with the sugar. This helps the strawberries release their sweet juice. I let them sit for about 15 to 20 minutes. This step makes the strawberries juicy and flavorful. In another bowl, I pour in 1 cup of heavy whipping cream. I grab my electric mixer and start whipping the cream. I whip until it begins to thicken. Then, I slowly add 1/2 cup of powdered sugar. I also include 1 teaspoon of vanilla extract for extra flavor. I continue to whip until soft peaks form. This whipped cream will be fluffy and perfect for the cake. Now, I take a long baking dish. I start with a layer of store-bought shortcake cookies. I slightly overlap them for a nice base. Next, I spoon a layer of the juicy strawberries over the cookies. I make sure to include some of the strawberry juice. Then, I spread a layer of whipped cream over the strawberries. I smooth it out gently with a spatula. I repeat this process until I use all the ingredients. I finish with a final layer of whipped cream on top. After that, I cover the dish with plastic wrap. I refrigerate it for at least 4 hours, or overnight. This allows the flavors to blend and the cookies to soften. To make the best whipped cream, start with cold tools. Use a cold bowl and beaters. This helps the cream whip faster. Pour 1 cup of heavy whipping cream into your bowl. Beat it until it thickens. Add 1/2 cup of powdered sugar and 1 teaspoon of vanilla extract. Keep beating until you see soft peaks. Do not over-whip, or it will turn grainy. This creamy texture is key for your cake. Using extracts can boost the flavor of your icebox cake. Besides vanilla, try almond or lemon extracts. Just add a few drops when you whip the cream. This small change can make a big difference. Taste as you go to find the perfect mix. Remember, the goal is to enhance, not to overpower the fresh strawberries. When ready to serve, slice the icebox cake into squares. Place each piece on a plate. Garnish with fresh mint leaves for color and a fresh taste. Drizzle some extra strawberry juice on top. This adds a nice touch and looks great. Serve it cold for a refreshing dessert. Your guests will love it! {{image_2}} You can switch out strawberries for other fruits. Fresh blueberries, raspberries, or peaches work great. Just slice them up like you do with strawberries. Use the same amount of fruit and sugar for the best taste. Each fruit brings a unique flavor, making it fun to try new combinations. For a gluten-free option, use gluten-free cookies. Many brands offer tasty choices. You can also make this icebox cake vegan. Use coconut cream instead of heavy cream. For the sweet taste, replace powdered sugar with a plant-based alternative. These swaps keep the cake yummy and suitable for everyone. You can add fun flavors to the whipped cream! Try adding a splash of almond extract or lemon zest. Both make the cream taste fresh and bright. For a chocolate twist, add cocoa powder to the cream. You can also mix in crushed cookies or nuts for added texture. These small changes keep your cake exciting every time you make it! To keep your Strawberry Shortcake Icebox Cake fresh, use a few simple steps. First, cover the dish tightly with plastic wrap. This helps keep moisture in and prevents the cake from absorbing other smells in the fridge. If you have leftovers, always remember to put them back in the fridge right after serving. Keeping the cake cold ensures it stays delicious and safe to eat. When stored properly, this cake lasts about 3 to 4 days in the fridge. The flavors blend well over time, making it even tastier. However, the cookies may get soggy after a few days. So, it's best to enjoy it while it's fresh. If the cake starts to smell off or look strange, it’s time to toss it out. You can freeze this cake if you want to enjoy it later. To freeze, cut the cake into slices. Wrap each slice in plastic wrap tightly. Then, put them in a freezer-safe bag or container. This way, they won’t stick together. The cake can last up to 2 months in the freezer. When you’re ready to eat, just thaw it in the fridge overnight. Enjoy your delicious treat! Yes, you can use frozen strawberries. Just let them thaw first. Drain any excess juice. This helps keep the cake from getting too soggy. The flavor will still be great. Fresh strawberries are best, but frozen work in a pinch. The cake should set for at least 4 hours. You can also let it sit overnight. This allows the flavors to mix well. The cookies will soften, making each bite creamy and delicious. Absolutely! You can make this dessert a day ahead. It keeps well in the fridge. Just cover it with plastic wrap. This way, you save time on the day you want to serve it. Plus, the flavors deepen over time, making it taste even better! This blog post covered all you need to know to make your own Strawberry Shortcake Icebox Cake. We talked about fresh ingredients, pantry staples, and optional extras. I shared step-by-step instructions for preparing the cake and tips for the perfect whipped cream. You learned how to store your cake and explored variations like gluten-free options. Now, with these details, you can create a delicious dessert that everyone will love. Experiment with flavors and truly make this dessert your own!

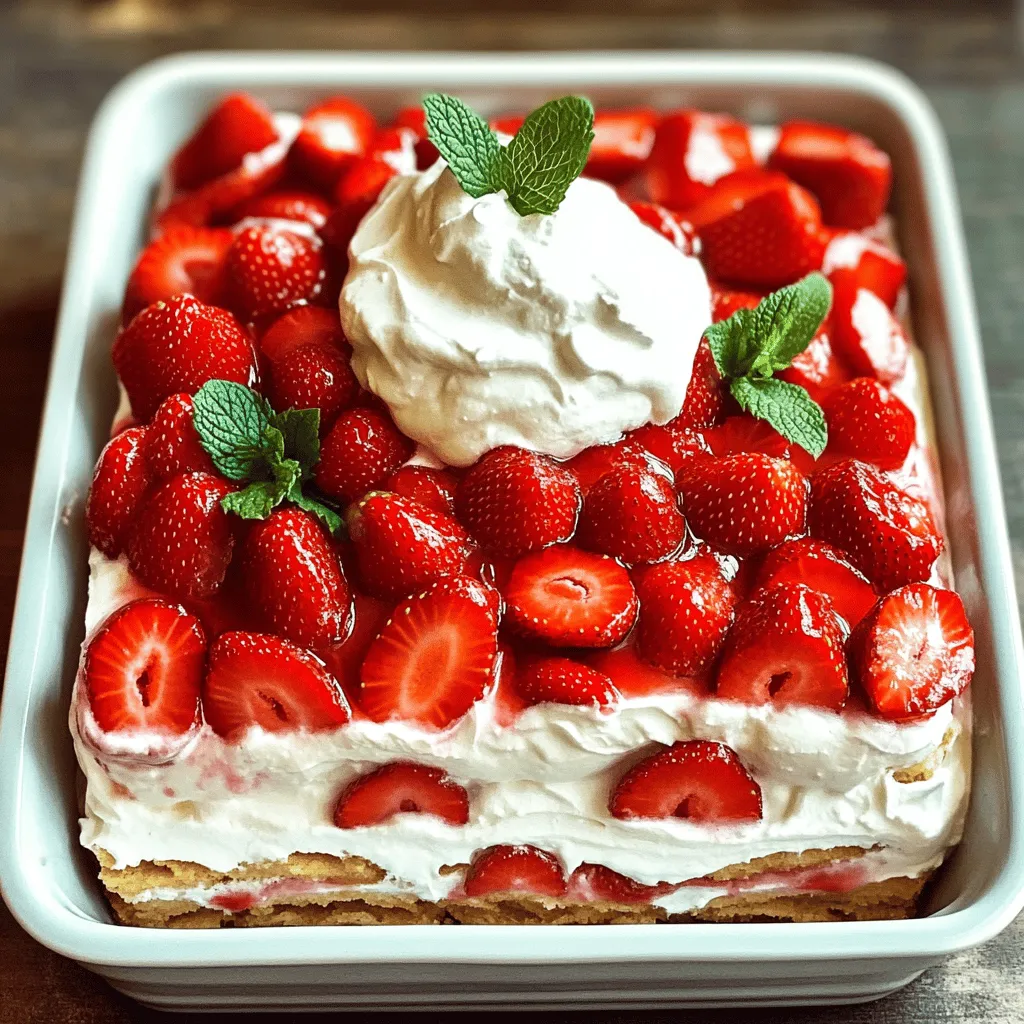
Are you craving a sweet treat that’s easy to make and perfect for warm days? Look no further! My Strawberry Shortcake Icebox Cake is the answer. With fresh strawberries, creamy …

Read more

Categories Desserts

Cozy Lasagna Soup Tasty and Simple Comfort Dish

August 28, 2025 by Chef Jamie
- 1 lb ground beef or Italian sausage - 1 medium onion, diced - 2 garlic cloves, minced - 1 can (28 oz) crushed tomatoes - 4 cups beef or vegetable broth - 2 cups uncooked pasta (like lasagna noodles broken into pieces or fusilli) - 1 teaspoon dried oregano - 1 teaspoon dried basil - 1/2 teaspoon red pepper flakes (optional) - Salt and pepper to taste - 1 cup ricotta cheese - 1 cup shredded mozzarella cheese - 1/2 cup grated Parmesan cheese - Fresh basil leaves for garnish When I make cozy lasagna soup, I gather these simple ingredients. First, I choose my meat. Ground beef or Italian sausage adds great flavor. Next, I dice one medium onion and mince two garlic cloves. These veggies give the soup a nice base. For the liquid, I use one can of crushed tomatoes and four cups of broth. Beef or vegetable broth works well. Then, I pick my pasta. I either break lasagna noodles or use fusilli. Both options cook well in the soup. To flavor the dish, I add dried oregano, dried basil, and red pepper flakes. Salt and pepper are also key to taste. For the creamy finish, I grab ricotta, mozzarella, and Parmesan cheese. Finally, fresh basil leaves make a lovely garnish. This list makes a hearty, flavorful soup that warms my heart. Each ingredient plays a role in creating that cozy feel. 1. Browning the meat In a large pot, I start by browning 1 pound of ground beef or Italian sausage. I cook it over medium heat until it's fully browned. This takes about 5-7 minutes. I drain any excess fat afterward. 2. Sautéing the onions and garlic Next, I add 1 medium diced onion to the pot. I sauté it for about 3-4 minutes until it's soft. Then, I toss in 2 minced garlic cloves and cook for another minute. This step fills the kitchen with a delicious aroma. 3. Combining liquids and seasonings After that, I pour in 1 can of crushed tomatoes and 4 cups of beef or vegetable broth. I stir to mix everything well. Then, I add 1 teaspoon of dried oregano, 1 teaspoon of dried basil, and 1/2 teaspoon of red pepper flakes if I want some heat. I season with salt and pepper to taste. 4. Adding pasta and cooking time I bring the mixture to a boil. Then, I reduce the heat and add 2 cups of uncooked pasta, either broken lasagna noodles or fusilli. I let it simmer for about 15 minutes, stirring occasionally. I want the pasta to be al dente, so I keep an eye on it. 1. Preparing the ricotta cheese blend While the soup simmers, I mix together 1 cup of ricotta cheese, half of 1 cup of shredded mozzarella, and 1/2 cup of grated Parmesan cheese in a small bowl. I add a pinch of salt and pepper to enhance the flavor. 2. Swirling the cheese into the soup Once the pasta is cooked, I remove the pot from heat. I ladle the soup into bowls and swirl in a generous spoonful of the ricotta mixture. This gives the soup a creamy texture. 1. Ladling into bowls and garnishing I serve the soup by ladling it into bowls. I top each bowl with the remaining mozzarella cheese. I let it melt slightly from the heat of the soup. 2. Optional toppings Finally, I garnish with fresh basil leaves. This adds color and freshness to my cozy lasagna soup. Choosing the right meat and cheese combinations: I find that ground beef or Italian sausage works best. The sausage adds a nice spice. For cheese, a blend of ricotta, mozzarella, and Parmesan gives great flavor and creaminess. Tips for cooking pasta in the soup: Use uncooked pasta like broken lasagna noodles or fusilli. Add the pasta during the last 15 minutes of cooking. This keeps the pasta firm and prevents it from getting mushy. Stir often to make sure it cooks evenly. Adjusting spice levels: You can control the heat by adding red pepper flakes. Start with half a teaspoon. If you want more spice, add more to taste. Adding fresh herbs: Fresh basil leaves are a must for garnish. They brighten the dish and add freshness. You can also add some chopped parsley for more flavor. Overcooking pasta: Be careful not to let the pasta cook too long. It should be al dente, as it will continue to soften in the soup. Skipping the cheese garnish: Always top your soup with the cheese mixture. It melts into the soup and adds a creamy, rich taste. Don't skip this step. It's what makes the soup feel cozy and special. {{image_2}} You can switch up the meat in this cozy lasagna soup. Try using ground turkey or chicken instead of beef or sausage. This change cuts fat and adds a lighter taste. For a veggie version, mushrooms and spinach work great. Mushrooms add a rich, meaty flavor. Spinach brings a nice pop of color and nutrition. You can mix these options to make a dish that suits your taste. If you're gluten-free, swap regular pasta for gluten-free options. Many brands offer pasta that cooks well and tastes great in soup. For those who need dairy-free options, use dairy-free cheese. This choice allows everyone to enjoy the dish without worry. There are many tasty alternatives to ricotta and mozzarella available in stores today. Adding different herbs and spices can change the soup's flavor. Try rosemary or thyme for a twist. You can also increase the heat with more red pepper flakes or add chili powder. Consider incorporating extra vegetables for added nutrition. Carrots, zucchini, or bell peppers can enhance flavor and make the soup heartier. These small changes keep the dish fresh and exciting every time you make it. To store leftovers, let the soup cool down first. Then, place it in an airtight container. This keeps it fresh and safe. You can store it in the fridge for up to three days. If you want to keep it longer, you can freeze it. To freeze the soup, let it cool completely. Then, pour it into freezer-safe bags or containers. Make sure to leave some space for expansion. Label the bags with the date. The soup can last up to three months in the freezer. When you want to eat it, take it out and thaw it overnight in the fridge. To reheat the soup, pour it into a pot over medium heat. Stir it often to avoid burning. If the soup looks thick, add a splash of broth or water. You can also use the microwave. Heat it in short bursts, stirring in between. This keeps the texture nice and smooth. Enjoy your cozy lasagna soup just like when you first made it! You can store lasagna soup in the fridge for up to three days. Make sure to keep it in an airtight container. This helps keep the soup fresh and tasty. Before you eat it, check for any off smells or changes in texture. Yes, this lasagna soup freezes well. Let it cool completely before placing it in a freezer-safe container. Make sure to leave some space for it to expand as it freezes. It can last up to three months in the freezer. When you’re ready to eat, thaw it in the fridge overnight. Reheat it on the stove until it's hot. If you want a dairy-free option, you can use tofu blended with a bit of lemon juice. For a low-fat choice, consider cottage cheese. Both work well in this soup, giving it a nice, creamy texture without the added fat. Yes, you can make this soup vegetarian. Simply swap the ground beef or sausage for lentils or mushrooms. Use vegetable broth instead of beef broth. This way, you keep all the great flavors while making it meat-free. To add some heat, stir in more red pepper flakes. You can also add diced jalapeños or hot sauce. Start with a small amount, then taste and adjust to your liking. This way, you can find the perfect spice level for your taste buds. This blog post shared how to make a delicious lasagna soup. We covered key ingredients like meats, vegetables, and cheeses. I provided step-by-step cooking instructions and tips to enhance flavor. We looked at ingredient swaps for dietary needs and storage info for leftovers. As you prepare this dish, don't forget to have fun and make it yours. Enjoy your tasty and cozy lasagna soup!

Cold nights call for warm meals, and nothing is cozier than Lasagna Soup. This dish is a mix of savory flavors and creamy cheese that will wrap you in comfort. …

Read more

Categories Dinner

Lemon Garlic Butter Shrimp Skillet Quick and Easy Meal

August 28, 2025 by Chef Jamie
- 1 pound large shrimp, peeled and deveined - 3 tablespoons unsalted butter - 4 cloves garlic, minced - Zest of 1 lemon - 2 tablespoons lemon juice - 1 teaspoon red pepper flakes (adjust to taste) - Salt and pepper to taste - 2 tablespoons fresh parsley, chopped - 1 cup cherry tomatoes, halved - 1 cup baby spinach Using fresh ingredients makes a big difference in flavor. Fresh shrimp taste sweeter and more tender. Fresh garlic gives a strong aroma and taste. Fresh parsley adds a bright touch. When you use fresh, your dish shines. You can really taste the difference in each bite. Always pick ripe tomatoes and vibrant spinach for the best results. Freshness is key for a tasty meal. You can easily swap ingredients to fit your needs. If you are allergic to shellfish, try chicken or tofu instead. Use olive oil instead of butter for a dairy-free option. For a spicy kick, add more red pepper flakes or a splash of hot sauce. If you cannot have gluten, serve the dish over rice instead of bread. This makes the recipe more accessible while keeping it delicious. To start, grab a large skillet. Place it over medium heat. Add 3 tablespoons of unsalted butter. Let the butter melt slowly. You want it to coat the bottom of the skillet. Once melted, it's time to add the garlic. Use 4 cloves of minced garlic. Sauté the garlic for about 1 minute. You want it fragrant but not burnt. If it burns, it can taste bitter. Now, it's time for the shrimp. Take 1 pound of large shrimp, peeled and deveined. Add the shrimp to the skillet. Sprinkle some salt and pepper on top. Cook the shrimp for about 2-3 minutes on one side. Watch for them to turn pink. This shows they are cooking well. After 2-3 minutes, flip the shrimp over. Next, pour in 2 tablespoons of fresh lemon juice. The zest of 1 lemon goes in too. This adds a bright flavor. Toss in 1 cup of halved cherry tomatoes. Add 1 cup of baby spinach as well. Cook for another 2-3 minutes. The shrimp should be fully cooked, and the spinach should wilt. Finally, take the skillet off the heat. Sprinkle 2 tablespoons of chopped parsley on top. This adds a lovely touch before serving. To keep shrimp tender, watch them closely. Cook shrimp for only 2-3 minutes per side. When they turn pink, they are done. Overcooking makes shrimp rubbery. Remove them from heat as soon as they are opaque. Adding fresh herbs boosts flavor. I love using parsley, but you can try basil or cilantro. Red pepper flakes give a nice kick. Adjust the amount based on your taste. Zesting the lemon adds a bright flavor. Never skip this step! Presentation matters in cooking. Serve the shrimp skillet in the pan for a casual look. Or, transfer it to a nice platter for guests. Garnish with lemon wedges and parsley for color. Pair it with crusty bread or rice to soak up the sauce. This makes each bite even better! {{image_2}} You can easily swap some ingredients in this dish. Here are a few ideas: - Use olive oil instead of butter for a lighter taste. - Try using lime juice instead of lemon for a fun twist. - Substitute shrimp with scallops or chicken for a different protein. - Replace cherry tomatoes with bell peppers or zucchini for more veggies. You can cook this dish in several ways. Here are some methods: - Grilling: Skewer the shrimp and grill them for a smoky flavor. - Baking: Spread everything on a baking sheet and bake at 400°F for about 10-12 minutes. - Stovetop: Follow the original method for a quick and easy meal. - Instant Pot: Cook on high for 1 minute, then quick release for tender results. Feel free to use seasonal ingredients to enhance your dish. Here are some suggestions: - In spring, add asparagus or peas for a fresh crunch. - In summer, use fresh corn or diced cucumbers for a refreshing twist. - In fall, consider butternut squash or mushrooms for a warm flavor. - In winter, try adding kale or root vegetables for heartiness. These variations keep the dish exciting. Enjoy your cooking adventure! To keep your Lemon Garlic Butter Shrimp fresh, store it in an airtight container. Make sure it cools to room temperature first. Place it in the fridge if you plan to eat it within three days. For best taste, try to eat it fresh. When reheating, use a skillet on low heat. Add a splash of water or broth to keep it moist. Stir gently to avoid overcooking the shrimp. You can also use a microwave, but cover it to retain moisture. Heat for 30 seconds to 1 minute. If you have leftovers, you can freeze them. Place the shrimp in a freezer-safe bag. Squeeze out as much air as possible. It will keep well for up to three months. To thaw, leave it in the fridge overnight. Reheat it gently to enjoy later. You can serve Lemon Garlic Butter Shrimp with many tasty sides. Here are some ideas: - Crusty bread: It soaks up the buttery sauce well. - Cooked rice: It makes a filling meal. Use white, brown, or even cauliflower rice. - Pasta: Toss the shrimp with cooked pasta for a hearty dish. - Salad: A fresh green salad adds crunch and color. These sides balance the rich flavors of the shrimp. You can mix and match to find your favorite combo. Shrimp cook fast. Look for these signs to know when they are done: - Color: Raw shrimp is gray. Cooked shrimp turns pink. - Shape: Shrimp curl into a C-shape when cooked. If they form an O-shape, they may be overcooked. - Texture: Cooked shrimp feels firm, not soft or mushy. Cooking shrimp takes about 4-6 minutes total. Keep an eye on them to avoid overcooking. Yes, you can use frozen shrimp. Here’s how: - Thaw: Place the shrimp in the fridge overnight or run them under cold water for about 15 minutes. - Cook: Use the same method as fresh shrimp. Just remember, they might need an extra minute or two to cook. Frozen shrimp are a great option and save time. They still taste good and work well in this dish. This blog covers fresh ingredients for your shrimp dish and step-by-step cooking tips. You learned how fresh items enhance taste and how to cook shrimp just right. I shared ideas for swaps and alternative cooking methods. Proper storage and reheating methods help keep leftovers tasty. Use these tips to enjoy delicious meals while accommodating dietary needs. Now, you can impress friends with your skills and delicious shrimp dishes. Enjoy cooking!

If you’re craving a dish that’s quick, tasty, and easy to make, look no further! My Lemon Garlic Butter Shrimp Skillet is your new go-to meal. In just a few …

Read more

Categories Dinner

No-Bake Oreo Cheesecake Bars Easy Dessert Recipe

August 28, 2025 by Chef Jamie
- 24 Oreo cookies (plus extra for garnish) - 4 tablespoons unsalted butter, melted - 16 oz cream cheese, softened - 1 cup powdered sugar - 1 teaspoon vanilla extract - 2 cups heavy whipping cream - 1 tablespoon cocoa powder (for garnish) - Pinch of salt Using Oreo cookies gives the crust a rich flavor. The melted butter helps bind the crumbs. Make sure your cream cheese is softened. This ensures a smooth filling. Powdered sugar blends well and sweetens the cheesecake nicely. Heavy whipping cream is key for a light and fluffy texture. Cocoa powder adds a lovely finish on top. If you want a gluten-free option, use gluten-free cookies. You can swap in vegan cream cheese for a dairy-free version. For a lighter option, use low-fat cream cheese. If you don’t have powdered sugar, regular sugar can work, but the texture may be grainy. You can try whipped topping as a substitute for heavy cream, but it may change the taste. To start, take 24 Oreo cookies and crush them. I love using a food processor for this. It makes fine crumbs in seconds. Then, mix the crumbs with 4 tablespoons of melted butter. Stir until the crumbs are fully coated. Next, grab an 8x8-inch baking pan and line it with parchment paper. Firmly press the Oreo mixture into the bottom. This creates a nice, even crust. Now, place the pan in the refrigerator to set while you work on the filling. For the filling, take 16 ounces of softened cream cheese and place it in a large bowl. Using an electric mixer, beat it until smooth. Then, slowly add 1 cup of powdered sugar and 1 teaspoon of vanilla extract. Mix it until it looks creamy and well-blended. In another bowl, whip 2 cups of heavy cream. Whip until stiff peaks form. This step makes your filling light and airy. Gently fold the whipped cream into the cream cheese mixture. Be careful not to deflate it. Keep folding until no streaks remain. Now, pour the cream cheese filling over your chilled Oreo crust. Use a spatula to spread it evenly. Cover the pan with plastic wrap. Place it back in the refrigerator for at least 4 hours. This step is key to getting the cheesecake bars to set. When ready, lift the cheesecake out using the parchment paper. Cut it into bars and garnish with extra crushed Oreos and cocoa powder. Enjoy your delicious no-bake Oreo cheesecake bars! To get a great crust, use fresh Oreo cookies. Crush them into fine crumbs. A food processor works best for this. Mix the crumbs with melted butter until you see no dry bits. Press the mixture firmly into the bottom of your pan. This helps it stay together. Chill the crust while you make the filling. This sets the base and gives it a nice crunch. Start with cold heavy whipping cream for the best results. Pour it into a clean bowl. Use an electric mixer on medium speed. Whip the cream until it starts to thicken. You want to see soft peaks first. Keep mixing until you see stiff peaks form. This means the cream holds its shape well. Be gentle when folding it into the cream cheese mixture. This keeps your dessert light and fluffy. After making your bars, cover them well. Use plastic wrap to keep them fresh. Store them in the fridge for up to five days. If you want to keep them longer, you can freeze them. Cut the bars before freezing for easy servings later. Just wrap them tightly in plastic wrap and foil. When ready to eat, let them thaw in the fridge overnight. Enjoy your tasty treat! {{image_2}} You can add fun flavors to your no-bake Oreo cheesecake bars. Try mixing in a bit of instant coffee or espresso powder for a mocha twist. A teaspoon of almond extract can give it a nutty flavor. For a fruity touch, fold in some strawberry puree or crushed raspberries. These small changes can make your bars taste unique! If you want to switch things up, you can use different cookies for the crust. Try using chocolate graham crackers or even vanilla wafers. You can also make a nut-based crust with crushed almonds or pecans mixed with butter. This offers a nice crunch and a tasty twist to the bars. To cater to dietary needs, there are swaps you can make. Use gluten-free Oreo cookies for a gluten-free version. For a dairy-free option, replace the cream cheese with vegan cream cheese and the heavy cream with coconut cream. You can also use maple syrup instead of powdered sugar for a less sweet option. These swaps ensure everyone can enjoy these tasty bars! To keep your No-Bake Oreo Cheesecake Bars fresh, store them in the fridge. Use an airtight container or cover the pan with plastic wrap. This way, they will not absorb other smells in your fridge. Make sure the bars are completely chilled before you store them. These cheesecake bars last up to five days in the fridge. After that, they may lose their texture and flavor. Always check for any signs of spoilage before serving. If they look or smell off, it's best to toss them. You can freeze these bars for later enjoyment. Cut them into squares before freezing. Place them in a single layer on a baking sheet, then put them in the freezer for about two hours. Once frozen, wrap each piece in plastic wrap and place them in a freezer-safe bag. They can last up to three months in the freezer. To enjoy, just thaw them in the fridge for a few hours before serving. Yes, you can make these bars ahead of time. In fact, they taste better after chilling. I often make them the day before I plan to serve them. This gives the flavors time to blend. Just cover them well with plastic wrap. Store them in the fridge until you are ready to enjoy. To cut the bars, I recommend using a sharp knife. First, remove the bars from the pan by lifting the parchment paper. Place the bars on a cutting board. For clean cuts, dip the knife in hot water and wipe it dry after each cut. This helps to prevent the cheesecake from sticking to the knife. Aim for even slices for a nice presentation. You can use low-fat cream cheese if you want. It will still taste good, but the texture might be a bit different. The bars may not be as rich and creamy. If you want a lighter option, this is a good choice. Just remember, the flavor may change slightly, so keep that in mind while making your decision. This article covered all you need for great No-Bake Oreo Cheesecake Bars. We went over the key ingredients and their alternatives. You learned step-by-step methods for making the crust and filling. Tips helped you achieve the best texture. We explored tasty variations and smart storage options. Now, you can enjoy these bars anytime. Your friends and family will love them. Keep these tips in mind as you bake. Happy creating!

Craving a sweet treat but don’t want to turn on the oven? Let me introduce you to my No-Bake Oreo Cheesecake Bars! This easy dessert recipe combines creamy cheesecake with …

Read more

Categories Desserts

Caramel Pecan Pumpkin Cheesecake Irresistible Dessert

August 26, 2025 by Chef Jamie
- 1 ½ cups graham cracker crumbs - ⅓ cup unsalted butter, melted - 2 tablespoons brown sugar To create the crust, I start with graham cracker crumbs. They give a sweet and crunchy base. I mix them with melted butter and brown sugar. This mixture binds well and adds flavor. I press it into the bottom of my pan. Baking it for just 10 minutes helps it set. - 16 oz cream cheese, softened - 1 cup pumpkin puree - 1 cup granulated sugar - 1 teaspoon vanilla extract - 2 large eggs - 1 teaspoon ground cinnamon - ½ teaspoon ground nutmeg - ¼ teaspoon ground ginger - ¼ teaspoon salt For the filling, I use softened cream cheese. It blends smooth and creamy. Then, I add pumpkin puree, which gives that rich fall flavor. Granulated sugar balances the taste. The vanilla extract adds warmth. I mix in eggs, one by one, to keep it fluffy. Spices like cinnamon, nutmeg, and ginger bring depth. A pinch of salt enhances the sweetness. - 1 cup pecans, roughly chopped - ½ cup caramel sauce (store-bought or homemade) For the topping, I use roughly chopped pecans. Toasting them in a skillet gives a nice crunch and flavor. The caramel sauce adds sweetness and richness. I drizzle it all over the cheesecake before serving. This creates a delicious layer that everyone loves. First, heat your oven to 325°F (160°C). This temperature is key for baking the cheesecake. While the oven warms, grab your 9-inch springform pan. Grease the sides with butter or cooking spray. This will help you remove the cheesecake later without any trouble. In a medium bowl, mix together 1 ½ cups of graham cracker crumbs, ⅓ cup of melted unsalted butter, and 2 tablespoons of brown sugar. This mix creates a tasty crust. Press the mixture evenly into the bottom of the springform pan. Bake it for 10 minutes, then set it aside to cool slightly. Now, in a large mixing bowl, beat 16 oz of softened cream cheese with an electric mixer until it is creamy. Add in 1 cup of pumpkin puree, 1 cup of granulated sugar, and 1 teaspoon of vanilla extract. Mix well until it is smooth. Next, add 2 large eggs, one at a time. Mix on low speed after each egg until just combined. Sprinkle in 1 teaspoon of ground cinnamon, ½ teaspoon of ground nutmeg, ¼ teaspoon of ground ginger, and ¼ teaspoon of salt. Mix gently until everything is just combined. Be careful not to overmix, as that can affect the texture. Pour the filling over your cooled crust. Use a spatula to smooth the top. Place the cheesecake in the preheated oven. Bake for 50 to 60 minutes. The center should be set but still slightly jiggly. When done, turn off the oven. Crack the door open and let the cheesecake cool inside for about 1 hour. After the cheesecake cools, refrigerate it for at least 4 hours or overnight for the best taste. When you're ready to serve, toast 1 cup of chopped pecans in a dry skillet over medium heat for about 5 minutes until they smell wonderful. Drizzle ½ cup of caramel sauce over the cheesecake. Then sprinkle the toasted pecans on top. Slice the cheesecake and serve it chilled. You can add more caramel sauce on individual plates if you want. Enjoy your delicious creation! To make the best crust, use fresh graham cracker crumbs. Crush them finely for a smooth texture. Combine the crumbs with melted butter and brown sugar well. Press the mixture firmly into the bottom of your springform pan. This step helps the crust hold together after baking. Bake it for 10 minutes to get a nice golden color. Softening the cream cheese is key. Leave it out for 30 minutes before mixing. Beat the cream cheese until smooth before adding other ingredients. Mix in the pumpkin puree, sugar, and vanilla gently. Avoid overmixing once you add the eggs. This keeps the filling light and creamy. Cracks often happen due to temperature changes. Bake the cheesecake in a water bath for even heat. After baking, turn off the oven and crack the door open. This helps it cool slowly. Letting it cool in the oven for an hour will also help. To wow your guests, serve slices on pretty dessert plates. Add a dollop of whipped cream on the side. A sprinkle of cinnamon elevates the look. Drizzle extra caramel sauce over individual slices for a tasty touch. Finally, toasted pecans add a nice crunch and a lovely finish. {{image_2}} You can give your cheesecake a pumpkin spice twist. Add a bit more spice to the filling. Use 1 ½ teaspoons of cinnamon, and include clove or allspice. This will enhance the fall flavors. The extra spices make each bite cozy and warm. You can also mix in chopped candied ginger for a zesty kick. If you love chocolate, try a chocolate drizzle. Melt some dark or milk chocolate. Drizzle it over the cheesecake before adding the caramel and pecans. This twist adds richness and a nice contrast to the pumpkin. The chocolate pairs well with the caramel, making each slice more indulgent. You can change the nuts or toppings, too. Instead of pecans, try walnuts or almonds. Both add a tasty crunch. You can also skip the nuts altogether for a nut-free dessert. Top the cheesecake with whipped cream or chocolate shavings. These options make it fun to customize your cheesecake. To keep your caramel pecan pumpkin cheesecake fresh, store it in the fridge. Use an airtight container or plastic wrap. This helps keep moisture in and odors out. The cheesecake lasts up to five days when stored properly. Remember to let it cool completely before covering it. If you want to save some for later, freezing works well too. First, slice the cheesecake into pieces. Wrap each slice in plastic wrap tightly. Then, place the slices in a freezer-safe bag or container. Label it with the date. You can freeze it for up to three months. To enjoy it later, thaw it in the fridge overnight. Cheesecake is best served cold. If you want to warm it up slightly, use a microwave. Heat it for about 10-15 seconds. Check to see if it's warm enough. Avoid overheating, as it can change the texture. Enjoy your cheesecake chilled or slightly warm, as you prefer! Yes, homemade caramel sauce works great! It adds a personal touch. To make it, heat sugar and water until it melts, then stir in butter and cream. This creates a rich, creamy sauce for your cheesecake. If you prefer store-bought, that also works well. You can use sweet potato puree as a substitute. It has a similar texture and flavor. Other options include butternut squash puree or even applesauce for a different taste. Just ensure the substitute is thick and creamy. Check the center of the cheesecake. It should be set but still slightly jiggly. An easy test is to gently shake the pan. If the edges are firm and the center has a slight wobble, it’s ready. You can store it in the fridge for about 5 days. Make sure to cover it well. For longer storage, freeze it for up to 3 months. Just thaw it in the fridge before serving for the best taste. Making caramel pecan cheesecake is easier than it seems. We covered the crust, filling, and topping. You learned step-by-step instructions to get it just right. With tips on texture and presentation, you'll impress everyone. Plus, I shared tasty variations to try. Remember to store leftovers properly, so they stay fresh. If you have any questions, check the FAQs for quick answers. Enjoy making your cheesecake and savor every bite!

If you love dessert, you’re in for a treat! This Caramel Pecan Pumpkin Cheesecake is a perfect mix of flavors that will wow your taste buds. Imagine a creamy filling …

Read more

Categories Desserts

Cinnamon Glazed Apple Fritter Bites Irresistible Treat

August 26, 2025 by Chef Jamie
- Apples and their variety Use 2 medium Granny Smith apples. They are tart and firm. Their flavor balances the sweetness of the glaze. Peel, core, and dice them into small pieces. - Dry ingredients overview You need 1 cup of all-purpose flour. It gives the fritters their structure. Add 1/2 cup of granulated sugar for sweetness. Mix in 1/2 tablespoon of baking powder to help them rise. Include 1/2 teaspoon of cinnamon, 1/4 teaspoon of nutmeg, and 1/4 teaspoon of salt for flavor. - Wet ingredients and frying oil For the wet mix, use 1/2 cup of milk and 1 large egg. Add 1 teaspoon of vanilla extract to enhance flavor. You will need oil for frying. It should be at least 2 inches deep, heated to 350°F (175°C). These ingredients make the fritter bites soft and full of flavor. The glaze adds the perfect sweet touch. Start by gathering your dry ingredients. In a medium bowl, whisk together: - 1 cup all-purpose flour - 1/2 cup granulated sugar - 1/2 tablespoon baking powder - 1/2 teaspoon cinnamon - 1/4 teaspoon nutmeg - 1/4 teaspoon salt Mix these well. This blend brings out the warm, sweet flavors in the fritters. Now, in another bowl, mix your wet ingredients. You will need: - 1/2 cup milk - 1 large egg - 1 teaspoon vanilla extract Whisk these until smooth. This step adds moisture and flavor to your fritter bites. Pour the wet mix into the dry mix. Stir gently until just combined. Be careful not to overmix, or the fritters may turn out tough. Now, fold in: - 2 medium apples, peeled, cored, and diced Make sure the apples are evenly spread throughout the batter. This ensures you get apple goodness in every bite. Heat about 2 inches of oil in a deep pan or skillet. Aim for a temperature of 350°F (175°C). Use a thermometer for accuracy. Once hot, drop spoonfuls of batter into the oil. Fry several at a time, but don’t overcrowd the pan. Fry for 2-3 minutes on each side until golden brown. Once done, transfer them to a paper towel-lined plate. This step helps drain excess oil. While the fritters cool slightly, prepare your glaze. In a mixing bowl, whisk together: - 1 cup powdered sugar - 2 tablespoons milk - 1/2 teaspoon vanilla extract - 1/2 teaspoon cinnamon Mix until smooth. This glaze adds a sweet finish to your fritter bites. Once the fritters are warm, drizzle the glaze over them. Doing this while they are warm helps the glaze stick better. Let the glaze set slightly before serving. For a fun touch, serve on a decorative plate, dusted with extra powdered sugar and cinnamon. Enjoy your delicious creation! - Ideal oil temperature: Heat your oil to 350°F (175°C). Use a thermometer to check. This helps the fritters cook evenly and become golden brown. - Avoiding overcrowding the pan: Fry only a few fritters at a time. If you add too many, the oil temperature drops. This makes them soggy instead of crispy. - Apple variety recommendations: I recommend using Granny Smith apples. They are tart and hold their shape well when cooked. This adds a great bite to your fritters. - Adding nuts or raisins: Throw in some chopped walnuts or pecans for crunch. You can also add raisins for a sweet surprise. Both options boost flavor and texture. - Creative serving suggestions: Serve your fritter bites on a bright plate. Dust them with powdered sugar and a sprinkle of cinnamon for a fun look. - Dipping sauce ideas: Offer a small bowl of extra glaze on the side. You can also try warm caramel or vanilla ice cream for dipping. These add a rich touch and make every bite special. {{image_2}} You can make your fritter bites even more fun with a different glaze. A chocolate glaze is a great choice! To make it, just melt 4 ounces of chocolate with 2 tablespoons of milk. Drizzle it over the warm fritters. The rich flavor pairs so well with the apples. Another option is a maple glaze. Mix 1 cup of powdered sugar, 2 tablespoons of maple syrup, and 1 tablespoon of milk. This sweet glaze adds a warm touch to your fritters. If you want to change up the fruit, try pears or peaches. They add a nice sweetness and soft texture. Just dice them like you did with the apples. You can use the same method to make fritters with seasonal berries too. Blueberries or raspberries give a burst of flavor. You can make these fritter bites healthier by baking instead of frying. Preheat your oven to 375°F (190°C). Place the batter on a baking sheet lined with parchment paper. Bake for about 15-20 minutes or until golden brown. If you want a gluten-free option, swap the all-purpose flour with a gluten-free blend. This way, everyone can enjoy the treat! To keep your fritter bites fresh, store them in an airtight container. Place a paper towel inside to absorb any moisture. This helps prevent sogginess. You can store them in the fridge for up to three days. If you won't eat them soon, freezing is a great option. To freeze leftover fritter bites, let them cool completely. Arrange them in a single layer on a baking sheet. Freeze them for about an hour until firm. Then, transfer the bites to a freezer-safe bag or container. They can last up to three months in the freezer. When it comes to reheating, the oven is the best way to go. Preheat your oven to 350°F (175°C). Place the fritter bites on a baking sheet. Heat them for about 10 minutes, or until warm. This keeps them crispy and tasty. You can use the microwave for a quicker option but beware. The fritter bites may turn soft. If you choose the microwave, heat them for 15-20 seconds. Check to see if they need more time. If you want to keep them crispy, the oven is the best bet. To make the cinnamon glaze thicker, add more powdered sugar. Start with a tablespoon at a time. Mix well after each addition until you reach your desired thickness. If it gets too thick, add a little milk to thin it out. This gives you control over the glaze's texture. Yes, you can use different types of apples. Granny Smith apples offer a nice tartness. Honeycrisp or Fuji apples add sweetness and crunch. Each apple type will change the flavor and texture of your fritter bites. Experiment to find your favorite! The fritter bites are fully cooked when they turn golden brown. Fry them for 2-3 minutes on each side. You can also check the inside with a toothpick. If it comes out clean, they are ready. This ensures they are cooked all the way through. Yes, you can make the batter ahead of time. Store it in the fridge for up to 2 hours. This makes it easy to fry later. Just remember to give it a good stir before frying. It may thicken up a bit in the fridge. Apple fritter bites pair well with many options. Serve them with vanilla ice cream for a sweet treat. A cup of coffee or tea is also a great match. You can even add a drizzle of caramel sauce for extra sweetness. Enjoy your fritter bites with whatever you love! In this post, we explored making delicious cinnamon glazed apple fritter bites. We covered the key ingredients, preparation steps, and valuable tips to ensure success. You learned about variations, storage, and even answered some common questions. These bites are simple to make and adapt to your taste. Enjoy creating these treats, sharing them, and making great memories! Try different fruits or glazes to keep things fun. Happy cooking!

Craving a sweet treat that’s hard to resist? Look no further than these Cinnamon Glazed Apple Fritter Bites! With fluffy dough and warm, spiced apples, this recipe combines classic comfort …

Read more

Categories Desserts

Cinnamon Blondies with Caramel Apple Cream Cheese Frosting Delight

August 26, 2025 by Chef Jamie
To make these cinnamon blondies, you will need the following main ingredients: - 1 cup (2 sticks) unsalted butter, melted - 1 cup packed brown sugar - 1/2 cup granulated sugar - 2 large eggs - 2 teaspoons vanilla extract - 2 cups all-purpose flour - 1 teaspoon baking powder - 1/2 teaspoon baking soda - 1 teaspoon ground cinnamon - 1/2 teaspoon salt These ingredients come together to create a rich, sweet base. The butter adds moisture and flavor. Brown sugar gives a deep sweetness, while the granulated sugar balances it out. Eggs help bind everything, and vanilla adds warmth. Flour provides structure, while baking powder and soda create lift. Cinnamon gives that cozy, warm taste we love. For the frosting, gather these ingredients: - 8 oz cream cheese, softened - 1/4 cup unsalted butter, softened - 1 cup powdered sugar - 1/2 cup caramel sauce (store-bought or homemade) - 1 small apple, peeled and finely chopped - 1/2 teaspoon vanilla extract - A pinch of cinnamon (for garnish) This frosting is creamy and sweet, with a lovely apple crunch. The cream cheese adds a tangy flavor that pairs well with caramel. Mixing in the apple gives texture and freshness. The powdered sugar sweetens it just right, while cinnamon on top adds a lovely finish. You can easily swap some ingredients for others. - Use coconut oil instead of butter for a dairy-free option. - Maple syrup can replace brown sugar for a different sweetness. - Try using applesauce in place of eggs for a vegan twist. - For gluten-free blondies, use a gluten-free flour blend. - If you don't have cream cheese, mascarpone works as a great substitute in the frosting. These substitutions help you modify the recipe to fit your needs. Experimenting can lead to fun new flavors! Start by preheating your oven to 350°F (175°C). Grease a 9x13 inch baking pan or line it with parchment paper. In a large bowl, mix 1 cup of melted butter, 1 cup of brown sugar, and 1/2 cup of granulated sugar. Whisk until smooth. Add in 2 large eggs, one at a time, mixing well after each. Then, stir in 2 teaspoons of vanilla extract. In another bowl, whisk together 2 cups of flour, 1 teaspoon of baking powder, 1/2 teaspoon of baking soda, 1 teaspoon of cinnamon, and 1/2 teaspoon of salt. Gradually add the dry mix to the wet mix. Stir until just combined. Avoid over mixing. Pour the blondie batter into your prepared pan. Spread it evenly across the bottom. Bake in your preheated oven for 20 to 25 minutes. To check if they are done, insert a toothpick into the center. If it comes out clean, the blondies are ready. Let them cool in the pan. While the blondies cool, prepare the frosting. In a medium bowl, beat together 8 oz of softened cream cheese and 1/4 cup of softened butter until smooth and creamy. Gradually add in 1 cup of powdered sugar. Mix until fully incorporated. Then, add 1/2 cup of caramel sauce, 1 small chopped apple, and 1/2 teaspoon of vanilla extract. Mix until everything is well combined. Once the blondies are cool, spread the caramel apple cream cheese frosting evenly over the top. For a nice touch, sprinkle a pinch of cinnamon on top. Slice the blondies into squares and serve. Enjoy the rich flavors and the sweet aroma! To make moist blondies, start with warm butter. Melted butter keeps the blondies soft. Use light brown sugar for a chewy texture and rich flavor. Avoid over-mixing the batter. Just mix until you see no dry flour. Bake until a toothpick comes out clean. Underbaking just a bit keeps them soft and gooey. For the best frosting, use room-temperature cream cheese. This helps it blend smoothly. Whip the cream cheese and butter until creamy. Add powdered sugar slowly to avoid lumps. Don't forget the caramel sauce! It gives a sweet, rich taste. Mix in finely chopped apples for a fresh crunch. Top with a pinch of cinnamon for an extra kick. Serve these blondies on a rustic wooden board for charm. Drizzle more caramel sauce over them for a stunning look. Cut them into squares and stack them high for height. Garnish with apple slices or a sprinkle of cinnamon. It makes your dessert not only tasty but beautiful too! {{image_2}} You can add nuts to your blondies for crunch. Chopped walnuts or pecans work great. Just stir in about a cup of nuts after mixing your batter. If you want to skip nuts, you can use seeds like sunflower or pumpkin seeds. They add a nice texture without the nutty taste. You can change the frosting to fit your taste. Try adding a bit of maple syrup instead of caramel for a new twist. You could also mix in some cocoa powder for a chocolate flavor. Just add about 1/4 cup of cocoa powder when making the frosting. This gives a fun new flavor while keeping the creaminess. If you want gluten-free blondies, swap out regular flour for gluten-free flour. Look for a blend that works well in baking. You can use 1:1 gluten-free flour blends, which work great here. This way, everyone can enjoy the sweet taste of cinnamon blondies. Make sure to check your baking powder too, as some brands may contain gluten. To keep your cinnamon blondies fresh, store them in an airtight container. Use wax paper or parchment to separate layers. This way, they won’t stick together. Keep them at room temperature for up to five days. If you want them to last longer, consider refrigeration. You can freeze cinnamon blondies for later use. First, let them cool completely. Cut them into squares and wrap each piece tightly in plastic wrap. Place the wrapped blondies in a freezer-safe bag. They will stay fresh for up to three months. When you're ready to enjoy, just thaw them in the fridge overnight. To reheat your blondies, use the microwave for about 10-15 seconds. This warms them gently without drying them out. If you want a crispy edge, preheat your oven to 350°F (175°C). Place the blondies on a baking sheet and warm them for about 5-10 minutes. They will taste freshly baked! Yes, you can make these blondies dairy-free! Use dairy-free butter and a dairy-free cream cheese. You can also swap the caramel sauce for a dairy-free version. This way, you can enjoy the same great taste without dairy! To check if the blondies are done, insert a toothpick into the center. If it comes out clean or with a few crumbs, they are ready. If the toothpick has wet batter, bake them for a few more minutes. If you don’t have caramel sauce, you can try using maple syrup or chocolate sauce. Both options add sweetness and a unique flavor. You could also make a simple homemade caramel if you prefer. These blondies can last for about 4 to 5 days at room temperature. If you store them in the fridge, they can stay fresh for up to a week. Just make sure to keep them in an airtight container to maintain their moisture. Cinnamon blondies topped with caramel apple cream cheese frosting are a delight. We discussed key ingredients, step-by-step prep, and tips for moistness. You now know variations to suit your taste, storage methods, and answers to common questions. Enjoy baking these treats and share them with friends. With simple steps, you can create a dessert that brings smiles. Keep experimenting, and have fun in the kitchen!

Are you ready to bake something incredible? These Cinnamon Blondies topped with Caramel Apple Cream Cheese Frosting will be your new go-to treat! They’re soft, sweet, and packed with warm …

Read more

Categories Desserts

Easy Pumpkin Pie Bites Simple and Tasty Dessert Treat

August 26, 2025 by Chef Jamie
To make easy pumpkin pie bites, gather these tasty ingredients: - 1 cup canned pumpkin puree - 1/3 cup brown sugar - 1/4 cup granulated sugar - 1/2 teaspoon ground cinnamon - 1/4 teaspoon ground nutmeg - 1/4 teaspoon ground ginger - 1/8 teaspoon salt - 1 large egg - 1 package pre-made phyllo pastry cups (15 count) - Whipped cream for topping - Optional: Crushed graham crackers for garnish These ingredients come together to create a dessert that is both simple and delicious. Canned pumpkin puree gives a rich flavor and creamy texture. Brown sugar adds a warm sweetness, while granulated sugar balances it out. The spices like cinnamon, nutmeg, and ginger create that classic pumpkin pie taste. A large egg helps bind the mixture, ensuring it sets nicely in the oven. Phyllo pastry cups provide a crispy base that contrasts with the soft filling. You can top your bites with whipped cream for a light finish. If you want an extra crunch, sprinkle some crushed graham crackers on top. These ingredients are easy to find and will make your mini pumpkin pie bites a hit at any gathering! - Preheat the oven: Start by preheating your oven to 350°F (175°C). This step is key for even baking. - Mix the filling ingredients: In a mixing bowl, combine 1 cup of canned pumpkin puree, 1/3 cup of brown sugar, and 1/4 cup of granulated sugar. Add 1/2 teaspoon of ground cinnamon, 1/4 teaspoon of ground nutmeg, 1/4 teaspoon of ground ginger, and 1/8 teaspoon of salt. Finally, crack in 1 large egg. Mix until the mixture is smooth and well combined. - Arrange phyllo cups on a baking sheet: Take a package of pre-made phyllo pastry cups, which usually contains 15 cups. Place them evenly on a baking sheet. Make sure they are spaced out so they bake well. - Fill phyllo cups with the pumpkin mixture: Use a spoon to fill each phyllo cup with the pumpkin mixture. Fill them about three-quarters full to allow for some rising. - Baking duration and temperature: Place the baking sheet in the preheated oven. Bake for 15 to 18 minutes. Keep an eye on them until the filling is set and the edges of the phyllo cups turn golden brown. - Cooling the bites before serving: Once baked, remove the bites from the oven. Let them cool for a few minutes on the baking sheet. This cooling time helps them set further and makes them easier to handle. - Ensuring the filling is mixed thoroughly: Mix your pumpkin puree, sugars, and spices well. This step helps blend the flavors. I use a whisk for a smooth mix. You want every bite to taste just right. If it looks lumpy, keep mixing until smooth. - Perfecting the baking time for optimal texture: Bake the pumpkin pie bites for 15 to 18 minutes. Keep an eye on them. The filling should be set, and the edges of the phyllo cups should be golden. If you bake them too long, they can get dry. - Presentation ideas for serving: Place the mini pumpkin pie bites on a nice platter. For a fun touch, sprinkle cinnamon around them. This gives a festive look. You could also use a cake stand for height and drama. - Additional topping options beyond whipped cream: Besides whipped cream, try crushed graham crackers. They add a nice crunch. You can also drizzle caramel or chocolate on top. These extras make each bite special and unique! {{image_2}} You can easily change up your pumpkin pie bites. One great idea is to add a drizzle of chocolate or caramel on top. This sweet touch gives a rich flavor contrast to the spiced pumpkin. Just melt some chocolate or caramel and drizzle it over the whipped cream. You’ll impress your friends with this fun twist! If you want to try different sweeteners, consider using maple syrup or honey. These options can add a unique taste. Just remember, they may change the texture a bit. Adjust the amount to keep the filling smooth. Are you looking for gluten-free options? Use gluten-free phyllo pastry cups. Many brands offer these, and they taste great. You can find them in most grocery stores. Just check the label to be sure. For vegan substitutions, replace the egg with a flax egg. Mix one tablespoon of ground flaxseed with two and a half tablespoons of water. Let it sit for a few minutes until it thickens. Instead of whipped cream, use coconut cream for topping. This keeps the dish dairy-free while still being creamy and delicious! To store your leftover mini pumpkin pie bites, place them in an airtight container. This keeps them fresh and tasty. You can use plastic wrap or a resealable bag if you don’t have a container. Store them in the refrigerator for up to three days. When you want to enjoy them again, just take them out and let them sit for a few minutes. You can also warm them in the oven at a low temperature for a few minutes. If you want to save the mini pumpkin pie bites for longer, you can freeze them. First, let them cool completely. Then, place them in a single layer on a baking sheet. Freeze for about an hour. Once frozen, transfer them to a freezer-safe bag or container. They can last up to two months in the freezer. To reheat, preheat your oven to 350°F (175°C). Place the frozen bites on a baking sheet and warm them for about 10-15 minutes. This keeps the crust crisp and the filling warm. Enjoy your bites just like fresh! Yes, you can make pumpkin pie bites ahead of time. Prepare the filling and store it in the fridge. Fill the phyllo cups right before baking. This keeps them fresh and crisp. If you want to bake them later, just cover them tightly. They can stay in the fridge for up to two days. You know the filling is set when it looks firm and slightly puffs up. Insert a toothpick or knife into the center. If it comes out clean, the filling is ready. The edges of the phyllo cups should be golden brown, too. This shows they are perfectly baked. Yes, fresh pumpkin is a great option! Start with a small pumpkin. Roast it until soft, then scoop out the flesh. Puree it in a blender to get a smooth texture. Use this in place of canned pumpkin. Just make sure to measure it correctly for the best taste. You learned how to make tasty mini pumpkin pie bites. We covered the ingredients, steps, and helpful tips. Don't forget the fun variations and serving ideas to impress friends. Store leftovers properly to enjoy them later. Pumpkin pie bites are easy to make and perfect for sharing. Try different flavors to find your favorite. Follow these steps, and you’ll have a delightful treat everyone will love. Enjoy baking!

Looking for a simple yet delightful dessert? These Easy Pumpkin Pie Bites combine the warm flavors of pumpkin and spices in cute phyllo pastry cups. Packed with tasty goodness, they …

Read more

Categories Desserts

Cozy Amish Applesauce Cake Warm and Comforting Treat

August 26, 2025 by Chef Jamie
To make this warm and tasty cake, you need simple ingredients that blend well. Here’s what to gather: - 1 ½ cups unsweetened applesauce - 2 cups all-purpose flour - 1 ½ cups granulated sugar - 1 teaspoon baking soda - 1 teaspoon baking powder - 1 teaspoon ground cinnamon - ½ teaspoon ground nutmeg - ½ teaspoon salt - ½ cup vegetable oil - 3 large eggs - 1 teaspoon vanilla extract These ingredients work together to create a soft and moist cake. The applesauce adds natural sweetness and moisture, making it a great base. While the base recipe is delicious, you can add more flavors. Here are some tasty options: - 1 cup chopped walnuts - ½ cup raisins - Powdered sugar for dusting Adding walnuts gives a nice crunch. Raisins add a sweet burst in every bite. If you like, dust the top with powdered sugar. It looks pretty and adds a touch of sweetness. Spices play a big part in Amish baking. They give warmth and depth to the cake. In this recipe, ground cinnamon and nutmeg shine. Cinnamon brings a sweet, warm flavor. Nutmeg adds a hint of earthiness. Together, they create a cozy aroma that fills your kitchen as the cake bakes. This is why many Amish recipes focus on simple, warm spices. They make every bite feel like a hug. To start, you need to gather all your ingredients. This cake uses simple items that you might already have. The main star of the show is unsweetened applesauce. You will also need flour, sugar, oil, eggs, and spices. Make sure your oven is set to 350°F (175°C). Grease and flour a 9x13 inch baking pan to prevent sticking. 1. In a big bowl, mix the applesauce, sugar, and oil until it's very smooth. 2. Add the eggs one by one. Mix well after each egg. Then, pour in the vanilla extract. 3. In another bowl, whisk the flour, baking soda, baking powder, cinnamon, nutmeg, and salt. 4. Slowly add this dry mix to the wet ingredients. Stir gently until combined. Don't mix too much. 5. If you want, fold in the chopped walnuts and raisins now. 6. Pour the batter into your prepared baking pan. Smooth the top with a spatula. 7. Bake for 35 to 40 minutes. Check for doneness by inserting a toothpick in the center. If it comes out clean, it's done. 8. Once baked, take the cake out. Let it cool in the pan for about 10 minutes. Then, move it to a wire rack to cool completely. 9. For a sweet touch, you can dust the top with powdered sugar before serving. To check if your cake is ready, use a toothpick. Insert it in the center of the cake. If it comes out clean, the cake is done. If it has batter on it, give it a few more minutes. Every oven is different, so keep an eye on your cake as it bakes. You want a nice, golden top. When it cools, it will be a perfect treat to enjoy! To keep your Cozy Amish Applesauce Cake nice and moist, use unsweetened applesauce. This adds flavor and moisture without extra sugar. Mix the wet ingredients well to ensure they blend. Don't overmix the batter when adding dry ingredients. This helps the cake stay soft and fluffy. For even baking, preheat your oven to 350°F (175°C). Use a light-colored baking pan to avoid browning the cake too much. Make sure to spread the batter evenly in the pan. Place the pan in the middle of the oven for the best heat circulation. Rotate the pan halfway through baking for an even bake. To keep your cake fresh, store it in an airtight container. If you want to keep it longer, wrap it in plastic wrap and place it in the fridge. This helps keep the moisture in. You can freeze pieces of the cake too. Just wrap them well to avoid freezer burn. When ready to eat, thaw the cake at room temperature or warm it in the oven. {{image_2}} You can make this cake gluten-free. Use a 1:1 gluten-free flour blend. Brands like Bob's Red Mill work well. This swap keeps the texture light and fluffy. You may want to add a bit of xanthan gum. It helps mimic the stretch of gluten. While applesauce shines here, feel free to mix it up. You can use mashed bananas or pureed pears instead. Each fruit brings its unique taste. For added fun, try adding some chopped fresh strawberries. This twist gives a fresh burst of flavor. If nuts are not your thing, leave them out. The cake still tastes great without walnuts. You can add extra raisins for a chewy texture. If you want crunch, try sunflower seeds. They add a nice bite without allergens. After baking your Cozy Amish Applesauce Cake, let it cool completely. Place it in an airtight container. You can store it at room temperature for up to three days. If your home is warm, keep it in the fridge. This will help it stay fresh longer. Just remember to bring it back to room temperature before serving for the best flavor. If you want to save some for later, freezing is a great option. First, let the cake cool completely. Then, wrap it tightly in plastic wrap. Next, place it in a freezer-safe bag or container. You can freeze it for up to three months. When you're ready to enjoy it, thaw it in the fridge overnight. This keeps it moist and tasty. To reheat your Cozy Amish Applesauce Cake, slice a piece and place it on a microwave-safe plate. Heat it for about 15-20 seconds. If you like it warm, consider serving it with a scoop of vanilla ice cream or a dollop of whipped cream. A sprinkle of cinnamon on top adds a lovely touch. Enjoy this warm and comforting treat anytime! If you don’t have applesauce, you can use mashed bananas or pureed pears. Both offer moisture and sweetness. You can also try yogurt for a creamy texture. Each option gives a unique taste but keeps the cake moist. Yes, you can swap all-purpose flour for whole wheat flour. Whole wheat flour adds a nutty flavor and more fiber. The cake may be denser, but it will still taste great. You might want to add a bit more liquid to the batter. The cake can last up to five days when stored properly. Keep it in an airtight container at room temperature. If you want to keep it longer, you can freeze it for up to three months. Just wrap it well to avoid freezer burn. This blog post covered how to make a cozy Amish applesauce cake. We explored key ingredients, optional add-ins, and the importance of spices. The detailed baking steps and tips helped you create a perfect cake every time. We also discussed various alternatives for dietary needs and storage methods. In the end, this cake is not just delicious; it’s a comforting treat. I encourage you to try different variations and make it your own. Enjoy baking this cake and share it with friends and family!

Warm up your kitchen with the delightful aroma of Cozy Amish Applesauce Cake. This simple recipe blends sweet applesauce and aromatic spices, creating a treat that feels like a warm …

Read more

Categories Desserts

Cheesy Hobo Ground Beef Casserole Flavorful Deal

August 26, 2025 by Chef Jamie
To make this tasty dish, you will need the following ingredients: - 1 pound ground beef - 1 medium onion, diced - 2 cloves garlic, minced - 1 bell pepper (red or green), diced - 1 can (15 oz) diced tomatoes, drained - 1 can (15 oz) black beans, rinsed and drained - 2 cups frozen mixed vegetables (carrots, peas, corn) - 2 cups cooked rice (white or brown) - 1 cup shredded cheddar cheese - 1 cup shredded mozzarella cheese - 1 teaspoon smoked paprika - 1 teaspoon chili powder - Salt and pepper to taste - 2 tablespoons olive oil - Sour cream and fresh cilantro for garnish (optional) You can change some ingredients to suit your taste. Here are some ideas: - Use ground turkey or chicken instead of beef for a lighter option. - Swap black beans for pinto or kidney beans if you prefer. - Try different frozen vegetables like broccoli or green beans for new flavors. - Use a mix of different cheeses for a unique twist. - For a spicy kick, add diced jalapeños or a dash of hot sauce. Each ingredient in this casserole adds value to your meal. Here are some benefits: - Ground beef: A good source of protein and iron, which helps build strong muscles and blood. - Black beans: Rich in fiber, they help support digestion and keep you full. - Bell peppers: Packed with vitamins A and C, they boost your immune system. - Mixed vegetables: Provide a variety of nutrients and antioxidants to keep you healthy. - Cheese: Offers calcium for strong bones, but use it in moderation for a balanced diet. This casserole not only tastes great but also brings a mix of health benefits. First, gather your ingredients. You need: - 1 pound ground beef - 1 medium onion, diced - 2 cloves garlic, minced - 1 bell pepper (red or green), diced - 1 can (15 oz) diced tomatoes, drained - 1 can (15 oz) black beans, rinsed and drained - 2 cups frozen mixed vegetables (carrots, peas, corn) - 2 cups cooked rice (white or brown) - 1 cup shredded cheddar cheese - 1 cup shredded mozzarella cheese - 1 teaspoon smoked paprika - 1 teaspoon chili powder - Salt and pepper to taste - 2 tablespoons olive oil Preheat your oven to 350°F (175°C). This step warms your oven for baking later. Next, heat olive oil in a large skillet over medium heat. Add the diced onion and bell pepper, cooking for about 5 minutes. This softens the veggies and builds flavor. Now, add minced garlic to the mix. Cook it for one more minute until it smells great. This makes your base flavorful. Then, add the ground beef. Break it up as it cooks, browning it for about 7-8 minutes. Season the beef with smoked paprika, chili powder, salt, and pepper. Once browned, stir in the drained diced tomatoes, black beans, and frozen mixed vegetables. Cook this mixture for another 5 minutes. You want everything heated through and well-mixed. In a large bowl, combine the cooked rice with half of the shredded cheddar and mozzarella. Mix well to blend the cheese with the rice. Then, fold in the beef and vegetable mix. Ensure everything is evenly combined. Transfer this mixture into a greased 9x13 inch baking dish. Top it off with the remaining cheese. Use medium heat when cooking the beef and veggies. This prevents burning and keeps the flavors balanced. Stir often to avoid sticking. Make sure to drain the canned tomatoes and rinse the black beans. This reduces excess liquid and salt. When combining the rice and cheese, make sure they are fully mixed. This ensures that every bite is cheesy and delicious. Use a spatula to fold the beef mixture into the rice gently. This keeps the rice intact and fluffy. Cover your baking dish with aluminum foil. Bake it in the preheated oven for 25 minutes. This helps steam the casserole and warms it throughout. After 25 minutes, remove the foil. Bake it for another 10-15 minutes. This allows the cheese to melt and turn golden brown. You want it bubbly and delicious. Let the casserole cool for a few minutes before serving. This helps set the layers and makes it easier to serve. Enjoy your tasty Cheesy Hobo Ground Beef Casserole! To boost flavor in your casserole, try these tips: - Use fresh herbs: Add chopped parsley or cilantro for a fresh kick. - Experiment with spices: Adding cumin or oregano can enhance the overall taste. - Sauté veggies: Cook the onion, bell pepper, and garlic longer to deepen their flavor. - Mix cheeses: Blend different cheeses for a richer taste. Try adding Monterey Jack or pepper jack. These small changes can give your casserole a big boost in flavor. Here are some common mistakes to watch out for: - Skipping the browning step: Always brown the ground beef well for better flavor. - Not draining canned items: Drain tomatoes and beans to avoid a watery dish. - Overcooking rice: Use properly cooked rice. Overcooked rice can become mushy in the casserole. - Skipping the cheese topping: Never skip the cheese on top! It adds a nice texture and flavor. Avoiding these mistakes will help you create a dish everyone will love. Having the right tools makes cooking easier. Here’s what I recommend: - Large skillet: Perfect for browning beef and sautéing veggies. - Mixing bowl: A large bowl helps combine your ingredients well. - 9x13 inch baking dish: Ideal for baking the casserole evenly. - Aluminum foil: Use it to cover the dish while baking to keep moisture in. These tools will make your cooking experience smooth and fun. {{image_2}} To make a tasty vegetarian version, swap out the ground beef. You can use mushrooms or lentils. Both options add great texture. Use the same spices like smoked paprika and chili powder. This keeps the flavors rich. You can also add more beans for protein. Black beans or kidney beans work well here. This dish remains filling and delicious without meat. If you want to try different proteins, consider ground turkey or chicken. These meats are leaner and still tasty. They absorb flavors easily, just like beef. You can also try plant-based meat. Many brands offer great options now. They mimic the flavor and texture of beef. This gives you a nice twist on the classic recipe. You can change the vegetables to fit your taste. Try adding zucchini or spinach for a fresh twist. Broccoli or cauliflower also adds crunch and health. Use seasonal veggies for the best flavor. You can even mix in some spicy peppers if you like heat. Don’t be afraid to experiment! Each veggie brings its own unique taste. To store leftover Cheesy Hobo Ground Beef Casserole, let it cool first. Place it in an airtight container. Make sure to cover it well. This keeps the flavors fresh. You can store it in the fridge for up to three days. When you reheat the casserole, do it gently. Use the oven if you can. Preheat the oven to 350°F (175°C). Cover the dish with foil to keep it moist. Heat for about 20 minutes. If you're in a hurry, you can use a microwave. Just be sure to cover it to avoid drying out the edges. For long-term storage, freeze the casserole. First, let it cool completely. Cut it into portions for easier thawing. Wrap each piece tightly in plastic wrap. Then, place them in a freezer-safe bag. This way, you can enjoy it later. It stays good in the freezer for up to three months. When you're ready to eat, thaw it in the fridge overnight before reheating. Cheesy Hobo Ground Beef Casserole has simple roots. It comes from the idea of a “hobo meal.” Hobo meals use whatever food you have on hand. They are easy to make in one pot or pan. This casserole blends flavors and textures. It makes a great meal for families. The mix of beef, beans, and cheese gives it a rich taste. You can see how this dish fits into home cooking history. Yes, you can make this casserole ahead of time. Just prepare it up to the baking step. Once you mix all the ingredients, cover the dish. You can keep it in the fridge for up to 24 hours. When ready to bake, just add about 10 extra minutes to the cooking time. This makes it perfect for busy days. You can enjoy a warm meal without much effort. You can easily adjust this recipe. For a gluten-free version, use gluten-free rice and check canned goods. If you want a vegetarian dish, swap the ground beef for lentils or plant-based meat. You can also use dairy-free cheese if you need to avoid dairy. Adjust spices and veggies to fit your taste. This way, everyone can enjoy this tasty casserole! This blog gave you a complete guide for Cheesy Hobo Ground Beef Casserole. We covered the key ingredients, step-by-step cooking tips, and tasty variations. You learned how to store leftovers and reheat them for the best flavor. Remember, you can adapt this recipe to fit your needs and preferences. Enjoy making your casserole unique to you. Trust me, with these tips, you'll master this dish and impress your family!

Are you ready to whip up a comforting meal that’s easy and delicious? Meet the Cheesy Hobo Ground Beef Casserole—a dish that delivers big flavors without breaking the bank. It’s …

Read more

Categories Dinner
Older posts
Newer posts
← Previous Page1 … Page41 Page42 Page43 … Page134 Next →

TOSSED RECIPES

Simple meals, bold taste. Quick recipes made for real life — always fresh, always delicious. 🌿🍴

PAGES

Home About Contact Privacy Policy Terms & Conditions Cookie Policy GDPR Policy Copyright Policy Disclaimer

CATEGORIES

Appetizers Desserts Salads Breakfast Dinner

Contact

  • Pinterest
  • Mail
Copyright © 2026 Tossed Recipes. All rights reserved.