Skip to content
Tossed Recipes
  • Home
  • Appetizers
  • Desserts
  • Salads
  • Breakfast
  • Dinner
  • Privacy Policy
  • Contact
  • About

Chef Jamie

Cinnamon Swirl Pumpkin Sourdough Flavorful Delight

August 26, 2025 by Chef Jamie
- 500g bread flour - 200g pumpkin puree (canned or fresh) - 100g sourdough starter, active and bubbly - 350ml warm water - 75g brown sugar - 10g sea salt - 1 tablespoon ground cinnamon - 50g unsalted butter, softened - 50g chopped walnuts or pecans (optional) The magic starts with bread flour. It gives structure and chew. Then comes pumpkin puree, which adds moisture and flavor. Your sourdough starter is key. It helps the bread rise and adds tang. Warm water is needed to activate the starter. Brown sugar adds sweetness and richness. Sea salt enhances the bread's taste. Ground cinnamon brings warmth and spice. Unsalted butter makes the dough soft and rich. If you like, add chopped walnuts or pecans for crunch and flavor. Gather these ingredients first. They make the bread taste amazing and give it a lovely texture. Working with fresh items helps boost flavor. Enjoy the process of mixing and creating! Start by grabbing a large mixing bowl. In this bowl, combine the bread flour, pumpkin puree, warm water, and your active sourdough starter. Stir until you see a shaggy dough form. This dough should look rough and a bit messy. That’s okay! It means you’re on the right track. The goal is to mix these ingredients well so that they come together. Next, add the brown sugar and sea salt to your dough mixture. Make sure to mix it thoroughly. You want the sugar and salt to blend into the dough. This step ensures a uniform flavor throughout your bread. The sweetness from the sugar and the savory touch from the salt make a perfect balance. Now, it’s time to knead the dough. Transfer it to a clean, floured surface. Knead for about 10 minutes. You want the dough to become smooth and elastic. This kneading process builds strength in the dough. Once done, place it in a lightly greased bowl. Cover it with a damp cloth. Let it rise at room temperature for about 4-6 hours. Watch it grow! The dough should double in size. After the first rise, it's punch-down time! Gently punch down the dough to release air. Then, shape it into a rectangle on a floured surface. Now, spread the softened butter over the surface of the dough. Sprinkle the ground cinnamon and any chopped nuts you like. This is where the magic happens! The filling brings wonderful flavor and texture to your bread. Roll the dough tightly into a log from the longer side. Pinch the seams to seal it well. Place your log into a greased loaf pan, seam side down. Cover it with a cloth again. Let it rise for about 2-3 hours until it puffs up nicely. Preheat your oven to 375°F (190°C). Bake the loaf for 35-40 minutes. It should be golden brown and sound hollow when tapped on the bottom. This is the moment you’ve been waiting for! To ensure an active sourdough starter, feed it regularly. Use equal parts flour and water. Let it sit at room temperature. This keeps it bubbly and ready. When kneading dough, use the heel of your hand. Push the dough away from you. Fold it over and repeat. Knead for about 10 minutes. The dough should feel smooth and elastic. You can add spices like nutmeg or ginger for extra warmth. Try adding different nuts, such as pecans or almonds. They bring a nice crunch and flavor. Experiment with sweeteners too. Swap brown sugar for maple syrup or honey. Each will change the taste profile in a fun way. If your dough doesn't rise, check the temperature. It should be warm, around 75°F to 80°F. If it's too cold, move it to a warmer spot. For overly dry dough, add a little water. If it's too sticky, sprinkle flour gradually. Adjust until you get the right consistency. {{image_2}} You can make your cinnamon swirl pumpkin sourdough even more fun. Try adding chocolate chips for a sweet burst. Dried fruits like raisins or cranberries also work well. They add a chewy texture that contrasts nicely. You can also mix in different nuts. Walnuts or pecans are great choices. They give a nice crunch and flavor. Feel free to swap nuts based on what you have. For those needing gluten-free options, you can use gluten-free flour blends. Just make sure to add a binding agent like xanthan gum. This helps the bread hold together well. If you want a vegan version, replace the butter with coconut oil or a vegan spread. You can use coconut sugar instead of brown sugar for sweetness. These swaps make the bread suitable for more diets. This recipe is not just for loaves. You can create cinnamon swirl pumpkin rolls too. Simply cut the rolled dough into smaller pieces before the final rise. Baking as mini loaves or muffins is another fun idea. Adjust the baking time to about 20-25 minutes for muffins. Keep an eye on them to avoid overbaking. Each format gives a unique twist to this delightful recipe. To keep your Cinnamon Swirl Pumpkin Sourdough fresh, store it in a bread box or a paper bag. This method allows air circulation while keeping moisture in. Avoid plastic bags, as they trap moisture and make the crust soggy. You can also wrap the bread in a clean kitchen towel. It stays fresh for about three days. If you want to enjoy your bread longer, slice it before storing. This makes it easy to grab a piece when you need it. Just make sure to keep the slices tightly wrapped to prevent drying out. For long-term storage, freezing is the best option. To freeze your bread, first, let it cool completely after baking. Then, wrap it tightly in plastic wrap, followed by aluminum foil. This double wrap prevents freezer burn and keeps the flavor intact. You can freeze it for up to three months. When you’re ready to enjoy it, take the bread out of the freezer. Let it thaw at room temperature for a few hours. If you want to warm it up, preheat your oven to 350°F (175°C). Place the loaf in the oven for about 10-15 minutes. This step revives the crust and makes it taste freshly baked. The sourdough usually takes about 4-6 hours to rise. This time can vary based on your kitchen’s warmth. If it’s cooler, it may take longer. You want the dough to double in size. After shaping, let it rise again for about 2-3 hours. This second rise is key for a light and fluffy loaf. Yes, you can use pumpkin spice! It adds a warm, fall flavor. Pumpkin spice often has cinnamon, nutmeg, and ginger. This mix can change the taste slightly but in a good way. If you love those spices, it’s a great option. Just keep in mind that the flavor will be a bit different. This bread pairs well with many things. Here are some ideas: - Cream cheese or butter for spreading. - Honey or maple syrup for sweetness. - Warm drinks like coffee or tea. - A side of fruit or a salad for brightness. These options will enhance your delightful loaf! You now have all the steps to make delicious Cinnamon Swirl Pumpkin Sourdough. We covered essential ingredients, mixing, kneading, and baking. You learned tips to enhance flavor and fix common problems. Don’t forget to explore variations and storage methods to keep your bread fresh. Baking can be fun and rewarding, so enjoy the process. I hope you feel ready to create this tasty treat in your kitchen!

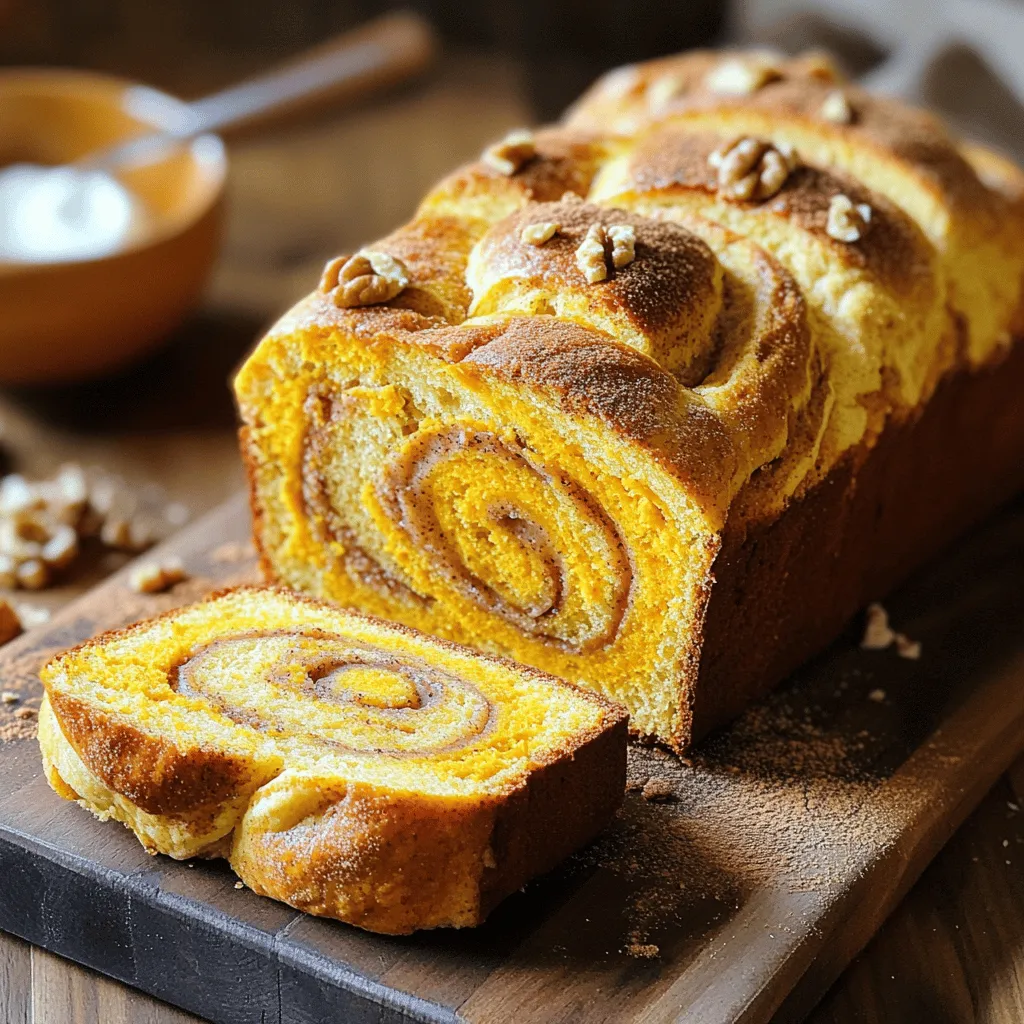
Are you ready to elevate your baking game? This Cinnamon Swirl Pumpkin Sourdough offers a perfect mix of warm flavors and a delightful texture. With simple ingredients and easy steps, …

Read more

Categories Desserts

Spicy Butternut Sweet Potato Soup Hearty and Healthy

August 26, 2025 by Chef Jamie
- 1 medium butternut squash, peeled and diced - 2 medium sweet potatoes, peeled and chopped - 1 onion, chopped - 2 cloves garlic, minced - 1 tablespoon fresh ginger, grated - 1 red chili, finely chopped (adjust to taste) - 4 cups vegetable broth - 1 teaspoon ground cumin - 1 teaspoon ground coriander - 1/2 teaspoon turmeric - Salt and pepper to taste - 2 tablespoons olive oil - 1 can coconut milk (optional for creaminess) - Fresh cilantro, for garnish When measuring, use a scale for the squash and sweet potatoes. This ensures you have the right amounts. For chopped ingredients, a sharp knife makes quick work. Fresh herbs should be packed lightly but not crushed. Always taste as you go to adjust flavors. You can add more heat with extra red chili. For a smoky flavor, try adding smoked paprika. If you like crunch, top your soup with toasted pumpkin seeds. You can also stir in some cooked quinoa for added protein. Fresh lime juice adds brightness, so don’t skip it! Start by peeling and dicing your butternut squash. A medium squash works great here. Next, peel and chop two sweet potatoes. You will also need to chop one onion and mince two cloves of garlic. Grate one tablespoon of fresh ginger. Finally, finely chop a red chili to add heat. Adjust the amount based on your spice preference. In a large pot, heat two tablespoons of olive oil over medium heat. Add the chopped onion and sauté it. Cook until the onion looks translucent, about five minutes. Then, add the minced garlic, grated ginger, and chopped chili. Stir for about two minutes until it smells amazing. Now, add the diced butternut squash and sweet potatoes to the pot. Mix everything well. Next, sprinkle in one teaspoon of ground cumin, one teaspoon of ground coriander, and half a teaspoon of turmeric. Season with salt and pepper to taste. Sauté the mixture for three to four minutes to toast the spices. Pour in four cups of vegetable broth. Bring the soup to a boil, then reduce the heat. Let it simmer for 20 to 25 minutes. Check that the squash and sweet potatoes are tender. Once cooked, remove the pot from the heat. Use an immersion blender to purée the soup until it is smooth. If you don’t have one, you can carefully transfer the soup in batches to a regular blender. If you want extra creaminess, stir in one can of coconut milk. Adjust the seasoning if needed. Heat gently before serving. Ladle the soup into bowls and finish with fresh cilantro on top. When using an immersion blender, keep it submerged to avoid splatters. Start blending at the bottom of the pot. Gradually move it up to mix everything well. This tool makes blending easy and quick. If you prefer a chunkier soup, blend only half the mixture. Enjoy the lovely texture! To change the spice in your soup, start with the red chili. You can use less or more depending on your taste. If you want it milder, remove the seeds and membranes from the chili. You can also use paprika or sweet bell peppers for a gentler kick. For extra heat, add more chili or a dash of cayenne pepper. Taste as you go to get your perfect level. You can make this soup in different ways. Try roasting the butternut squash and sweet potatoes first. This adds a rich flavor. Simply bake them at 400°F for 25-30 minutes. After that, add them to the pot with the other ingredients. You can also use a slow cooker for a hands-off method. Just combine all ingredients and cook on low for 6-8 hours. Blend once it's ready, and enjoy! Add depth to your soup with a few simple tricks. Fresh herbs like basil or thyme can brighten the flavor. A squeeze of lime juice will add a nice zing. Also, consider adding a splash of soy sauce or a spoon of miso for umami. If you like sweetness, stir in a bit of maple syrup or honey. Each addition will make your soup unique and exciting! {{image_2}} You can easily make this soup vegan and dairy-free. Simply skip the coconut milk or use a nut milk instead. Almond or cashew milk adds creaminess without dairy. You can also enhance the flavor with a splash of lime juice or a bit of nutritional yeast. Want to change the spice profile? You can try adding a pinch of smoked paprika for a deeper flavor. If you love more heat, add cayenne pepper. For warmth, try a dash of nutmeg. Don’t be afraid to mix spices to find your favorite blend. You can swap sweet potatoes for carrots or parsnips if you want. Butternut squash is key, but acorn or kabocha squash can work well too. If you don't have fresh ginger, use a dash of ground ginger. These swaps keep the soup tasty and fun! After cooking your Spicy Butternut Sweet Potato Soup, let it cool. Transfer it to an airtight container. Store it in the fridge for up to 5 days. Make sure to label the container with the date. This way, you'll know when to enjoy it again. If you want to keep the soup longer, freezing is a great option. Cool the soup completely before freezing. Pour it into freezer-safe bags or containers. Leave some space at the top, as the soup will expand when frozen. It can last up to 3 months in the freezer. When you're ready to eat, thaw it in the fridge overnight. To reheat your soup, you can use a pot on the stove. Heat it over medium heat, stirring often. This method keeps the soup smooth and creamy. If you're in a hurry, use the microwave. Place the soup in a microwave-safe bowl. Heat in short bursts, stirring in between. Check the temperature to ensure it's hot all the way through. Enjoy your warm, spicy bowl of goodness! To tone down the heat, skip the red chili. You can also use less ginger. Another way is to add more coconut milk. This will make the soup creamier and milder. If you want some heat later, serve chili flakes on the side. This way, everyone can adjust to their taste. Yes, you can use frozen butternut squash and sweet potatoes. Just remember to thaw them first. This helps them cook evenly. Add them to the pot just like fresh ones. They will still taste great in your soup! This soup pairs well with crusty bread. A fresh salad also works nicely. If you want a heartier meal, serve it with grilled cheese. You can even top the soup with roasted seeds for a crunchy bite. The options are endless! This post covered everything you need for Spicy Butternut Sweet Potato Soup. We explored the ingredients, including measurements and tasty additions. I provided step-by-step cooking instructions and tips for using an immersion blender. You learned how to adjust spice levels, switch cooking methods, and enhance flavors. Several variations, including vegan options, are available. Lastly, we discussed storage, freezing, and reheating techniques. In summary, with these tips, your soup will be delicious every time. Enjoy your cooking journey!

Looking for a warm, comforting dish that packs a healthy punch? Welcome to my spicy butternut sweet potato soup recipe! This hearty soup balances rich flavors and spicy heat, making …

Read more

Categories Dinner

Maple Glazed Sweet Potato Fries Tasty and Simple Treat

August 26, 2025 by Chef Jamie
- 2 large sweet potatoes, cut into thin fries - 3 tablespoons olive oil - 1/4 cup pure maple syrup - 1 teaspoon ground cinnamon - 1/2 teaspoon sea salt - 1/4 teaspoon black pepper - Optional: Fresh chopped parsley for garnish Sweet potatoes are the star here. They give a natural sweetness and vibrant color. Olive oil helps the fries crisp up nicely. Maple syrup adds a rich, sweet glaze that makes these fries special. Ground cinnamon brings warmth and depth, while sea salt and black pepper enhance the flavors. One serving of these fries contains about 180 calories. They have around 6 grams of fat, 30 grams of carbohydrates, and 4 grams of fiber. Sweet potatoes are rich in vitamins and minerals, making them a healthy choice. They offer a good amount of beta-carotene, which is great for your eyes. Enjoying these fries gives you a tasty treat without feeling guilty! First, you need to preheat your oven to 425°F (220°C). This step is crucial. While the oven heats, line a baking sheet with parchment paper. This helps with cleanup and keeps fries from sticking. Next, take the two large sweet potatoes. Cut them into thin fries. Aim for even sizes to cook them well. Place the fries in a big bowl. Add three tablespoons of olive oil. Toss the sweet potatoes in the oil until they are well-coated. This step helps them bake nicely. Now, it’s time to make the maple glaze. In a small bowl, combine 1/4 cup of pure maple syrup with one teaspoon of ground cinnamon, 1/2 teaspoon of sea salt, and 1/4 teaspoon of black pepper. Whisk these ingredients together until smooth. This glaze adds a sweet and spicy flavor. Once the fries are ready, pour the maple mixture over them. Toss again to coat all fries evenly. Spread the fries in a single layer on your baking sheet. Make sure they are not crowded. This helps them get crispy. Bake the fries for about 25-30 minutes. Flip them halfway through. They should turn golden brown and crispy. After baking, let them cool slightly before serving. To get sweet potato fries crispy, follow these simple steps: - Cut fries thin: Aim for fries about 1/4 inch thick. Thin fries cook faster and get crispier. - Toss in olive oil: Use enough olive oil to coat the fries well. This helps them crisp. - Space them out: Spread fries in a single layer on the baking sheet. Do not overcrowd them. - Flip halfway: Turn the fries halfway through baking. This helps them cook evenly and get crispy on all sides. Want to add more flavor to your fries? Here are some tasty ideas: - Add garlic powder: A sprinkle of garlic powder gives a nice kick. - Try smoked paprika: This adds a smoky flavor that pairs well with sweet potatoes. - Top with fresh herbs: Chopped parsley or cilantro adds color and freshness to the dish. Avoid these common pitfalls for perfect fries every time: - Cutting fries too thick: Thick fries can be soggy. Keep them thin for best results. - Not drying sweet potatoes: Make sure to dry the fries before adding oil. Moisture can lead to sogginess. - Using too much syrup: More syrup can make fries soggy. Stick to the recipe for the best glaze. {{image_2}} If you want to swap maple syrup, try honey or agave nectar. Both work well in this recipe. Honey adds a floral note, while agave has a mild flavor. You can also use brown sugar. Just mix it with a bit of water to create a syrup. Each option brings a unique taste to your fries. To change things up, add spices like chili powder or smoked paprika. These spices give the fries a savory kick. You could also mix in garlic powder for depth. For a sweet heat, add cayenne pepper. Each option creates a fun twist on the classic dish! Pair these fries with a cool dip, like yogurt or ranch dressing. They also go well with grilled meats or fish. Try serving them alongside a fresh salad for a balanced meal. You can even enjoy them as a snack with friends. They are great for sharing and will impress anyone! To keep your fries fresh, first, let them cool. Place them in an airtight container. Make sure to separate layers with parchment paper. This step helps keep them from sticking together. Store the container in the fridge. Use leftovers within three days for the best flavor. To reheat, preheat your oven to 400°F (200°C). Spread the fries on a baking sheet. Bake for about 10 minutes. This method helps the fries regain their crispiness. You can also use a toaster oven if you have one. Avoid microwaving, as it can make fries soggy. You can freeze fries for later use. First, let them cool completely. Then, lay them flat on a baking sheet. Freeze them for about an hour. Once frozen, transfer them to a freezer bag. Seal tightly, removing as much air as possible. To prepare, bake them from frozen at 425°F (220°C) for about 25-30 minutes. Yes, you can make these fries in an air fryer. Preheat the air fryer to 400°F (200°C). Toss the sweet potato fries with olive oil and the maple mixture as you would for the oven. Place the fries in a single layer in the air fryer basket. Cook for about 15-20 minutes, shaking the basket halfway through. This method gives you crispy fries with less oil. Leftovers from this recipe can last up to 3 days in the fridge. Store them in an airtight container. If you want to keep them longer, you can freeze them. They will stay good for up to 3 months in the freezer. Make sure to let them cool before freezing. You can use regular potatoes, but the taste will change. Sweet potatoes are sweeter and have a different texture. If using regular potatoes, adjust the cooking time. They may need less time in the oven. Cut them thin, just like sweet potatoes, for the best results. This blog post covered how to make tasty sweet potato fries. We looked at the key ingredients, step-by-step instructions, and cooking tips. You learned how to create the perfect crispy fries and flavorful variations. We also discussed storage methods for leftovers and answered common questions. Remember, sweet potato fries are versatile and easy to make. Enjoy experimenting with toppings and spices. Whether you're serving them as a snack or a side, these fries will impress. With these tips, you’ll make delicious fries every time.

If you’re looking for a tasty snack that’s both sweet and savory, you’re in the right place! These maple glazed sweet potato fries are simple to make and perfect for …

Read more

Categories Appetizers

Spicy Thai Peanut Noodles Flavorful and Easy Recipe

August 26, 2025 by Chef Jamie
To make Spicy Thai Peanut Noodles, you will need: - 8 oz rice noodles - 1 cup peanut butter (smooth) - 2 tablespoons soy sauce - 2 tablespoons lime juice - 1 tablespoon honey or agave syrup - 1 tablespoon sriracha (adjust for spice preference) - 1 clove garlic, minced - 1 inch ginger, grated - 1/4 cup water (to thin the sauce) - 1 red bell pepper, julienned - 1 cup shredded carrots - 1/2 cup green onions, sliced - 1/4 cup chopped cilantro (for garnish) - Crushed peanuts for topping You can swap some ingredients if needed. Here are a few ideas: - Use almond butter instead of peanut butter for a nut-free option. - Swap lime juice with lemon juice for a different flavor. - Agave syrup can be replaced with maple syrup if you prefer. - If you don’t have sriracha, try chili paste or hot sauce. - For a crunch, use sunflower seeds instead of crushed peanuts. When you pick fresh produce, keep these tips in mind: - Choose bright and firm bell peppers. They should feel heavy for their size. - Pick carrots that are crisp and free of blemishes. - For green onions, look for green tops that are sturdy and fresh. - Cilantro should smell bright and look vibrant green. - Always check for any signs of spoilage before buying. These tips help ensure your dish is fresh and tasty. Happy cooking! To make the best rice noodles, start with a large pot. Fill it with water and bring it to a boil. Once the water is bubbling, add the rice noodles. Follow the package instructions for cooking time, usually about 5 to 7 minutes. You want them to be al dente, so keep an eye on them. After cooking, drain the noodles in a colander and set them aside. This step is key for a great texture. The peanut sauce is simple but packed with flavor. Grab a mixing bowl and add the smooth peanut butter. Then, pour in the soy sauce and lime juice. Add honey or agave syrup for sweetness. Next, include sriracha. Adjust the amount based on how spicy you want it. Mince one clove of garlic and grate an inch of ginger, adding them to the bowl. Finally, add a splash of water to thin the sauce. Whisk everything together until it's smooth and creamy. If the sauce is too thick, just add more water. Sautéing vegetables adds great flavor and keeps them crisp. Heat a large skillet over medium heat and add a splash of oil. Once the oil is hot, add the julienned red bell pepper and shredded carrots. Stir them around for about 3 to 4 minutes. You want them slightly softened but still crunchy. This step enhances the taste and makes your dish colorful. The bright veggies will make your noodles pop! You can control the heat in your spicy Thai peanut noodles with sriracha. Start with one tablespoon for a mild kick. Taste it, and if you want more spice, add a bit more. Mix well to ensure it blends in. If you love heat, try two tablespoons. Just remember, it’s easier to add heat than to take it away! To get a creamy peanut sauce, use smooth peanut butter. This helps the sauce blend well. If you find the sauce too thick, add a little water. Start with a tablespoon, mix, and check the texture. If you want a nuttier flavor, stir in crushed peanuts at the end. This will add great texture and taste. Garnishing makes your dish pop! Use sliced green onions for a fresh look. Add chopped cilantro for a burst of color. Crushed peanuts on top give a nice crunch. Arrange the noodles neatly on the plate. A sprinkle of lime zest can also brighten the dish visually and flavor-wise. Remember, we eat with our eyes first! {{image_2}} If you want to keep this dish vegetarian, you can swap out the meat. Tofu is a great choice. You can use firm or extra-firm tofu. Just cube it and pan-fry until it’s golden. Tempeh also works well. It adds a nice nutty flavor. If you want a lighter option, try using chickpeas. They add protein and fiber too. This recipe is super flexible. You can add many veggies to boost flavor and nutrition. Try snap peas, broccoli, or baby corn for crunch. You can also toss in some mushrooms for an earthy taste. If you like a bit of sweetness, add some pineapple chunks. For an extra kick, sprinkle in some red pepper flakes or chili powder. If you want to make this dish low-carb, swap rice noodles for zucchini noodles or spaghetti squash. They’re both tasty and light. For a gluten-free option, check that your soy sauce is gluten-free. Tamari is a great substitute. You can also use coconut aminos for a slightly sweeter flavor. Enjoy these twists while keeping the spirit of the dish! To store leftover spicy Thai peanut noodles, let them cool first. Place them in an airtight container. A glass or plastic container works well. Make sure to use a lid to keep air out. You can store them in the fridge for up to three days. To reheat the noodles, use a skillet or a microwave. If you use a skillet, add a splash of water. Heat it on low. Stir the noodles often to warm them evenly. If using a microwave, place the noodles in a safe dish. Add a little water, cover, and heat for one to two minutes. Stir halfway through to ensure even heating. If you want to freeze the noodles, pack them in freezer-safe bags. Remove as much air as you can. This helps prevent freezer burn. Label the bags with the date. You can freeze them for up to three months. To thaw, place them in the fridge overnight. Then, reheat as mentioned above. Spicy Thai Peanut Noodles are a tasty dish made with rice noodles. They feature a rich peanut sauce mixed with fresh vegetables. You get flavors from garlic, ginger, and sriracha that add a nice kick. This dish is not just spicy; it’s creamy and full of crunch from toppings like crushed peanuts and green onions. Yes, you can make this dish in advance. Prepare the peanut sauce and noodles ahead of time. Store each in separate containers in the fridge. When you are ready to eat, just reheat them together in a skillet. Add a splash of water if the sauce is too thick. This way, you can enjoy a quick meal without any hassle. Spicy Thai Peanut Noodles pair well with several sides. You can serve them with a fresh salad, like cucumber or mango salad, to balance the heat. Another great option is spring rolls filled with veggies or shrimp. For a heartier meal, consider grilled chicken or tofu on the side. These options complement the noodles and enhance your dining experience. Spicy Thai peanut noodles combine fresh ingredients, easy steps, and handy tips. You learned how to cook the noodles perfectly and create a flavorful peanut sauce. Remember, you can adjust spice levels and explore variations, like vegetarian options. Store leftovers properly to enjoy later without losing quality. This dish is quick and fun to make. So, grab your ingredients and start creating a delicious meal that everyone will love. Enjoy the cooking journey!

If you’re craving bold flavors and a quick meal, you’re in the right place! My Spicy Thai Peanut Noodles recipe is not only delicious but also easy to whip up. …

Read more

Categories Dinner

Salted Caramel Pretzel Brownies Decadent Sweet Treat

August 26, 2025 by Chef Jamie
To make these Salted Caramel Pretzel Brownies, gather these items: - 1 cup unsalted butter (2 sticks) - 2 cups granulated sugar - 4 large eggs - 1 teaspoon vanilla extract - 1 cup all-purpose flour - 1 cup unsweetened cocoa powder - 1 teaspoon baking powder - 1/2 teaspoon salt - 1 cup pretzels, crushed - 1 cup caramel sauce (store-bought or homemade) - Flaky sea salt for topping You can swap some ingredients if needed. For butter, use coconut oil for a dairy-free option. Instead of granulated sugar, try brown sugar for a richer flavor. Egg substitutes like applesauce or flaxseed meal work well too. If you want a gluten-free option, use a gluten-free flour blend. Choose fresh eggs. They should feel heavy and have a clean shell. For butter, select unsalted for better control over saltiness. Look for high-quality cocoa powder. A deeper color often means richer flavor. When picking pretzels, choose thick ones for better crunch. Finally, opt for a good caramel sauce; it can make a big difference in taste. First, set your oven to 350°F (175°C). This heat makes the brownies bake just right. Next, grab a 9x13-inch baking pan. Grease it lightly and line it with parchment paper. Leave some paper hanging over the edges. This will help you lift the brownies out later. Now, let’s melt the butter. Use a medium saucepan over low heat. Stir it until it's fully melted, then take it off the heat. Let it cool for a minute. In a large mixing bowl, combine the melted butter with 2 cups of granulated sugar. Whisk them together until they mix well. Add 4 large eggs one by one, mixing after each. Finally, stir in 1 teaspoon of vanilla extract. In another bowl, mix the dry ingredients. Whisk together 1 cup of all-purpose flour, 1 cup of unsweetened cocoa powder, 1 teaspoon of baking powder, and 1/2 teaspoon of salt. Gradually add this dry mix to the wet mix. Stir gently until just combined. Be careful not to overmix; a few lumps are okay. Pour half the brownie batter into the pan. Spread it evenly. Drizzle half of your caramel sauce on top. Then, add the rest of the brownie batter, smoothing it out. Drizzle the remaining caramel sauce on top. Take a knife or skewer and swirl the caramel in the batter a bit. This creates a beautiful pattern. Sprinkle the reserved crushed pretzels on top. Finish with a pinch of flaky sea salt. Bake the brownies for 25-30 minutes. Check with a toothpick; it should come out with some moist crumbs. Once done, let the brownies cool in the pan for at least 30 minutes. Use the parchment to lift them out and cut them into squares. For a great presentation, serve them on a wooden board. Drizzle with more caramel and add a sprinkle of sea salt. Enjoy! To get the best texture in your brownies, you must mix well. Start by melting the butter slowly. This gives the brownies a rich flavor. When you mix the sugar with the butter, combine them until smooth. Add the eggs one by one. Mixing after each one helps the batter stay fluffy. When you mix the dry and wet ingredients, do not overmix. Just combine them until you see no dry flour. This keeps the brownies soft and chewy. One common mistake is using cold eggs. Always use room-temperature eggs. This helps the batter mix well and rise properly. Another mistake is pouring all the batter at once. Pour half, add caramel, then add the rest. This gives a nice caramel swirl. Also, watch the baking time. Check your brownies at 25 minutes. If a toothpick comes out with a few moist crumbs, they are done. To boost flavor, use high-quality cocoa powder. This makes a big difference. You can also add a splash of coffee to the batter. It enhances the chocolate taste without making it taste like coffee. For a fun twist, try adding nuts. Chopped pecans or walnuts can add a crunchy texture. You can mix them into the batter or sprinkle on top with the pretzels. Lastly, serve with a drizzle of extra caramel. This adds a sweet touch and makes it look beautiful. Enjoy your salted caramel pretzel brownies! {{image_2}} You can add nuts to your brownies for extra crunch. Walnuts, pecans, or almonds work well. Just chop them roughly and fold them in with the pretzels. You can also mix in chocolate chips. They add a sweet touch and make the brownies even more rich. To make these brownies gluten-free, swap all-purpose flour with a gluten-free blend. Look for a blend that includes xanthan gum. This helps mimic the texture of regular brownies. You can also check labels for certified gluten-free oats. They work great as an alternative. If you prefer homemade caramel, you can easily make it. Combine sugar, butter, and cream in a pot. Stir until smooth and thick. Let it cool before drizzling over the brownies. You can also try using dulce de leche. It adds a creamy, sweet flavor that pairs well with pretzels. Store your Salted Caramel Pretzel Brownies in an airtight container. This keeps them fresh and moist. Place parchment paper between layers to prevent sticking. Keep the container at room temperature for up to four days. If you want them to last longer, consider refrigeration. Just remember, cold can change the texture a bit. To freeze brownies, first let them cool completely. Cut them into squares, then wrap each piece tightly in plastic wrap. Place the wrapped brownies in a freezer-safe bag or container. They can stay frozen for up to three months. When you’re ready to enjoy, thaw them overnight in the fridge or at room temperature. Freshly baked brownies last about four days at room temperature. If you refrigerate them, they can last up to a week. Signs of spoilage include a dry texture or an off smell. If the brownies develop mold, discard them immediately. Always trust your senses to judge freshness. Yes, you can use dark or milk chocolate instead of cocoa powder. Each type of chocolate gives a unique flavor. Dark chocolate adds richness, while milk chocolate is creamier. Just remember to adjust the sugar if you use sweeter chocolate. You can check if the brownies are done by inserting a toothpick in the center. If it comes out with a few moist crumbs, they are ready. If it comes out wet with batter, bake them a bit longer. Keep an eye on them; overbaking can make them dry. Absolutely! You can make these brownies a day in advance. Just store them in an airtight container at room temperature. If needed, warm them in the microwave for a few seconds before serving. This keeps them soft and delicious. This blog post covered the key ingredients and provided step-by-step instructions for baking brownies. You learned how to prep your oven and combine ingredients for the best results. I shared tips for texture, flavor, and avoiding mistakes. We explored variations like gluten-free options and storage methods to keep your brownies fresh. Remember, baking is about experimenting. Try new flavors and enjoy the process. Happy baking!

Indulge your sweet tooth with my Salted Caramel Pretzel Brownies! This treat combines rich chocolate, crunchy pretzels, and a drizzle of caramel for pure bliss. Baking these brownies only takes …

Read more

Categories Desserts

Quick Teriyaki Chicken Stir Fry Bold and Flavorful Meal

August 26, 2025 by Chef Jamie
- 1 lb boneless, skinless chicken breasts, cut into bite-sized pieces - Assorted vegetables: bell pepper, broccoli, carrot, sugar snap peas - Aromatics: ginger, garlic, green onions In this dish, I use chicken breasts for their tenderness. You can cut them into small pieces for quick cooking. The vegetables add color and nutrition. I like bell peppers for sweetness, broccoli for crunch, and carrots for a touch of earthiness. Sugar snap peas bring a nice snap. Fresh ginger and garlic boost flavor. Green onions add brightness. - 1/4 cup low-sodium soy sauce - 2 tablespoons honey - 1 tablespoon sesame oil - 1 teaspoon cornstarch mixed with 2 tablespoons water (slurry for thickening) The sauce is simple yet rich. Low-sodium soy sauce keeps it lighter. Honey gives a sweet touch, balancing the saltiness. Sesame oil adds a nutty depth. The cornstarch slurry helps thicken the sauce. This mix coats the chicken and veggies perfectly. - Sesame seeds - Additional green onions For garnish, sesame seeds add crunch. They also look great on the plate. Extra green onions give a fresh taste. You can sprinkle them on top for a pop of color. These little touches elevate the dish visually and flavor-wise. To start, you need to prepare the chicken and vegetables. Cut 1 pound of boneless, skinless chicken breasts into bite-sized pieces. This helps them cook evenly. Next, slice your bell pepper, julienne the carrot, and chop the broccoli into florets. Rinse 1 cup of sugar snap peas. Now, let's make the cornstarch slurry. In a small bowl, mix 1 teaspoon of cornstarch with 2 tablespoons of water. Stir until smooth. This will help thicken your sauce later. Heat 2 tablespoons of olive oil in a large pan or wok over medium-high heat. Once the oil is hot, add the chicken pieces. Cook the chicken for about 4-5 minutes. Stir frequently until the chicken is browned and cooked through. Add 3 cloves of minced garlic and 1 tablespoon of minced fresh ginger to the pan. Cook for another minute until you smell their aroma. Now, it’s time to add the vegetables. Toss in the sliced bell pepper, broccoli florets, julienned carrot, and sugar snap peas. Stir-fry the mix for 3-4 minutes until the vegetables are crisp-tender. In a small bowl, whisk together 1/4 cup of low-sodium soy sauce, 2 tablespoons of honey, and 1 tablespoon of sesame oil. Pour this mixture over the chicken and vegetables in the pan. Allow the sauce to simmer for 1-2 minutes. Now, add your cornstarch slurry to the pan. Stir quickly to thicken the sauce. Finally, toss in the chopped green onions (whites) and stir to mix everything well. Cook for another minute to heat through. Before serving, sprinkle with sesame seeds for a nice finish. Enjoy your quick teriyaki chicken stir fry! Using fresh ginger and garlic is key. They add a bold taste that makes your dish shine. Dried or jarred versions lack the same punch. Always choose fresh to lift your meal. For the right vegetable crunch, aim for a quick stir-fry. Cook them just until they are crisp-tender. This keeps their bright colors and nutrients intact. A large skillet or wok works best for stir-frying. Their wide surface allows for even cooking. Heat your pan over medium-high heat to get a nice sear on the chicken. Timing is crucial for perfect texture. Cook the chicken until browned and fully cooked, about 4-5 minutes. Then add the veggies. Stir-fry for 3-4 minutes and watch for that crispness. You can adjust the sweetness and saltiness to fit your taste. If you prefer a sweeter sauce, add more honey. For saltiness, a dash more soy sauce can help. Feel free to add extra proteins or veggies, like shrimp or bell peppers. This dish is flexible and can adapt to your fridge's contents. {{image_2}} You can swap chicken for beef, shrimp, or tofu. Each option offers a unique taste. For beef, use thin strips to cook quickly. Shrimp cooks fast and adds a nice sweetness. Tofu is great for a vegetarian or vegan meal. Just make sure to press it first to remove extra moisture. - Beef: Use thin slices for quick cooking. - Shrimp: Sweet and cooks in minutes. - Tofu: Press to remove moisture before use. You can create your own teriyaki sauce at home. Try adding garlic or sesame seeds for extra flavor. You can also mix in pineapple juice for a fruity twist. If you want something spicy, add chili paste or sriracha. Each sauce change gives your dish a new taste. - Homemade Teriyaki: Add garlic or sesame for flavor. - Fruity Twist: Mix in pineapple juice. - Spicy Option: Add chili paste or sriracha. Serve your stir fry with sides like rice, noodles, or a fresh salad. Steamed white rice balances flavors well. Noodles add a fun twist and soak up the sauce. For a healthy option, a salad with sesame dressing works great, too. Arrange your meal on a large platter for a beautiful presentation. - Rice: Perfect for soaking up sauce. - Noodles: Fun and flavorful option. - Salad: Fresh and healthy side. After you finish your meal, let the stir fry cool down first. Use an airtight container to keep it fresh. Glass or plastic containers work well. If you store it right, the dish lasts up to three days in the fridge. Make sure to label your container with the date. This will help you keep track of how long it has been stored. To freeze your stir fry, first let it cool completely. Then, place it in a freezer-safe bag or container. Remove as much air as possible. This helps prevent freezer burn. The stir fry can stay in the freezer for up to three months. When you want to eat it again, thaw it in the fridge overnight. You can reheat your stir fry in two ways: microwave or stove. If using the microwave, heat it in short bursts. Stir every minute to keep it even. If you prefer the stove, use a non-stick pan over medium heat. Add a splash of water to keep it moist. Be careful not to overcook it. This will keep your chicken tender and juicy. Yes, you can make this dish gluten-free. Just swap regular soy sauce with gluten-free soy sauce. Brands like Tamari or coconut aminos work well. They give a similar taste without the gluten. Always check labels for hidden gluten. To add heat, you can use crushed red pepper flakes or sliced jalapeños. Stir these in with the garlic and ginger. You can also use sriracha or chili paste in the sauce for a spicy kick. Adjust the amount based on your heat preference. Yes, you can use frozen vegetables. They are quick and easy. Just remember, frozen veggies may need less cooking time. Cook them until they are heated through and tender but still crisp. This keeps them from getting mushy. This article covers how to make a tasty stir-fry with chicken and veggies. We discussed key ingredients, cooking steps, and flavor tips. I shared ways to customize your dish, such as using different proteins or sauces. You learned about storing and reheating leftovers too. With these tips, your meal will be delicious and satisfying. Enjoy creating your stir-fry masterpiece!

Are you ready to whip up a meal that packs a punch? This Quick Teriyaki Chicken Stir Fry is your answer for a satisfying, bold dinner in no time. With …

Read more

Categories Dinner

S’mores Chocolate Chip Skillet Cookie Delight

August 26, 2025 by Chef Jamie
To make the S'mores Chocolate Chip Skillet Cookie, gather these key ingredients: - 1 cup all-purpose flour - 1/2 teaspoon baking soda - 1/4 teaspoon salt - 1/2 cup unsalted butter, softened - 1/2 cup brown sugar, packed - 1/2 cup granulated sugar - 1 teaspoon vanilla extract - 1 large egg - 1 cup semi-sweet chocolate chips - 1 cup graham cracker crumbs - 1 cup mini marshmallows These ingredients create a rich and gooey cookie that brings the campfire classic right to your kitchen. You can enhance your skillet cookie with these fun toppings and mix-ins: - Extra chocolate chips for a richer flavor - Chopped nuts like walnuts or pecans for crunch - A sprinkle of sea salt on top for balance - Caramel sauce drizzled for extra sweetness Feel free to get creative! You can mix and match based on what you love. If you have dietary restrictions or run out of something, here are some great substitutes: - Use coconut oil instead of butter for a dairy-free option - Substitute almond flour for all-purpose flour for a gluten-free treat - Swap brown sugar with coconut sugar for a healthier twist - Use egg replacer instead of an egg for a vegan version These swaps keep the cookie tasty while fitting your needs. First, set your oven to 350°F (175°C). This step is key for perfect baking. A preheated oven helps the cookie rise and bake evenly. Don’t skip this part for the best results! In a medium bowl, whisk together 1 cup of all-purpose flour, 1/2 teaspoon of baking soda, and 1/4 teaspoon of salt. This mix gives your cookie structure. Next, in a large bowl, cream together 1/2 cup of softened unsalted butter, 1/2 cup of brown sugar, and 1/2 cup of granulated sugar. Mix until the texture is light and fluffy. Then add 1 teaspoon of vanilla extract and 1 large egg, mixing well until combined. Now, slowly add the dry mix to the wet mix. Stir just until the dough comes together. Be careful not to overmix! Finally, fold in 1 cup of semi-sweet chocolate chips and 1 cup of graham cracker crumbs. This will give your cookie that signature s'mores flavor. Grease a 10-inch cast-iron skillet. Spread the dough evenly in the skillet. Press 1 cup of mini marshmallows into the top of the dough. This makes for a gooey, melty topping. Bake in your preheated oven for 25-30 minutes. Look for golden edges and a set center. Once done, take it out and let it cool for 5-10 minutes. Serve warm for the best gooey experience! To get the right texture, remember a few key points. First, mix the butter and sugars well. This step makes your cookie light and fluffy. Don’t overmix the dough once you add the flour. Stir just until the dry ingredients blend in. This keeps it chewy. Lastly, the mini marshmallows on top should be slightly toasted for that perfect crisp. Baking times may change based on skillet type. I recommend a cast-iron skillet for even heat. For a 10-inch skillet, bake for 25-30 minutes at 350°F. If you use a smaller skillet, check it around 20 minutes. The edges should be golden brown. The center needs to feel set but soft. Always keep an eye on it! Serving straight from the skillet is fun and cozy. Drizzle warm chocolate sauce over the top. Sprinkle extra graham cracker crumbs for a nice touch. For a warm experience, let it cool for just 5-10 minutes. This lets the gooey center shine. Use a large spoon to scoop out servings, and enjoy every bite! {{image_2}} You can enjoy this skillet cookie without gluten. Use gluten-free all-purpose flour instead of regular flour. Check the label to ensure it has xanthan gum. This helps bind the cookie. The taste stays rich and delicious. To make this cookie vegan, swap the egg for a flax egg. Mix 1 tablespoon of flaxseed meal with 2.5 tablespoons of water. Let it sit for a few minutes to thicken. Use vegan butter instead of regular butter. Choose dairy-free chocolate chips to keep it vegan. Get creative with flavors! Add peanut butter chips for a nutty taste. Use white chocolate chips for a sweeter twist. Try adding chopped nuts, like walnuts or pecans, for crunch. You can even mix in dried fruit, like cranberries or cherries, for a fruity touch. Each option gives your cookie a fun new spin! To store leftovers, let the skillet cookie cool completely. Cover the skillet with plastic wrap or foil. You can also transfer pieces to an airtight container. It stays fresh for about 3 days at room temperature. For longer storage, put it in the fridge. To reheat, slice a piece of the cookie. Place it on a microwave-safe plate. Heat for about 10-15 seconds. Check if it is warm but not too hot. You want it soft and gooey. If you prefer, you can also reheat it in the oven. Preheat the oven to 350°F. Bake for about 5-10 minutes. You can freeze this cookie for later. First, let it cool completely. Wrap the skillet tightly in plastic wrap, then in foil. You can also slice it and freeze individual pieces. They will last for about 2 to 3 months in the freezer. To enjoy, thaw it in the fridge overnight, then reheat. Yes, you can use other types. Milk chocolate or dark chocolate work well. They add unique flavors to your cookie. Each type brings its own sweetness. If you like nuts, try adding chopped walnuts or pecans. For a twist, use white chocolate chips or even peanut butter chips. Look for golden brown edges and a set center. You can insert a toothpick in the middle. If it comes out clean, it's done. If not, bake it a few more minutes. The cookie will continue to cook a bit after you take it out. Don't overbake, or it will be dry. This cookie is great on its own, but you can add more fun! Serve it warm with vanilla ice cream. Drizzle chocolate or caramel sauce on top. Fresh berries or whipped cream can also enhance the flavor. For a more s'mores feel, add extra graham cracker crumbs and marshmallows to the top. Enjoy! In this post, we covered how to make a tasty S'mores Chocolate Chip Skillet Cookie. We explored the key ingredients and shared optional toppings for extra fun. You learned step-by-step instructions, along with tips for the perfect bake. We discussed variations to fit different diets and how to store your cookie. Remember, baking is all about practice. Enjoy the process and share your creations!

Are you ready to take your dessert game to the next level? Meet the S’mores Chocolate Chip Skillet Cookie Delight! This warm, gooey treat combines everything you love about s’mores …

Read more

Categories Desserts

Instant Pot Chicken and Dumplings Simple Comfort Food

August 26, 2025 by Chef Jamie
- 1.5 lbs boneless, skinless chicken thighs - 1 medium onion, diced - 3 cloves garlic, minced - 3 cups low-sodium chicken broth - 2 cups carrots, sliced - 2 cups celery, chopped - 1 teaspoon dried thyme - 1 teaspoon dried rosemary - 1 teaspoon paprika - Salt and pepper to taste - 1 cup frozen peas These main ingredients create a hearty and rich base for your dish. The chicken thighs add great flavor and tenderness. The mix of vegetables brings color and texture. Fresh garlic and onion enhance the aroma and taste. The herbs and spices give it that cozy comfort food vibe. - 2 tablespoons cornstarch (optional, for thickening) - 2 tablespoons olive oil - 1 can (8 oz) refrigerated biscuit dough You can use cornstarch if you like a thicker broth. Olive oil helps with sautéing the onion and garlic. The biscuit dough is key for soft and fluffy dumplings. You can skip it if you want a lighter dish. - Cooking time: Total time for this dish is about 45 minutes. - Serving size: This recipe serves about 6 people. These details help you plan your meal. If you’re cooking for a crowd, this recipe works well. Adjust the number of ingredients for fewer or more servings. 1. First, set your Instant Pot to 'Sauté' mode. 2. Add 2 tablespoons of olive oil and let it heat up. 3. Add 1 medium diced onion. Cook for about 3 minutes. It should look translucent. 4. Next, add 3 cloves of minced garlic. Sauté for 1 minute until it smells great. 1. Take 1.5 lbs of boneless, skinless chicken thighs. Season them with salt, pepper, 1 teaspoon of dried thyme, rosemary, and paprika. 2. Place the chicken in the pot. Brown it on both sides for about 3-4 minutes each. 3. Pour in 3 cups of low-sodium chicken broth. Scrape the bottom to get any browned bits. This adds great flavor. 4. Add 2 cups of sliced carrots and 2 cups of chopped celery. Stir to mix well. Ensure the chicken is submerged. 1. Close the Instant Pot lid and set the pressure valve to sealing. 2. Select 'Manual' mode and set the timer for 10 minutes. 3. After cooking, let the pot naturally release pressure for 5 minutes. Then switch to quick release. 4. Carefully open the lid and stir in 1 cup of frozen peas. 5. Cut the 8 oz can of refrigerated biscuit dough into quarters. Drop them on top of the chicken and veggies. Do not stir. 6. Close the lid again and set the valve to sealing. Cook on 'Manual' high pressure for 7 minutes. 7. After the cooking time, use quick release. 8. If you want a thicker broth, mix 2 tablespoons of cornstarch with cold water. Stir it in until thickened. 9. Serve hot, making sure to include chicken, veggies, and dumplings in each bowl. To get the best texture, you need to brown the chicken well. Start by heating the Instant Pot in 'Sauté' mode. Add olive oil and let it heat up. Season the chicken thighs with salt, pepper, thyme, rosemary, and paprika. Place them in the pot and brown them for about 3-4 minutes on each side. This step adds a lot of flavor. Herbs can make a big difference in taste. Use fresh thyme and rosemary if you can. They add a bright flavor. You can also mix in garlic while sautéing the onions for more depth. For a thicker broth, cornstarch works well. Mix two tablespoons of cornstarch with cold water to create a slurry. Stir it into the pot after the first cooking phase. This will help achieve the desired thickness. After pressure cooking, taste the broth. It may need more salt or pepper. Adjust it to suit your taste. When serving, use deep bowls. This helps hold the broth and dumplings. Garnish each bowl with chopped parsley. It adds a nice color and fresh flavor. For sides, serve with crusty bread or a light salad. These pair well with the rich meal. Enjoy the warmth and comfort of this dish! {{image_2}} For a gluten-free option, use gluten-free biscuit dough. Many brands offer this now. You can also make dumplings from almond flour or coconut flour. These options keep your meal tasty without gluten. For low-carb adaptations, skip the biscuit dough. Instead, try using cauliflower dumplings. You can mix riced cauliflower with egg and cheese. This swap gives you a hearty dish, minus the carbs. You can add different veggies to your dish. Try bell peppers, green beans, or corn for extra color and taste. Each veggie brings its unique flavor and texture. You can also change the protein. Turkey or even tofu works well. For a twist, add spices like cayenne pepper or curry powder. These spices add warmth and depth to your meal. If you prefer the stovetop method, start by heating a large pot. Add olive oil, then sauté the onions and garlic until soft. Then, season and brown the chicken as you would in the Instant Pot. After browning, add the broth and veggies. Simmer until the chicken is cooked through. Finally, add your dumplings and cover until they are fluffy and done. For a slow cooker, brown the chicken first. Then, add all ingredients to the slow cooker. Cook on low for 6-8 hours or high for 3-4 hours. Add the dumplings in the last 30 minutes. This allows them to cook nicely without getting soggy. Store your leftovers in an airtight container. This keeps the chicken and dumplings fresh. You can refrigerate them for up to three days. If you want to save them longer, you can freeze them. They last well in the freezer for about three months. Just make sure to label the container with the date. To reheat your chicken and dumplings, place them in a pot on the stove. Heat over low to medium heat. Stir gently to keep the dumplings intact. You can also use a microwave-safe bowl. Cover it loosely with a lid or microwave-safe wrap. Heat in short bursts, stirring in between, until warm. If the dish seems dry, add a splash of broth. For best texture, avoid boiling. When you freeze the dish, let it thaw in the fridge overnight before reheating. This helps maintain flavor and texture. Can I use chicken breasts instead of thighs? Yes, you can use chicken breasts. They will cook faster and may be less juicy. Adjust cooking time to about 8 minutes on high pressure. How do I make dumplings from scratch? To make dumplings, mix 2 cups of flour, 1 tablespoon of baking powder, 1 teaspoon of salt, and ¾ cup of milk. Stir until combined, then drop spoonfuls into the pot. What can I use instead of chicken broth? You can use vegetable broth or water with added seasoning. This still gives good flavor to your dish. How can I make my dumplings fluffier? Use cold ingredients and don’t overmix the dough. This helps keep them light and airy. What is the best way to thicken chicken and dumplings? Mix cornstarch with cold water to make a slurry. Stir this into the hot broth until it thickens. Can I cook frozen chicken in the Instant Pot? Yes, you can cook frozen chicken. Increase the cooking time to about 12-15 minutes on high pressure. What should I do if the Instant Pot won’t seal? Check the sealing ring for damage and ensure it is in place. Also, make sure the valve is set to sealing. In this post, we covered how to make a tasty chicken and dumplings dish. We discussed main and optional ingredients, preparation essentials, and step-by-step cooking instructions. I shared helpful tips for perfecting texture and flavor, along with cooking variations and storage tips. Remember, this dish is flexible. Feel free to customize it to fit your tastes and needs. Enjoy cooking and sharing this dish with others!

Are you craving a warm and hearty meal? My Instant Pot Chicken and Dumplings offers simple comfort food that hits the spot every time. With tender chicken, fresh veggies, and …

Read more

Categories Dinner

No Bake Oreo Cheesecake Bars Rich and Creamy Delight

August 26, 2025 by Chef Jamie
To make No Bake Oreo Cheesecake Bars, you need: - 24 Oreo cookies, crushed - 4 tablespoons unsalted butter, melted - 16 oz cream cheese, softened - 1 cup powdered sugar - 1 teaspoon vanilla extract - 1 cup whipped cream (store-bought or homemade) - 8-10 Oreo cookies, coarsely chopped (for topping) Choose fresh ingredients for the best taste. Look for cream cheese that is smooth and soft. Check the expiration date on the package. For the whipped cream, pick one with no added sugars to keep it light. When selecting Oreos, make sure the package is sealed well. Fresh cookies will crush better and taste great. You can change some ingredients if needed. If you are dairy-free, use a dairy-free cream cheese. Coconut cream can be a good swap for whipped cream. For those who can’t eat gluten, choose gluten-free cookies. Always check labels for allergens. If you have nut allergies, ensure your whipped cream is nut-free. First, gather your ingredients. You need 24 crushed Oreo cookies and 4 tablespoons of melted unsalted butter. In a mixing bowl, combine these two ingredients. Mix until it looks like wet sand. This texture is key for a solid crust. Next, take a lined 9x9-inch baking dish. Press the Oreo mixture firmly into the bottom. Use the back of a measuring cup to pack it tightly. Make sure it is even across the dish. This step gives you a strong base for your cheesecake. In a separate bowl, beat 16 ounces of softened cream cheese with an electric mixer. Mix until it is creamy and smooth. Then, add in 1 cup of powdered sugar and 1 teaspoon of vanilla extract. Keep mixing until everything is well blended. Now, gently fold in 1 cup of whipped cream. This will give your filling a light and airy texture. Make sure not to overmix; you want to keep that fluffy feel. Pour the creamy cheesecake filling over the crust in the baking dish. Use a spatula to spread it evenly. Next, take 8 to 10 coarsely chopped Oreo cookies and sprinkle them on top. Press them down slightly to make sure they stick. Cover the dish with plastic wrap. Place it in the refrigerator for at least 4 hours. This helps the cheesecake layer set well. Once set, cut it into bars and serve chilled. Enjoy your rich and creamy Oreo cheesecake bars! To get the best texture in your cheesecake bars, ensure your cream cheese is soft. Take it out of the fridge an hour before mixing. When you beat it, mix until it's creamy. Adding the whipped cream gently keeps the mix light. This helps create a rich and airy filling. Store your leftover bars in an airtight container. This keeps them fresh and prevents drying out. Place a piece of wax paper between layers to avoid sticking. You can also cover them tightly with plastic wrap. They last up to five days in the fridge. For a stunning look, serve the bars on a nice platter. Drizzle chocolate sauce over the top for flair. You can also add extra whipped cream on the side. Sprinkle some crushed Oreos for a fun touch. These small details make your dessert pop! {{image_2}} You can change the flavor of your cheesecake bars easily. Here are some ideas to try: - Peanut Butter: Mix in ½ cup of creamy peanut butter with the cream cheese for a nutty twist. - Mint: Add 1 teaspoon of mint extract to the cream cheese for a refreshing taste. - Chocolate: Stir in ½ cup of melted chocolate to the filling for a rich chocolate flavor. These add-ins let you customize the bars to your taste. Feel free to experiment and find your favorite! The toppings make your cheesecake bars fun and tasty. Here are some fun options: - Chocolate Drizzle: Melt chocolate and drizzle it over the top for extra sweetness. - Caramel Sauce: Add caramel sauce for a rich, sweet flavor. - Fresh Berries: Top with strawberries or raspberries for a fruity touch. These toppings not only add flavor, but they also look great. Get creative with your choices! If you want to make mini versions, it’s easy! Just follow these steps: 1. Use a mini muffin tin and line each cup with liners. 2. Press the Oreo crust into the bottom of each cup. 3. Fill them with the cheesecake mixture. 4. Top with chopped Oreos and refrigerate until set. These mini bars are perfect for parties or snacks. They are cute and easy to eat! To keep your No Bake Oreo Cheesecake Bars fresh, store them in the fridge. Use an airtight container to prevent any odors from ruining the taste. You can also cover the dish tightly with plastic wrap. Make sure the bars are fully chilled before sealing them. The cold helps maintain their rich and creamy texture. You can freeze these bars for later enjoyment. Cut them into squares before freezing. Wrap each piece in plastic wrap and place them in a freezer-safe container. Label the container with the date. They will stay fresh for up to three months. When ready to eat, thaw them in the fridge overnight. In the refrigerator, these cheesecake bars last about five days. If you follow the freezing instructions, they can last for three months. Always check for any signs of spoilage before serving. If you see any changes in color or smell, it’s best to discard them for safety. Yes, you can make these bars a day or two ahead of time. They taste great when chilled and allow the flavors to mix well. Just cover them tightly with plastic wrap and store them in the fridge. This way, you save time on the day you want to serve them. If you want to swap out cream cheese, try using Greek yogurt or mascarpone cheese. Both options give a creamy texture. Greek yogurt adds a bit of tang, while mascarpone is rich and smooth. Choose based on your taste and what you have at home. You can tell the cheesecake layer is set when it feels firm to the touch. After chilling for at least four hours, check the edges first. They should feel solid and not jiggle too much in the center. If you press gently, it should feel like a soft pillow rather than liquid. You learned about tasty Oreo cheesecake bars today. We covered ingredients, step-by-step instructions, and tips for storing. Remember to choose quality ingredients for the best results. You can also try fun variations to make them your own. Lastly, keep your bars fresh with proper storage. I hope you enjoy making and sharing these delicious treats!

Craving something sweet and easy? You’ll love these No Bake Oreo Cheesecake Bars! They’re rich, creamy, and perfect for any dessert lover. I’ll show you how to whip up these …

Read more

Categories Desserts

Air Fryer Garlic Parmesan Brussels Sprouts Delight

August 26, 2025 by Chef Jamie
- 1 pound Brussels sprouts - 3 tablespoons olive oil - 4 garlic cloves, minced - 1/2 cup grated Parmesan cheese The main ingredients create a rich flavor. I love using fresh Brussels sprouts. They bring a nice crunch and earthy taste. The olive oil helps the sprouts crisp up nicely in the air fryer. Minced garlic adds a strong aroma. It pairs perfectly with the salty, nutty Parmesan cheese. - 1 teaspoon onion powder - 1 teaspoon garlic powder - 1/2 teaspoon red pepper flakes (optional) - Salt and pepper to taste - Fresh parsley for garnish Adding seasonings makes these Brussels sprouts pop. Onion powder gives a subtle sweetness. Garlic powder enhances the garlic flavor. If you like heat, add red pepper flakes for a spicy kick. Don’t forget salt and pepper; they balance the flavors. Fresh parsley adds color and freshness when you serve. Using these ingredients transforms simple Brussels sprouts into a tasty side dish. Trust me, everyone will love them! - Preheat the air fryer to 375°F (190°C). - Trim and halve the Brussels sprouts. First, set the air fryer to 375°F. This step warms up the air fryer for even cooking. Next, take your Brussels sprouts and trim off the tough ends. Halve each sprout to ensure they cook evenly. This size helps them crisp up nicely in the air fryer. - Combine Brussels sprouts, olive oil, minced garlic, and seasonings in a bowl. - Toss with grated Parmesan cheese. In a large bowl, mix the halved Brussels sprouts with olive oil and minced garlic. Adding onion powder, garlic powder, salt, and pepper gives them great flavor. You can also add red pepper flakes if you like a little heat. Toss everything well until each sprout is coated. Then, sprinkle in the grated Parmesan cheese and toss again. The cheese will stick to the sprouts and add a savory touch. - Place Brussels sprouts in the air fryer basket in a single layer. - Air fry for 15-20 minutes, shaking halfway. Now, place the seasoned Brussels sprouts in the air fryer basket. Make sure they lie in a single layer to ensure they crisp up. If your air fryer is small, you may need to do this in batches. Set the timer for 15-20 minutes. Halfway through, give the basket a shake. This helps them cook evenly and get that perfect crunch. When finished, they should look golden brown and crispy—just right for serving! To get those Brussels sprouts super crispy, shake the basket while they cook. This simple step helps all sides cook evenly. If you skip this, some sprouts may burn, while others stay soggy. Give the basket a good shake halfway through cooking. This ensures every bite is crunchy and delicious. Cooking time can vary based on a few factors. The size of your Brussels sprouts matters. Larger sprouts may take longer to cook than smaller ones. Also, your air fryer’s brand and model can affect the time. Start with 15 minutes, then check for doneness. You want them golden brown and crisp. Adjust cooking time as needed. For a lovely presentation, serve in a rustic bowl or on a wooden platter. This looks appealing and gives a homey feel. Drizzle a little extra olive oil or fresh lemon juice on top. Add fresh parsley for a pop of color. These small touches make your dish shine at the table. Enjoy your tasty creations! {{image_2}} Want to boost the flavor? You can add crispy bacon bits for a savory touch. The salty flavor of bacon pairs well with the garlic and Parmesan. If you want a cheese alternative, try nutritional yeast. It adds a cheesy flavor without dairy. Both options give your Brussels sprouts extra taste. If you need gluten-free options, you’re in luck! This recipe is naturally gluten-free. For a dairy-free choice, skip the Parmesan. Use a dairy-free cheese or simply use more garlic. These tweaks let everyone enjoy this dish. Using seasonal produce can change the taste and freshness. In the fall, add roasted butternut squash for sweetness. In spring, toss in fresh herbs like basil or dill. These seasonal items bring new life to your Brussels sprouts, making each bite exciting. To store leftover Brussels sprouts, place them in an airtight container. Keep them in the refrigerator. They stay fresh for up to three days. Make sure they cool before sealing. This helps prevent moisture buildup. To reheat your Brussels sprouts, use the air fryer again. Set it to 350°F (175°C). Heat them for about 5 minutes. This keeps them crispy and tasty. You can also use a skillet over medium heat. Stir them often to avoid burning. You can freeze Brussels sprouts for later use. First, let them cool completely. Then, spread them on a baking sheet. Freeze them for 1-2 hours until firm. After that, transfer them to a freezer bag. They last up to three months. When ready to use, thaw them overnight in the fridge before reheating. Yes, you can use frozen Brussels sprouts. However, they may not get as crispy. Frozen sprouts usually contain more moisture. This extra water can make them soggy during cooking. To fix this, thaw them first and pat them dry before air frying. Adjust cooking times to about 20-25 minutes. Keep an eye on them for best results. To reduce bitterness, start by choosing fresh sprouts. Cut off the ends and peel away any yellow leaves. Soaking them in cold water for 30 minutes can help. Tossing them with olive oil and salt before cooking also makes a big difference. Adding sweet flavors, like honey or balsamic vinegar, can balance bitterness too. Yes, you can air fry many vegetables just like Brussels sprouts. Cut them into equal sizes for even cooking. Use similar seasonings and oil. Cooking times will vary based on the type of vegetable. For example, thinly sliced carrots cook faster than thick zucchini slices. Always shake the basket halfway through for the best texture. In this post, we covered how to make air fryer garlic Parmesan Brussels sprouts. We explored essential ingredients, step-by-step cooking instructions, and helpful tips for perfect results. You learned about possible variations to suit your taste and dietary needs. Remember, cooking is fun and easy! Enjoy experimenting with this recipe. Serve these tasty sprouts to impress friends and family. They will love it! Keep these tips in mind to make the best dish possible. Happy cooking!

Welcome to the crunchy world of Air Fryer Garlic Parmesan Brussels Sprouts! If you’re curious about how to make this dish pop with flavor and crispiness, you’ve come to the …

Read more

Categories Appetizers
Older posts
Newer posts
← Previous Page1 … Page42 Page43 Page44 … Page134 Next →

TOSSED RECIPES

Simple meals, bold taste. Quick recipes made for real life — always fresh, always delicious. 🌿🍴

PAGES

Home About Contact Privacy Policy Terms & Conditions Cookie Policy GDPR Policy Copyright Policy Disclaimer

CATEGORIES

Appetizers Desserts Salads Breakfast Dinner

Contact

  • Pinterest
  • Mail
Copyright © 2026 Tossed Recipes. All rights reserved.