Skip to content
Tossed Recipes
  • Home
  • Appetizers
  • Desserts
  • Salads
  • Breakfast
  • Dinner
  • Privacy Policy
  • Contact
  • About

Chef Jamie

Everything Bagel Cucumber Bites Simple and Tasty Snack

August 24, 2025 by Chef Jamie
- Cucumber - Cream Cheese - Sour Cream - Garlic Powder - Onion Powder - Fresh Dill - Everything Bagel Seasoning - Cherry Tomatoes for Garnish To make everything bagel cucumber bites, we need a few simple ingredients. First, grab a large cucumber. It should be fresh and firm. Next, we need cream cheese. Use eight ounces of softened cream cheese for the best taste. Sour cream adds a nice tang, so get two tablespoons of that too. Spices bring flavor to our bites. You will need one teaspoon each of garlic powder and onion powder. Fresh dill adds a pop of color and flavor, so chop up one tablespoon. Everything bagel seasoning is key. It gives that classic taste, so do not skip it! Finally, we will use cherry tomatoes as a garnish. Halve them for a pretty touch on top of each bite. With these ingredients, you will create a tasty snack that everyone will love. How to Wash and Cut Cucumber First, wash the cucumber under cold water. Use a vegetable brush to scrub it well. After washing, dry it with a clean towel. Now, grab a sharp knife. Cut the cucumber in half lengthwise. Then, slice it into thick pieces, about 1-inch thick. Optimal Thickness for Slices Cutting the cucumber to about 1-inch thick makes a sturdy bite. This thickness holds the cream cheese well. It also gives you a nice crunch with each bite. Combining Ingredients for Smoothness In a bowl, add the softened cream cheese and sour cream. Mix them together until smooth. This step is key for a creamy texture. Use a spatula or a whisk to blend them well. Importance of Softening Cream Cheese Softening the cream cheese helps it mix easily. Cold cream cheese can be lumpy. Let it sit at room temp for about 30 minutes. This small step makes a big difference in texture. Spreading the Cream Cheese Mixture Take a cucumber slice and spread a dollop of the cream cheese mixture on top. Use a knife or a spoon for this. Make sure to cover the slice well for the best taste. Adding Everything Bagel Seasoning Now, sprinkle everything bagel seasoning over each slice. This adds a burst of flavor and a nice crunch. You can adjust the amount to your taste. Garnishing with Cherry Tomatoes Finish by placing half a cherry tomato on top of each bite. This adds color and freshness. It also balances the creaminess of the cheese. Now, you have a tasty and simple snack ready to enjoy! Serve these cucumber bites cold or at room temp. Chilling them enhances their fresh taste. Arrange them on a bright platter for a fun look. You can add extra colors using herbs or edible flowers. Want more flavor? Try adding a squeeze of lemon juice. You can also mix in some chopped chives or parsley. Feel free to experiment with other spices too. For a spicy kick, add a dash of cayenne or paprika. You can make these bites a day early. Just keep them covered in the fridge. This lets the flavors blend nicely. Store them in an airtight container. Serve within two days for the best taste. {{image_2}} You can switch to vegan cream cheese if you want a plant-based version. Many brands offer tasty vegan options made from nuts or soy. These work well in this recipe. You can also try cream cheese made from coconut, which adds a unique flavor. To add extra taste, you can mix in herbs or spices. Try mixing in fresh chives or basil for a fresh twist. You could also use smoked paprika for a smoky flavor. Get creative with what you have on hand! Instead of cherry tomatoes, you can use other veggies as toppings. Try sliced radishes or bell peppers for a crunchy bite. You can also add fresh herbs like parsley or cilantro for a pop of color. For more protein, consider adding toppings like smoked salmon or cooked shrimp. These options will make your bites more filling and satisfying. You can also sprinkle some crumbled feta cheese on top for added flavor. You can make your own everything bagel seasoning at home to suit your taste. Combine sesame seeds, poppy seeds, garlic flakes, onion flakes, and salt. This mix is simple and fresh. Don’t be afraid to explore global flavors! Try adding za’atar for a Middle Eastern twist. Or mix in some chili flakes for heat. These changes can give your cucumber bites a fun new taste. - How to Store Leftovers After making your everything bagel cucumber bites, place them in an airtight container. This helps keep them fresh. Layer them with parchment paper if needed to prevent sticking. - Optimal Duration for Freshness These bites stay fresh in the fridge for about 2 to 3 days. After that, the cucumber may lose its crunch, and the cream cheese can spoil. - Can You Freeze These Bites? It's not ideal to freeze these bites. Freezing changes the texture of the cucumber and cream cheese. - Best Practices for Freezing and Thawing If you decide to freeze them, separate each bite with parchment paper. To thaw, place them in the fridge overnight. However, I recommend enjoying them fresh. - Techniques for Enjoying Them Warm These bites are best served cold or at room temperature. If you want to reheat, use a microwave for a few seconds, but this can affect the texture. - Is Reheating Recommended for This Recipe? Reheating is not usually recommended. They taste great fresh and cold, which keeps the cucumber crisp and the flavors bright. Everything bagel seasoning is a mix of flavors. It usually includes sesame seeds, poppy seeds, garlic, onion, and salt. This blend gives a savory, crunchy taste that enhances many dishes. You can use it on salads, popcorn, or even roasted veggies. Yes, you can make this recipe gluten-free. Use gluten-free everything bagel seasoning. Many brands now offer gluten-free options. You should also check the cream cheese and sour cream labels to ensure they are gluten-free. You can adjust the creaminess by changing the cream cheese amount. If you want a thicker bite, use more cream cheese. For a lighter spread, add more sour cream. This way, you can find the perfect balance for your taste. These Everything Bagel Cucumber Bites are easy to make and delicious. We covered ingredients, step-by-step instructions, and tips for perfect bites. You can customize flavors and serve them at any gathering. Remember to store leftovers properly for the best taste. Whether you stick to the classic or try new variations, these bites will impress. Enjoy creating and sharing this fun snack!

Looking for a simple and tasty snack? You’re in the right place! These Everything Bagel Cucumber Bites are refreshing, easy to make, and packed with flavor. With just a few …

Read more

Categories Appetizers

Pumpkin Spice Overnight Oats Comforting Fall Treat

August 24, 2025 by Chef Jamie
To make Pumpkin Spice Overnight Oats, you'll need a few simple ingredients. Here’s what you will need: - 1 cup rolled oats - 2 cups unsweetened almond milk - ½ cup canned pumpkin puree - 2 tablespoons maple syrup - 1 teaspoon vanilla extract - 1 teaspoon pumpkin pie spice - 1 tablespoon chia seeds (optional) - Pinch of salt - Suggested toppings: sliced banana, chopped pecans, and a dollop of yogurt Each ingredient plays a key role in making this dish tasty and healthy. The rolled oats provide a hearty base. Almond milk makes it creamy and adds flavor. Canned pumpkin puree brings in the fall vibe and gives you some added nutrition. Maple syrup sweetens the mix, but you can adjust it to your taste. Vanilla extract and pumpkin pie spice add warmth and depth. Chia seeds are great for texture and nutrition, but they are optional. A pinch of salt helps balance the sweetness. When it comes to toppings, you can get creative! Sliced bananas and chopped pecans add crunch and flavor. A dollop of yogurt gives it a nice creamy finish. Enjoy making this delightful dish! 1. Start by taking a large bowl. Combine 1 cup of rolled oats, 2 cups of unsweetened almond milk, ½ cup of canned pumpkin puree, and 2 tablespoons of maple syrup. Mix these well until combined. 2. Next, stir in 1 teaspoon of vanilla extract, 1 teaspoon of pumpkin pie spice, 1 tablespoon of chia seeds (if you want a fun texture), and a pinch of salt. Make sure everything is mixed evenly. 3. Divide this creamy mixture into two jars or containers. Ensure each jar gets the same amount so they are equal. - After sealing the jars, place them in the refrigerator. Let them soak overnight or for at least 4 hours. This soaking time is key for soft oats. - Soaking oats overnight helps them absorb the flavors. It also makes them easier to digest. You wake up to a ready breakfast! - In the morning, take the jars out of the fridge. Give the oats a good stir. You can add a splash of almond milk if you want a thinner texture. - Before serving, top your oats with sliced banana, chopped pecans, and a dollop of yogurt for extra taste and creaminess. Enjoy your fall treat! You can adjust the sweetness of your overnight oats. Add more maple syrup if you like it sweet. You can also try honey or agave if you want. For toppings, get creative! Use sliced bananas, chopped pecans, or a dollop of yogurt. You can also try berries or granola for a different taste. Need a non-dairy option? Almond milk works great, but you can use oat or coconut milk too. For spices, you can swap pumpkin pie spice with just cinnamon, nutmeg, or ginger. This will give you new flavors to enjoy. Mix all the base ingredients well. You want everything to blend together smoothly. If you add chia seeds, they will make your oats thicker and creamier. Let them soak in the fridge overnight for the best texture. {{image_2}} You can easily change up your pumpkin spice overnight oats for the season. Adding cranberries brings a sweet-tart flavor that pairs well with pumpkin. Slice an apple into small pieces for a crisp twist. You can also use different nut butters like almond or cashew. These add creaminess and a fun taste. For those needing gluten-free options, choose certified gluten-free oats. They can offer the same great taste without the gluten. If you're vegan, use non-dairy milk like almond or oat milk. Maple syrup already makes this recipe vegan, so you're good to go! You can use steel-cut oats instead of rolled oats for a chewier bite. Just remember, steel-cut oats need more soaking time. If you want a smooth texture, blend the mixture before putting it in jars. This creates a creamy delight that is easy to eat. To keep your pumpkin spice overnight oats fresh, store them in airtight jars or containers. This way, they stay moist and tasty. The oats can last up to five days in the fridge. Make sure to label your jars with the date you made them. You can enjoy your oats cold or warm. To reheat, add a splash of almond milk and microwave for 30 seconds. Stir well and check the texture. If you like them warm, heat them longer. For a cold treat, simply take them out of the fridge and enjoy. Making a big batch saves time. You can double or triple the recipe to enjoy all week. Just divide the mixture into individual jars. This makes meal prep easy and fun. Grab a jar in the morning and you’re ready to go! Pumpkin Spice Overnight Oats can last in the fridge for about 3 to 5 days. Keep them in a sealed jar. After a few days, they may thicken. You can add more almond milk to adjust the texture. Yes, you can use quick oats. They will soak up the liquid faster. This may change the texture. Quick oats can make the mixture creamier but less chewy than rolled oats. Absolutely! This recipe is perfect for meal prep. You can make several jars at once. Just store them in the fridge. They are easy to grab for busy mornings. If you don't have chia seeds, you can skip them. They add texture and nutrition, but they aren’t needed. You can also use flaxseeds for a similar effect. Ground flaxseeds work well too. To boost protein, add Greek yogurt or protein powder. Mixing in nut butter, like almond or peanut, works great too. These additions will keep your oats tasty and filling. In this blog post, we explored the simple and delicious recipe for Pumpkin Spice Overnight Oats. You learned the key ingredients, step-by-step instructions, and tips for customizing your oats. I shared how different toppings and variations can enhance your meals. Remember, you can adapt this dish to fit any diet and make it your own. Enjoy making your oats, and don’t be afraid to experiment. The more you create, the more fun it will be!

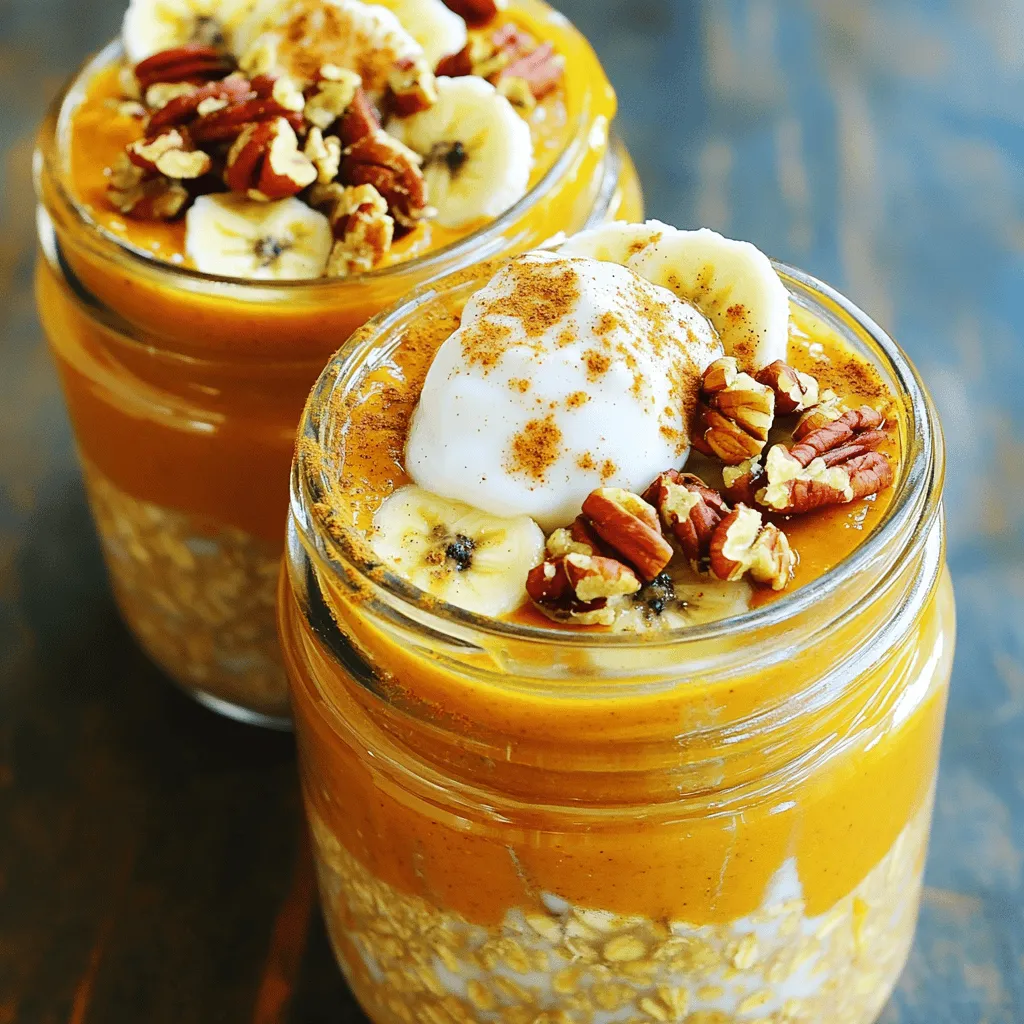
Are you ready to welcome fall with open arms and a delicious treat? Pumpkin Spice Overnight Oats are a cozy way to enjoy the flavors of the season. Made with …

Read more

Categories Breakfast

Avocado Chocolate Mousse Rich and Creamy Delight

August 24, 2025 by Chef Jamie
- 2 ripe avocados, peeled and pitted - 1/2 cup unsweetened cocoa powder - 1/4 cup maple syrup (or honey) The star of this recipe is ripe avocados. They bring a creamy texture and healthy fats. Choose avocados that are slightly soft when you press them gently. Next, you need unsweetened cocoa powder. This gives the mousse its rich chocolate flavor without added sugars. Lastly, sweeteners like maple syrup or honey balance the cocoa's bitterness. You can adjust the sweetness to your taste. - 2 tablespoons nut butter for richness - 1/4 cup almond milk (or any milk of choice) - Fresh berries, shaved dark chocolate, or chopped nuts for toppings Adding nut butter makes the mousse even richer. You can use almond, peanut, or any nut butter you love. Almond milk adds extra creaminess, but you can use any milk you prefer. For a beautiful finish, top your mousse with fresh berries, shaved dark chocolate, or chopped nuts. These toppings not only look great but also add flavor and texture to your dessert. Enjoy creating this rich and creamy delight! Start by peeling and pitting the avocados. You want ripe avocados for the best taste. Cut them in half, remove the pit, and scoop out the green flesh with a spoon. This part is easy and fun! Next, measure out the cocoa powder and sweeteners. Use 1/2 cup of unsweetened cocoa powder. For sweeteners, you can choose 1/4 cup of maple syrup or honey, depending on your taste. Now it’s time to blend! Place the avocados, cocoa powder, maple syrup, almond milk, vanilla extract, and a pinch of sea salt in a food processor. This is where the magic happens. Blend on high until the mix is creamy and smooth. Don’t forget to scrape down the sides. This helps to combine all the ingredients well. If you want a richer taste, add 2 tablespoons of nut butter and blend again. Taste the mousse to see if you want it sweeter. If so, add more maple syrup or honey and blend again. Once your mousse is perfect, spoon it into serving dishes or cups. You can enjoy it right away, but I recommend chilling it for at least 30 minutes. This gives it a firmer texture. For a lovely touch, serve it with fresh berries, shaved dark chocolate, or chopped nuts. Using clear cups makes it look even nicer, showing off that rich, dark color. Enjoy your delicious treat! To avoid lumps in your avocado chocolate mousse, blend the ingredients well. Start with ripe avocados. They should feel soft when you press them. If they’re hard, the mousse will not be smooth. Use a good food processor. Blend for at least 1-2 minutes on high. Stop to scrape down the sides. This helps mix everything evenly. If you still see lumps, blend again for another minute. To taste and modify sweetness, try the mousse after blending. If it’s not sweet enough, add more maple syrup or honey. Blend again to mix it well. You can also use other sweeteners like agave or stevia. Start with a small amount. You can always add more if needed. This keeps your mousse at the right sweetness for your taste. For a creative serving suggestion, use glass cups or bowls. This shows off the rich, dark color of the mousse. Top it with fresh berries, shaved dark chocolate, or chopped nuts. These add color and texture. You could also pair it with a light cookie or a scoop of ice cream. This makes the dessert more fun and exciting! {{image_2}} You can make this mousse even more fun. Adding extracts like peppermint or almond gives a new twist. Just a few drops will change the flavor. Try mixing in spices, too. A pinch of cinnamon adds warmth, while a dash of cayenne gives it a kick. These small changes can make your mousse special and unique. If you follow a vegan diet, this mousse is great for you! Use maple syrup instead of honey. For a nut-free option, skip the nut butter or use sunflower seed butter. This keeps the mousse creamy without dairy. You can enjoy this treat while sticking to your dietary needs. Plus, it's gluten-free, making it a hit for many. You might not have all the ingredients on hand. No worries! If you don’t have nut butter, try tahini or sunflower seed butter. These alternatives still add richness. For the almond milk, any milk works well. Coconut milk adds a fun twist, too. Just pick what you have, and your mousse will still taste amazing. To keep your avocado chocolate mousse fresh, store it in an airtight container. This helps prevent it from absorbing other flavors in the fridge. Always cover the top with plastic wrap. This stops any browning from the avocado. You can keep the mousse in the fridge for up to three days. After that, it may lose its smooth texture and flavor. Yes, you can freeze avocado chocolate mousse! It freezes well and still tastes great when thawed. To freeze, place the mousse in a freezer-safe container. Leave some space at the top for expansion. When you’re ready to enjoy it again, take it out and let it thaw in the fridge overnight. To serve, stir it gently to restore its creamy texture. You might want to add a fresh topping, like berries or nuts, for a nice touch. No, you cannot taste the avocado in this mousse. The chocolate flavor shines through. The creamy texture comes from the ripe avocados. This mousse tastes rich and smooth, just like a traditional mousse. Unlike a classic mousse made with eggs and cream, this one has no dairy. The cocoa powder masks the avocado flavor well. Yes, avocado chocolate mousse is healthy. Avocados are full of good fats and nutrients. They are high in fiber, which helps digestion. A serving of this mousse has fewer calories than a typical chocolate mousse. The main ingredients are nutritious and offer health benefits. To make a sugar-free version, use a sugar substitute like stevia or erythritol. These alternatives can add sweetness without calories. Adjust the sweetness by adding a small amount, then taste it. You may need to mix it more to blend well. This way, you enjoy a sweet treat without the sugar. You now know how to make a delicious avocado chocolate mousse. We discussed the key ingredients, like ripe avocados and cocoa powder, and optional ones to enhance the flavor. I shared steps for blending and serving, alongside tips for achieving the right texture. You can also explore variations and storage options to suit your tastes. This mousse is not just tasty; it's healthy, too. You can enjoy a dessert that delights and nourishes. Experiment with flavors and enjoy your creation!

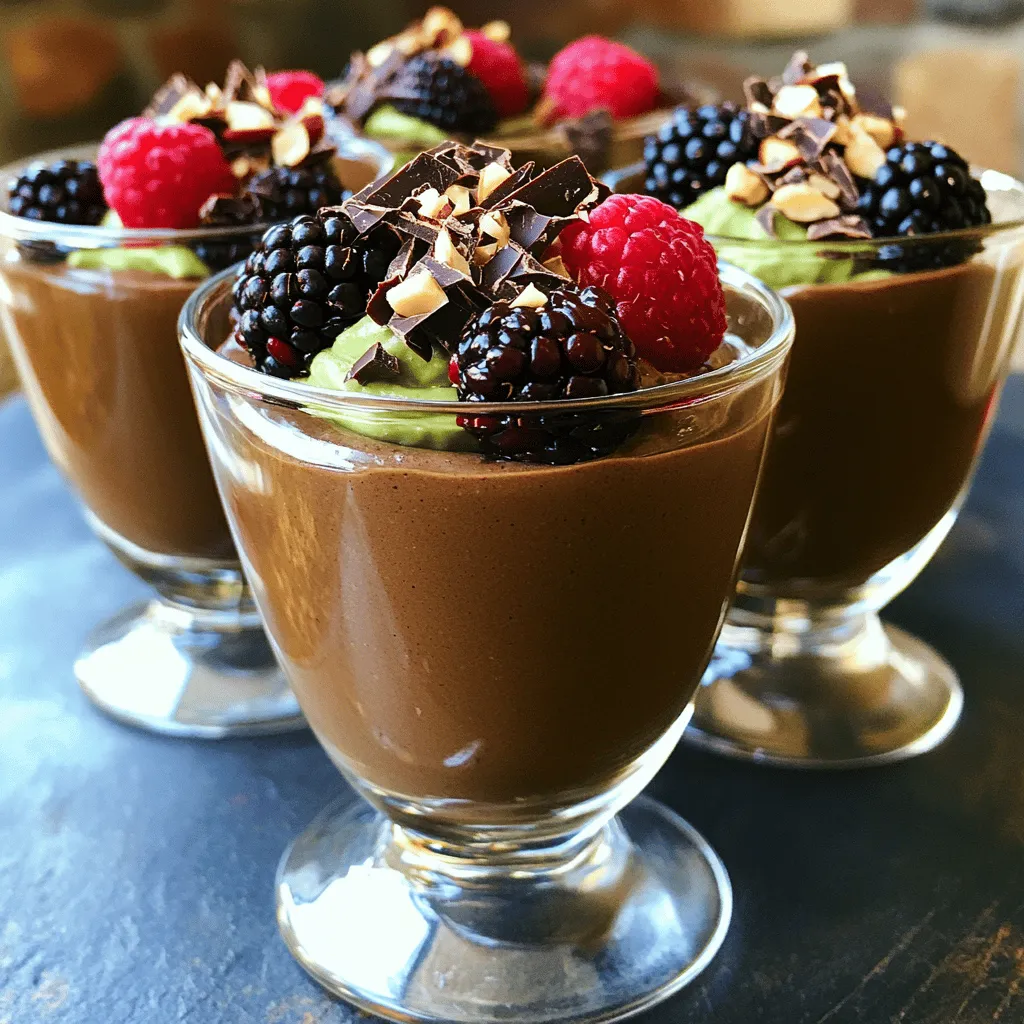
Indulging in a rich and creamy dessert doesn’t have to mean guilt. With this Avocado Chocolate Mousse, you can enjoy a delicious treat that’s both healthy and satisfying. You’ll use …

Read more

Categories Desserts

Lasagna Soup Savory and Hearty Comfort Food

January 4, 2026August 23, 2025 by Chef Jamie
- 1 lb ground beef or Italian sausage - 1 medium onion, diced - 3 cloves garlic, minced - 1 bell pepper, diced (red or green) - 1 can (28 oz) crushed tomatoes - 8-10 lasagna noodles, broken into pieces - 2 teaspoons dried Italian herbs (oregano, basil, thyme) - 1 teaspoon red pepper flakes (optional) - 4 cups beef broth - Salt and pepper to taste - 1 cup ricotta cheese - 2 cups shredded mozzarella cheese - 1/2 cup grated Parmesan cheese Lasagna soup has all the rich flavors of classic lasagna, but it’s easier to make. The base starts with ground beef or Italian sausage. This adds a hearty touch. I love using fresh vegetables like onion, garlic, and bell pepper. They bring a nice crunch and flavor. The crushed tomatoes create a rich sauce that ties everything together. For pasta, I break lasagna noodles into pieces. They soak up the soup's flavors while cooking. Seasonings are key. I use dried Italian herbs like oregano and basil. They make the soup smell amazing. A pinch of red pepper flakes adds a touch of heat, but you can skip it if you prefer mild flavors. Beef broth gives the soup depth. Don’t forget to add salt and pepper to taste. Now, let’s talk cheese. Ricotta cheese is creamy and smooth. Mixing it with shredded mozzarella and Parmesan gives that classic cheesy taste. As you serve the soup, the cheeses melt slightly on top, making each bite decadent and comforting. {{ingredient_image_1}} - Browning the meat: Start by heating a large pot over medium heat. Add 1 pound of ground beef or Italian sausage. Cook it until it turns brown, breaking it apart as it cooks. Drain any extra fat. This gives a rich base for your soup. - Sautéing the vegetables: Next, add 1 diced medium onion and 1 diced bell pepper to the pot. Stir in 3 minced garlic cloves. Cook for about 5 minutes until the veggies soften. Their flavors will blend with the meat. - Adding tomatoes and broth: Now, pour in 1 can of crushed tomatoes and 4 cups of beef broth. The broth adds depth to the soup. - Incorporating herbs and seasonings: Stir in 2 teaspoons of dried Italian herbs and 1 teaspoon of red pepper flakes if you want some heat. Season with salt and pepper to taste. Bring this mixture to a gentle simmer. - Adding lasagna pieces: Break 8-10 lasagna noodles into smaller pieces. Add them to the simmering pot. Stir well to mix everything. - Ensuring noodles are tender: Let the soup cook for about 10-12 minutes. Check the noodles to ensure they become tender but not mushy. - Combining ricotta, mozzarella, and Parmesan: In a separate bowl, mix together 1 cup of ricotta cheese, 1 cup of shredded mozzarella, and ½ cup of grated Parmesan cheese. This mixture will create a creamy topping for your soup. - Ladling soup into bowls: Once the noodles are cooked, ladle the soup into bowls. Each bowl should be filled with meaty, cheesy goodness. - Topping with cheese and basil: Add a generous dollop of the ricotta mixture on top of each bowl. Then, sprinkle the remaining mozzarella cheese over it. Let the cheese melt slightly. Finish with fresh basil leaves for added flavor and a pop of color. To make your lasagna soup extra creamy, focus on the cheese. I suggest blending different cheeses for depth. Here are some great options: - Ricotta cheese: Adds a rich, creamy texture. - Mozzarella cheese: Use fresh mozzarella for a stringy melt. - Parmesan cheese: Grates finely for a salty, nutty flavor. Mix these cheeses together, and you'll get a fantastic creamy topping. Want to boost the flavor? You can easily add veggies or spices. Try these: - Spinach: Add fresh or frozen spinach for color and nutrition. - Carrots: Diced carrots bring sweetness and crunch. - Zucchini: Sliced zucchini adds moisture and flavor. For spices, consider adding more Italian herbs or a hint of garlic powder. A pinch of red pepper flakes gives it a nice kick. The right sides can make your soup even better. Here are some ideas: - Garlic bread: Perfect for dipping into the soup. - Salad: A fresh green salad balances the meal. For presentation, serve the soup in rustic bowls. Top with extra Parmesan and fresh basil leaves for a pop of color. You can also drizzle a bit of olive oil on top for a gourmet touch. Pro Tips Use Fresh Herbs: Fresh basil adds a bright flavor to your lasagna soup. Add it just before serving for a burst of freshness. Customize Your Protein: Feel free to substitute ground beef with ground turkey or chicken for a lighter version of this dish. Make it Vegetarian: Replace the meat with sautéed mushrooms and add extra vegetables like zucchini or spinach for a hearty vegetarian option. Store Leftovers Properly: If you have leftovers, store the soup and cheese mixture separately to keep the noodles from becoming mushy. Reheat when ready to serve. {{image_2}} You can make this soup without meat. Use lentils or mushrooms instead. Lentils add protein and fiber. They also soak up the flavors well. Mushrooms give a nice, earthy taste. You can sauté them with onions and garlic for more flavor. This option is both hearty and healthy. If you need a gluten-free soup, use gluten-free noodles. Many brands offer good alternatives. You can also use spiralized zucchini or rice. These options keep the soup light and fresh. Just make sure to adjust the cooking time. You want the noodles to be tender but not mushy. For a spicy twist, add more spices. You can use red pepper flakes for heat. Try adding diced jalapeños or spicy sausage too. This will give your soup a nice kick. Adjust the spice level to suit your taste. Always start with a little and add more if needed. To store your lasagna soup, let it cool first. Use an airtight container. This keeps the soup fresh. In the fridge, it lasts about 3 to 4 days. Be sure to stir it before serving again. Freezing is a great way to save leftovers. First, cool the soup completely. Then, pour it into freezer-safe containers. Leave some space at the top for expansion. It can stay frozen for up to 3 months. When ready to eat, thaw it overnight in the fridge. Reheat your lasagna soup on the stove. Use low heat and stir often. This helps keep the flavors rich and the texture smooth. You can also use a microwave. Heat in short bursts and stir in between. Enjoy your warm, cheesy comfort food! You can serve Lasagna Soup with many tasty sides. Here are some ideas: - Crusty garlic bread - A fresh green salad - Breadsticks or cheesy bread - Garlic knots - Steamed vegetables Each option adds a nice touch to your meal. I find that garlic bread pairs perfectly with the soup's rich flavors. Yes, you can make Lasagna Soup ahead of time. Here are some tips: - Store it in an airtight container in the fridge for up to three days. - For longer storage, freeze the soup in portions. - When you want to eat it, thaw it in the fridge overnight. - Reheat in a pot over low heat, stirring often. This makes meal prep easy and saves time during busy days. Adjusting the serving size is simple. Here’s how to do it: - To make more, just double the ingredients. - To make less, half the ingredients. - Keep the cooking time the same for small changes. - For large changes, check the noodles for doneness. This way, you always have the right amount for your needs. You now have all the steps to create a delicious lasagna soup. We covered the main ingredients, from the meat to the rich cheeses. I shared tips to enhance its flavor and suggested fun variations. You also learned about proper storage methods to keep your soup fresh. Getting this recipe right will impress your family and friends. Enjoy the warm, comforting bowl of lasagna soup that’s easy to make and full of flavor. Don’t hesitate to experiment with your own twists!

If you’re yearning for a warm, filling meal that wraps you in comfort, try lasagna soup! This dish combines the heartiness of traditional lasagna with the ease of soup. Imagine …

Read more

Categories Dinner

Crack Corn Salad Flavorful and Easy to Make

August 23, 2025 by Chef Jamie
To make a tasty Crack Corn Salad, gather these fresh ingredients: - 4 cups fresh corn kernels (from about 5-6 ears of corn) - 1 cup cherry tomatoes, halved - 1 cup black beans, rinsed and drained - 1/2 cup red bell pepper, diced - 1/2 cup green onions, chopped - 1/2 cup cilantro, chopped - 1 avocado, diced These ingredients give the salad a bright and fresh taste. The corn is sweet, and the tomatoes add a nice pop. Black beans provide protein, while the peppers and onions bring crunch and flavor. You can customize the salad with these optional ingredients: - Diced jalapeños for heat - Chopped cucumber for extra crunch - Crumbled feta or queso fresco for creaminess Feel free to mix and match based on your tastes. Each option adds a unique twist to the dish. To prepare your Crack Corn Salad, gather these kitchen tools: - Large mixing bowl - Small bowl for the dressing - Whisk or fork for mixing - Knife and cutting board for chopping - Measuring cups and spoons Having the right tools makes cooking easier and more fun. With these in hand, you’re ready to create a fresh and delicious salad! Start by shucking the corn. If you use fresh corn, boil salted water in a pot. Blanch the corn for 3-4 minutes. This step keeps the corn sweet and crisp. After blanching, cool it quickly in an ice bath. This stops the cooking process. If you choose frozen corn, just thaw it. Pat it dry with a towel to remove extra moisture. In a large mixing bowl, add the fresh corn kernels. Then, toss in one cup of halved cherry tomatoes. Next, add one cup of rinsed and drained black beans. Dice half a cup of red bell pepper and toss it in too. Chop half a cup of green onions and add them next. Finally, mix in half a cup of chopped cilantro for that fresh taste. In a small bowl, whisk together the lime juice and olive oil. Add one teaspoon of chili powder, salt, and pepper to taste. Whisk until the dressing blends well. Pour this dressing over your corn mixture. Gently toss everything to coat evenly. This dressing adds a zesty kick that brightens the flavors. Just before serving, gently fold in one diced avocado. Be careful not to mash it; you want nice, fresh chunks. The avocado adds creaminess and richness to the dish. Taste your salad and adjust the seasoning if needed. Serve the salad chilled or at room temperature for the best flavor. When you pick corn, look for bright green husks. The silk should be moist and golden. Fresh corn feels firm and has plump kernels. I suggest using corn on the cob for the best flavor. If you can, buy it from local farmers. This way, it’s often fresher and sweeter. If you have leftover salad, store it in an airtight container. Keep it in the fridge to maintain freshness. It can last about 2-3 days, but the avocado may brown. To slow this, add lime juice over the avocado before storing. Always stir before serving to wake up the flavors! To boost the taste, serve the salad with lime wedges. Extra cilantro on top adds a nice touch too. Consider pairing it with grilled chicken or fish for a complete meal. You can also serve it alongside tortilla chips for a fun crunch. Enjoy your vibrant and tasty dish! {{image_2}} You can give your Crack Corn Salad a spicy kick by adding jalapeños. Start with one or two fresh jalapeños. Remove the seeds for less heat. Chop them fine and mix them in with the other veggies. This adds a nice warmth and bright flavor. Your guests will love the extra zing! If you want a creamy twist, use Greek yogurt instead of oil. Replace the olive oil with 1/2 cup of Greek yogurt. Mix it in with the lime juice, chili powder, salt, and pepper. This makes the salad rich and smooth. It’s a great way to add protein too! You can change your salad based on the season. In summer, add diced cucumbers for crunch. In fall, try roasted sweet potatoes for a hearty touch. In winter, add shredded carrots for color and sweetness. These changes keep the salad fresh and exciting all year long. To keep your Crack Corn Salad fresh, place it in an airtight container. Make sure to cover it tightly. This helps to lock in the flavors and keeps the salad crisp. If you add avocado, store that separately. Avocado can brown quickly, so it’s best to add it just before serving. When stored properly, Crack Corn Salad lasts about 3 to 5 days in the fridge. The flavors meld nicely over time, but the veggies may lose some crunch. Always check for any signs of spoilage, like a strange smell or off color. If it looks or smells funny, it’s time to toss it. Freezing Crack Corn Salad is not recommended. The fresh veggies can become mushy when thawed. If you want to prepare some ahead, consider freezing just the corn and beans. You can mix them with fresh ingredients later. This way, you keep that delightful texture and flavor intact. Yes, you can use canned corn. It saves time and is easy to find. Rinse the corn well to remove extra salt. This way, your salad remains fresh and tasty. Fresh corn gives a crunch that canned corn lacks, but both work. Crack Corn Salad lasts up to 3 days in the fridge. Keep it in an airtight container. The flavors will blend over time, making it even better. Check for freshness before eating, especially if it sits for a while. You can serve Crack Corn Salad with grilled chicken, fish, or tacos. It pairs well with BBQ dishes too. For a lighter option, enjoy it with pita chips or fresh bread. The salad adds a refreshing touch to any meal. Yes, Crack Corn Salad is vegan-friendly. It has no meat or dairy. The ingredients are all plant-based, making it a great choice for everyone. If you want it even creamier, try adding a vegan yogurt. Enjoy it guilt-free! This blog post covered how to make a tasty Crack Corn Salad. We looked at fresh ingredients, optional add-ins, and tools you'll need. Then, I shared easy steps for prep and mixing. Finally, I offered tips on storage and fun variations. In summary, making this salad is simple and fun. You can customize it to fit your taste. Enjoy it as a delicious side dish or snack!

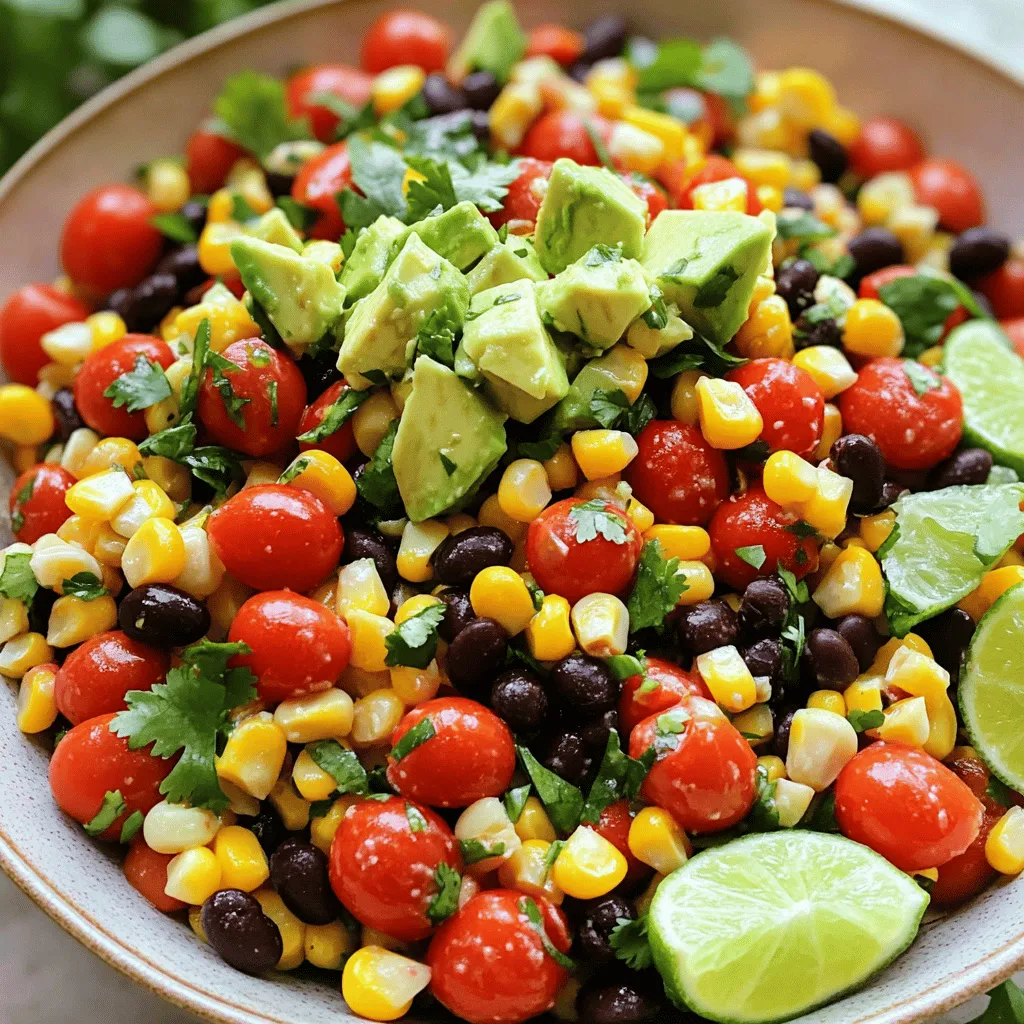
Crack Corn Salad is a fun and tasty dish that you can whip up in no time. With fresh corn and simple ingredients, it’s full of flavor and perfect for …

Read more

Categories Salads

Grandma’s Classic Pumpkin Bread Comforting Home Recipe

August 23, 2025 by Chef Jamie
- 1 cup pumpkin puree (canned or homemade) - 2 cups all-purpose flour - 1 cup granulated sugar - 1/2 cup brown sugar, packed - 1/2 cup vegetable oil - 4 large eggs - 1 teaspoon vanilla extract - 1 teaspoon baking soda - 1/2 teaspoon baking powder - 1 teaspoon ground cinnamon - 1/2 teaspoon ground nutmeg - 1/2 teaspoon ground ginger - 1/2 teaspoon salt I love using pumpkin puree because it adds moisture and flavor. You can use canned or homemade puree, both work well. Flour is key for structure. I use all-purpose flour, but you can experiment with others. Sugar sweetens the bread, while brown sugar adds depth. Vegetable oil keeps the bread tender. The eggs help bind the mix and create a soft texture. Vanilla gives a warm flavor. Baking soda and baking powder are crucial for rising. The spices—cinnamon, nutmeg, and ginger—bring warmth and comfort. Lastly, salt enhances all the flavors. - 1/2 cup chopped nuts (walnuts or pecans, optional) - 1/2 cup chocolate chips (optional) I love adding chopped nuts for crunch. Walnuts or pecans work best. They add texture and flavor. Chocolate chips bring sweetness and fun. You can mix and match these add-ins based on your taste. Feel free to get creative! First, preheat your oven to 350°F (175°C). This step warms up your oven, ensuring a nice bake. Next, grease and flour two 9x5-inch loaf pans. You can also line them with parchment paper. This makes it easy to remove the bread later. In a large bowl, combine 1 cup of pumpkin puree, 1/2 cup of vegetable oil, 1 cup of granulated sugar, and 1/2 cup of brown sugar. Crack in 4 large eggs and add 1 teaspoon of vanilla extract. Whisk everything together until it looks creamy and smooth. In another bowl, whisk together 2 cups of all-purpose flour, 1 teaspoon of baking soda, and 1/2 teaspoon of baking powder. Add 1 teaspoon of ground cinnamon, 1/2 teaspoon of ground nutmeg, 1/2 teaspoon of ground ginger, and 1/2 teaspoon of salt. Mix until the spices and flour blend well. Gradually add the dry mix to the wet mix, stirring gently. You want to combine them but not overmix. This keeps your bread fluffy. If you choose, fold in 1/2 cup of chopped nuts or 1/2 cup of chocolate chips. These add a nice texture and flavor. Divide the batter evenly between your prepared loaf pans. Bake in the oven for 60-70 minutes. Check for doneness by inserting a toothpick in the center. If it comes out clean, the bread is ready. Once done, let the loaves cool in the pans for about 10 minutes. Then, transfer them to a wire rack to cool completely before serving. To make the best pumpkin bread, start with the right pumpkin puree. You can use canned or make your own. If you choose canned, pick one with no added sugar or spices. This gives you more control over the taste. Homemade puree can be richer, so it’s a great choice if you have time. When mixing the batter, avoid overmixing. This can make your bread tough. Mix just until you see no dry flour. A few lumps are okay. The goal is to keep the bread light and fluffy. Adding spices can give your pumpkin bread a unique twist. Try adjusting the cinnamon, nutmeg, and ginger to your liking. If you love a spicy kick, add more ginger or even a bit of allspice. For serving, warm slices of pumpkin bread are best. Spread a little butter on top. A sprinkle of cinnamon adds a nice touch. Enjoy it with a hot cup of tea or coffee. This simple step makes every bite a delight! {{image_2}} You can make Grandma's classic pumpkin bread healthier with a few simple swaps. - Substitutes for sugar and oil: Use applesauce instead of oil. It keeps the bread moist. For sugar, try using honey or maple syrup. These options add natural sweetness. - Whole wheat flour options: Swap out half of the all-purpose flour for whole wheat flour. This adds fiber and nutrients. The bread remains soft and tasty. Adding different flavors can spice up the bread. - Seasonal spices and flavor combinations: Try adding allspice or cardamom for a new twist. These spices enhance the warm, cozy taste of pumpkin. - Adding fruits (like raisins or cranberries): Toss in some raisins or dried cranberries. They add a chewy texture and a burst of sweetness. You can also mix in chopped apples for extra flavor. To keep your pumpkin bread fresh and moist, store it properly. First, let the bread cool completely. This step is key; it helps prevent sogginess. Wrap the bread tightly in plastic wrap. Then, place it in an airtight container. This keeps air out and moisture in. You can also use aluminum foil instead of plastic wrap. If you want to store slices, cut the bread first. Wrap each slice separately. This way, you can grab a slice whenever you want. You can freeze your pumpkin bread for later. To do this, wrap it well in plastic wrap. Then, place it in a freezer-safe bag. Be sure to remove as much air as possible. This helps prevent freezer burn. You can store it this way for up to three months. When you are ready to eat it, take it out of the freezer. Let it thaw in the fridge overnight. For a warm treat, reheat it in the oven. Set the oven to 350°F (175°C) and bake for about 10 to 15 minutes. This will make the bread warm and soft again. Enjoy your slice with butter or a cup of tea! Can I use fresh pumpkin instead of canned? Yes, you can use fresh pumpkin. First, cook it until soft. Then, mash it well. This makes a great substitute for canned pumpkin. Just make sure it is pure pumpkin with no added ingredients. How do I know when my pumpkin bread is done baking? To check doneness, insert a toothpick in the center. If it comes out clean, the bread is ready. If you see wet batter, bake it a bit longer. This usually takes 60-70 minutes. Calories and serving sizes Each slice of pumpkin bread has about 150 calories. You can get 16 slices from one loaf. This makes it a nice treat to share. Dietary considerations (gluten-free, vegan adaptations) To make it gluten-free, use a gluten-free flour blend. For a vegan version, replace eggs with flax eggs. Use 1 tablespoon of ground flaxseed mixed with 3 tablespoons of water for each egg. Pairings with beverages or spreads Pumpkin bread tastes great with coffee or tea. You can also spread a little butter or cream cheese on warm slices for extra flavor. Creative ways to enjoy pumpkin bread Try toasting the bread and topping it with maple syrup. You can also make a French toast with it for a fun breakfast twist. Enjoy experimenting! You now know how to make Grandma's classic pumpkin bread. We covered the key ingredients, step-by-step instructions, and helpful tips. Plus, I shared variations for a healthier twist. Overall, baking pumpkin bread can be easy and fun. Enjoy it fresh or store it for later. This treat brings warmth to any season. Whether you keep it simple or get creative, you'll love sharing this recipe!

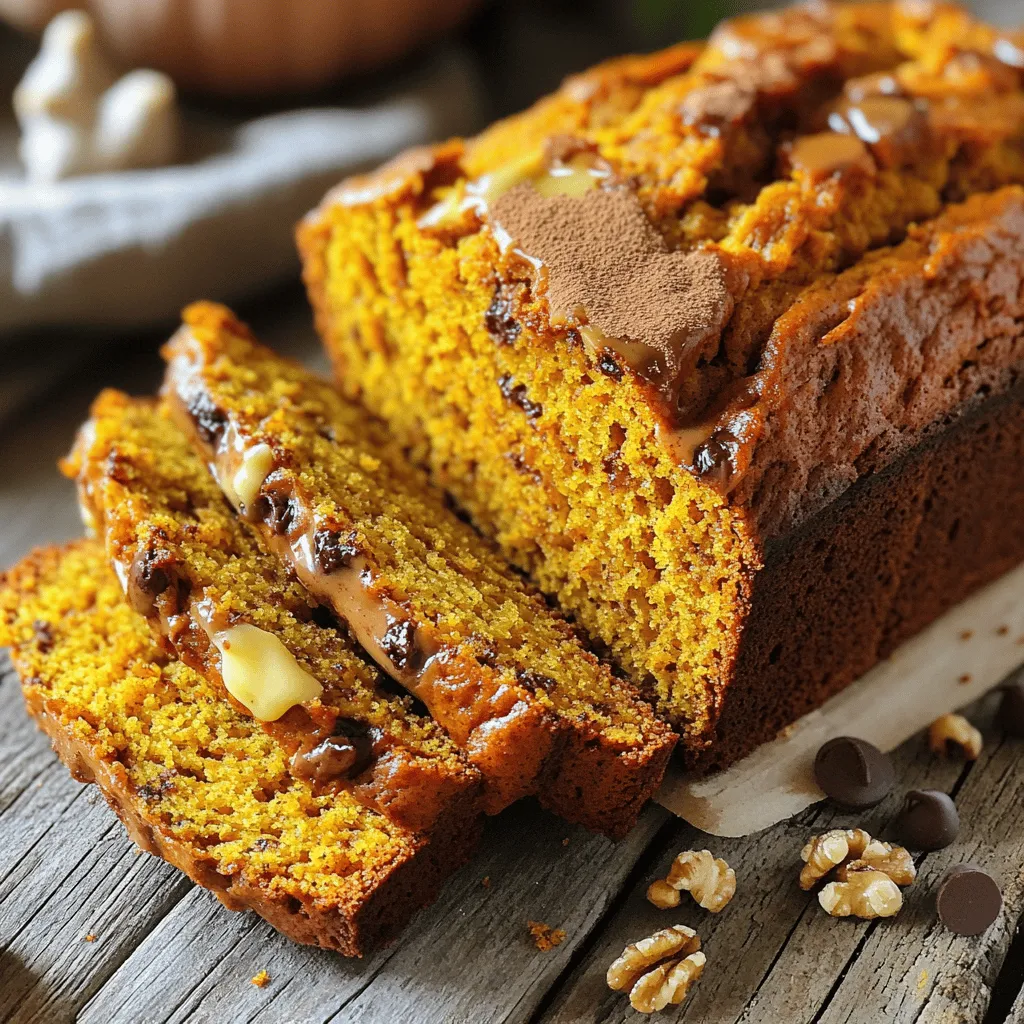
Baking Grandma’s Classic Pumpkin Bread brings back warm memories and delicious scents. This recipe is easy and uses simple ingredients. You’ll love how pumpkin puree, spices, and a few mix-ins …

Read more

Categories Desserts

Sushi Cucumber Salad Fresh and Tasty Dish Recipe

August 23, 2025 by Chef Jamie
To make a tasty sushi cucumber salad, you need fresh and simple ingredients. Here’s what to gather: - 2 large cucumbers - 1 cup cooked sushi rice - 1 avocado, sliced - 1/4 cup shredded carrots - 1/4 cup edamame, shelled - 2 tablespoons rice vinegar - 1 tablespoon sesame oil - 1 tablespoon soy sauce (adjust to taste) - 1 teaspoon honey or agave syrup - 1 tablespoon sesame seeds - Fresh cilantro leaves for garnish These ingredients blend well to create a colorful and crunchy salad that sings with flavor. When picking cucumbers, look for firm ones. They should feel heavy for their size and have a bright green color. Avoid those with soft spots or wrinkles. For the avocado, choose one that yields slightly when you press it. This means it’s ripe and ready to eat. Fresh carrots should be crisp and bright orange. Finally, check that your edamame is bright green and tender. Fresh ingredients make a big difference in taste. This sushi cucumber salad is not just delicious; it’s also healthy. A serving provides important nutrients: - Cucumbers help keep you hydrated. - Avocado adds healthy fats. - Carrots are full of vitamins. - Edamame gives you protein. - Sesame seeds add more nutrients and flavor. This salad is a great choice for a light meal or side dish. Enjoying it is a treat for your taste buds and a win for your health! Start with two large cucumbers. Cut each cucumber in half lengthwise. Use a spoon to scoop out the seeds. This helps keep your salad crisp. Next, cut the cucumbers into bite-sized pieces or thin half-moons. This shape makes them easy to eat. Set aside your cucumbers for later use. Grab a large mixing bowl. Add one cup of cooked sushi rice. Then, toss in the sliced cucumbers. Next, add one sliced avocado, a quarter cup of shredded carrots, and a quarter cup of shelled edamame. Each ingredient adds a nice texture. Mix everything gently to combine. Be careful not to mash the avocado. In a small bowl, whisk together two tablespoons of rice vinegar, one tablespoon of sesame oil, one tablespoon of soy sauce, and one teaspoon of honey or agave syrup. This dressing adds flavor to your salad. Once mixed, pour the dressing over the salad ingredients. Gently toss everything together. Sprinkle one tablespoon of sesame seeds on top and mix once more. Allow the salad to sit for about 10 minutes. This lets the flavors blend well. Before serving, add fresh cilantro leaves for a burst of flavor. Enjoy your fresh and tasty sushi cucumber salad! To make the dressing pop, balance flavors well. Use rice vinegar for a tangy bite. Sesame oil adds a nice nutty taste. Adjust soy sauce to your liking. If you want sweetness, add more honey or agave syrup. Mix these ingredients well in a bowl. This ensures all flavors blend nicely. Taste the dressing. If it’s too strong, add a little water. Choose ripe avocados for the best taste. Look for a firm avocado that has a slight give when you press it. If it’s too soft, it may be overripe. Cut the avocado just before serving. This keeps it fresh and bright green. If you have leftovers, save the pit. Store it with the avocado to slow browning. Serve this salad in a big bowl for sharing. You can also use small cups for individual servings. Top with fresh cilantro for a burst of color and flavor. For extra crunch, sprinkle more sesame seeds before serving. Pair this salad with grilled fish or chicken for a full meal. Enjoy it as a light lunch or a side dish at dinner. {{image_2}} You can make your sushi cucumber salad more filling by adding protein. Here are a few great choices: - Cooked shrimp: They add a nice texture and flavor. - Crab meat: Use real or imitation for a seafood touch. - Tofu: Cubed, firm tofu gives a hearty bite. - Chicken: Shredded cooked chicken works well for a meatier dish. These proteins blend well with the fresh veggies and rice. Just mix them in when you combine the salad ingredients. If you want to keep it vegetarian, consider these add-ins: - Chickpeas: They add protein and a creamy taste. - Bell peppers: They give a sweet crunch and bright color. - Radishes: Thinly sliced, they add a peppery kick. - Seaweed: Wakame or nori adds an ocean flavor. These options keep the salad light and fresh while adding extra nutrients. Feel free to experiment with your favorite veggies! To make this salad gluten-free, just swap out the soy sauce. Use tamari, which is a gluten-free soy sauce alternative. Double-check that all your ingredients are gluten-free, especially the sesame oil and rice vinegar. This way, everyone can enjoy the salad without worry. To keep your sushi cucumber salad fresh, store it in an airtight container. This helps keep the flavors locked in. Make sure the container is clean and dry before adding the salad. You can also cover it tightly with plastic wrap. This keeps the air out and helps prevent wilting. If stored correctly, the salad can last in the fridge for about 2 days. After that, the cucumbers may become soggy. The avocado can brown quickly, so eat it sooner for the best taste. Always check for any off smells or changes in color before eating leftovers. To revive leftover sushi cucumber salad, add a splash of fresh rice vinegar. This brightens the flavors and wakes up the salad. You can also mix in a small amount of fresh sesame oil. If the salad seems dry, consider adding a bit of extra soy sauce. This helps restore moisture and taste. Sushi cucumber salad is a fresh dish that combines crisp cucumbers, sushi rice, and colorful veggies. It offers a light and tasty option for sushi lovers. The salad includes avocado, shredded carrots, and edamame, making it healthy and satisfying. The dressing adds a tangy flavor that ties everything together. Yes, you can make this salad ahead of time. Prepare it up to a day in advance. Keep the dressing separate until you are ready to serve. This helps keep the veggies crunchy and fresh. Just mix in the dressing before serving for the best taste. You can add many other vegetables to this salad. Try bell peppers for crunch or radishes for a spicy kick. You can also use thinly sliced green onions or jicama for extra texture. Feel free to mix in seasonal veggies you enjoy! Sushi cucumber salad is fresh, tasty, and easy to make. We covered key ingredients, how to prepare them, and tips for flavor. You can add protein or go vegetarian, depending on your taste. Don't forget to store leftovers properly to keep them fresh. This salad can fit into many diets and is great for sharing. Enjoy crafting your own version of this dish. It's a healthy choice that everyone will love.

If you crave a fresh, vibrant dish that’s quick to make, look no further! This Sushi Cucumber Salad packs a punch with crisp cucumbers, savory dressing, and endless possibilities. I’ll …

Read more

Categories Salads

Savory Potato Kielbasa Soup Hearty and Comforting

August 23, 2025 by Chef Jamie
- 1 lb Kielbasa sausage, sliced - 4 medium potatoes, diced - 1 medium onion, chopped - 2 carrots, sliced - 2 celery stalks, chopped - 4 cups low-sodium chicken broth - 1 cup heavy cream (or coconut milk for a dairy-free option) - 2 cloves garlic, minced - 1 teaspoon dried thyme - 1 teaspoon smoked paprika - Salt and pepper to taste - Fresh parsley, chopped (for garnish) Gathering the right ingredients is key to making a great Potato Kielbasa Soup. The star of this dish is the Kielbasa sausage. Choose a high-quality sausage for the best flavor. You will need 1 pound, sliced into bite-sized pieces. Next, potatoes bring heartiness to this soup. I like to use four medium potatoes, diced into small cubes. They should cook evenly and add texture. For the veggies, I use one medium onion, two sliced carrots, and two chopped celery stalks. These give the soup a rich base and depth of flavor. Seasonings are crucial too. You need two cloves of minced garlic, one teaspoon of dried thyme, and one teaspoon of smoked paprika. These add warmth and aroma. Don’t forget salt and pepper to enhance all the flavors. If you want a creamy finish, use one cup of heavy cream. For a dairy-free option, coconut milk works great. Finally, fresh parsley adds a pop of color when you serve the soup. With these ingredients, you can create a warm and comforting Potato Kielbasa Soup. Each component plays a role in the overall taste and heartiness of the dish. Start with 1 pound of Kielbasa sausage. Slice it into bite-sized pieces. Heat a splash of olive oil in a large pot over medium heat. Add the sliced Kielbasa. Sauté it for about 5 to 7 minutes until it gets a nice brown color. This step adds great flavor to the soup. Once browned, remove the Kielbasa and set it aside for later. In the same pot, add the chopped onion, sliced carrots, and chopped celery. These veggies bring a lot of taste. Sauté them for about 4 to 5 minutes until they are soft. Next, add minced garlic and cook for one more minute. You want the garlic to smell good but not burn. Now, it's time to add the fun stuff! Toss in the diced potatoes along with the chicken broth. Use 4 cups of low-sodium chicken broth for a lighter taste. Add back the browned Kielbasa. Sprinkle in 1 teaspoon of dried thyme and 1 teaspoon of smoked paprika. These spices give the soup its unique flavor. Turn the heat to high and bring the soup to a boil. Once the soup boils, reduce the heat to low, cover it, and let it simmer for about 20 minutes. This allows the potatoes to become tender. After 20 minutes, stir in 1 cup of heavy cream or coconut milk. This makes the soup creamy and rich. Season with salt and pepper to taste. Let it heat through for another 5 minutes. Once done, serve it hot, garnished with fresh chopped parsley. Enjoy your hearty bowl of Potato Kielbasa Soup! To make a rich broth, start with low-sodium chicken broth. This lets you control salt levels. Brown the Kielbasa first. This step adds depth and flavor to the soup. Don't skip the thyme and smoked paprika; they bring warmth and earthiness. Always taste as you cook. Adjust the seasoning to find the perfect balance. Use a large pot or Dutch oven for even heat. Sauté the Kielbasa over medium heat first. This creates a nice crust and flavor base. When cooking veggies, stir often. This helps them soften and release their flavors. Keep the heat consistent. Too high can burn the garlic or veggies. For a thicker soup, blend a portion of the potatoes. Just take some out, blend, and add back. If the soup is too thick, add a little more broth or cream. For a lighter version, use coconut milk instead of heavy cream. Remember, always taste before serving. Adjust salt, pepper, and herbs to suit your taste. {{image_2}} You can make Potato Kielbasa Soup healthier with a few simple swaps. First, use turkey Kielbasa instead of pork. This change cuts fat and calories while keeping flavor. You can also reduce heavy cream. Try using low-fat milk or a plant-based milk like almond or oat milk. This keeps the soup creamy without the extra calories. Another great tip is to add more veggies. You can toss in spinach or kale at the end. These greens add nutrients and color to the soup. Also, try using sweet potatoes instead of regular potatoes. They add a hint of sweetness and more fiber. To create a vegetarian or vegan version, you'll need to replace the Kielbasa. Use hearty mushrooms, like portobello or shiitake, for a meaty texture. You can also add canned beans, like white beans or chickpeas, for protein. Instead of chicken broth, opt for vegetable broth. This keeps the flavor rich and still plant-based. For creaminess, use coconut milk or cashew cream. This adds a nice touch without dairy. You can easily enhance the flavors in your Potato Kielbasa Soup. Try adding fresh herbs like dill or thyme for a fresh taste. A squeeze of lemon juice can brighten the soup, too. For a little heat, add red pepper flakes or a dash of hot sauce. If you love smokiness, throw in some smoked salt or more smoked paprika. Each of these variations can make your soup unique and delicious. Don't be afraid to experiment and find the combinations you love best! To store your Potato Kielbasa Soup, let it cool first. Transfer the soup to an airtight container. Make sure to seal it well to keep the flavors fresh. You can keep it in the fridge for up to three days. When you want to eat it again, just take it out and reheat. You can also freeze Potato Kielbasa Soup. Use freezer-safe containers or heavy-duty freezer bags. Leave some space at the top, as the soup will expand when frozen. This soup can last in the freezer for about three months. To thaw, place it in the fridge overnight or use the microwave. Reheating the soup is easy. You can use a pot on the stove over medium heat. Stir the soup while it warms to avoid hot spots. If you use a microwave, heat it in short bursts. Stir in between to get even warmth. Always check the soup's temperature before serving. Enjoy it hot! To make Potato Kielbasa Soup gluten-free, choose a gluten-free Kielbasa. Many brands offer this option. You can also use gluten-free chicken broth. Always check the labels to be sure. This change keeps the soup hearty and safe for those with gluten issues. Yes, you can use other sausages in this soup. Italian sausage or turkey sausage works well. For a spicy kick, try chorizo. Each sausage adds its own flavor. Just cook them the same way as Kielbasa. This soup pairs well with crusty bread or a fresh salad. A simple green salad adds a nice crunch. You could also serve it with cornbread for a cozy vibe. These sides enhance the meal and make it even more filling. Potato Kielbasa Soup lasts about 3 to 4 days in the fridge. Store it in an airtight container. When reheating, heat it slowly on the stove. This keeps the flavors rich and delicious. You've learned about the key ingredients, preparation steps, and useful tips for making Potato Kielbasa Soup. This dish is not just filling; it’s also flexible. You can change it up to suit your tastes or dietary needs. Whether you choose a healthier version, a veggie option, or want to enhance the flavor, the options are endless. Remember to store your leftovers properly to enjoy later. Dive into this comforting soup and have fun making it your own. Enjoy the warmth and flavor it brings!

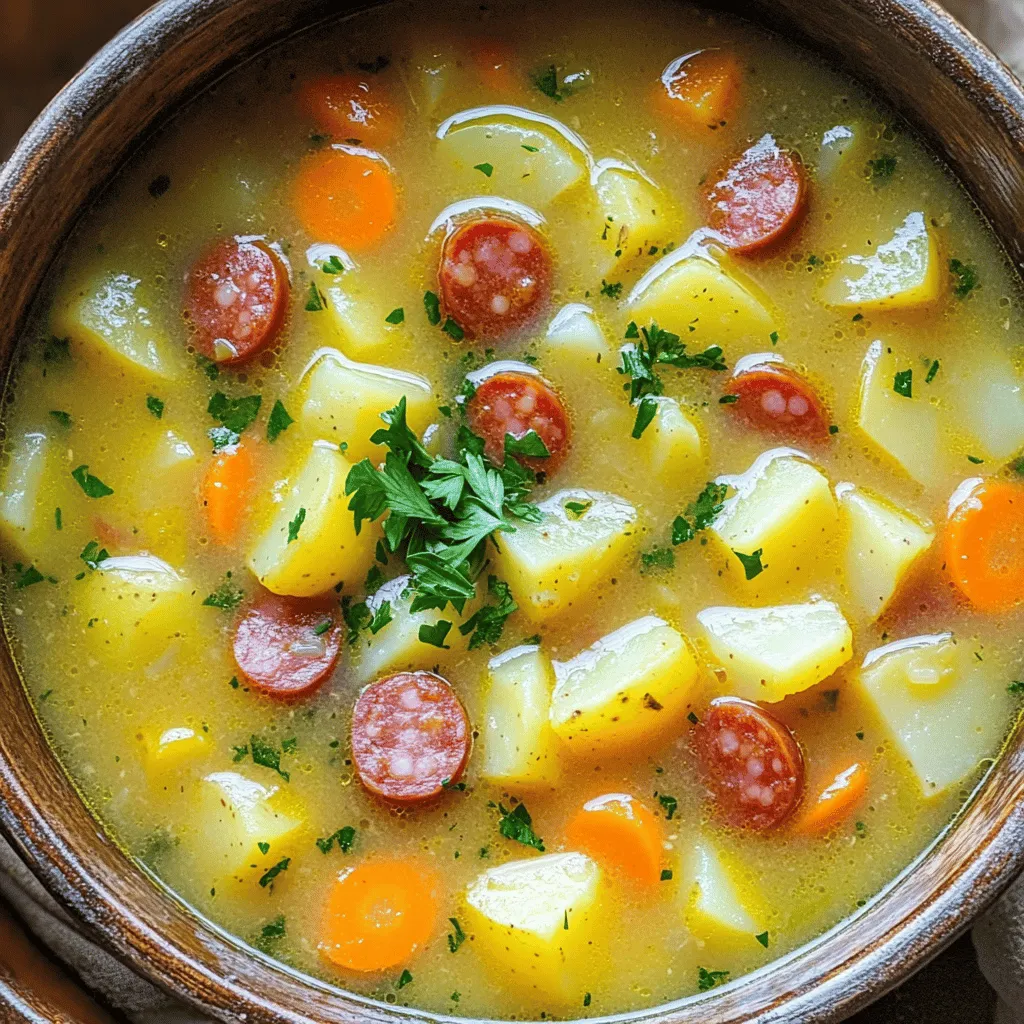
Looking for a cozy meal that warms both heart and soul? My Savory Potato Kielbasa Soup delivers just that! With hearty kielbasa, creamy potatoes, and fresh vegetables, it’s a dish …

Read more

Categories Dinner

Joanna Gaines Pumpkin Cream Cheese Bread Delight

August 23, 2025 by Chef Jamie
- 1 ½ cups all-purpose flour - 1 teaspoon baking soda - ½ teaspoon baking powder - ½ teaspoon salt - 1 teaspoon ground cinnamon - ½ teaspoon ground nutmeg - ½ teaspoon ground ginger - 1 cup pumpkin puree (canned or fresh) - ½ cup granulated sugar - ½ cup brown sugar, packed - ½ cup vegetable oil - 2 large eggs - 1 teaspoon vanilla extract - 8 oz cream cheese, softened - 1 egg yolk - 2 tablespoons powdered sugar - 1 teaspoon vanilla extract (for the cream cheese filling) This list has all you need to make Joanna Gaines' Pumpkin Cream Cheese Bread. Each ingredient plays a role in creating a moist, flavorful bread. The all-purpose flour gives the bread its structure. Baking soda and baking powder help it rise. Salt balances the sweetness, while spices add warmth and depth. Pumpkin puree brings moisture and a lovely flavor. The two types of sugar, granulated and brown, add sweetness and a hint of caramel. Vegetable oil keeps the bread moist. Eggs bind everything together and add richness. The cream cheese filling adds a special touch. It makes each bite creamy and delicious. The powdered sugar sweetens the filling, while vanilla extract enhances the flavor. Gather these ingredients, and you are ready to bake! - Preheat your oven to 350°F (175°C). - Grease a 9x5-inch loaf pan. Use butter or cooking spray for best results. - In a medium bowl, whisk together: - 1 ½ cups all-purpose flour - 1 teaspoon baking soda - ½ teaspoon baking powder - ½ teaspoon salt - 1 teaspoon ground cinnamon - ½ teaspoon ground nutmeg - ½ teaspoon ground ginger - In a large bowl, mix together: - 1 cup pumpkin puree - ½ cup granulated sugar - ½ cup brown sugar, packed - ½ cup vegetable oil - 2 large eggs - 1 teaspoon vanilla extract - Stir until the mixture is smooth and well combined. - Gradually add the dry ingredients to the wet mix. - Stir gently until just combined. - It’s okay if a few lumps remain; do not overmix. - In a separate bowl, blend: - 8 oz cream cheese, softened - 1 egg yolk - 2 tablespoons powdered sugar - 1 teaspoon vanilla extract - Mix until smooth and creamy. - Pour half of the pumpkin batter into the greased loaf pan. - Spread it evenly. - Spoon the cream cheese mix over the batter. - Gently swirl it with a knife. - Pour the remaining pumpkin batter on top, fully covering the cream cheese. - Bake in the preheated oven for 55-65 minutes. - Check doneness by inserting a toothpick into the center. - It should come out clean when the bread is done. To get the best texture, avoid overmixing the batter. When you mix the wet and dry ingredients, stir gently. A few lumps are fine. If you mix too much, the bread can turn out tough. The goal is a light and tender loaf. You can adjust the spices to make the bread your own. If you love cinnamon, add a bit more. You can also try adding a pinch of cloves for warmth. If you want a spicier kick, increase the ginger. Taste as you go and find your perfect blend. To keep leftover bread fresh, wrap it well in plastic wrap. Store it at room temperature for up to three days. For longer storage, put it in the fridge, but it may dry out a bit. You can also freeze slices. Just wrap them in foil and place in a freezer bag. Thaw them at room temperature before serving. Enjoy with a warm drink for a cozy treat! {{image_2}} You can easily make Joanna Gaines' Pumpkin Cream Cheese Bread gluten-free. Use a 1:1 gluten-free flour blend instead of all-purpose flour. This blend often includes rice flour and starches, which work well in quick breads. For a dairy-free version, substitute the cream cheese with a dairy-free cream cheese alternative. Make sure to check the labels for any hidden dairy ingredients. These swaps keep the taste and texture delicious! There are many ways to add new flavors. You can mix in chopped nuts like walnuts or pecans for a crunchy bite. Chocolate chips add sweetness and richness, making the bread even more indulgent. If you want a fruity twist, try adding dried cranberries. They give a nice tart contrast to the sweet bread. Each of these options creates a unique twist while keeping the spirit of the recipe. This bread is perfect for fall. You can add spices like cloves or allspice for extra warmth. Consider mixing in apple or pear chunks for a fruity kick. You can also toss in a handful of raisins or pumpkin seeds for added texture. Each of these seasonal add-ins makes the bread feel fresh and festive, enhancing the cozy vibe of this delightful treat. To keep your Joanna Gaines pumpkin cream cheese bread fresh, store it properly. First, let the bread cool completely on a wire rack. Once cool, wrap it tightly in plastic wrap or aluminum foil. This keeps moisture in and prevents drying out. You can also place it in an airtight container. A bread box works well too. This method helps maintain its soft texture and rich flavor. If you want to save some for later, freezing works great! First, slice the bread after it cools. Then, wrap each slice in plastic wrap. Place the wrapped slices in a freezer-safe bag or container. Remove as much air as possible to prevent freezer burn. To thaw, simply take out a slice and let it sit at room temperature for about 30 minutes. You can also use a microwave for a quick thaw. Just heat for about 10-15 seconds. This delicious bread stays fresh for about 3 to 4 days at room temperature. If stored in the fridge, it can last up to a week. When frozen, it keeps well for up to 3 months. Just remember, the longer it sits, the more flavor it may change. Enjoy your bread while it’s at its best! Yes, you can use fresh pumpkin. Start with about 2 cups of raw pumpkin. Cut the pumpkin, remove the seeds, and roast it until soft. Then, scoop out the flesh and puree it. This adds a fresh taste but requires extra work. You may need to adjust moisture since fresh pumpkin may differ in water content compared to canned. To make this bread vegan, replace the eggs. Use one flax egg for each egg. Mix one tablespoon of ground flaxseed with three tablespoons of water. Let it sit until thick. Swap cream cheese for a vegan alternative. Use coconut cream or any plant-based cream cheese. This keeps the recipe creamy and delightful. If your bread is dense, it may be overmixed. Stir the batter gently until just combined. Also, check your leavening agents. Make sure your baking soda and baking powder are fresh. If your bread sinks, it could be from too much moisture. Reduce the pumpkin puree by a few tablespoons next time. Yes, you can bake mini loaves. Use a mini loaf pan and adjust the baking time. Bake for about 25 to 30 minutes. Check for doneness with a toothpick. The toothpick should come out clean. Mini loaves make great gifts and are fun to share. This blog post covered everything you need to know to make delicious pumpkin bread. We discussed key ingredients, from spices to cream cheese, and outlined the clear steps to follow. Achieving the perfect texture and flavor takes some care, but it’s worth it. Remember, you can customize this bread with various nuts or even make it vegan. Store leftovers properly for the best taste. With these tips and tricks, you’re set to impress friends and family with your baking skills. Enjoy your time in the kitchen!

Love the taste of fall? Joanna Gaines Pumpkin Cream Cheese Bread gives you that cozy vibe in every bite. Imagine warm spices and creamy filling combining in a perfectly baked …

Read more

Categories Desserts

Edible Brownie Batter Dip Delightful Dessert Recipe

August 23, 2025 by Chef Jamie
- 1 cup all-purpose flour - 1/2 cup unsweetened cocoa powder - 1/2 cup brown sugar - 1/4 cup granulated sugar - 1/2 cup unsalted butter, softened - 1 teaspoon vanilla extract - 1/4 teaspoon salt - 1/4 cup milk (or dairy-free alternative) - 1/2 cup semi-sweet chocolate chips - 1/4 cup chopped nuts (optional) When making this dip, measuring accurately is key. Use dry measuring cups for flour and cocoa powder. For sugars, level them off with a knife. The butter should be softened to room temperature, making it easy to cream. If you want a richer taste, you can use more cocoa powder. The milk should be added slowly to reach the right consistency. You can customize your brownie batter dip. Here are some fun add-ins: - Peanut butter: Mix in 1/4 cup for a nutty twist. - Mint extract: Use 1/2 teaspoon for a fresh flavor. - Mini marshmallows: Add for a chewy texture. - Crushed cookies: Stir in some for extra crunch. These options let you explore new flavors and textures. To start, gather all your ingredients. You will need: - 1 cup all-purpose flour - 1/2 cup unsweetened cocoa powder - 1/2 cup brown sugar - 1/4 cup granulated sugar - 1/2 cup unsalted butter, softened - 1 teaspoon vanilla extract - 1/4 teaspoon salt - 1/4 cup milk (or dairy-free alternative) - 1/2 cup semi-sweet chocolate chips - 1/4 cup chopped nuts (optional) First, mix the flour, cocoa powder, brown sugar, granulated sugar, and salt in a bowl. Use a whisk to blend them well. In another bowl, cream the softened butter. An electric mixer works best here. Make the butter fluffy before adding the vanilla extract. After creaming the butter, slowly add the dry mix to it. Keep the mixer on low speed. This helps avoid a flour cloud! Once mixed, pour in the milk slowly. Keep mixing until the dip is smooth and creamy. If it’s too thick, add a little more milk. Next, fold in the chocolate chips and nuts gently. This step ensures the chocolate and nuts spread evenly. For the best dip, the texture should be smooth but thick enough to hold up on a spoon. If it’s too runny, add a bit more flour. If it’s too thick, just mix in more milk. After mixing, transfer the dip to a serving bowl. Refrigerate it for at least 30 minutes. This chilling time allows the flavors to blend and makes the dip a bit firmer. Serve your brownie batter dip chilled, and enjoy with your favorite dippers! To make your edible brownie batter dip shine, focus on key ingredients. Use good-quality cocoa powder. It gives a deep chocolate taste. Also, try to mix the sugars well with the dry ingredients. This helps blend flavors early on. The butter must be softened, not melted. Softened butter makes your dip creamy and fluffy. Lastly, don't skip the vanilla extract. It adds warmth and depth to the dip. One common mistake is not measuring flour correctly. Too much flour makes the dip dry. Use a spoon to scoop flour into the measuring cup, then level it off. Another mistake is adding milk too fast. Pour it slowly to control the dip's texture. Also, don't forget to chill the dip for at least 30 minutes. Chilling helps the flavors mix and the dip firm up. For serving, use a fun bowl to catch attention. Surround it with dippers like graham crackers, pretzels, or fresh fruit. You can even add cookies for a sweet touch. This makes the dip interactive and enjoyable. If you want to make it extra special, drizzle some melted chocolate on top. This adds a nice finish and extra sweetness. {{image_2}} You can change the flavor of your brownie batter dip to make it special. Try adding peanut butter for a rich, nutty taste. Just mix in half a cup of creamy peanut butter when you blend the butter and vanilla. Or, add mint extract for a fresh twist. Use one teaspoon of mint extract to give it a cool flavor. You can also mix in different extracts, like almond or coconut. Each adds a unique touch to this sweet treat. If you have dietary needs, you can easily adjust this recipe. For a gluten-free option, use gluten-free flour in place of regular flour. It works well and tastes great! If you want a vegan dip, substitute the butter with coconut oil or vegan butter. Use a plant-based milk like almond or soy to keep it dairy-free. You can also skip the chocolate chips or use dairy-free ones to make it fully vegan. Choosing the right dippers can make your brownie batter dip even better! Fresh fruits like strawberries, bananas, or apples add a nice contrast. You can also use cookies like graham crackers or chocolate chip cookies for a classic feel. Pretzels bring a sweet and salty mix that many love. For a fun twist, try mini doughnuts or waffle chips. These choices make for a fun dessert spread that everyone can enjoy! After enjoying your edible brownie batter dip, store any leftovers in an airtight container. Make sure to seal it well to keep the dip fresh. Place it in the fridge right away. This will help keep it cool and tasty. The brownie batter dip can last about five days in the fridge. If you want to save it for longer, you can freeze it. Use a freezer-safe container and leave a bit of space at the top. This allows room for expansion. It can last up to three months in the freezer. When ready to eat, you can thaw it in the fridge overnight. To enjoy the best texture, do not heat the dip. It tastes best cold. If it gets too thick after storing, mix in a little milk. This will bring back the creamy dip consistency. Simply stir until smooth, and it’s ready to serve again! Yes, this dip is safe to eat. I use heat-treated flour, which removes any risk. You can also buy flour labeled as safe for raw consumption. The cocoa powder and other ingredients are safe as well. This dip is made for enjoyment, so dig in! Absolutely! You can use sugar substitutes like stevia or erythritol. Just make sure to check the package for the right amount. Adjust based on the sweetness you desire. These options can help if you want a lower-calorie treat. To amp up the chocolate flavor, add more cocoa powder. Start with two tablespoons at a time. You can also mix in extra chocolate chips. Dark chocolate chips bring a rich taste. This dip can be as chocolatey as you want! If you need a milk substitute, try almond milk, oat milk, or coconut milk. These options keep the dip creamy. You can also use water, but it might change the flavor a bit. Adjust the quantity to get the right dip consistency. In this blog post, we explored making delicious edible brownie batter dip. We covered the key ingredients, measurement details, and fun add-ins. You learned step-by-step how to prepare and mix it for the perfect texture. I shared tips for enhancing flavor while avoiding common mistakes. We also discussed various flavor options, dietary swaps, and great dippers. Lastly, I provided storage tips and answered common questions. Enjoy making this treat, and remember, it’s all about personalizing it to fit your taste. Dive in and have fun with your dip!

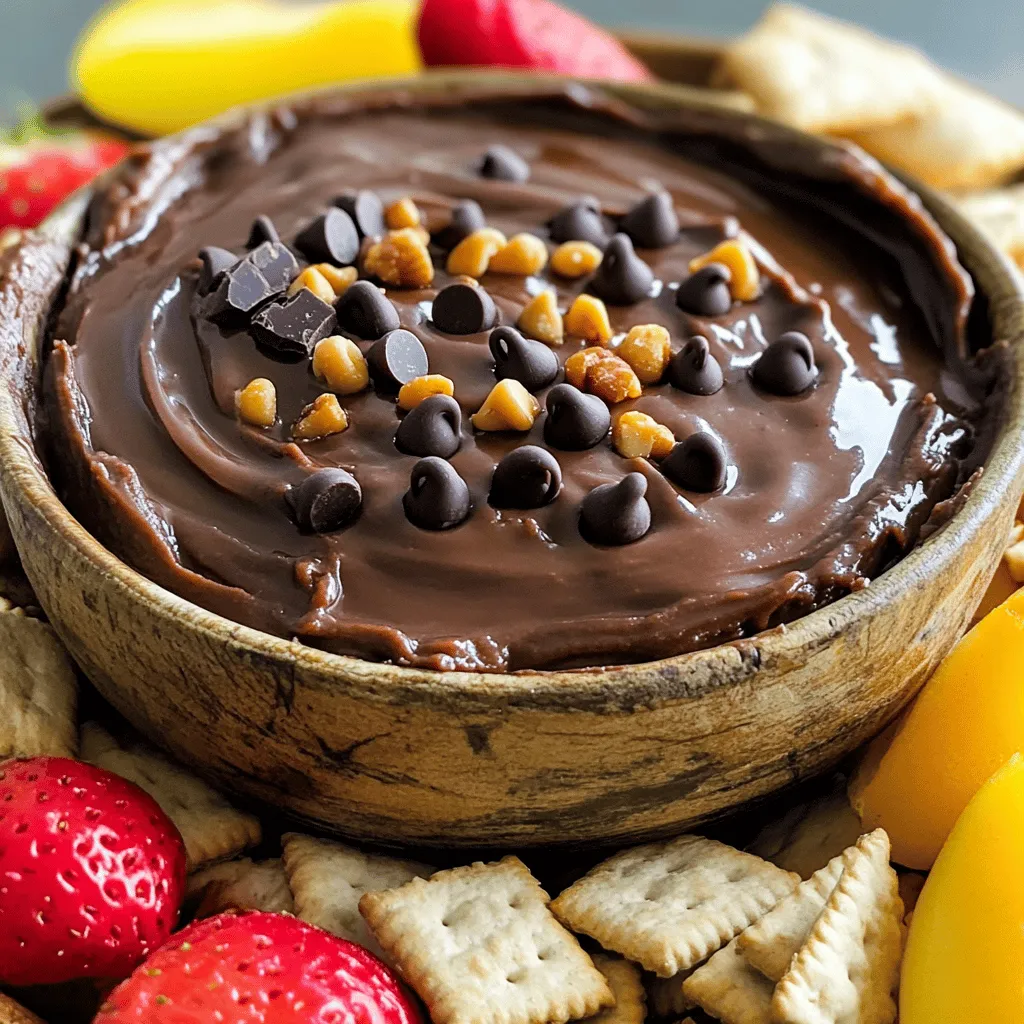
Get ready to indulge in a sweet treat with my Edible Brownie Batter Dip! This easy recipe lets you enjoy the rich taste of brownie batter without worry. Perfect for …

Read more

Categories Desserts
Older posts
Newer posts
← Previous Page1 … Page44 Page45 Page46 … Page134 Next →

TOSSED RECIPES

Simple meals, bold taste. Quick recipes made for real life — always fresh, always delicious. 🌿🍴

PAGES

Home About Contact Privacy Policy Terms & Conditions Cookie Policy GDPR Policy Copyright Policy Disclaimer

CATEGORIES

Appetizers Desserts Salads Breakfast Dinner

Contact

  • Pinterest
  • Mail
Copyright © 2026 Tossed Recipes. All rights reserved.