Skip to content
Tossed Recipes
  • Home
  • Appetizers
  • Desserts
  • Salads
  • Breakfast
  • Dinner
  • Privacy Policy
  • Contact
  • About

Chef Jamie

Egg Roll in a Bowl Quick and Tasty Meal Recipe

January 5, 2026August 12, 2025 by Chef Jamie
To make Egg Roll in a Bowl, you need simple, fresh ingredients. Here’s what you’ll gather: - 1 pound ground turkey (or chicken) - 1 tablespoon sesame oil - 4 cups coleslaw mix (shredded cabbage and carrots) - 3 green onions, sliced - 2 cloves garlic, minced - 1 tablespoon fresh ginger, minced - 1/4 cup low-sodium soy sauce - 1 tablespoon rice vinegar - 1 teaspoon sesame seeds (for garnish) - Salt and pepper to taste - Optional: Sriracha or chili sauce for a kick Each ingredient brings unique flavor and texture. Ground turkey or chicken adds protein. Sesame oil gives a nutty taste. The coleslaw mix provides crunch. Green onions add brightness, while garlic and ginger boost aroma. Soy sauce and rice vinegar create a balanced sauce. Don’t forget the sesame seeds for a finishing touch. If you like spice, add Sriracha or chili sauce. This meal is quick and easy. You can prepare it in about 20 minutes. That makes it perfect for busy nights. Gather these ingredients, and you’re ready to start cooking! {{ingredient_image_1}} - Heat 1 tablespoon of sesame oil in a large skillet over medium-high heat. - Add 1 pound of ground turkey or chicken. Cook for 5 to 7 minutes. Break it apart as it cooks. The meat should be brown and fully cooked. Season with salt and pepper. - Stir in 2 minced cloves of garlic and 1 tablespoon of minced fresh ginger. - Cook these for 1 to 2 minutes. You want the kitchen to smell amazing. - Add 4 cups of coleslaw mix to the skillet. Stir until everything is combined. - Pour in 1/4 cup of low-sodium soy sauce and 1 tablespoon of rice vinegar. Toss it all together. Cook for another 2 to 3 minutes. - Remove the skillet from the heat and stir in 3 sliced green onions. - Taste the dish and adjust the seasoning if needed. Add sriracha for some extra heat if you like. - Serve your dish hot. Garnish with sesame seeds and more green onions on top. When making Egg Roll in a Bowl, choose between a skillet and a wok. A skillet is great for smaller servings, while a wok offers more space. Using a wok helps with even cooking and keeps the flavors bright. Make sure to heat your pan before adding oil. This step helps the meat brown nicely. Stir often for even cooking and to prevent sticking. For bold flavors, use fresh spices over dried ones. Fresh garlic and ginger add vibrancy to your dish. You can also add Sriracha or chili sauce for heat. Start with a little, then add more if you want extra spice. This way, you can control the heat level to suit your taste. Prep your ingredients in advance to save time. Chop your veggies and mince your garlic and ginger beforehand. Store them in the fridge. Another tip is to make this dish in bulk. You can enjoy it throughout the week. Just reheat your portions in the microwave or on the stove. This method makes busy days much easier. Pro Tips Use Fresh Ingredients: Fresh garlic and ginger make a significant difference in flavor. Use them instead of powdered or jarred versions for the best taste. Customize Your Protein: Feel free to substitute ground turkey with ground beef, pork, or tofu for a vegetarian option. Adjust cooking times accordingly. Make It Spicy: If you enjoy heat, add sriracha or chili sauce during cooking for a flavorful kick that enhances the dish. Prep Ahead: You can prepare the coleslaw mix and chop the green onions in advance to save time during the cooking process. {{image_2}} You can change the meat in this dish to fit your taste. Ground beef or pork works well. They add a rich flavor that many love. Just cook it the same way as the turkey. If you prefer a plant-based meal, try tofu or tempeh. Crumble it like the meat and cook until warmed through. These options make the dish tasty and satisfying for everyone. Want a low-carb version? Swap the coleslaw mix for zucchini noodles. They give a fresh crunch and are low in carbs. You can spiralize the zucchini for extra fun! Another great choice is cauliflower rice. It soaks up the flavors and keeps the dish light. Both options are healthy and fill you up without the extra carbs. Feel free to get creative with your veggies. Add bell peppers, mushrooms, or snap peas for more color and taste. You can even throw in some baby corn or water chestnuts for a nice crunch. Adjust the spice level to your liking, too. If you want more heat, add Sriracha or chili flakes. For a milder dish, skip the spice or use less. These tweaks let you make this meal your own! To store leftovers, let your Egg Roll in a Bowl cool first. Once it cools, place it in an airtight container. Keep it in the fridge. It stays fresh for about three to four days. When you’re ready to eat, just reheat it in the microwave or on the stove. For freezing, use a freezer-safe container. This dish can last up to three months in the freezer. When you want to enjoy it, thaw it overnight in the fridge. Reheat it on the stove for best results. This keeps the flavors bright and fresh. Egg Roll in a Bowl pairs well with rice or quinoa. You can also serve it with some crispy wonton chips for extra crunch. If you have leftovers, you can make a delicious wrap. Just use lettuce leaves or tortillas to create a tasty meal. You can use several proteins in this dish. Ground chicken works well. You might also try ground beef or pork for a different flavor. If you want a vegetarian option, use tofu or tempeh. Chopped mushrooms can add texture, too. Each choice brings a unique taste to your Egg Roll in a Bowl. Egg Roll in a Bowl can last about 3 to 4 days in the fridge. Make sure to store it in an airtight container. This helps keep it fresh and tasty. If you notice any off smell or change in color, it's best to throw it away. Always check your food before eating. Yes, you can prepare this dish ahead of time. Cook it fully and let it cool. Then, store it in the fridge. You can also chop your veggies and meat in advance. Reheat it in a skillet or microwave before serving. This saves you time on busy days. Egg Roll in a Bowl is a healthy choice. It has lean protein from turkey or chicken. The coleslaw mix offers fiber and vitamins. Garlic and ginger add flavor and health benefits. Using low-sodium soy sauce keeps the sodium low. Overall, it's a tasty and nutritious meal option. This recipe for Egg Roll in a Bowl is simple and fun. You learned about key ingredients, step-by-step cooking tips, and variations. I shared how to store leftovers and answered common questions. Feel free to experiment with flavors and proteins. Remember, you can even prep in advance for busy days. This dish is versatile and packed with nutrients. Enjoy making your own version!

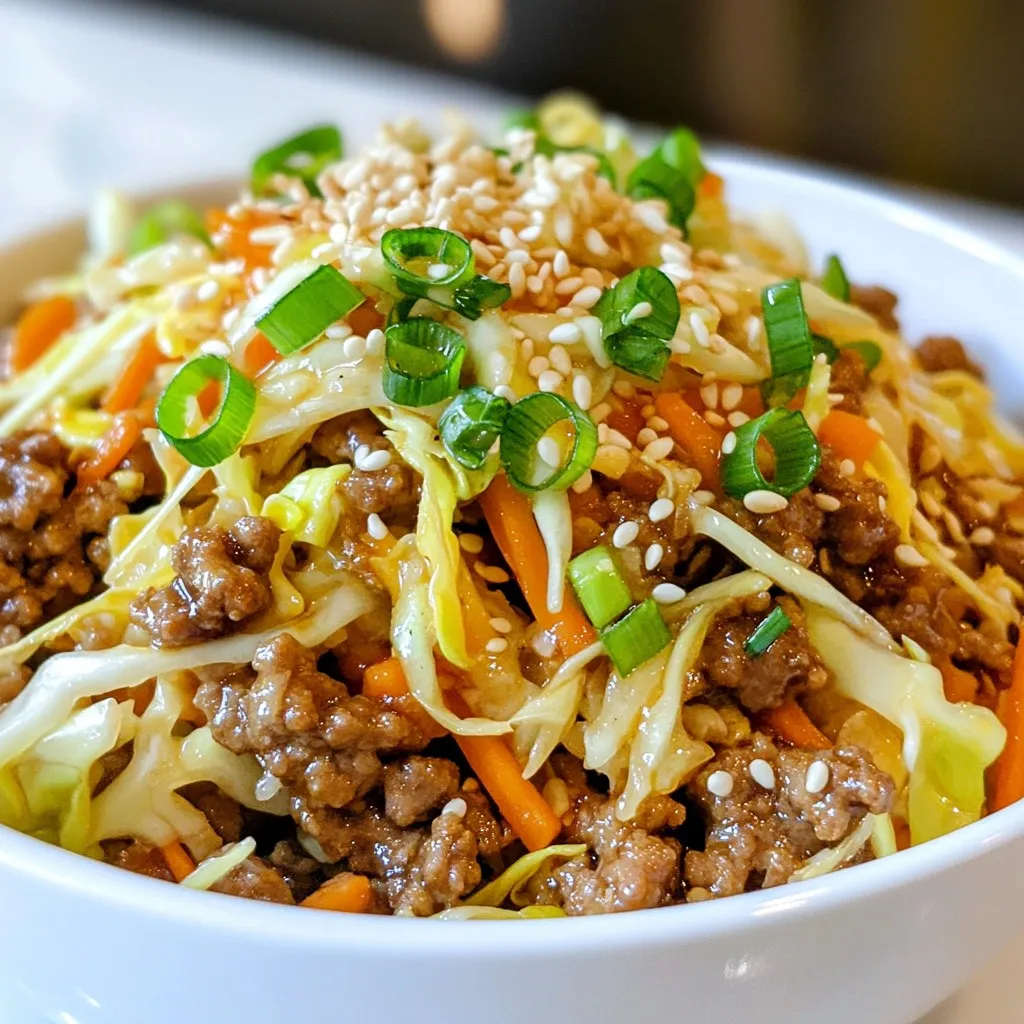
Looking for a quick and tasty meal? Try my Egg Roll in a Bowl recipe! This dish packs all the great flavors of traditional egg rolls but is much easier …

Read more

Categories Dinner

Apple Pumpkin Streusel Muffins Irresistible Flavor Treat

November 11, 2025August 12, 2025 by Chef Jamie
To make these delightful Apple Pumpkin Streusel Muffins, you need the following main ingredients: - 1 cup pumpkin puree - 1 cup apples, peeled and diced - 2 cups all-purpose flour - 1 teaspoon baking powder - 1 teaspoon baking soda - ½ teaspoon salt - 2 teaspoons ground cinnamon - ½ teaspoon ground nutmeg - 1 cup granulated sugar - ½ cup brown sugar, packed - 2 large eggs - ½ cup vegetable oil - ½ cup milk - 1 teaspoon vanilla extract If you need substitutes, here are some ideas: - You can use unsweetened applesauce instead of pumpkin puree for a lighter muffin. - Swap the all-purpose flour with a gluten-free blend to make it gluten-free. - For a dairy-free option, use almond milk instead of regular milk. For the tasty streusel topping, gather these ingredients: - ½ cup rolled oats - ½ cup all-purpose flour - ¼ cup brown sugar, packed - ½ teaspoon ground cinnamon - ¼ cup cold butter, cubed You can make the streusel topping ahead of time. Just mix the ingredients and store them in the fridge. This way, when you are ready to bake, it will be ready to sprinkle right on top of your muffins. {{ingredient_image_1}} First, preheat your oven to 375°F (190°C). This step is key for even baking. While the oven heats, prepare your muffin tin. You can either line it with paper liners or grease it with butter. Greasing helps the muffins come out easily after baking. For the streusel topping, grab a medium bowl. Combine ½ cup rolled oats, ½ cup all-purpose flour, ¼ cup brown sugar, and ½ teaspoon ground cinnamon. Mixing these ingredients gives the topping a nice flavor. Next, add ¼ cup of cold butter, cubed. Use your fingers or a pastry cutter to mix until it looks like coarse crumbs. This texture adds crunch to your muffins. Now, let's make the muffin batter. In a large bowl, whisk together 2 cups all-purpose flour, 1 teaspoon baking powder, 1 teaspoon baking soda, ½ teaspoon salt, 2 teaspoons ground cinnamon, and ½ teaspoon ground nutmeg. This mixture makes the muffins rise and taste great. In another bowl, beat together 1 cup granulated sugar, ½ cup packed brown sugar, 2 large eggs, ½ cup vegetable oil, ½ cup milk, 1 cup pumpkin puree, and 1 teaspoon vanilla extract. This mix creates a moist batter. After it’s well combined, pour the wet ingredients into the dry ingredients. Gently fold until just combined. Finally, add in the 1 cup diced apples for sweetness and texture. Using a spoon or an ice cream scoop, fill each muffin cup about ¾ full with the batter. This gives them space to rise. Next, generously sprinkle the streusel topping over each muffin. The streusel will bake into a nice, crunchy layer. Bake your muffins in the preheated oven for 18-20 minutes. To check if they are done, insert a toothpick into the center of a muffin. If it comes out clean, they are ready. Once done, remove the muffins from the oven and let them cool in the pan for about 5 minutes. After that, transfer them to a wire rack to cool completely. Enjoy the warm, delicious smell as they cool! To get the best texture for your Apple Pumpkin Streusel Muffins, follow these steps: - Use room temperature ingredients: This helps create a smooth batter. - Mix gently: Fold wet and dry ingredients until just combined. Over-mixing makes muffins tough. - Check your oven: Every oven is different. Use an oven thermometer to ensure accurate temperature. Measuring ingredients accurately is key. Use a kitchen scale for precise measurements. For dry ingredients like flour, spoon it into a cup and level it off with a knife. This prevents packing, which can make your muffins dense. Serve your muffins warm for the best flavor. Dust them with powdered sugar for a sweet touch. Pair them with a small bowl of whipped cream or sliced apples. This adds freshness and a nice contrast to the rich muffins. For drinks, try serving these muffins with apple cider or a spiced latte. The warm flavors complement each other perfectly. To keep your muffins fresh, store them in an airtight container at room temperature. This helps maintain moisture and flavor. If you need to store them longer, consider freezing them. Wrap each muffin in plastic wrap and place them in a freezer bag. This keeps them fresh for up to three months. When you’re ready to enjoy, just thaw them at room temperature or warm them in the oven. Pro Tips Use Fresh Ingredients: For the best flavor and texture, use fresh, seasonal apples and high-quality pumpkin puree. Don’t Overmix: When combining wet and dry ingredients, mix until just combined to ensure your muffins remain light and fluffy. Cool Before Serving: Allow the muffins to cool slightly before serving to enhance their flavor and texture. Experiment with Spices: Feel free to adjust the spices according to your taste; adding ginger or cloves can give a nice twist to the flavor. {{image_2}} You can easily change the flavors in your Apple Pumpkin Streusel Muffins. Adding nuts like walnuts or pecans gives a nice crunch. Chopped nuts blend well with the soft muffin. They add a nutty flavor that complements the pumpkin. If you want a sweet twist, try adding chocolate chips or dried fruit. Chocolate chips melt and create gooey pockets of goodness. Dried fruit, like cranberries or raisins, adds a chewy texture. Both options make the muffins even more delicious. For those needing gluten-free options, replace all-purpose flour with a gluten-free blend. Almond flour or oat flour works well too. This change keeps the muffins tasty while meeting dietary needs. If you want to cut down on sugar, use substitutes like applesauce or ripe bananas. These options keep the muffins moist and sweet. You can also try using stevia or monk fruit for a healthier muffin. This way, you can enjoy a treat without the extra calories. To check if the muffins are done, use a toothpick. Insert it into the center of a muffin. If it comes out clean, they are ready. If there is batter on the toothpick, bake for a few more minutes and test again. This simple method helps ensure perfect muffins every time. Yes, you can make these muffins ahead of time. Allow them to cool completely after baking. Then, store them in an airtight container at room temperature for up to 2 days. For longer storage, wrap them in plastic and freeze. Just thaw before serving. You can use both fresh and canned pumpkin for these muffins. Canned pumpkin is convenient and consistent in texture. Fresh pumpkin gives a richer flavor but requires more work. If using fresh, roast and puree it first for the best results. Both options lead to delicious muffins. For a crispier streusel, use cold butter and mix it well with dry ingredients. Ensure the mixture looks like coarse crumbs. You can also bake the muffins a bit longer, but check frequently to avoid burning. Adding nuts can also enhance the crunchiness of the topping. After baking, you can add a dusting of powdered sugar for sweetness. A drizzle of caramel sauce adds richness. Consider serving with whipped cream or a scoop of vanilla ice cream for extra flavor. Chopped nuts or a sprinkle of cinnamon can also enhance the muffins’ taste. These muffins are packed with great flavors and textures. We covered key ingredients like pumpkin, apples, and spices. You learned how to prep the oven and muffin tin. Making the streusel topping was also simple. With tips for perfect results and fun variations, you can customize your muffins. Proper storage methods ensure they stay fresh. Enjoy baking these delicious treats, and experiment with your own ideas to make them even better.

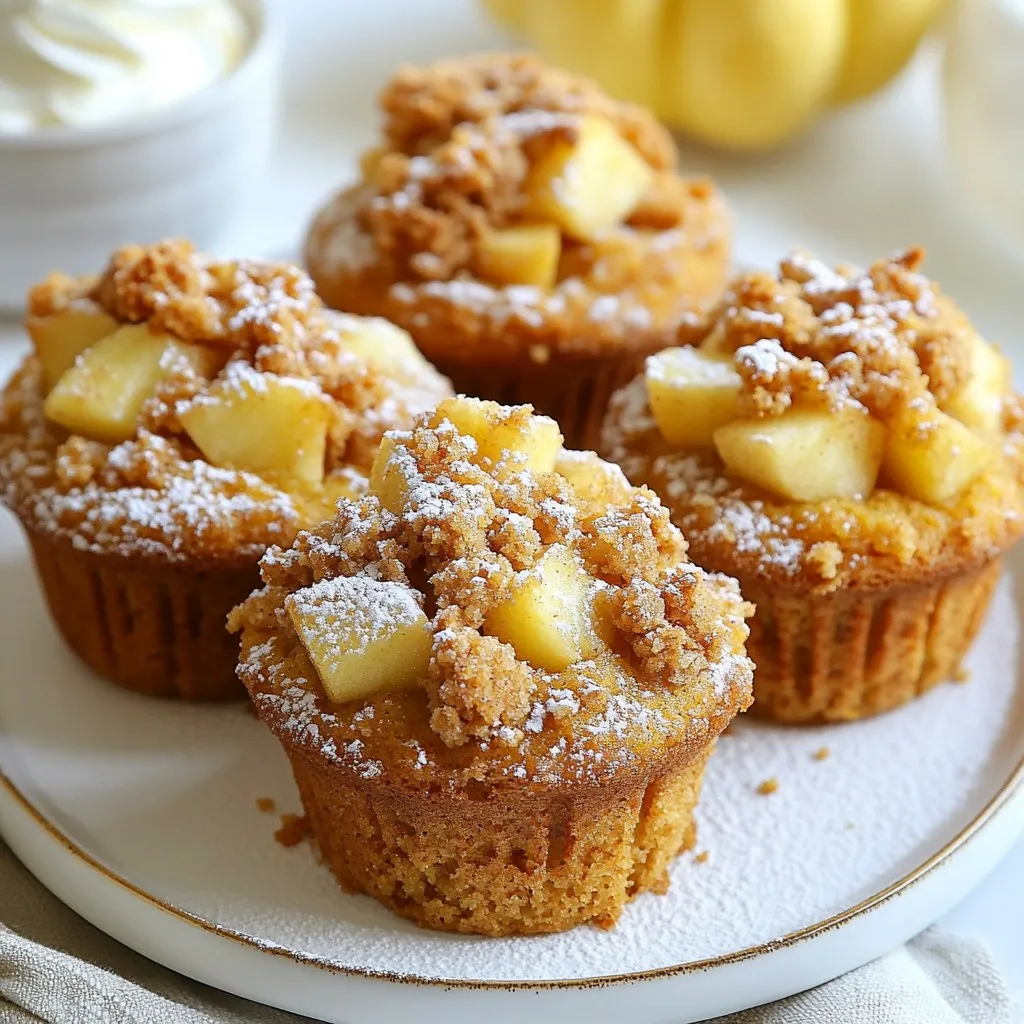
Get ready to delight your taste buds with Apple Pumpkin Streusel Muffins! This recipe combines warm spices, tender pumpkin, and tart apples for a treat you’ll crave every autumn. As …

Read more

Categories Desserts

Slow Cooker Ranch Chicken Easy and Flavorful Recipe

August 11, 2025 by Chef Jamie
- 4 boneless, skinless chicken breasts - 1 packet ranch dressing mix - 1 cup chicken broth - 1 cup cream cheese, softened - 1 cup frozen corn - 1 cup black beans, rinsed and drained - 1 cup diced tomatoes (canned or fresh) - 1 teaspoon garlic powder - 1 teaspoon onion powder - 1/2 teaspoon cumin - Salt and pepper to taste - Fresh cilantro - Lime wedges To create the best Slow Cooker Ranch Chicken, you need a few key ingredients. Start with boneless, skinless chicken breasts. These cook evenly and shred easily. The ranch dressing mix adds rich flavor. Next, chicken broth keeps the dish moist. Cream cheese makes it creamy and smooth. It also helps bind the flavors together. Now let’s add the fun stuff! Frozen corn adds sweetness and texture. Rinsed black beans give a nice protein boost. Diced tomatoes, whether canned or fresh, add color and tang. For seasoning, garlic powder and onion powder are must-haves. They enhance the taste without overpowering it. A pinch of cumin adds warmth, while salt and pepper bring everything to life. Finish it off with fresh cilantro and lime wedges. They brighten the dish and give a burst of freshness. This perfect blend of ingredients makes the Slow Cooker Ranch Chicken easy and full of flavor. To start, place the chicken breasts in the bottom of your slow cooker. Make sure they fit well without overlapping. Next, sprinkle the ranch dressing mix evenly over the chicken. This adds a lot of flavor! Now, pour the chicken broth over the chicken. This keeps the chicken moist as it cooks. Then, add the softened cream cheese right on top. It will melt and create a creamy sauce. Next, add the frozen corn, black beans, and diced tomatoes to the slow cooker. These veggies add color and texture. Finally, mix in the garlic powder, onion powder, cumin, salt, and pepper. Stir gently to combine everything well. Cover the slow cooker and choose your cooking setting. You can cook on low for 6-7 hours or on high for 3-4 hours. Your chicken is done when it shreds easily with a fork. After cooking, shred the chicken in the slow cooker and stir it into the sauce. This makes it extra tasty! How to get the best flavor To boost the flavor, use fresh ingredients when you can. Fresh cilantro and lime add a bright taste. For deeper flavor, let the chicken soak in the ranch mix longer. Adding more seasonings like garlic powder and cumin can also enhance the taste. You can even try mixing in some hot sauce for a kick! Avoiding dry chicken To keep the chicken juicy, always use enough liquid. Chicken broth is key here. If the chicken looks dry while cooking, add a splash of broth. Cooking on low heat helps too. It allows the meat to cook slowly and stay tender. Shredding the chicken at the end keeps it moist, soaking up all the tasty sauce. Best sides to serve with ranch chicken Ranch chicken pairs well with many sides. Fluffy rice or warm tortillas are great options. You can also serve it with a fresh salad for crunch. Or, try tortilla chips for dipping! Adding some avocado or guacamole can make it even better. Creative ways to use leftovers Leftovers can be a treat! Use them in wraps or tacos for lunch. You can add ranch chicken to salads for extra flavor. Another fun idea is to make a creamy ranch chicken pizza. Just spread the chicken on dough and bake it. The options are endless! Best slow cookers for this recipe A good slow cooker makes a big difference. Look for one with adjustable heat settings. A programmable slow cooker lets you set the cooking time and forget about it. Brands like Crock-Pot or Instant Pot are great choices for this recipe. Recommended kitchen tools Having the right tools helps a lot. You need a sharp knife for cutting the chicken. A sturdy cutting board is also a must. Plus, use measuring cups for accuracy. A good set of mixing spoons will help combine your ingredients nicely. {{image_2}} You can make this dish lighter by swapping some ingredients. Try using Greek yogurt instead of cream cheese. It adds creaminess with fewer calories. You can also use low-sodium chicken broth to cut back on salt. For a vegetarian option, replace the chicken with firm tofu. Tofu soaks up flavors well and makes a hearty meal. Want more heat? Add red pepper flakes or a few dashes of hot sauce. You can also try adding spices like smoked paprika or chili powder. This gives a nice kick to the ranch chicken. Incorporating different vegetables can boost nutrition. Try bell peppers, zucchini, or even spinach for a colorful twist. Just toss them in before cooking. Ranch chicken is great in salads. Toss shredded chicken over mixed greens with tomatoes and avocado. Drizzle with ranch dressing for a fresh meal. You can also make wraps. Use tortillas to fill with ranch chicken, lettuce, and cheese. These wraps are perfect for lunch or a quick dinner option. To keep your slow cooker ranch chicken safe, store it in an air-tight container. This helps keep out germs and moisture. In the fridge, it lasts about 3 to 4 days. Always cool the chicken down first before putting it in the fridge. This prevents the fridge from getting warm. When you’re ready to eat, check for any off smells or changes in color. If it looks or smells bad, throw it away. If you want to keep ranch chicken longer, freezing is a great option. First, let the chicken cool completely. Then, place it in a freezer-safe bag or container. Remove as much air as possible to prevent freezer burn. Ranch chicken can last in the freezer for up to 3 months. To use, take it out and thaw it in the fridge overnight. For quick thawing, you can use a microwave. When reheating ranch chicken, you want to keep it moist. Use the stove or microwave for best results. If using the stove, heat in a pan over low heat. Add a splash of chicken broth to keep it juicy. When using the microwave, cover the dish and heat in short bursts. Aim for an internal temperature of 165°F for safety. Enjoy your ranch chicken warm, over rice, or in tacos! You should cook Slow Cooker Ranch Chicken for 6-7 hours on low or 3-4 hours on high. The chicken will be tender when done. You can check it by using a fork to shred the chicken. If it pulls apart easily, it is ready to serve. Yes, you can use thawed chicken instead of frozen. Just adjust the cooking time. If using thawed chicken, cook on high for about 3 hours or low for about 5 hours. If you want to substitute cream cheese, you can use Greek yogurt or a dairy-free cream cheese. Both options will add a nice creaminess to the dish. Just remember to adjust the amount based on your taste. Yes, this recipe can be gluten-free. Just make sure the ranch dressing mix you use is gluten-free. Some brands contain gluten, so it's best to check the label before buying. To make this dish spicier, you can add diced jalapeños or a splash of hot sauce. You can also sprinkle in some cayenne pepper or red pepper flakes. Adjust to your heat level for a perfect kick! This blog post covered how to make Slow Cooker Ranch Chicken. We explored the main and extra ingredients, along with preparation steps. I shared tips to enhance flavor and different serving ideas. Lastly, I discussed storage and common questions. In summary, this recipe is easy and delicious. You can customize it to fit your taste. Enjoy making this flavorful dish for your family and friends!

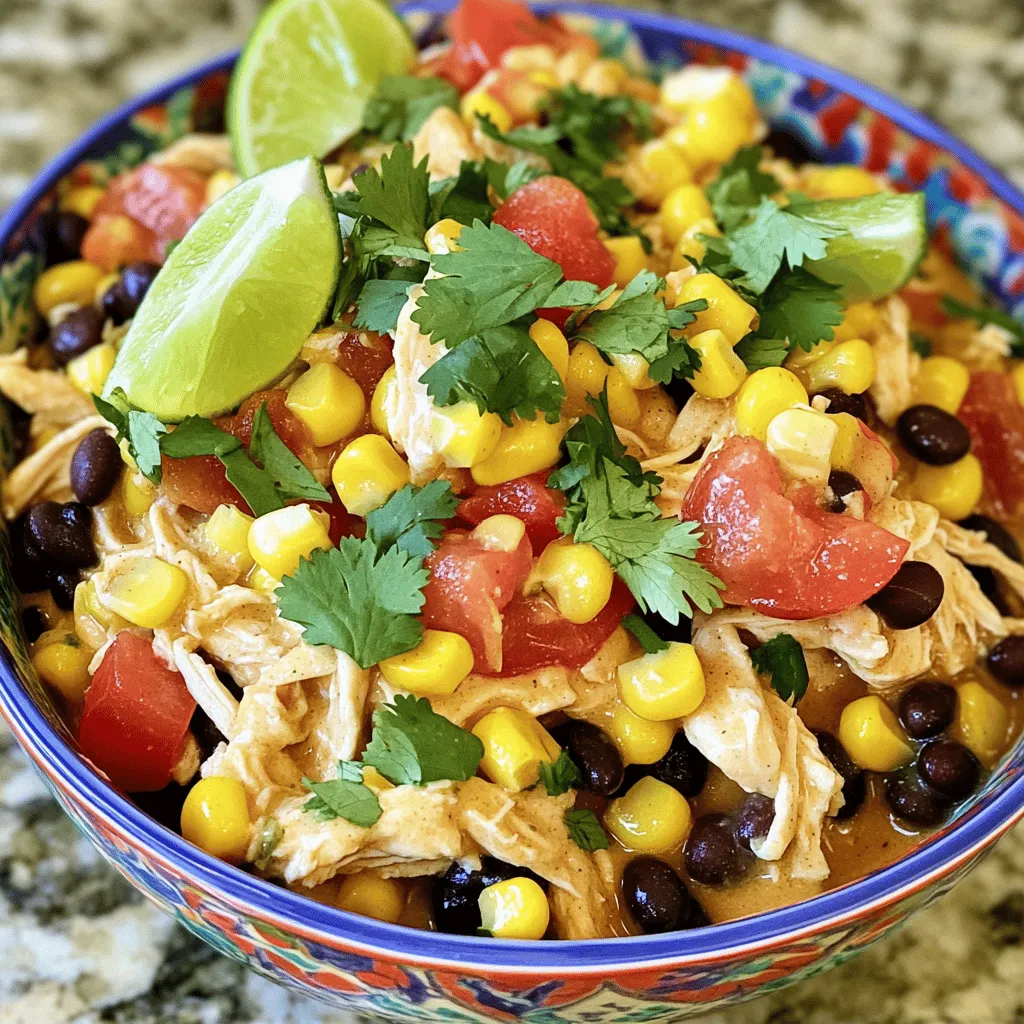
Are you ready for a meal that’s both simple and bursting with flavor? Today, I’m sharing my favorite Slow Cooker Ranch Chicken recipe. With just a few ingredients, like boneless …

Read more

Categories Dinner

Vanilla Spiced Pumpkin Bread Irresistible Fall Treat

August 11, 2025 by Chef Jamie
To make Vanilla Spiced Pumpkin Bread, you need a few simple ingredients. Here’s the list: - 1¾ cups all-purpose flour - 1 teaspoon baking soda - ½ teaspoon baking powder - 1 teaspoon ground cinnamon - ½ teaspoon ground nutmeg - ¼ teaspoon ground ginger - ½ teaspoon salt - 1 cup pumpkin puree - ½ cup granulated sugar - ¼ cup brown sugar, packed - ½ cup vegetable oil - 2 large eggs - 1 teaspoon pure vanilla extract - Optional: ½ cup chopped pecans - Optional: ½ cup chocolate chips Each ingredient plays a key role in making this bread tasty. The flour gives the bread its structure. The pumpkin puree adds moisture and flavor. The spices bring warmth and a cozy fall smell. The vanilla extract enhances sweetness and adds depth. You can customize the recipe by adding pecans or chocolate chips if you'd like. Nuts add a nice crunch, while chocolate gives a sweet surprise. Enjoy choosing the mix-ins that excite your taste buds! - Preheat oven to 350°F (175°C). - Prepare the loaf pan by greasing it well. - In a medium bowl, whisk together: - 1 ¾ cups all-purpose flour - 1 teaspoon baking soda - ½ teaspoon baking powder - 1 teaspoon ground cinnamon - ½ teaspoon ground nutmeg - ¼ teaspoon ground ginger - ½ teaspoon salt This mix gives your bread a warm, spiced flavor. - In a large bowl, mix: - 1 cup pumpkin puree - ½ cup granulated sugar - ¼ cup brown sugar, packed - ½ cup vegetable oil Stir until smooth. Add: - 2 large eggs, one at a time. Mix well after each egg. - Stir in 1 teaspoon pure vanilla extract until fully mixed. - Gradually add the dry mixture to the wet mixture. Stir gently until just combined. - If you want extra flavor, fold in: - ½ cup chopped pecans (optional) - ½ cup chocolate chips (optional) These add a nice crunch and sweetness. - Pour the batter into the prepared loaf pan. Smooth the top with a spatula. - Bake in the preheated oven for 55-65 minutes. Check for doneness by inserting a toothpick into the center. It should come out clean. - After baking, let the bread cool in the pan for about 10 minutes. Then, transfer it to a wire rack to cool completely. To bake Vanilla Spiced Pumpkin Bread just right, first ensure your oven is at 350°F (175°C). An oven thermometer can help. This keeps the bread from being too dry or too wet. To test for doneness, use a toothpick. Insert it into the center of the bread. If it comes out clean, your bread is ready. If not, give it a few more minutes. You can boost flavor with spices like allspice or cardamom. A splash of orange zest also adds brightness. Feel free to play around with different extracts too, like almond or hazelnut. Mix-ins can take your bread to the next level. Chopped apples or dried cranberries add sweetness. If you love texture, consider adding walnuts or pecans. Just fold them in gently before baking. When serving, slice the bread and enjoy it warm or at room temperature. Dust a bit of powdered sugar on top for a sweet touch. For a special treat, drizzle a warm cream cheese glaze over the top. You can also serve it with a dollop of whipped cream cheese for some extra creaminess. {{image_2}} You can change the spices in your pumpkin bread. Try adding gingerbread or chai spices. These flavors add warmth and depth. You can also swap out sweeteners. Instead of granulated sugar, try maple syrup or honey. Each sweetener gives a unique taste to the bread. If you need gluten-free options, use almond flour or oat flour. Both can work well in this recipe. For dairy-free, replace eggs with flax eggs or applesauce. Use coconut oil instead of vegetable oil. These swaps keep the bread moist and tasty. To make your bread even more festive, add cranberries or diced apples. Both bring a sweet and tart flavor that fits the fall theme. You can also transform this recipe into muffins or pancakes. Just adjust the baking time for each. Muffins cook faster, while pancakes need a hot skillet. Enjoy these variations to keep things exciting! To keep your vanilla spiced pumpkin bread fresh, store it at room temperature. Wrap it in plastic wrap or place it in an airtight container. This keeps moisture in and prevents it from drying out. If you plan to eat it later, refrigerate it. Make sure to wrap it well. For long-term storage, freeze the bread. Slice it first for easy thawing. Wrap each slice in plastic wrap, then place them in a freezer bag. When stored properly, this pumpkin bread lasts about 3 to 4 days at room temperature. In the fridge, it can last up to a week. If you freeze it, the bread stays good for about 3 months. Just remember to thaw it in the fridge before enjoying it. To bring back the fresh taste, reheat your pumpkin bread in the oven. Preheat your oven to 350°F (175°C). Place the slice on a baking sheet and heat for about 10 minutes. You can also use the microwave. Heat it for about 15 to 20 seconds. If you want a warm slice, serve it with butter or cream cheese. This adds a nice touch to the flavor! Can I use fresh pumpkin instead of puree? Yes, you can use fresh pumpkin. First, cook and mash it until smooth. Use the same amount as puree in the recipe. It adds a fresh taste to your bread. How do I know when the bread is done baking? To check if the bread is done, insert a toothpick into the center. If it comes out clean, the bread is ready. It usually takes 55 to 65 minutes to bake. Can I leave out the nuts or chocolate chips? Absolutely! You can skip the nuts and chocolate chips if you prefer. The bread will still taste great. You can also try other mix-ins if you like. What should I serve with Vanilla Spiced Pumpkin Bread? Serve it warm or at room temperature. A dusting of powdered sugar adds a nice touch. You can drizzle cream cheese glaze on top or serve it with whipped cream cheese for extra flavor. In this blog post, we covered how to make Vanilla Spiced Pumpkin Bread. We discussed the main ingredients, which add flavor and texture. You learned step-by-step instructions, tips for success, and fun variations. I shared storage advice and answered common questions to help you. Now, enjoy trying this recipe. It’s perfect for any season and great for sharing! Happy baking!

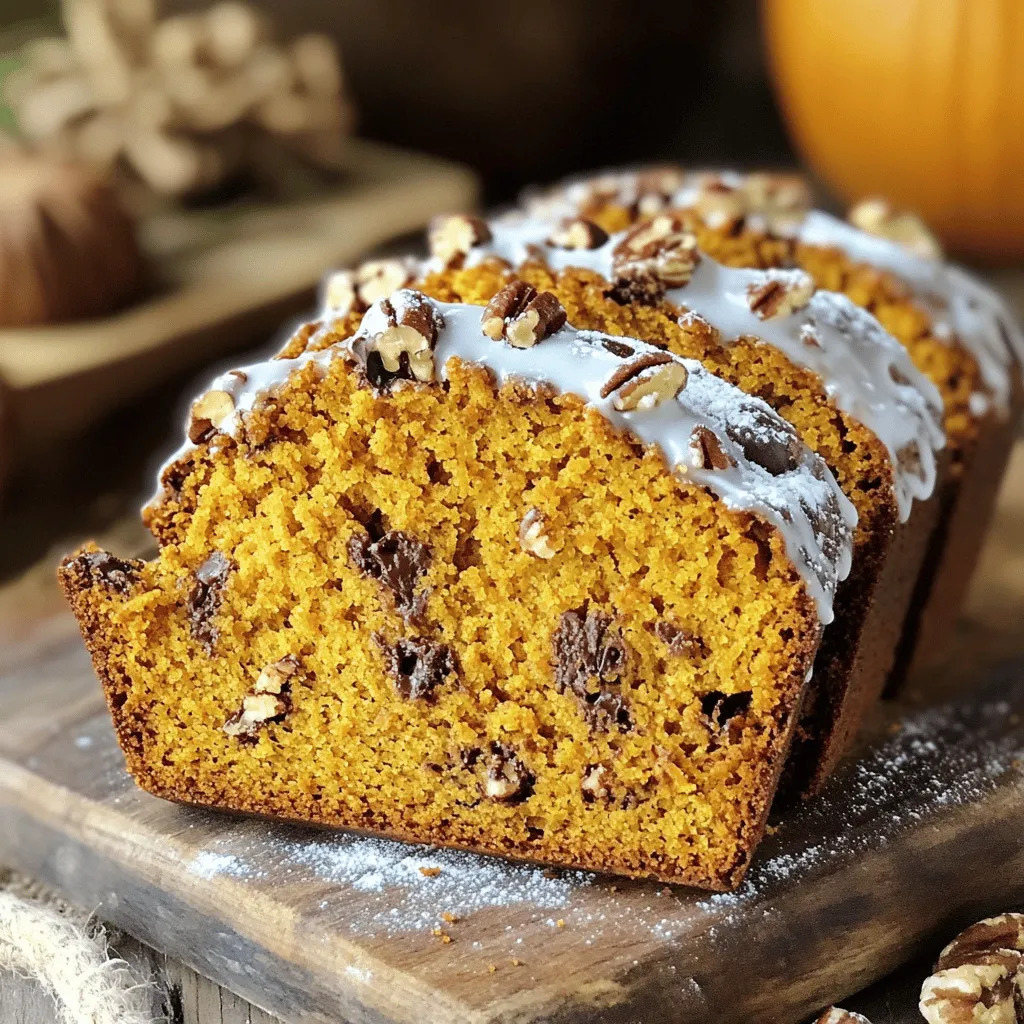
Fall is here, and it’s time to indulge in warm, cozy treats! If you love the rich flavors of pumpkin, cinnamon, and vanilla, then you’re in for a delight. I’m …

Read more

Categories Desserts

Pumpkin Streusel Muffins Irresistible Warm Treat

August 11, 2025 by Chef Jamie
To make these tasty muffins, you need a few key items: - 1 cup canned pumpkin puree - 1/2 cup vegetable oil - 1/2 cup brown sugar - 1/2 cup granulated sugar - 2 large eggs - 1 teaspoon vanilla extract - 1 1/2 cups all-purpose flour - 1 teaspoon baking powder - 1 teaspoon baking soda - 1 teaspoon ground cinnamon - 1/2 teaspoon ground nutmeg - 1/4 teaspoon salt These ingredients create a moist and flavorful muffin. The pumpkin puree gives it a rich taste. The sugars add sweetness, while the spices bring warmth. For that crunchy top, gather these ingredients: - 1/2 cup all-purpose flour - 1/4 cup brown sugar - 1/4 teaspoon ground cinnamon - 1/4 cup cold unsalted butter, cubed - 1/4 cup chopped pecans (optional) The streusel topping adds a delightful crunch and sweetness. The pecans bring in a nutty flavor if you choose to add them. Don't worry if you lack some ingredients. Here are a few swaps: - Use melted coconut oil instead of vegetable oil. - Substitute maple syrup for brown sugar for a unique taste. - Swap out all-purpose flour for a gluten-free blend. These substitutions keep the muffins delicious. You can still enjoy great flavor and texture. Start by preheating your oven to 350°F (175°C). This step is key. While the oven heats, grab a muffin tin. You can use paper liners or spray it with non-stick spray. This keeps your muffins from sticking and makes cleanup easy. In a large bowl, mix the canned pumpkin puree, vegetable oil, brown sugar, granulated sugar, and eggs. Add the vanilla extract too. Whisk everything together until it is smooth. This mixture forms the base of your muffins. In another bowl, sift together the all-purpose flour, baking powder, baking soda, cinnamon, nutmeg, and salt. This helps to aerate the flour and mix in the leavening agents. Gradually add this dry mix to your pumpkin mixture. Stir gently until everything is combined. Be careful not to over-mix. This will keep your muffins fluffy. For the streusel, take a small bowl and mix together the flour, brown sugar, and cinnamon. Then, add the cold butter cubes. Use a fork or your fingers to mix until the mixture looks crumbly. If you want a nutty crunch, stir in chopped pecans now. Fill each muffin cup about two-thirds full with the pumpkin batter. After that, sprinkle the streusel topping generously over each muffin. This adds a nice crunch. Place the muffin tin in the oven and bake for 18-20 minutes. Check if they are done by inserting a toothpick. If it comes out clean, they are ready! Let the muffins cool in the pan for 5 minutes before moving them to a wire rack. Enjoy the warm, cozy smell filling your kitchen! To keep your muffins light, mix gently. When you add dry ingredients, stir just until combined. You might see some lumps, but that’s okay. Over-mixing makes muffins dense and tough. Remember, a few lumps are fine, and they will bake out. This small tip can change your muffin game. Moist muffins come from the right balance of wet and dry ingredients. Canned pumpkin puree adds moisture, flavor, and nutrition. Use it straight from the can. Avoid letting the batter sit too long before baking. This can cause the muffins to lose their rise. Also, don’t skip the oil; it adds richness. Store your muffins in an airtight container at room temperature. They stay fresh for up to three days. If you want to keep them longer, freeze them. Wrap each muffin in plastic wrap, then place them in a freezer bag. They last for about three months in the freezer. When you’re ready to enjoy, just thaw at room temperature or microwave for a few seconds. {{image_2}} You can change the flavor by adding different nuts or fruits. Try walnuts, almonds, or pecans. Chopped apples or dried cranberries also work well. These add sweet and crunchy bites. Just mix them into the batter before pouring it into the muffin cups. If you want gluten-free muffins, use a gluten-free flour blend. This will keep the taste and texture similar. You may need to adjust the liquid in the recipe. Adding a bit more pumpkin puree can help keep them moist. For an extra treat, add chocolate chips to the batter. This adds a rich, sweet taste. You can also play with spices. Try ginger or allspice for a warm kick. Just mix in a teaspoon or two to boost the flavor. To keep your Pumpkin Streusel Muffins fresh, store them in an airtight container. This helps keep moisture in and keeps them soft. You can place a piece of bread in the container. The bread will help absorb excess moisture. This trick keeps your muffins tasty for longer. Store them at room temperature for up to three days. If you want to keep them longer, consider freezing. Freezing is a great way to save your muffins. Start by letting them cool completely. Then, wrap each muffin in plastic wrap. Place the wrapped muffins in a freezer bag. Squeeze out the air to avoid freezer burn. Label the bag with the date. You can freeze them for up to three months. When you want one, just pull it out and thaw it at room temperature. Reheating your muffins brings back their warm goodness. Preheat your oven to 350°F (175°C). Unwrap the muffin and place it on a baking sheet. Heat for about 5-10 minutes. You can also use a microwave. Heat on medium power for 10-15 seconds. Enjoy with a pat of butter or a sprinkle of cinnamon. Warm muffins taste best! Pumpkin streusel muffins last about 3 to 5 days. Store them in an airtight container. This keeps them fresh and moist. If you want to save them longer, freeze them. They can last for up to 3 months in the freezer. Just wrap them well in plastic wrap, then foil. Thaw them at room temperature or warm them in the oven. Yes, you can use fresh pumpkin! Just make sure to cook and puree it first. Cut the pumpkin into pieces, steam or roast until soft, then blend. Strain the puree to remove excess water. Use the same amount as canned pumpkin. This adds a fresh flavor to your muffins. To add the streusel topping, sprinkle it over the muffin batter. After you fill each cup with batter, use your fingers or a spoon to distribute it evenly. Make sure to cover the tops well. This gives a nice crunch when baked. You can also press it down lightly to help it stick. Now you know how to make delicious pumpkin streusel muffins. We covered the main ingredients, step-by-step instructions, and tips to get them just right. Remember that you can customize the recipe with different nuts or fruits. Store your muffins properly for freshness or even freeze them for later. Enjoy these muffins as a warm treat or a tasty snack. Happy baking!

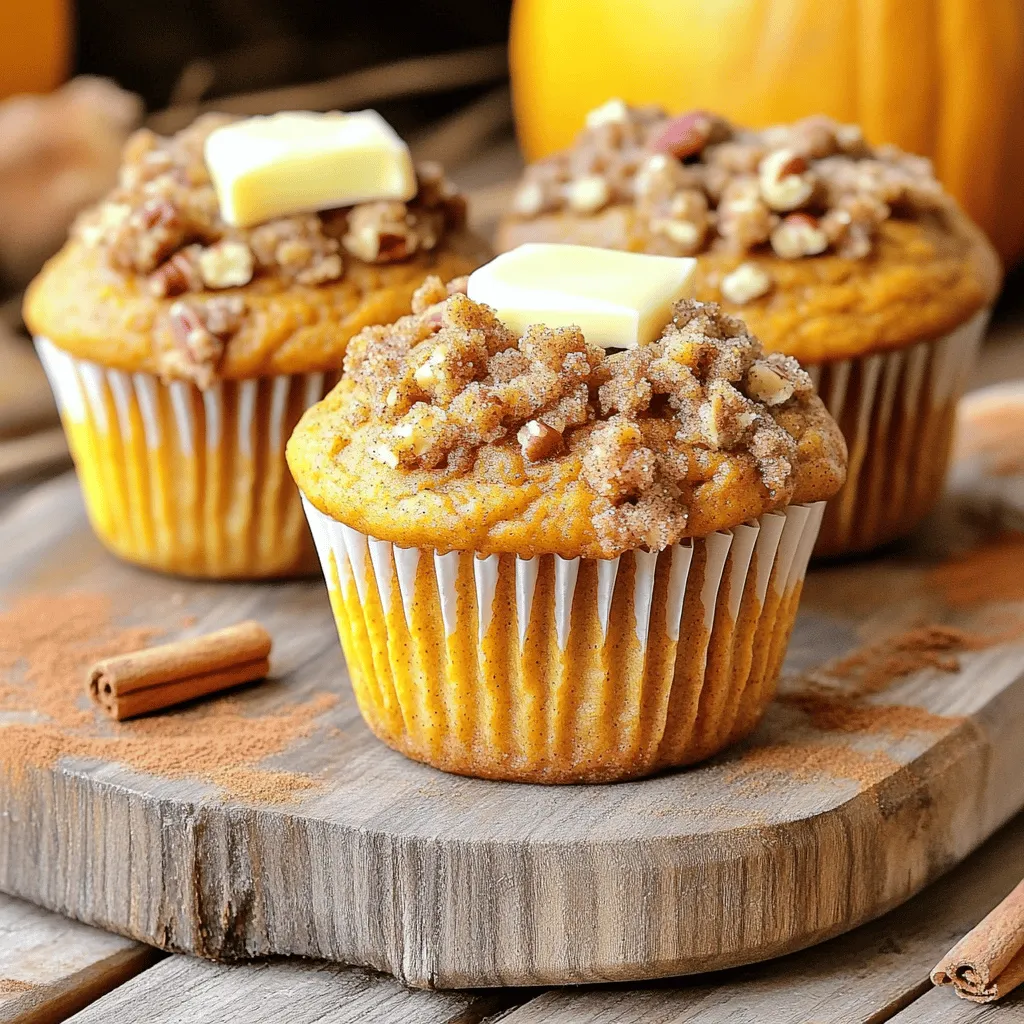
Fall is here, and it’s time to indulge in warm, delightful treats! If you love the cozy flavors of pumpkin, you’ll adore these Pumpkin Streusel Muffins. With a soft, moist …

Read more

Categories Breakfast

Gluten-Free Pumpkin Protein Muffins Healthy Snack Idea

August 11, 2025 by Chef Jamie
For these gluten-free pumpkin protein muffins, you will need: - 1 cup gluten-free oat flour - 1 cup canned pumpkin puree - 1/2 cup protein powder (vanilla or unflavored) - 1/2 cup almond milk (or any milk of choice) - 1/3 cup honey or maple syrup - 1/4 cup coconut oil, melted - 2 large eggs - 1 teaspoon baking powder - 1/2 teaspoon baking soda - 1 teaspoon ground cinnamon - 1/2 teaspoon ground nutmeg - 1/4 teaspoon salt - Optional: 1/2 cup walnuts or chocolate chips These ingredients help make the muffins moist and tasty. The pumpkin gives flavor and moisture. Oat flour keeps them gluten-free and adds fiber. You can swap some items based on your needs: - Use any milk for almond milk. - Maple syrup can replace honey. - If you want a nut-free option, skip the walnuts. - Use sunflower oil instead of coconut oil. - For a vegan option, try flax eggs instead of regular eggs. These substitutes can keep your muffins delicious while fitting your diet. Each muffin has: - Calories: 150 - Protein: 5g - Carbs: 20g - Fiber: 3g - Fat: 5g These muffins are a smart snack choice. They provide protein, fiber, and healthy fats. You can enjoy them without guilt! Start by preheating your oven to 350°F (175°C). This helps your muffins rise well. While the oven heats, grab a muffin tin. Line it with paper liners. You can also lightly grease it with coconut oil. This keeps the muffins from sticking. In a large mixing bowl, add the gluten-free oat flour, protein powder, baking powder, baking soda, ground cinnamon, ground nutmeg, and salt. Use a whisk to mix these dry ingredients well. This step is key for even flavor throughout your muffins. Make sure there are no clumps. In another bowl, combine pumpkin puree, almond milk, honey or maple syrup, melted coconut oil, and eggs. Whisk them together until smooth and well mixed. This blend adds moisture and flavor to your muffins. The pumpkin brings a nice richness that you will love. Now, pour the wet mixture into the dry ingredients. Stir gently until just combined. Avoid overmixing, as this can make your muffins tough. If you want, fold in walnuts or chocolate chips at this point. These add-ins give a fun texture and flavor. Divide the batter evenly among the muffin cups, filling each about two-thirds full. Place the muffin tin in the oven and bake for 18 to 22 minutes. Check for doneness by inserting a toothpick into the center of a muffin. If it comes out clean, they are ready. Let the muffins cool in the tin for 5 to 10 minutes. Then, transfer them to a wire rack to cool completely. Enjoy your healthy snack! Baking gluten-free muffins can be tricky. Here are some key tips: - Use fresh ingredients: Make sure your baking powder and baking soda are fresh. - Measure flour correctly: Spoon the flour into the measuring cup and level it. - Mix dry and wet separately: This helps ensure even blending and avoids lumps. - Don’t overmix: Stir until just combined. This keeps the muffins light and fluffy. To get the perfect texture in your muffins, consider these points: - Oat flour is great: It gives muffins a nice, hearty feel. - Add moisture: Canned pumpkin puree adds moisture and flavor. - Use eggs: Eggs help bind everything and add structure. - Monitor baking time: Check muffins a few minutes early. They should be golden on top. Storing your muffins properly keeps them fresh. Follow these tips: - Cool completely: Let muffins cool on a wire rack before storing. - Use airtight containers: This keeps muffins moist and prevents drying out. - Refrigerate for longer life: If you need to store them for more than a few days, refrigerate. - Freeze for future snacks: Wrap them tightly and freeze for up to three months. {{image_2}} You can use various protein powders in these muffins. I recommend vanilla or unflavored protein powder. If you want a chocolate twist, try chocolate protein powder. Plant-based powders like pea or rice work well too. Each type adds unique flavor and nutrition. Experiment to find what you like best! Adding spices can elevate these muffins. Besides cinnamon and nutmeg, consider ginger or allspice. You can also add vanilla extract for extra depth. A pinch of cardamom can give a warm kick. Feel free to mix and match spices to create your perfect blend. The right combination makes every bite exciting. If you want a low-sugar option, there are sweeteners to try. Erythritol or stevia can replace honey or maple syrup. These options will keep your muffins sweet without extra sugar. Always check the conversion rates on the packages. This way, you will get the right sweetness without ruining the texture. You can enjoy a guilt-free treat! To keep your gluten-free pumpkin protein muffins fresh, place them in an airtight container. This helps to lock in moisture and keep them from drying out. Store them at room temperature for up to three days. If you want to keep them longer, the fridge is a good option. Just remember to wrap them in plastic wrap to avoid extra moisture. Freezing muffins is a great way to enjoy them later. First, let the muffins cool completely. Then, wrap each muffin in plastic wrap or foil. After that, place them in a freezer-safe bag or container. They can last in the freezer for up to three months. When you want one, just take it out and let it thaw at room temperature. To enjoy your muffins warm, reheat them in the oven or microwave. For the oven, preheat it to 350°F (175°C). Place the muffins on a baking sheet for about 10 minutes. For the microwave, heat one muffin for 15-20 seconds. If you like, add a little butter or nut butter on top for added flavor. Enjoy your snack! No, you cannot use regular flour instead of gluten-free flour. Regular flour has gluten, which is not safe for people with gluten intolerance. Gluten-free oat flour is a great choice for these muffins. It provides a nice texture and flavor. To make these muffins vegan, replace the eggs with flax eggs. Mix one tablespoon of ground flaxseed with three tablespoons of water. Let it sit for five minutes. You can also use a plant-based milk, like almond or soy milk, instead of regular milk. Adding protein powder boosts the protein content in these muffins. It helps keep you full for longer. Plus, it supports muscle recovery if you eat them after a workout. You can choose vanilla or unflavored protein to match your taste. These muffins last about five days at room temperature. Store them in an airtight container to keep them fresh. If you want to keep them longer, you can freeze them. Just make sure to wrap them well before freezing. Yes, you can customize the flavors! Add-ins like chopped nuts or fresh fruit work well. Walnuts or chocolate chips are great options. You can also try dried fruit like cranberries or blueberries for a sweet twist. In this guide, we explored the key ingredients for muffins, with tips on substitutes and nutritional facts. I shared step-by-step instructions for making perfect muffins, along with essential tips for gluten-free baking. We also discussed variations, storage methods, and answered common questions to help you succeed. Baking muffins can be fun and rewarding. With these insights, you can create delightful treats that fit your needs. Enjoy baking your own delicious muffins!

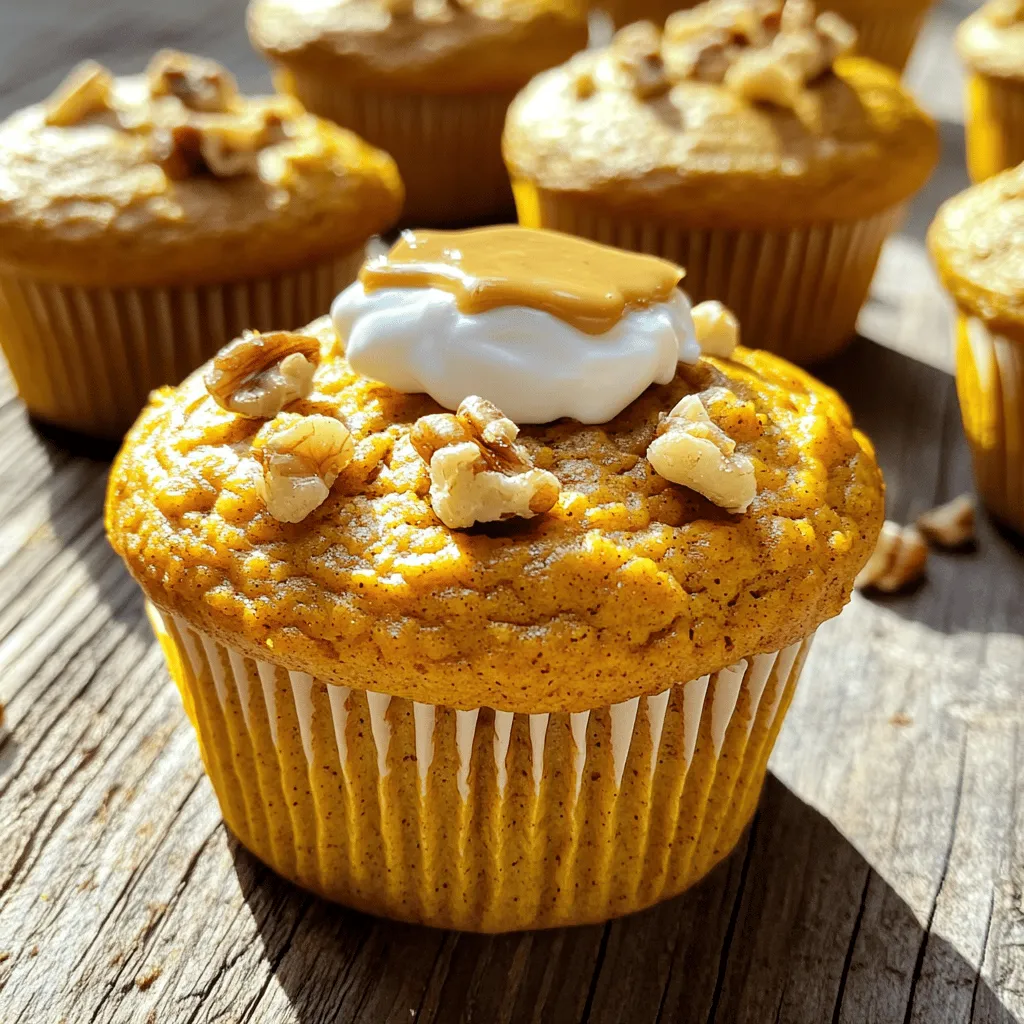
Looking for a tasty snack that packs a protein punch? Try my Gluten-Free Pumpkin Protein Muffins! They’re perfect for a quick breakfast or a post-workout treat. Made with wholesome ingredients, …

Read more

Categories Breakfast

Sausage Potato Kale Soup Hearty and Comforting Meal

August 11, 2025 by Chef Jamie
- 1 pound Italian sausage (spicy or mild, your choice) - 4 medium-sized Yukon Gold potatoes, diced - 1 large onion, chopped - 3 cloves garlic, minced - 4 cups vegetable broth - 1 cup milk (or a dairy-free alternative) - 1 bunch fresh kale, stems removed and chopped - 2 carrots, sliced - 1 teaspoon dried thyme - 1 teaspoon smoked paprika - Salt and pepper to taste - 2 tablespoons olive oil - Grated Parmesan cheese for serving (optional) This soup is a great mix of flavors and textures. The Italian sausage gives it a rich taste. Yukon Gold potatoes add creaminess, while kale brings in freshness. The carrots and onion bring sweetness and depth. Garlic and spices kick it up a notch. You can change up the recipe to fit your taste. Here are some ideas: - Add beans for extra protein. - Use sweet potatoes instead of Yukon Gold potatoes. - Spinach can replace kale if you prefer. - For a spicy kick, add red pepper flakes. - If you want a thicker soup, blend part of it. These changes can make the soup your own. Feel free to get creative! This soup is not just tasty; it is also good for you. Here is a rough idea of what you get in one serving: - Calories: 350 - Protein: 15g - Carbs: 40g - Fat: 15g - Fiber: 5g This soup is hearty and filling. It can be a meal on its own. Enjoy the flavors while knowing you’re eating well! To start, gather your ingredients. You need: - 1 pound Italian sausage (spicy or mild) - 4 medium-sized Yukon Gold potatoes, diced - 1 large onion, chopped - 3 cloves garlic, minced - 4 cups vegetable broth - 1 cup milk (or dairy-free alternative) - 1 bunch fresh kale, chopped - 2 carrots, sliced - 1 teaspoon dried thyme - 1 teaspoon smoked paprika - Salt and pepper to taste - 2 tablespoons olive oil - Grated Parmesan cheese for serving (optional) Next, chop the onion, garlic, potatoes, carrots, and kale. This helps the soup cook evenly. Remember to remove the stems from the kale. Set aside all your chopped veggies. In a large pot or Dutch oven, heat the olive oil over medium heat. Once hot, add the sausage. Remove the casing first, and break it up with a spatula. Cook until browned, about 5-7 minutes. The sausage gives the soup great flavor. Add the chopped onion and minced garlic to the pot. Cook for 3-4 minutes until the onion is soft and clear. Then, stir in the diced potatoes, sliced carrots, dried thyme, and smoked paprika. Cook for another 3 minutes, stirring often. This builds up more flavor. Now, pour in the vegetable broth. Bring it to a boil, then reduce the heat. Cover the pot and let it simmer for 15-20 minutes. Check if the potatoes and carrots are tender. When they are soft, stir in the chopped kale and milk. Let the soup simmer for 5 more minutes. The kale should wilt but still stay green. Season with salt and pepper to taste. If the soup is too thick, add a bit more broth or water until it’s just right. For a smooth soup, blend part of it after cooking. This gives a creamy feel without using too much milk. Cut the potatoes into even sizes. This helps them cook at the same time. If you want it thicker, let it simmer longer. If it's too thin, add a bit of potato. Enjoy your warm bowl of comfort! To make your soup more tasty, consider these tips: - Use spicy Italian sausage for a kick. - Add a squeeze of lemon juice for brightness. - Toss in a bay leaf while cooking for depth. - Try fresh herbs like parsley or dill at the end. - A dash of hot sauce can bring warmth. Here are some common errors to steer clear of: - Don’t skip browning the sausage; it adds flavor. - Avoid overcooking kale; it should be bright and tender. - Use enough broth; too little makes the soup thick. - Don’t add salt too early; wait until the end. - Cutting vegetables unevenly can lead to uneven cooking. Here are some ideas for serving your soup: - Pair it with crusty bread for dipping. - Serve with a light salad for balance. - Top with grated cheese for a rich finish. - Add a dollop of sour cream for creaminess. - Enjoy it with a glass of white wine. {{image_2}} If you want a meat-free soup, you can skip the sausage. Use mushrooms for a savory flavor. You can also add lentils for protein. Replace the milk with almond or oat milk for a creamy base. This keeps the soup rich and tasty without meat. Use vegetable broth to keep it vegan. While Italian sausage is great, you can switch it up. Ground turkey or chicken works well too. For a spicy kick, try chorizo. If you want a different flavor, add diced ham or bacon. Each choice brings its own taste, making the soup unique every time. Feel free to swap out the potatoes or carrots for seasonal veggies. In spring, use peas or asparagus. In winter, add sweet potatoes or squash. Kale is great year-round, but try spinach or Swiss chard in its place. These swaps keep the soup fresh and exciting with each season. After enjoying your Sausage Potato Kale Soup, let it cool completely. Then, place it in an airtight container. It will keep well in the fridge for about 3 to 4 days. If you want to keep it longer, freezing is a great option. To reheat, pour the soup into a pot over medium heat. Stir gently until it warms up. You can also use a microwave. Heat it in a bowl for about 2 to 3 minutes, stirring halfway. Make sure it's hot all the way through before serving. To freeze, let the soup cool first. Transfer it to freezer-safe bags or containers. Remove as much air as possible to avoid freezer burn. This soup can last in the freezer for up to 3 months. When ready to enjoy, thaw it overnight in the fridge. Reheat as mentioned above. You can keep Sausage Potato Kale Soup in the fridge for about 3 to 4 days. Make sure to store it in an airtight container. This keeps the soup fresh and tasty. When you want to eat it again, just reheat it on the stove or in the microwave. The flavors will blend even more as it sits, making it even better! Yes, you can easily make this soup in a slow cooker! Start by browning the sausage in a pan. Then add it to the slow cooker with all the other ingredients. Set it on low for 6 to 8 hours or on high for about 3 to 4 hours. This method lets the flavors meld well together. The soup will still be hearty and comforting, just like the stovetop version. There are many tasty options to serve with this soup. Here are a few ideas: - Crusty bread or a warm baguette - A simple green salad - Grilled cheese sandwiches - Crackers or breadsticks - Parmesan cheese for sprinkling on top These sides will complement the soup and make your meal even more enjoyable! This blog post covered how to make Sausage Potato Kale Soup. We explored the key ingredients, cooking steps, and helpful tips. You learned about optional add-ins and how to avoid common mistakes. We also shared serving ideas and variations suited for different diets. To finish, cooking can be fun and rewarding. With these steps, you can create a delicious soup that brings comfort and joy. Enjoy your cooking journey and share this soup with friends and family!

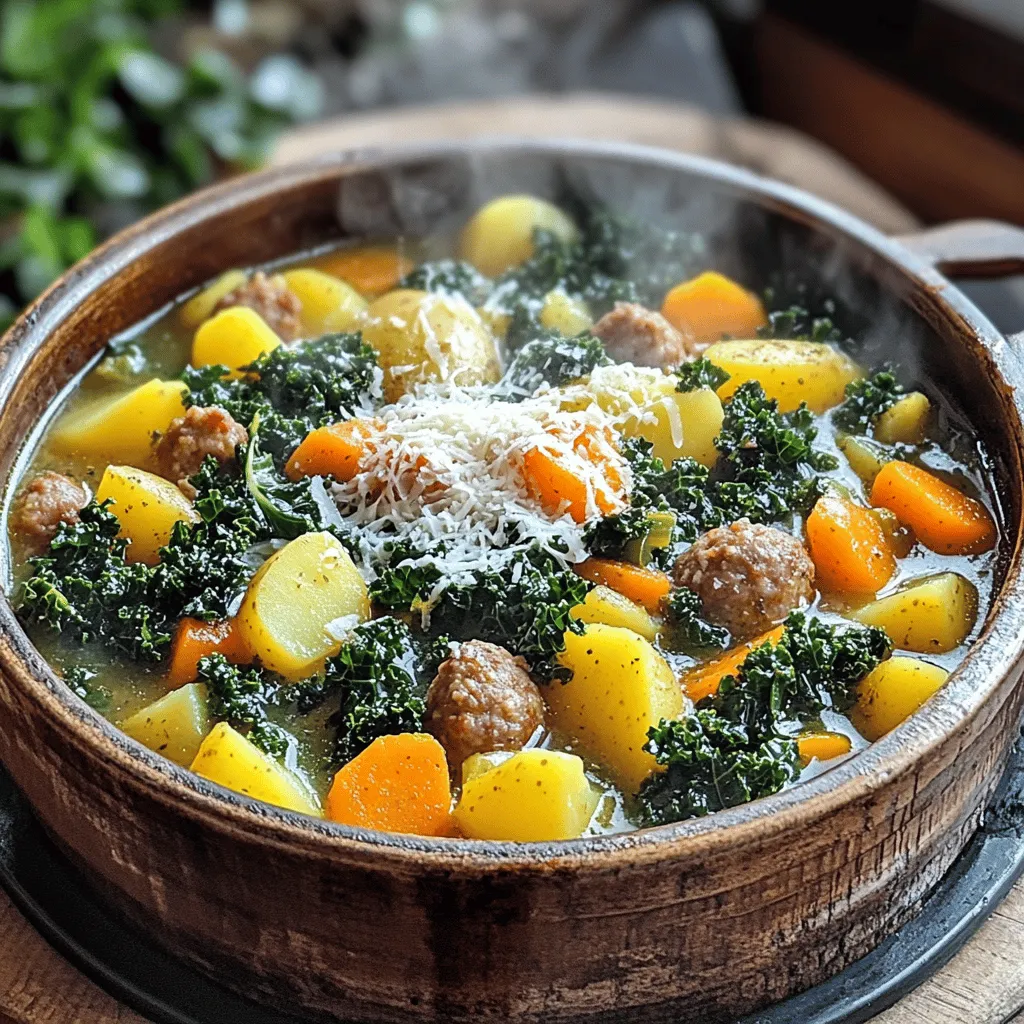
Looking for a warm and filling meal? I have just the recipe for you! This Sausage Potato Kale Soup combines hearty sausage, tender potatoes, and nutrient-rich kale for a dish …

Read more

Categories Dinner

Gingerbread Oatmilk Chai Latte Rich and Cozy Drink

August 11, 2025 by Chef Jamie
To make the Gingerbread Oatmilk Chai Latte, you need simple and tasty ingredients. Here’s what you will need: - 1 cup oat milk - 1 chai tea bag (or 1 tablespoon loose leaf chai) - 1 tablespoon molasses - 1 teaspoon ground ginger - 1 teaspoon ground cinnamon - 1/4 teaspoon ground nutmeg - 1 tablespoon maple syrup (adjust for sweetness) - 1/2 teaspoon vanilla extract - Freshly whipped cream (for topping, optional) - Ground cinnamon or nutmeg (for garnish) Each ingredient plays a key role. Oat milk gives a creamy base. Chai tea adds warmth with spices. Molasses gives a rich, sweet flavor. Ground ginger, cinnamon, and nutmeg bring the holiday spirit. Maple syrup adds sweetness, and vanilla enhances all the flavors. You can top it with whipped cream for extra comfort. A sprinkle of cinnamon or nutmeg makes it look special. Gather these ingredients, and you’re ready to make this cozy drink! Start by pouring 1 cup of oat milk into a small saucepan. Heat it on medium heat. Stir it often, so it does not stick to the bottom. You want it warm, but not boiling. This step helps bring out the oat milk's creamy texture. Once your oat milk is warm, it's time to add flavor. Place 1 chai tea bag or 1 tablespoon of loose leaf chai into the warm oat milk. Let it steep for about 5 minutes. This step allows the chai spices to infuse their warm notes into the milk. After steeping, remove the tea bag or strain out the loose leaves. Now, add 1 tablespoon of molasses, 1 teaspoon of ground ginger, 1 teaspoon of ground cinnamon, and 1/4 teaspoon of ground nutmeg. Then, stir in 1 tablespoon of maple syrup and 1/2 teaspoon of vanilla extract. Mix everything well until it is fully combined. This blend creates a rich and cozy flavor. If you want a frothy texture, use a frother to whip up your chai latte. Pour the chai mixture into a mug. You can top it with freshly whipped cream for extra creaminess if you like. Finally, sprinkle ground cinnamon or nutmeg on top for a lovely finish. Enjoy your warm drink! To make your Gingerbread Oatmilk Chai Latte shine, focus on the spices. Use fresh ground ginger and cinnamon for the best taste. Fresh spices have a stronger flavor than pre-ground ones. Adding a pinch of nutmeg can elevate the taste. It gives your drink a warm, cozy feel. Steeping the chai for five minutes is key. This time helps the flavors bloom fully. If you want a stronger flavor, steep a minute longer. Sweetness can change your drink’s vibe. Start with one tablespoon of maple syrup. Taste the latte and add more if needed. You can also swap maple syrup for honey or agave. If you prefer a less sweet drink, cut back on the syrup. The molasses adds a rich flavor, so balance is key. Remember, you can always make it sweeter, but you can’t take sweetness out. Frothing adds fun to your latte. If you have a frother, use it to create a creamy texture. Heat the oat milk and froth it for about 30 seconds. If you don’t have a frother, a whisk works too. Just whisk the milk vigorously for foam. Pour the chai mixture into your mug and add the frothed milk. Top with whipped cream for extra indulgence. A sprinkle of cinnamon or nutmeg makes it festive. Enjoy your cozy drink! {{image_2}} If you want to keep this drink dairy-free, oat milk is a great choice. It has a creamy texture and a slight sweetness that complements the spices. You can also try almond milk or coconut milk. Both add unique flavors. Coconut milk gives a rich, tropical twist. Almond milk keeps it light and nutty. To change up the spice blend, you can get creative! Try adding cardamom for a warm, fragrant note. A pinch of black pepper adds a subtle heat. You might also enjoy a dash of cloves for more depth. Each spice brings a new layer of flavor, making your drink special. Maple syrup is a favorite for sweetness, but there are other options. Honey adds a floral note, while agave syrup gives a mild sweetness. For a sugar-free option, try stevia or monk fruit sweetener. Adjust the amount based on your taste. Each sweetener can change the drink's character, so experiment to find what you love! To store leftover chai latte, let it cool first. Pour it into an airtight container. Seal the container and place it in the fridge. This drink stays fresh for about three days. If you want to enjoy it later, storing it properly helps keep the flavors intact. To reheat your leftover chai latte, pour it into a saucepan. Warm it over low heat, stirring gently. This method helps keep the creamy texture. You can also use a microwave. Heat it in short bursts of 30 seconds. Stir in between to heat evenly. To keep your ingredients fresh, store them in cool, dark places. For spices like ginger and cinnamon, use airtight jars. This prevents moisture from ruining their flavor. Check the expiration dates on your oat milk and maple syrup. Fresh ingredients ensure your gingerbread oatmilk chai latte tastes its best! Oat milk is a plant-based milk made from oats. It is creamy and smooth. This milk works well in drinks. It adds a rich flavor to the Gingerbread Oatmilk Chai Latte. Oat milk also froths nicely. It helps create a cozy texture in your drink. Plus, it has a hint of sweetness that pairs well with spices. Yes, you can use other types of milk. Almond milk, soy milk, or cow's milk are good choices. Each milk will give a different taste. Almond milk is light and slightly nutty. Soy milk is creamy and rich. Cow's milk is classic and familiar. Each type will change how the latte feels and tastes. To make more servings, just double or triple the recipe. For two lattes, use 2 cups of oat milk and 2 chai tea bags. Keep all other ingredients the same. You can mix it all in a larger pot. Just be sure to heat it slowly. This way, the flavors blend well without burning. Yes, you can adjust the spice levels. To make it spicier, add more ground ginger or cinnamon. Just a pinch more will do. If you prefer less spice, cut back on those spices. You can also skip the nutmeg if you want a milder taste. Find the balance that you enjoy most. Many coffee shops and cafes offer seasonal drinks. During the holidays, look for this latte on their menus. Some places may not have it, but they can make it for you. Just ask if they have oat milk and chai tea. You can enjoy this cozy drink at home or out and about! This blog shared a simple recipe for a delicious Oat Milk Chai Latte. We covered each ingredient, from oat milk to spices. You learned step-by-step instructions to prepare and customize your drink. I also provided tips for perfecting flavor and options for variations. Remember to store any leftovers correctly to keep your chai fresh. Enjoy your warm, cozy drink, and don’t hesitate to experiment with flavors. Making this latte can be fun and easy, giving you a delightful treat every time!

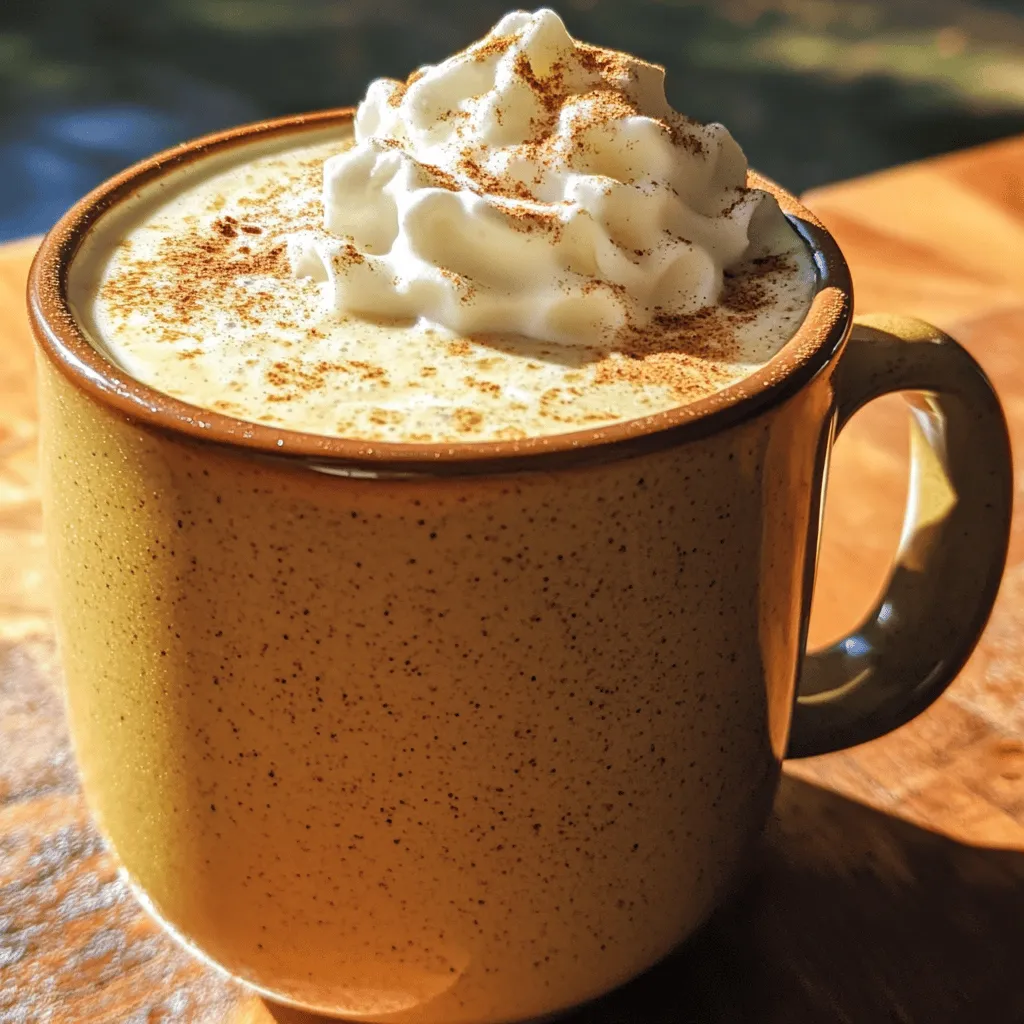
As the weather cools down, there’s nothing like a warm drink to lift your spirits. Enter the Gingerbread Oatmilk Chai Latte! This rich and cozy drink combines the spicy notes …

Read more

Categories Breakfast

Bang Bang Chicken Bowl Flavorful Meal Made Easy

January 7, 2026August 10, 2025 by Chef Jamie
To make a Bang Bang Chicken Bowl, you need a few key ingredients: - 2 boneless, skinless chicken breasts - 1 cup cooked jasmine rice - 1 cup broccoli florets - 1 carrot, julienned - 1 red bell pepper, sliced These ingredients work well together to create a tasty and colorful bowl. The chicken is the star, while the veggies add crunch and nutrition. You can customize your bowl with some optional ingredients. Here are a few ideas: - Avocado slices for creaminess - Cucumber ribbons for freshness - Edamame for extra protein - Peanuts for a nice crunch Feel free to mix and match these optional ingredients. This way, you can create a dish that fits your taste. The marinade gives the chicken big flavor. You’ll need: - 1 tablespoon soy sauce - 1 teaspoon garlic powder - 1 teaspoon ground ginger - Salt and pepper to taste Mix these ingredients well before coating the chicken. Letting it marinate for at least 15 minutes makes a huge difference in taste. {{ingredient_image_1}} First, take your chicken breasts. In a bowl, mix garlic powder, ground ginger, soy sauce, salt, and pepper. This is your marinade. Coat the chicken well in the mix. Let it sit for at least 15 minutes. This helps the chicken soak up all the flavors. While the chicken marinates, it's time to prep the veggies. Steam the broccoli florets for about 3 to 4 minutes. You want them bright green and slightly tender. Then, set them aside. Next, slice the red bell pepper and julienne the carrot. Keep these ready for cooking. Now, it's time to build your bowl. Start with a scoop of cooked jasmine rice at the bottom. On top of that, add your steamed broccoli, sautéed bell pepper, and carrot. Slice the cooked chicken and place it on top. Drizzle your bang bang sauce all over the bowl. Finally, sprinkle sesame seeds and sliced green onions as a garnish. This adds crunch and color! To make the bang bang sauce, mix three key ingredients. Use mayonnaise, sweet chili sauce, and Sriracha. Adjust the amount of Sriracha to control the heat. If you want a milder sauce, add less Sriracha. For a creamier sauce, use more mayonnaise. This sauce adds a nice kick to the bowl. Start by marinating the chicken. Combine garlic powder, ground ginger, soy sauce, salt, and pepper. Let the chicken sit for at least 15 minutes. This helps the flavors soak in. Cook the chicken in a hot skillet for 5-7 minutes on each side. The chicken should be golden brown and cooked through. Let it rest before slicing. This keeps the juices locked in. Use a wide, shallow bowl to show off the food. Start with a scoop of jasmine rice at the bottom. Place the colorful vegetables on top, like broccoli and bell pepper. Add the sliced chicken in a nice layer. Drizzle the bang bang sauce over everything. Finish with sesame seeds and green onions for garnish. This makes the dish look bright and inviting. Pro Tips Marinate for Maximum Flavor: Allow the chicken to marinate for at least 30 minutes, or even overnight if you have time, to deeply infuse the flavors into the meat. Perfectly Cooked Chicken: Use a meat thermometer to ensure your chicken reaches an internal temperature of 165°F (75°C) for safe consumption and juiciness. Customize Your Vegetables: Feel free to swap in your favorite vegetables or whatever you have on hand, like snap peas or zucchini, to make this bowl your own. Bang Bang Sauce Variations: Experiment with the bang bang sauce by adding lime juice or honey for a unique twist that enhances the flavor profile. {{image_2}} If you want a veggie twist, swap chicken for tofu or tempeh. Both options soak up flavor well. Use the same marinade to infuse taste. You can also add more veggies like bell peppers, zucchini, or mushrooms. For a filling base, try quinoa or brown rice instead of jasmine rice. This keeps the dish healthy and adds new textures. Not a fan of heat? You can adjust the spice in the bang bang sauce. Start with just sweet chili sauce and mayonnaise. Add Sriracha slowly, tasting as you go. If you like it spicier, add more Sriracha or a pinch of cayenne pepper. Always trust your taste buds to find the right heat for you. While the classic bang bang sauce is tasty, feel free to experiment! A peanut sauce adds a nutty flavor. Mix peanut butter, soy sauce, and a bit of honey for sweetness. You could also try a creamy ranch or a zesty lemon dressing. These swaps change the dish while keeping it delicious and fun. To store leftovers, place them in an airtight container. Make sure the chicken and veggies cool before sealing. This keeps them fresh for up to three days in the fridge. Label the container with the date to track freshness. Reheat your Bang Bang Chicken Bowl in the microwave for about two minutes. Stir halfway to ensure even heating. If you prefer, you can heat it in a skillet over medium heat until warm. Add a splash of water to keep things moist. To freeze, separate the chicken, rice, and veggies. Use freezer-safe bags or containers. Squeeze out excess air from the bags. You can freeze for up to three months. When ready to eat, thaw overnight in the fridge and reheat as mentioned above. Bang Bang Chicken Bowl is a tasty meal that features chicken, rice, and veggies. It has a creamy and spicy sauce that makes it unique. You cook marinated chicken and serve it over jasmine rice. The bowl also has broccoli, red bell peppers, and carrots. This dish is colorful, filling, and easy to make at home. You can find Bang Bang Chicken Bowl at many Asian restaurants and fast-casual spots. Some places might call it by a different name, but the idea is the same. Look for restaurants that offer Asian-inspired dishes or bowls. You can also check food delivery apps to see if local spots have it on the menu. Yes, you can meal prep Bang Bang Chicken Bowl! It stores well in the fridge for a few days. Cook the chicken and veggies ahead of time. You can also make the sauce in advance. Just keep everything in separate containers to stay fresh. When ready to eat, assemble your bowl and enjoy a quick, healthy meal. In this article, we explored the key ingredients for a Bang Bang Chicken Bowl, from chicken to optional add-ins. You learned step-by-step how to prepare, cook, and assemble the dish for a tasty meal. I shared tips on perfecting the sauce and keeping your chicken juicy. We also discussed variations and storage methods to help you enjoy this dish long after cooking. Try it out and share your flavors! Happy cooking!

Are you ready to whip up a meal that’s bursting with flavor? The Bang Bang Chicken Bowl is not only delicious but also super easy to make! In this post, …

Read more

Categories Dinner

Blueberry Lemon Cheesecake Overnight Oats Delight

August 10, 2025 by Chef Jamie
For Blueberry Lemon Cheesecake Overnight Oats, you will need: - 1 cup rolled oats - 1 cup unsweetened almond milk (or any milk of choice) - 1/2 cup Greek yogurt (plain or vanilla) - 1/4 cup cream cheese, softened - 2 tablespoons honey or maple syrup (adjust to sweetness preference) - Zest of 1 lemon - Juice of 1/2 lemon - 1 cup fresh blueberries (plus extra for topping) - 1 teaspoon chia seeds (optional, for added thickness) - A pinch of salt - Crushed graham crackers, for topping (optional) You can swap out some ingredients if needed. Use any milk you like instead of almond milk. You can also use dairy-free yogurt if you want a vegan option. Instead of cream cheese, try a vegan cream cheese for a dairy-free treat. If honey is not your thing, use maple syrup or agave syrup for sweetness. You can also switch blueberries for other fruits, like strawberries or raspberries, for a twist. When picking fresh blueberries, look for ones that are firm and plump. They should be deep blue and free from any green or red spots. Check for mold or squished berries in the container. For lemons, choose ones that feel heavy for their size and have a bright yellow color. This means they are juicy and fresh. When buying oats and dairy products, go for brands with short ingredient lists. This ensures quality and freshness in your overnight oats. Start with a large mixing bowl. You need to gather all your ingredients first. This recipe is simple and quick. You can prep it in just 10 minutes. It’s perfect for busy mornings. First, add the rolled oats to the bowl. Pour in the almond milk next. Then, add the Greek yogurt and cream cheese. Mix these well so they combine. Add honey or maple syrup for sweetness. Then, mix in the lemon zest and juice. Don’t forget a pinch of salt! If you want a thicker texture, add chia seeds now. Stir everything until smooth. Next, gently fold in the fresh blueberries. Be careful not to mash them. You want to keep them whole for bites of flavor. Once mixed, divide the mixture into jars. You can use two or three jars, based on your needs. Cover the jars and place them in the fridge. Let them chill overnight or for at least 4 hours. This time lets the oats soak up the liquid. In the morning, stir the oats to mix again. Taste and adjust the sweetness if you like. Top your oats with more blueberries. You can also add crushed graham crackers for crunch. Enjoy your Blueberry Lemon Cheesecake Overnight Oats straight from the jar or in a bowl! To get that creamy, dreamy texture, use rolled oats. They soak up the liquid well. Mix in Greek yogurt and cream cheese for a rich base. If you like it thicker, add a teaspoon of chia seeds. They help absorb moisture and add a nice bite. Let the oats chill overnight. This gives them time to soften and blend flavors. Taste is key. Start with two tablespoons of honey or maple syrup. After mixing, you can adjust the sweetness. If you find it too sweet, add more Greek yogurt or a squeeze of lemon. The lemon juice brightens the dish and balances sweetness. Always mix well after adding more ingredients. This way, you get an even taste. Choose jars or containers with tight lids. Glass jars work great, as they keep the oats fresh. Use small mason jars for individual servings. They’re cute and easy to grab. If you want to make a batch, opt for a larger container. Just make sure it has enough space for the oats to expand. Remember, the right container makes serving easier! {{image_2}} You can change the fruit in your overnight oats. Instead of blueberries, try strawberries or raspberries. Mangoes and peaches also work well. Each fruit adds its own flavor. Mix in fruits that match your taste. You can even use frozen fruit if fresh is not available. Just remember, frozen fruit may make your oats a bit watery. If you want less sugar, there are many options. Agave syrup, stevia, or coconut sugar can all work. Each sweetener gives a different taste. If you prefer a richer flavor, try brown sugar. Adjust the amount based on your taste. I recommend adding sweeteners little by little, tasting as you go. Making this recipe vegan is simple! Use almond milk or coconut milk instead of regular milk. Swap Greek yogurt for dairy-free yogurt. You can even replace cream cheese with a vegan cream cheese. This way, you keep the creamy texture while being plant-based. Enjoy a tasty treat without dairy! Store your Blueberry Lemon Cheesecake Overnight Oats in a jar with a lid. Glass jars work great. Make sure the lid is on tight. This keeps the oats fresh and tasty. You can also use plastic containers if you prefer. Keep them in your fridge until you are ready to eat. These overnight oats last for about 3 to 5 days in the fridge. After making them, let them sit overnight. This helps the oats soak up the milk and flavors. If you notice any change in smell or texture, it’s best to toss them out. Yes, you can freeze these oats! Just make sure to use freezer-safe containers. Fill the jars or containers, leaving some space at the top. The oats will expand when frozen. They can last up to 3 months in the freezer. When you are ready to eat, thaw them in the fridge overnight. Yes, you can use instant oats. Instant oats will cook faster. Your overnight oats might be mushier. I prefer rolled oats for better texture. They soak up the liquid well and stay hearty. To make this recipe gluten-free, use certified gluten-free rolled oats. Many oats contain gluten due to cross-contamination. Check labels carefully. All other ingredients are naturally gluten-free, so you’re good to go! You can add nuts for crunch, like almonds or walnuts. Fresh fruit, such as bananas or strawberries, works well too. A sprinkle of cinnamon adds warmth and flavor. Consider coconut flakes or chia seeds for extra nutrition. We explored the key ingredients needed for Blueberry Lemon Cheesecake Overnight Oats. You learned substitutions and tips for choosing fresh items. Step-by-step instructions helped you mix and prepare the oats perfectly. We shared useful tips for texture, sweetness, and storage. You now have many variations to try, including vegan options. Remember, making these oats allows for creativity and enjoyment in your meals. With this knowledge, you can craft delicious oats tailored to your taste. Enjoy your cooking journey!

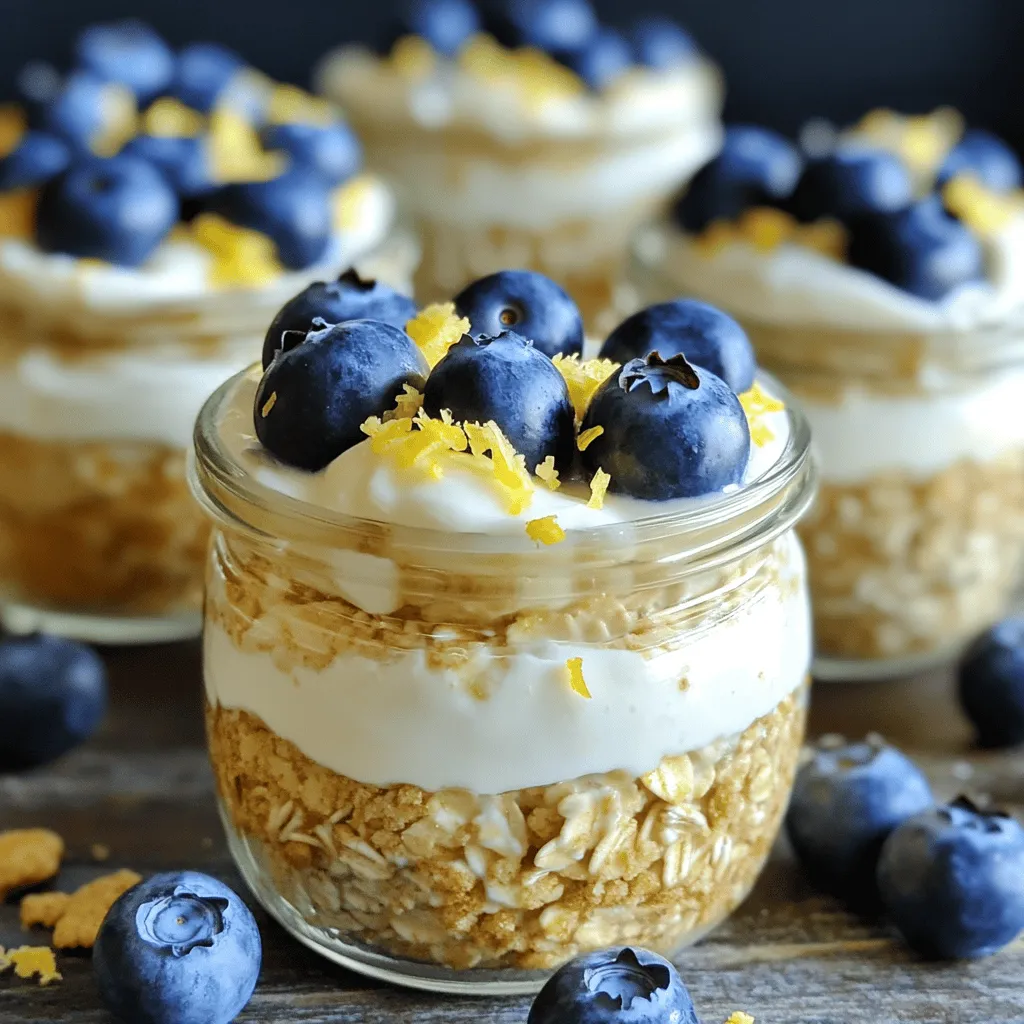
Start your day right with my Blueberry Lemon Cheesecake Overnight Oats Delight! This tasty treat combines creamy, dreamy cheesecake flavors with bright blueberries and zesty lemon. It’s easy to make …

Read more

Categories Breakfast
Older posts
Newer posts
← Previous Page1 … Page52 Page53 Page54 … Page134 Next →

TOSSED RECIPES

Simple meals, bold taste. Quick recipes made for real life — always fresh, always delicious. 🌿🍴

PAGES

Home About Contact Privacy Policy Terms & Conditions Cookie Policy GDPR Policy Copyright Policy Disclaimer

CATEGORIES

Appetizers Desserts Salads Breakfast Dinner

Contact

  • Pinterest
  • Mail
Copyright © 2026 Tossed Recipes. All rights reserved.