Skip to content
Tossed Recipes
  • Home
  • Appetizers
  • Desserts
  • Salads
  • Breakfast
  • Dinner
  • Privacy Policy
  • Contact
  • About

Chef Jamie

Kid Friendly School Lunch Ideas That Excite Kids
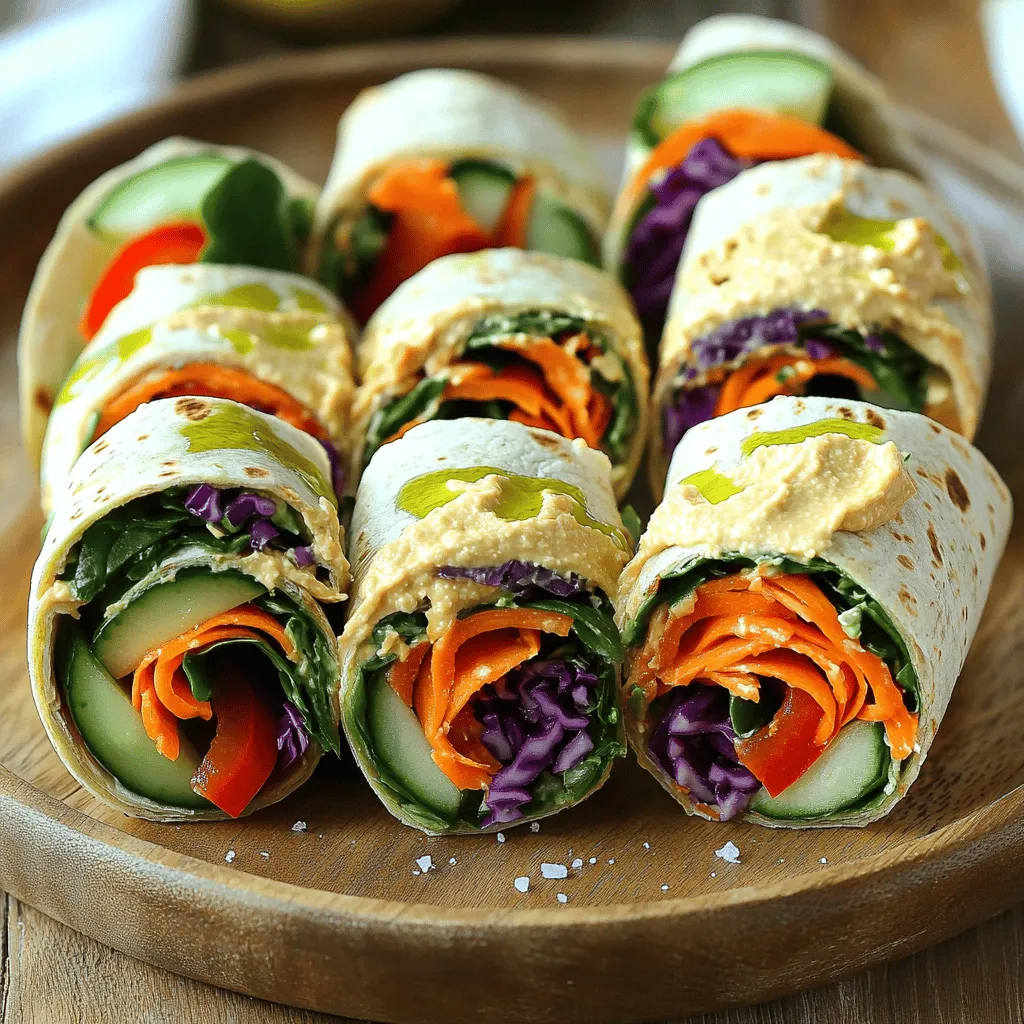
July 29, 2025 by Chef Jamie
To make Rainbow Veggie Wraps, you will need: - 4 whole wheat tortillas - 1 cup hummus (store-bought or homemade) - 1 cup shredded carrots - 1 cup cucumber, thinly sliced - 1 cup bell peppers (mixed colors), thinly sliced - 1 cup baby spinach leaves - 1/2 cup cherry tomatoes, halved - 1/4 cup feta cheese, crumbled (optional) - Salt and pepper to taste These wraps are packed with nutrition. Whole wheat tortillas offer fiber, which helps digestion. Hummus adds protein and healthy fats. Carrots bring vitamins A and K. Cucumbers hydrate and are low in calories. Bell peppers add vitamin C, which helps the immune system. Baby spinach is rich in iron and calcium. Cherry tomatoes add antioxidants. Feta cheese, if used, adds flavor and calcium. You can easily change the ingredients to meet different needs. For gluten-free options, use gluten-free wraps or lettuce leaves. If you want a nut-free spread, use bean dip instead of hummus. If dairy is a concern, skip the feta or use a dairy-free cheese. This way, everyone can enjoy these fun wraps! This is just a glimpse of the delights that come from the full recipe. To make rainbow veggie wraps, I start by laying a whole wheat tortilla flat on my cutting board. I then spread about 1/4 cup of hummus evenly across the tortilla. It’s important to leave a small border at the edges so the filling doesn’t spill out. Next, I layer on shredded carrots, cucumber slices, bell pepper strips, and baby spinach. Adding halved cherry tomatoes and feta cheese, if desired, gives it a nice touch. Finally, I season the fillings with a pinch of salt and pepper for flavor. Rolling a wrap can be tricky, but I have some simple tips. Start at one edge of the tortilla and gently fold it over the fillings. Tuck in the sides as you roll to keep everything inside. Roll tightly, but not too tight, to avoid squishing the veggies. If you want, you can use a toothpick to hold the wrap together. This makes it easier for kids to eat. Practice makes perfect, so don’t worry if it’s not perfect on the first try! When serving these wraps, I like to slice them into pinwheels or halves. This makes them fun to eat! I arrange the wraps on a colorful plate and add a few cherry tomato halves for extra color. Packing a side of fruit adds balance and sweetness. Kids love variety, so feel free to mix and match sides. You can serve them with yogurt, applesauce, or even a small treat. This way, lunchtime stays exciting and enjoyable! Making lunch prep quick can save you time. Start by planning meals on the weekend. You can choose simple recipes like Rainbow Veggie Wraps. Chop veggies in advance and store them in the fridge. This way, you grab and go on busy mornings. Use clear containers to see your options easily. Also, keep a list of your kid's favorite foods handy. This helps you stay on track. Getting kids involved makes cooking fun! Ask them to help wash veggies or spread hummus. You can turn it into a game by letting them choose the colors. For example, "Which color of bell pepper do you want to add?" This gives them a sense of control. You can also let them roll the wraps. Kids love to create their own meals. This builds their confidence in the kitchen. Keeping wraps fresh is key for tasty lunches. Wrap them tightly in plastic wrap or foil. This prevents them from drying out. You can also store them in airtight containers. Adding a slice of lemon or lime can help too. The acid keeps veggies crisp. Avoid adding watery ingredients like cucumbers right before packing. This keeps the wrap from getting soggy. Enjoy the Rainbow Veggie Wraps as a fun lunch! {{image_2}} You can switch up the fillings in your wraps to keep things fun. Try adding sliced turkey or chicken for protein. If your kids like cheese, use cheddar or mozzarella instead of feta. For a sweeter twist, add sliced apples or grapes. You can even mix in some avocado for creaminess. Each of these options gives a new taste and keeps kids excited for lunch. Dressings can make wraps more fun. Pack some ranch or yogurt-based dressing on the side. Kids love to dip! You can also try a simple vinaigrette made with olive oil and lemon juice. Hummus is a great dip too, and it goes well with veggies. Each dip adds flavor and makes eating more interactive. Whole wheat tortillas are versatile! Use them for quesadillas filled with cheese and beans. You can make mini pizzas by adding sauce and cheese, then bake them. Another idea is to fill them with scrambled eggs and veggies for breakfast wraps. The options are endless, and they keep meals fresh and fun. For a colorful and healthy option, check out the Rainbow Veggie Wraps [Full Recipe]. To keep your Rainbow Veggie Wraps fresh, wrap them tightly in plastic wrap. This helps keep the veggies crisp and the tortillas soft. Use wax paper or foil for a fun touch. If you pack them in containers, choose ones that fit snugly. Avoid letting air get in, as it can dry out the wraps. I love using bento boxes for lunch. They have different sections, which makes packing fun. Look for containers with secure lids to prevent spills. You can also use small jars for dips or dressings. When kids see their lunch packed nicely, they get excited to eat! Rainbow Veggie Wraps stay fresh in the fridge for about three days. If you make them in advance, store them in airtight containers. To keep them crunchy, add wet ingredients like hummus right before lunch. Always check for freshness before packing. If it looks or smells off, it's better to toss it. Easy kid-friendly lunch ideas include wraps, sandwiches, and colorful fruit cups. One fun option is Rainbow Veggie Wraps. These wraps look bright and taste great. Kids love the mix of colors and flavors. You can customize them based on what your kids like. Just pack them with some fruits or a yogurt for balance. To make healthy lunches more appealing, focus on colors and shapes. Use cookie cutters to make fun shapes from sandwiches. Add dips like hummus or yogurt for extra flavor. Include a variety of textures, like crunchy veggies and soft fruits. Present the food in fun containers or bento boxes to keep things exciting. Kids eat with their eyes first, so make it fun! To save money on school lunches, plan ahead each week. Buy ingredients in bulk when possible. Use seasonal produce, as it’s often cheaper and fresher. Prepare meals at home instead of buying pre-made options. Get kids involved in choosing foods they want. This way, they will eat what you pack. You can also swap lunch items with friends to keep things varied while saving money! Rainbow veggie wraps are fun, tasty, and easy to make. We explored the key ingredients, and their nutrients, and shared swaps for dietary needs. You learned how to roll and serve these wraps, making lunch prep simpler. We also offered ways to involve kids in cooking and keeping wraps fresh. With different fillings and dips, you can please any palate. Store these wraps properly to keep them fresh. Now, you have all the tools to create healthy lunches that kids will love. Enjoy making mealtime fun!

Are your kids tired of the same old lunches? I’ve got fun, tasty ideas that will spark their interest! In this post, you’ll discover kid-friendly school lunch ideas designed to …

Read more

Categories Appetizers

Chocolate Chip Pumpkin Pancakes Delicious Fall Treat

July 29, 2025 by Chef Jamie
To make these yummy chocolate chip pumpkin pancakes, you need some simple ingredients. Here’s what to gather: - 1 cup all-purpose flour - 1 tablespoon baking powder - 1/2 teaspoon baking soda - 1/2 teaspoon salt - 1 teaspoon ground cinnamon - 1/4 teaspoon ground nutmeg - 1 cup pumpkin puree (canned or fresh) - 1 cup milk (dairy or non-dairy) - 1 large egg - 2 tablespoons sugar - 2 tablespoons vegetable oil (or melted coconut oil) - 1/2 cup semi-sweet chocolate chips - Butter or oil for cooking These ingredients work together to create a warm, spiced, and sweet pancake. The pumpkin adds moisture and flavor. The chocolate chips bring sweetness, making every bite a treat. You can use canned pumpkin for ease, or make your own puree if you prefer fresh. For the milk, choose what you like best. Dairy milk gives a rich taste, while non-dairy options work just as well. The spices like cinnamon and nutmeg bring a cozy fall feel. Now that you have your ingredients, you’re ready to start cooking! Check the [Full Recipe] for detailed steps. Start by gathering your dry ingredients. Grab a large mixing bowl. In this bowl, add 1 cup of all-purpose flour, 1 tablespoon of baking powder, 1/2 teaspoon of baking soda, and 1/2 teaspoon of salt. Next, sprinkle in 1 teaspoon of ground cinnamon and 1/4 teaspoon of ground nutmeg. Whisk these together until they blend well. This step ensures your pancakes rise and have a warm, spiced flavor. Now, let’s move on to the wet ingredients. In another bowl, add 1 cup of pumpkin puree, either from a can or fresh. Pour in 1 cup of milk, which can be dairy or non-dairy. Crack in 1 large egg, then add 2 tablespoons of sugar and 2 tablespoons of vegetable oil or melted coconut oil. Mix these together until everything is smooth and well combined. This mixture brings moisture and sweetness to your pancakes. Next, it’s time to combine the mixtures. Pour the wet ingredients into the bowl with the dry ingredients. Gently fold them together until just combined. It’s okay if there are a few lumps; don’t overmix. Now, fold in 1/2 cup of semi-sweet chocolate chips for that delicious chocolatey flavor. Preheat a griddle or non-stick skillet over medium heat. Lightly grease it with butter or oil. For each pancake, pour about 1/4 cup of batter onto the hot surface. Cook until bubbles form on top, which takes about 2-3 minutes. After that, flip the pancake and cook for another 2-3 minutes, until golden brown. Repeat this process with the remaining batter. Adjust the heat if necessary to avoid burning. For the full recipe, check out the detailed steps above. Enjoy your warm, fluffy pancakes! To make your pancakes fluffy, mix the dry and wet ingredients separately. This method helps keep the batter light. When you combine them, fold gently. You want to mix until just combined. A few lumps are okay. Overmixing makes the pancakes dense, and we want them airy and soft. Adding baking powder also helps create that lift you want in your pancakes. The right cooking temperature is key. Preheat your griddle or skillet over medium heat. If it's too hot, the pancakes will burn. If it’s too cool, they will cook unevenly. A good test is to sprinkle a drop of water on the surface. If it sizzles and evaporates, you’re ready to go! Adjust the heat as needed while cooking. Toppings can make your pancakes shine. I suggest drizzling warm maple syrup over the stack. A sprinkle of cinnamon can enhance the pumpkin flavor. You can also add whipped cream for a creamy touch. Fresh fruit like bananas or berries adds color and flavor. For a fun twist, try adding more chocolate chips on top. These toppings make each bite a delicious treat. Try different combinations to find your favorite! {{image_2}} You can make these pancakes gluten-free easily. Use a gluten-free flour blend instead of all-purpose flour. Look for blends that contain xanthan gum. This helps give your pancakes the right texture. You can also try almond flour or coconut flour. These options will change the taste a bit but add a nice twist. To make these pancakes dairy-free, swap out regular milk for almond milk or oat milk. Both options work well and keep the flavor intact. You can use coconut milk for a richer taste. For the butter, use coconut oil or any dairy-free butter. This keeps your pancakes light and fluffy without dairy. Feel free to spice things up! Add a pinch of ginger or cloves for extra warmth. You can also mix in chopped nuts or dried fruits like cranberries. For a fun twist, try white chocolate chips instead of semi-sweet. Each variation adds a new layer of flavor. You can find the full recipe at the beginning of this article. Enjoy exploring these fun options! After enjoying your chocolate chip pumpkin pancakes, store leftovers in an airtight container. Let them cool first. Place parchment paper between pancakes to avoid sticking. Store in the fridge for up to three days. This keeps them fresh and tasty for your next meal. To reheat your pancakes, use a microwave or a skillet. For the microwave, place pancakes on a plate. Heat for about 20-30 seconds. Check if they are warm enough. If using a skillet, heat it over low heat. Add a bit of butter or oil, then warm the pancakes for about 1-2 minutes on each side. This method brings back their crispy edges. You can freeze pancakes for a quick breakfast later. First, let them cool completely. Stack pancakes with parchment paper between each one. Wrap the stack in plastic wrap, then place it in a freezer bag. They can stay in the freezer for up to two months. When ready to eat, thaw in the fridge overnight and reheat as needed. For the full recipe, check out the complete guide. Yes, you can use fresh pumpkin. To do this, roast a pumpkin until it’s soft. Then, scoop out the flesh and mash it. This gives you a rich flavor. Just make sure to measure out one cup for your recipe. Fresh pumpkin adds a nice touch to your pancakes. If you need an egg substitute, try using a mashed banana or applesauce. You can also use flaxseed meal mixed with water. Mix one tablespoon of flaxseed meal with three tablespoons of water. Let it sit for five minutes to thicken. This works well in the pancake batter and helps bind the ingredients. To prevent sticking, use a non-stick skillet or griddle. Make sure it’s hot before adding the batter. Lightly grease the surface with butter or oil. You can test the heat by sprinkling a few drops of water. If they sizzle, it’s ready. This will help your pancakes cook evenly and slide off easily. For the full recipe, check out the details above. You now have a complete guide to making delicious pumpkin pancakes. We covered all the ingredients, step-by-step instructions, and helpful tips. You learned how to make them fluffy and varied to fit your needs. Storing and reheating ideas help you enjoy leftovers too. Try these pancakes for breakfast or a snack. They are tasty and fun to make with loved ones. Enjoy your cooking and share your results!

Fall is here, and it’s the perfect time for a cozy breakfast! Imagine warm, fluffy chocolate chip pumpkin pancakes that blend the sweetness of chocolate with the rich flavor of …

Read more

Categories Breakfast

Easy Fall Dessert for Your Next Party Delight

July 29, 2025 by Chef Jamie
- Apples: Use Granny Smith for tartness or Honeycrisp for sweetness. - Granola: Choose a mix with nuts, seeds, or dried fruit for texture. - Whipped cream: You can use homemade or store-bought options. - Caramel sauce: Make your own or pick a good-quality store-bought brand. - Optional garnishes: Consider chopped nuts, chocolate chips, or a sprinkle of cinnamon. Using fresh, quality ingredients will make your Autumn Caramel Apple Parfait pop with flavor. Apples give a crisp bite, while granola adds crunch. The whipped cream smooths it all out, and caramel provides a sweet touch. You can customize garnishes to surprise your guests, keeping it fun and fresh. For the full recipe, visit the linked section above. To get started, wash your apples well. Choose Granny Smith or Honeycrisp for the best flavor. - Peeling: Use a sharp knife or a peeler. Start at the top and peel down in a smooth motion. - Dicing: Cut the apples into quarters. Remove the core, then slice each quarter into small cubes. Aim for about half an inch in size. To coat the apples with cinnamon, do this: - Place diced apples in a bowl. Add 1/2 teaspoon of cinnamon. - Toss the apples gently until they are evenly covered. This makes each bite tasty. Layering is key to a great parfait. Here’s how to do it: - Start with a clear glass or bowl. This shows off the pretty layers. - Place a layer of the cinnamon-coated apples at the bottom. - Next, add a layer of granola. This gives a nice crunch. - Drizzle some caramel sauce on top of the granola. Repeat these layers until you fill the glass, finishing with whipped cream on top. This order keeps the flavors balanced and makes your parfait look great! Chilling your parfaits is very important. It allows the flavors to mix and taste better. - Chill in the fridge for at least 30 minutes before serving. This makes them cool and refreshing. When it’s time to serve: - Take the parfaits out of the fridge. Drizzle extra caramel sauce on top. - If you like, sprinkle some chopped nuts for a nice crunch. Your guests will love these Autumn Caramel Apple Parfaits! For the full recipe, check the complete instructions above. To avoid soggy layers, start with the apples. Make sure you dice them small. This way, they blend well with the granola. Toss the diced apples with cinnamon and let them sit for a few minutes. This helps remove excess moisture. For the granola, use a crunchy mix. The crunch adds texture and keeps the parfait light. Layering the ingredients is key. Start with apples, then granola, and finish with whipped cream. Repeat this until you reach the top. To achieve the perfect balance of sweetness, taste before you build. Adjust the caramel sauce based on your preference. If you like it sweeter, add more caramel. If you prefer less, hold back. This makes the dessert just right for everyone. Serving ideas can impress your guests. Use clear glasses to show off the layers. You can use mason jars for a rustic look too. Arrange the parfaits on a large platter. This creates a fun and inviting display. Garnishes can elevate your dish. Drizzle extra caramel on top for a splash of color. Chopped nuts add crunch and flair. You can also sprinkle a bit of cinnamon on top. This adds a nice touch and makes it look fancy. If you are busy, consider make-ahead strategies. You can prepare the apples and granola a day before. Just store them in the fridge separately. Layer them the day of the party for freshness. Using store-bought components can save time too. Buy your favorite granola instead of making it. You can also choose whipped cream from the store. This makes the process quick and stress-free. Just focus on the fun part: assembling your parfaits! {{image_2}} You can easily switch up the flavors in your parfait. Try using pears or berries instead of apples. Berries add a sweet-tart taste. Pears bring a soft and juicy bite. You can also mix in spices like nutmeg or allspice. These spices warm up the flavor and add depth. A pinch of these spices can change the whole dish. If you want a gluten-free option, look for gluten-free granola. Many brands now offer tasty choices that fit this need. For a dairy-free version, use coconut whipped cream instead of regular whipped cream. This will keep your dessert light and fluffy while being dairy-free. Both adjustments keep the fun and flavor intact. Change your parfait for the holidays! Add pumpkin puree for a festive twist. Pecans also make a great addition, adding crunch and flavor. You can even mix apple with different autumn spices like ginger or cloves. These changes will make your dessert feel perfect for fall. Each variation keeps the core idea while introducing new tastes and textures. To store parfaits overnight, use airtight containers or jars. This keeps them fresh. You can also cover them tightly with plastic wrap. Parfaits stay good in the fridge for up to three days. Parfaits are not great for freezing. They can lose their texture and flavor. If you must freeze, use a freezer-safe container. Thaw them in the fridge overnight. This helps keep them from becoming mushy. Before serving stored parfaits, check the layers. If they look mixed, gently stir them. You can also add fresh ingredients, like extra granola or whipped cream. This gives a fresh taste and a nice look. Yes, you can prepare this dessert ahead of time. I suggest making the parfaits a few hours before your party. This allows the flavors to mix well. Store them in the fridge. They taste even better after chilling for at least 30 minutes. For this recipe, I love using Granny Smith or Honeycrisp apples. Granny Smith apples are tart and crisp, which gives a nice contrast to the sweet caramel. Honeycrisp apples are sweet and juicy, adding a delightful flavor. Both types work well together, enhancing your dessert. You can lower the sugar by using less caramel sauce. Try using a sugar-free version if you like. You can also swap some whipped cream with Greek yogurt. It adds creaminess without too much sugar. Using fresh fruits also boosts flavor without added sweetness. This article helped you create delicious apple parfaits. We explored key ingredients, from choosing apples to using different whipped creams. I shared step-by-step instructions for preparing and layering, ensuring your parfaits look and taste great. You learned tips to avoid soggy layers and impress guests with presentation. Plus, we covered variations for seasonal flavors and dietary needs. Now, you’re ready to enjoy or share this dessert. Follow these tips for a delightful treat that everyone will love. Happy parfait-making!

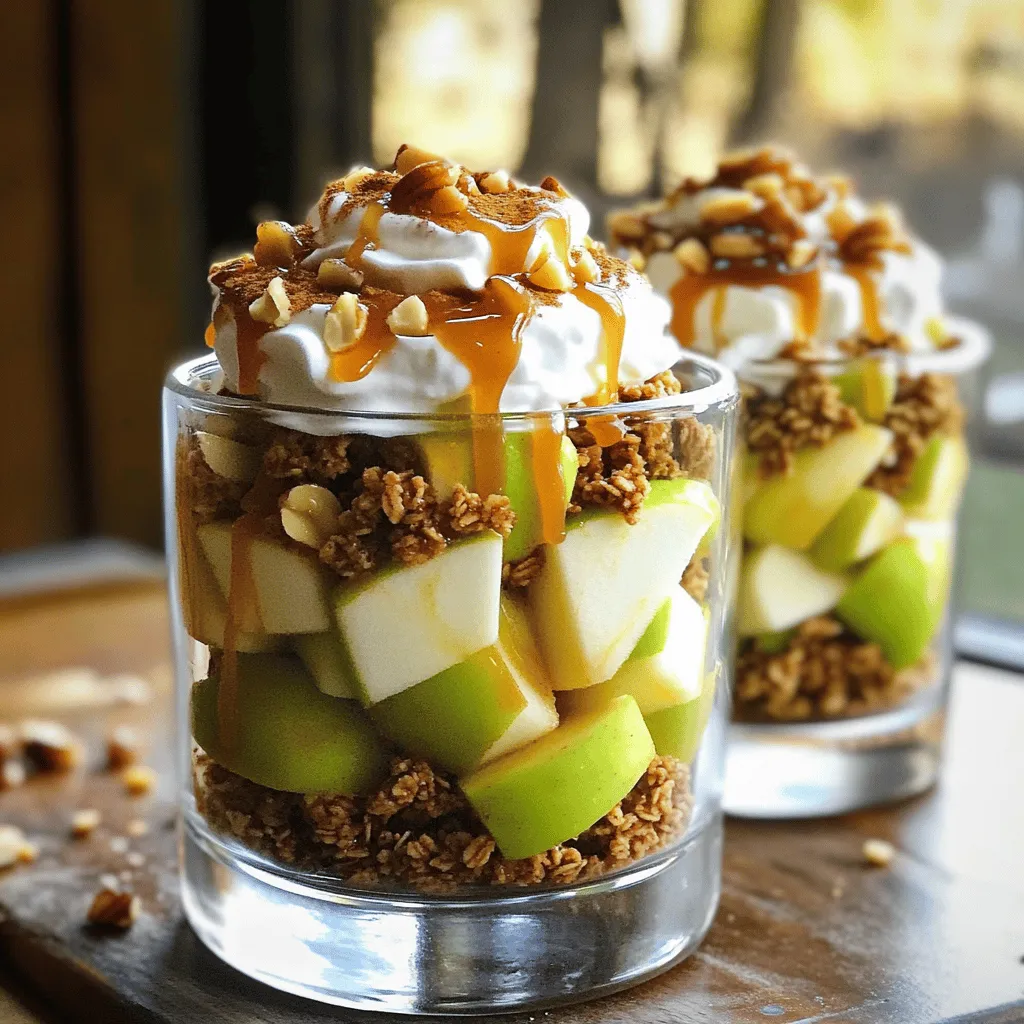
Fall is here, and it’s time to impress your guests with a delightful dessert! My Easy Fall Dessert for Your Next Party Delight combines crisp apples, crunchy granola, and creamy …

Read more

Categories Desserts

Pumpkin French Toast with Cinnamon Butter Delight

July 29, 2025 by Chef Jamie
To make the best pumpkin French toast, gather these key items: - 4 slices of thick bread (brioche or challah works best) - 1 cup pumpkin puree (canned or fresh) - 2 large eggs - 1 cup milk (or almond milk) - 1 teaspoon vanilla extract - 1 teaspoon ground cinnamon - ½ teaspoon ground nutmeg - ¼ teaspoon ground ginger - 2 tablespoons brown sugar - Pinch of salt - Butter (for cooking) These ingredients blend together to create a rich, warm flavor that brings joy to your morning. For the cinnamon butter that adds a sweet touch, you’ll need: - ½ cup unsalted butter, softened - 2 tablespoons powdered sugar - 1 teaspoon ground cinnamon This easy mix takes the dish from good to great, enhancing every bite. If you want to switch things up, consider these ideas: - Use whole grain or gluten-free bread for a healthier choice. - Swap pumpkin puree with sweet potato puree for a different taste. - Substitute eggs with flaxseed meal mixed with water for a vegan option. - Try coconut milk if you want a dairy-free version. These options let you enjoy pumpkin French toast your way while still keeping the flavors delightful. For the complete recipe, check out the Full Recipe section. To make the cinnamon butter, you need a medium bowl. Start with ½ cup of softened unsalted butter. Add 2 tablespoons of powdered sugar and 1 teaspoon of ground cinnamon. Mix these well until the butter is smooth and creamy. This butter will add a rich flavor to your French toast. Set it aside for later use. Next, we will mix the pumpkin batter. Take a large mixing bowl and add 1 cup of pumpkin puree. Crack in 2 large eggs and pour in 1 cup of milk. Add 1 teaspoon of vanilla extract for flavor. Then, sprinkle in 1 teaspoon of ground cinnamon, ½ teaspoon of ground nutmeg, and ¼ teaspoon of ground ginger. Don’t forget 2 tablespoons of brown sugar and a pinch of salt. Whisk everything together until it is well blended. This mixture gives the French toast its tasty pumpkin flavor. Now it's time to cook the French toast. Heat a skillet or griddle over medium heat. Add a small pat of butter to grease the surface. Dip each slice of thick bread into the pumpkin mixture. Make sure to coat both sides, but don’t soak them too long. Place the coated slices on the hot skillet. Cook them for about 3-4 minutes on each side. You want them golden brown and crispy. If needed, add more butter between batches for cooking. Once done, serve the French toast warm. Top it with a big dollop of your cinnamon butter. You can also sprinkle some powdered sugar on top for extra sweetness. Enjoy this delightful dish! For the full recipe, check the details above. To make your French toast fluffy, choose thick bread like brioche or challah. This bread absorbs the pumpkin mixture well without becoming too soggy. Whisk your eggs well to add air into the mix. This air helps create a light texture. Let the bread soak for just a few seconds; don’t leave it too long. A quick dip gives you that perfect fluffy center. For a golden brown color, use medium heat on your skillet. If the heat is too high, the outside burns while the inside stays raw. Add enough butter to coat the pan but don’t drown the bread in it. Cook each side for 3-4 minutes. Flip only when you see a nice golden hue. If you’re unsure, test a small piece first. Serve your Pumpkin French Toast warm, topped with a dollop of cinnamon butter. You can also sprinkle powdered sugar for added sweetness. To make it more fun, drizzle maple syrup on top. For crunch, add crushed pecans. Fresh mint leaves give a nice pop of color. Enjoy this dish with a hot cup of coffee or tea for a cozy breakfast. Check out the Full Recipe for more details! {{image_2}} You can make a gluten-free version of this dish. Just swap the thick bread for gluten-free bread. Look for a brand that has a soft texture to keep the dish fluffy. The pumpkin batter stays the same. You’ll still enjoy that lovely pumpkin flavor. Just be sure to check that all your other ingredients are gluten-free as well. To make a vegan version, swap the eggs for flax eggs. Mix one tablespoon of ground flaxseed with three tablespoons of water. Let it sit for five minutes to thicken. Use almond milk or oat milk instead of regular milk. The pumpkin puree remains the same, giving you that rich taste you love. This version will still be creamy and delicious without any animal products. You can easily add even more flavor to your French toast. Try mixing in a pinch of clove or allspice for a warm note. You can also add chocolate chips for a sweet twist. If you like nuts, try folding in some chopped pecans or walnuts into the batter. Fresh fruit like bananas or apples can add a burst of freshness. These simple tweaks can make your Pumpkin French Toast even more special. For the full recipe, check the link above. After enjoying your pumpkin French toast, let it cool. Place the slices in an airtight container. You can store them in the fridge for up to three days. If you want to keep them longer, freezing is a great option. Always layer parchment paper between slices to avoid sticking. To reheat, use a skillet or a toaster oven. Heat the skillet over medium heat. Cook each slice for about two minutes on each side. If using a toaster oven, set it to 350°F. It should take about five minutes to warm up. You want the toast hot but not dried out. For meal prep, freeze the cooled slices. Wrap each slice in plastic wrap, then place them in a freezer bag. Label the bag with the date. You can freeze them for up to two months. When ready to eat, just thaw in the fridge overnight. Reheat as mentioned above for a fresh taste. For a full recipe, check the Pumpkin Spice French Toast with Cinnamon Butter section. Yes, you can make the pumpkin batter ahead of time. Just mix the pumpkin puree, eggs, milk, and spices. Store this mix in the fridge for up to 24 hours. You can dip the bread just before cooking. This way, you save time on busy mornings. I love using thick bread like brioche or challah. These types soak up the pumpkin batter well. They also give a nice, fluffy texture. You can also use sourdough or Texas toast for a different taste. Just pick bread that is sturdy and can hold the mix. To avoid soggy French toast, dip the bread quickly in the batter. Make sure each slice is coated but not soaked. Let excess batter drip off before cooking. A hot skillet helps create a crispy outside. This way, you keep the inside soft without it getting too wet. Pumpkin French toast is simple to make and so tasty. We explored the best ingredients, like pumpkin and cinnamon butter. I shared clear steps to mix and cook your French toast flawlessly. You learned tips for perfect fluffiness and options for gluten-free or vegan versions. Remember to store leftovers carefully for future meals. With these ideas, you can enjoy pumpkin French toast any time. Try this recipe and impress your family and friends! Cooking can be fun and rewarding.

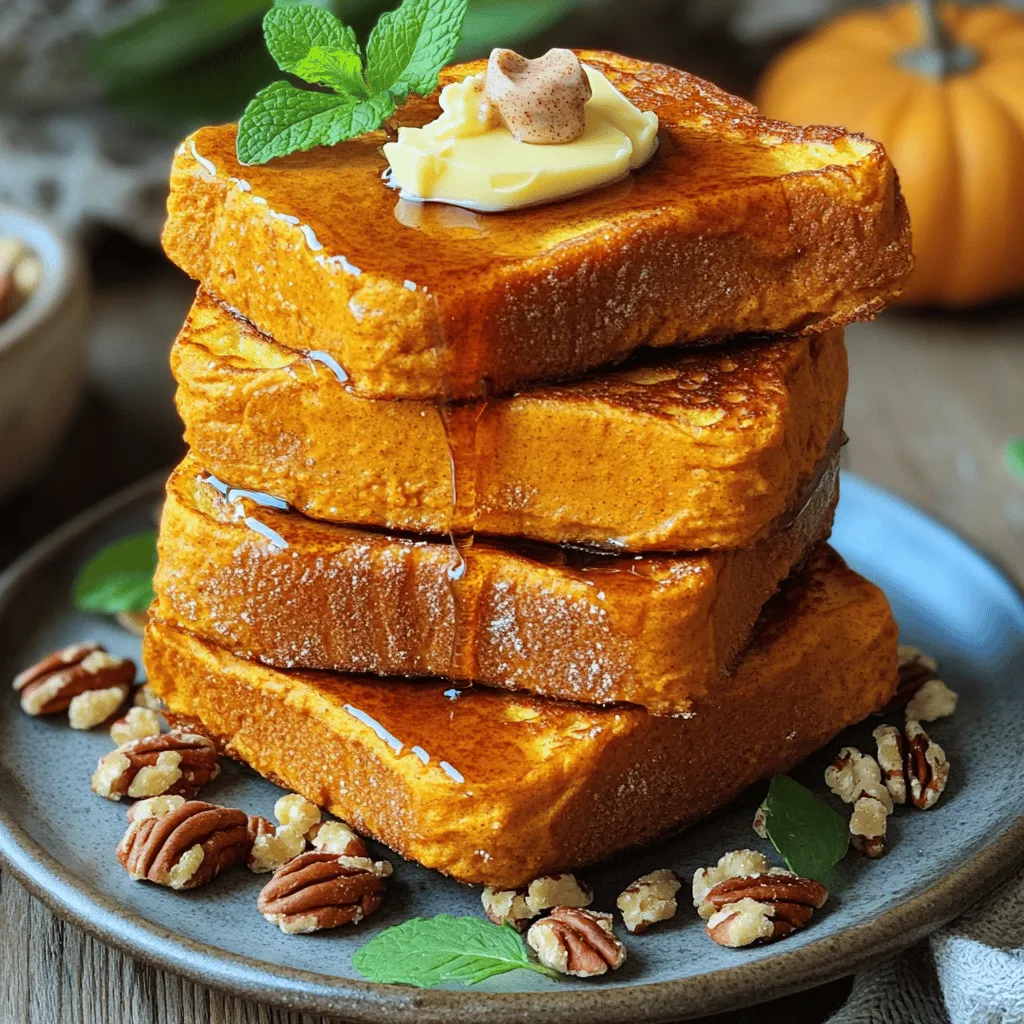
Are you ready to elevate your breakfast game? This Pumpkin French Toast with Cinnamon Butter is a fall delight you can enjoy all year round. Imagine fluffy slices of bread …

Read more

Categories Breakfast

Salted Apple Maple Munchkins Irresistible Bite-Sized Treats

July 29, 2025 by Chef Jamie
To make the best Salted Apple Maple Munchkins, you need a few key ingredients: - 2 cups all-purpose flour - 1/2 cup granulated sugar - 1/2 teaspoon baking powder - 1/4 teaspoon baking soda - 1/4 teaspoon salt - 1 teaspoon ground cinnamon - 1/2 cup unsalted butter, softened - 1 large egg - 1/2 cup maple syrup - 1 cup finely chopped apples (preferably Granny Smith) - 1/4 cup powdered sugar (for dusting) - Sea salt flakes (for topping) These ingredients come together to create a sweet and salty flavor. The apples add moisture and a bit of tartness, while the maple syrup brings rich sweetness. Ground cinnamon adds warmth. If you're missing any ingredients, don't worry! Here are some easy swaps: - Use whole wheat flour instead of all-purpose for a heartier munchkin. - Substitute brown sugar for granulated sugar for a deeper flavor. - Replace unsalted butter with coconut oil for a dairy-free option. - Use honey or agave syrup in place of maple syrup for a different twist. - Any tart apple works if Granny Smith is not available. These substitutions keep the munchkins tasty while catering to dietary needs or preferences. To make your munchkins, gather these tools: - Mini muffin pan (or mini muffin liners) - Mixing bowls - Whisk - Rubber spatula - Measuring cups and spoons - Toothpick (for testing doneness) - Wire rack (for cooling) Having the right tools makes the process smoother and more enjoyable. You’ll find baking these munchkins easy and fun! For the full recipe, refer to the recipe section above. Start by preheating your oven to 350°F (175°C). Next, grease a mini muffin pan or line it with mini muffin liners. This helps the munchkins pop out easily. In a large mixing bowl, whisk together the flour, sugar, baking powder, baking soda, salt, and cinnamon. Mix until everything blends well. In a separate bowl, beat the softened butter until it is creamy. Then add the egg and maple syrup, mixing until smooth. Slowly add the dry ingredients to this mix. Stir until just combined; do not overmix. Finally, fold in the finely chopped apples. This will give your munchkins a delicious fruity flavor. Once your batter is ready, spoon it into the mini muffin pan. Fill each cup about 3/4 full to allow room for rising. Bake them in your preheated oven for 12-15 minutes. Keep an eye on them; they should turn golden brown. To check if they’re done, insert a toothpick in the center. If it comes out clean, they are ready. After baking, let them cool in the pan for about 5 minutes. Then, gently transfer them to a wire rack to cool completely. To get the best munchkins, avoid overmixing the batter. Overmixing can make them tough. Use finely chopped apples to ensure even distribution. This helps every bite have flavor. Also, remember to measure your ingredients carefully. Too much flour can make them dry. For a nice finish, dust the tops with powdered sugar and sprinkle sea salt flakes on them. This adds a sweet-and-salty touch that everyone loves. For the full recipe, check back to the ingredients section. When making salted apple maple munchkins, avoid overmixing the batter. Overmixing makes the munchkins tough. Use a gentle hand when folding in the apples. Also, be sure your ingredients are fresh. Stale flour or old baking powder can ruin your treats. Lastly, do not skip the sea salt flakes on top. This touch enhances the sweet flavor beautifully. To boost flavor, try adding a splash of vanilla extract. A teaspoon can make a big difference. You could also mix in some chopped nuts for crunch. Pecans or walnuts pair nicely with apples. If you want a more intense apple taste, use apple pie spice instead of cinnamon. This adds warmth and depth to every bite. For an egg-free version, swap the egg for a flaxseed egg. Mix one tablespoon of ground flaxseed with two and a half tablespoons of water. Let it sit for five minutes until it thickens. To make these munchkins vegan, use a plant-based butter and maple syrup. This keeps the flavor while making it suitable for everyone. Check the full recipe for more details on ingredients and steps. {{image_2}} You can choose many types of apples for your munchkins. Granny Smith apples add a nice tartness. Honeycrisp apples lend a sweet crunch. Fuji apples offer a juicy bite. Mix different apples to create a unique taste. Each type adds its own twist, making your munchkins even more special. Want to jazz up your munchkins? Try adding spices like nutmeg or ginger. A pinch of nutmeg brings warmth and depth. Ginger adds a zesty kick that pairs well with apples. You can also mix in vanilla extract for extra flavor. These small changes can make a big difference. If you love chocolate, chop up some dark or milk chocolate. This adds richness and sweetness to your munchkins. You can also add nuts for crunch. Walnuts or pecans work well. Just fold in your choice before baking. These additions can make your munchkins even more delightful. For the full recipe, check back to the main section. To keep your salted apple maple munchkins fresh, place them in an airtight container. This will keep them soft and tasty. You can store them at room temperature for up to three days. If you want to save them longer, refrigeration is a great option. Just make sure to let them cool completely before storing. This helps prevent condensation, which can make them soggy. Freezing is a smart way to keep munchkins for later. First, allow them to cool completely. Then, place them in a single layer on a baking sheet. Freeze them for about an hour. Once frozen, transfer them to a zip-top bag or airtight container. They can last up to three months in the freezer. When you're ready to enjoy them, just take out what you need. To reheat your munchkins, use an oven or a microwave. For the oven, preheat it to 350°F (175°C). Place the munchkins on a baking sheet and heat for about 5-7 minutes. This will make them warm and soft again. If you use a microwave, heat them for about 10-15 seconds. Check that they are warm but not too hot. Enjoy them fresh, just like when you first made them! You can find the full recipe above for reference. Salted Apple Maple Munchkins are small, soft treats with a sweet and salty taste. They combine fresh apples and rich maple syrup. These munchkins are perfect for snacks or desserts. I love their warm, cozy flavor. Each bite brings a mix of sweet and salty. The sprinkle of sea salt makes them special. You can enjoy them with coffee or tea too! You can make these munchkins ahead by baking and storing them. Once cooled, place them in an airtight container. Keep them in the fridge for up to 3 days. For longer storage, freeze them for up to 2 months. Just make sure to wrap them well to avoid freezer burn. When you’re ready to eat, thaw and warm them in the oven. They taste fresh and delicious! Serve Salted Apple Maple Munchkins warm or at room temperature. They pair well with a dusting of powdered sugar on top. I also love to add extra sea salt for flavor. You can serve them on a pretty plate for guests. For a fun twist, try adding a drizzle of maple syrup over them. They make a great addition to any brunch or gathering! Yes, you can customize the flavor of these munchkins easily! Try different types of apples, like Honeycrisp or Fuji, for varied sweetness. You can also add spices such as nutmeg or ginger for a warm touch. For extra crunch, mix in some walnuts or pecans. These changes keep the recipe exciting and fun to make! This blog post shared the key ingredients and steps to make Salted Apple Maple Munchkins. We discussed substitutions, tools, and common tips to avoid mistakes. You learned the best ways to store and reheat these treats. In summary, making munchkins is easy with the right prep and flavors. Get creative with your ingredients and enjoy!

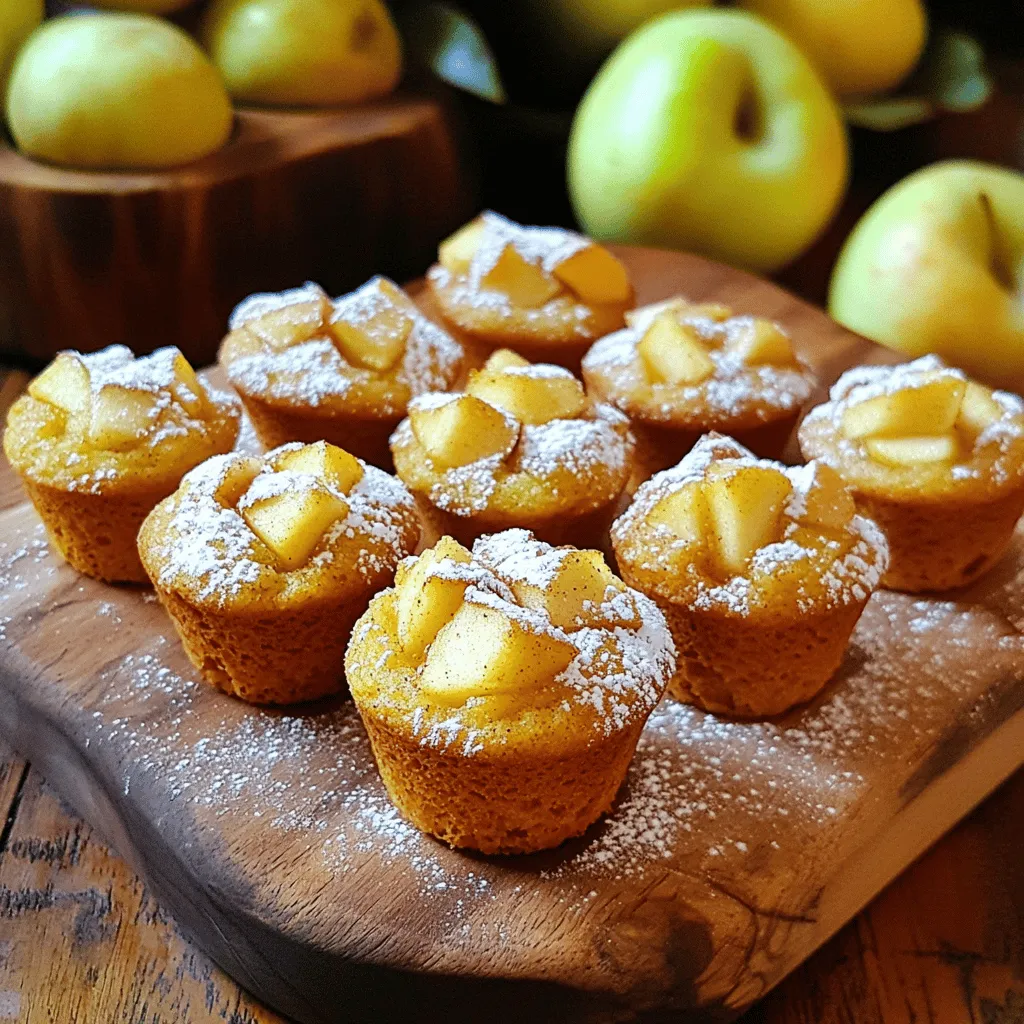
Craving a sweet yet salty snack? Get ready for Salted Apple Maple Munchkins, your new favorite treat! These bite-sized goodies blend tender apples with rich maple flavor, giving you a …

Read more

Categories Desserts

Campfire S’mores Latte Tasty and Simple Recipe

July 29, 2025 by Chef Jamie
To make a Campfire S'mores Latte, you need a few key ingredients: - 1 cup brewed strong coffee (or espresso) - 1 cup milk (dairy or non-dairy) - 2 tablespoons chocolate syrup - 2 tablespoons marshmallow fluff - 1/2 teaspoon vanilla extract These ingredients create the rich, sweet base of the latte. The brewed coffee gives you that strong kick, while the milk adds creaminess. Chocolate syrup and marshmallow fluff bring in the classic s'mores taste, and a hint of vanilla rounds it all out. Now for the fun part—toppings! You will want to gather: - Mini marshmallows - 1 tablespoon crushed graham crackers - Whole graham crackers (for garnish) These toppings not only make your latte look amazing but also add extra flavor. Toasting mini marshmallows gives you that campfire feel. The crushed graham crackers add a nice crunch, making every sip special. For a great touch, place a whole graham cracker next to your mug for that classic s'mores look. For the full recipe, you can check the details above. To make the best Campfire S'mores Latte, you need strong coffee. I like to use dark roast coffee or espresso. A dark roast gives a rich flavor that pairs well with sweet toppings. Brew about one cup. If you prefer espresso, use one shot. The stronger the coffee, the better it stands up to the sweet mix. Next, you will heat your milk. Use dairy or non-dairy milk, whichever you like. Pour one cup into a small saucepan and warm it over medium heat. Stir it gently so it heats evenly. You want it hot but not boiling. Once hot, whisk in two tablespoons of chocolate syrup and two tablespoons of marshmallow fluff. Add half a teaspoon of vanilla extract for extra flavor. Whisk until everything is frothy and well mixed. This combo creates that delicious campfire vibe. Now it's time to put it all together. Start by pouring your brewed coffee into a large mug. Slowly add the chocolate-marshmallow milk mixture on top. It should look creamy and inviting. For a fun garnish, toast some mini marshmallows. You can use a kitchen torch or broiler for this. Aim for a golden brown color. Finally, sprinkle some crushed graham crackers on top. You can also add a whole graham cracker on the side for a fun touch. This latte is now ready to enjoy! For the full recipe, check out the details above. To get that perfect campfire taste, use rich chocolate syrup. This adds depth to your latte. You can also mix in a touch of smoked sea salt. It enhances the flavor and gives a unique twist. For the mini marshmallows, toast them slowly. Use a kitchen torch or broiler. Keep an eye on them to avoid burning. You want them golden brown, not charred. If you want a vegan version, swap the milk with almond or oat milk. These add a nice creaminess. For the marshmallow fluff, look for plant-based options. Many brands now offer vegan fluff made from aquafaba or other ingredients. This way, you keep the s'mores flavor without dairy. Pair your Campfire S'mores Latte with a slice of chocolate cake for extra sweetness. It’s a delightful match! In fall, sprinkle some pumpkin spice on top for a seasonal touch. In summer, serve it cold over ice. You can even add a scoop of vanilla ice cream for a fun twist. Check out the full recipe for more ideas! {{image_2}} To make an iced version, start by brewing your coffee and letting it cool. You can use ice cubes in place of hot milk. Blend together: - 1 cup brewed coffee - 1 cup milk (dairy or non-dairy) - 2 tablespoons chocolate syrup - 2 tablespoons marshmallow fluff - 1/2 teaspoon vanilla extract Mix these in a shaker with ice. Pour over ice in a tall glass. For added flavor, drizzle chocolate syrup inside the glass before pouring. This gives a fun look and extra sweetness. You can add other flavors to your latte, too. Try peppermint or cinnamon for a twist. Just stir in a drop of peppermint extract or a sprinkle of cinnamon. This can make your drink feel festive. You can also mix your latte with other coffee drinks. Try blending it with cold brew or a mocha for a fun mix. If you want to make this drink for adults, add a splash of your favorite liqueur. Use ingredients like: - 1 ounce chocolate liqueur - 1 ounce vanilla vodka Mix it into your latte after combining the milk and chocolate mix. Serve it in a mug with a mini marshmallow on top for fun. This adds a new layer of flavor and makes it feel special. To keep your Campfire S'mores Latte fresh, store leftover chocolate syrup and marshmallow fluff in a cool, dry place. Use airtight containers for best results. Chocolate syrup can last for up to a year if kept sealed. Marshmallow fluff stays good for about six months when stored properly. Brewed coffee should be consumed within two hours if kept at room temperature. If you have leftovers, refrigerate them. Cold brewed coffee can last up to a week in the fridge. Milk, whether dairy or non-dairy, usually lasts about a week after opening. Always check the expiration date before using. You can prepare some ingredients ahead of time. Brew your coffee in advance and keep it in the fridge. This saves time on busy mornings. You can also measure out the chocolate syrup and marshmallow fluff for quick assembly. When it’s time to enjoy your latte, reheat the coffee and the milk mixture separately. Warm the milk until hot, but do not boil it. Combine everything in a large mug, and you’ll have a delicious drink ready to enjoy. A Campfire S'mores Latte is a drink that brings the joy of campfire s'mores to your cup. It has a rich flavor from brewed coffee, sweet chocolate, and creamy marshmallow. The taste is warm and comforting, just like sitting by a fire. It combines the smoky flavor of toasted marshmallows with the crunch of graham crackers. You may also notice notes of vanilla, adding to its delightful profile. You can use instant coffee if you prefer, but brewed coffee gives a better taste. Instant coffee lacks the depth and richness of brewed coffee. When you make the Campfire S'mores Latte with brewed coffee, you get a strong flavor that blends well with the other ingredients. Instant coffee might work in a pinch, but I recommend brewed for the best experience. You can find Campfire S'mores Lattes at many coffee shops and cafes, especially in fall and winter. Some specialty coffee places offer seasonal drinks that include this flavor. Look for local cafes that focus on unique lattes. Chains like Starbucks may have similar drinks, especially around holidays. If you want to enjoy it at home, check out the Full Recipe to make your own. You can personalize your Campfire S'mores Latte in many fun ways. Try adding flavored syrups like caramel or hazelnut for a twist. If you like spice, a pinch of cinnamon can enhance the taste. You can also adjust the amount of chocolate syrup and marshmallow fluff to suit your sweet tooth. Using different types of milk, like almond or oat, can change the flavor too. The Campfire S'mores Latte combines rich coffee, creamy milk, and sweet toppings. You’ve learned how to brew the perfect coffee and mix flavors for a great taste. I shared tips for achieving that campfire flavor, making it vegan, and even cool variations like iced lattes. You can store your extra ingredients and prepare ahead for easy assembly. Enjoy this fun drink that reminds you of campfires, no matter where you are. Get creative and make your own special twist!

Are you craving the sweet, smoky taste of a campfire? Look no further! My Campfire S’mores Latte recipe blends rich coffee, creamy milk, and delightful s’mores flavors for a drink …

Read more

Categories Desserts

Toddler Lunches Packed with Fresh Ingredients

July 28, 2025 by Chef Jamie
To make tasty rainbow veggie wraps, you need fresh and colorful ingredients. Here’s what you’ll need: - 4 whole wheat tortillas - 1 cup hummus (store-bought or homemade) - 1 medium carrot, peeled and grated - 1 small cucumber, thinly sliced - 1 red bell pepper, thinly sliced - 1/2 cup purple cabbage, shredded - 1/2 cup spinach leaves - 1 tablespoon olive oil - Salt and pepper to taste - Optional: 1/4 cup shredded cheese These ingredients create a fun and healthy meal. The colors in the wraps make them more appealing to kids. Each bite is filled with vitamins and crunch. You can mix and match other healthy ingredients in your wraps. Here are some great options: - Avocado for creaminess - Cooked chicken for protein - Sunflower seeds for crunch - Different cheese types for flavor - Fresh herbs like basil or cilantro These ingredients can add fun textures and flavors. They help you cater to your child's taste. You want to keep meals exciting! When shopping for your wraps, always look for the freshest ingredients. Here are some tips: - Choose bright and firm veggies. - Avoid produce with spots or bruises. - Buy organic when possible to reduce chemicals. - Check for expiration dates on packaged items. Fresh ingredients not only taste better but also pack more nutrients. Your child will enjoy their lunch even more with fresh flavors. Remember, the goal is to make healthy eating fun and delicious! To start, lay out your whole wheat tortillas on a clean surface. This makes it easy to spread the hummus. Use a generous layer of hummus on each tortilla. Leave a small border around the edges. Next, in a bowl, combine your grated carrot, sliced cucumber, red bell pepper, purple cabbage, and spinach. These fresh ingredients add color and crunch. Drizzle olive oil over the veggies. Then, sprinkle with salt and pepper, and toss them gently to coat. This step enhances the flavors. Divide the veggie mix evenly among the tortillas, placing it in the center. If you want, add shredded cheese on top of the veggies. Now, roll the tortillas tightly. Start from the edge nearest to the filling. Tuck in the sides as you roll to keep everything inside. Once rolled, slice each wrap into bite-sized pinwheels or cut in half. This makes it easier for toddlers to handle. Arrange the wraps on a plate and serve them with extra hummus or a small side of fruit. Make your lunch prep easier by doing some tasks ahead of time. You can wash and cut your veggies the night before. Store them in a container in the fridge. When lunch time comes, you’ll save time. You can also use store-bought hummus instead of making it from scratch. This cuts down on prep time and still tastes great. If your child is a fan of cheese, buy pre-shredded cheese for convenience. To make the Rainbow Veggie Wraps more fun, serve them with a colorful side. Fresh fruit like apple slices or berries works well. You can also add a small cup of yogurt for dipping. Kids love to dip! Use fun plates or colorful napkins to make lunch special. Creating a fun lunch experience keeps toddlers excited about eating healthy. For more ideas, check out the Full Recipe! To keep toddler lunches fresh, use insulated containers. These containers help maintain food temperature. Store sandwiches or wraps in airtight bags to prevent them from drying out. Always pack cold items with an ice pack. This keeps fruits and veggies crisp. For dips like hummus, use small containers. Keep them tightly sealed until lunch. Toddlers love bright colors! Use colorful fruits and veggies for a fun look. Cut fruits into fun shapes with cookie cutters. Create a rainbow effect with your wraps. Try using the Rainbow Veggie Wraps recipe to make lunch exciting. Arrange food in fun patterns or shapes on the plate. Add a splash of color with a mix of fruits. This can include strawberries, blueberries, and grapes. To help picky eaters try new foods, involve them in the process. Let them choose fruits or veggies at the store. Offer new foods alongside familiar favorites. Keep portions small at first to avoid overwhelming them. Make food fun with creative names or stories. For example, call broccoli "little trees." Gradually, they may become curious and willing to try more. {{image_2}} You can make rainbow veggie wraps fun and tasty for your toddler. Start with whole wheat tortillas. Spread a layer of hummus on each one. This adds flavor and nutrition. Then, pile on colorful veggies like carrots, cucumbers, and bell peppers. The bright colors make them look yummy. You can also add spinach and purple cabbage for crunch. Try a sprinkle of cheese for extra taste. Wrap them tightly, and slice them into bite-sized pieces. These wraps are perfect for tiny hands to hold. Wraps are very versatile. You can change the filling based on what your child likes. Try using turkey or chicken for protein. Add slices of avocado for healthy fats. You can also use cream cheese or nut butter as a spread. Let your toddler help choose the fillings. This gives them a sense of control. You can even make sweet wraps with bananas and peanut butter for a fun treat! Pairing wraps with fruits can make lunch more exciting. You can add apple slices, grapes, or berries on the side. These fruits are easy to eat and full of vitamins. Snack options like yogurt or whole grain crackers can round out the meal. For a crunchy side, consider carrot sticks or bell pepper strips. These snacks are colorful and healthy. Mixing and matching these items keeps lunch fresh and fun! To keep toddler lunches fresh, store leftovers in airtight containers. Glass or BPA-free plastic works well. Make sure to cool the food down before sealing it. Label each container with the date so you can track freshness. Use leftovers within 3 days for the best taste and safety. When reheating meals, do it evenly. Use the microwave or stove. For the microwave, heat food for 30 seconds, stir, and check the temperature. It should be hot, not steaming. For the stove, warm on low heat, stirring often to prevent hot spots. Always test a small bite before serving. Food safety is key for toddler lunches. Wash hands before preparing food. Rinse fruits and veggies under cold water. Keep raw ingredients separate from cooked ones. Avoid leaving food out for more than two hours. If you’re packing lunches, use ice packs to keep items cool. Always follow these steps to keep your little one safe. This method ensures your meals, like the Rainbow Veggie Wraps, stay tasty and safe for your toddler. You want fast, healthy lunches for toddlers. Here are some ideas: - Peanut Butter Banana Wraps: Spread peanut butter on a tortilla and add banana. Roll it up. - Mini Pita Pockets: Fill pita bread with hummus and diced veggies. It’s fun to eat! - Cheese and Crackers: Pair cheese slices with whole-grain crackers. Add fruit for sweetness. - Yogurt Parfait: Layer yogurt with granola and berries in a cup. It looks pretty too! These meals are quick to make, tasty, and full of nutrients. Picky eaters can be tough. Here are tricks to help them enjoy lunch: - Fun Shapes: Use cookie cutters to make sandwiches or fruits into fun shapes. - Color Variety: Use a rainbow of fruits and veggies. Kids love bright colors! - Dips and Spreads: Serve veggies with hummus or yogurt dips. Dipping is fun. - Involve Them: Let kids help pack their lunches. They feel proud of their choices. These methods make meals more engaging and can lead to better eating habits. Portion sizes for toddlers can be small. Here are some guidelines: - Fruits and Veggies: Offer about 1/4 to 1/2 cup per meal. - Grains: A small slice of bread or a small tortilla works well. - Protein: A couple of tablespoons of meat, beans, or cheese is good. - Dairy: 1/2 cup of yogurt or milk is enough. These portions keep meals balanced without overwhelming little ones. In this post, we explored the best ingredients and tips for tasty toddler lunches. We discussed making rainbow veggie wraps, packing fresh meals, and keeping lunches fun. Remember, variety is key to keeping your toddler excited about food. Use colorful and healthy ingredients to make meals more appealing. With these ideas, you can create lunches that are both nutritious and fun. Enjoy this journey of making meals your little one will love!

Making nutritious lunches for toddlers can be a challenge. You want to pack fresh ingredients that excite their taste buds while keeping it healthy. In this post, I’ll share simple …

Read more

Categories Appetizers

Mediterranean Quesadillas Flavorful Easy Recipe

July 28, 2025 by Chef Jamie
To make Mediterranean quesadillas, you need fresh and tasty ingredients. Here’s what to gather: - 4 large flour tortillas - 1 cup feta cheese, crumbled - 1 cup mozzarella cheese, shredded - 1 cup fresh spinach, chopped - 1/2 cup sun-dried tomatoes, chopped - 1/2 cup black olives, sliced - 1/4 cup red onion, thinly sliced - 1 tablespoon olive oil - 1 teaspoon dried oregano - Salt and pepper to taste You can switch out some ingredients if needed. Here are a few ideas: - Use whole wheat tortillas for a healthier option. - Swap feta for goat cheese for a tangy flavor. - Try fresh basil instead of spinach for a twist. - Replace sun-dried tomatoes with fresh tomatoes for a lighter taste. - Use any cheese you like, such as cheddar or pepper jack. Using fresh ingredients makes a big difference. Fresh veggies and herbs add bright flavors and colors. Packaged goods can be easy but often lack taste. Here are some points to consider: - Fresh spinach wilts nicely and keeps its color. - Crumbled feta from a block tastes richer than pre-crumbled. - Sun-dried tomatoes in oil add depth, while dried ones may need rehydration. - Always taste your ingredients first. Freshness enhances the whole dish. For a full recipe, check the link provided. Enjoy crafting these delicious Mediterranean quesadillas! 1. Start by gathering all your ingredients. Having everything ready makes cooking smooth. 2. Chop the fresh spinach, sun-dried tomatoes, and red onion. Keep them handy for mixing. 3. In a bowl, mix together the feta cheese, mozzarella cheese, spinach, tomatoes, olives, onion, oregano, salt, and pepper. Stir well until it’s all combined. 1. Heat a large skillet on medium heat. Add the olive oil and let it warm up. 2. Place one tortilla in the skillet. Sprinkle half of the cheese and vegetable mix on one half. 3. Fold the tortilla over the filling. Cook for 2-3 minutes until it turns golden brown. 4. Carefully flip the quesadilla using a spatula. Cook the other side for another 2-3 minutes until it is crispy. 5. Remove the quesadilla from the skillet. Let it cool for a minute, then slice it into wedges. 6. Repeat the steps with the remaining tortillas and filling mixture. - Use enough olive oil to coat the skillet lightly. This helps the outside get nice and crispy. - Make sure the skillet is hot before adding the tortilla. A hot pan gives a better crunch. - Don’t overload the quesadilla with filling. Too much can make it soggy. - After cooking, let the quesadilla rest for a minute. This helps it hold its shape when you slice it. For the full recipe, check out the details above. Enjoy making your Mediterranean Quesadillas! To boost the taste of your Mediterranean quesadillas, use fresh herbs. Basil, parsley, and dill add bright notes. You can also try adding lemon zest for a zesty kick. Don’t skip the olive oil. It helps with browning and flavor. If you want more depth, add garlic or onion to the filling mix. One common mistake is overfilling your quesadilla. If you add too much, it can burst open. Another mistake is not letting the skillet heat enough. A hot skillet makes the tortillas crisp and brown. Lastly, don’t forget to season your filling. A pinch of salt and pepper brings out all the flavors. For making these quesadillas, a large skillet is key. A spatula helps flip them without mess. Use a sharp knife for cutting the quesadillas. A cutting board is great for slicing. If you have a quesadilla maker, it’s even easier! For the full recipe, check the section above. {{image_2}} You can easily make Mediterranean quesadillas vegetarian or vegan. For a vegetarian dish, keep the feta and mozzarella. Both add creamy texture and flavor. If you want a vegan option, use plant-based cheese. Look for brands that melt well. You can also add more veggies. Try bell peppers, zucchini, or artichokes. They add color and taste. Cheese is key to good quesadillas. Feta and mozzarella work great together. But you can mix it up! Try goat cheese for a tangy kick. Provolone adds a nice stretch. Or use cheddar for a sharper flavor. Each cheese gives a new twist to your dish. Experiment with what you like best! Want to add protein? Chicken and shrimp are both great choices. Cook chicken breast and shred it. Mix it with your cheese and veggies. For shrimp, sauté them in olive oil until pink. Then mix them in. This adds heartiness to your quesadillas. You can even use leftover grilled meats. Just chop them up and throw them in! For the full recipe, check out the details provided above. To keep your Mediterranean quesadillas fresh, let them cool down first. Wrap each quesadilla in plastic wrap or foil. You can also place them in an airtight container. Store them in the fridge for up to three days. This way, you can enjoy them later without losing flavor. When you’re ready to eat the leftovers, reheating is simple. Heat a skillet over medium heat. Place the quesadilla in the skillet for about 2-3 minutes on each side. This keeps them crispy. You can also use a microwave, but they may get a bit soggy. To avoid this, use a paper towel to absorb moisture. If you want to save quesadillas for even longer, freezing is a great option. After cooling, wrap them tightly in plastic wrap. Then, place them in a freezer bag. Make sure to remove as much air as possible. You can freeze them for up to three months. When you are ready to eat, thaw them in the fridge overnight before reheating. This will help keep the taste fresh. Enjoy your Mediterranean quesadillas anytime! For the full recipe, check the earlier section. Yes, you can make Mediterranean quesadillas ahead of time. Prepare them as you normally would, then cool them completely. Wrap each quesadilla in plastic wrap or foil. Store them in the fridge for up to 2 days. When you’re ready to eat, just reheat them in a skillet until warm and crispy. Many sauces work well with Mediterranean quesadillas. Here are a few tasty options: - Tzatziki sauce - Hummus - Roasted red pepper sauce - Garlic aioli These sauces add extra flavor and enhance the dish's Mediterranean vibe. Traditional quesadillas use flour tortillas, which are not gluten-free. However, you can easily make them gluten-free. Just use corn tortillas or gluten-free wraps. Always check the labels to ensure they are certified gluten-free. This way, everyone can enjoy this delicious meal! In this post, we covered everything about Mediterranean quesadillas. We explored the best ingredients, preparation steps, and cooking tips. You learned about useful substitutions and how to store leftovers. We also discussed tasty variations and answered key questions, like gluten-free options. Ultimately, making these quesadillas can be fun and rewarding. With the right ingredients and methods, you can create a dish that everyone will love. Enjoy your cooking!

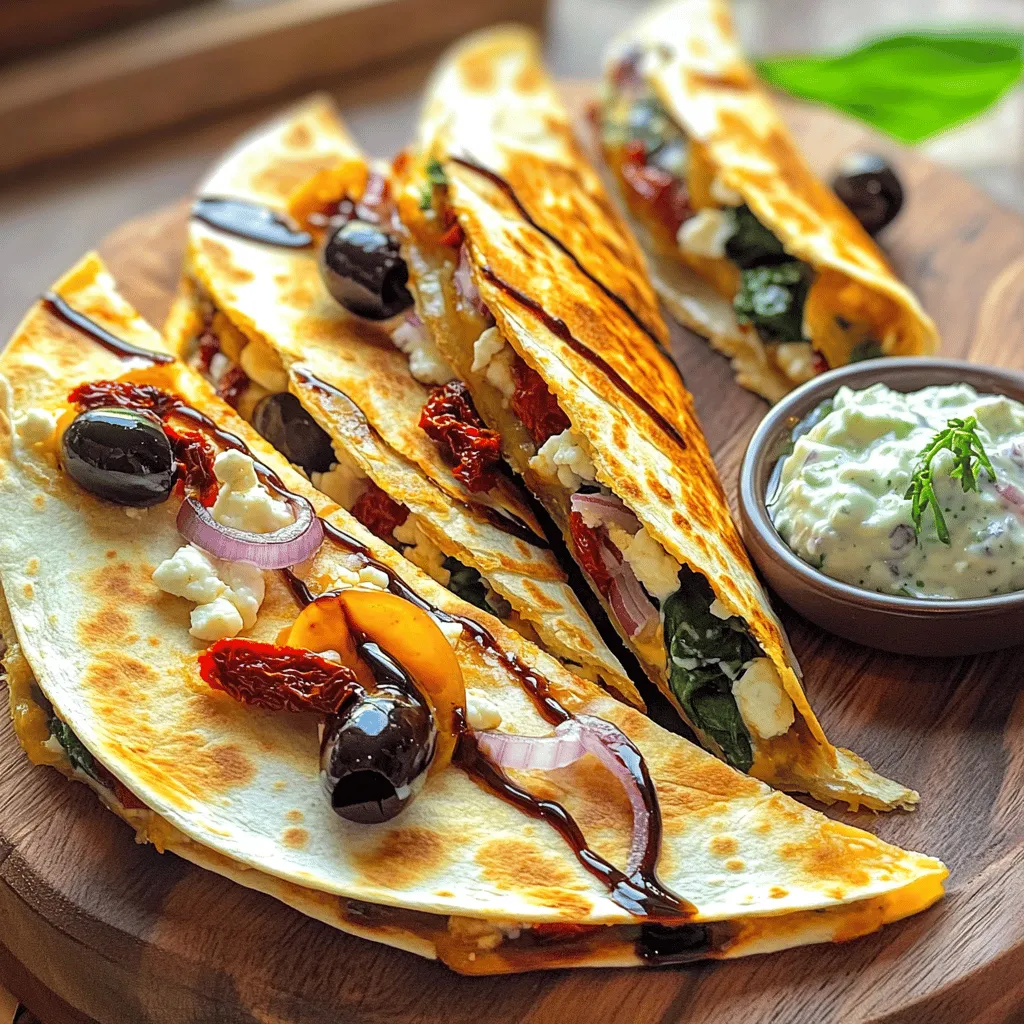
Looking for a quick, tasty meal? Mediterranean quesadillas are the answer! This simple recipe blends fresh ingredients with bold flavors. You can make them your own by using various cheeses …

Read more

Categories Appetizers

Easy After School Snacks Fun and Quick Recipes

July 28, 2025 by Chef Jamie
To make this fun snack, gather these easy ingredients: - 1 large whole wheat tortilla - 2 tablespoons peanut butter - 1 medium banana, peeled - 1 tablespoon honey - 1 tablespoon chia seeds (optional) - A sprinkle of cinnamon Let’s break down why each ingredient is great for you: - Whole wheat tortilla: This has fiber for digestion and keeps you full. - Peanut butter: Packed with protein and healthy fats, it gives you energy. - Banana: This fruit provides potassium and helps with muscle function. - Honey: A natural sweetener that adds flavor and has antioxidants. - Chia seeds: These tiny seeds are full of omega-3s and fiber (optional). - Cinnamon: This spice adds taste and can help with blood sugar levels. If you have allergies, here are some swaps: - Replace peanut butter with almond or sunflower seed butter. - Use a gluten-free tortilla for those who can’t have wheat. - If you can’t have honey, try maple syrup or agave nectar. - Skip chia seeds if you have a seed allergy; they are optional. For the full recipe, check out Peanut Butter Banana Sushi. Start by laying the whole wheat tortilla flat. Make sure it is clean and smooth. This flat surface helps with even rolling. If the tortilla is cold, warm it slightly in the microwave for ten seconds. A warm tortilla is easier to roll without tearing. Use a spatula or a butter knife to spread peanut butter. Scoop a generous amount and place it in the center. Start from the middle and spread outwards. Cover the entire tortilla, leaving a small edge at the top. This edge will help seal the roll later. Place the banana at the bottom edge of the tortilla. Drizzle honey over the banana for sweetness. Start rolling tightly from the bottom. Keep the filling inside as you roll. Once you reach the edge, press it to seal. Use a sharp knife to slice it into 1-inch pieces. These pieces will look like sushi rolls. Enjoy your fun and tasty snack! To make snack prep fun, get the kids involved. Let them help with steps like spreading peanut butter or rolling the tortilla. Use colorful plates to serve the snacks. Play upbeat music while you cook together. Make it a game to see who can make the neatest roll. This turns snack time into a fun family activity. You can store leftover peanut butter banana sushi in an airtight container. Keep it in the fridge for up to two days. If you plan to eat it later, avoid adding honey until serving. This keeps the sushi fresh and tasty. Always slice it before storage; it makes it easy for kids to grab a piece. To boost the flavor, try adding toppings! You can drizzle more honey or sprinkle nuts on top. Consider adding shredded coconut or chocolate chips for a sweet twist. You might also try a dash of nutmeg or a few slices of strawberries. These simple changes keep the snack exciting and new every time you make it. {{image_2}} You can change the filling to match what you like. Try using almond butter instead of peanut butter. It gives a nutty flavor. For a fruity twist, add berries or apple slices inside the tortilla. These options keep it fun and fresh. If you want a savory taste, use cream cheese with veggies. Carrots or cucumbers add crunch and flavor. Not all tortillas are the same. You can use flavored tortillas to boost taste. Spinach or tomato tortillas add a nice color and flavor. You can even find garlic or herb tortillas in stores. These wraps can make your sushi look great and taste even better. Each bite becomes a new surprise! Dipping sauces can make your snack even more exciting. Try honey or yogurt for a sweet touch. For a savory kick, mix soy sauce with a bit of sesame oil. You can create a spicy dip using sriracha and mayonnaise. Each sauce adds a new layer of taste to your peanut butter banana sushi. Experiment with different dips to find your favorite combo. For the full recipe, check out the Peanut Butter Banana Sushi section. To keep your peanut butter banana sushi fresh, wrap it well. Use plastic wrap or a resealable bag. Store it in the fridge for up to three days. This way, the tortilla stays soft, and the banana does not brown too fast. Always check for freshness before eating. You can freeze the sushi too! Slice the rolls first, then wrap each piece in plastic wrap. Place them in a freezer-safe bag. They can last for up to two months. When you want a snack, just thaw them in the fridge overnight. Enjoy them cold or let them sit for a few minutes. A good container can help keep your snacks safe. Use airtight containers to avoid moisture. Glass or BPA-free plastic containers work well. Make sure they are the right size for your snacks. This will help keep them fresh and tasty for whenever you get hungry! You can try yogurt parfaits, fruit kabobs, or cheese and crackers. These are quick to make. You can mix yogurt with granola and berries for a tasty treat. For fruit kabobs, use fresh fruit on skewers. Kids enjoy picking their favorites. Cheese and crackers offer a nice balance of protein and carbs. To make it healthier, use almond or sunflower butter instead of peanut butter. You can also swap the whole wheat tortilla for a spinach or cauliflower wrap. This adds extra nutrients. Adding sliced strawberries or apples gives more flavor and vitamins. You can reduce honey to cut down on sugar. Yes, you can prepare these snacks ahead of time. Make the sushi rolls and store them in an airtight container. Keep them in the fridge for up to two days. You can slice the rolls before serving. This saves time after school. Some quick dips include yogurt, hummus, or a simple fruit dip. You can mix yogurt with a little honey and cinnamon. Hummus pairs well with veggie sticks. A fruit dip can be made with cream cheese and marshmallow fluff. These dips add fun flavors. Yes, you can use sunbutter or soy nut butter as nut-free options. These spreads work well in place of peanut butter. They still offer a creamy texture and flavor. Try these if allergies are a concern. Add some protein-rich foods like sliced hard-boiled eggs or Greek yogurt. You can also serve the sushi with a side of trail mix. This boosts the energy level and keeps kids full longer. Absolutely! You can use apples, strawberries, or even peaches. Just be sure to adjust the sweetness if needed. Each fruit brings its own flavor and nutrition. This keeps the snack exciting and fun. Peanut butter banana sushi is a fun and easy snack to make. We covered the needed ingredients, their benefits, and how to adapt the recipe for allergies. The step-by-step instructions make rolling a breeze. I shared tips to make prep fun and how to store leftovers. You can also try various fillings and fun sauces to mix it up. With these ideas, you can enjoy this tasty treat anytime. Now, get creative and enjoy making your own sushi snack!

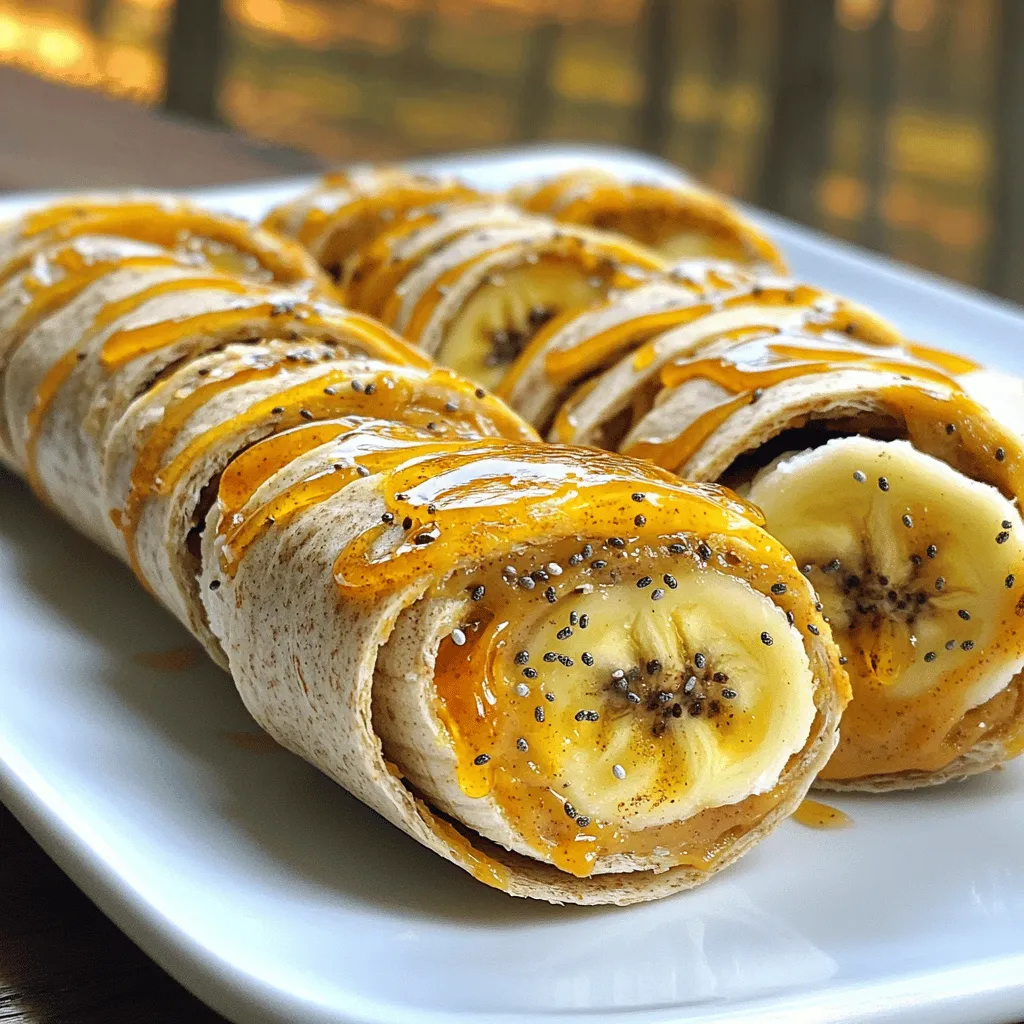
Are you on the hunt for quick and fun after-school snacks? You’re in the right place! I’ll share simple recipes that kids will love, like Peanut Butter Banana Sushi. These …

Read more

Categories Breakfast

Fresh Marinara Sauce Simple and Flavorful Recipe

July 28, 2025 by Chef Jamie
To make fresh marinara sauce, you need simple, fresh ingredients. Here is what you will need: - 2 lbs ripe tomatoes, preferably Roma or vine-ripened - 4 cloves garlic, minced - 1 medium onion, finely chopped - 1/4 cup extra-virgin olive oil - 1 teaspoon dried oregano - Salt, to taste - Freshly cracked black pepper, to taste - Fresh basil leaves, roughly chopped (about 1/2 cup) These ingredients create a rich and flavorful sauce that enhances any dish. You can add a few optional ingredients to boost flavor. These include: - 1/2 teaspoon red pepper flakes (for heat) - 1 tablespoon sugar (to balance acidity) These ingredients let you customize the sauce to your taste. When choosing your ingredients, freshness is key. Here are some tips: - Tomatoes: Look for ripe tomatoes that feel heavy for their size. They should have a sweet smell. - Garlic: Choose firm bulbs with no soft spots. Fresh garlic adds great flavor. - Onion: Select onions that are firm and heavy. Avoid any with soft spots or blemishes. - Basil: Use fresh basil with vibrant green leaves. Avoid any yellow or wilting leaves. By selecting high-quality ingredients, you ensure your marinara sauce is the best it can be. Start by preparing the tomatoes. Fill a large pot with water and bring it to a boil. Take your ripe tomatoes, and make a small 'X' on the bottom of each. Once the water is boiling, carefully add the tomatoes. Blanch them for 30 seconds. This step helps with peeling. After that, transfer them to a bowl of ice water. Let them cool for a few minutes. Now, remove the skins. You can chop them roughly and remove the seeds if you want a smoother sauce. Next, heat a large skillet or saucepan over medium heat. Pour in the extra-virgin olive oil. Once hot, add the finely chopped onion. Stir and cook it until soft and translucent, about 5 to 7 minutes. It should smell sweet and fragrant. After the onion is ready, add minced garlic and red pepper flakes if you like heat. Cook for 1 to 2 minutes. Keep an eye on the garlic; you don’t want it to burn. Now it's time for the tomatoes. Pour the chopped tomatoes into the pan and stir. Bring the mix to a gentle simmer. After that, add dried oregano, salt, and black pepper. If you find the sauce too acidic, add a tablespoon of sugar. Let the sauce simmer uncovered for 20 to 30 minutes. Stir it occasionally. This will help it thicken nicely. In the last few minutes, add the roughly chopped fresh basil. Taste the sauce and adjust the seasoning if needed. Once done, let it cool slightly before serving or storing. This recipe is simple and packed with flavor. Enjoy your homemade marinara sauce! One common mistake is using low-quality tomatoes. Always choose ripe, fresh tomatoes. They give the best taste. Another mistake is adding too much garlic at once. Garlic can burn fast, which makes the sauce bitter. Stir it in just before the tomatoes. To enhance your sauce, balance the acidity. A pinch of sugar can help. Fresh herbs brighten the flavor. Add basil towards the end of cooking for a fresh taste. You can also mix in some red pepper flakes for heat, but keep it mild if you prefer. If your sauce is too thick, add a splash of water. For a thicker sauce, let it simmer longer. Stir often to prevent sticking. Blend the sauce if you want a smoother texture. Adjusting the consistency is easy once you know how! {{image_2}} To make spicy marinara, add more red pepper flakes. Start with one teaspoon. If you like it hotter, add more to taste. You can also use fresh chili peppers. Chop them finely and add them when cooking the onion. This gives your sauce a nice kick. Making a vegan version is easy! Simply use the basic fresh marinara recipe. All the ingredients are plant-based. Just ensure your sugar is vegan-friendly. Optional ingredients like nutritional yeast can add a cheesy flavor without using dairy. This keeps your sauce rich and tasty. You can enhance your marinara with extra ingredients. Try adding a splash of red wine. This gives depth to the flavor. Fresh herbs like thyme or parsley also work well. For a touch of sweetness, consider adding grated carrot. It blends well and boosts nutrition. Use the full recipe for classic fresh marinara sauce to get started. Mixing and matching these variations can help you find your perfect taste. To keep your fresh marinara sauce tasty, let it cool first. Once cool, transfer it to airtight containers. Glass jars or plastic containers work well. Store it in the fridge for up to five days. This way, you can enjoy it in pasta or on pizza anytime. Freezing is a great option for longer storage. Pour the sauce into freezer-safe containers, leaving space at the top. The sauce expands as it freezes. You can also use freezer bags, laying them flat to save space. Marinara sauce can stay fresh in the freezer for up to three months. To use, thaw it overnight in the fridge or place the bag in cold water. Reheating marinara sauce is simple. Use a pot on low heat, stirring often. You can also microwave it in short bursts, stirring in between. Add a splash of water or broth if it looks too thick. Leftover marinara sauce can be used in many meals. Try it with pasta, as a pizza base, or in meat dishes. The versatility makes it a kitchen staple. You can make marinara sauce using canned tomatoes. Start by draining the tomatoes. Crush them in a bowl or use a food processor for a smoother texture. Heat olive oil in a pan. Add chopped onions, cooking until soft. Then, add minced garlic and cook for a minute. Pour in the crushed tomatoes. Season with salt, pepper, and herbs. Let it simmer for about 20 minutes. This will give the sauce a rich flavor. Yes, you can use various tomatoes for marinara sauce. Roma tomatoes are common due to their low water content. However, you can also use vine-ripened, San Marzano, or even heirloom tomatoes. Each type brings a unique flavor. Just make sure they are ripe and sweet for the best taste. Marinara sauce pairs well with many dishes. Here are some ideas: - Pasta: Spaghetti or penne are classic choices. - Pizza: Use it as a base sauce for homemade pizza. - Dipping: Serve with garlic bread or mozzarella sticks. - Meatballs: A hearty addition to your meatball subs. - Veggies: Pour over roasted vegetables for a tasty twist. To make my classic fresh marinara, gather these ingredients: - 2 lbs ripe tomatoes, preferably Roma or vine-ripened - 4 cloves garlic, minced - 1 medium onion, finely chopped - 1/4 cup extra-virgin olive oil - 1 teaspoon dried oregano - 1/2 teaspoon red pepper flakes (optional for heat) - Fresh basil leaves, roughly chopped (about 1/2 cup) - Salt, to taste - Freshly cracked black pepper, to taste - 1 tablespoon sugar (optional, to balance acidity) Follow the cooking steps in the full recipe to enjoy a rich and vibrant marinara sauce. You learned how to make fresh marinara sauce from scratch. We covered essential and optional ingredients, cooking steps, and common mistakes. Remember to select fresh tomatoes for the best flavor. You can also try spicy or vegan variations to mix things up. Proper storage is key for keeping your sauce tasty. With all this, you'll create delicious marinara sauce every time. Enjoy experimenting and sharing your sauce with others. Trust your taste. Happy cooking!

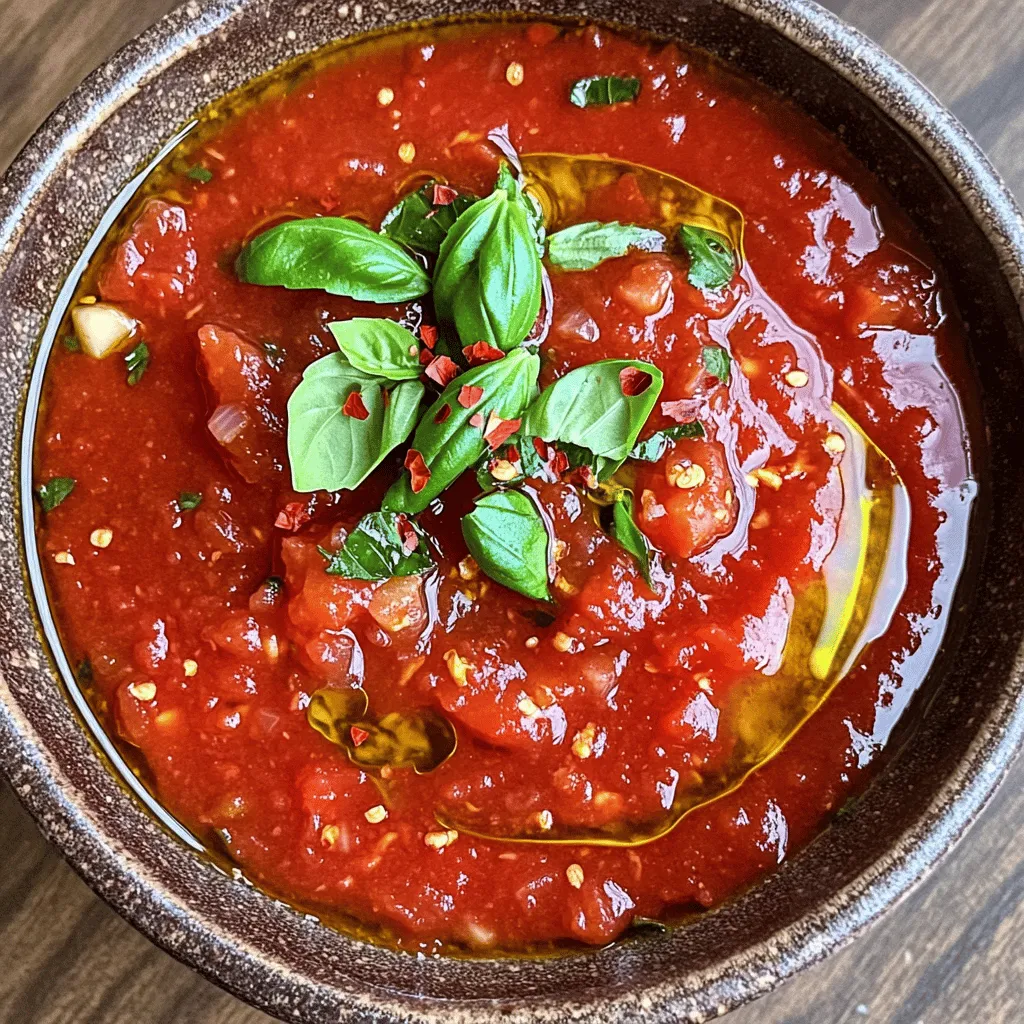
Are you ready to take your pasta nights to the next level? This Fresh Marinara Sauce recipe is simple and packed with flavor! I’ll guide you through choosing the best …

Read more

Categories Dinner
Older posts
Newer posts
← Previous Page1 … Page62 Page63 Page64 … Page134 Next →

TOSSED RECIPES

Simple meals, bold taste. Quick recipes made for real life — always fresh, always delicious. 🌿🍴

PAGES

Home About Contact Privacy Policy Terms & Conditions Cookie Policy GDPR Policy Copyright Policy Disclaimer

CATEGORIES

Appetizers Desserts Salads Breakfast Dinner

Contact

  • Pinterest
  • Mail
Copyright © 2026 Tossed Recipes. All rights reserved.