Pumpkin Cinnamon Rolls with Brown Butter Frosting Delight

Get ready to savor fall with my Pumpkin Cinnamon Rolls! These rolls are soft, sweet, and bursting with pumpkin flavor. Topped with rich brown butter frosting, they’re hard to resist. …

![To make these tasty muffins, gather the following ingredients: - 2 cups all-purpose flour - 1/2 cup granulated sugar - 1 tablespoon baking powder - 1/2 teaspoon salt - 1/2 teaspoon ground cinnamon - 1/2 cup unsalted butter, melted - 1 cup milk - 2 large eggs - 1 teaspoon vanilla extract - 1/2 cup brown sugar, packed - 1 tablespoon ground cinnamon (for swirl) - 1/4 cup powdered sugar (for icing) - 2 tablespoons milk (for icing) Each ingredient plays a key role in the recipe. For flour, you can use whole wheat flour for a healthier option. If you need a dairy-free choice, almond milk works well instead of regular milk. You may swap granulated sugar with coconut sugar for a different sweetness. If you follow a gluten-free diet, use a gluten-free flour blend. To make this recipe vegan, replace eggs with flax eggs and use plant-based milk and butter. These swaps allow you to enjoy cinnamon roll muffins while sticking to your dietary needs. To start, gather your ingredients for the Easy Cinnamon Roll Muffins. Preheat your oven to 375°F (190°C). Line a muffin tin with paper liners or grease it to prevent sticking. In a large bowl, whisk together 2 cups of all-purpose flour, 1/2 cup of granulated sugar, 1 tablespoon of baking powder, 1/2 teaspoon of salt, and 1/2 teaspoon of ground cinnamon. Mix well until everything is combined. In another bowl, mix 1/2 cup of melted unsalted butter, 1 cup of milk, 2 large eggs, and 1 teaspoon of vanilla extract until smooth. Pour the wet mixture into the dry ingredients. Stir gently until just combined; the batter should remain slightly lumpy. Avoid overmixing, as that can make your muffins tough. Now, fill each muffin cup about halfway with the batter. This gives room for the muffins to rise. Next, sprinkle a generous teaspoon of the cinnamon-brown sugar mixture on top of each muffin. Add more batter until each cup is about 3/4 full. Make sure to finish with the remaining cinnamon-brown sugar mixture on top. Bake the muffins for 18-20 minutes. Check doneness by inserting a toothpick into the center; it should come out clean. While the muffins bake, prepare the cinnamon swirl. In a small bowl, mix 1/2 cup of packed brown sugar with 1 tablespoon of ground cinnamon. This mixture gives the muffins a sweet and spicy flavor. For the icing, combine 1/4 cup of powdered sugar with 2 tablespoons of milk until smooth. Once the muffins cool slightly in the tin, drizzle the icing over them. This adds a sweet touch to your treat. You can find the full recipe at the end of this article. Enjoy your delicious muffins! For fluffy muffins, use fresh baking powder. Old baking powder can make muffins flat. Always measure flour correctly. Too much flour can lead to dry muffins. Spoon flour into your measuring cup and level it off with a knife. Mixing the batter should be gentle. Stir until just combined, and leave lumps. A common mistake is overmixing the batter. This makes muffins tough instead of fluffy. Don’t skip the cinnamon swirl; it adds great flavor. Also, ensure your oven is at the right temperature. An oven thermometer can help check this. Lastly, let muffins cool in the pan for a few minutes before moving them. This helps them stay moist. You can boost flavor with fun add-ins. Try adding chocolate chips or nuts to the batter. For a twist, mix in dried fruit like raisins or cranberries. You can also use different spices, like nutmeg or cardamom, for added warmth. If you love a sweeter touch, drizzle honey or maple syrup on top. These add-ins make your Easy Cinnamon Roll Muffins even more special. For the complete recipe, check the [Full Recipe]. {{image_2}} You can change the flavor of your muffins easily. Try adding a splash of almond extract for a nutty twist. You can also swap out the cinnamon for pumpkin spice. This gives a warm, fall vibe to your muffins. For a chocolatey treat, add cocoa powder to the batter. You can fold in chocolate chips for an extra sweet bite. Making these muffins gluten-free is simple. Use a gluten-free flour blend instead of all-purpose flour. Make sure to check the packaging for the right measurements. You may need to add a little extra baking powder. This helps the muffins rise well and stay fluffy. Your friends won’t even taste the difference! Fruits and nuts add great texture and flavor. You can mix in chopped apples or mashed bananas for natural sweetness. Blueberries or raspberries work well too! If you love nuts, throw in some chopped walnuts or pecans. This gives a nice crunch. Just remember to adjust the sugar if you add sweet fruits. For the full recipe, check the above list of ingredients. Enjoy your baking! To keep your cinnamon roll muffins fresh, store them in an airtight container. Layer parchment paper between the muffins to prevent them from sticking together. They stay good for about 2 to 3 days at room temperature. If you want to keep them longer, refrigeration helps, but it can dry them out. Freezing is a great way to save muffins for later. First, let them cool completely. Wrap each muffin tightly in plastic wrap or foil. Then, place them in a freezer-safe bag. They can last up to 3 months in the freezer. When you're ready to eat, just take out a muffin and let it thaw at room temperature. To reheat frozen or refrigerated muffins, use your oven or microwave. For the oven, preheat it to 350°F (175°C). Place the muffins on a baking sheet and warm them for about 10 minutes. For the microwave, heat each muffin for about 15 to 20 seconds. This will make them soft and warm again, just like fresh! Easy Cinnamon Roll Muffins stay fresh for about three days at room temperature. Keep them in an airtight container. If you want them to last longer, you can refrigerate them. They will stay good for up to a week in the fridge. Just be sure to let them cool completely before storing. Yes, you can make these muffins ahead of time! You can bake them a day before you need them. Just store them in an airtight container. If you want to prep further, you can mix the dry and wet ingredients separately. Combine them just before you bake for the best texture. Dense muffins often come from overmixing the batter. When you mix too much, you develop gluten, making the muffins tough. Make sure to stir until just combined. Also, check your baking powder. If it’s old or expired, it may not rise well, leading to density. Always use fresh ingredients for the best results. These Easy Cinnamon Roll Muffins combine simple ingredients with easy steps. You learned about key measurements, special dietary needs, and ways to enhance flavor. I shared tips for fluffy muffins and mistakes to avoid. You also explored fun flavor variations and how to store muffins for later. Enjoy your baking, and don't hesitate to try new ingredients and techniques. Delicious cinnamon roll muffins await you!](https://tossedrecipes.com/wp-content/uploads/2025/07/e796e9af-1c83-43de-965e-79547208c201.webp)


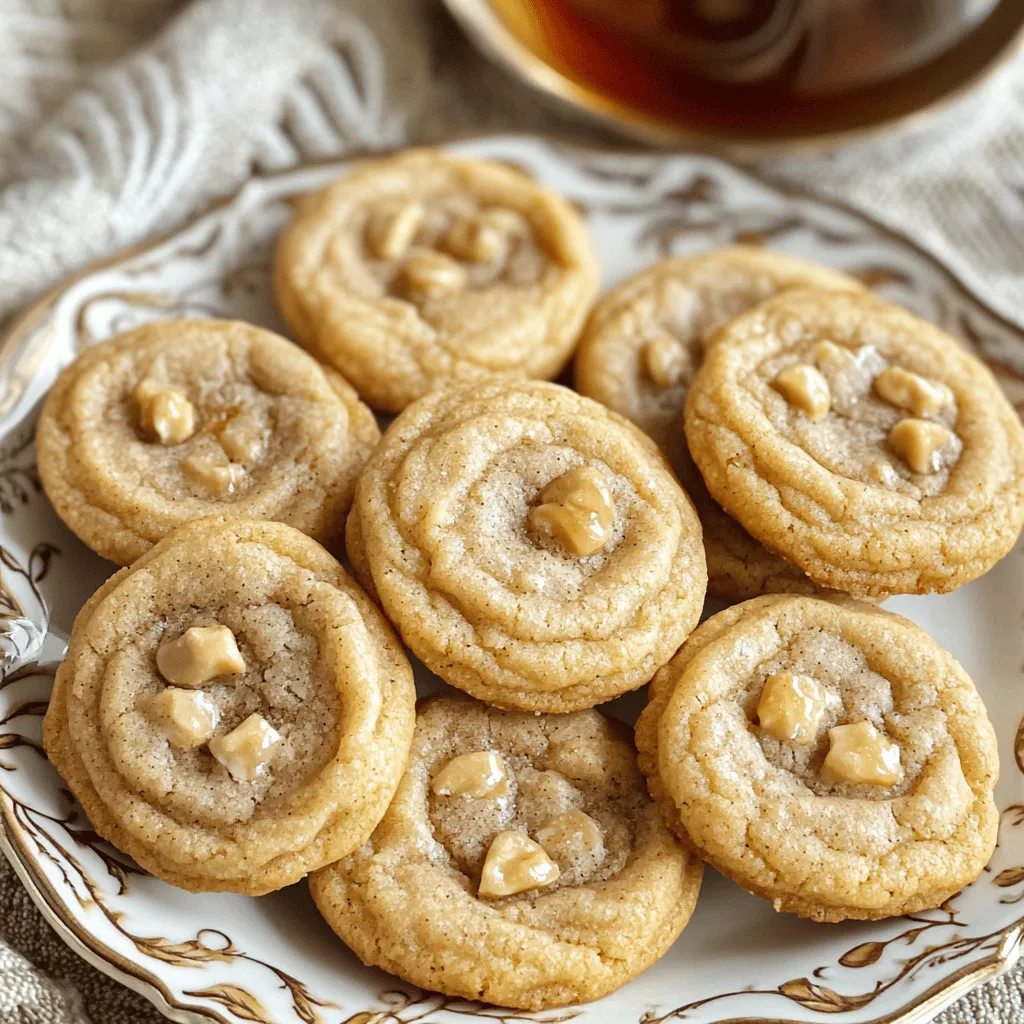
![- 1 cup canned pumpkin puree - 1/2 cup almond butter (or any nut butter) - 1/4 cup maple syrup or honey - 1 teaspoon vanilla extract - 1 1/2 cups whole wheat flour - 1 teaspoon baking soda - 1 teaspoon baking powder - 1 teaspoon cinnamon - 1/2 teaspoon nutmeg - 1/4 teaspoon salt - 1/2 cup dark chocolate chips (preferably dairy-free) - 1/4 cup walnuts or pecans, chopped (optional) These ingredients come together to create a delightful treat. Each one serves a purpose. For example, canned pumpkin puree is the star. It adds moisture and flavor. Plus, it's packed with vitamins. Almond butter takes the place of traditional butter. It brings healthy fats and a nutty taste. I love using it because it keeps the cookies soft and chewy. The maple syrup or honey adds just the right sweetness. You can swap these for agave syrup if needed. Whole wheat flour is a great choice. It gives the cookies a hearty texture and adds fiber too. The baking soda and baking powder help the cookies rise. Cinnamon and nutmeg add warmth and spice, making each bite tasty. Dark chocolate chips are a sweet surprise. They melt perfectly, creating a rich flavor. If you want a little crunch, add walnuts or pecans. They offer a nice contrast to the soft cookie. Pumpkin puree is more than just tasty. It is high in fiber and vitamins A and C. These nutrients support eye health and boost the immune system. Using almond butter is a wise choice. It is lower in carbs and higher in protein than regular butter. This makes the cookies more filling and nutritious. Whole wheat flour is better than white flour. It keeps you feeling full longer. It also adds nutrients like iron and magnesium. These benefits make these cookies a healthier option. If you need alternatives, here are some ideas. You can use honey or agave syrup instead of maple syrup. They provide the same sweetness. For nut allergies, try sunflower seed butter or tahini. These options still keep the cookies creamy. If you want a gluten-free version, use almond flour or coconut flour. Just remember, these flours may need other adjustments in baking time. You can find the full recipe for these tasty cookies [Full Recipe]. Enjoy baking! - Preheat your oven to 350°F (175°C). - Line a baking sheet with parchment paper. - In a large bowl, combine the pumpkin puree, almond butter, maple syrup, and vanilla extract. Mix well until smooth. - In another bowl, whisk together the whole wheat flour, baking soda, baking powder, cinnamon, nutmeg, and salt. Mix until well combined. - Use a tablespoon to scoop out cookie dough. Place each scoop on the baking sheet, leaving space between cookies. - Bake for 10-12 minutes. The edges should turn lightly golden. Check if they look soft; they will firm up while cooling. Follow these steps for the BEST Healthy Pumpkin Chocolate Chip Cookies. For the full recipe, refer to the previous section. To avoid overmixing the dough, mix your ingredients until just combined. This keeps the cookies soft and tender. If you mix too much, the cookies can become tough. I suggest using a spatula to fold in your dry ingredients gently. For the perfect chewiness, make sure to use almond butter. This nut butter adds moisture and richness. Also, let the dough rest for about 10 minutes before baking. This small step helps the cookies rise nicely and gives them a great texture. You can add spices like ginger or cloves for a fun twist. A splash of orange extract can brighten the flavor too. Mix in chopped nuts or dried fruits for extra texture. Try walnuts or even dried cranberries for a fruity touch. If you want more chocolate, add more chocolate chips or try using white chocolate chips. This adds a different flavor that pairs perfectly with pumpkin. These cookies are great on their own, but you can make them special. Serve them warm with a scoop of vanilla ice cream. The warm cookie and cold ice cream make a great combo. Pair your cookies with a hot cup of tea or coffee for a cozy treat. You can also stack the cookies and sprinkle some cinnamon on top. This makes for a beautiful presentation. If you want to impress guests, serve them on a decorative plate. {{image_2}} You can make these cookies gluten-free! Use almond flour or coconut flour instead of whole wheat flour. Almond flour gives a nutty taste, while coconut flour adds a slight sweetness. When switching flours, you may need to bake a little longer. Start with an extra two minutes and check for doneness. Want to make the cookies vegan? It’s simple! Replace the egg with a flax egg. Mix one tablespoon of flaxseed meal with three tablespoons of water. Let it sit for five minutes until it thickens. This will bind the cookies and keep them moist. Get creative with flavors! You can add dried fruits like cranberries or apricots for a chewy texture. Nuts like pecans or almonds also add a nice crunch. If you want a twist on chocolate chips, try white chocolate or butterscotch chips. These options give your cookies a unique taste that everyone will love! For the complete recipe, follow this link to [Full Recipe]. To keep your cookies fresh, store them in a sealed container. A glass or plastic container works well. Line the bottom with parchment paper to prevent sticking. Keep the cookies at room temperature, away from heat or sunlight. This helps maintain their soft texture. You can freeze cookie dough for later use. Scoop the dough into balls and place them on a baking sheet. Freeze them for about an hour until firm. Once frozen, transfer the balls to a freezer-safe bag. When you’re ready to bake, simply thaw the dough overnight in the fridge. Bake as directed from the Full Recipe. These cookies last about five days at room temperature. To extend freshness, keep them in an airtight container. You can also store them in the fridge for up to two weeks. If you notice any moisture, add a slice of bread to the container. This keeps the cookies soft and tasty. Yes, you can! There are great sugar substitutes. You can use stevia, monk fruit sweetener, or applesauce. Each option adds sweetness without refined sugar. For this recipe, use 1/4 cup of your chosen substitute. Remember, some substitutes may change the flavor. Always taste test to ensure it fits your liking. To make these cookies chewier, add more moisture. You can do this by increasing the almond butter or pumpkin puree by a tablespoon. Another trick is to bake them for a shorter time. Check them at 10 minutes. The cookies should look soft but firm up as they cool. Avoid overmixing the dough, as it can create a dense texture. Absolutely! These cookies are a great snack for kids. They contain whole grains and healthy fats. Pumpkin adds vitamins and fiber, making them nutritious. Plus, kids love chocolate chips! You can also limit the chips for less sugar. They are a fun way to get kids excited about healthy snacks. In this article, we covered the essential ingredients and steps for making delicious pumpkin chocolate chip cookies. I shared tips for ingredient substitutes and variations to meet different diets. Proper storing methods ensure they stay fresh. These cookies are healthy and fun to make. You can enjoy them as a snack or dessert. With a few tweaks, they can fit any dietary need. Happy baking!](https://tossedrecipes.com/wp-content/uploads/2025/07/58649165-c7ae-46b4-8704-05ad37b54a51.webp)
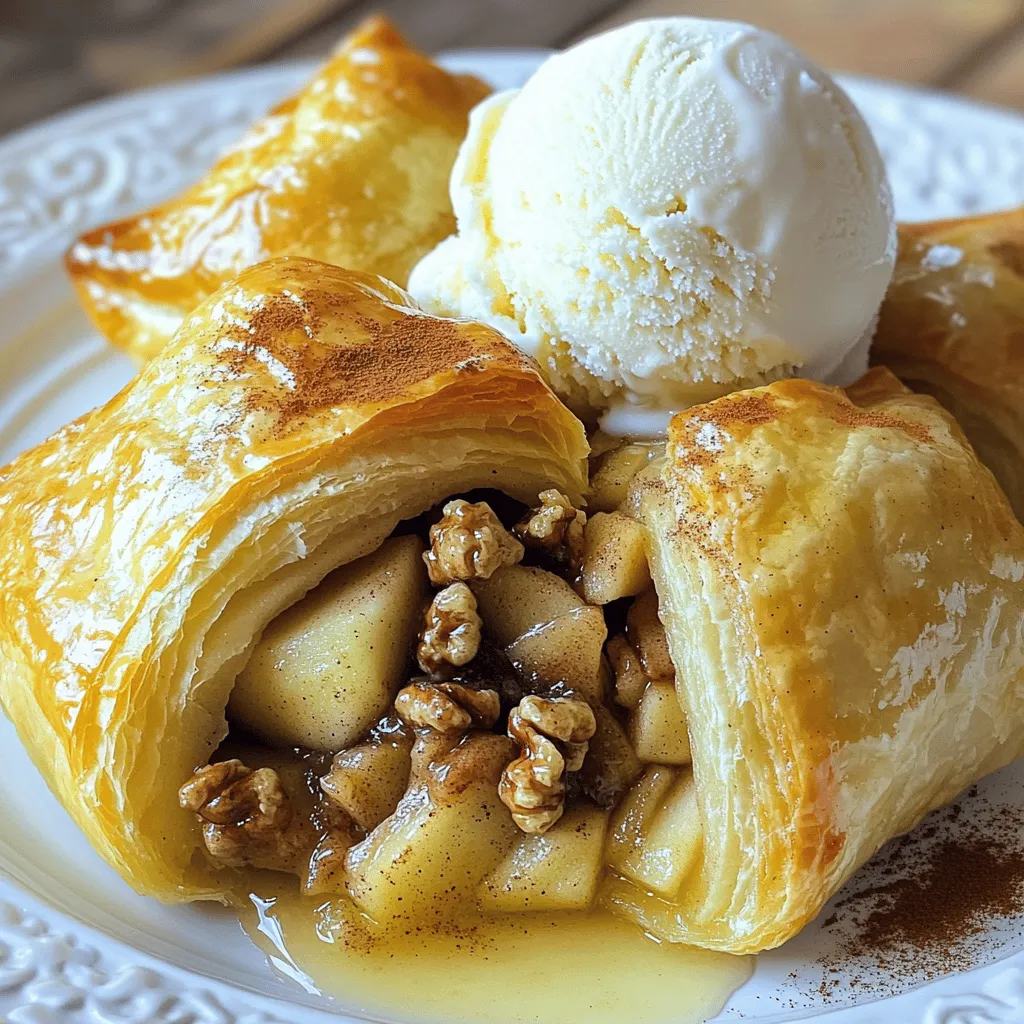

![- 3 large Granny Smith apples, peeled, cored, and sliced - 1 cup brown sugar - 2 tablespoons all-purpose flour - 2 teaspoons ground cinnamon - 1/4 teaspoon nutmeg - 1 tablespoon lemon juice - 1 teaspoon vanilla extract - 1 pre-made pie crust (store-bought or homemade) - 2 tablespoons unsalted butter, cut into small pieces - Vanilla ice cream (for serving) - Fresh mint leaves (for garnish) - Alternative Apples: You can use Honeycrisp or Fuji apples for a sweeter taste. These apples add a nice twist to the flavor. - Sugar Substitutes: If you prefer a healthier option, try using coconut sugar or maple syrup. These options can keep your pie just as tasty. - Gluten-Free Pie Crust: For a gluten-free version, use almond flour crust or a store-bought gluten-free crust. This way, everyone can enjoy the pie. These ingredients create a balanced and flavorful pie. The tartness of the apples pairs well with the sweetness of the brown sugar. The spices add warmth, making it hard to resist. If you want to learn how to make this delicious treat, check out the Full Recipe. To make the filling, start with the apples. Use 3 large Granny Smith apples. Peel, core, and slice them. Next, grab a large mixing bowl. Add the apple slices to the bowl. Now, sprinkle in 1 cup of brown sugar, 2 tablespoons of all-purpose flour, and 2 teaspoons of ground cinnamon. Don't forget 1/4 teaspoon of nutmeg for depth. Pour in 1 tablespoon of lemon juice and 1 teaspoon of vanilla extract. Toss everything together well. Make sure each slice gets coated evenly. This helps the flavors blend nicely. Now, let’s put the pie together. Take your pre-made pie crust and place it in a 9-inch pie dish. Spoon the apple filling into the crust. Spread it out evenly, so every slice gets a bit of everything. Next, cut 2 tablespoons of unsalted butter into small pieces. Dot these butter pieces on top of the apple filling. This adds richness and flavor as it bakes. If you have a second crust, cover the pie. Cut a few slits in it for steam to escape. If not, leave it open-faced and sprinkle extra cinnamon on top. Time to bake! Preheat your oven to 425°F (220°C). Place the pie in the oven and bake for 15 minutes. After that, lower the temperature to 350°F (175°C). Continue baking for another 30-35 minutes. Keep an eye on it. You want the apples to get tender and the crust to turn golden brown. To check for doneness, insert a fork into the filling. It should go in easily. Let the pie cool for at least 30 minutes before slicing. This helps the filling set. Enjoy your warm slice with a scoop of vanilla ice cream on top! Don't forget to check the [Full Recipe] for more details. To make a pie crust that is flaky and tender, use cold ingredients. Cold butter or shortening helps create layers in the dough. When mixing, handle the dough gently. Overworking it can make the crust tough. If you want to avoid a soggy bottom, blind bake your crust. This means you bake it for a few minutes before adding the filling. Use pie weights or dried beans to hold the crust down during baking. When it's time to plate your pie, cut slices carefully. A hot pie can be tricky, so let it cool first. To make it pretty, add a scoop of vanilla ice cream on top. A sprinkle of cinnamon adds a nice touch. You can also use fresh mint leaves for color. This makes your dessert look fancy and inviting. To store leftover pie, let it cool first. Once it cools, wrap it well in plastic. You can also use an airtight container. This keeps it fresh. If you want to reheat, place slices in the oven. Heat them at 350°F for about 10 minutes. This helps keep the crust crispy and the filling warm. Avoid using the microwave, as it can make the crust soggy. {{image_2}} You can make your cinnamon apple pie even better with some fun add-ins. Here are a couple of ideas: - Adding nuts for texture: Chopped walnuts or pecans give a nice crunch. Mix them in with your apple filling. They add a rich flavor that pairs well with the apples. - Incorporating dried fruits for extra sweetness: Dried cranberries or raisins can boost sweetness and flavor. Toss them in with the apples for a delightful surprise in every bite. If you have special diet needs, you can still enjoy this pie. Here are ways to adapt it: - Vegan adaptations: Use a plant-based butter instead of regular butter. You can also replace the ice cream with a dairy-free version. This way, everyone can enjoy the pie. - Low-carb options for a healthier version: Swap brown sugar for a sugar substitute like erythritol. Use an almond flour crust instead of a regular one. This keeps the taste while cutting carbs. Serving your pie can be as fun as making it. Here are some creative ideas: - Creative ways to serve à la mode: Instead of just a scoop of ice cream, try using a small ice cream cone on top of your pie slice. This makes it a fun treat! - Using plates vs. jars for dessert serving: You can serve pie in small jars for a rustic look. Layer the pie and ice cream in the jar for a charming dessert that’s easy to share. For more about making delicious cinnamon apple pie, check the Full Recipe. Store your leftover pie in an airtight container. This keeps it fresh. Place the container in the fridge. The pie can last for up to four days in the fridge. If you want to keep it longer, consider freezing it. To freeze pie slices, first, let the pie cool completely. Then, wrap each slice tightly in plastic wrap. Place the wrapped slices in a freezer bag or container. Remove as much air as possible before sealing. You can freeze apple pie for up to three months. To reheat, you can use an oven or microwave. For the oven, heat to 350°F (175°C). Place the pie slice on a baking sheet. Bake for about 10 to 15 minutes. If using a microwave, heat for about 30 seconds. Check if it's warm enough. To keep the pie's flavor and texture, avoid overheating. Cover the pie with foil in the oven. This helps it stay moist. Enjoy your warm pie with a scoop of vanilla ice cream! For the full recipe, check the earlier section. Yes, you can use different apples. Sweet apples add a rich flavor, while tart apples give a nice bite. Granny Smith apples are tart and work well in pies. If you prefer sweet apples, consider Fuji or Honeycrisp. Mixing sweet and tart apples can create a well-rounded taste. A perfectly baked pie shows a golden-brown crust. The filling should bubble at the edges. You can also check the apples. They should be tender but not mushy. If you insert a knife, it should slide in easily. Let the pie cool for 30 minutes after baking. Ice cream is a classic choice for this pie. Vanilla ice cream pairs well with warm apple pie. You can also serve it with whipped cream or a caramel drizzle. For drinks, consider warm cider or a cup of coffee. These options enhance the pie’s rich flavors. You can prepare the pie a day in advance. Assemble it and store it in the fridge. Just avoid baking until you are ready to serve. If you want to freeze it, wrap it tightly in plastic. Bake it straight from the freezer. Just add extra time to the baking. Yes, you can make this pie gluten-free. Use a gluten-free pie crust instead of regular flour crust. Many brands offer ready-made options. For the filling, check your ingredients. Ensure they are gluten-free, like the sugar and spices. Your pie will still taste great! This blog post walks you through making a delicious Cinnamon Apple Pie, from ingredients to serving. You learned about the perfect apple filling, crafting a flaky crust, and baking tips. I shared ways to customize your pie for different diets and taste preferences. Remember, the key is in how you prepare and serve. Enjoy this treat fresh or as leftovers, keeping them tasty when reheated. With a bit of care and some creativity, you can make this dessert really shine. Happy baking!](https://tossedrecipes.com/wp-content/uploads/2025/07/2f7d13ed-9a6c-47c5-914a-2f305fb11400.webp)