Crispy Chicken Caprese Flavorful and Easy Meal
![- 2 boneless, skinless chicken breasts - 1 cup breadcrumbs - 1/2 cup grated Parmesan cheese - 1 teaspoon Italian seasoning - 1/2 teaspoon garlic powder - Salt and pepper to taste - 1 cup fresh mozzarella balls (bocconcini), halved - 1 cup cherry tomatoes, halved - 1/4 cup fresh basil leaves, chopped - 2 tablespoons balsamic glaze - 2 tablespoons olive oil Crispy Chicken Caprese is a simple dish that bursts with flavor. You will love how fresh and vibrant it tastes. The chicken is juicy, and the toppings add a nice pop. You start with chicken breasts. They need to be boneless and skinless for easy cooking. The breadcrumbs give the chicken a crispy outer layer. Mixing in Parmesan cheese adds a rich flavor. Then, the additional spices come into play. Italian seasoning and garlic powder bring out the taste of the chicken. A pinch of salt and pepper helps balance everything. Next, we have the fresh ingredients. Fresh mozzarella balls make everything creamy. Cherry tomatoes provide sweetness and color. The basil brings a lovely herbal note. Finally, balsamic glaze adds a tangy finish that ties it all together. For the full recipe, make sure to check out the detailed instructions. This dish is quick to prepare and perfect for any meal. - Preheat your oven to 425°F (220°C). - Line a baking sheet with parchment paper. This step helps with easy cleanup. - In a shallow dish, combine the breadcrumbs, grated Parmesan cheese, Italian seasoning, garlic powder, salt, and pepper. Mix well to ensure even flavor. - Pat the chicken breasts dry with paper towels. This helps the coating stick better. - Season both sides of the chicken with salt and pepper. A little seasoning goes a long way. - Dredge each chicken breast in the breadcrumb mixture. Press down firmly to coat evenly. This ensures a crispy crust. - Place the coated chicken breasts on the prepared baking sheet. Drizzle with olive oil for added flavor and moisture. - Bake in the preheated oven for 20-25 minutes. The chicken should be golden brown and reach an internal temperature of 165°F (74°C). - While the chicken is baking, combine the halved mozzarella balls, cherry tomatoes, and chopped basil in a bowl. Toss lightly to mix. This fresh topping brightens the dish. - Once the chicken is done, remove it from the oven. Let it rest for a few minutes to keep it juicy. - Top each crispy chicken breast with the tomato and mozzarella mixture. Drizzle with balsamic glaze for a sweet finish. - Serve immediately to enjoy this delightful combination of flavors. For the full experience, pair it with a fresh salad or pasta. To achieve a perfect crispy texture, you need to use dry chicken. Pat the chicken breasts with paper towels to remove any moisture. This step helps the breadcrumbs stick better. When coating the chicken, press down firmly on the breadcrumbs. This ensures they adhere well and form a crunchy crust. Let the cooked chicken rest for a few minutes before serving. Resting allows the juices to settle, keeping the chicken moist and flavorful. If you cut into it right away, those juices will run out and make the coating soggy. You can enhance the flavor of your crispy chicken with extra spices. Try adding paprika for a smoky kick or cayenne pepper for heat. Fresh herbs, like thyme or oregano, can also boost the taste. When seasoning, adjust based on your preference. If you love garlic, add more garlic powder. If you prefer less salt, reduce it. You control the taste, so make it your own! Using the right tools can make your cooking experience easier. A shallow dish is great for mixing breadcrumbs and cheese. A baking sheet lined with parchment paper helps with easy cleanup. A meat thermometer is essential for checking doneness. It ensures your chicken reaches 165°F (74°C) without overcooking. Having these tools ready will make your cooking smoother and more enjoyable. For the full recipe, check out the detailed instructions and tips. {{image_2}} You can switch up the cheese in this dish for a new taste. Try using provolone or goat cheese for a different flavor. Both options add a nice creaminess. If you want a sharper taste, consider using aged cheddar. Adding more veggies can make your meal healthier. Try including spinach or arugula in the tomato mix. Zucchini or bell peppers also work well. They add color and crunch to your plate. The air fryer is great for making crispy chicken. It cooks faster and uses less oil. You’ll still get that perfect crunch. For a more traditional method, bake the chicken in your oven. It gives a nice golden color and flavor. Grilling the chicken adds a tasty smoky flavor. The grill marks make it look stunning too! Just be sure to oil the grill to prevent sticking. Get creative with side dishes to serve with your chicken. A fresh salad or garlic bread pairs well. You can also serve it with pasta or rice for a hearty meal. If you want a quick lunch, turn this dish into a salad or wrap. Slice the chicken and mix it with greens, tomatoes, and mozzarella. Wrap it up in a tortilla for an easy meal on the go. For the full recipe, check out [Full Recipe]. To keep your Crispy Chicken Caprese fresh, store leftovers in the fridge. Place the chicken in an airtight container. This helps maintain its flavor and texture. Use the chicken within three days for the best taste. For longer storage, you can freeze the chicken. Wrap each piece tightly in plastic wrap, then place it in a freezer bag. This prevents freezer burn and keeps it tasty for up to three months. Reheating your chicken while keeping it crispy is key. The best way to do this is in the oven. Preheat your oven to 375°F (190°C). Place the chicken on a baking sheet for about 10-15 minutes. This method warms the chicken and restores some crispiness. You can also use an air fryer. Set it to 350°F (175°C) and cook for about 8 minutes. This method is fast and keeps the chicken delicious. Enjoy your flavorful meal without losing that crunchy texture! For the full recipe, check out my Crispy Chicken Caprese. Making Crispy Chicken Caprese takes about 40 minutes. - Prep Time: 15 minutes - Cook Time: 20-25 minutes Yes, you can prepare some parts in advance. - Chicken: You can bread the chicken and refrigerate it. - Salad: Mix the tomatoes, mozzarella, and basil a few hours before serving. This dish pairs well with various sides and drinks. - Side Dishes: Garlic bread, steamed veggies, or a fresh salad. - Drinks: A light white wine or sparkling water complements it nicely. You can easily add seasonal veggies for extra flavor. - Zucchini: Thinly slice and roast alongside the chicken. - Spinach: Toss fresh spinach in the salad for added greens. - Bell Peppers: Roast or sauté them and add to your tomato mix. Feel free to explore the Full Recipe for more details! Crispy Chicken Caprese combines simple ingredients for a delicious dish. You learned about the key ingredients, preparation steps, and tips to make it perfect. Feel free to experiment with flavors and cooking methods for your own twist. Remember, the right storing and reheating methods keep leftovers tasty. Enjoy making this meal for family and friends; it’s sure to impress! Embrace your kitchen creativity and have fun cooking.](https://tossedrecipes.com/wp-content/uploads/2025/07/66ee0576-857e-4b28-b687-33d403e678eb.webp)
Looking for a meal that’s both crisp and delicious? You’ll love my Crispy Chicken Caprese! This dish combines juicy chicken, fresh mozzarella, and vibrant tomatoes in an easy recipe that …
Looking for a meal that’s both crisp and delicious? You’ll love my Crispy Chicken Caprese! This dish combines juicy chicken, fresh mozzarella, and vibrant tomatoes in an easy recipe that …

Are you ready to bake something that will impress your friends and family? This Chocolate Zucchini Cake is moist, rich, and utterly delicious. You might think zucchini has no place …

Are you ready to impress your friends and family with a cake that blends classic flavors in a unique way? My Earl Grey Blueberry Cake is simple, delicious, and perfect …
![- Mixed greens selection: I like to use a mix of spinach, arugula, or spring mix. These greens add a crisp and fresh base for the salad. Choose your favorite or what you have on hand. - Strawberries details: Fresh strawberries are key in this dish. Select ripe, juicy strawberries for the best flavor. Make sure to hull and slice them before adding to the salad. The sweet and tangy taste of the strawberries brightens each bite. - Red onion specifics: Use a small amount of red onion, thinly sliced. This adds a nice crunch and a hint of sharpness. You can soak the slices in water to tone down the flavor if needed. - Feta cheese type and crumbling techniques: Feta cheese is a must for this salad. I prefer a creamy, tangy feta. Crumble it by hand or use a fork for smaller pieces. This makes it easy to mix throughout the salad, adding rich flavor to every forkful. - Almonds preparation: Toasted sliced almonds add a nice crunch. Simply heat them in a pan for a few minutes until golden. This brings out their nutty flavor, making them a great addition. - Mint leaves inclusion: Fresh mint leaves are optional but highly recommended. They add a refreshing twist. Add a few leaves for a burst of flavor that pairs well with the strawberries and feta. For the complete recipe, check out the [Full Recipe]. Start by combining the ingredients in a large bowl. First, add 4 cups of mixed greens. You can use spinach, arugula, or spring mix. Next, toss in 1 cup of fresh strawberries, hulled and sliced. Then, add 1/4 small red onion, thinly sliced. Now, sprinkle in 1/2 cup of crumbled feta cheese. Finally, add 1/4 cup of sliced almonds that you have toasted for extra flavor. Next, you will make the dressing. In a small bowl, whisk together 2 tablespoons of olive oil and 1/4 cup of balsamic glaze until they blend well. This dressing will tie all the flavors together. For even distribution, gently toss the salad. Use salad tongs or two large spoons. This will help mix the greens, fruit, and cheese without breaking them. After mixing, allow the salad to sit for about 5 minutes. This lets the flavors meld together. When you’re ready to serve, consider plating ideas. You can use a large, shallow bowl for a family-style serving. Or, for individual servings, use small plates. Garnishing adds a nice touch. Top the salad with fresh mint leaves for extra color and flavor. You can also drizzle a bit more balsamic glaze on top for a beautiful finish. For more details, refer to the Full Recipe. When you make the best strawberry feta salad, you can swap some ingredients. If you can’t find mixed greens, use spinach or arugula. Spring mix also works well. Each option brings its own taste and texture. For feta cheese, try goat cheese if you want a tangy flavor. You can also use ricotta for a creamier bite. Just remember, these changes can alter the salad's overall taste. Want to kick up the flavor? Consider adding some fresh herbs like basil or cilantro. They add a nice twist. You can also sprinkle in some black pepper or crushed red pepper for heat. If you don't have balsamic glaze, you can use balsamic vinegar instead. It offers a similar taste but is a bit sharper. Mixing in a touch of honey can sweeten it up nicely. To make your salad look pretty, layer the ingredients. Start with greens, then add strawberries, onions, and feta. This way, each bite offers a mix of flavors. When it comes to bowls, choose clear glass for a fresh look. A wooden bowl can give a rustic vibe. Serve the salad chilled for the best experience. For a fancy touch, add a sprig of mint on top. For the full recipe, check out the section above. {{image_2}} You can switch up the fruits in your salad based on the season. In spring, fresh strawberries shine. In summer, add peaches or blueberries. Fall brings apples and pears, while winter can feature citrus fruits like oranges or grapefruit. Each change adds a unique flavor and keeps your salad fresh. For winter greens, try using kale or collard greens. These greens pair well with the sweet strawberries and salty feta. Just make sure to massage them a bit to soften their texture. You want them to mix well with the other ingredients. Adding protein makes your salad heartier. Grilled chicken adds a nice touch. Simply slice it up and toss it in. If you prefer plant-based options, tofu works great too. Cube it and marinate it in your favorite sauce for added taste. Nuts enhance the crunch factor. Sliced almonds are a classic choice, but consider walnuts or pecans for a twist. Roasting them can also bring out more flavor. Just be careful not to burn them! Homemade dressings can elevate your salad. A simple lemon vinaigrette is a great option. Mix olive oil, lemon juice, and a pinch of salt. This brightens the flavors in the salad. You can also try different vinaigrettes. A honey mustard dressing adds sweetness. Just mix honey, mustard, and vinegar, and whisk in oil. This will give your salad a delightful twist. Check out the Full Recipe for more ideas and tips on making the best strawberry feta salad! To keep your salad fresh, store leftovers in the fridge. Use an airtight container to prevent moisture loss. Avoid mixing the dressing until you are ready to eat. This way, the greens stay crisp. You can enjoy the salad for up to three days. After that, the greens may wilt. Look for slimy or brown leaves as signs of spoilage. If the strawberries start to smell sour, it's time to toss them. Make the salad ahead for busy days. You can prep the ingredients and store them separately. Portion out the greens, strawberries, and feta in small containers. This makes it easy to grab and go. For a quick meal, just add dressing right before eating. Check out the Full Recipe for more details on preparation. Yes, you can use frozen strawberries. However, they will change the texture. Frozen strawberries become mushy when thawed. They also lose some of their bright flavor. If you choose to use them, I suggest thawing and draining excess water. Fresh strawberries are best for this salad. To make this salad vegan, skip the feta cheese. You can use a plant-based cheese instead. Crumbled tofu can also work well. It adds creaminess and absorbs flavors. Nutritional yeast is another option. It gives a cheesy taste without dairy. This salad pairs well with grilled chicken or fish. You can also serve it with crusty bread or a light soup. For a picnic, try it with quinoa or pasta salad. Each of these sides adds a nice balance to the dish. Yes, this salad can be part of meal prep. Store the ingredients separately to keep them fresh. Mixed greens and strawberries last a few days in the fridge. However, add the dressing just before eating. This keeps the salad crisp and tasty. In this blog post, we explored how to create a delicious Strawberry Feta Salad. We looked at fresh produce, dairy components, and optional add-ons that enhance flavor. You learned about preparation steps, mixing techniques, and serving suggestions. I also shared tips for ingredient substitutes and ways to adjust the recipe seasonally. In conclusion, this salad is versatile and easy to make. Use your favorite ingredients and enjoy experimenting with different flavors!](https://tossedrecipes.com/wp-content/uploads/2025/07/2207ac8e-d73a-40e3-98a1-52a39c3a0c4f.webp)
Craving a bright, refreshing dish? Look no further! This Strawberry Feta Salad combines sweet strawberries, crunchy mixed greens, and creamy feta for a perfect flavor blend. Whether it’s a light …

Looking for a quick and tasty meal? Chicken Ramen Stir Fry is your answer! This dish is packed with flavor and takes just minutes to make. Whether you’re a busy …
![- 4 ripe tomatoes, sliced - 1 cup fresh basil leaves - 8 ounces fresh mozzarella, sliced - 1/4 cup balsamic glaze - 2 tablespoons extra virgin olive oil - Salt and pepper to taste The heart of a Caprese salad lies in fresh ingredients. I love using ripe tomatoes. They should be juicy and sweet. Look for tomatoes that are firm but give slightly when you squeeze them. This ensures they have great flavor. Next, I always choose fresh basil leaves. The aroma of basil adds a special touch to the dish. You can tear the leaves for a rustic look or place them whole for a burst of flavor. Fresh mozzarella is a must for this salad. It should be soft and creamy. The texture of the cheese complements the tomatoes perfectly. To dress the salad, I use balsamic glaze. It adds a sweet and tangy flavor. Extra virgin olive oil brings richness to the dish. A sprinkle of salt and pepper enhances all the flavors. These ingredients come together to create a simple yet elegant dish. For the full recipe, check out the instructions above. Start by arranging alternate slices of tomato and mozzarella on a large plate. Overlap them slightly for a nice look. This step makes your salad vibrant and inviting. Next, tuck fresh basil leaves between the layers. The aroma of basil adds a fresh twist. Now, drizzle the olive oil all over the salad. This step enhances the fresh flavors of the tomatoes and cheese. Then, take the balsamic glaze and drizzle it in a zigzag pattern. This adds a beautiful finish and a touch of sweetness. Season your salad lightly with salt and pepper. This small step amplifies the taste of each ingredient. Allow the salad to rest for about five minutes. This lets the flavors mix and become even more delicious. For the complete recipe, check the Full Recipe section. When making Caprese salad, you need ripe tomatoes. Look for tomatoes that feel heavy and firm. Their color should be vibrant, signaling ripeness. A great choice is the heirloom variety. These tomatoes are juicy and sweet. Next, opt for high-quality mozzarella. Fresh mozzarella is best for this dish. It should feel soft but not mushy. Look for mozzarella packed in water for extra freshness. The creaminess of the cheese pairs well with the tomatoes. For plating, arrange the tomato and mozzarella slices in a circle. Overlap them slightly to create a beautiful pattern. You can also stack them vertically for a fun twist. Use a large white plate to let the colors pop. When garnishing, sprinkle fresh basil leaves on top. You can also add a few whole leaves around the plate. This adds color and freshness to your dish. A drizzle of balsamic glaze creates an eye-catching finish. To season your salad, use a pinch of salt. This brings out the natural sweetness of the tomatoes. Freshly cracked black pepper adds a nice kick. If you want to add more toppings, consider avocado or pine nuts. These add creaminess and crunch. You could also try a sprinkle of crushed red pepper for some heat. For the full recipe, check here: [Full Recipe]. {{image_2}} You can easily change the classic Caprese salad for more flavor. Adding avocado gives a creamy texture. Just slice ripe avocado and layer it with the tomatoes and mozzarella. Another great option is arugula. Its peppery taste adds a nice kick. Toss in a handful of arugula between the layers for a fresh twist. You might also try using burrata cheese instead of mozzarella. Burrata has a rich, creamy center that melts in your mouth. It takes the salad to a new level of indulgence. You can enhance the flavors of your Caprese salad with a splash of lemon juice. Squeeze fresh lemon juice over the top right before serving. The acidity brightens all the flavors. You can also experiment with flavored balsamic vinegars. There are many types available, like fig or raspberry. Each adds a unique taste and sweetness to your dish. Try swapping the regular balsamic for these options to surprise your guests. If you're looking to make a vegan-friendly version, simply replace mozzarella with a plant-based cheese. There are many great options on the market today. You can also make it gluten-free by ensuring your balsamic glaze has no additives. Most balsamic glazes are gluten-free, but check the label to be sure. These small changes can make the salad fit various diets without losing its delicious charm. To keep your Caprese salad fresh, store it in an airtight container. This method locks in the flavors. Place it in the fridge right after you make it. The salad stays fresh for about 1 to 2 days. After that, the tomatoes may get mushy. Freezing Caprese salad is not ideal. The cheese and tomatoes do not freeze well. However, you can freeze the balsamic glaze. Pour it into ice cube trays. Once frozen, transfer the cubes to a bag. They last for about 3 months. When ready to use, thaw the glaze in the fridge overnight. To avoid sogginess, store each ingredient separately. Keep tomatoes, cheese, and basil apart. This method helps retain their textures. For basil, wrap it in a damp paper towel. Then, place it in a plastic bag. This keeps it fresh for longer. Caprese Salad hails from Italy, specifically the island of Capri. This dish celebrates fresh, local ingredients. The classic blend of tomatoes, mozzarella, and basil represents the colors of the Italian flag. It first appeared in the early 20th century. Locals enjoyed it as a simple, refreshing meal. Today, many people love it worldwide. Yes, you can prepare parts of the salad in advance. Slice the tomatoes and mozzarella a few hours before serving. Keep them in the fridge to stay fresh. However, wait to add the basil until just before serving. It looks best when fresh. Drizzle the olive oil and balsamic glaze right before you eat. This way, the flavors stay bright and lively. If you don’t have balsamic glaze, try these options: - Balsamic vinegar: Use it straight or mix with a bit of honey. - Red wine vinegar: This adds a tangy kick. - Honey mustard dressing: It gives a sweet and tangy flavor. - Ranch dressing: A creamier option that pairs well with the salad. These alternatives change the taste but still enhance your salad. In this article, we explored the fresh ingredients and steps for making a Caprese salad. We covered how to arrange ripe tomatoes and mozzarella, add basil, and enhance flavors with olive oil and balsamic glaze. I shared tips for choosing the best produce and creative ways to present your dish. Remember to store leftovers properly to keep them fresh. Caprese salad is a simple, tasty dish that you can customize. Enjoy making your own version of this classic salad!](https://tossedrecipes.com/wp-content/uploads/2025/07/092c07a0-7f9d-479f-9caf-d94153989a0c.webp)
If you crave fresh flavors, you’ll love this Caprese Salad with Balsamic Glaze. This dish brings together juicy tomatoes, creamy mozzarella, and fragrant basil, topped with a rich balsamic drizzle. …

Are you ready to indulge in a treat that feels utterly sinful yet secretly healthy? These Decadent Chocolate Zucchini Brownies will satisfy your sweet tooth without the guilt. With rich …
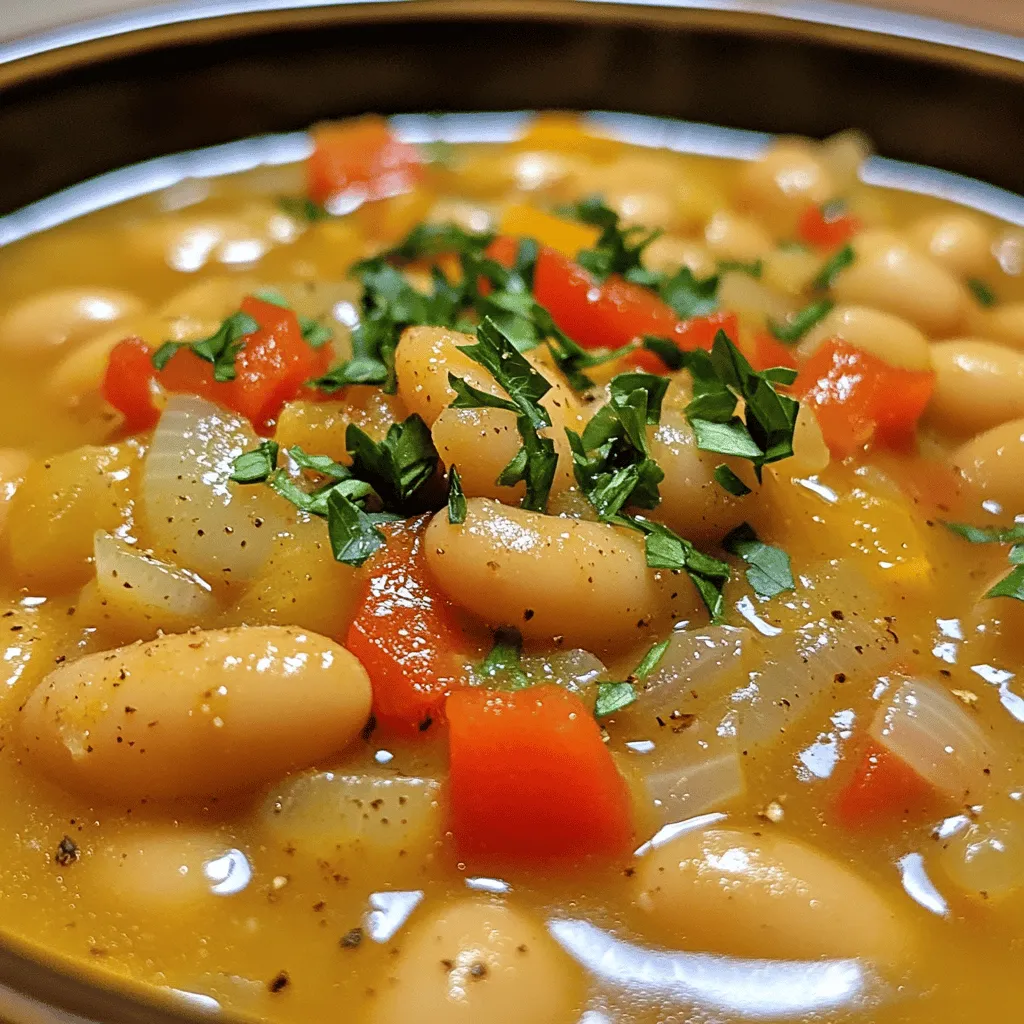
Are you ready to savor a taste of the South? My Delicious Southern Butter Beans Recipe is a simple, flavorful dish that impresses everyone. With fresh or frozen butter beans, …
![To make Creamy Crockpot White Chicken Chili, you need some simple, fresh ingredients. Here’s what you’ll need: - 2 lbs boneless, skinless chicken breasts - 1 medium onion, diced - 3 cloves garlic, minced - 3 cans white beans (cannellini or great northern), drained and rinsed - 1 can diced green chilies - 1 cup corn (fresh or frozen) - 4 cups chicken broth - 1 teaspoon cumin - 1 teaspoon chili powder - ½ teaspoon oregano - 1 cup sour cream - 1 cup cream cheese, softened - Salt and pepper to taste - Fresh cilantro for garnish (optional) Each ingredient plays a key role in the dish. The chicken provides protein and heartiness. The beans add fiber and creaminess. The spices bring warmth and flavor. The sour cream and cream cheese create that rich, creamy texture we all love. Don't forget, fresh cilantro brightens everything up with a pop of flavor. For the full recipe, check out the detailed instructions that follow. Start by placing the boneless, skinless chicken breasts at the bottom of your crockpot. This helps the chicken cook evenly. Next, layer the diced onion, minced garlic, and the three cans of white beans. I prefer cannellini beans for their creamy texture. Then, add the can of diced green chilies and the cup of corn. Pour in the chicken broth, and sprinkle the cumin, chili powder, oregano, salt, and pepper. Stir gently to mix everything. It’s important to ensure the chicken is submerged to keep it moist during cooking. You can cook this chili on low heat for 6-7 hours or on high for 4 hours. Both methods work well; just choose the one that fits your schedule. When the chicken is fully cooked and tender, it’s time to shred it. About 30 minutes before serving, take the chicken breasts out of the pot. Use two forks to shred the chicken into bite-sized pieces. This step adds texture and flavor to the chili when you return it to the pot. Once the chicken is back in the pot, it’s time to make it creamy. Stir in the softened cream cheese and sour cream. This will give the chili its rich, creamy texture. Mix until fully blended. Before serving, taste your chili and adjust the seasoning as needed. You can add more salt, pepper, or spices for extra flavor. This creamy crockpot white chicken chili is now ready to serve! For the full recipe, check out the earlier section. To make your creamy crockpot white chicken chili pop with taste, focus on spices. Adding spices like cumin and chili powder helps build layers of flavor. Use fresh ingredients whenever you can. Fresh onion and garlic bring a bright taste that dried versions can't match. Adjust the cooking time based on the size of your chicken breasts. Larger pieces may need extra time to cook through. If you use frozen corn, you can toss it in directly. Fresh corn adds a sweet crunch, so choose what fits your taste. Garnish your chili with fresh cilantro for a vibrant touch. A dollop of sour cream adds creaminess and balance. For some crunch, serve with crushed tortilla chips. Pair your chili with warm bread or a side salad for a complete meal. Don’t forget to check out the Full Recipe for more details! {{image_2}} To make this chili a bit lighter, try using low-fat cream cheese. This change cuts down on calories but keeps the creamy texture. You can also boost the veggie content. Add more corn or toss in some chopped bell peppers and zucchini. This adds flavor and nutrients. If you want a change from chicken, use turkey instead. Rotisserie chicken is another great option. It saves time and adds a rich flavor. For a vegetarian twist, skip the meat altogether. Use extra white beans or add lentils for protein. You still get a hearty meal without meat. For those who love heat, adding jalapeños can spice things up. You can chop them finely and mix them in. Other peppers work well too, like poblano or serrano. If you prefer a simple boost, incorporate a few dashes of hot sauce. This gives your chili a kick without being too overwhelming. Don’t forget to check the [Full Recipe] for all the details! To store leftovers of your creamy crockpot white chicken chili, let it cool first. Then, pack it in an airtight container. You can keep it in the fridge for about 3 to 4 days. Make sure to label it with the date. This helps you know when to eat it. If you want to freeze your chili, use freezer-safe containers. Leave some space at the top, as liquids expand when frozen. Your chili can last up to 3 months in the freezer. When you're ready to eat it, move it to the fridge to thaw overnight. You can reheat your chili on the stovetop or in the microwave. For stovetop, heat it in a pot over medium heat until hot. Stir often to avoid sticking. In the microwave, place chili in a bowl and cover it. Heat in 1-minute bursts, stirring in between. If it looks too thick, add a little broth or water to adjust the consistency. Yes, you can use frozen chicken. It saves time and is convenient. Just make sure your crockpot is large enough. Cooking frozen chicken may take a bit longer. The chicken will be safe to eat once it reaches 165°F. Don't skip the shredding step; it helps blend flavors. If you want a thicker chili, try these methods: - Add a cornstarch slurry: Mix cornstarch with water and stir it in. - Mash some beans: Use a fork to mash a few beans against the side of the pot. - Simmer uncovered: Let it cook without the lid for a bit to reduce liquid. Serving this chili is fun and easy! Here are some ideas: - Serve it in bowls, and top with fresh cilantro. - Add a dollop of sour cream for creaminess. - For some crunch, sprinkle crushed tortilla chips on top. - Pair it with warm cornbread or a side salad for a complete meal. Absolutely! Meal prep makes life easier. Here are some tips: - Prep your ingredients the night before and store them in the fridge. - Cook the chili and let it cool before storing it in airtight containers. - You can freeze leftovers for up to three months. Just thaw in the fridge before reheating. This blog post covered a tasty recipe for Creamy Crockpot White Chicken Chili. We explored the essential ingredients, step-by-step instructions, and tips to enhance flavor. I shared variations to suit different diets and preferences, along with storage and reheating tips. Remember, this dish is versatile and easy to tweak. Get creative with spices or add your favorite toppings. Enjoy making this chili, and share it with friends and family for a warming meal!](https://tossedrecipes.com/wp-content/uploads/2025/07/bed3abe3-cd7b-49c2-86bb-79a80f7b0c39.webp)
If you love a hearty meal that cooks itself, you’re in the right place! This Creamy Crockpot White Chicken Chili is easy, tasty, and perfect for any day. With just …

Are you ready to enjoy a deliciously moist treat? Classic Chocolate Zucchini Bread brings together rich cocoa and fresh zucchini for a sweet, unique twist. This recipe is sure to …