Zucchini Picnic Cake Tasty and Easy Summer Recipe
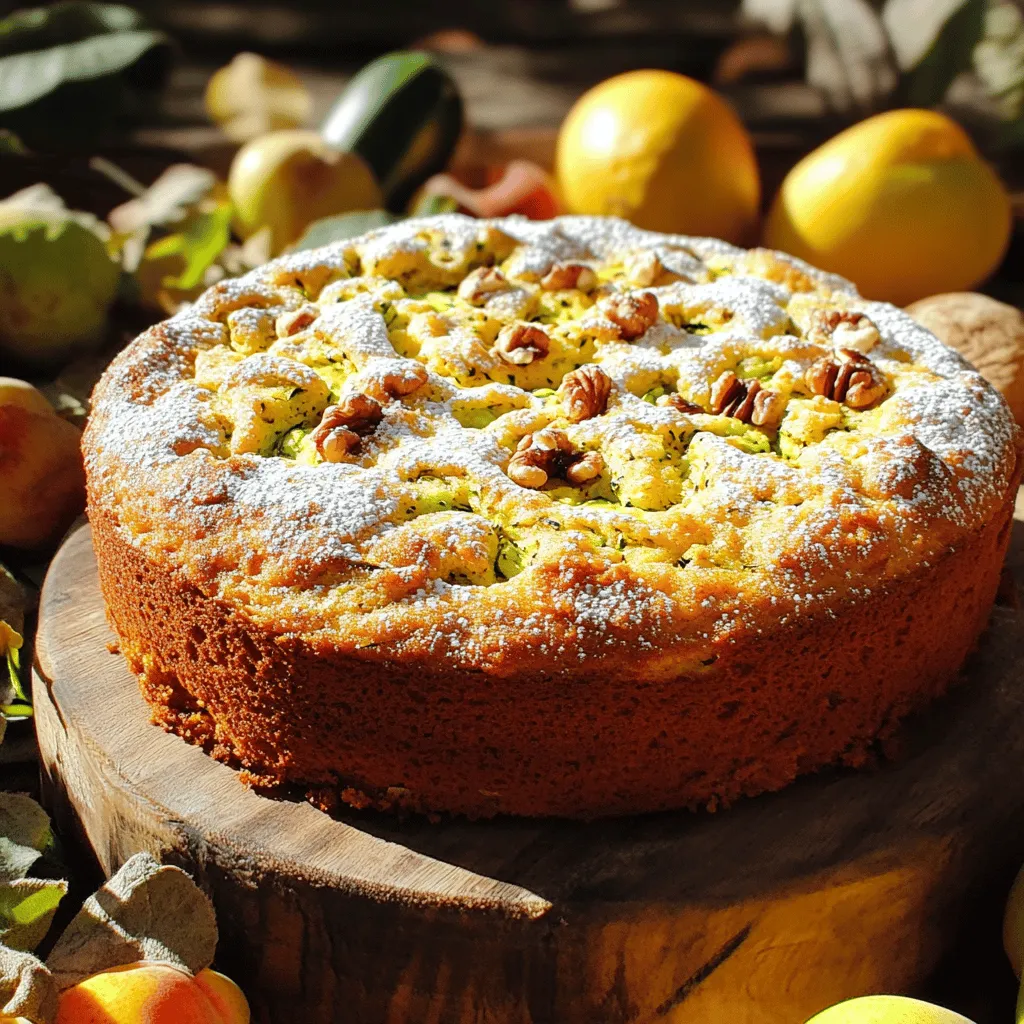
Looking for a simple summer treat that’s both tasty and a little sneaky? Try my Zucchini Picnic Cake! This cake is moist, sweet, and packed with good ingredients like fresh …
Looking for a simple summer treat that’s both tasty and a little sneaky? Try my Zucchini Picnic Cake! This cake is moist, sweet, and packed with good ingredients like fresh …
![- 2 medium zucchinis, grated and moisture squeezed out - 1 cup fresh corn kernels (or 1 can of drained corn) - 1/2 cup all-purpose flour - 1/4 cup cornmeal Zucchini brings a mild flavor and a soft texture to the fritters. Fresh corn adds sweetness and a pop of color. The all-purpose flour and cornmeal bind the mixture while adding a nice crunch. - 1/2 teaspoon baking powder - 1/2 teaspoon garlic powder - 1/2 teaspoon onion powder - 1/4 teaspoon cayenne pepper (optional for heat) These spices elevate the fritters’ taste. The baking powder helps them puff up, while garlic and onion powders add depth. Cayenne pepper offers a hint of heat if you like spice. - 2 large eggs, beaten - 1/4 cup finely chopped fresh parsley (or cilantro) - Olive oil for frying Eggs help bind the fritters together. Fresh herbs add brightness and flavor. Olive oil is perfect for frying, giving the fritters a crisp surface. For the full recipe, check out the Zesty Zucchini Corn Fritters. You’ll enjoy every bite! Grating and Moisture Removal Start by grating the zucchini. Use a box grater or food processor. Place the grated zucchini in a bowl and sprinkle a pinch of salt. This helps draw out moisture. Let it sit for about 10 minutes. Afterward, use a clean kitchen towel or paper towels to squeeze out any extra liquid. This step is key for crispy fritters. Combining Ingredients Next, add the fresh corn kernels to the drained zucchini. You can use fresh corn or canned corn. Mix them well in the bowl. This blend gives the fritters a sweet and savory flavor. Dry Ingredients Preparation In a separate bowl, combine the all-purpose flour, cornmeal, baking powder, garlic powder, onion powder, cayenne pepper, salt, and pepper. Whisk these dry ingredients together until they are well mixed. This blend adds flavor and structure to the fritters. Incorporating Wet Ingredients Now, add the beaten eggs and finely chopped parsley to the dry mix. Stir gently until just combined. Do not overmix. Next, fold the zucchini and corn mixture into the batter. Ensure everything is evenly distributed. This step ensures every fritter has a delicious bite. Frying in the Skillet Heat about 2 tablespoons of olive oil in a large skillet over medium heat. Once the oil is hot, drop spoonfuls of the fritter mixture into the skillet. Flatten them slightly with the back of a spatula. This helps them cook evenly. Perfecting the Crispiness Cook the fritters for about 3-4 minutes on each side. They should turn golden brown and crispy. Adjust the heat if needed to avoid burning. Once done, remove them and place them on paper towels to drain excess oil. Repeat this with the rest of the batter. Enjoy your fritters warm! For a delicious twist, serve with a dollop of sour cream or yogurt mixed with lime juice. For the full recipe, check out the detailed instructions provided. - Importance of Squeezing Out Moisture Squeezing out moisture from the zucchini is key. Too much water makes fritters soggy. Grate the zucchini, then let it sit with a pinch of salt. After 10 minutes, use a clean towel to wring out excess liquid. This step is vital for a crispy fritter. - Frying Temperature Frying at the right temperature is crucial. Heat your skillet over medium heat, then add olive oil. If the oil is too hot, the fritters will burn. If it’s too cool, they will soak up oil. Aim for a golden brown color, and adjust heat as needed. - Accompaniments for Fritters Zucchini corn fritters pair well with many sides. Serve them with a fresh salad for a light meal. You can also enjoy them as a tasty snack. They are great for brunch or a party platter. - Ideal Dipping Sauces The right dipping sauce can elevate your fritters. Try sour cream mixed with lime juice for a zesty kick. Yogurt is another excellent choice. You can also serve them with salsa or a spicy aioli for extra flavor. - Recommended Skillets and Frying Tools Use a non-stick skillet for easy frying. A cast-iron skillet also works well for even heat. Make sure you have a spatula to flip the fritters without breaking them. A slotted spoon can help drain excess oil. - Tools for Easy Preparation A box grater makes grating zucchini quick. Use a mixing bowl for combining ingredients. A clean kitchen towel is essential for squeezing moisture. Having these tools ready will make the cooking process smoother. For a full recipe, refer to the [Full Recipe] section above. {{image_2}} - Using Canned or Frozen Corn: You can easily swap fresh corn for canned or frozen corn. Just drain canned corn before using. If you use frozen corn, thaw it first and drain excess water. This makes it a quick option when fresh corn is not available. - Gluten-Free Options: To make these fritters gluten-free, replace all-purpose flour with a gluten-free blend. Almond flour or chickpea flour also works well. Adjust the amount as needed for the right texture. - Adding Cheese or Spices: For a cheesy twist, mix in shredded cheese like cheddar or feta. You can also add spices like cumin, paprika, or Italian herbs for extra flavor. Adjust the spices to your taste. - Incorporating Other Vegetables: Feel free to add more veggies like grated carrots, bell peppers, or spinach. This not only boosts nutrition but also adds color to your fritters. Just remember to squeeze out moisture from these veggies too. - Fritters as Appetizers: Serve these fritters as tasty appetizers at your next party. Pair them with dips like salsa, guacamole, or a creamy yogurt sauce. They will be a hit with your guests! - Zucchini Corn Fritters in Meal Prep: These fritters are great for meal prep. Make a batch ahead of time and store them in the fridge. They are perfect for quick lunches or snacks. Just reheat in a skillet or microwave when you’re ready to eat. For the full recipe, check out the Zesty Zucchini Corn Fritters. To store leftover fritters, let them cool down first. Place them in an airtight container. I recommend using glass or plastic containers with tight lids. This helps keep them fresh. For freezing, arrange the fritters in a single layer on a baking sheet. Freeze them for about 1-2 hours until firm. Then, transfer them to a freezer bag. Remove as much air as possible. When you want to reheat, just pop them in the oven at 375°F (190°C) for about 15-20 minutes. This will keep them crispy. In the fridge, these fritters last about 3-4 days. Keep an eye out for any signs of spoilage. If they smell bad or become slimy, it's best to toss them. Freshness is key for the best taste! Enjoy your Zucchini Corn Fritters from the [Full Recipe] for the ultimate snack. To make Zucchini Corn Fritters, you start by grating the zucchini. After grating, squeeze out the moisture. Combine the zucchini with fresh corn in a bowl. Then, mix flour, cornmeal, baking powder, and spices in another bowl. Add beaten eggs and parsley to the dry mix. Fold in the zucchini and corn. Heat olive oil in a skillet, drop spoonfuls of the mixture, and fry until golden brown. This whole process takes about 30 minutes. For the full recipe, check out the section above. Yes, you can prepare the fritters ahead. Make the batter and store it in the fridge for up to 24 hours. This lets the flavors blend well. You can also cook the fritters and store them. Keep cooked fritters in an airtight container. They last for up to three days in the fridge. Reheat them in the oven for a crisp finish. The best oil for frying Zucchini Corn Fritters is olive oil. It has a nice flavor and a high smoke point. You can also use canola oil or vegetable oil if you prefer. These oils work well to get that perfect crispy texture. Just make sure to heat the oil properly before adding the fritters. You learned how to make delicious zucchini corn fritters. We covered the main ingredients, like zucchini and fresh corn, and explained the cooking steps. You also got tips for the best texture and how to store leftovers. These fritters are easy to enjoy any time. You can adjust flavors and ingredients to fit your taste. I hope you try making them soon! Enjoy the crunch and flavor packed in each bite.](https://tossedrecipes.com/wp-content/uploads/2025/07/fc4515e1-aa1f-4606-b777-b11e5b8a3987.webp)
Looking for a simple yet delicious snack? Zucchini Corn Fritters are the answer! These tasty bites combine fresh zucchini and sweet corn, making them the perfect munchie. With just a …
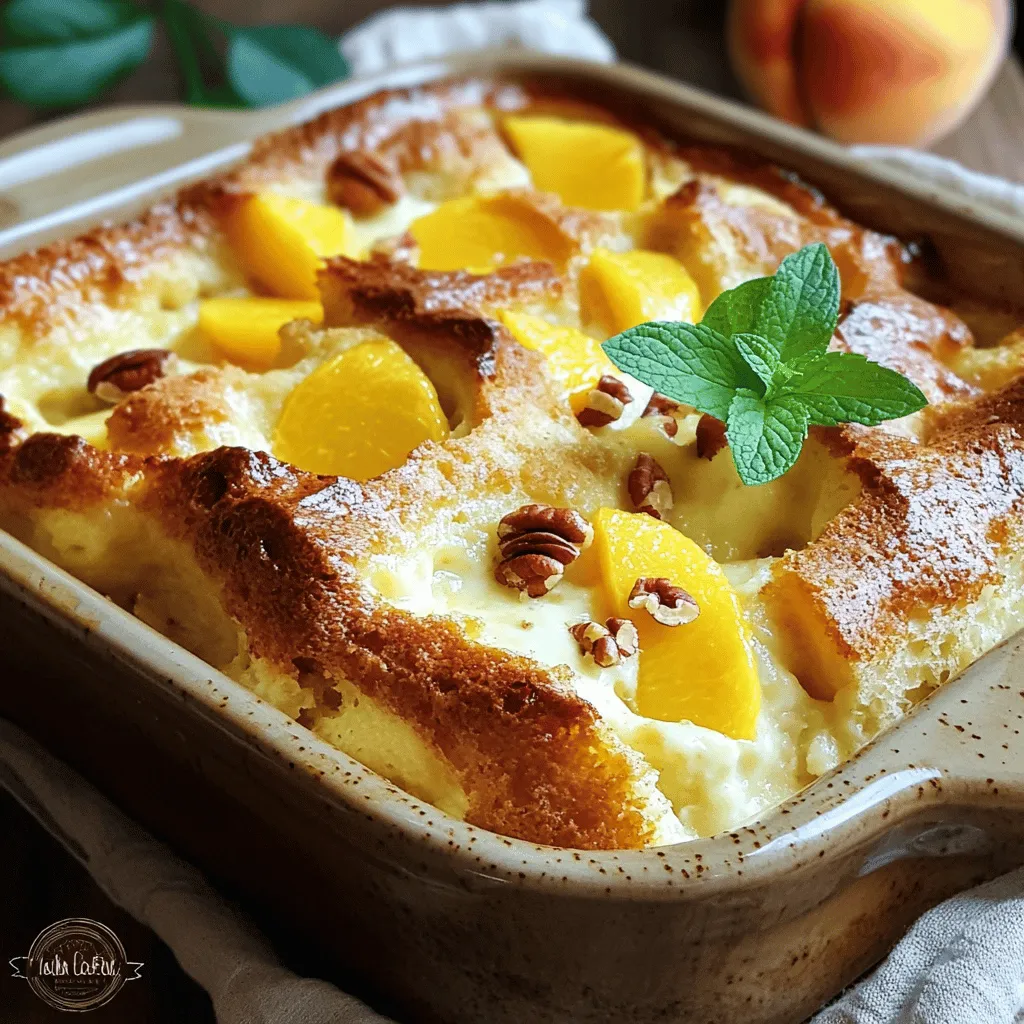
If you’re seeking a dessert that’s both easy and delicious, you’ve found it! Peach bread pudding combines sweet peaches with soft, buttery bread for a treat you can’t resist. In …
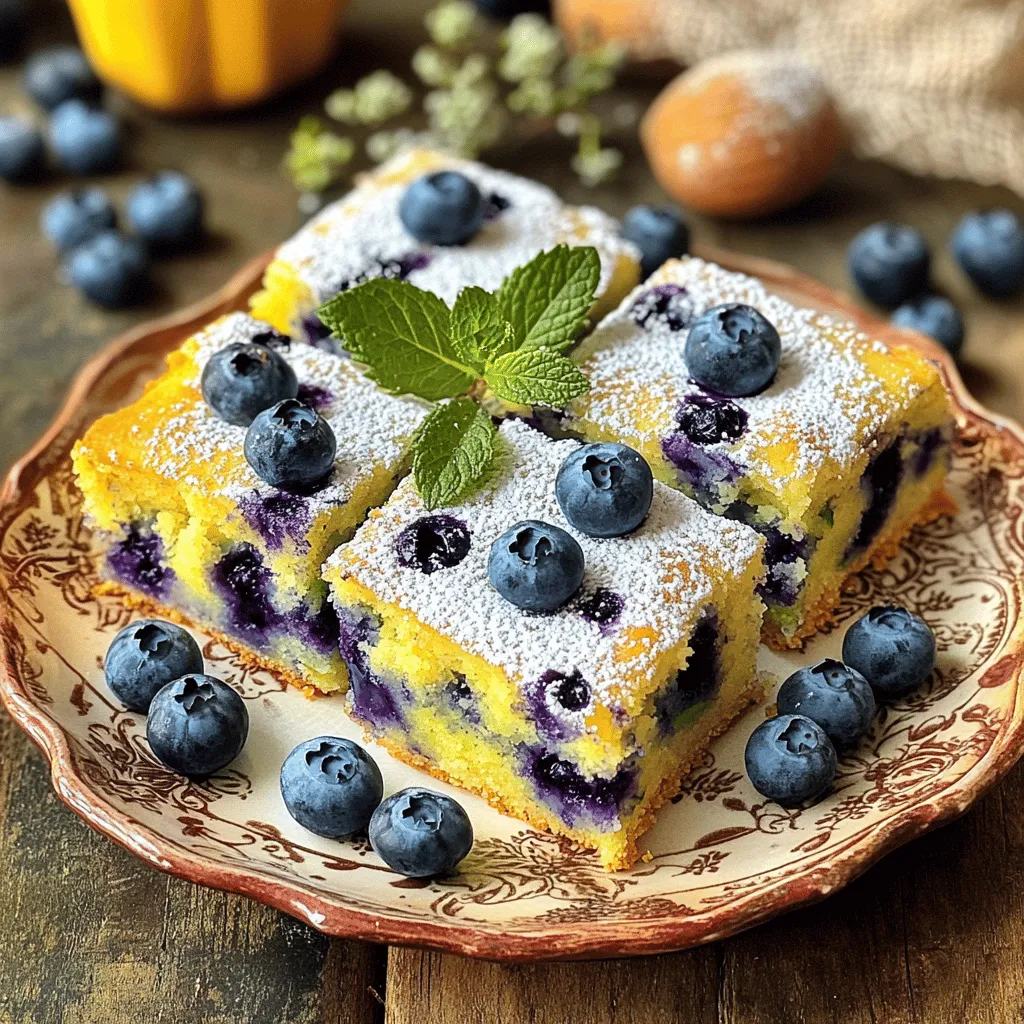
If you’re looking for a treat that’s both tasty and healthy, you’re in the right spot! My Blueberry Zucchini Squares are a perfect blend of sweet and moist, making them …
![- 4 medium zucchinis - 1 cup cherry tomatoes, halved - 1 cup cooked quinoa - 1 cup shredded mozzarella cheese - 1/2 cup diced bell peppers (any color) - 1/4 cup fresh basil, chopped - 2 cloves garlic, minced - 1 tablespoon olive oil - 1 teaspoon Italian seasoning - Salt and pepper to taste When making Baked Zucchini, you want to choose the best ingredients. First, zucchinis are your main star. Look for firm ones with a bright color. They should feel heavy for their size. Next, cherry tomatoes add a sweet burst. Halving them helps release their juices, which mix well. Cooked quinoa is great for filling. It’s healthy and gives the dish a nice texture. Shredded mozzarella cheese melts beautifully. It adds creaminess and flavor to your dish. For optional add-ins, bell peppers add crunch and color. Fresh basil gives a garden-fresh flavor. Minced garlic packs a punch. Olive oil keeps everything moist and adds richness. Seasonings are key. Italian seasoning brings all the flavors together. Adjust salt and pepper to your taste. For the full recipe, be sure to check out the complete instructions. Enjoy your cooking adventure! - Preheat the oven to 375°F (190°C). - Slice zucchinis in half lengthwise and scoop out a small portion. Start by cutting each zucchini carefully. You want two long halves. Use a spoon to remove some flesh. Set the scooped-out flesh aside; it will add flavor to the filling. - Combine cooked quinoa, cherry tomatoes, bell peppers, mozzarella cheese, basil, garlic, olive oil, Italian seasoning, salt, and pepper. - Add chopped zucchini flesh to the filling mixture. In a large bowl, mix the cooked quinoa with the cherry tomatoes, diced bell peppers, and shredded mozzarella. Add the chopped basil and minced garlic next. Then, drizzle in the olive oil and sprinkle the Italian seasoning, salt, and pepper. This step brings all the flavors together. Don’t forget to stir in the chopped zucchini flesh. It makes the filling even tastier. - Fill zucchini halves with the quinoa mixture. - Place on a baking sheet and bake for 25-30 minutes. Now, take each zucchini half and fill it with the quinoa mixture. Press it down gently to pack it in. Once filled, place them on a baking sheet lined with parchment paper. Bake for 25-30 minutes. You’ll know they are ready when the zucchinis are tender and the cheese is melted and bubbly. Enjoy your colorful, healthy dish! For the full recipe, check the details above. To ensure your zucchinis are tender and the cheese is bubbly, follow a few steps. First, make sure to slice the zucchinis evenly. This helps them cook at the same rate. Next, hollow out enough flesh so the filling fits well. Don't forget to pack the filling tightly. This keeps it moist and flavorful. Bake them just right at 375°F (190°C) for 25 to 30 minutes. You want them soft but not mushy. Adjusting seasonings to your taste is key. Start with the recommended salt and pepper, but feel free to add more. A bit of extra Italian seasoning can enhance the flavor. Taste the filling before you stuff the zucchini. This way, you can make it just how you like it. When it's time to serve, think about how to make your dish pop. Garnish your baked zucchini with fresh basil. This adds color and a fresh taste. Drizzle a balsamic reduction on top for a sweet and tangy finish. It makes the dish look fancy! Pair your zucchini boats with a side salad or garlic bread. A light salad balances the rich flavors. Garlic bread adds a nice crunch and complements the meal perfectly. To make this dish, you need a few simple tools. Use a baking sheet, and line it with parchment paper. This keeps the zucchinis from sticking and makes cleanup easy. You’ll also need a sharp knife to slice the zucchinis. A spoon will help you scoop out the flesh. These tools make the process smooth and fun. Don’t forget to check the [Full Recipe] for all the steps! {{image_2}} You can easily switch up the cheese in your baked zucchini. If you want a salty kick, swap mozzarella for feta or cheddar cheese. Feta adds a tangy flavor, while cheddar gives a rich taste. You can also sprinkle some Parmesan on top for an extra layer of flavor. This will create a nice, crispy crust as it bakes. Adding protein to your zucchini makes it heartier. Try including cooked ground turkey or beef for a filling meal. If you want a vegetarian option, black beans work great. They add protein and fiber, making your dish even healthier. This allows you to customize your meal based on what you have on hand. Don't be afraid to get creative with flavors. You can experiment with different herbs like parsley or cilantro. These fresh herbs brighten up the dish. If you like some heat, add crushed red pepper flakes. This simple addition can take your baked zucchini to the next level. Explore these variations to find your favorite flavor profile! After enjoying your baked zucchini, store leftovers in airtight containers. They will stay fresh for about 3-4 days. When you're ready to eat them again, reheat in the oven. This method keeps the zucchini tender and the cheese bubbly. If you want to save some for later, freeze the assembled zucchini boats before baking. Wrap each boat tightly in plastic wrap and place them in a freezer bag. When you want to enjoy them, thaw in the fridge overnight. Bake directly from frozen, adding a few extra minutes to the cooking time. To keep your zucchini fresh, avoid cutting them until you are ready to use them. Store them in a cool, dry place. If you have leftover filling, keep it separate from the zucchini for the best flavor. Always check for signs of spoilage before using any leftovers. You know baked zucchini is done when it is soft. The cheese on top should be melted and bubbly. Use a fork to pierce the zucchini. If it goes in easily, it's ready. Yes, you can use many different vegetables. Bell peppers, eggplants, and even mushrooms work well. Try adding spinach or kale for extra nutrients. Just make sure to chop them finely. Yes, you can prepare them ahead of time. Stuff the zucchinis and cover them. Store them in the fridge for up to a day. When ready, just bake them as directed. This makes meal prep easy and fast. In this post, I shared a fun recipe for Zesty Baked Zucchini Boats. I covered essential ingredients, cooking tips, and even tasty variations. You learned how to make a flavorful filling with quinoa, veggies, and cheese. Plus, I provided storage tips to keep leftovers fresh. Cooking can be simple and rewarding. Don’t shy away from trying new add-ins. Explore flavors, enjoy the process, and share your delicious meals!](https://tossedrecipes.com/wp-content/uploads/2025/07/336db178-1078-4faa-a9fe-079a95043f60.webp)
Looking for a tasty and healthy dish? Baked zucchini is your answer! This simple recipe features fresh veggies and hearty quinoa, making it both delicious and nutritious. You’ll love how …
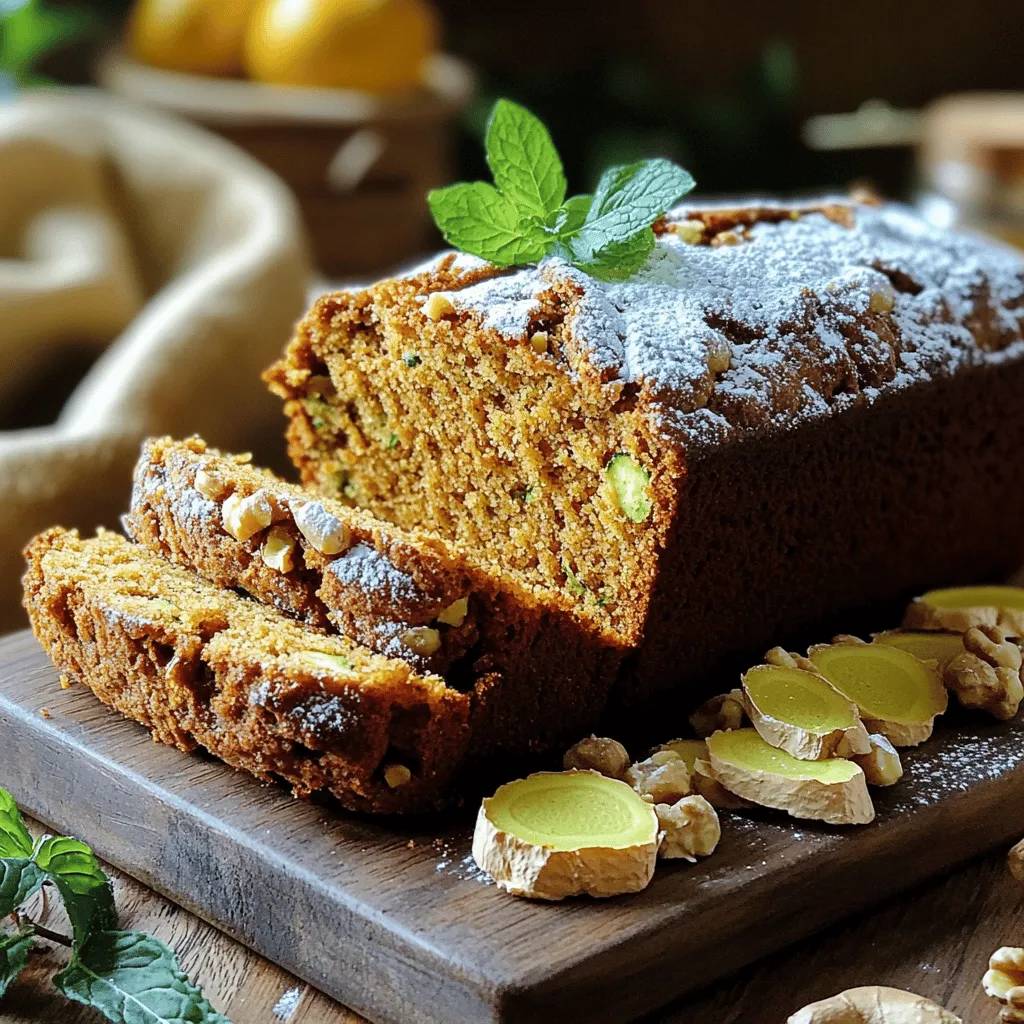
Do you love a tasty treat that’s both fun and healthy? Zucchini gingerbread is your answer! This delightful and wholesome dessert combines the warm spices of gingerbread with the moistness …
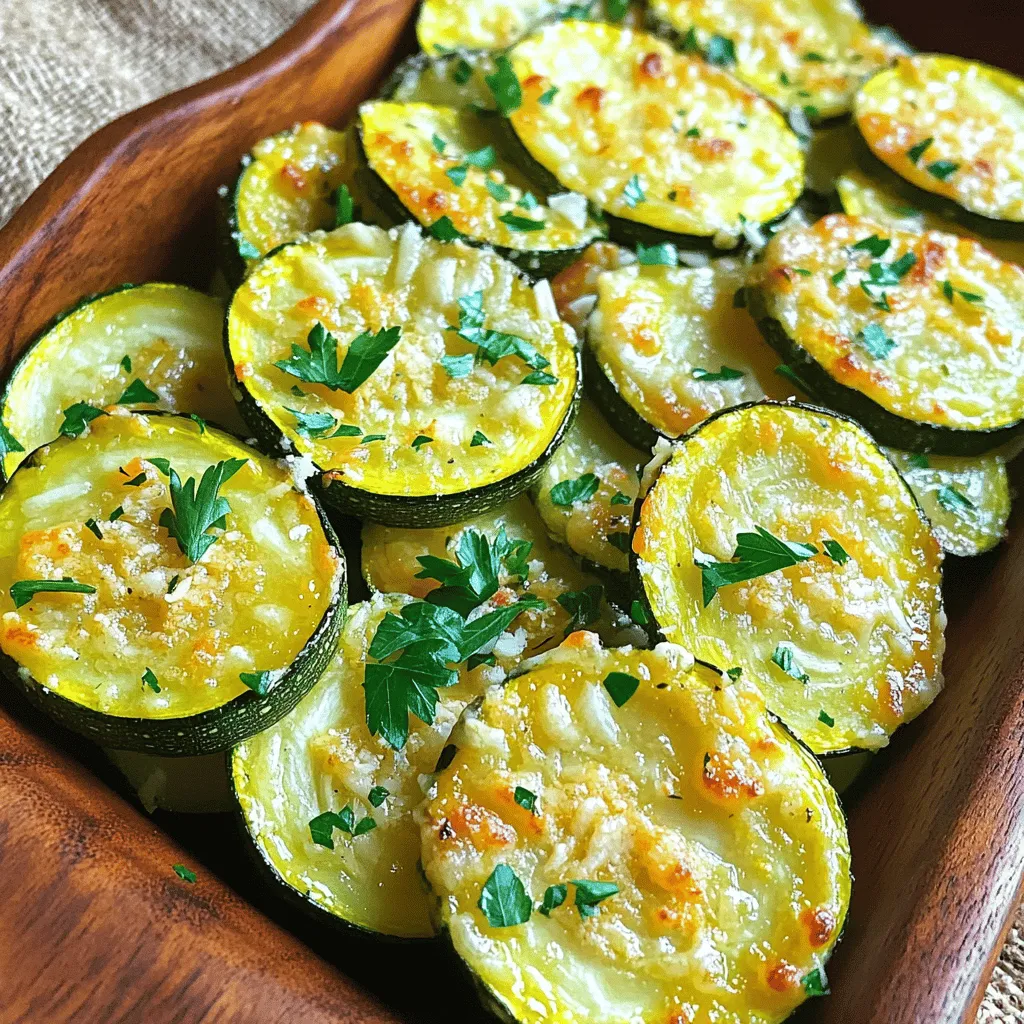
Are you ready to transform your weeknight dinner? My Roasted Garlic Parmesan Zucchini and Squash Delight is delicious, easy, and healthy. With just a few fresh ingredients, you can create …
![To make these vegan zucchini brownies, you need simple and healthy ingredients. Here’s the list: - 1 cup finely grated zucchini (about 1 medium zucchini) - 1 cup all-purpose flour - 1/2 cup cocoa powder - 1/2 cup coconut sugar (or brown sugar) - 1/2 teaspoon baking soda - 1/2 teaspoon baking powder - 1/4 teaspoon salt - 1/3 cup unsweetened applesauce - 1/3 cup maple syrup - 1/4 cup almond milk (or any plant-based milk) - 1 teaspoon vanilla extract - 1/2 cup dairy-free chocolate chips (optional) These ingredients work together to create rich and yummy brownies. Each one plays a key role in flavor and texture. You might not have every ingredient on hand. Here are some easy swaps: - Zucchini: You can use finely grated carrots instead. - All-purpose flour: Try whole wheat flour for a nuttier taste. - Coconut sugar: Brown sugar works well, too. - Unsweetened applesauce: Use mashed bananas if you prefer. - Almond milk: Any plant-based milk, like soy or oat, is great. These substitutions keep the recipe vegan and still tasty. Understanding the nutritional value can help you make informed choices. Here's a quick look: - Calories: About 150 per brownie - Fat: 6 grams - Carbohydrates: 24 grams - Fiber: 2 grams - Protein: 2 grams These brownies are lower in fat compared to regular ones. They still satisfy your sweet tooth without guilt. You can find the full recipe for these delicious vegan zucchini brownies to try this healthy treat at home. To make these vegan zucchini brownies, start by gathering all your ingredients. You will need zucchini, flour, cocoa, sugar, baking powder, and more. Prepping is key. Grate your zucchini finely. This helps it mix well and keeps the brownies moist. Measure your dry and wet ingredients separately. This way, you ensure the right balance. 1. Preheat the oven to 350°F (175°C). This step is important for even baking. 2. Grease your pan or line it with parchment paper. This helps with easy removal later. 3. Mix the wet ingredients in a large bowl. Combine grated zucchini, applesauce, maple syrup, almond milk, and vanilla. Stir until it blends well. 4. In a separate bowl, whisk together the flour, cocoa powder, coconut sugar, baking soda, baking powder, and salt. This keeps your dry mix even. 5. Add the dry mix to the wet mix. Use a spatula or wooden spoon. Stir gently until just blended. Overmixing can make the brownies tough. 6. Fold in chocolate chips if you want extra sweetness. This is optional but highly recommended. 7. Pour the batter into the prepared pan. Spread it evenly with the spatula. This helps it bake uniformly. 8. Bake for 25-30 minutes. Check for doneness by inserting a toothpick. It should come out mostly clean, with a few crumbs. 9. Cool in the pan for about 10 minutes. Then transfer to a wire rack. Let them cool completely before cutting. To check if your brownies are done, use a toothpick. Insert it into the center. If it comes out with a few moist crumbs, they are ready. If it comes out wet, they need more time. Remember, baking times can vary with different ovens. Keep an eye on them. Enjoy your rich and yummy vegan zucchini brownies! For the full recipe, refer to the earlier section. To make your brownies moist and chewy, use fresh zucchini. Grate it finely and squeeze out some excess water. This keeps the brownies rich. Applesauce adds moisture too. Use unsweetened applesauce for the best results. Also, don’t overmix the batter. Mix just until combined to avoid tough brownies. One common mistake is using too much flour. Measure it correctly to avoid dry brownies. Another mistake is baking them too long. Always check doneness with a toothpick. If it comes out with a few crumbs, they are ready. Letting them cool in the pan too long can make them soggy. For the perfect texture, use a mix of coconut sugar and maple syrup. This blend provides sweetness without being too heavy. If you want a fudgier brownie, reduce the flour slightly. Adding dairy-free chocolate chips enhances both flavor and texture. Experiment with these tips to find your ideal brownie! For the complete recipe, check out the Full Recipe. {{image_2}} You can customize your vegan zucchini brownies by adding nuts or dried fruits. Chopped walnuts or pecans give a nice crunch. Almonds can also work great. If you like dried fruits, try adding raisins or chopped dates. These add sweetness and texture. Just mix in about 1/2 cup of your choice into the batter. This small change can make a big difference in flavor and fun. If you need gluten-free brownies, I recommend using almond flour or a gluten-free flour blend. These options keep the brownies moist and tasty. You might need to adjust the liquid amounts slightly. Start with the same amount of liquid, then add more if needed. This way, you keep that rich and yummy delight without gluten. Spices and extracts can change the taste of your brownies. Adding a pinch of cinnamon or nutmeg brings warmth. You might also try a splash of almond or peppermint extract. These can add a new layer of flavor that surprises your taste buds. Experiment with different combinations to find your favorite. The options are endless, and it makes baking more exciting! For the complete recipe, check out the [Full Recipe]. To keep your vegan zucchini brownies fresh, store them in an airtight container. Place them at room temperature for up to three days. If you want to store them longer, move them to the fridge. They last about a week when chilled. Always let them cool completely before storing. This helps prevent sogginess. You can freeze these brownies for later enjoyment. First, cut them into squares. Wrap each piece tightly in plastic wrap. Then, place the wrapped brownies in a freezer-safe bag. They will stay fresh for about three months. When you’re ready to eat, just thaw them in the fridge or at room temperature. To reheat, use your oven for the best flavor. Preheat it to 350°F (175°C). Place the brownies on a baking sheet. Heat them for about 5-10 minutes. This warms them up and revives their texture. You can also microwave them for about 30 seconds. Just be careful not to overheat. Enjoy them warm or at room temperature! For the complete recipe, check out the Full Recipe section. No, you cannot taste the zucchini in these brownies. The zucchini adds moisture and keeps them soft. The cocoa powder and sweeteners mask any veggie flavor. You will only enjoy rich, chocolatey goodness. This recipe makes it fun to sneak in some veggies! These brownies last about 3 to 5 days when stored in an airtight container. You can keep them at room temperature. If you want them to last longer, store them in the fridge. Just remember to let them warm up a bit before eating! Yes, you can substitute the applesauce. You can use mashed bananas or even pureed pumpkin. Both options will keep the brownies moist. The flavors will change a little, but they will still taste great. Just stick to the same amount, about 1/3 cup. For the full recipe, you can check out the complete instructions and details. Vegan zucchini brownies are delicious and easy to make. We covered all the essential ingredients you need and suggested great substitutions. I shared detailed steps for preparing and baking, plus tips to check for doneness. You can avoid common mistakes to ensure your brownies are moist and chewy. Don't forget the fun variations to try! Store them well to keep them fresh. You can even freeze extras for later. Now, you’re ready to bake. Enjoy these treats that are both tasty and guilt-free!](https://tossedrecipes.com/wp-content/uploads/2025/07/be3da008-ef75-4a73-94ee-d6f0ebc6426c.webp)
Are you ready to indulge in a sweet treat that’s both healthy and guilt-free? My Vegan Zucchini Brownies are the perfect blend of rich flavor and wholesome ingredients. Made with …
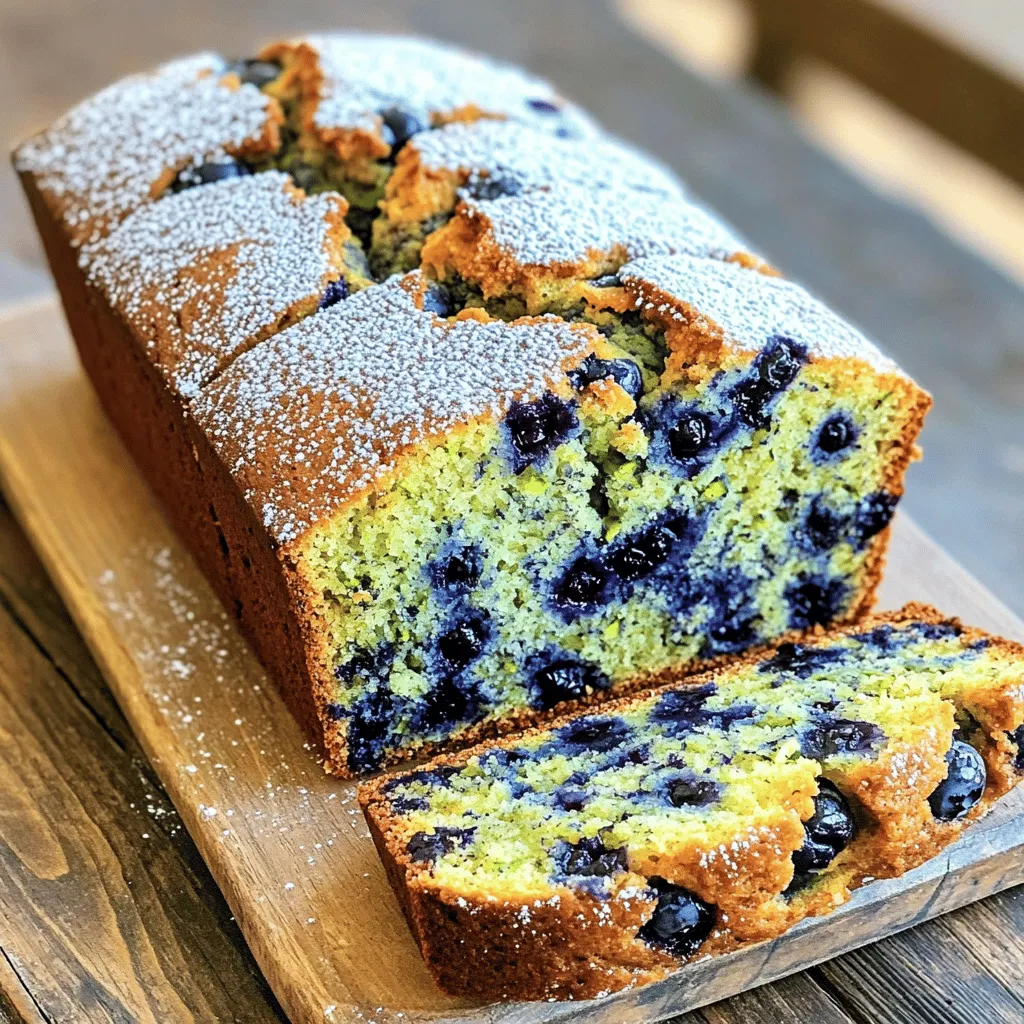
Are you ready to bake something delicious? This Blueberry Zucchini Bread is both tasty and easy! It’s a perfect way to make use of garden zucchini and plump blueberries. In …
. {{image_2}} To make this bread gluten-free, swap all-purpose flour for a gluten-free blend. Look for a mix that includes xanthan gum. This will help give the bread structure. You may also need to adjust the liquid slightly. Gluten-free flours absorb more moisture. So, add a little extra applesauce if needed. To create a vegan version, replace eggs with flaxseed meal. Mix one tablespoon of flaxseed meal with three tablespoons of water. Let it sit for five minutes to thicken. You can use coconut oil instead of vegetable oil. Use a plant-based applesauce for added flavor. This keeps the bread moist and tasty. You can boost the flavor of your bread in many ways. Consider adding: - Spices: Try ginger or allspice for warmth. - Add-ins: Toss in raisins or dried cranberries for a sweet twist. - Zest: Add lemon or orange zest for a fresh taste. These simple changes make your carrot apple zucchini bread unique and exciting! Check out the Full Recipe for more ideas. To keep your carrot apple zucchini bread fresh, store it in an airtight container. Place a layer of wax paper between the bread and the lid to absorb moisture. This helps maintain the bread's soft texture. You can also wrap it in plastic wrap first, then place it in the container. Keep it at room temperature for up to three days. Freezing is a great way to save your bread for later. First, let it cool completely. Then, slice the bread for easy thawing. Wrap each slice in plastic wrap, and then place them in a freezer bag. Make sure to remove as much air as possible. You can freeze the bread for up to three months. Carrot apple zucchini bread lasts about three days at room temp. If you freeze it, it can stay fresh for three months. To reheat, simply take a slice and warm it in the microwave for 10-15 seconds. For a lovely crust, toast it in a toaster or oven. Enjoy it warm for the best taste. For more details, check out the Full Recipe. Yes, you can change some ingredients. Use any type of apple you like. If you want to skip sugar, try honey or maple syrup. You can also swap vegetable oil for melted coconut oil. For gluten-free, use a gluten-free flour blend. Just remember, these changes may change the taste a bit. To check if the bread is done, insert a toothpick into the center. If it comes out clean or with just a few crumbs, the bread is ready. If it has wet batter on it, bake a bit longer. The top should be golden brown, and the edges should pull away from the pan. Absolutely! You can make mini loaves. Just fill mini loaf pans about two-thirds full with batter. Bake them for around 25 to 30 minutes. Check them with a toothpick like you would for the large loaf. This is a fun way to share with friends. To store leftover bread, let it cool completely first. Wrap it in plastic wrap or foil. You can keep it at room temperature for up to three days. If you want to keep it longer, place it in the freezer for up to three months. Just thaw it in the fridge when you’re ready to eat. This blog post covered a delightful carrot, apple, and zucchini bread recipe. You learned about ingredients, steps, and variations to make it yours. Remember to store your bread properly for longer freshness. Try different flavors or make it gluten-free or vegan. Follow these tips and tricks for perfect results every time. With practice, you’ll create a tasty treat that everyone will enjoy. Baking should be fun, so experiment and share your results! Enjoy this delicious bread in good company.](https://tossedrecipes.com/wp-content/uploads/2025/07/2bacab0d-553b-4236-9b44-90450d566770.webp)
Are you ready to bake something delicious? This Carrot Apple Zucchini Bread is a simple and tasty treat that will impress everyone. It combines fresh fruits and veggies for a …