Tomato Pie Delightful Recipe for a Flavorful Meal
![- Ripe tomatoes: Choose firm, juicy tomatoes. Varieties like heirloom or vine-ripened work best. They bring rich flavor and moisture to your pie. - Types of cheeses: This recipe uses three cheeses. Mozzarella gives a lovely melt, ricotta adds creaminess, and Parmesan adds a salty bite. You can mix and match to suit your taste. - Essential herbs and spices: Fresh herbs make a big difference. Use basil for sweetness and thyme for earthiness. Garlic adds depth, while salt and pepper enhance the flavors. - Suggested additions: If you want to mix it up, add crispy bacon or caramelized onions. They add a savory kick that pairs nicely with the tomatoes. - Seasoning options: Feel free to experiment! Try adding Italian seasoning or a sprinkle of smoked paprika. A pinch of red pepper flakes gives a nice heat. - Variations in cheese types: You can swap ricotta for goat cheese or use cheddar instead of mozzarella. Each cheese brings its own unique flavor to the pie. For the complete recipe, check out the Full Recipe section. To start, let's pre-bake the pie crust. Take your pre-made crust and press it into a 9-inch pie dish. Use a fork to prick the bottom. This helps prevent bubbling. Bake it at 375°F (190°C) for about 10 minutes. You want it lightly golden. Once done, let it cool for a bit. Next, mix the cheese and herb filling. In a medium bowl, combine ricotta cheese, half a cup of mozzarella, and Parmesan cheese. Add chopped basil, thyme, minced garlic, olive oil, salt, and pepper. Stir it well until creamy. This mix adds great flavor to the pie. Now, arrange the tomatoes in the crust. Start by layering half of the sliced tomatoes at the bottom. Sprinkle a bit of salt and pepper over the tomatoes. This seasoning is key for flavor. Then, spread the ricotta mixture evenly over this layer. After that, add the rest of the tomato slices on top. Finish the layers with the remaining mozzarella cheese. Sprinkle it evenly across the top. If you like a kick, add a pinch of red pepper flakes. This step adds a nice spice to the pie. For baking, place the pie in the preheated oven. Bake it for 30 to 35 minutes. Look for the cheese to turn golden and bubbly. The tomatoes should also be tender. These signs show the pie is done. Once out of the oven, let it cool for about 10 minutes before slicing. Enjoy your flavorful creation! If you're interested in more details, you can check the Full Recipe. Choosing the right tomatoes: Use ripe, juicy tomatoes for the best flavor. Varieties like Roma or heirloom work well. Look for tomatoes that feel heavy and have a rich color. Avoid ones with blemishes or soft spots. Fresh, in-season tomatoes give the pie a sweet taste. How to avoid a soggy crust: To prevent a soggy crust, pre-bake it. This step helps set the base. After fitting the crust into your pie dish, poke holes in the bottom with a fork. Bake it at 375°F (190°C) for about 10 minutes. Let it cool slightly before adding the filling. Ideal accompaniments to enhance flavors: Serve your tomato pie warm with a fresh garden salad. A light vinaigrette pairs well. You can also add crusty bread or a side of roasted vegetables for more texture. These sides balance the rich cheese and tomatoes. Recommended garnishes for presentation: Garnish each slice with fresh basil leaves for color and flavor. Drizzle a bit of olive oil on top for shine. You can also sprinkle grated Parmesan cheese before serving. These small touches make the dish pop visually. Common mistakes to avoid: Don’t skip the pre-baking step. This is key for a firm crust. Also, avoid overloading the pie with too many tomatoes. Stick to the recipe for balanced flavors. Lastly, let the pie cool before slicing to avoid messy pieces. How to customize the recipe: Feel free to mix in some caramelized onions or cooked bacon. You can swap cheeses too, using feta or goat cheese for a twist. Adjust herbs based on what you like. Experimenting will help you find your perfect blend. {{image_2}} Classic tomato pie is all about fresh tomatoes and creamy cheese. The Southern-style version shines with its buttery crust, ripe tomatoes, and a rich blend of cheeses. You often find it topped with basil and sometimes a sprinkle of sugar to balance the acidity of the tomatoes. In many Southern homes, this dish is a summer staple. Italian influences bring a different flair. In Italy, you might see tomato pie made with a flaky pastry and regional cheeses. It often includes herbs like oregano and fresh garlic, giving it a robust flavor. Each region uses local ingredients, creating unique versions worth trying. Not everyone needs a traditional crust. For gluten-free folks, a chickpea or almond flour crust works well. You can also use cauliflower to make a low-carb alternative. If you want a vegan twist, swap out the cheese for plant-based options. Vegan ricotta or cashew cream can add creaminess without dairy. Nutritional yeast can give a cheesy flavor, which many find delightful. The beauty of tomato pie lies in its versatility. You can experiment by adding different vegetables. Spinach, zucchini, or bell peppers can enhance the dish's flavor and nutrition. Want a creative twist? Try adding pesto for a burst of flavor or some roasted garlic for depth. You could even throw in some artichoke hearts or sun-dried tomatoes for a gourmet touch. The possibilities are endless! To keep your tomato pie fresh, you have two main options: refrigeration and freezing. - Refrigeration: If you plan to eat the pie within a few days, store it in the fridge. Cover it with plastic wrap or foil. This keeps the pie moist and prevents it from absorbing other smells. - Freezing: If you want to save it for later, freezing is best. Wrap the pie tightly in plastic wrap, then place it in a freezer bag. This can keep your pie tasty for up to three months. When it’s time to enjoy your frozen pie, let it thaw in the fridge overnight. To reheat, place it in a preheated oven at 350°F (175°C) for about 20-25 minutes. Check that the center is warm. This method helps the crust stay crisp. In the fridge, your tomato pie lasts about 3 to 5 days. After that, it may not taste good anymore. Look for signs that the pie has gone bad: - An off smell - Mold on the crust or filling - A change in texture If you see any of these signs, it's best to throw it away. If you want to save time, you can prepare your tomato pie ahead of time. Make the filling and crust in advance, then assemble and bake when ready. Freezing portions is also a smart idea. Cut the pie into slices before freezing. This way, you can enjoy a single slice anytime. Just reheat as needed. For the complete recipe, check out the [Full Recipe]. Tomato pie is a savory dish made with fresh tomatoes and cheese. It often has a flaky crust. This dish comes from the South, where tomatoes grow well. People have enjoyed it for many years, especially in summer. You can find tomato pie in many family cookbooks. It combines the flavors of summer tomatoes with creamy cheese. Yes, you can prepare tomato pie ahead of time. Make it up to a day before serving. Just bake it and let it cool. After cooling, cover it and place it in the fridge. When ready to eat, simply reheat it. You can also serve it cold if you like. The best tomatoes for tomato pie are ripe and juicy. Varieties like beefsteak, heirloom, and Roma work well. Choose tomatoes that are firm but slightly soft. The ripeness adds to the flavor. Avoid using very watery tomatoes, as they can make the crust soggy. For the best taste, try to pick tomatoes at their peak ripeness. Tomato pie is a tasty dish made with fresh tomatoes, cheese, and herbs. You learned how to select ripe tomatoes and choose the right cheeses. The step-by-step guide showed you how to layer ingredients for the best flavor. Also, tips helped to avoid a soggy crust and suggested tasty sides. You can try fun variations or adapt the recipe to fit your needs. Remember to store any leftovers safely. Enjoy making your own tomato pie. It’s a rewarding dish that can impress anyone.](https://tossedrecipes.com/wp-content/uploads/2025/06/4027f49a-9152-40fc-ae46-5c6a85aec748.webp)
Are you ready to take your taste buds on an adventure? Tomato Pie is a delicious dish that showcases fresh, ripe tomatoes in a way you’ve never tasted before. In …
Are you ready to take your taste buds on an adventure? Tomato Pie is a delicious dish that showcases fresh, ripe tomatoes in a way you’ve never tasted before. In …
If you love warm, sweet desserts, you’ll adore this Peach Crisp recipe. It’s easy to make, and perfect for anyone. You can whip it up for a family dinner or …
![- 4 ripe peaches, pitted and sliced - 2 cups whole milk - 1/2 cup granulated sugar - 3 large eggs - 1 teaspoon vanilla extract - 3 tablespoons cornstarch - 1/4 teaspoon ground cinnamon - A pinch of salt - Fresh mint leaves for garnish (optional) - Medium saucepan - Mixing bowl - Whisk - 8x8-inch baking dish Choosing ripe peaches Ripe peaches are key for this dessert. Look for peaches that feel soft when you gently squeeze them. They should have a sweet smell and a rich color. Avoid any with bruises or dark spots. Fresh vs. canned peaches Fresh peaches offer the best taste and texture. However, canned peaches can work in a pinch. Just drain them well before using. The flavor may differ, but they are still a good option. For the best results and to make this Easy Peach Custard Dessert shine, always try to use ripe, fresh peaches. The full recipe guides you through the steps to create this delightful treat. First, set your oven to 350°F (175°C). This is the perfect temperature for baking custard. Next, grease an 8x8-inch baking dish. You can use butter or a non-stick spray. This step keeps the custard from sticking, making it easier to serve. Heat 2 cups of whole milk in a medium saucepan. Use medium heat until the milk is steaming, but do not let it boil. Remove the saucepan from the heat. In a mixing bowl, whisk together 3 large eggs and 1/2 cup of granulated sugar. Mix until it looks frothy. Slowly add the warm milk to the egg mixture. Keep whisking. This process is called tempering, which helps prevent the eggs from scrambling. Stir in 3 tablespoons of cornstarch, 1 teaspoon of vanilla extract, 1/4 teaspoon of ground cinnamon, and a pinch of salt. Make sure everything is mixed well and smooth. Now, layer the peaches in the greased baking dish. Use 4 ripe peaches that you have pitted and sliced. Spread them evenly on the bottom. Next, pour the custard mixture over the peaches. Make sure all the peaches are covered. Bake the dish in your preheated oven for 30-35 minutes. The custard should be set and lightly golden on top. Enjoy making this simple yet special treat! Tempering eggs is key for perfect custard. This step gently warms the eggs. It helps prevent them from scrambling. To temper, slowly add warm milk to the beaten eggs while whisking. This method keeps your custard smooth. To check if your custard is set, gently shake the dish. If it jiggles slightly in the center, it's ready. You can also insert a knife. If it comes out clean, your custard is done. Warm custard offers a cozy treat. Chilled custard feels refreshing, especially on hot days. Try serving it warm with a scoop of ice cream. Or enjoy it chilled with whipped cream. Both options delight the taste buds! For garnishing, use fresh mint leaves. They add a nice color and flavor. A light dusting of cinnamon also looks great. It makes your dessert pop even more. You can add spices like nutmeg for extra warmth. A pinch blends well with the peach flavor. Consider mixing in other fruits too. Berries or apples can add new tastes. They make your peach custard even more special. Explore the [Full Recipe] for more details on making this delightful dessert! {{image_2}} You can switch up the fruit in this dessert. Fresh berries like blueberries or raspberries work great. They add a nice tart flavor that mixes well with the creamy custard. Apples also make a tasty choice. Just slice them thin and layer them in the dish. You can even combine different fruits. Mixing peaches with berries can create a colorful and fruity treat. If you need a dairy-free version, use almond or coconut milk instead of whole milk. These options taste great and still keep the custard creamy. For those watching sugar, try cutting the sugar in half. You can also use a sugar substitute like stevia or monk fruit for a lower-calorie treat. Both adjustments help you enjoy this dessert while fitting your diet. Want to save time? You can use a slow cooker. Pour your custard mixture and peaches in the cooker and set it on low for a few hours. This method makes the custard soft and creamy. If you’re in a hurry, try the microwave. Pour the mixture into a microwave-safe dish and cook it in short bursts. Check it often to avoid overcooking. You can find the full recipe to try these methods at home. To store leftovers, let the peach custard dessert cool first. Then, cover it tightly with plastic wrap or transfer it to an airtight container. This helps keep it fresh. You can store it in the fridge for up to three days. Glass containers work well for storage. They don’t absorb odors and are easy to clean. Yes, you can freeze peach custard dessert! Just make sure it is completely cool. Cut it into portions for easier defrosting. Wrap each piece in plastic wrap and then in aluminum foil. This extra layer helps prevent freezer burn. When you’re ready to eat, thaw it overnight in the fridge. To reheat, place the custard in the oven at 350°F (175°C) for about 15 minutes. For the best quality, use leftovers within three days if refrigerated. If frozen, aim to eat it within two months for the best taste. Over time, the texture may change. It might not taste as fresh after a long freeze. Enjoy your peach custard dessert while it is still creamy and delicious! To know if your custard is done, look for a few key signs. First, it should be set in the middle. You can gently shake the dish. If the center jiggles slightly but not too much, it's ready. The top should have a light golden color. This shows that it has baked well. If you insert a knife, it should come out clean. If it’s wet, bake it a bit longer. Yes, you can use frozen peaches. However, they may change the texture a bit. Frozen peaches often become softer when cooked. This can make your custard less firm. The flavor might also be less fresh than ripe peaches. If you use frozen ones, let them thaw and drain excess water. This step helps keep your custard from being too watery. Making this dessert ahead is simple. You can prepare the custard and peaches a day in advance. Just follow the recipe until baking. Cover the dish and store it in the fridge. When you are ready, bake it as directed. The custard can sit in the fridge for up to two days. Just remember to let it cool before serving. No, it is not necessary to use whole milk. You can use other types of milk. Almond milk or oat milk works well too. Just know that the texture might change. Whole milk gives a creamier feel. If you choose a lower fat milk, the custard may be less rich but still tasty. You now know how to make a delicious peach custard dessert. We talked about the ingredients, key steps, and helpful tips. Choosing the right peaches is crucial for taste. Remember, you can customize this dessert with other fruits or methods. Store leftovers in the fridge or freeze them for later. Enjoy making and sharing this treat with friends and family. Your kitchen is now ready for a fun and tasty adventure!](https://tossedrecipes.com/wp-content/uploads/2025/06/0e68ad5c-10af-4363-8698-f6b27dfee2eb.webp)
If you’re craving a sweet treat that’s simple yet special, you’re in the right place! This Easy Peach Custard Dessert combines the creamy goodness of custard with fresh, juicy peaches. …
![To make pickled red cabbage, gather these simple ingredients: - 1 medium red cabbage, thinly sliced - 1 cup apple cider vinegar - 1 cup water - 2 tablespoons sugar - 1 tablespoon salt - 1 teaspoon mustard seeds - 1 teaspoon coriander seeds - 1 teaspoon black peppercorns - 2 cloves garlic, smashed - 1 red chili, sliced (optional for heat) These ingredients create a bright and tangy flavor. The red cabbage adds crunch and color. Apple cider vinegar gives it a zesty kick. The sugar and salt balance the flavors perfectly. Mustard seeds, coriander, and peppercorns bring in warm notes. Garlic adds a savory touch, and the chili can spice things up if you like heat. This pickled red cabbage recipe is quick, easy, and delicious. You can find the full recipe at the end of this article. Enjoy your crunchy delight! Start by removing the tough outer leaves from your red cabbage. Then, cut the cabbage into quarters. Slice each quarter into thin strips. This will help the cabbage pickle evenly and absorb the brine well. In a large saucepan, combine the apple cider vinegar, water, sugar, and salt. Stir this mixture over medium heat until the sugar and salt dissolve completely. Next, add mustard seeds, coriander seeds, black peppercorns, smashed garlic, and red chili if you like it spicy. Let it simmer for about 5 minutes. This step releases the flavors from the spices into the brine. Now it’s time to pack the cabbage. Take a clean glass jar and tightly pack the thinly sliced cabbage inside. Pour the cooled vinegar mixture over the cabbage, making sure it is fully submerged. If you need to add more water to cover the cabbage, go ahead. Seal the jar with a lid. Let it cool at room temperature before placing it in the fridge. For the best taste, allow the cabbage to pickle for at least 24 hours. You can store it in the fridge for up to 2 weeks. For the full recipe, check out the detailed instructions provided. To keep your pickled red cabbage crunchy, follow these tips: - Use fresh cabbage: Freshness is key. Look for firm, vibrant heads. - Slice thinly: Thin strips soak up the brine better and stay crisp. - Salt properly: Salt draws out moisture. It helps keep the crunch intact. - Brine cooling: Let your brine cool before adding cabbage. This helps retain the crunch. You can boost the flavor of your pickled cabbage with these extras: - Add fruits: Try adding apple slices or orange peels for a sweet twist. - Use herbs: Fresh dill or thyme brings a new layer of taste. - Experiment with spices: Cardamom or cloves can add warmth and depth. Pickled red cabbage is versatile. Here are some great pairings: - Tacos: It adds a tangy crunch to any taco. - Sandwiches: Use it in sandwiches or burgers for a zesty bite. - Salads: Toss it into salads for added color and flavor. - Grilled meats: It complements grilled chicken or pork beautifully. For the full recipe, check out the [Full Recipe]. {{image_2}} To make your pickled red cabbage spicy, try different chili options. You can use fresh red chili, jalapeños, or even crushed red pepper flakes. Each adds its unique heat. Adjust the amount of chili based on your taste. If you love spice, go for more. If you prefer mild, stick to just a slice. You can also mix different types of chili for a fun flavor twist. For a sweet and sour twist, adjust the sugar levels and add fruits. You can use honey, maple syrup, or even agave nectar for extra sweetness. Consider adding slices of apple or pear. These fruits blend well with the cabbage and add a nice crunch. You can also throw in a bit of grated ginger for extra zing. This combination will surprise your taste buds and add a refreshing touch. Don’t stop at just red cabbage! You can add other vegetables to your pickling mix. Carrots, radishes, and cucumbers work well. Slice them thinly for quick pickling. You can mix these veggies with your cabbage or pickle them separately. Each vegetable will bring its flavors and textures. A colorful mix makes for a beautiful dish, too. Store your pickled red cabbage in a clean glass jar. Choose a jar that seals tightly. This keeps air out and helps the cabbage stay crispy. Make sure the cabbage is fully submerged in the brine. If it floats, add a weight or more brine to keep it covered. Always seal the jar well to prevent leaks. Pickled red cabbage lasts about two weeks in the fridge. Keep it chilled and check the lid is on tight. After two weeks, the flavor might change slightly. It’s best to eat it fresh for the best taste. Look for signs of spoilage before eating. If you see mold on the surface, toss it out. An off smell or slimy texture means it’s time to discard it. Fresh pickled cabbage should smell tangy and crisp. Trust your senses; they are your best guide. Pickled red cabbage needs at least 24 hours to pickle. This time helps the flavors blend and deepen. The longer it sits, the better it tastes. I often wait 48 hours for best results. After that, it will last about two weeks in the fridge. Yes, you can use other vinegars. White vinegar works well, but it has a sharper taste. Rice vinegar gives a milder flavor. Each type of vinegar will change the taste a bit. Choose based on what you enjoy! Yes, it is safe to eat pickled cabbage after a week. If stored well in the fridge, it stays fresh. Look for any signs of spoilage, like an off smell or unusual color. If it looks and smells good, it is safe to enjoy. Pickled red cabbage pairs well with many dishes. It adds crunch and tang to tacos, salads, or sandwiches. Use it as a topping for burgers or on a charcuterie board. It goes great with rich meats like pork or beef too. For detailed instructions, check out the [Full Recipe](#). In this post, we explored how to make pickled red cabbage. You learned about the ingredients, step-by-step instructions, and storage tips. We also discussed variations and serving suggestions to enhance your dishes. Pickled cabbage adds a crisp, tangy burst to meals and stays fresh for weeks. Remember to check for spoilage signs to ensure quality. With this guide, you can enjoy delicious pickled red cabbage at home. Try it with your favorite dishes and elevate your meals today.](https://tossedrecipes.com/wp-content/uploads/2025/06/02a0502e-8af8-4242-a5ae-df73497406fd.webp)
Are you ready to add a burst of color and flavor to your meals? My quick and crunchy pickled red cabbage recipe is just what you need! With simple ingredients …

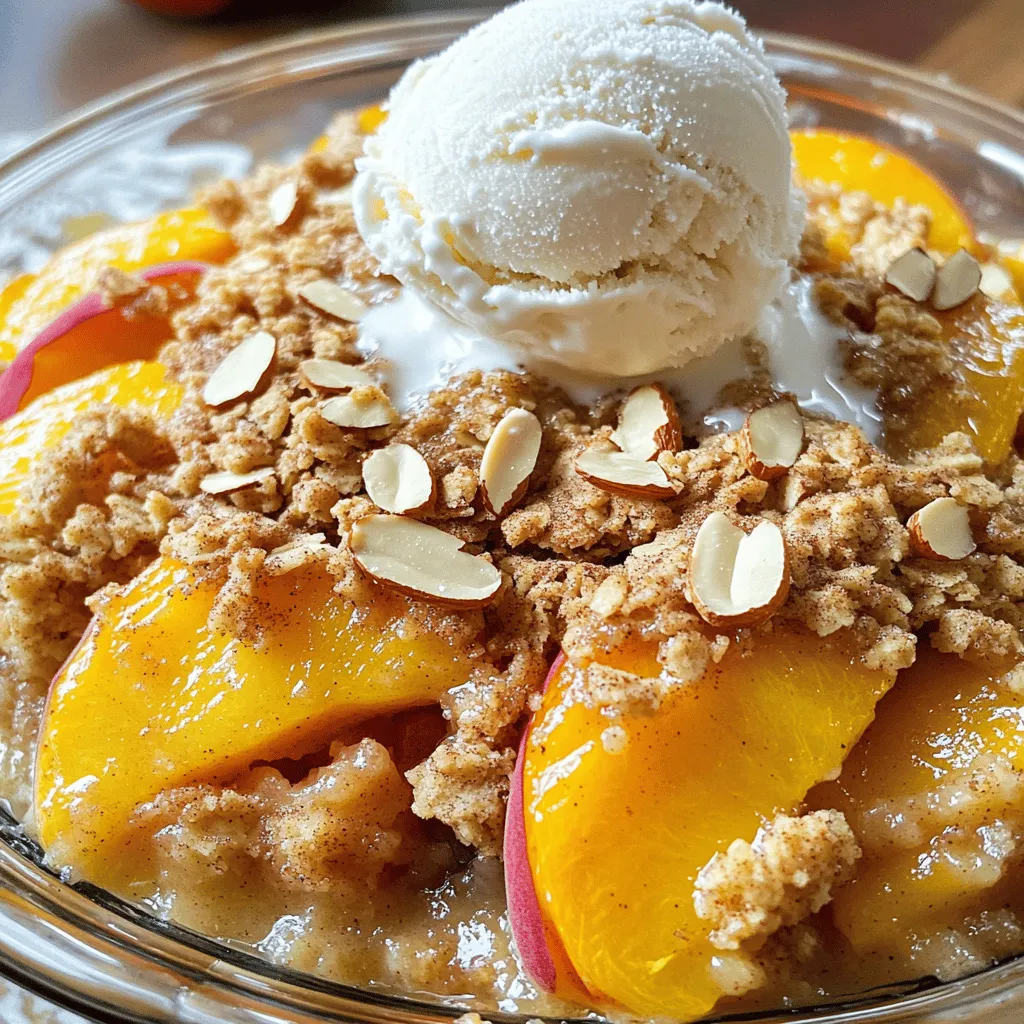
Get ready to dive into a world of sweet goodness with my Easy Homemade Peach Cobbler! This simple and delicious dessert highlights fresh peaches, making it a perfect choice for …

Get ready to indulge in Extra Crispy Buttermilk Fried Chicken like never before! With a juicy, flavorful interior and a delightfully crunchy exterior, this fried chicken dish will please any …

Get ready to treat your taste buds with a Cherry Tomato and Cheese Galette! This simple yet tasty dish blends fresh cherry tomatoes and creamy cheeses, all enveloped in a …

Are you ready to elevate your summer cookouts with Garlic Butter Grilled Corn on the Cob? This easy delight combines sweet, juicy corn with rich, savory garlic butter to create …
. - Use potato starch for an ultra-crispy coating. - Ensure the oil temperature is consistent during frying. To get that perfect crunch, potato starch is your best friend. This starch gives a light and crispy texture that you won't find with regular flour. It absorbs moisture while frying, creating a lovely crisp shell. Keeping the oil temperature steady is key too. If the oil is too cool, the chicken will soak up oil and become greasy. If it's too hot, the coating can burn before the chicken cooks. Aim for about 180°C (350°F). A thermometer helps keep it just right. - Overcrowding the pan which leads to soggy chicken. - Not allowing chicken to marinate long enough. One common mistake is overcrowding the pan. When you add too many chicken pieces at once, the temperature drops. This results in soggy chicken instead of crispy. Fry in small batches to keep the heat steady. Another mistake is rushing the marinating process. Marinate the chicken for at least 30 minutes. If you have time, go for 2 hours. This longer marination helps the flavors soak in, making the chicken juicy and tasty. - Complement with sides like rice, salad, or pickles. - Pair with dipping sauces like mayonnaise or spicy sauce. When serving, think about sides that balance your meal. Steamed rice, a fresh salad, or tangy pickles make great companions. They add freshness and texture to the crispy chicken. Don’t forget the sauces! Creamy mayonnaise or a spicy dipping sauce can elevate the dish. These options allow everyone to customize their bites. For ideas, check out the Full Recipe for more pairings. {{image_2}} You can switch up the marinade to fit your taste. For a spicy kick, add chili paste or sriracha. These will make your chicken burst with heat. If you prefer sweet, try using honey or increase the mirin. This will add a rich, sweet layer to the dish. You can also play with the type of chicken you use. Swap chicken thighs for chicken breast if you want a leaner dish. Both options taste great in this recipe. You can also experiment with different starches or flours for the coating. Cornstarch, rice flour, or even breadcrumbs can change the texture. How you serve your chicken can change the meal. Try it as a sandwich with your favorite toppings. You can also wrap it in lettuce for a fresh, crunchy bite. Another idea is to add it to a rice bowl with veggies and sauce. Each option offers a new way to enjoy this crispy delight. After enjoying your Japanese fried chicken, store any leftovers in an airtight container. This keeps the chicken fresh. You can refrigerate it for up to 3 days. Make sure to let it cool before sealing it up. This helps keep the flavor and moisture locked in. When it’s time to eat your leftovers, reheating is key. The best way to do this is in an oven or air fryer. Both methods help restore the crispiness you love. Set the oven to 180°C (350°F) and warm the chicken for about 10-15 minutes. If using an air fryer, heat it at the same temperature for about 5-8 minutes. This will bring back that crunchy texture. If you want to save your fried chicken for later, freezing is a great option. Place the cooked chicken in a freezer-safe bag. Remove as much air as possible before sealing. You can freeze it for up to 1 month for future meals. When ready to eat, thaw in the fridge overnight before reheating. Japanese fried chicken, or karaage, is a popular dish in Japan. It features marinated chicken pieces, deep-fried until crispy. This dish symbolizes comfort food in Japanese culture, often served at home or festivals. The marinade usually includes soy sauce, garlic, and ginger, giving it a savory taste. The crispy coating adds texture, making it a favorite among many. Yes, you can prepare Japanese fried chicken ahead of time. Marinate the chicken and coat it, then store it in the fridge. Fry it just before serving for the best results. If you have leftovers, refrigerate them in an airtight container. They will stay fresh for up to three days. When serving Japanese fried chicken, consider these tasty sides: - Steamed rice or fried rice - Fresh salad with a light dressing - Pickled vegetables for a crunchy contrast - Miso soup for a comforting touch - Cold beer or green tea to drink To get the crispiest chicken, follow these tips: - Use potato starch for the coating; it makes a great crunch. - Heat the oil to 180°C (350°F) before frying. - Fry in small batches. This keeps the oil hot and the chicken crispy. - Let the chicken rest on paper towels to drain excess oil. Japanese fried chicken and KFC differ in many ways: - Flavor: Karaage has a savory, umami flavor from the marinade, while KFC is often more seasoned. - Coating: Karaage uses potato starch, making it lighter and crispier than KFC's breaded coating. - Preparation: Japanese fried chicken is marinated first, while KFC has a secret blend of spices. For a full recipe on making this delicious dish, check out the [Full Recipe]. This recipe for Japanese Fried Chicken combines tender chicken thighs with a crispy coating. Marinating enhances the flavors, while simple frying techniques ensure perfect texture. Use potato starch for extra crunch, and avoid overcrowding the pan to keep each piece crispy. You can also explore different marinades and serving options to customize your dish. Remember to store any leftovers properly for delicious meals later. With these tips, you’ll create a crowd-pleasing dish every time. Enjoy your cooking and the tasty results it brings!](https://tossedrecipes.com/wp-content/uploads/2025/06/dc137012-94de-46b7-9848-0106089a4693.webp)
Are you ready to indulge in a crispy treat? Japanese Fried Chicken, or Karaage, is a beloved dish that combines juicy chicken with a crunchy outer layer. In this guide, …

Peach cobbler is a comfort food classic that never disappoints. In this post, I’ll share my easy old-fashioned peach cobbler recipe, perfect for any home cook. With just a handful …