Baked Salmon Foil Packs Quick and Easy Dinner Delight

If you need a quick and tasty dinner, Baked Salmon Foil Packs are a must-try! These packs are easy to make and keep clean-up simple. You’ll enjoy fresh salmon, colorful …
If you need a quick and tasty dinner, Baked Salmon Foil Packs are a must-try! These packs are easy to make and keep clean-up simple. You’ll enjoy fresh salmon, colorful …
![To make a great peach cobbler, you need simple and fresh ingredients. Here’s what you will use: - 6 fresh peaches, peeled and sliced - 1 cup granulated sugar, divided - 1 teaspoon cinnamon - 1 tablespoon lemon juice - 1 cup all-purpose flour - 1 tablespoon baking powder - 1/2 teaspoon salt - 1 cup milk - 1/2 cup unsalted butter, melted - 1 teaspoon vanilla extract - 1/2 teaspoon nutmeg (optional) These ingredients come together to create a sweet, juicy filling and a soft, buttery topping. Choosing the right peaches is key to your cobbler. Look for peaches that are firm yet slightly soft when you press them. Their color should be bright yellow or golden, with a bit of red on the skin. Avoid any that have green patches, as they are not ripe yet. The best peaches offer a sweet aroma. If you find them a bit hard, let them sit at room temperature for a day or two. While the classic recipe is amazing, you can add some optional ingredients for a twist. A pinch of nutmeg can add warmth to the flavor. You can also try adding a splash of almond extract for a nutty taste. If you like a bit of crunch, consider sprinkling some toasted nuts on top before baking. These little touches can elevate your peach cobbler to the next level. For the full recipe, check out the section above. Start by washing your peaches. Peel them and slice them into thin pieces. This helps them cook evenly. In a bowl, mix the sliced peaches with 1/2 cup sugar, cinnamon, and lemon juice. Toss them well. Set this bowl aside. The juices from the peaches will mix with the sugar and spices. This will make your cobbler sweet and tasty. Next, grab another bowl. In this bowl, whisk together the flour, baking powder, salt, and the rest of the sugar. This gives your cobbler a nice rise. Slowly add in the milk, melted butter, and vanilla. Mix until smooth. If you like, you can fold in nutmeg for extra flavor. Now, it's time to put everything together. Grease a 9x13 inch baking dish with butter. Pour the batter into the dish. Spread it out evenly. Next, take the peach mixture and spoon it over the batter. Make sure to include all the juices. Do not stir it! Let the layers be. This helps create a beautiful cobbler as it bakes. Preheat your oven to 350°F (175°C). Once your oven is ready, place the baking dish inside. Bake it for 40 to 45 minutes. You want it to turn golden brown on top. To check if it’s done, insert a toothpick into the center. If it comes out clean, it’s ready! Allow the cobbler to cool for a bit before serving. This enhances the flavor and makes it easier to slice. For the best enjoyment, serve it warm. A scoop of vanilla ice cream on top makes it even better. This recipe is not just about taste; it's about making sweet memories. Try the Full Recipe for more details! To get the best texture for your peach cobbler, pay attention to your batter. Mix it just enough to combine the wet and dry ingredients. Overmixing can make it tough. The batter should be thick but still pourable. Pour it into the baking dish without stirring in the peaches. As it bakes, the batter rises and creates a light, fluffy texture that hugs the juicy peaches. One common mistake is using unripe or overly soft peaches. Choose peaches that are firm but yield slightly to gentle pressure. This balance gives your cobbler the perfect sweetness. Another mistake is stirring the peach mixture into the batter. This can ruin the layers. Remember, let the peaches sit on top. Finally, check your oven temperature. If it’s too hot, the cobbler may burn before it cooks through. Use an oven thermometer for accuracy. If you want a healthier option, you can swap some ingredients. Use whole wheat flour instead of all-purpose flour. This adds fiber and nutrients. For a dairy-free version, almond milk or oat milk works great in place of regular milk. If you need a sugar substitute, try maple syrup or agave nectar. Adjust the amount, as these sweeteners are sweeter than sugar. These simple swaps keep the dish tasty while meeting your needs. For the full recipe, check out the [Full Recipe]. {{image_2}} You can switch up the fruit in your cobbler. Try using berries like blueberries or strawberries. Apples and pears also work well. Each fruit gives a unique flavor. Mixing fruits can create a tasty twist too. For example, peach and raspberry make a fun combo. Just keep the same sugar and spice amounts for best results. The topping for your cobbler can change the whole dish. Instead of a batter, you can use biscuits. Just drop spoonfuls over the fruit. This gives a nice, flaky texture. You can also try a crumble topping. Mix oats, flour, and brown sugar for a crunchy finish. Both options bring new flavors and textures to your peach cobbler. Serving your peach cobbler is easy and fun. I love serving it warm. A scoop of vanilla ice cream on top makes it even better. Whipped cream is another great choice. For a fresh touch, add a sprig of mint. Pair your cobbler with a cup of coffee or sweet tea. It’s a perfect match for any gathering. You can find the full recipe at the end of the article. To keep leftover peach cobbler fresh, let it cool first. Then, cover it tightly with plastic wrap or aluminum foil. You can also store it in an airtight container. Place it in the fridge. It will stay good for about 3 to 4 days. If you want to enjoy it later, freezing is a great option. When you are ready to eat the cobbler, preheat your oven to 350°F (175°C). Place the cobbler in an oven-safe dish. Cover it with foil to keep it moist. Heat for about 15 to 20 minutes. If you like a crispy top, remove the foil for the last 5 minutes. You can also reheat it in the microwave for 30 to 60 seconds. Just make sure to keep an eye on it to avoid overheating. Freezing peach cobbler is simple. Slice it into portions and place them in freezer-safe bags. Remove as much air as you can to prevent freezer burn. You can store it this way for up to 3 months. When you want to enjoy it, thaw it in the fridge overnight. Then, follow the reheating instructions above. Enjoy the taste of summer any time of year with this peachy delight! For the full recipe, refer back to the earlier section. Southern Peach Cobbler has roots in the American South. It began as a way to use fresh peaches in summer. This dish became popular in the 19th century. Early settlers made it with simple ingredients. They wanted to make something sweet and comforting. Over time, cooks added their own spin. Each family has its special way of making it. Peach cobbler now represents Southern hospitality and love for good food. Yes, you can use canned peaches! Canned peaches save time and are easy to find. Be sure to choose peaches packed in juice or water, not syrup. Drain the peaches to avoid too much liquid in your cobbler. You might want to reduce sugar since canned peaches are often sweet. This way, you can still enjoy a tasty dessert. Making a gluten-free peach cobbler is simple. Substitute all-purpose flour with a gluten-free flour blend. Look for blends that work well in baking. You can also use almond flour or coconut flour, but adjust the amounts. Make sure to check labels to avoid hidden gluten. With these changes, you can still enjoy the same great taste without gluten. For the full recipe, visit the recipe section above. This blog post covered the key steps to make a classic Southern peach cobbler. We explored essential ingredients and tips for picking the best peaches. I shared easy instructions for prepping, assembling, and baking. You learned common mistakes to avoid and how to achieve the best texture. Remember, cobbler is versatile; feel free to try different fruits! Enjoy your homemade treat now or freeze it for later. Cobblers are fun and easy, making them great for any occasion. You’ll impress your friends and family with these simple techniques.](https://tossedrecipes.com/wp-content/uploads/2025/06/51abd898-d271-442c-b819-d5459d11e099.webp)
If you crave a dessert that shines with Southern charm, you need this Classic Southern Peach Cobbler recipe. This dish combines juicy peaches and a warm, buttery crust that will …

If you love a snack that’s both sweet and spicy, you’re in the right place! I’m excited to share my recipe for Sweet & Spicy Peach Pickles. These tasty treats …

If you’re looking for a sweet and healthy treat, these stuffed baked peaches will delight your taste buds. This easy recipe combines juicy peaches with a flavorful oat filling. Perfect …
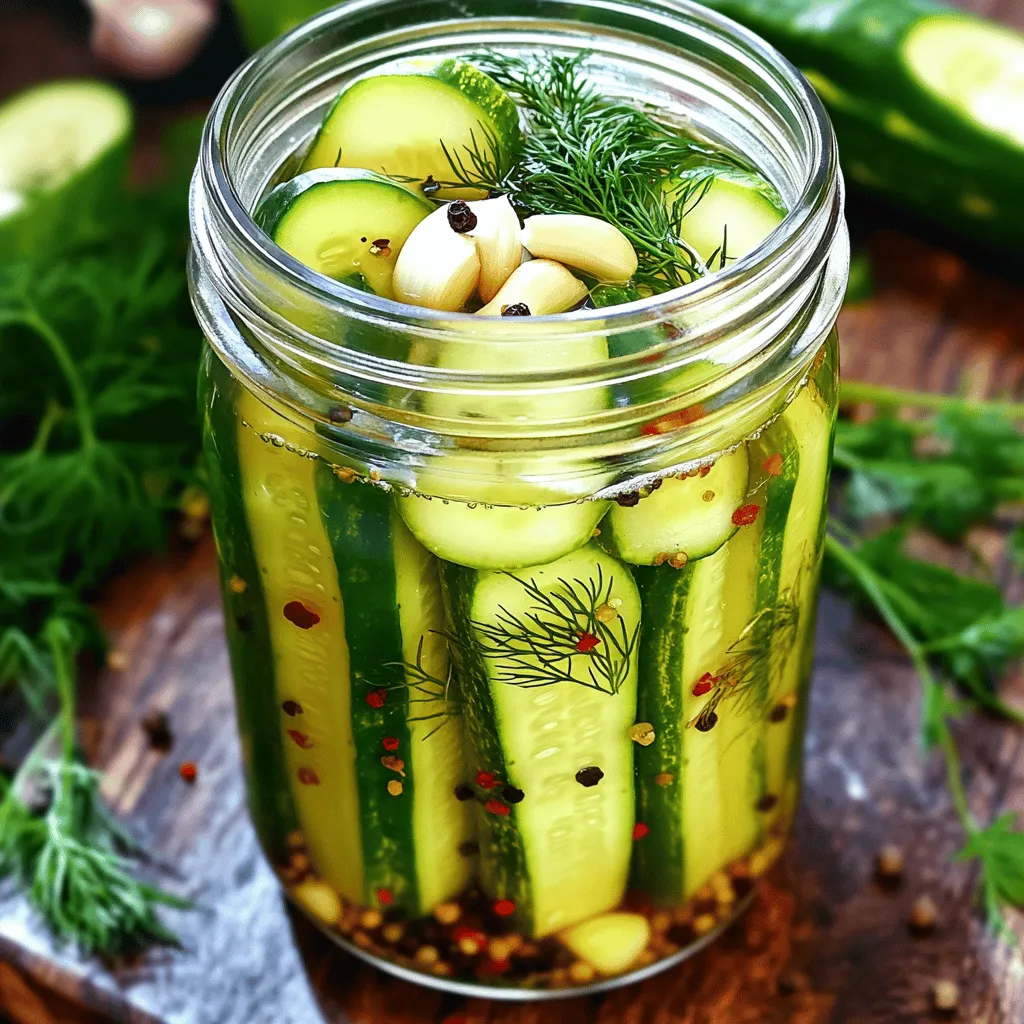
Who doesn’t love a crunchy, flavorful pickle? In this post, I’ll show you how to make garlic dill pickles that are both easy and delicious. With just a few simple …
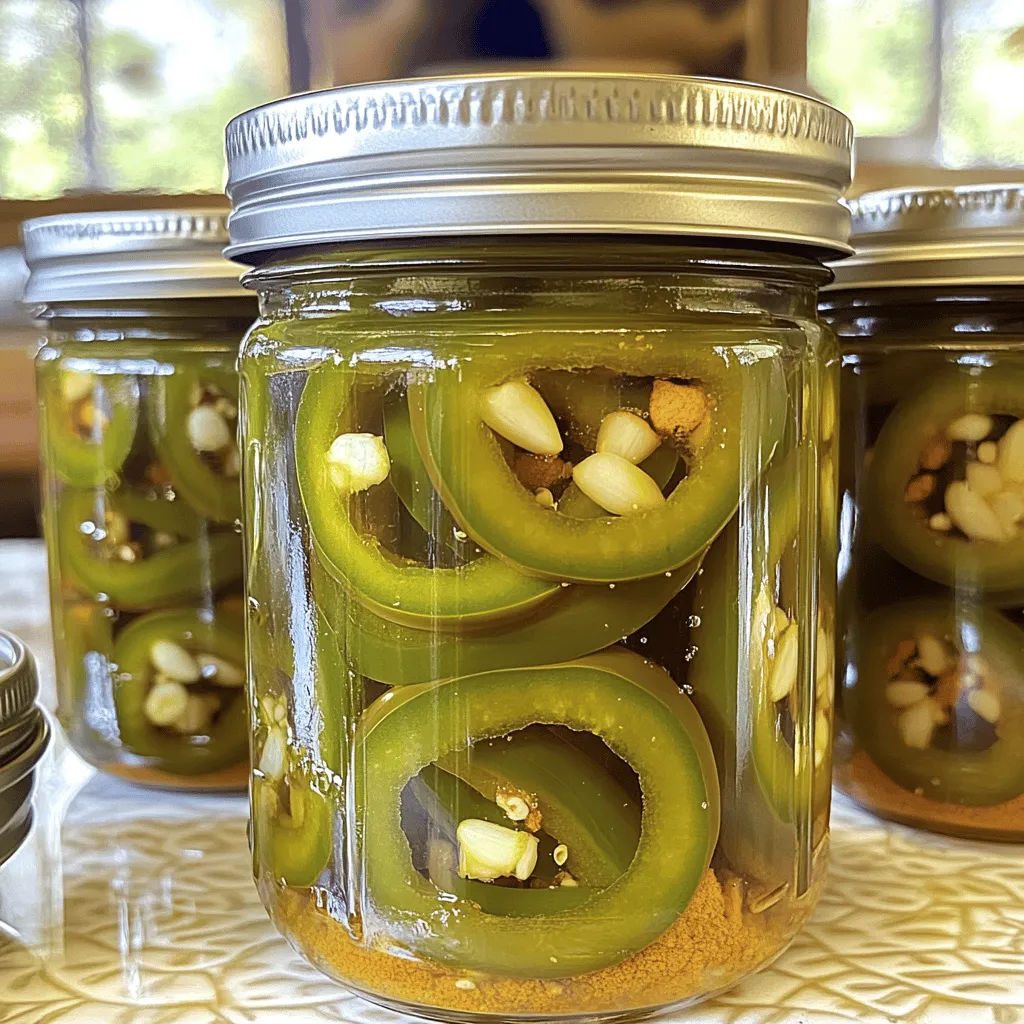
Are you ready to add a sweet and spicy kick to your meals? Canning candied jalapeños is easy and fun! With just a few simple ingredients and steps, you can …

Peach cobbler is a classic dessert that brings sweet joy to any table. In this Peach Cobbler Must-Try: Delightful Sweet Treat guide, I will share the secrets to crafting the …
![Here’s what you need for a tasty Tomato Galette: - 1 ½ cups all-purpose flour - ½ teaspoon salt - ¼ teaspoon black pepper - ½ cup unsalted butter, chilled and cubed - 5-6 tablespoons ice water - 4 medium ripe tomatoes, sliced - 1 cup fresh mozzarella cheese, torn into chunks - ¼ cup fresh basil leaves, chopped - 1 tablespoon balsamic glaze - Salt and pepper to taste - 1 egg, beaten (for egg wash) These ingredients create a perfect balance of flavors. When choosing tomatoes, look for ripe ones. They add sweetness and moisture to your galette. Fresh mozzarella gives a creamy texture that pairs well with the tomatoes. Basil adds a fresh touch, enhancing the dish's overall taste. The balsamic glaze offers a nice tang. It brings everything together, making each bite a delight. The egg wash gives the crust a beautiful golden color. This galette is not just easy to make; it’s a feast for the eyes and the palate. For the full recipe, check out the instructions included above. Enjoy the cooking experience! To start, gather your dry ingredients. In a large bowl, mix together 1 ½ cups of all-purpose flour, ½ teaspoon of salt, and ¼ teaspoon of black pepper. This mix will add flavor to your crust. Next, you need to incorporate the butter. Cut ½ cup of chilled, cubed unsalted butter into the flour mix. Use your fingers or a fork to mash it until it looks like coarse crumbs. Now, it's time to add ice water. Gradually mix in 5-6 tablespoons of ice water, one tablespoon at a time. Stop mixing when the dough holds together. Shape the dough into a disk. This makes it easier to roll out later. Wrap the disk tightly in plastic wrap. Place it in the fridge for at least 30 minutes. Chilling helps the butter firm up and makes the dough flaky. While your dough chills, prepare the filling. Slice 4 medium ripe tomatoes. Place the slices on a paper towel. This step helps absorb excess moisture. Sprinkle the tomato slices lightly with salt and let them sit for about 10 minutes. This draws out some water and keeps your galette crisp. Once your dough is chilled, roll it out. On a lightly floured surface, roll the dough into a 12-inch round circle. Transfer the rolled dough to a parchment-lined baking sheet. Now, layer the fillings. Start from the center and add 1 cup of torn fresh mozzarella cheese, followed by the tomato slices. Overlap them slightly, leaving a 2-inch border around the edges. Sprinkle with chopped basil and drizzle with 1 tablespoon of balsamic glaze for added flavor. Preheat your oven to 400°F (200°C). While it heats, fold the edges of the dough over the filling. Pleat it as you go for a rustic look. Brush the edges with a beaten egg to give them a golden color while baking. Bake the galette for 30-35 minutes. You want the crust to be golden brown and the tomatoes tender. After baking, let the galette cool slightly before slicing. This helps the filling set. For a beautiful presentation, serve it warm on a wooden board. Garnish with extra basil leaves for a fresh touch. You can also add a simple green salad for a tasty meal. For the full recipe, check the section above. Using chilled ingredients is key for a flaky crust. Cold butter and water help keep the dough firm. When you mix the dough, avoid overmixing. Stop when you see small crumbs. This way, the dough stays light and airy. For the best flavor, choose heirloom or Roma tomatoes. They are juicy and sweet, perfect for baking. In summer, use fresh garden tomatoes. In fall, you may find delicious varieties at local markets. Always select ripe tomatoes for a great taste. A savory tomato galette pairs well with a fresh salad. Try a simple green salad with light dressing. For drinks, a crisp white wine or iced tea works nicely. These choices balance the rich flavors of the galette. {{image_2}} You can switch up the cheese in your tomato galette. If you want a different taste, try these alternatives to mozzarella: - Goat cheese for a tangy flavor - Feta cheese for a crumbly texture - Gruyère for a nutty touch If you need vegan cheese suggestions, consider: - Cashew cheese for a creamy base - Vegan mozzarella, which melts well - Nutritional yeast for a cheesy flavor without dairy Adding vegetables can boost flavor and nutrition. Some great choices are: - Sliced zucchini for a mild taste - Bell peppers for sweetness - Spinach for a pop of color You can also enhance flavor with spices and herbs. Consider these options: - Oregano for a classic touch - Red pepper flakes for heat - Garlic powder for depth Make the most of seasonal produce! In summer, use fresh basil and ripe tomatoes. Try these ideas for fall: - Swap tomatoes for roasted squash - Add caramelized onions for sweetness - Use thyme for an earthy flavor Choosing seasonal ingredients not only enhances the dish but also supports local farms. For the full recipe, check out the complete guide to creating a savory tomato galette. To keep your galette fresh, store leftovers in the fridge. Use an airtight container for best results. This method helps maintain the flavor and texture of the tomatoes. The galette will stay good for about three days. When it's time to enjoy your galette again, the oven works best. Preheat it to 350°F (175°C). Place the galette on a baking sheet. Heat for about 10-15 minutes. This keeps the crust crispy and the filling warm. You can also use a toaster oven if you have one. If you want to save some galette for later, freezing is a great option. First, let it cool completely. Wrap the galette tightly in plastic wrap. Then, place it in a freezer bag. It can last up to three months in the freezer. When you're ready to eat, let it thaw in the fridge overnight. Preheat your oven to 375°F (190°C). Bake the thawed galette for 20-25 minutes. This way, you'll enjoy that delightful crispy crust again! For the full recipe and more details, check out the [Full Recipe]. A tomato galette is a free-form tart filled with fresh tomatoes. It has a flaky crust and a savory filling. The galette offers a rustic look. You can use various tomato types for flavor. I love using ripe, juicy tomatoes for the best taste. The cheese adds creaminess, while herbs bring freshness. Yes, you can prepare the dough ahead. After mixing, shape it into a disk. Wrap the disk in plastic wrap. Store it in the fridge for up to two days. This way, you save time on busy days. Just remember to let it sit at room temperature for a few minutes before rolling it out. To avoid a soggy crust, use fresh tomatoes. Slice them and let them sit on paper towels. This helps remove excess moisture. You can also sprinkle salt lightly on the tomatoes. This step draws out more water. Lastly, bake the galette right away after assembling for the best crust. The tomato galette pairs well with many sides. A simple green salad works great. You can also serve it with roasted veggies. For a heartier meal, try a quiche or frittata. A light soup can also complement the galette nicely. Choose sides that balance the flavors. Yes, you can make a gluten-free tomato galette. Use gluten-free all-purpose flour in the dough. There are many great blends available. Make sure to check for good binding agents. These help keep the galette from falling apart. Your final dish will still be tasty! A tomato galette lasts for about three days in the fridge. Store it in an airtight container. For the best taste, eat it within two days. Reheat slices in the oven to keep the crust crispy. You can also freeze it for up to a month. Absolutely! If you don’t have balsamic glaze, try olive oil instead. Drizzle it over the tomatoes before baking. You can also use a splash of lemon juice for brightness. For a sweet touch, honey or a fruit glaze works too. Feel free to get creative! You have learned how to make a delicious Tomato Galette. We covered the ingredients, step-by-step instructions, and helpful tips for success. Remember to choose fresh tomatoes and chill the dough to get the best crust. Feel free to experiment with different cheeses and add your favorite veggies. Store leftovers properly to keep them tasty. This galette is not just a dish; it is a canvas for your creativity. Try it out and enjoy your cooking!](https://tossedrecipes.com/wp-content/uploads/2025/06/0fd8e3d5-add3-4782-bf89-d5a02dbac95c.webp)
Are you ready to impress your family and friends with a delicious Tomato Galette? This savory dish combines fresh tomatoes, gooey mozzarella, and a flaky crust, all in one bite. …
![Here are the ingredients you will need for Tomato Pie Delight: - 2 cups fresh tomatoes, sliced - 1 cup mozzarella cheese, shredded - 1 cup ricotta cheese - 1/2 cup grated Parmesan cheese - 1/4 cup fresh basil, chopped - 1 tablespoon olive oil - 1 garlic clove, minced - 1 teaspoon dried oregano - 1 teaspoon salt - 1/2 teaspoon black pepper - 1 9-inch pie crust (store-bought or homemade) Feel free to add your own touch! Here are some optional ingredients: - Spinach for extra greens - Zucchini for a different texture - Feta cheese for a tangy twist - Additional herbs like thyme or rosemary This recipe allows you to be creative. Swap in your favorite flavors to make it your own! For the full recipe, check out the instructions above. To make Tomato Pie Delight, follow these easy steps. 1. Preheat Oven and Prepare Pie Crust First, set your oven to 375°F (190°C). Next, take your pie crust and place it in a 9-inch pie dish. Bake the crust for about 10-12 minutes. You want it lightly golden. Once done, remove it from the oven and let it cool a bit. 2. Layering Ingredients Technique Start layering your ingredients. Begin with half of the sliced tomatoes. Spread them evenly in the pie crust. Then, take your ricotta mixture and spread it over the tomatoes. Next, add half of the mozzarella and Parmesan cheese. Top this with the rest of the sliced tomatoes. Finish by sprinkling the remaining mozzarella and Parmesan on top. 3. Baking Time and Tips for Monitoring Now, drizzle olive oil over the top and add the chopped basil. Place the pie in the oven and bake for 30-35 minutes. Watch for the cheese to bubble and turn golden brown. When done, take it out and let it cool for 10 minutes before slicing. Follow these steps for a delicious Tomato Pie Delight. For full details, check the Full Recipe. Enjoy! Choosing the Best Tomatoes for Flavor For the best taste, use fresh, ripe tomatoes. Varieties like heirloom, beefsteak, or vine-ripened work well. They have a rich flavor that shines through in every bite. Look for tomatoes that feel heavy for their size and have smooth skin. Avoid any that are bruised or too soft. Cheese Substitutions and Recommendations While mozzarella gives a great melt, you can swap it for provolone or gouda. Ricotta adds creaminess, but you can use cottage cheese if you like. For a tangy kick, feta cheese is also a good choice. Just remember to adjust the salt, as some cheeses are saltier than others. How to Achieve a Flaky Pie Crust For a flaky pie crust, keep your ingredients cold. Use chilled butter or shortening, and ice water when mixing. Don't overwork the dough; mix until just combined. If using a store-bought crust, let it sit at room temperature for a few minutes before baking. This helps it bake evenly and prevents shrinkage. Feel free to explore more tips in the [Full Recipe]. {{image_2}} You can easily change the flavors in your Tomato Pie Delight. Here are some great ideas: - Adding Vegetables: Spinach or Zucchini Adding greens like spinach or thin slices of zucchini makes the pie healthier. Spinach adds a nice color and flavor. Zucchini brings a mild taste and great texture. Just sauté them briefly before adding to the pie. - Different Cheeses: Feta or Goat Cheese If you want a different cheese flavor, try feta or goat cheese. Feta gives a salty kick that pairs well with tomatoes. Goat cheese adds a creamy texture and tang. You can mix these with mozzarella for a unique taste. - Seasoning Variations: Adding Spices or Herbs Spices or herbs can change the whole dish. Try adding red pepper flakes for heat, or smoked paprika for a smoky flavor. Fresh herbs like thyme or dill can also enhance the taste. Just sprinkle them in the ricotta mix or on top before baking. These variations let you make the Tomato Pie Delight truly your own. You can create a dish that fits your tastes. For the full recipe, check out the details above. After enjoying your Tomato Pie Delight, you may have some left. Storing it properly keeps it fresh and tasty. - Refrigeration Guidelines: Allow the pie to cool completely. Once cool, wrap it tightly in plastic wrap or aluminum foil. You can also place it in an airtight container. Store it in the fridge for up to three days. - Freezing Tomato Pie Delight: Step-by-Step: If you want to save it longer, freezing is a great option. First, let the pie cool completely. Then, slice it into pieces. Wrap each slice in plastic wrap. Place the wrapped slices into a freezer bag or container. Be sure to label it with the date. It will stay good for up to three months in the freezer. - Reheating Instructions for Best Results: When you're ready to eat your leftovers, the best way to reheat is in the oven. Preheat the oven to 350°F (175°C). Remove the plastic wrap from the pie or slices and place them on a baking sheet. Heat for about 15-20 minutes, or until warmed through. You can also use a microwave, but the oven keeps the crust crispy. Enjoy your delicious Tomato Pie Delight again! Can I make Tomato Pie Delight Ahead of Time? Yes, you can! Prepare the pie, but do not bake it. Wrap it well and store it in the fridge for up to 24 hours. When ready to eat, bake it right from the fridge. This keeps the flavors fresh and tasty. What is the Best Way to Serve Tomato Pie Delight? Serve it warm for the best taste. I like to garnish it with fresh basil leaves. Pairing it with a simple side salad adds crunch and balance. You can also cut it into slices for easy serving. Can I Use Canned Tomatoes Instead of Fresh? You can use canned tomatoes, but fresh ones taste best. If you use canned, drain them well to avoid a soggy pie. The flavor of fresh tomatoes shines in this dish, so try to use them when possible. For the full recipe of Tomato Pie Delight, check the earlier section. Enjoy your cooking! This article covered how to make a tasty Tomato Pie Delight. We discussed ingredients and precise measurements, along with tips for perfecting your dish. I shared ways to personalize it with extra veggies and cheeses and storage methods for leftovers. Remember, you can prepare this dish ahead of time and even swap fresh tomatoes for canned ones. Experiment and enjoy each bite. Happy cooking!](https://tossedrecipes.com/wp-content/uploads/2025/06/a2f9e63a-717e-426e-95fb-dc2b02afd1e2.webp)
If you’re craving a comforting dish that’s bursting with flavor, you’ll love this Tomato Pie Delight recipe! It’s simple to make and perfect for anyone, whether you’re an expert cook …

Ready to impress your family with a delicious breakfast? An Italian frittata is both flavorful and easy to make! This classic dish combines fresh eggs, vibrant veggies, and gooey cheese …