Quick Pickled Carrots Easy and Flavorful Delight
![To make quick pickled carrots, you need these main ingredients: - 4 medium carrots, peeled and cut into thin strips or rounds - 1 cup distilled white vinegar - 1 cup water - 2 tablespoons granulated sugar - 1 tablespoon salt - 1 teaspoon black peppercorns - 1 teaspoon mustard seeds - 2 cloves garlic, peeled and smashed These ingredients work together to create a tasty and tangy flavor. The vinegar and sugar balance the crunch of the carrots perfectly. You can also add optional ingredients to boost the flavor: - 1 small piece of fresh ginger, sliced (optional) - Red pepper flakes to taste (optional) Adding ginger gives a warm spice, while red pepper flakes add heat. Feel free to adjust these to your taste. You will need some simple tools to make these pickles: - A medium saucepan - A clean glass jar or container for storing - A stirring spoon These items make it easy to prepare and store your pickled carrots. With these ingredients and tools, you can quickly make a delightful snack. For the full recipe, check out the detailed steps. Start by peeling your carrots. It’s best to use medium-sized carrots for this recipe. Cut them into thin strips or rounds. Thin pieces absorb the pickling liquid better. You want them to be uniform in size for even pickling. Grab a medium saucepan. Add 1 cup of distilled white vinegar and 1 cup of water. Then, put in 2 tablespoons of sugar and 1 tablespoon of salt. Add 1 teaspoon of black peppercorns and 1 teaspoon of mustard seeds. Stir this mixture over medium heat. Keep stirring until the sugar and salt dissolve. Once dissolved, remove the pan from heat. This is your pickling liquid. Take the smashed garlic and ginger, if you choose to use it. Add these to your pickling liquid. Let it sit and cool down. While it cools, pack your carrot slices tightly into a clean glass jar. If you like a kick, sprinkle some red pepper flakes over the carrots. Once the liquid cools, pour it over the carrots. Make sure they are fully submerged. Seal the jar tightly. Let it sit at room temperature for about 30 minutes to an hour. You can also refrigerate it for up to 24 hours. The flavors will deepen overnight. The pickled carrots are ready to eat after just one hour. Check out the Full Recipe for more details! One common mistake is slicing carrots too thick. Thin strips or rounds pickle better. Another mistake is not letting the carrots sit long enough. They need time to soak up the flavors. Avoid using old carrots; fresh ones taste best. Ensure your jar is clean. This keeps the carrots safe to eat. You can easily change the sweetness and spice levels. If you want sweeter carrots, add more sugar. Start with an extra half tablespoon. For a spicier kick, add more red pepper flakes. You can also try fresh jalapeños for heat. Taste the pickling liquid before pouring it over the carrots. This way, you can adjust as needed. Adding extra ingredients can create new flavors. Try adding sliced radishes for a zing. Fresh herbs like dill or cilantro make great additions. You can also use citrus peels for a bright taste. A splash of soy sauce adds depth. Just remember to keep the balance of vinegar and sugar. This way, your carrots stay tangy and delicious. For the full recipe, visit the section above. {{image_2}} You can use many vegetables for quick pickling. Think about cucumbers, radishes, or even cauliflower. Each vegetable adds its own taste and crunch. For a fun twist, try pickling bell peppers or green beans. Just slice them thinly and follow the same pickling steps as carrots. You will enjoy their unique flavors! While distilled white vinegar is a classic choice, you can switch it up. Apple cider vinegar adds a fruity taste. Rice vinegar is milder and sweeter. If you want a bolder flavor, try red wine vinegar or balsamic vinegar. Each vinegar will change the taste of your pickles. Experiment to find your favorite! Want to spice things up? Add fresh herbs like dill or cilantro to your pickling mix. You can also include whole spices like cinnamon sticks or cloves for warmth. If you enjoy heat, try adding jalapeño slices or mustard seeds. For a sweet touch, toss in some sliced peaches or mango. These flavors will make your pickles stand out! For the full recipe, check out the Zesty Quick Pickled Carrots. Store your quick pickled carrots in a clean glass jar. Make sure the jar is tightly sealed. Keep them in the fridge to keep them fresh. Avoid leaving them at room temperature for long. This helps maintain their crispness and flavor. Always use a clean utensil to take out the carrots. This prevents germs from getting in the jar. Quick pickled carrots can last about two to four weeks in the fridge. They taste best within the first week. After that, they may start to lose crunch. If you see any mold or off smells, toss them out. Always trust your senses when it comes to food safety. Don’t throw away the leftover pickling liquid! You can use it to add flavor to salads or sauces. It also makes a great marinade for meats or tofu. Just pour it over your favorite veggies and let them soak. You can even pickle other vegetables in the same liquid for a new twist. It's a smart way to reduce waste and keep those flavors going. For the full recipe, check out the [Full Recipe]. Quick pickled carrots are ready in about one hour. You can eat them right away! If you let them sit longer, they soak up more flavor. I recommend refrigerating them overnight for the best taste. They can last well in the fridge for about two weeks. Yes, you can use different types of vinegar. Apple cider vinegar adds a nice fruity flavor. Rice vinegar gives a milder taste. Just remember, each type of vinegar changes the taste. Stick to the same ratio for the best results. No, they are not the same. Quick pickled carrots use a fast process. Traditional pickles take longer and often involve fermentation. Quick pickling gives you fresh flavor in less time. Enjoy these carrots as a bright snack or topping! Quick pickled carrots are easy to make using the right ingredients and steps. We discussed essential items, optional add-ins, and the proper equipment. I shared tips to avoid common mistakes and ways to customize sweetness and spice. You learned about different vegetables and vinegars to try. Remember, stored well, your pickled carrots can last. Enjoy experimenting with flavors and share your creations. Happy pickling!](https://tossedrecipes.com/wp-content/uploads/2025/06/aff702d8-eca0-4d93-8c4b-d63e864ae21b.webp)
Love the crunch of pickled carrots? You’re in the right place! In this guide, I’ll show you how to make quick pickled carrots that are easy and full of flavor. …
Love the crunch of pickled carrots? You’re in the right place! In this guide, I’ll show you how to make quick pickled carrots that are easy and full of flavor. …
![To make a tasty peach crumble, you need some key ingredients. Here’s what you’ll need: - 4 ripe peaches, peeled and sliced - 1 tablespoon lemon juice - 1/3 cup granulated sugar - 1 teaspoon vanilla extract - 1 cup rolled oats - 1/2 cup all-purpose flour - 1/2 cup brown sugar - 1/2 teaspoon ground cinnamon - 1/4 teaspoon salt - 1/2 cup unsalted butter, melted These ingredients come together to create a warm and comforting dessert. Each one plays a key role in the final flavor and texture of the crumble. You can make your peach crumble even better with a few optional ingredients. Here are some ideas: - Add 1/4 cup chopped nuts for crunch. - Use 1/2 cup of mixed berries for extra flavor. - Top with vanilla ice cream for a creamy treat. These extras can add fun twists to the classic recipe. Experiment and find what you love. Choosing the right peaches is important for a great crumble. Here are tips to pick the best ones: - Look for peaches with a deep color. - Choose firm peaches that are slightly soft to touch. - Smell the peaches; they should have a sweet aroma. Fresh, ripe peaches will make your crumble tastier. Don’t rush; take your time to find the best fruit. Start by washing the peaches. Use warm water to remove any dirt. Next, peel the peaches. A sharp knife works best for this. After peeling, slice the peaches into thin pieces. Place them in a large bowl. Pour in one tablespoon of lemon juice. This helps keep the color fresh. Add one-third cup of granulated sugar to the bowl. Then, drizzle in one teaspoon of vanilla extract. Toss the peaches gently until they are coated. This mix will make the peaches sweet and flavorful. In a separate bowl, combine one cup of rolled oats, half a cup of all-purpose flour, and half a cup of brown sugar. Add half a teaspoon of ground cinnamon and a quarter teaspoon of salt. Mix these dry ingredients well. Now, take half a cup of melted unsalted butter and pour it over the dry mix. Stir until it looks crumbly. This topping will add a nice crunch to your dessert. Preheat your oven to 350°F (175°C). Grease a 9-inch pie dish. Pour the peach mixture into the dish and spread it evenly. Now, sprinkle the crumble topping over the peaches. Bake in your preheated oven for 30-35 minutes. Look for a golden brown top and bubbling peaches. When done, remove it from the oven. Let it cool for a few minutes. If you like, add a scoop of vanilla ice cream on top before serving. You can find the full recipe [Full Recipe]. When making peach crumble, small errors can change the dish. Here are key mistakes to watch out for: - Using unripe peaches: Always pick ripe peaches. They should feel soft but not mushy. - Not peeling the peaches: Peeling helps keep the texture light. The skins can add a chewiness that’s not always welcome. - Skipping the lemon juice: This adds brightness and balances sweetness. Don’t skip it for a better flavor. A crisp topping is key to a great peach crumble. Here’s how to get it just right: - Use cold butter: Make sure your butter is cold when mixing. This helps create that crunchy texture. - Mix gently: Combine your dry ingredients and melted butter carefully. You want it crumbly, not paste-like. - Don’t over-bake: Keep an eye on your crumble. It should be golden brown but not too dark. Peach crumble is great on its own, but you can enhance it even more. Here are some serving ideas: - Top with vanilla ice cream: The warm crumble pairs perfectly with cold ice cream. - Drizzle with honey: A little honey adds sweetness and makes it look fancy. - Serve with whipped cream: A dollop of whipped cream can make it feel extra special. These tips will help you create a peach crumble that shines. For more on making this dish, check the Full Recipe. {{image_2}} You can easily make this peach crumble gluten-free. Instead of using all-purpose flour, choose a gluten-free flour blend. Many blends work well and taste great. Make sure to check the labels for any added ingredients. You can also use gluten-free oats. This keeps the crumble light and tasty while being safe for those with gluten issues. Get creative with your toppings! You can add chopped nuts like almonds or walnuts for a crunchy twist. Just mix them into the crumble topping. You can also try adding other fruits. Berries or apples pair well with peaches. Just remember to adjust the sugar based on the fruit’s sweetness. This gives your peach crumble a fun twist! To make this recipe vegan, swap the butter for coconut oil or vegan butter. Use maple syrup or agave nectar instead of granulated sugar for a natural sweetener. The rest of the recipe stays the same. This vegan peach crumble is still full of flavor and easy to make. Enjoy it warm or cold, just like the classic version! Check out the Full Recipe for details on how to make this delicious dessert. To keep your peach crumble fresh, let it cool completely. Then, cover it tightly with plastic wrap or aluminum foil. You can also place it in an airtight container. Store it in the fridge for up to three days. This way, you can enjoy it later without losing flavor. When you want to eat your leftover peach crumble, reheating is easy. Preheat your oven to 350°F (175°C). Place the crumble in an oven-safe dish. Heat it for about 15-20 minutes. This brings back its warm, gooey goodness. If you prefer, you can microwave it. Heat it in short bursts, checking every 30 seconds. You can freeze peach crumble for later enjoyment. First, let it cool completely. Then, wrap it tightly in plastic wrap and foil. You can also use a freezer-safe container. It will stay good for up to three months. When you're ready to eat it, thaw it in the fridge overnight. Reheat it as mentioned before. Enjoy the taste of summer anytime! Yes, you can use frozen peaches. Just thaw them first and drain excess juice. This helps keep the crumble from becoming too watery. Using frozen peaches can save time and still taste great. You can tell the crumble is done when the top is golden brown and the peaches bubble. This usually takes about 30 to 35 minutes at 350°F (175°C). Keep an eye on it toward the end. A golden top means it's ready to enjoy. Peach crumble pairs well with vanilla ice cream or whipped cream. Both add a creamy touch that contrasts nicely with the warm crumble. You could also serve it with yogurt for a lighter option. This dessert is versatile and tastes great with many sides. Check the Full Recipe for more serving ideas. In this post, we explored how to make a great peach crumble. We covered the main ingredients and some tasty optional ones. I shared tips for picking the best peaches. You learned step-by-step instructions to prepare, bake, and serve your crumble. We discussed common mistakes and variations like gluten-free and vegan options. Finally, I provided storage tips for leftovers. Remember, the key to a delicious peach crumble is ripe peaches and a crisp topping. Enjoy your baking!](https://tossedrecipes.com/wp-content/uploads/2025/06/b851761f-fcdb-47c9-9262-ce3865be03ec.webp)
Are you ready to enjoy a warm, comforting dessert? This Peach Crumble Delight recipe is both simple and delicious! With ripe peaches and a sweet crumble topping, it’s the perfect …
. This blog post walks you through making baked spaghetti and meatballs. You learned about key ingredients, cooking steps, and helpful tips. Feel free to explore variations and storage ideas too. Cooking should be fun and easy. Experiment with flavors and enjoy your meals. With practice, you'll make this dish perfectly every time. Happy cooking!](https://tossedrecipes.com/wp-content/uploads/2025/06/ff764a63-4dab-4892-b405-de6d3bd2689a.webp)
If you’re looking for a meal that delivers warmth and joy, look no further than baked spaghetti and meatballs. This cozy comfort dish combines hearty meatballs, tender spaghetti, and rich …

If you’re craving a meal that’s both delicious and easy to make, you’re in the right place! Mongolian Ground Beef Noodles blend savory ground beef, tender egg noodles, and fresh …
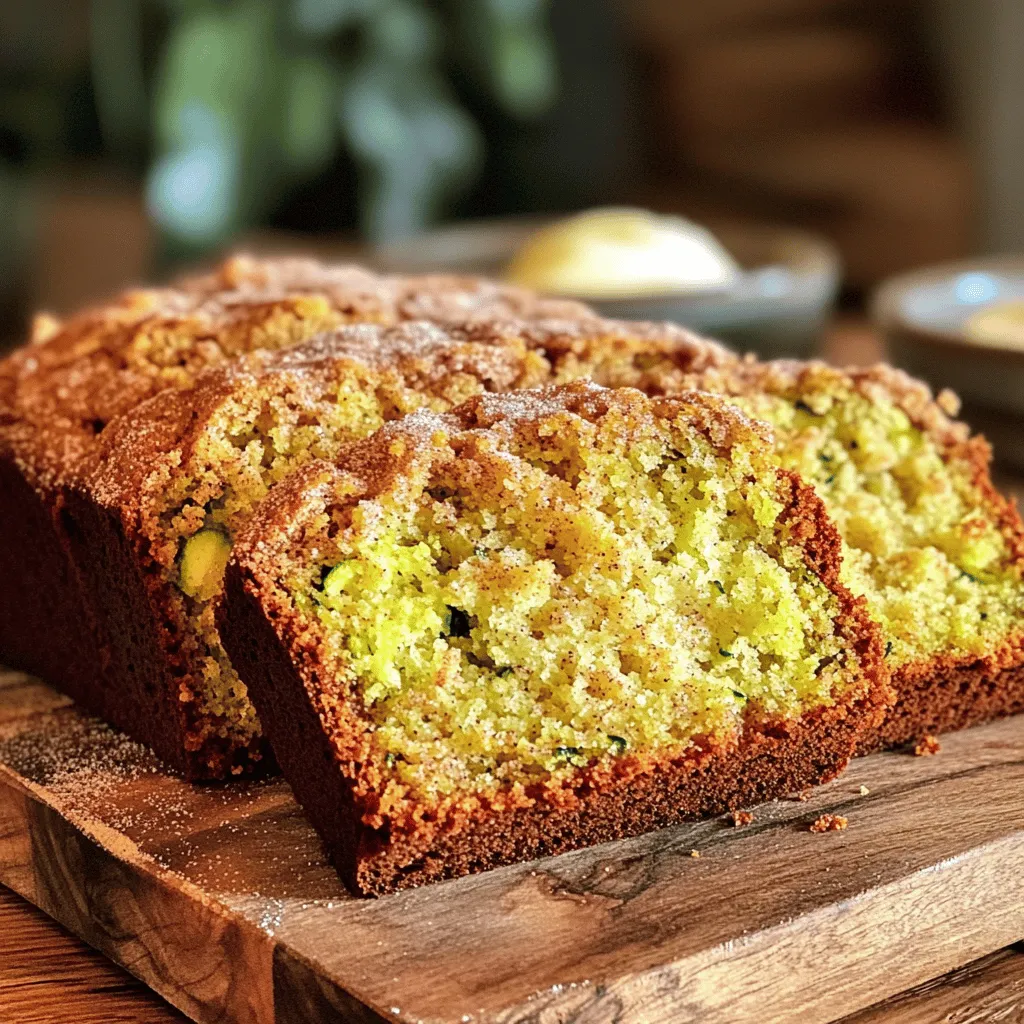
Are you ready to elevate your baking game? This Snickerdoodle Zucchini Bread recipe packs irresistible flavor in every slice! With just a few simple ingredients, you can create a warm, …

Looking for a fun and tasty meal? Sweet Potato Taco Bowls are here to save the day! These bowls mix sweet, savory, and spicy in every bite. I’ll share easy …
![To make One Pot Cheesy Chicken and Broccoli Orzo, gather these simple ingredients: - 1 lb (450g) boneless, skinless chicken breasts, diced - 1 cup orzo pasta - 3 cups broccoli florets - 1 medium onion, diced - 3 cloves garlic, minced - 4 cups chicken broth - 1 cup shredded cheddar cheese - 1/2 cup grated Parmesan cheese - 2 tablespoons olive oil - Salt and pepper to taste - 1 teaspoon paprika - 1/2 teaspoon garlic powder - Fresh parsley, chopped for garnish These ingredients come together to create a creamy, cheesy dish that is both filling and nutritious. The chicken provides protein, while the broccoli adds vitamins. Using orzo pasta makes the dish comforting and satisfying. You can adjust the cheese levels based on your taste. For a fun twist, you can mix in extra spices or vegetables. You’ll find that this recipe is perfect for busy nights. It’s quick to prepare and cooks in just one pot, making cleanup a breeze. Plus, you can find the Full Recipe at the end of this article for detailed instructions. Enjoy making this delightful dish! Heat olive oil in a large pot over medium heat. Add diced chicken. Season it with salt, pepper, paprika, and garlic powder. Cook the chicken until it turns brown and is fully cooked, about 5-7 minutes. Once done, remove the chicken from the pot and set it aside. In the same pot, toss in the diced onion and minced garlic. Sauté for 2-3 minutes. You want the onion to turn translucent and fragrant. Now, stir in the orzo pasta and pour in the chicken broth. Bring this mixture to a boil. After it boils, reduce the heat to low. Let it simmer for about 10 minutes, stirring every so often. The orzo should be nearly cooked at this stage. Next, add the broccoli florets to the pot. Keep simmering for another 3-4 minutes. You want the broccoli to be tender and the orzo cooked al dente. Return the cooked chicken to the pot. Mix in the shredded cheddar cheese and grated Parmesan. Stir well until the cheeses melt and blend into a creamy mix. Adjust the seasoning if needed. Take the pot off the heat. Spoon the cheesy chicken and broccoli orzo into bowls. Garnish with fresh chopped parsley for a pop of color. For a nice touch, sprinkle some extra cheese on top and add a sprig of parsley. You can also add toasted breadcrumbs for a bit of crunch. For the full recipe, check [Full Recipe]. To enhance the flavor of your One Pot Cheesy Chicken and Broccoli Orzo, consider these seasoning tips: - Add a pinch of red pepper flakes for heat. - Use fresh herbs like thyme or basil for a bright taste. For a creamy texture, follow these cooking tips: - Stir the cheese in slowly for even melting. - Don't rush the simmering stage; let it meld together. Two common issues can ruin your dish: - Overcooking or undercooking the orzo can change its texture. Aim for al dente. - Using low-quality cheese can make the dish less flavorful. Always choose good cheese. Pair your cheesy chicken and broccoli orzo with these great sides: - A fresh garden salad adds a nice crunch. - Garlic bread complements the meal nicely. When serving, consider these options: - Serving from the pot keeps it casual and fun. - For a fancy touch, use individual bowls. {{image_2}} You can easily make One Pot Cheesy Chicken and Broccoli Orzo healthier. First, try substituting whole grain orzo for regular orzo. Whole grain orzo has more fiber, making it a better choice. Next, add more vegetables. You can include spinach, bell peppers, or carrots. This boosts nutrition and adds vibrant colors. To spice things up, add Italian seasoning or cayenne pepper. These spices give your dish a nice kick. If you want a different taste, try using different cheeses. Mozzarella or pepper jack can add a unique twist. Mixing cheeses can create new flavors that keep things interesting. If you're gluten-free, use gluten-free orzo. There are many brands available that taste great. For dairy-free diets, swap out the cheese for vegan cheese or nutritional yeast. You can also make a vegetarian version. Simply omit the chicken and add more veggies or beans for protein. These changes make the dish suitable for everyone. To keep your One Pot Cheesy Chicken and Broccoli Orzo fresh, store it in the fridge. Use an airtight container to avoid moisture loss. Make sure to cool the dish to room temperature before sealing it up. This keeps the flavors intact. Leftovers can last up to three days in the fridge. When you reheat the orzo, add a splash of chicken broth or milk. This keeps the dish creamy. You can use a microwave or stovetop. For the microwave, heat in short bursts. Stir in between to ensure even warming. If using the stovetop, heat on low, stirring slowly until it warms through. To freeze this dish, let it cool completely first. Pack it tightly in a freezer-safe container. Be sure to leave some space for expansion. This dish can stay good for up to three months in the freezer. When ready to eat, thaw it overnight in the fridge. Reheat as needed, following the same steps to keep it creamy. For the complete recipe, check out the [Full Recipe]. If you need a pasta swap, several options work well. You can use: - Ditalini pasta - Small shells - Couscous - Rice These choices will fit into the dish nicely. They all cook quickly and absorb flavor well. Yes, you can prepare this dish ahead of time. Here are some tips: - Cook the dish completely and cool it before storing. - Store it in an airtight container in the fridge. - You can also cook the chicken and veggies ahead, then add orzo later. This makes meal prep easy and fast. This dish lasts about 3 to 5 days in the fridge. To ensure safety: - Store it in a sealed container. - Always check for any signs of spoilage before eating. Yes, you can easily make it vegetarian. Here are some ideas: - Swap chicken for chickpeas or tofu. - Use vegetable broth instead of chicken broth. - Add extra veggies like bell peppers or mushrooms. These changes keep the dish tasty and filling. To reheat it, you have a couple of good options: - Use a microwave, heating in short bursts. Stir between each burst. - Heat on the stovetop over low heat. Add a splash of broth for moisture. These methods help keep the creamy texture intact. For the [Full Recipe], check out the main article. This recipe for One Pot Cheesy Chicken and Broccoli Orzo brings together simple steps and tasty ingredients. You learned how to sauté chicken, cook aromatics, and mix in cheeses for creamy goodness. Remember the tips for seasoning and avoid common mistakes to make it just right. You can also try variations to suit your needs. With the right storage and reheating methods, your leftovers will stay delicious. Enjoy this dish with family and friends, and let it brighten your meals!](https://tossedrecipes.com/wp-content/uploads/2025/06/ed9785fe-5ae6-4bee-a829-b4db68311c1d.webp)
Looking for a quick and tasty meal? One Pot Cheesy Chicken and Broccoli Orzo Delight is your answer! This dish packs rich flavors, creamy cheese, and nutritious broccoli—all in one …
![To make Creamy Cajun Chicken Pasta, you will need the following items: - 2 boneless, skinless chicken breasts - 8 ounces fettuccine pasta - 2 tablespoons Cajun seasoning - 2 tablespoons olive oil - 1 small onion, finely chopped - 3 cloves garlic, minced - 1 bell pepper (red or yellow), sliced - 1 cup heavy cream - 1 cup chicken broth - 1 teaspoon paprika - 1 teaspoon dried oregano - Salt and pepper to taste - Fresh parsley, chopped (for garnish) - Grated Parmesan cheese (for serving) For the best flavors, I suggest using quality brands. Look for Cajun seasoning blends from brands like Tony Chachere’s or Zatarain’s. If you can’t find Cajun seasoning, make your own. Mix paprika, cayenne pepper, garlic powder, and onion powder. For heavy cream, brands like Land O’Lakes work well. You can replace heavy cream with coconut milk for a dairy-free option. Always choose fresh chicken breasts. They should feel firm and have a pink hue. For the vegetables, opt for bright, crisp bell peppers and aromatic onions. This makes a big difference in taste. Fresh garlic has a strong smell and is more flavorful than pre-minced. When you buy herbs, look for vibrant colors. Fresh parsley adds a nice touch to your dish. For the best results, use fresh ingredients whenever possible. You can find full recipe details in the [Full Recipe]. Start by boiling a large pot of salted water. Once the water is boiling, add 8 ounces of fettuccine pasta. Cook it according to the package instructions until it is al dente. This usually takes about 8-10 minutes. When it's done, drain the pasta in a colander and set it aside for later. While the pasta cooks, take 2 boneless, skinless chicken breasts. Sprinkle 2 tablespoons of Cajun seasoning evenly on both sides. Heat 2 tablespoons of olive oil in a large skillet over medium-high heat. Add the chicken breasts to the skillet. Cook them for about 5-7 minutes on each side until they turn golden brown and are cooked through. Remove the chicken from the skillet and let it rest for a few minutes. Then, slice it into strips. In the same skillet, add a small chopped onion, 3 minced garlic cloves, and a sliced bell pepper. Sauté these for about 3-4 minutes until they soften and smell great. Pour in 1 cup of heavy cream and 1 cup of chicken broth. Add 1 teaspoon of paprika and 1 teaspoon of dried oregano. Stir everything well and bring the mixture to a simmer. Let it cook for about 5 minutes so the sauce thickens slightly. Now, combine the cooked fettuccine and sliced chicken back into the skillet. Toss it all together, ensuring the pasta is well coated in the creamy sauce. Season with salt and pepper to taste. If you want the full recipe, check out the complete cooking instructions! To make a great cream sauce, use heavy cream. It gives a rich and smooth texture. When you add the cream to the pan, keep stirring. This helps blend the flavors well. Let it simmer gently. This allows the sauce to thicken. If you want more flavor, add a bit of chicken broth. This makes the sauce lighter without losing taste. One big mistake is overcooking the chicken. Cook it until golden brown, then remove it from the heat. If you let it cook too long, it can become dry. Another mistake is rushing the sauce. Let it simmer to thicken properly. Lastly, don’t forget to season. Add salt and pepper to taste at the end. This makes all the flavors pop. This dish shines when served hot. Top it with fresh parsley and grated Parmesan cheese. You can also serve it with garlic bread or a fresh salad. For a fun twist, add a sprinkle of Cajun seasoning on top. This adds a nice kick. You can find the full recipe to explore more tips. Enjoy your meal! {{image_2}} You can easily boost the nutrition of your creamy Cajun chicken pasta. Adding vegetables makes it colorful and tasty. I love using spinach, zucchini, or cherry tomatoes. Spinach wilts well in the sauce, while zucchini adds a nice crunch. Cherry tomatoes bring a burst of sweetness. Just sauté the veggies with the onion and garlic to keep them fresh and bright. If you want a change from chicken, there are great options. Shrimp works wonderfully with the Cajun flavors. Just cook them until pink and tender. You can also try tofu for a vegetarian twist. It soaks up the sauce nicely and adds protein. Cook the tofu until golden for added texture. Want more heat? You can amp up the spice level easily. Add more Cajun seasoning to the sauce. If you like it extra spicy, toss in some red pepper flakes. For a milder dish, reduce the seasoning. You can also add a dollop of sour cream on top to cool it down. This way, you can adjust the heat to fit everyone’s taste. For the complete experience, check out the Full Recipe and enjoy your cooking adventure! Store any leftover creamy Cajun chicken pasta in an airtight container. Make sure it cools down first. Refrigerate it for up to three days. Keep in mind that the sauce may thicken as it sits. If it gets too thick, you can add a splash of chicken broth when reheating. To reheat, use a skillet on medium heat. Add a little olive oil or broth to help the sauce loosen. Stir often to heat evenly. You can also use the microwave. Place pasta in a bowl, cover it, and heat in short bursts. Stir between each burst to ensure even heating. You can freeze creamy Cajun chicken pasta, but the texture may change. Place it in a freezer-safe container. Use it within three months for the best taste. To thaw, move it to the fridge overnight. Reheat it gently on the stove or microwave, adding a little liquid to revive the sauce. For the full recipe, check out the details above! Cajun seasoning is a mix of spices. It often includes paprika, cayenne pepper, garlic powder, and onion powder. You may also find oregano, thyme, and black pepper. This mix gives Cajun dishes their bold, spicy flavor. Yes, you can make this recipe gluten-free. Use gluten-free fettuccine instead of regular pasta. Most Cajun seasonings are gluten-free, but check the label to be sure. With these swaps, you can enjoy this dish without worry. Creamy Cajun Chicken Pasta lasts about three to four days in the fridge. Store it in an airtight container. When you’re ready to eat, just heat it in the microwave or on the stovetop. Enjoy it warm for the best flavors. For the full recipe, check the instructions provided above. This blog post covers everything you need to make creamy Cajun chicken pasta. You learned the right ingredients, brand suggestions, and tips for fresh items. The step-by-step instructions guide you through each part, from cooking fettuccine to making the sauce. I shared helpful tips to perfect your dish, avoid common mistakes, and suggested ways to serve. You also saw variations for added vegetables and spice options. Finally, I provided storage tips to keep your leftovers tasty. Enjoy your cooking journey!](https://tossedrecipes.com/wp-content/uploads/2025/06/818b6f7f-a069-4cdd-9d1d-cb620b92a4b7.webp)
Are you ready to spice up your dinner routine? This Creamy Cajun Chicken Pasta recipe is packed with bold flavors and rich sauce, making it a crowd-pleaser. In just a …

Looking for a delightful dessert that’s easy to make? This Miniature Peach Cobbler recipe is your answer! I’ll guide you through simple steps to create these peachy delights that everyone …
![- 2 medium zucchinis, grated - 1 cup all-purpose flour - 1/2 cup whole wheat flour - 1 teaspoon baking powder - 1 teaspoon baking soda - 1/2 teaspoon salt - 1 teaspoon ground cinnamon - 1/4 teaspoon nutmeg - 1/4 cup vegetable oil - 3/4 cup sugar (or coconut sugar for a healthier option) - 2 large eggs - 1 teaspoon vanilla extract - 1/2 cup chopped walnuts or pecans (optional) For the base of my zucchini bread, I start with fresh, grated zucchini. It gives moisture and flavor. The mix of flours adds depth. I use both all-purpose and whole wheat flour. The baking powder and baking soda help the bread rise nicely. Salt, cinnamon, and nutmeg add warmth and spice. I mix in vegetable oil for richness and sugar for sweetness. Eggs bind everything together, while vanilla rounds out the flavors. Optional nuts offer a delightful crunch. - 1/2 cup all-purpose flour - 1/3 cup brown sugar - 1/4 cup rolled oats - 1/4 cup cold butter, cubed - 1/2 teaspoon cinnamon For the crumble topping, I combine flour, brown sugar, and oats. This mix gives a sweet, crunchy layer. I add cold butter to create a crumbly texture. A touch of cinnamon ties in the flavors from the bread. This topping takes the zucchini bread to a new level of delight. You can find the full recipe in the section above. Start by grating two medium zucchinis. Place them in a bowl and add a pinch of salt. Let the zucchini sit for about ten minutes. This helps draw out excess moisture. After the time is up, take a clean kitchen towel and squeeze the zucchini. This step is key for a nice bread texture. Next, mix the wet ingredients. In a separate bowl, whisk together 1/4 cup vegetable oil, 3/4 cup sugar, 2 large eggs, and 1 teaspoon vanilla extract. Mix until smooth. Once blended, fold in the squeezed zucchini. This adds moisture and flavor to your batter. Now it’s time to whisk the dry ingredients. In a large bowl, combine 1 cup all-purpose flour, 1/2 cup whole wheat flour, 1 teaspoon baking powder, 1 teaspoon baking soda, 1/2 teaspoon salt, 1 teaspoon ground cinnamon, and 1/4 teaspoon nutmeg. Whisk these together until well mixed. If you like nuts, now is the time to add them. Fold in 1/2 cup of chopped walnuts or pecans for crunch and extra flavor. To make the crumble topping, combine 1/2 cup all-purpose flour, 1/3 cup brown sugar, 1/4 cup rolled oats, 1/2 teaspoon cinnamon, and 1/4 cup cold butter in a bowl. Use your fingers or a pastry cutter to mix until it turns crumbly. This topping will give your bread a sweet crunch. Sprinkle the crumble topping evenly over the batter. This adds a delicious layer to the bread. Preheat your oven to 350°F (175°C). Grease a 9x5 inch loaf pan for easy removal. Pour the batter into the prepared pan and smooth the top with a spatula. Bake for 50-60 minutes. To check for doneness, insert a toothpick into the center. If it comes out clean, your bread is ready. Let it cool in the pan for about ten minutes. Then, transfer it to a wire rack to cool completely. - Ensuring Moisture Balance Zucchini has a lot of water. Always squeeze out the excess moisture. This step keeps your bread from being soggy. Use a clean towel to do this well. The right moisture keeps the bread soft and tender. - Perfecting the Crumble Texture For a great crumble, keep the butter cold. This helps create small bits. Use your hands or a pastry cutter to mix. You want it to look like coarse crumbs. This texture adds a nice crunch to your bread. - Presentation Ideas Serve the zucchini bread warm or at room temperature. For a lovely touch, add a light icing. Mix powdered sugar with a bit of milk for a drizzle. You can also garnish with thin slices of fresh zucchini. This adds color and a fresh look. - Accompaniments to Serve Pair your zucchini bread with a cup of tea or coffee. It makes a perfect afternoon snack. You can also serve it with cream cheese for extra flavor. This combo enhances the bread's natural sweetness. {{image_2}} Healthier Sugar Options You can swap regular sugar for coconut sugar. This option has a lower glycemic index. It works well in this recipe and adds a slight caramel flavor. You can also use honey or maple syrup. If you use these, cut back on the moisture in the recipe slightly. Alternative Flours For a gluten-free version, try almond flour or oat flour. Both give great texture and flavor. If you want more fiber, use whole wheat flour or a mix of both. Each flour adds a unique taste to the zucchini bread. Fruits and Nuts You can toss in fruits like raisins or cranberries for added sweetness. Chopped nuts like walnuts or pecans add crunch and depth. They also boost nutrition and make the bread heartier. Flavor Enhancements Consider adding spices like ginger or cloves for warmth. You can also use citrus zest for a fresh twist. Lemon or orange zest pairs nicely with zucchini, brightening the flavor. Each of these add-ins can create a new twist on the classic zucchini bread. For the complete recipe, check out the [Full Recipe]. You can store your zucchini bread in two ways: at room temperature or in the fridge. If you plan to eat it within two days, keep it on the counter. Wrap it in plastic wrap or place it in a sealed container. This keeps it moist and fresh. If you want it to last longer, put it in the fridge. This can help it stay good for up to a week. Just remember to wrap it well to avoid drying it out. How to freeze zucchini bread? Freezing is a great way to save your extra bread. First, let the bread cool completely. Then, slice it into pieces for easy serving later. Wrap each slice in plastic wrap. After that, place the slices in a freezer bag. Make sure to remove air before sealing it. This helps prevent freezer burn. You can freeze zucchini bread for up to three months. When you're ready to eat it, just thaw it in the fridge or at room temperature. Enjoy it fresh again! For the full recipe, check out the Zucchini Bread Delight with Crumble Topping section. You can test the bread with a toothpick. Insert it into the center. If it comes out clean, the bread is ready. If it has batter on it, bake it a bit longer. This simple test helps you avoid undercooked bread. Yes, you can use frozen zucchini. First, thaw it completely before using. Drain any excess water to avoid a soggy bread. You can press it in a clean towel to remove moisture. This keeps your zucchini bread light and fluffy. You can add spices and flavors. Consider adding more cinnamon or nutmeg. Vanilla extract boosts the taste too. You can also mix in chocolate chips or dried fruit for a sweet twist. These little changes can make your zucchini bread shine. Zucchini bread is a delicious treat, made with simple ingredients and easy steps. We discussed the main ingredients like grated zucchini, flour, sugar, and eggs, along with a crumbly topping. I shared tips to balance moisture and improve the crumble's texture. You can customize this recipe with variations and store leftovers effectively. Now, you can enjoy baking zucchini bread at home. With these steps, your next loaf will be a hit. Happy baking!](https://tossedrecipes.com/wp-content/uploads/2025/06/8d1d213d-ab7e-4120-aae6-bc9729304760.webp)
Are you ready to bake the most delightful Zucchini Bread with a crunchy crumble topping? You’ll love how easy it is to make this tasty treat. With simple ingredients and …