Honey Butter Chicken Flavorful and Easy Recipe Guide
![- 4 boneless, skinless chicken thighs - 1/4 cup honey - 1/4 cup unsalted butter, melted - 1 teaspoon garlic powder - 1 teaspoon paprika - 1/2 teaspoon salt - 1/2 teaspoon black pepper - 1 tablespoon soy sauce - 1 tablespoon lemon juice - Fresh parsley, chopped (for garnish) For extra flavor, consider adding a pinch of cayenne pepper or thyme. These can give your dish a nice twist without much effort. If you need substitutes, try using chicken breast instead of thighs for a leaner option. You can swap honey with maple syrup for a different sweetness. For a dairy-free version, use coconut oil instead of butter. This will still give you a great taste and texture. To make this dish, gather these kitchen tools: - A medium mixing bowl - Whisk or fork for mixing - Resealable plastic bag or shallow dish for marinating - Baking sheet - Parchment paper for easy clean-up - Meat thermometer to check the chicken's doneness These tools will help you create a delicious and easy honey butter chicken meal with minimal fuss. Enjoy the cooking process! To get started, you need to marinate the chicken. Marinating makes the chicken juicy and tasty. In a medium bowl, mix melted butter, honey, garlic powder, paprika, salt, pepper, soy sauce, and lemon juice. Whisk until smooth. Next, place the chicken thighs in a resealable bag or shallow dish. Pour the honey butter marinade over the chicken. Make sure every piece gets covered well. Seal the bag or cover the dish. You should refrigerate it for at least 30 minutes. If you have time, let it marinate for up to 2 hours. This longer time gives more flavor. Now, it’s time to cook! Preheat your oven to 375°F (190°C). Take the chicken out of the marinade. Keep the marinade to use later. Place the chicken thighs on a baking sheet lined with parchment paper. Bake them for 25 to 30 minutes. Use a meat thermometer to check the chicken’s internal temperature. It needs to reach 165°F (74°C) to be safe to eat. Make sure the chicken is cooked all the way through. If you are unsure, cut into a piece. The meat should be white and juices should run clear. In the last 5 minutes of baking, pour the reserved marinade over the chicken. This adds a sticky glaze that makes it shine. When it’s done, take the chicken out of the oven. Let it rest for a few minutes before slicing. For a lovely finish, chop some fresh parsley and sprinkle it on top. This adds color and makes your dish look great! Enjoy your honey butter chicken and savor each bite. - For chicken thighs, bake for 25-30 minutes at 375°F (190°C). - Chicken breasts may need 30-35 minutes. - Try grilling the chicken for a smoky flavor. - Pan-searing is quick and gives a nice crust. - Add a pinch of cayenne for heat. - Fresh thyme or rosemary brightens the dish. - Try a splash of hot sauce for a spicy kick. - Lemon zest adds a fresh twist to the honey butter. - Serve with rice or mashed potatoes for a hearty meal. - Steamed broccoli or green beans balance the flavors well. - Plate the chicken on a bed of greens for color. - Drizzle extra honey butter sauce on top for shine. Explore the [Full Recipe] for more details on making this dish! {{image_2}} To make honey butter chicken tenders, start with chicken breasts. Cut them into strips. Use the same marinade from the recipe. This will keep the chicken juicy. Marinate them for about 30 minutes. Bake them at the same temperature, but reduce the cooking time to 15-20 minutes. Check that they reach 165°F. The tenders will be crispy and tasty. Serve them with a side of your choice. If you prefer a quicker method, try cooking in a skillet. Start by heating a bit of oil in a pan over medium heat. Remove excess marinade from the chicken. Place the chicken in the skillet. Cook for 6-7 minutes on each side. The outside should be golden and the inside should be juicy. This method saves time while keeping all the great flavors. You can also turn this dish into a sandwich. After cooking, slice the chicken and place it on a bun. Add your favorite toppings. Lettuce, tomato, and pickles work great. You can spread extra honey butter on the bun for more flavor. This option is fun for a quick lunch or dinner. Enjoy your tasty creation! After enjoying your honey butter chicken, let the leftovers cool down. Place them in an airtight container. You can refrigerate them for up to three days. If you want to keep them longer, freeze the chicken. Use a freezer-safe bag or container. Make sure to remove as much air as possible to prevent freezer burn. To reheat, use the oven for the best taste. Preheat your oven to 350°F (175°C). Place the chicken on a baking sheet and cover it with foil. Heat for about 15-20 minutes, or until warm. You can also use a microwave, but it may dry out the chicken. When stored in the fridge, honey butter chicken lasts about three days. In the freezer, it can last up to three months. Always check for signs of spoilage. Look for off smells or a change in color. If the chicken feels slimy, it's best to throw it away. To make meals quicker, prep your chicken in advance. Marinate the chicken the night before. Store it in the fridge in the marinade. This adds flavor and saves time. You can also cut the chicken into pieces for faster cooking later. Just make sure to store it in an airtight container. To check if your chicken is cooked, use a meat thermometer. The internal temperature should reach 165°F (74°C). This ensures that harmful bacteria are gone. If you don’t have a thermometer, cut into the thickest part of the chicken. The meat should be white with no pink juices. - Internal temperature guidelines: 165°F (74°C) is the safe point for chicken. - Tips for cut size and doneness checks: Thicker cuts take longer to cook. Always cut into the thickest part to check for doneness. Yes, you can prepare Honey Butter Chicken in advance. Marinate the chicken for a tasty boost. This adds flavor and moisture. You can store it in the fridge for up to 2 hours before cooking. If you want to save time, cook the chicken and reheat it later. - Reheating and marinating tips for meal prep: Marinate for at least 30 minutes. Store cooked chicken in an airtight container in the fridge for up to 3 days. Honey Butter Chicken pairs well with many sides. Think about mashed potatoes or rice to soak up the sauce. Fresh veggies or a salad add a nice crunch. You can also serve it with cornbread for a Southern twist. - Recommendations for side dishes and complementary flavors: Try green beans, coleslaw, or roasted vegetables. These add color and flavor to your meal. For the complete instructions on making this dish, check the [Full Recipe]. You now have everything to make Honey Butter Chicken. This dish brings together sweet and savory flavors that many enjoy. You learned about the ingredients, cooking methods, and even storage tips. Feel free to try variations or enhance it with your favorite spices. Remember to check the chicken's doneness and explore serving ideas for a complete meal. Enjoy creating this tasty dish and sharing it with family and friends!](https://tossedrecipes.com/wp-content/uploads/2025/06/266ea16e-a4a7-4659-bcd8-adae5ab38ff6.webp)
Are you ready to elevate your dinner game? In this easy recipe guide, I will show you how to make Honey Butter Chicken that’s sweet, savory, and oh-so-delicious. Whether you’re …
Are you ready to elevate your dinner game? In this easy recipe guide, I will show you how to make Honey Butter Chicken that’s sweet, savory, and oh-so-delicious. Whether you’re …

Welcome to your new favorite snack: Oven Baked Chicken Taquitos! These crispy, flavorful bites are perfect for any occasion, from game day to a cozy night in. With just a …

Looking for a fun, simple meal? Try my Thai Peanut Chicken Lettuce Wraps! They are packed with flavor and fresh ingredients. With just a few steps, you can whip up …

Are you ready to elevate your burrito game? Steak & Cheese Dirty Fry Burritos are an irresistible treat that combines juicy steak, crispy fries, and gooey cheese. In this article, …
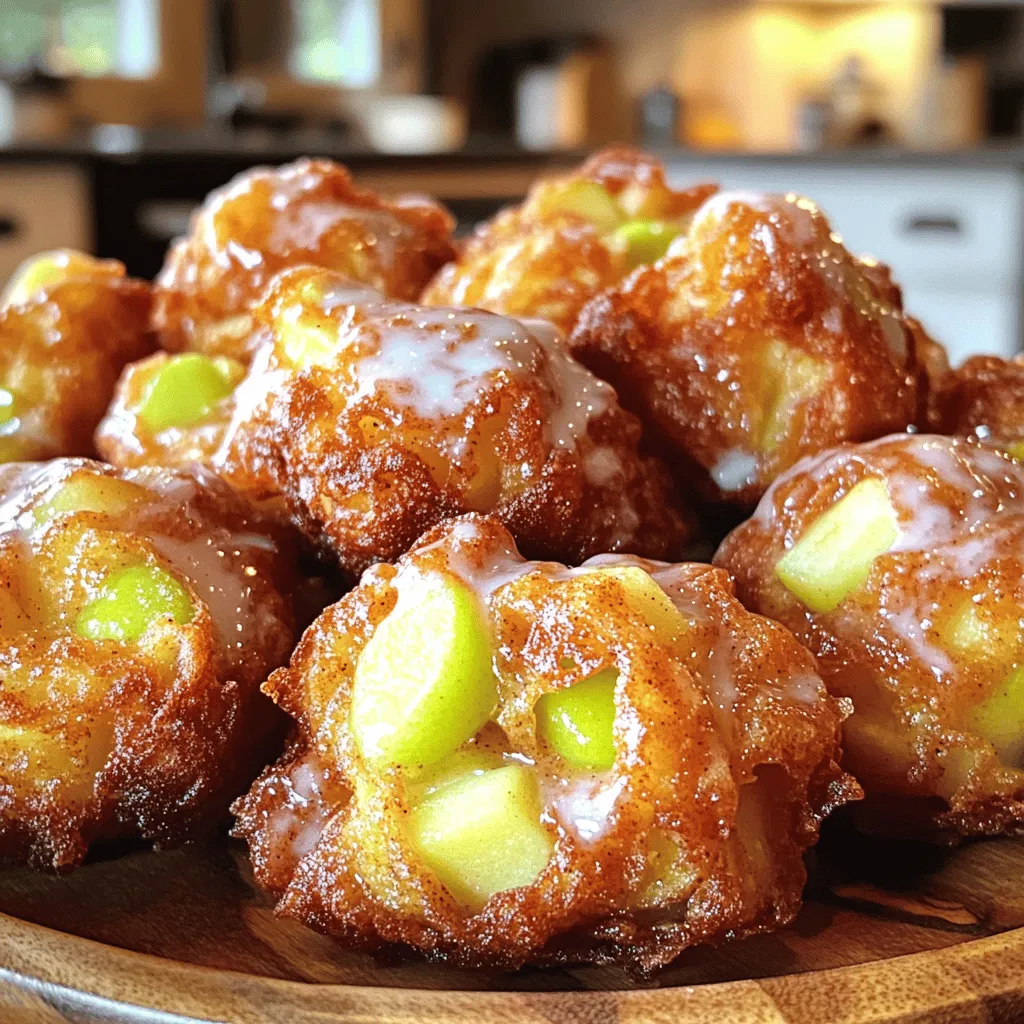
Get ready to enjoy the most delicious baked apple fritters you’ve ever tasted! This easy recipe combines sweet apples with a fluffy batter that bakes to golden perfection. With tips …
![To make this yummy bread, you need some key ingredients. Here’s what you will need: - 1 medium zucchini, grated (about 1 cup) - 1 cup gluten-free all-purpose flour - ½ cup unsweetened cocoa powder - ½ teaspoon baking soda - ½ teaspoon baking powder - ½ teaspoon salt - 1 teaspoon ground cinnamon - 2 large eggs - ½ cup maple syrup - ½ cup coconut oil, melted - 1 teaspoon vanilla extract - ½ cup chocolate chips (dairy-free if desired) These ingredients create the perfect blend of flavors. The zucchini adds moisture and keeps the bread soft. The cocoa powder gives it that rich chocolate taste. Want to make your bread more exciting? You can add some optional ingredients for extra flavor. Consider including: - ¼ cup chopped nuts (walnuts or pecans) for added crunch These nuts add a nice texture and a nutty taste. You can mix and match to find what you like best. If you have specific dietary needs, you can make some easy swaps. Here are a few suggestions: - Use almond flour or oat flour instead of gluten-free all-purpose flour for a different taste. - Replace maple syrup with agave syrup if you prefer. - For a vegan option, swap the eggs for flax eggs (1 tablespoon flaxseed meal + 2.5 tablespoons water per egg). These substitutions help you enjoy this treat no matter your diet. Don't forget to check the [Full Recipe] for all the details! Start by preheating your oven to 350°F (175°C). Grease a 9x5 inch loaf pan or use parchment paper. This makes it easy to take the bread out later. Gather all your ingredients so you can work efficiently. In a large mixing bowl, combine the gluten-free flour, cocoa powder, baking soda, baking powder, salt, and ground cinnamon. Whisk these ingredients together until they mix well. This step ensures that your bread rises evenly and has a rich chocolate flavor. In another bowl, beat the eggs. Add the maple syrup, melted coconut oil, and vanilla extract into this mixture. Stir well until all the wet ingredients blend smoothly. This step adds moisture and flavor to your bread, making it truly delightful. Now, slowly mix the dry ingredients with the wet ones. Stir gently until they just combine. Do not overmix; this keeps your bread light and fluffy. Next, fold in the grated zucchini, chocolate chips, and optional nuts until evenly mixed. The batter will be thick but full of flavor. Pour the batter into the prepared loaf pan, using a spatula to smooth the top. Bake it for 50-60 minutes. You’ll know it’s ready when a toothpick comes out clean. Let the bread cool for 10 minutes in the pan before moving it to a wire rack. Enjoy the wonderful smell as it cools! To keep your bread light, do not overmix the batter. Overmixing can add too much air and make the bread dense. Mix just until you see no more dry flour. Also, measure your ingredients precisely. Too much zucchini or flour can change the texture. If you want a fluffier loaf, add an extra egg. This will help lift the bread while baking. When grating zucchini, choose fresh ones that are firm. Avoid large zucchinis, as they often contain more water and seeds. Use a box grater or food processor for quick work. After grating, place the zucchini in a clean kitchen towel. Squeeze out excess moisture. This step is key to preventing soggy bread. You want the zucchini to add flavor, not extra water. Baking time can vary based on your oven. Start checking your bread around the 50-minute mark. Insert a toothpick into the center. If it comes out clean, the bread is done. If it's wet, add time in 5-minute increments. Let the bread cool in the pan for 10 minutes before moving it to a wire rack. This helps it firm up and makes slicing easier. For best flavor, let it cool completely before cutting. For the full recipe, check out the Choco-Zucchini Delight. {{image_2}} You can easily boost the flavor of your chocolate zucchini bread. Try adding spices like nutmeg or cardamom for warmth. You can also mix in different extracts, like almond or peppermint. For a fun twist, add a swirl of peanut butter or Nutella. These changes add depth and surprise to each bite. I love how these small tweaks make the bread even more exciting. If you want to change the sweetness, consider using honey or agave syrup instead of maple syrup. Coconut sugar is another great option. Each sweetener adds its own flavor, which can change the taste of your bread. Just remember to adjust the amount based on how sweet you want it. I often experiment with these options to find my favorite balance. To make this recipe vegan, you can replace the eggs with flax eggs or applesauce. Use 1 tablespoon of ground flaxseed mixed with 2.5 tablespoons of water for each egg. For a nut-free version, skip the nuts and use sunflower seed butter instead of coconut oil. This keeps the bread moist and tasty. These adjustments let everyone enjoy this delicious treat without worry. Check out the full recipe for more ideas on how to make it your own! To keep your gluten-free chocolate zucchini bread fresh, store it at room temperature. Use an airtight container or wrap it in plastic wrap. This helps keep the bread moist and soft. If you plan to eat it within two days, this method works well. If you want to keep it longer, consider freezing it. To freeze your chocolate zucchini bread, first allow it to cool completely. Slice the bread into pieces for easier use later. Wrap each slice in plastic wrap. Then, place the wrapped slices in a freezer bag. Remove as much air as possible to prevent freezer burn. This way, your bread can last up to three months in the freezer. When you're ready to enjoy the bread again, take a slice out of the freezer. Unwrap it and let it thaw at room temperature for about 30 minutes. For a warm treat, place it in the microwave for 10-15 seconds. You can also heat it in a toaster oven for a few minutes. This makes the bread soft and delicious again. For an extra touch, spread a little butter or coconut oil on top before serving. Check out the Full Recipe for more tips and tricks on making this delightful treat! Yes, you can use other gluten-free flours. Almond flour and oat flour are popular choices. They may change the texture a bit. Almond flour can add moisture, while oat flour might make it denser. You might need to adjust the liquid in the recipe. Start with the same amount and see how it mixes. If it feels too dry, add a little more liquid. Experimenting is part of the fun! To check if your bread is done, use a toothpick. Insert it into the center of the loaf. If it comes out clean, your bread is ready. If there’s wet batter, bake for a few more minutes. Keep checking every five minutes. The edges will pull away from the pan when it’s ready. This is a great sign too! Zucchini adds moisture and nutrition to your bread. It’s low in calories and high in fiber. This helps with digestion and keeps you feeling full. Zucchini also has vitamins A and C, which are good for your skin and immune health. Plus, it’s a great way to sneak in veggies! This makes your treat a bit healthier without losing flavor. You’ll enjoy a sweet treat and some added nutrients! For more details, check out the Full Recipe. This blog post shared how to make gluten-free chocolate zucchini bread. We covered core ingredients, optional flavors, and dietary substitutions. Step-by-step instructions made cooking easy. Tips helped avoid a dense texture and achieve perfect baking. We explored fun variations and shared storage methods for leftovers. In conclusion, you can enjoy a tasty treat that's also good for you. Try new flavors and share your fun creations with others!](https://tossedrecipes.com/wp-content/uploads/2025/06/42bef810-1693-47af-aebb-13a620774d77.webp)
Are you craving a rich, moist treat that’s also gluten-free? Look no further! This Gluten-Free Chocolate Zucchini Bread is here to satisfy your sweet tooth while keeping things healthy with …
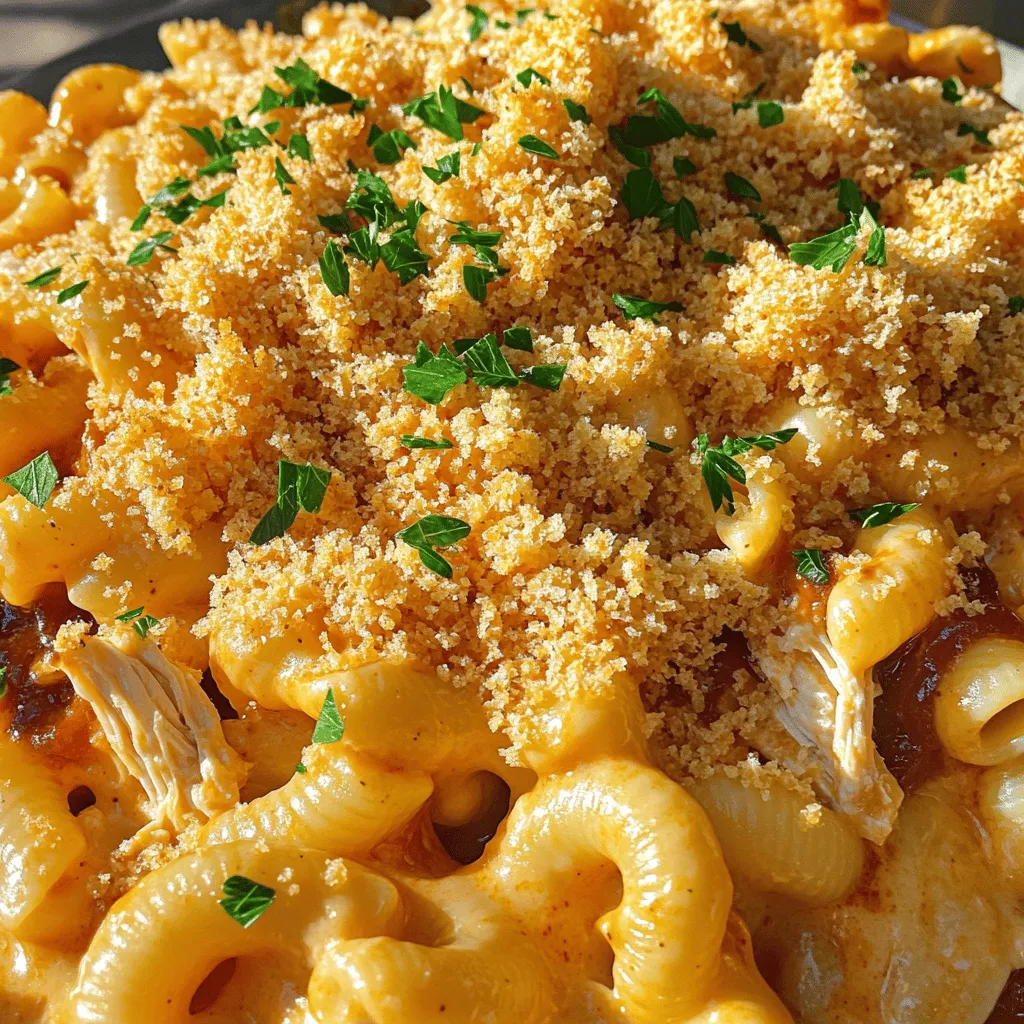
If you’re craving a dish that warms your heart and fills your belly, you’ve found it! BBQ Chicken Mac and Cheese combines rich, cheesy goodness with the smoky flavor of …
![To make a fresh peach custard pie, gather these ingredients: - 4 ripe peaches, peeled, pitted, and sliced - 1 pre-baked 9-inch pie crust (store-bought or homemade) - 1 cup heavy cream - 1 cup whole milk - 3 large eggs - 3/4 cup granulated sugar - 1 teaspoon vanilla extract - 1/4 teaspoon salt - 1 tablespoon cornstarch - 1/2 teaspoon ground cinnamon - 1 tablespoon butter, diced - Fresh mint leaves for garnish (optional) Using ripe peaches is key. They should be firm yet slightly soft to the touch. This ensures your pie has a great flavor and texture. The heavy cream and whole milk give the custard a rich, creamy base. The eggs help set the custard and hold everything together. You can use a store-bought pie crust for convenience or make your own for a homemade touch. Cornstarch helps thicken the custard, while cinnamon adds a lovely warm spice. A bit of butter on top makes the pie even more delicious. This pie is a true celebration of summer. The combination of fresh peaches and creamy custard is hard to beat. You can find the full recipe for this delightful pie in the section above. Enjoy! To make this fresh peach custard pie, follow these easy steps. 1. Preheat your oven and prepare the custard: Set your oven to 375°F (190°C). In a medium bowl, whisk together the heavy cream, whole milk, eggs, granulated sugar, vanilla extract, salt, and cornstarch. Mix until smooth. This custard gives the pie its rich and creamy texture. 2. Arrange the peaches and pour the custard mixture: Peel, pit, and slice the peaches. Place them evenly in the bottom of your pre-baked pie crust. Sprinkle ground cinnamon over the peaches for added flavor. Next, pour the custard mixture over the peaches, making sure they are fully covered. This step infuses the peaches with custard goodness. 3. Baking time and cooling process: Bake your pie in the preheated oven for 45-50 minutes. Look for the custard to be set and the top lightly golden. Once done, remove the pie from the oven and let it cool at room temperature for at least one hour. This cooling time helps the filling firm up. After that, refrigerate the pie for at least two hours before serving. This wait enhances the flavors and texture. For the full recipe, check out the details above. Enjoy your baking! When picking fresh peaches, look for these traits: - Color: Choose peaches that are a golden-yellow color. Avoid green spots. - Feel: Gently squeeze the peach. It should give slightly but not be too soft. - Fragrance: Ripe peaches have a sweet smell. If they smell good, they are likely ready. If your peaches are still hard, you can ripen them quickly. Place them in a paper bag at room temperature. This traps the ethylene gas, speeding up ripening. Check daily until they are soft and fragrant. One common problem is a soggy crust. To avoid this, blind bake your crust. This means baking it before adding the filling. Use pie weights to help keep the crust in shape. Another issue is custard that doesn’t set. If your custard is runny, it could mean it didn’t bake long enough. Make sure to bake until the edges are firm and the center is slightly jiggly. It will set more as it cools. For serving, slice the pie into wedges. Each slice looks great with a sprig of fresh mint on top. This adds a nice touch of color. Serve with a dollop of whipped cream on the side. This adds creaminess and makes every bite even better. Enjoy your beautiful and tasty pie! For a complete recipe, check out the Full Recipe. {{image_2}} You can switch out peaches for other stone fruits. Nectarines add a nice twist. Their flavor is sweet and juicy, just like peaches. You can also try plums. Plums bring a tart taste that balances well with the sweet custard. If you want more fun, mix several fruits together. Combine peaches, nectarines, and plums for a flavor explosion. Each fruit adds its unique touch. This mix makes each bite an adventure. To make this pie even better, think about adding spices. Nutmeg gives a warm, cozy taste. Just a pinch can elevate the pie. Cardamom adds a hint of spice and sweetness. Both spices work well with peaches. You might also like to add chocolate or caramel. Swirls of chocolate can create a rich flavor. Caramel adds sweetness and a sticky texture. These enhancements can turn a simple pie into a dessert masterpiece. For the full recipe, check out the [Full Recipe]. To store leftover pie in the fridge, first cover it with plastic wrap or aluminum foil. This keeps the pie fresh and prevents it from drying out. You can also use an airtight container if you prefer. For the best taste, eat the pie within three to four days. After that, the texture and flavor may start to fade. If you want to freeze the pie, wait until it cools completely. Wrap the pie tightly in plastic wrap, then cover it with aluminum foil. This double layer helps prevent freezer burn. You can keep it frozen for up to three months. When you're ready to enjoy it, take the pie out of the freezer and let it thaw in the fridge overnight. For the best texture, warm it in the oven at 350°F (175°C) for about 15 minutes before serving. This way, the custard will regain its creamy delight. Yes, you can use canned peaches. Canned peaches save time and are easy to find. However, they often have added sugar. Fresh peaches have a better taste and texture. When using canned peaches, drain them well to avoid excess liquid. This helps prevent a soggy pie. If you choose fresh, look for ripe ones. They should feel soft but not mushy. Using fresh gives your pie a bright flavor. The pie lasts about three to four days in the fridge. For the best taste, cover it with plastic wrap or foil. This keeps it fresh. If you leave the pie at room temperature, eat it within two hours. Bacteria can grow quickly in warm conditions. To enjoy it later, refrigerate right after it cools. You can make the custard a day in advance. Store it in the fridge in an airtight container. When you're ready, pour the custard over the peaches in the pie crust. Just remember, the custard may thicken a bit. Whisk it gently before using. This helps it return to a smooth consistency. If your custard doesn’t set, it could be because of undercooked eggs. Make sure you bake it long enough. The custard should be firm yet slightly jiggly in the center. Another reason could be too much liquid. Follow the recipe closely, especially with cream and milk. If it doesn't set, you can try to bake it a bit longer. If all else fails, you can turn it into a delicious parfait! This blog post guides you through making a peach pie that shines. We covered the ingredients, step-by-step instructions, tips on selecting ripe peaches, and how to avoid common issues. You learned ways to present and store your pie, plus some fun variations. As you bake, remember that fresh ingredients and careful techniques matter. Enjoy your peach pie, and share it with others. Happy baking!](https://tossedrecipes.com/wp-content/uploads/2025/06/e23fdabb-5491-4a2a-9857-92def648ea36.webp)
Are you ready for a dessert that shines with summer’s best flavors? My Fresh Peach Custard Pie is a rich and creamy delight that will make your taste buds sing. …
![To make a great peach crisp, you need some key ingredients: - 6 ripe peaches, peeled and sliced - 1/4 cup granulated sugar - 1 tablespoon lemon juice - 1 teaspoon vanilla extract - 1 cup rolled oats - 1/2 cup all-purpose flour - 1/2 cup packed brown sugar - 1/2 teaspoon ground cinnamon - 1/4 teaspoon salt - 1/4 cup unsalted butter, melted These ingredients come together to create a warm, sweet dish that bursts with flavor. For some extra crunch and richness, consider adding: - 1/2 cup chopped pecans - 1/4 cup unsalted butter for the topping Adding nuts gives a nice texture and flavor to each bite. Don’t worry if you need to change things up. Here are some alternatives: - If you want a different sweetener, try honey or maple syrup. - For gluten-free options, use almond flour or gluten-free oats. These substitutions let you enjoy peach crisp without losing any deliciousness. For the complete recipe, check out the Full Recipe section. To start, grab your ripe peaches. First, you need to peel them. A sharp knife or peeler works well for this. After peeling, slice each peach into thin wedges. Aim for about 1/2 inch thick. Next, mix the peach slices in a large bowl. Add 1/4 cup of granulated sugar, 1 tablespoon of lemon juice, and 1 teaspoon of vanilla extract. Toss everything together gently. Let it sit for about 10 minutes. This helps the peaches release their sweet juices. For the crisp topping, take another bowl and mix 1 cup of rolled oats, 1/2 cup of all-purpose flour, 1/2 cup of packed brown sugar, 1/2 teaspoon of ground cinnamon, and 1/4 teaspoon of salt. Stir this mixture well. Now, pour in 1/4 cup of melted unsalted butter. Use a fork to mix until it looks like coarse crumbs. If you want, chop up 1/2 cup of pecans and add them. This adds a nice crunch. Grab a greased baking dish, about 9x9 inches. Pour the peach mixture into this dish. Spread it out evenly. Next, sprinkle the oat topping over the peaches. Now it's time to bake! Preheat your oven to 350°F (175°C). Place the dish in the oven and bake for 30 to 35 minutes. Look for a golden brown topping and bubbly peaches. Enjoy the lovely smell filling your kitchen! For more detailed steps, check out the Full Recipe. To get the best crumb topping, use cold butter. Cut it into the dry mix until it looks like small crumbs. This keeps the topping crisp. Use rolled oats for a chewy texture. If you prefer crunch, add chopped pecans. Mix them in just before baking. For juicy, tender peaches, choose ripe ones. You want them soft but not mushy. Slice them evenly for even cooking. Toss them with sugar, lemon juice, and vanilla. Let them sit for about 10 minutes. This helps the flavors blend and juices form. Peach Crisp shines when served warm. A scoop of vanilla ice cream on top adds creaminess. Fresh mint leaves make it pop. For gatherings, serve it in a pretty dish. You can also offer extra toppings like whipped cream or caramel sauce. Overbaking makes the topping hard. Check your crisp at 30 minutes. If the topping is golden brown and the peaches bubble, it’s done. Underbaking leaves the peaches too firm. Ensure you bake until it reaches that perfect golden color. When measuring ingredients, use a kitchen scale for accuracy. Too much flour makes the topping dense. Use light scoops for flour and level it off with a knife. This helps maintain the right texture for your Peach Crisp. For the complete cooking experience, refer to the Full Recipe. {{image_2}} You can make Peach Crisp even tastier by adding spices. Nutmeg and cardamom add warm notes. A pinch of either spice can enhance the peach flavor. You can also mix in other fruits. Try blueberries or raspberries for a fun twist. This mix adds color and flavor, making your dessert unique. If you want a vegan version, swap butter for coconut oil. Use maple syrup instead of granulated sugar for sweetness. These changes keep the crisp tasty while meeting dietary needs. For a low-sugar option, use less sugar or a sugar substitute. This keeps the dish light and sweet without the extra calories. You don’t have to stick only to fresh peaches. Frozen peaches work great too. Just thaw and drain them before using. This option is perfect in winter when fresh peaches aren't available. You can also switch fruits based on the season. In fall, try apples. In summer, berries shine. Each fruit gives a new flavor twist to your crisp. For the complete recipe, check the [Full Recipe]. To keep your Peach Crisp fresh, let it cool first. Then, cover it tightly with plastic wrap or foil. Store it in the fridge. It will stay good for up to four days. If you want to keep it longer, freezing is a great option. To freeze, let the Peach Crisp cool completely. Cut it into portions for easy serving. Wrap each piece in plastic wrap, then place them in a freezer-safe bag. Make sure to label it with the date. When you're ready to eat, take it out. Reheat it in the oven at 350°F (175°C) until warm, about 15-20 minutes. This keeps the topping crispy. Peach Crisp is best when fresh. If you notice any off smells or mold, it’s time to toss it out. Freshness is key. Signs of spoilage include a soggy texture or a change in color. Always trust your senses when checking your dessert. Enjoy your Peach Crisp while it’s at its best! For the full recipe, refer to the main article. You can easily use canned peaches for your Peach Crisp. First, drain the peaches well to remove excess syrup. Use about 2 cups of canned peaches to replace 6 fresh ones. Canned peaches tend to be sweeter, so cut back on the sugar. I suggest reducing the granulated sugar to 2 tablespoons. This way, your crisp won’t be overly sweet. Yes, you can make Peach Crisp ahead of time! If you want to bake it later, prepare the peach mixture and topping separately. Store the peach mix in the fridge for up to 2 days. Keep the topping in an airtight container at room temperature. When you are ready to bake, just pour the peaches into a dish and sprinkle the topping on top. The best topping for Peach Crisp has a mix of textures and flavors. You want a crunchy, sweet topping. A great mix includes oats, flour, brown sugar, and butter. You can also add chopped nuts for extra crunch. Pecans or walnuts work well here. The topping should be golden brown and crisp when baked. This contrast makes each bite enjoyable. Peach crisp is a delightful dessert that anyone can make. We covered the key ingredients, from ripe peaches to optional toppings. I shared simple steps for prepping, baking, and storing your crisp. Remember tips to avoid common mistakes and explore flavor variations. This dessert is versatile, making it perfect for any occasion. Whether you choose to use fresh or frozen peaches, peach crisp will impress your friends and family. Enjoy crafting this delicious treat and savoring each bite!](https://tossedrecipes.com/wp-content/uploads/2025/06/bee0b147-b201-4ea7-a207-690dbf3d24d7.webp)
If you’re craving a dessert that captures the essence of summer, look no further! This Peach Crisp is juicy, sweet, and topped with a crunchy mix. I’ll guide you through …

Looking for a quick and tasty weeknight meal? You’ll love this Creamy Beef and Bowtie Pasta! It’s comfortable, filling, and easy to make. We’ll dive into the simple ingredients and …