The BEST Pickled Sweet Peppers Flavorful and Simple
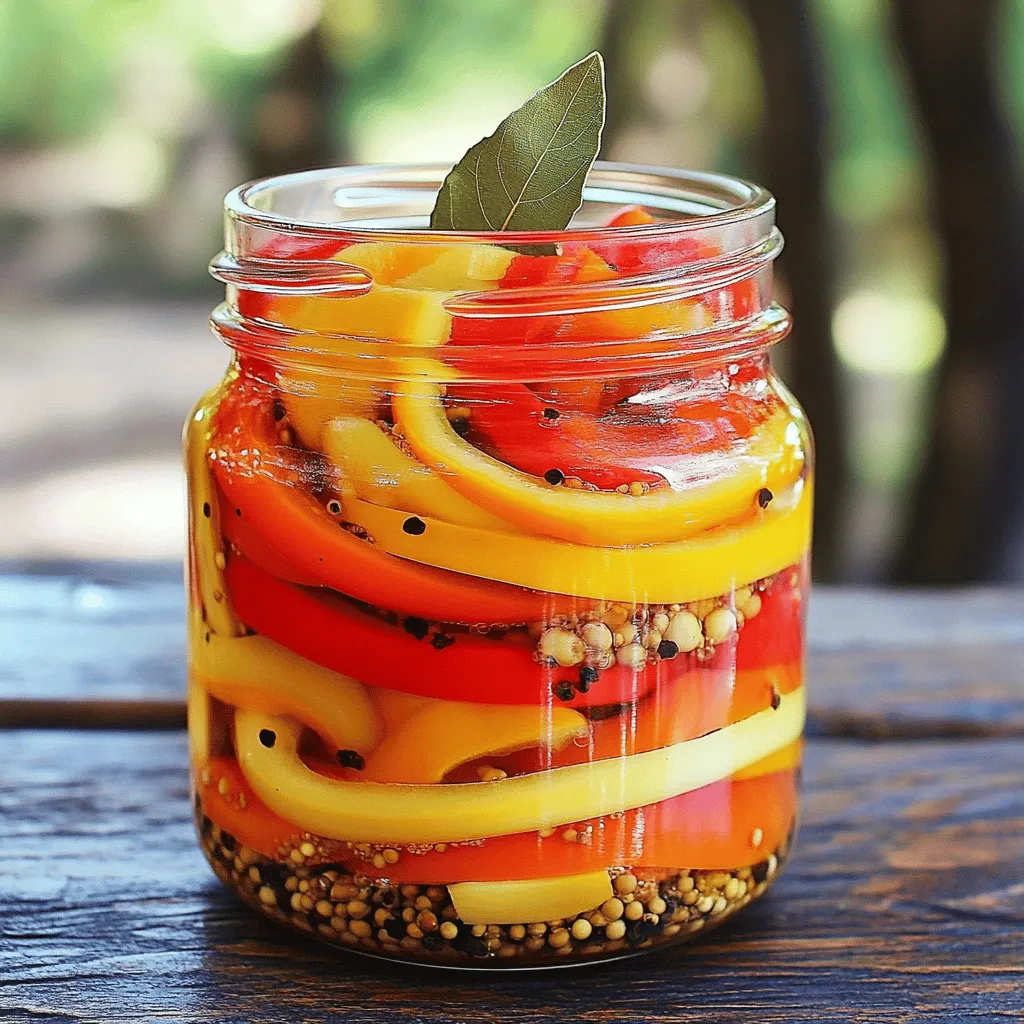
Looking to add a burst of color and flavor to your meals? You’ve come to the right place! I’ll show you how to make the best pickled sweet peppers that …
Looking to add a burst of color and flavor to your meals? You’ve come to the right place! I’ll show you how to make the best pickled sweet peppers that …
![To make tasty Korean BBQ meatballs, you need some simple ingredients. Here’s the complete list of ingredients: - 1 pound ground beef or ground turkey - 1/2 cup breadcrumbs - 1/4 cup green onions, finely chopped - 1/4 cup sesame seeds - 2 cloves garlic, minced - 1-inch piece ginger, grated - 1/4 cup soy sauce - 2 tablespoons brown sugar - 1 tablespoon gochujang (Korean chili paste) - 1 tablespoon rice vinegar - 1 teaspoon sesame oil - Salt and pepper to taste - Fresh cilantro for garnish Each ingredient plays a special role. The ground beef or turkey is your meat base. Breadcrumbs help give the meatballs a nice texture. Green onions add a fresh taste, while sesame seeds give a nice crunch. Garlic and ginger add warmth and depth. Soy sauce brings umami flavor, while brown sugar balances the saltiness. Gochujang is key for that spicy kick, and rice vinegar adds a touch of acidity. Sesame oil adds a nutty flavor, and salt and pepper enhance everything. Finally, fresh cilantro makes a great garnish. Feel free to explore variations with these ingredients. You can find the full recipe [Full Recipe]. 1. First, preheat the oven to 400°F (200°C). This helps the meatballs cook evenly. 2. Next, prepare a baking sheet by lining it with parchment paper. This makes cleanup easy. 1. In a large bowl, combine the following ingredients: - 1 pound ground beef or ground turkey - 1/2 cup breadcrumbs - 1/4 cup green onions, finely chopped - 1/4 cup sesame seeds - 2 cloves garlic, minced - 1-inch piece ginger, grated - 1/4 cup soy sauce - 2 tablespoons brown sugar - 1 tablespoon gochujang - 1 tablespoon rice vinegar - 1 teaspoon sesame oil - Salt and pepper to taste 2. Mix all the ingredients together well. Use your hands to ensure everything is combined. 1. Shape the mixture into small meatballs, about 1 inch in diameter. Place them on the baking sheet. 2. Bake the meatballs in the preheated oven for 20 to 25 minutes. They should be cooked through and have a nice caramelized look. For more details, check the Full Recipe. To make great meatballs, use the right ingredient ratios. A mix of meat, breadcrumbs, and seasonings gives the best texture. Too many breadcrumbs can make them dry. Too little makes them fall apart. Always remember to mix gently. Over-mixing can lead to tough meatballs. Want to kick up the flavor? Add a bit of chopped cilantro or extra ginger. You can also try different sauces. A sweet chili sauce or teriyaki can give a fun twist. Experiment with your favorite ingredients to find what you love. Serve your meatballs with some rice or noodles for a complete meal. Steamed veggies make a nice side, too. For a fun touch, use a large platter. Arrange the meatballs in a circle and add your dipping sauce in the center. This looks great and makes sharing easy. If you want to impress guests, garnish with sesame seeds and fresh cilantro. {{image_2}} You can switch meats in this recipe. Try chicken or pork for a lighter taste. Both options offer a different texture. Ground turkey works well too. For a vegetarian or vegan version, use lentils or chickpeas. You can mash them and mix with breadcrumbs. This keeps the meatball shape while adding flavor and nutrition. Feel free to add spices for more kick. You might try chili powder or black pepper. They enhance the meatballs with a nice warmth. Adding vegetables like finely chopped carrots or bell peppers will also boost nutrition. They add color and crunch to each bite. You can pan-fry these meatballs for a crispy outside. Heat oil in a pan and cook until browned. Baking works great too, as it cooks evenly. If you want smoky flavor, grill your meatballs. The grill adds a unique taste and makes them extra juicy. For the best results, choose the method that you enjoy most! To keep your Korean BBQ meatballs fresh, store them in the fridge. Place them in an airtight container. This helps prevent moisture loss. You can store leftovers for up to three days. When reheating, gentle heat keeps them juicy and tasty. Freezing is a great option for future meals. First, let the cooked meatballs cool completely. Then, place them in a freezer bag. Remove as much air as possible to avoid freezer burn. Freeze them for up to three months. To reheat, simply thaw in the fridge overnight. Then, warm them in the oven or microwave until hot. Understanding how long your meatballs last is key. In the fridge, they stay good for about three days. In the freezer, they last up to three months. Always check for odd smells or changes in color before eating. Storing them right helps you enjoy these tasty bites longer. For the complete recipe, check out the Full Recipe link. Korean BBQ meatballs blend many flavors in Korean cooking. They reflect street food culture in Korea. These meatballs often use ingredients like soy sauce and gochujang. These flavors make them rich and savory. Korean food emphasizes balance, combining sweet, salty, and spicy notes. This dish showcases the creativity found in Korean kitchens. Eating these meatballs connects people to traditions that span generations. Yes, you can prepare these meatballs in advance. Make the meatball mixture and shape them. Store them in the fridge for up to 24 hours. You can also freeze them for longer storage. Just remember to thaw them overnight in the fridge before baking. This saves time on a busy day and makes meal prep easy. Korean BBQ meatballs pair well with many sides. Here are some great options: - Steamed rice - Kimchi - Roasted vegetables - Asian slaw - Noodles These sides add texture and flavor. They complement the savory taste of the meatballs, creating a full meal. To ensure meatballs are fully cooked, check their internal temperature. They should reach 160°F (71°C) for beef and turkey. Use a meat thermometer for accuracy. If you don’t have one, cut one meatball in half. The inside should be no longer pink and juices should run clear. This ensures safety and the best texture. Yes, ground turkey is a great substitute for beef. It is leaner, which can make meatballs lighter. The taste is slightly different, but still delicious. You can also add more seasoning to enhance flavor. Ground turkey absorbs sauces well, making it perfect for Korean BBQ. This swap keeps the dish healthy without losing taste. For the full recipe, check out the link. This post covered everything you need to make Korean BBQ meatballs. You learned the ingredients, prep steps, and baking instructions. I shared tips to enhance flavor and texture, along with storage methods. Try different meats and flavor variations to find your favorite. Use this guide to create delicious meals. Enjoy your cooking experimentation and serve up those tasty meatballs!](https://tossedrecipes.com/wp-content/uploads/2025/06/4f469120-43aa-48db-b378-ed889e0aa354.webp)
Are you ready to jazz up your dinner with a dish that’s packed with flavor? My Korean BBQ Meatballs recipe is not only easy to make, but it’s also a …

Craving a quick and tasty dinner? Japanese katsu bowls offer crispy delights that you can whip up in no time. Whether you choose chicken, pork, or tofu, this dish will …
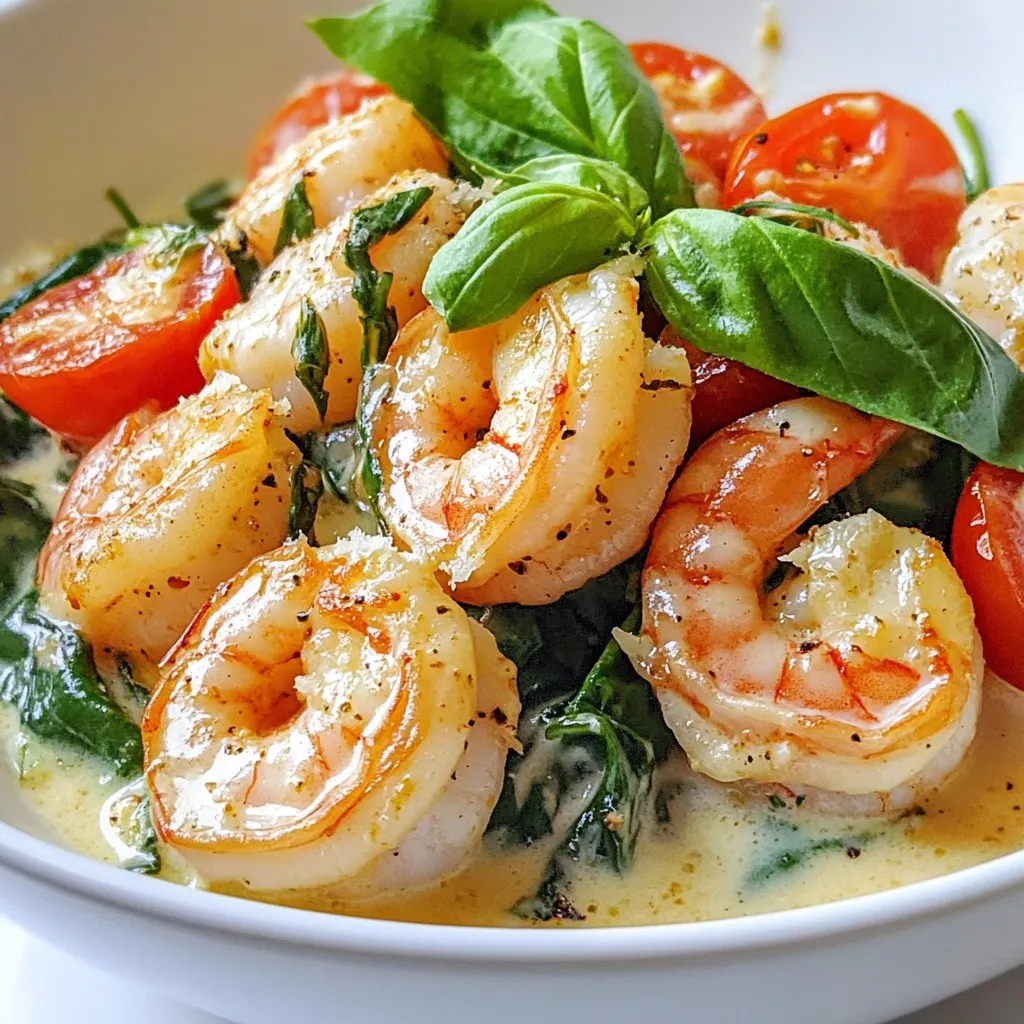
If you’re looking for a simple yet delicious dinner, you’ve come to the right place! In this One Pot Creamy Tuscan Shrimp Easy Dinner Delight, I will show you how …
![- 1 cup cottage cheese - 1 cup canned chickpeas, rinsed and drained - 1 medium cucumber, diced - 1 red bell pepper, diced - 1/4 red onion, finely chopped - 1 cup cherry tomatoes, halved - 1/4 cup fresh parsley, chopped Cottage cheese is creamy and rich in protein. Chickpeas add fiber and a nutty taste. Fresh vegetables bring crunch and color. They make this salad lively and healthy. - 1 tablespoon olive oil - 2 tablespoons lemon juice - 1 teaspoon cumin powder - Salt and pepper to taste The dressing ties everything together. Olive oil and lemon juice add brightness. Cumin gives a warm spice. Salt and pepper enhance the flavors. - 1/4 teaspoon red pepper flakes for heat - Additional herbs or toppings If you like a kick, add red pepper flakes. Fresh herbs can boost flavor too. You can try adding avocado or nuts for crunch. Explore different toppings to make it your own! For the complete recipe, check out the [Full Recipe]. - Combine cottage cheese and chickpeas Start by taking a large mixing bowl. Add 1 cup of cottage cheese and 1 cup of canned chickpeas (rinsed and drained). Mix them well. This creates a creamy base packed with protein. - Add diced vegetables Next, chop up a medium cucumber, a red bell pepper, and a small red onion. Toss these diced veggies into the bowl. The colors and textures will brighten your dish. - Prepare the dressing In a small bowl, whisk together 1 tablespoon of olive oil, 2 tablespoons of lemon juice, 1 teaspoon of cumin, and salt and pepper. This simple dressing adds a zesty kick. - Toss salad components together Pour the dressing over the salad. Gently toss all the ingredients together until they are nicely coated. This step helps to blend the flavors. - Allow flavors to meld Let your salad sit for about 10 minutes. This waiting time allows the flavors to mix and deepen. It’s worth the wait! - Serve attractively Serve your salad in individual bowls or on a large platter. You can garnish with extra parsley for a pop of color. Enjoy your Cottage Cheese and Chickpea Salad Bowl! For the full recipe, see [Full Recipe]. To boost the taste of your cottage cheese and chickpea salad, try these seasonings: - Ground cumin - Fresh parsley - Lemon juice - Olive oil - Salt and pepper Resting the salad is key. Let it sit for at least 10 minutes. This time helps the flavors mix. You want a nice mix of creaminess and crunch. The cottage cheese adds creaminess. Fresh veggies add crunch. Use only fresh ingredients. Fresh cucumbers and tomatoes taste better. This salad pairs well with grilled chicken or fish. You can also serve it with pita bread. It tastes great cold or at room temperature. For best results, serve it soon after mixing. For the full recipe, check out the Cottage Cheese and Chickpea Delight Bowl 🥗. {{image_2}} You can easily adjust this salad for dietary needs. If you're vegan, swap cottage cheese for dairy-free cheese. It will still taste great. For those needing gluten-free options, chickpeas are safe. You can use fresh veggies and herbs to keep it healthy. Feel free to get creative with your ingredients. If you don’t have chickpeas, try black beans or lentils. They add a nice texture. You can also mix in seasonal vegetables. Think about using zucchini in summer or roasted butternut squash in fall. These swaps keep your salad fresh and exciting. Add a twist to your salad with fun themes. For a Mediterranean flair, toss in some olives. They bring a salty punch that complements the creamy cheese. If you want a Southwestern vibe, mix in corn and diced avocado. This combination adds sweetness and creaminess, making each bite a delight. For the complete recipe, check out Cottage Cheese and Chickpea Delight Bowl! To keep your cottage cheese and chickpea salad bowl fresh, store it in an airtight container. This method helps to keep moisture in and air out. You can enjoy this salad for up to three days in the fridge. However, the longer you wait, the more the flavors may change. Freezing this salad is not the best idea. The texture of cottage cheese changes when frozen. If you still want to freeze it, separate the dressing and salad. Place the salad in a freezer-safe bag and remove as much air as possible. When you want to eat it, thaw it in the fridge overnight. Serve it with fresh dressing to regain that creamy taste. You do not need to heat this salad. Serve it cold for the best flavor and texture. If it has been in the fridge, give it a gentle stir before serving. You can add a touch of fresh lemon juice or olive oil to refresh the taste. This salad is excellent on a hot day or as a light meal. Enjoy it with some whole-grain bread or crackers for added crunch. To make a Cottage Cheese and Chickpea Salad Bowl, follow these steps: 1. Mix the base: In a large bowl, add 1 cup of cottage cheese and 1 cup of canned chickpeas. Rinse the chickpeas well, then mix them together gently. 2. Add vegetables: Dice 1 medium cucumber and 1 red bell pepper. Finely chop 1/4 of a red onion. Add these fresh veggies to the bowl. 3. Incorporate tomatoes and herbs: Halve 1 cup of cherry tomatoes. Chop 1/4 cup of fresh parsley. Fold these into the mix to keep it colorful. 4. Make the dressing: In a small bowl, whisk together 1 tablespoon of olive oil, 2 tablespoons of lemon juice, 1 teaspoon of cumin powder, salt, and pepper. If you like heat, add 1/4 teaspoon of red pepper flakes. 5. Combine everything: Pour the dressing over the salad. Toss gently to coat all the ingredients. 6. Let it rest: Allow the salad to sit for at least 10 minutes. This lets the flavors blend well. 7. Serve: You can serve the salad in individual bowls or on a big platter. Garnish with extra parsley if you like. This full recipe makes enough for four servings and takes about 15 minutes to prepare. The Cottage Cheese and Chickpea Salad Bowl is packed with nutrients. Here are some key benefits: - High in protein: Cottage cheese and chickpeas both offer a good amount of protein, supporting muscle health. - Rich in fiber: Chickpeas provide fiber, which aids digestion and keeps you full longer. - Vitamins and minerals: Fresh veggies like cucumber, bell pepper, and tomatoes boost vitamins A and C, which are great for your skin and eyes. - Healthy fats: Olive oil adds healthy fats that support heart health. - Low calorie: This salad is low in calories, making it a great option for light meals or snacks. Yes, you can prepare the Cottage Cheese and Chickpea Salad Bowl ahead of time. Here’s how: - Meal prep: You can mix the salad and store it in the fridge for up to 2 days. This keeps the flavors fresh. - Storage tips: Keep it in an airtight container to maintain quality. - Dressing separately: If you want the salad to stay crisp, store the dressing separately. Add it just before serving. This way, you can enjoy a quick and healthy meal any day! This blog post showed you how to make a tasty Cottage Cheese and Chickpea Salad. We covered the main ingredients and essential dressings. You learned how to put everything together step-by-step. Tips and tricks helped enhance flavor and texture. We also talked about fun variations and storage tips. Remember, you can change ingredients based on your taste. This salad is not just healthy; it’s versatile and easy to enjoy anytime. Make it your way, and have fun with it!](https://tossedrecipes.com/wp-content/uploads/2025/06/ec0c9219-a432-4a62-8abd-17550ec8feee.webp)
Are you ready to enjoy a fresh and healthy delight? The Cottage Cheese and Chickpea Salad Bowl is packed with protein, flavor, and color. This simple recipe combines creamy cottage …
![- 2 boneless, skinless chicken breasts - 1 cup fresh corn kernels - 1 ripe avocado, diced - 1 red bell pepper, diced - 1 small red onion, finely chopped - 2 tablespoons olive oil - 1 teaspoon smoked paprika - 1 teaspoon cumin - Salt and pepper to taste - Juice of 1 lime - Fresh cilantro for garnish When you gather your ingredients, focus on freshness. I love using fresh corn because it adds a sweet crunch. You can use canned corn, but fresh tastes best. The ripe avocado brings creaminess. Make sure your avocado is soft but not mushy. For vegetables, the red bell pepper and onion add color and flavor. The olive oil helps everything cook nicely. Smoked paprika and cumin give your dish a warm, smoky taste. Salt and pepper are key to making flavors pop. Lime juice brightens everything up. Don't forget the cilantro! It adds a fresh touch at the end. This recipe combines all these ingredients into a meal you will love. For the full details on how to make it, see the Full Recipe section. - Preheat your oven to 400°F (200°C). - In a bowl, mix the corn, red bell pepper, red onion, lime juice, and half the olive oil. Season with salt, pepper, smoked paprika, and cumin. Stir well to combine. - Spread the corn mixture evenly on a baking sheet. - Roast for 15-20 minutes until lightly charred and tender. - Season the chicken breasts with salt, pepper, and the remaining olive oil. - In a skillet, heat over medium-high heat. Sear the chicken for about 5 minutes on each side until golden brown. - Once seared, transfer the chicken to the oven. You can place it on the same tray as the corn. - Bake for an additional 10-15 minutes until the chicken is cooked through. The internal temperature should reach 165°F (74°C). - Remove both the chicken and roasted corn from the oven. Let the chicken rest for a few minutes before slicing. - To serve, lay the sliced chicken on a plate. Top with the roasted corn mixture. Sprinkle diced avocado and fresh cilantro on top. For the full recipe, refer to the detailed instructions above. - Use a meat thermometer for accurate doneness. Aim for 165°F (74°C). - Let the chicken rest before slicing for juiciness. This keeps the meat moist. To achieve the best chicken, I recommend checking the internal temperature. A meat thermometer ensures the chicken is safe to eat. If you do not have one, look for clear juices when you cut into the chicken. If the juices run clear, your chicken is likely done. Resting the chicken is key. After cooking, place it on a cutting board and let it sit for about five minutes. This simple step allows the juices to redistribute, giving you tender, juicy bites. - Experiment with additional spices or herbs. Try garlic powder or fresh thyme. - Consider marinating the chicken for extra flavor. Use lime juice, olive oil, and spices. Flavor can elevate your dish. I love to mix spices like garlic powder, thyme, or even chili powder. These can add depth and warmth to the chicken. You could also add a pinch of cayenne for heat. Marinating the chicken makes it even better. A simple mix of lime juice, olive oil, and your favorite spices works wonders. Let it marinate for at least 30 minutes, or even overnight. This step will make your chicken taste amazing. For the full recipe, refer back to the main article. {{image_2}} You can switch up the protein in this dish. Try using turkey breasts instead of chicken. Turkey gives a similar texture and flavor. If you want a plant-based option, consider tofu. Tofu absorbs flavors well and can be a great choice. To make it more exciting, add black beans. They add protein and fiber. If you enjoy spice, throw in some jalapeños for a kick. It enhances the flavor and brings some heat. For toppings, you have options too! Sour cream adds creaminess, while cheese brings richness. These additions can make each bite even tastier. Explore these variations to create your perfect plate! For the full recipe, check out the [Full Recipe]. To keep your chicken breast with roasted corn and avocado fresh, store it in the fridge. Place leftovers in an airtight container. This helps keep moisture in and prevents odors. You can store it for up to three days. If you want to keep it longer, freezing is a great option. Wrap the chicken and corn mixture tightly in plastic wrap, then place it in a freezer-safe bag. This way, it stays good for up to three months. When you reheat your chicken, you want it to stay juicy. The best way is to use the oven. Preheat it to 350°F (175°C). Place the chicken and corn on a baking sheet. Cover them with foil to keep the moisture in. Heat for about 15-20 minutes. You can also use a microwave, but be careful. Heat it in short bursts, about 30 seconds, checking often. This keeps the chicken from drying out. Enjoy your delicious meal again! Yes, you can use frozen corn. Just thaw it first. Drain any excess water. This makes it easier to roast. The cooking time may be a bit shorter. Check for doneness after 10-15 minutes. To make this dish gluten-free, use gluten-free spices. Check labels on any packaged ingredients. Most fresh ingredients are naturally gluten-free. This means the corn, chicken, and veggies are safe. Enjoy a worry-free meal! This chicken dish pairs well with a green salad. You can also serve it with rice or quinoa. Grilled vegetables make a great side, too. These options balance the flavors nicely. Yes, this recipe is great for meal prep. Cook the chicken and corn ahead of time. Store in airtight containers in the fridge. Reheat for lunch or dinner all week! It stays tasty for about 3-4 days. For full details, check the Full Recipe. This blog post showed how to make a tasty chicken dish. You learned about the key ingredients, like chicken, corn, and avocado. I shared simple steps for cooking and tips for juicy results. You can also explore variations and storage options for leftovers. Remember, cooking is fun and you can adjust recipes to suit your taste. Enjoy experimenting and making this dish your own!](https://tossedrecipes.com/wp-content/uploads/2025/06/e9310303-88f2-4d11-aa8c-eb3235cd1ea7.webp)
Ready to enjoy a fresh and tasty meal? This Savory Chicken Breast with Roasted Corn and Avocado dish combines simple ingredients for a burst of flavor. Juicy chicken pairs perfectly …
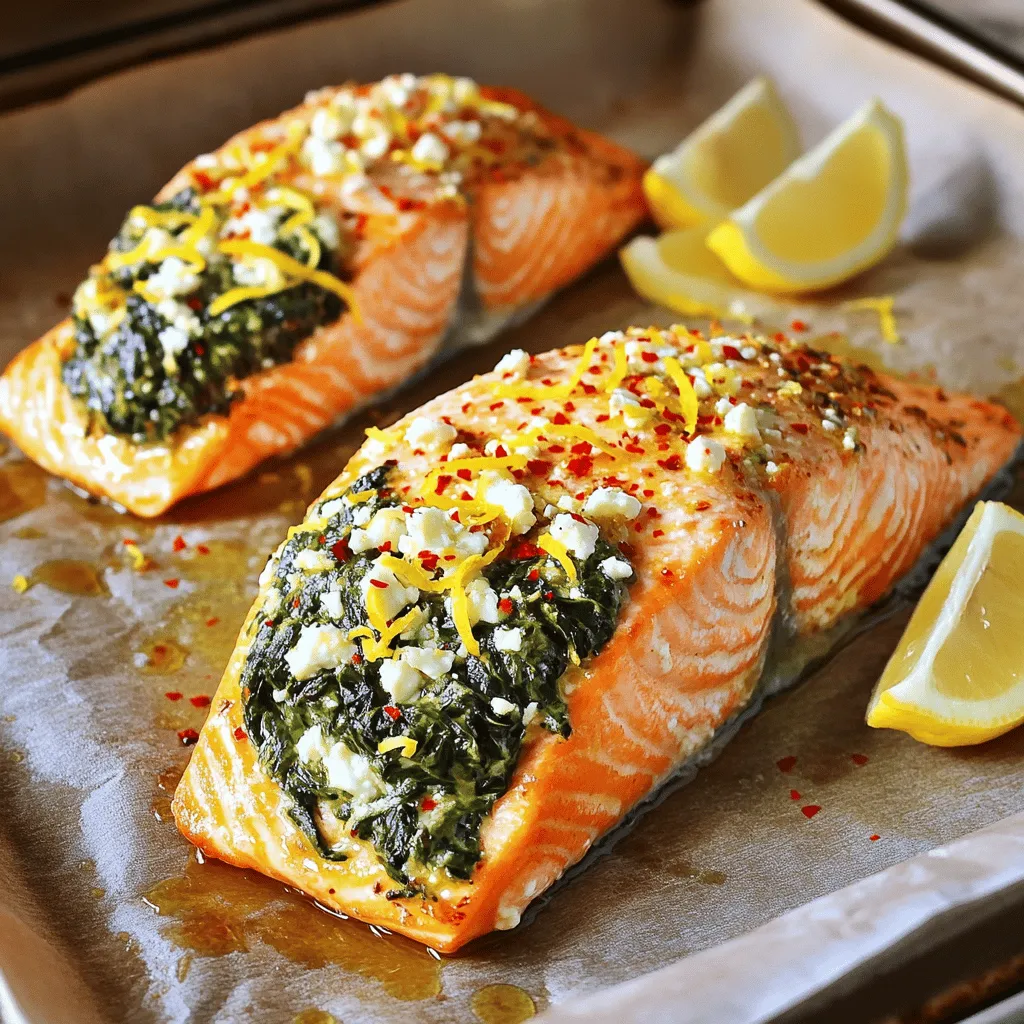
If you crave a dish that’s both elegant and easy, Baked Stuffed Salmon with Spinach & Feta is your answer! This recipe combines tender salmon with a creamy spinach and …
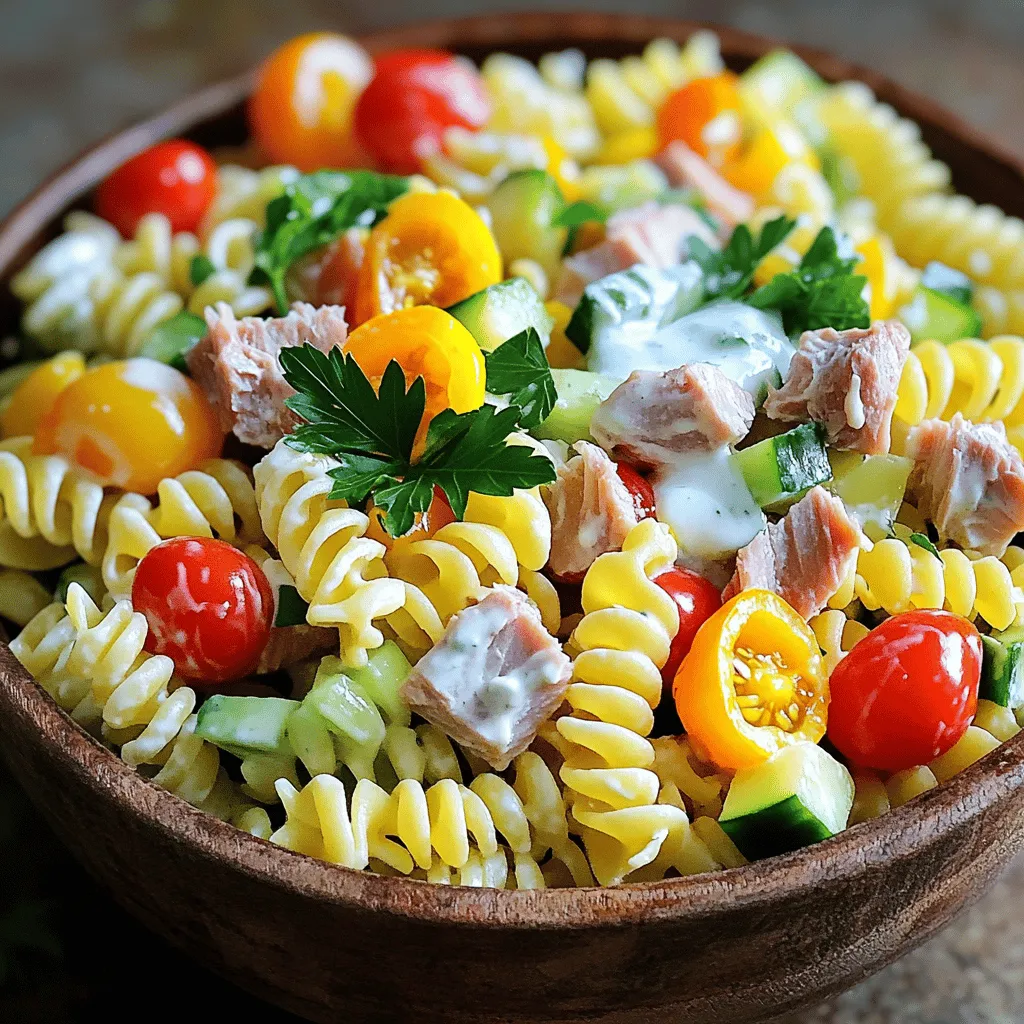
If you’re seeking a meal that’s both easy to make and packed with protein, look no further! My High Protein Tuna Pasta Salad is simple, satisfying, and perfect for any …
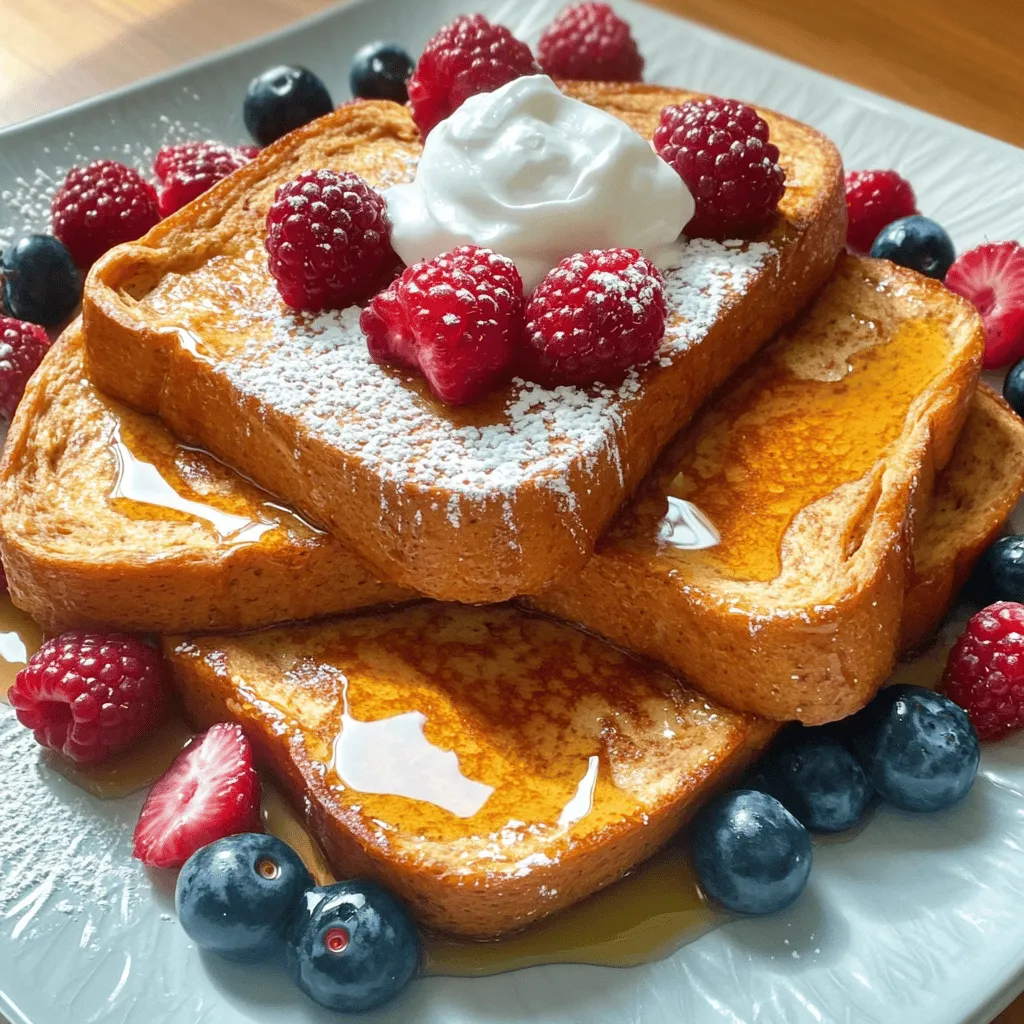
Are you looking for a breakfast that’s both tasty and packed with protein? You’ve landed in the right place! I’ll guide you through making Protein French Toast, a flavorful delight …
![- 4 cod fillets (6 oz each) - 1 cup breadcrumbs (preferably panko) - 1 lemon, zested and sliced - Fresh herbs (parsley, dill) - Garlic powder - Onion powder - Paprika - Cayenne pepper (optional) - Olive oil - Salt and pepper to taste I love using fresh ingredients in my cooking. For this easy baked cod, I use four cod fillets, each weighing about six ounces. Cod is a mild fish that cooks well and has a nice texture. I recommend using panko breadcrumbs. They make the topping extra crispy. Zest a lemon to add a bright flavor. I also slice the lemon to place around the fish. Fresh herbs like parsley and dill give a nice finish to the dish. I like garlic and onion powder for depth. Paprika adds warmth, while cayenne gives a little kick, but it’s optional. For the oil, I use olive oil for its rich taste. It helps the breadcrumbs crisp up and keeps the fish moist. Don’t forget salt and pepper to enhance all the flavors. This combination makes the cod delicious and satisfying. You can find the full recipe above for all the details. 1. Preheat the oven to 400°F (200°C). This step is key for even cooking. 2. Prepare your baking dish by lightly greasing it with olive oil. This helps prevent sticking. 1. Combine 1 cup of breadcrumbs with fresh herbs like parsley and dill in a bowl. 2. Add garlic powder, onion powder, paprika, cayenne pepper, lemon zest, salt, and pepper. Mix well. 3. Pour in 2 tablespoons of olive oil and stir until the breadcrumbs are coated. Adjust seasoning levels to taste. 1. Place the 4 cod fillets in the greased baking dish. Drizzle them with olive oil. 2. Season both sides of the fillets with salt and pepper. 3. Add the breadcrumb mixture evenly on top of each fillet. Press it down gently to stick. 4. For added flavor, place lemon slices around the fillets in the dish. 1. Bake the cod in the preheated oven for 15-20 minutes. 2. To check for doneness, use a fork. The cod should flake easily and look opaque. Now you have a simple and tasty dish ready to impress your family or guests! For the complete recipe, check the Full Recipe. To get a crispy topping, I use panko breadcrumbs. They are light and crisp. Mix them with fresh herbs and spices. This adds flavor and crunch. Press the mixture onto the cod fillets. A firm press helps it stick well during baking. Keeping cod moist is also key. I drizzle olive oil over the fillets. This adds flavor and locks in moisture. Baking at 400°F (200°C) for 15-20 minutes works perfectly. The cod should flake easily when done. If you see a golden brown topping, you know it’s ready. For the best results, choose a good baking dish. A glass or ceramic dish works great. These materials heat evenly and show the fish well. I prefer a shallow dish. It allows the heat to circulate around the cod. You’ll need a few kitchen tools too. A mixing bowl helps combine the topping. A spatula makes serving easy. Use a fork to check if the cod flakes nicely. These tools keep the cooking process simple and fun. When it comes to sides, I love steamed veggies. Broccoli or asparagus pair well with cod. They add color and nutrients to the meal. A fresh salad is another good choice. It adds crunch and freshness. For presentation, serve the cod on a nice plate. Add a wedge of lemon and a sprinkle of parsley. This makes the dish look vibrant. It’s all about making it appealing and tasty. Don't forget to check the Full Recipe for more details! {{image_2}} You can change the flavor of your baked cod by using different herbs or spices. For example, try using basil or thyme for a fresh twist. You can also add some lemon zest for brightness. Using different types of fish can also work well. Instead of cod, try tilapia or haddock. These fish have a mild taste that pairs nicely with the same toppings. If you need gluten-free options, use gluten-free breadcrumbs. These can be found in most stores. You can also make your own by grinding gluten-free crackers or oats. For dairy-free needs, skip the butter or any dairy in your recipe. Olive oil works great as a substitute. You can also use dairy-free cheese if you want a cheesy crust. Broiling can give your cod a crispy texture. Place your dish under the broiler for the last few minutes of cooking. Keep an eye on it to avoid burning. Cooking in an air fryer is a quicker option. Set the air fryer to 375°F and cook for about 10-12 minutes. This method gives you a tasty, crispy fish without much fuss. For the full recipe, check out the [Full Recipe]. To keep your baked cod fresh, first cool it to room temperature. Then, place the cod in an airtight container. You can store it in the fridge for up to three days. When freezing, wrap each fillet tightly in plastic wrap, then place them in a freezer bag. This method helps prevent freezer burn. The cod can last up to three months in the freezer. When you want to enjoy your cod again, there are a few easy ways to reheat it. The oven is the best method. Preheat it to 350°F (175°C). Place the cod on a baking sheet, cover it with foil, and heat for about 10-15 minutes. This keeps the fish moist. You can also use the microwave, but be careful. Heat it in short bursts to avoid drying it out. Add a small splash of water to keep it juicy. For extra flavor, consider adding a squeeze of fresh lemon juice before serving. Enjoy your meal! If you want the full recipe, check out the complete instructions above. How long does baked cod last in the fridge? Baked cod lasts about 3 days in the fridge. Store it in an airtight container. This keeps it fresh and safe to eat. Always check for any off smells before eating leftovers. Can I use frozen cod for this recipe? Yes, you can use frozen cod. Just thaw it in the fridge before cooking. This helps the fish cook evenly. It’s best to avoid cooking from frozen, as it may not cook through properly. What wine pairs well with baked cod? A crisp white wine pairs well with baked cod. Options like Sauvignon Blanc or Pinot Grigio enhance the dish's flavors. The acidity balances the fish's richness, making each bite delightful. Is baked cod healthy? Yes, baked cod is very healthy. It is low in calories and high in protein. Cod also provides essential omega-3 fatty acids, which are great for heart health. Plus, using fresh herbs and lemon adds nutrients without extra calories. Can I substitute other fish for cod? Absolutely! You can use haddock, tilapia, or even salmon. Each fish has a unique taste and texture. Just adjust the cooking time based on the thickness of the fillets you choose. What’s the best way to tell if cod is cooked? The best way to check is by flaking it with a fork. Cooked cod should flake easily and be opaque all the way through. If it is still translucent or rubbery, it needs a bit more time in the oven. In this article, we explored how to bake cod to perfection. You learned about the main ingredients and how to mix them for a tasty topping. We outlined step-by-step instructions, plus helpful tips to achieve a crispy finish. You can also try fun variations to suit your taste or dietary needs. When storing leftovers, follow the best practices to keep them fresh. Overall, this method guarantees a delicious, healthy meal that’s easy to prepare. Now you're ready to cook and impress everyone at your table!](https://tossedrecipes.com/wp-content/uploads/2025/06/c6a0dd03-f41c-4ac2-9d22-85f88579a9ce.webp)
Welcome to the world of easy and delicious cooking! If you’re looking for a quick, tasty meal, my Easy Baked Cod Recipe is just for you. With just a few …