Appetizers

To make tasty crispy zucchini fritters, you need basic ingredients. Here’s what you’ll use: - 2 medium zucchinis, grated - 1 teaspoon salt - 1/2 cup all-purpose flour - 1/4 cup grated Parmesan cheese - 1/4 teaspoon baking powder - 1 large egg, beaten - 2 green onions, finely chopped - 1 clove garlic, minced - 1/4 teaspoon black pepper - Olive oil for frying These ingredients come together to create a delightfully crispy dish. The zucchinis give a nice texture, while the Parmesan adds a rich flavor. You can add a few extra flavors to your fritters. Here are some fun options: - Fresh herbs like parsley or basil - A pinch of red pepper flakes for heat - Chopped bell peppers for extra crunch - Corn kernels for sweetness Mixing in these options can change the taste and make it more exciting. Feel free to experiment! If you have dietary needs, don’t worry. You can easily swap some ingredients: - For gluten-free fritters, use almond flour or a gluten-free blend. - If you’re dairy-free, try nutritional yeast instead of Parmesan cheese. - You can use flaxseed meal mixed with water as a vegan egg substitute. These substitutions keep the dish delicious while meeting your needs. Enjoy creating a version that fits you! For the full recipe, check out the details above. First, you need to prepare the zucchini. Take two medium zucchinis and grate them. Then, put the grated zucchini in a clean kitchen towel. Sprinkle one teaspoon of salt on the zucchini. Let it sit for about 10 minutes. This step helps draw out excess moisture. After 10 minutes, wrap the zucchini in the towel and squeeze out the remaining liquid. This is key for crispy fritters. Next, grab a large mixing bowl. Combine the drained zucchini with half a cup of all-purpose flour. Add a quarter cup of grated Parmesan cheese and a quarter teaspoon of baking powder. Then, include one large beaten egg, two finely chopped green onions, one minced clove of garlic, and a quarter teaspoon of black pepper. Mix everything together until well combined. This batter is the heart of your fritters. Now it’s time to fry! Heat a non-stick skillet over medium heat. Add enough olive oil to coat the bottom of the pan. Wait until the oil is hot. Drop spoonfuls of the zucchini batter into the skillet. Flatten them slightly with the back of the spoon. Fry for about 3-4 minutes on each side. Look for a golden brown color. Once cooked, remove the fritters from the skillet and let them drain on a paper towel. This helps get rid of any excess oil. Serve the fritters warm and enjoy! For a tasty touch, you can add a side of yogurt or sour cream for dipping. For the full recipe, check out the details above. To get your zucchini fritters crispy, start by removing moisture. Grate the zucchini and sprinkle it with salt. Let it sit for about 10 minutes. This step helps pull out extra water. After that, use a clean towel to squeeze out any remaining liquid. Less moisture means more crunch. Use a non-stick skillet for frying. Heat the oil until it shimmers. This shows it's hot enough. Drop spoonfuls of the batter into the pan. Flatten them slightly with the back of your spoon. Fry for 3-4 minutes on each side. Look for that golden color as your cue to flip. Serve your fritters warm for the best taste. They pair well with yogurt or sour cream. You can also add herbs or spices to the dip for extra flavor. Enjoy them as a snack, appetizer, or side dish. For the full recipe, check out the section above. {{image_2}} You can boost flavor by adding herbs and spices. Fresh herbs like parsley or dill work great. Dried herbs like oregano or thyme also add a nice touch. For some heat, a pinch of red pepper flakes is a good choice. You can mix and match to find what you love. If you want a vegetarian option, just skip the Parmesan cheese. For a vegan version, replace the egg with a flaxseed mixture. To make this, mix one tablespoon of ground flaxseed with three tablespoons of water. Let it sit for a few minutes to thicken. This swap keeps the fritters intact while being plant-based. Toppings and dips can make your fritters even better. Serve them with a dollop of Greek yogurt or sour cream. A zesty lemon aioli brings a fresh taste. You can also try salsa or guacamole for a fun twist. Each dip adds a unique flavor, so feel free to explore different options. Check out the Full Recipe for more ideas! Store leftovers in an airtight container. Make sure they cool down first. Place a paper towel inside the container. This towel absorbs extra moisture. Keep the fritters in the fridge for up to three days. To reheat, use a skillet over medium heat. Add a little olive oil to the pan. Heat each fritter for about two to three minutes on each side. This keeps them crispy. You can also use an air fryer at 350°F for five minutes. Both methods will bring back the crunch. You can freeze these fritters for later. Let them cool completely before freezing. Lay them flat on a baking sheet. Freeze for one to two hours until firm. Then, transfer them to a freezer bag. They can last up to two months in the freezer. When ready to eat, thaw in the fridge before reheating. Enjoy them fresh again! Check the Full Recipe for more details on making these tasty treats. Yes, you can use frozen zucchini for fritters. Just remember to thaw and drain it well. Frozen zucchini can have more water, so squeezing out the excess moisture is key. This step keeps your fritters from becoming soggy. To make zucchini fritters gluten-free, swap out all-purpose flour with gluten-free flour. You can use almond flour, coconut flour, or a gluten-free blend. Each option adds its own flavor and texture. Just be sure to check the packaging for any other ingredients. The best dips for zucchini fritters include yogurt, sour cream, or tzatziki. These dips add a cool, creamy contrast to the crispy fritters. You can also try spicy sauces or homemade salsa for a zesty kick. For the full recipe, check above. We covered all you need for making delicious zucchini fritters. You learned about key ingredients and how to prep them. I shared tips for crispy fritters and fun variations to try. Proper storage helps keep your leftovers fresh too. Enjoy cooking and experimenting with this tasty dish. Trust me, these fritters will delight you and your guests.
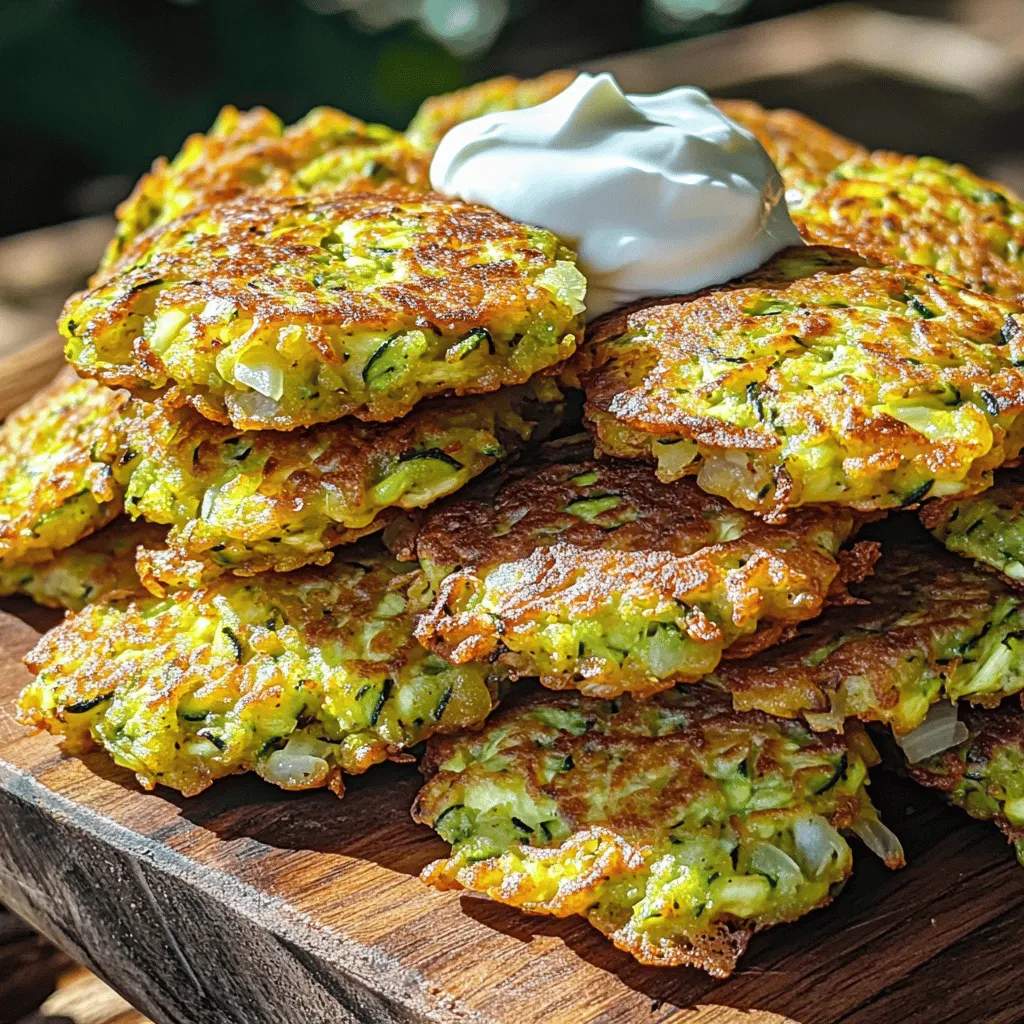
Easy Crispy Zucchini Fritters Delightful and Quick Dish
Are you ready to enjoy a dish that’s both tasty and easy to make? My Easy Crispy Zucchini Fritters are just what you need! You’ll
- 2 medium zucchinis, grated and moisture squeezed out - 1 cup fresh corn kernels (or 1 can of drained corn) - 1/2 cup all-purpose flour - 1/4 cup cornmeal Zucchini brings a mild flavor and a soft texture to the fritters. Fresh corn adds sweetness and a pop of color. The all-purpose flour and cornmeal bind the mixture while adding a nice crunch. - 1/2 teaspoon baking powder - 1/2 teaspoon garlic powder - 1/2 teaspoon onion powder - 1/4 teaspoon cayenne pepper (optional for heat) These spices elevate the fritters’ taste. The baking powder helps them puff up, while garlic and onion powders add depth. Cayenne pepper offers a hint of heat if you like spice. - 2 large eggs, beaten - 1/4 cup finely chopped fresh parsley (or cilantro) - Olive oil for frying Eggs help bind the fritters together. Fresh herbs add brightness and flavor. Olive oil is perfect for frying, giving the fritters a crisp surface. For the full recipe, check out the Zesty Zucchini Corn Fritters. You’ll enjoy every bite! Grating and Moisture Removal Start by grating the zucchini. Use a box grater or food processor. Place the grated zucchini in a bowl and sprinkle a pinch of salt. This helps draw out moisture. Let it sit for about 10 minutes. Afterward, use a clean kitchen towel or paper towels to squeeze out any extra liquid. This step is key for crispy fritters. Combining Ingredients Next, add the fresh corn kernels to the drained zucchini. You can use fresh corn or canned corn. Mix them well in the bowl. This blend gives the fritters a sweet and savory flavor. Dry Ingredients Preparation In a separate bowl, combine the all-purpose flour, cornmeal, baking powder, garlic powder, onion powder, cayenne pepper, salt, and pepper. Whisk these dry ingredients together until they are well mixed. This blend adds flavor and structure to the fritters. Incorporating Wet Ingredients Now, add the beaten eggs and finely chopped parsley to the dry mix. Stir gently until just combined. Do not overmix. Next, fold the zucchini and corn mixture into the batter. Ensure everything is evenly distributed. This step ensures every fritter has a delicious bite. Frying in the Skillet Heat about 2 tablespoons of olive oil in a large skillet over medium heat. Once the oil is hot, drop spoonfuls of the fritter mixture into the skillet. Flatten them slightly with the back of a spatula. This helps them cook evenly. Perfecting the Crispiness Cook the fritters for about 3-4 minutes on each side. They should turn golden brown and crispy. Adjust the heat if needed to avoid burning. Once done, remove them and place them on paper towels to drain excess oil. Repeat this with the rest of the batter. Enjoy your fritters warm! For a delicious twist, serve with a dollop of sour cream or yogurt mixed with lime juice. For the full recipe, check out the detailed instructions provided. - Importance of Squeezing Out Moisture Squeezing out moisture from the zucchini is key. Too much water makes fritters soggy. Grate the zucchini, then let it sit with a pinch of salt. After 10 minutes, use a clean towel to wring out excess liquid. This step is vital for a crispy fritter. - Frying Temperature Frying at the right temperature is crucial. Heat your skillet over medium heat, then add olive oil. If the oil is too hot, the fritters will burn. If it’s too cool, they will soak up oil. Aim for a golden brown color, and adjust heat as needed. - Accompaniments for Fritters Zucchini corn fritters pair well with many sides. Serve them with a fresh salad for a light meal. You can also enjoy them as a tasty snack. They are great for brunch or a party platter. - Ideal Dipping Sauces The right dipping sauce can elevate your fritters. Try sour cream mixed with lime juice for a zesty kick. Yogurt is another excellent choice. You can also serve them with salsa or a spicy aioli for extra flavor. - Recommended Skillets and Frying Tools Use a non-stick skillet for easy frying. A cast-iron skillet also works well for even heat. Make sure you have a spatula to flip the fritters without breaking them. A slotted spoon can help drain excess oil. - Tools for Easy Preparation A box grater makes grating zucchini quick. Use a mixing bowl for combining ingredients. A clean kitchen towel is essential for squeezing moisture. Having these tools ready will make the cooking process smoother. For a full recipe, refer to the [Full Recipe] section above. {{image_2}} - Using Canned or Frozen Corn: You can easily swap fresh corn for canned or frozen corn. Just drain canned corn before using. If you use frozen corn, thaw it first and drain excess water. This makes it a quick option when fresh corn is not available. - Gluten-Free Options: To make these fritters gluten-free, replace all-purpose flour with a gluten-free blend. Almond flour or chickpea flour also works well. Adjust the amount as needed for the right texture. - Adding Cheese or Spices: For a cheesy twist, mix in shredded cheese like cheddar or feta. You can also add spices like cumin, paprika, or Italian herbs for extra flavor. Adjust the spices to your taste. - Incorporating Other Vegetables: Feel free to add more veggies like grated carrots, bell peppers, or spinach. This not only boosts nutrition but also adds color to your fritters. Just remember to squeeze out moisture from these veggies too. - Fritters as Appetizers: Serve these fritters as tasty appetizers at your next party. Pair them with dips like salsa, guacamole, or a creamy yogurt sauce. They will be a hit with your guests! - Zucchini Corn Fritters in Meal Prep: These fritters are great for meal prep. Make a batch ahead of time and store them in the fridge. They are perfect for quick lunches or snacks. Just reheat in a skillet or microwave when you’re ready to eat. For the full recipe, check out the Zesty Zucchini Corn Fritters. To store leftover fritters, let them cool down first. Place them in an airtight container. I recommend using glass or plastic containers with tight lids. This helps keep them fresh. For freezing, arrange the fritters in a single layer on a baking sheet. Freeze them for about 1-2 hours until firm. Then, transfer them to a freezer bag. Remove as much air as possible. When you want to reheat, just pop them in the oven at 375°F (190°C) for about 15-20 minutes. This will keep them crispy. In the fridge, these fritters last about 3-4 days. Keep an eye out for any signs of spoilage. If they smell bad or become slimy, it's best to toss them. Freshness is key for the best taste! Enjoy your Zucchini Corn Fritters from the [Full Recipe] for the ultimate snack. To make Zucchini Corn Fritters, you start by grating the zucchini. After grating, squeeze out the moisture. Combine the zucchini with fresh corn in a bowl. Then, mix flour, cornmeal, baking powder, and spices in another bowl. Add beaten eggs and parsley to the dry mix. Fold in the zucchini and corn. Heat olive oil in a skillet, drop spoonfuls of the mixture, and fry until golden brown. This whole process takes about 30 minutes. For the full recipe, check out the section above. Yes, you can prepare the fritters ahead. Make the batter and store it in the fridge for up to 24 hours. This lets the flavors blend well. You can also cook the fritters and store them. Keep cooked fritters in an airtight container. They last for up to three days in the fridge. Reheat them in the oven for a crisp finish. The best oil for frying Zucchini Corn Fritters is olive oil. It has a nice flavor and a high smoke point. You can also use canola oil or vegetable oil if you prefer. These oils work well to get that perfect crispy texture. Just make sure to heat the oil properly before adding the fritters. You learned how to make delicious zucchini corn fritters. We covered the main ingredients, like zucchini and fresh corn, and explained the cooking steps. You also got tips for the best texture and how to store leftovers. These fritters are easy to enjoy any time. You can adjust flavors and ingredients to fit your taste. I hope you try making them soon! Enjoy the crunch and flavor packed in each bite.
Zucchini Corn Fritters Tasty and Easy Snack Recipe
Looking for a simple yet delicious snack? Zucchini Corn Fritters are the answer! These tasty bites combine fresh zucchini and sweet corn, making them the
To make baked Parmesan zucchini, gather these ingredients: - 4 medium zucchinis, sliced into rounds - 1 cup grated Parmesan cheese - 1 cup breadcrumbs (preferably panko for extra crunch) - 2 cloves garlic, minced - 1 teaspoon dried oregano - 1 teaspoon dried basil - 1 teaspoon paprika - Salt and pepper to taste - 2 tablespoons olive oil - Fresh parsley, chopped (for garnish) When selecting zucchinis, look for firm ones with smooth skin. Avoid any with blemishes. For cheese, choose high-quality Parmesan for the best flavor. It should be fresh and finely grated for even melting. Feel free to spice things up! Here are some optional ideas: - Add crushed red pepper for heat. - Use fresh herbs like thyme or rosemary for extra flavor. - Swap in gluten-free breadcrumbs for a gluten-free dish. These tweaks can help make your baked Parmesan zucchini even more exciting! Preheat the Oven and Prepare the Baking Sheet Start by preheating your oven to 400°F (200°C). This high heat will help the zucchini turn crispy. Next, line a baking sheet with parchment paper. This helps with easy cleanup and keeps the zucchini from sticking. How to Properly Slice the Zucchini Take four medium zucchinis and wash them well. Slice them into rounds about a quarter-inch thick. Make sure the slices are even. This helps them cook at the same rate. If you cut them too thick, they will not get crispy. Combining Ingredients in the Bowls In a large bowl, mix the sliced zucchini with two tablespoons of olive oil. Add two minced garlic cloves, one teaspoon of dried oregano, one teaspoon of dried basil, and one teaspoon of paprika. Season with salt and pepper to taste. Toss everything together until the zucchini is well coated. In another bowl, combine one cup of grated Parmesan cheese with one cup of breadcrumbs. Panko breadcrumbs work best for that extra crunch. Mix until fully combined. Arranging Zucchini for Optimal Cooking Place the seasoned zucchini slices on the lined baking sheet in a single layer. Make sure they do not overlap. This allows the heat to reach every slice. Then, sprinkle the Parmesan-breadcrumb mixture generously over each zucchini. Cover the slices well for a tasty crust. Checking Doneness Cues Before Removing from the Oven Bake in the preheated oven for 20 to 25 minutes. Check for doneness when the tops are golden brown and crispy. The zucchini should feel tender when pierced with a fork. Serving Suggestions for Presentation Once done, take the baking sheet out of the oven. Allow the zucchini to cool slightly. Garnish with chopped fresh parsley for a pop of color and flavor. Serve these baked Parmesan zucchinis hot as a side dish or a tasty snack. For the full recipe, refer back to the beginning. Enjoy your crispy treat! To get that perfect crispy top on your Baked Parmesan Zucchini, follow these tips: - Use Panko Breadcrumbs: They add extra crunch compared to regular breadcrumbs. - Don’t Overcrowd the Baking Sheet: Space the zucchini slices out. This allows hot air to circulate and crisp them up. - Adjust Cook Time: If your zucchini slices are thicker, increase the cooking time by 5 minutes. Thinner slices will cook faster. Adding fresh herbs or spices can elevate your dish. Here are some great ideas: - Fresh Herbs: Try adding parsley, thyme, or rosemary for a fresh twist. - Cheese Variations: You can mix in mozzarella for a gooey texture or use pecorino for a sharp flavor. Avoid these pitfalls for the best results: - Overcooking: Keep an eye on the zucchini. If they look soggy or limp, you’ve cooked them too long. Aim for a golden brown top. - Uneven Coating: Make sure each slice has an even layer of the Parmesan-breadcrumb mix. This ensures every bite is flavorful. These tips will help you create a delicious and appealing dish. For the complete recipe, check out the Full Recipe section. {{image_2}} You can easily make this dish fit many diets. For vegetarians, it’s perfect as is; just skip meat. For vegans, use nutritional yeast instead of Parmesan. This gives a cheesy flavor without dairy. If you want a low-carb option, swap regular breadcrumbs for almond flour. This keeps the crunch while cutting carbs. Want to switch things up? Try adding mozzarella or cheddar cheese. These cheeses melt nicely and add a different taste. You can also mix in some spices like garlic powder or red pepper flakes for heat. For more veggies, consider adding bell peppers or cherry tomatoes. These add color and sweetness to the dish. You can adapt baked zucchini for any season. For example, during fall, add pumpkin spice to the mix. This makes a fun twist for a holiday meal. In summer, toss in fresh herbs like basil or cilantro for a bright flavor. You might even try an Italian theme by adding Italian sausage. The world is your oyster when it comes to creativity! For the full recipe, check out Baked Parmesan Zucchini Delight. To keep your baked Parmesan zucchini fresh, store it in an airtight container. Make sure to let the zucchini cool down first. Place it in the fridge if you plan to eat it within a few days. It stays good for about 3 to 5 days. When you're ready to eat, reheat the zucchini in the oven. This keeps the crispiness. Set your oven to 350°F (175°C) and warm for about 10 minutes. You can also freeze baked zucchini for longer storage. First, let it cool completely. Then, place the pieces in a single layer on a baking sheet and freeze them for about an hour. Once frozen, transfer the zucchini to a freezer bag. Remove as much air as possible. This way, it stays fresh for about 2 to 3 months. When you want to enjoy it, just bake from frozen. Leftover baked zucchini can become a new meal. Chop it up and mix it into pasta, or use it in a salad. You can also turn it into a tasty sandwich filling. If you want a quick snack, just serve the zucchini with a dip. It’s great as a side dish, too, paired with grilled chicken or fish. The options are endless! For the full recipe, check out the details above. Can I use yellow squash instead of zucchini? Yes, you can use yellow squash. It has a similar texture and taste. The cooking time remains the same. This swap adds a fun color too! How do I make the zucchini less watery? To reduce water, sprinkle salt on the sliced zucchini. Let it sit for 15 minutes. Then, pat the slices dry with paper towels. This step helps keep your baked zucchini crisp. Can I make this recipe ahead of time? You can prep the zucchini and coating in advance. Store them separately in the fridge. When ready to bake, assemble and cook as usual. This saves time for busy days! What's the best way to reheat baked zucchini? To reheat, use the oven. Set it to 350°F (175°C). Place the zucchini on a baking sheet. Heat for about 10 minutes until warm and crispy again. What can I use if I don't have Parmesan cheese? If you lack Parmesan, try Pecorino Romano or nutritional yeast for a vegan option. Both add a nice flavor and similar texture. How to make breadcrumbs at home? Making breadcrumbs is simple! Just take old bread and pulse it in a food processor until fine. You can also dry the bread in the oven first for a crunchier texture. In this blog post, we explored the ingredients for baked zucchini, from choosing fresh zucchinis to enhancing flavors with herbs and spices. I shared step-by-step cooking instructions, tips for crisp tops, and common mistakes to avoid. We also discussed how to adapt the recipe for different diets and storage tips for leftovers. Remember, cooking is fun! Experiment with your ingredients and make this dish your own. Enjoy your baked zucchini with family and friends, and feel free to get creative!
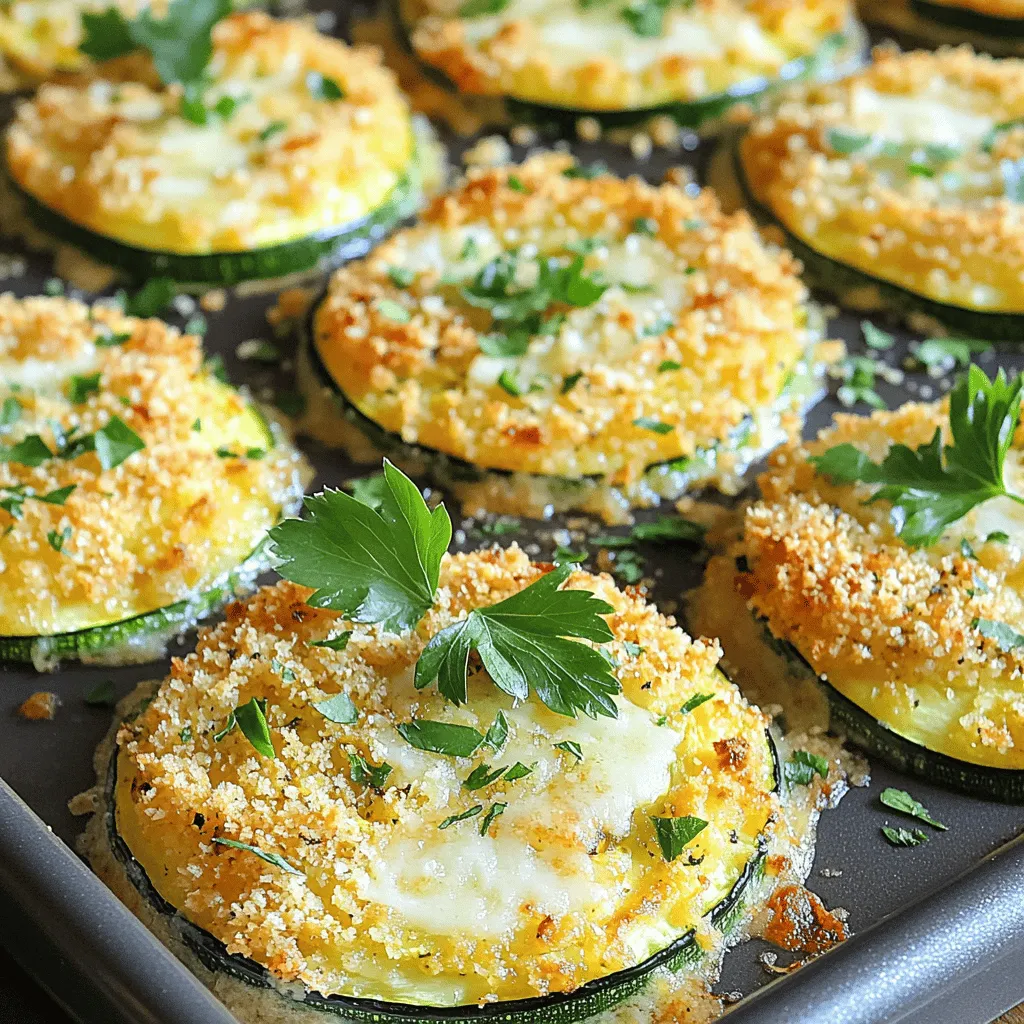
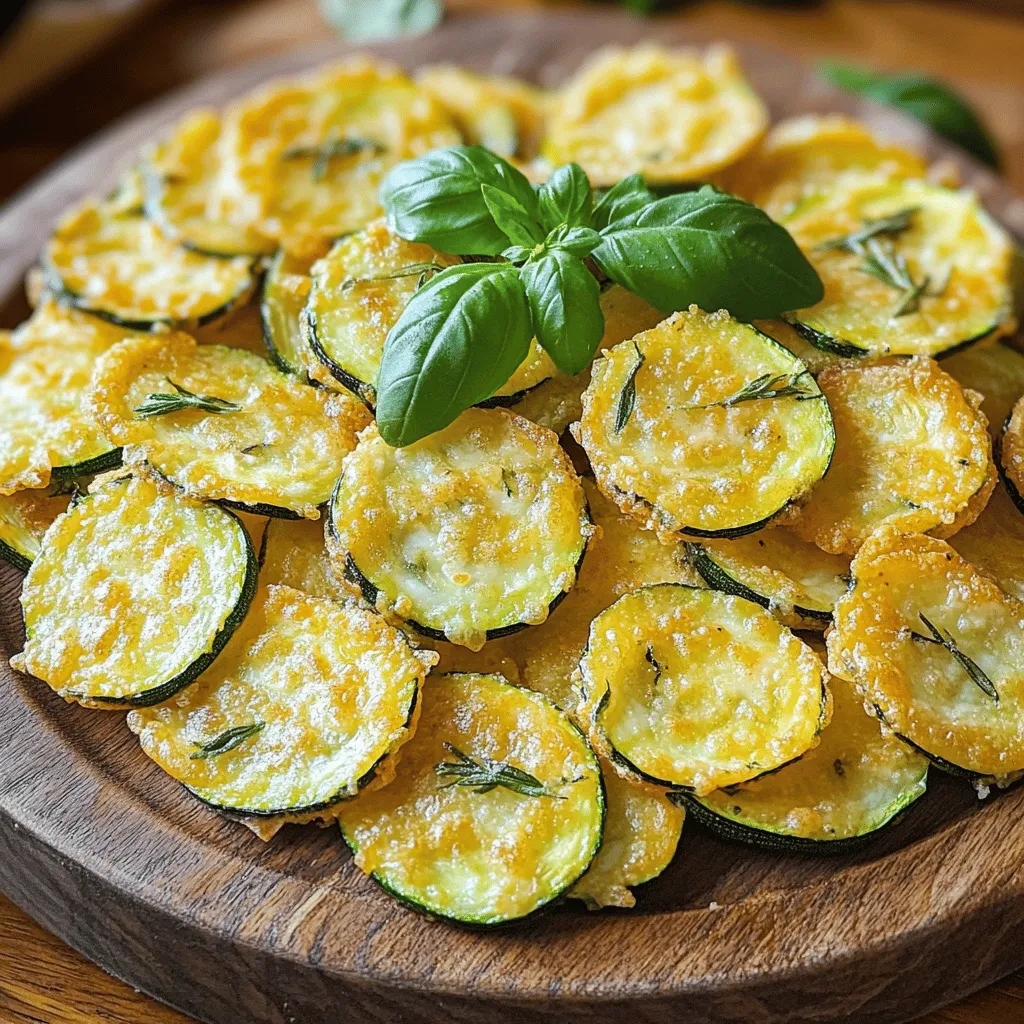
Baked Parmesan Zucchini Crispy and Flavorful Treat
If you’re craving a tasty dish that’s both crispy and healthy, you’re in the right place! This Baked Parmesan Zucchini recipe is my go-to for
- 2 medium zucchinis, sliced into rounds or sticks - 1 cup breadcrumbs (panko or regular) - 1/2 cup grated Parmesan cheese - 2 teaspoons garlic powder - 1 teaspoon onion powder - 1/2 teaspoon smoked paprika - 1/2 teaspoon salt - 1/4 teaspoon black pepper - 1 large egg - 2 tablespoons fresh parsley, chopped - Cooking spray - Seasoning variations (Italian herbs, cayenne pepper) - Alternative cheeses (Mozzarella, Cheddar) - Dipping sauces suggestions When cooking with zucchini, the right ingredients make all the difference. Start with fresh zucchinis. Choose ones that are firm and bright in color. This ensures a tasty outcome. You can slice them into rounds or sticks based on your preference. Next, you’ll need breadcrumbs. Panko works great for that extra crunch. Combine it with grated Parmesan cheese for a cheesy flavor. Garlic powder and onion powder add depth. Smoked paprika gives a nice touch of warmth. Don’t forget salt and black pepper to enhance all the flavors. Finally, one large egg helps bind everything together. For a fresh finish, add chopped parsley. This mix of ingredients makes your crispy air fryer zucchini so tasty. If you want to spice things up, consider adding some Italian herbs or a pinch of cayenne pepper. Different cheeses like Mozzarella or Cheddar can also change the flavor profile. For dipping, marinara sauce or tzatziki are great options. These simple ingredients will transform zucchini into a delightful snack or side dish. Check out the Full Recipe for all the details. Start by washing your zucchinis well. Slice them into rounds or sticks, about half an inch thick. This size helps them cook evenly. For a fun twist, try cutting them into fun shapes. Next, you need to coat your zucchini slices. First, whisk one large egg in a bowl until it’s smooth. In another bowl, mix breadcrumbs, Parmesan cheese, garlic powder, onion powder, smoked paprika, salt, and black pepper. Now, dip each zucchini slice into the egg, making sure it’s well-coated. Then, roll it in the breadcrumb mix. Make sure every slice is covered, so it turns out crispy. Preheat your air fryer to 400°F (200°C). Once it's ready, arrange the coated zucchini slices in a single layer in the air fryer basket. Avoid stacking them, as this may lead to uneven cooking. Cook the zucchini for 10-12 minutes. Flip them halfway through to ensure they cook evenly. Keep an eye on them; you want them golden brown and crispy. After cooking, let the zucchini rest on a paper towel for a minute. This helps absorb any extra oil, making them crispier. Serve your crispy zucchini right away for the best taste. They go great with marinara sauce or tzatziki for dipping. If you like, sprinkle some fresh parsley on top for a pop of color. For the full recipe, check out the section above. Enjoy your crispy air fryer zucchini! To get the best texture, it's key to dry the zucchini. After slicing, place the rounds or sticks on paper towels. Let them sit for about 10 minutes. This step helps remove excess moisture. A dry zucchini will fry better and become crispier. Using panko breadcrumbs is another smart choice. They give a light and crunchy texture. Panko absorbs less oil and creates a wonderful crust. For a really crispy finish, mix panko with regular breadcrumbs. This gives you the best of both worlds. For cooking, I recommend setting your air fryer to 400°F (200°C). This temperature helps the zucchini cook evenly and get that nice golden brown color. The cooking time should be around 10-12 minutes. Keep in mind that each air fryer model can vary slightly. If your zucchini is not browning, you may need to increase the cooking time by a couple of minutes. Always check for doneness by looking for a golden color. One big mistake is overcrowding the air fryer basket. When you place too many zucchini slices at once, they won’t cook evenly. It’s best to fry them in batches if needed. This ensures each piece gets enough hot air to crisp up. Another mistake is skipping the cooking spray. A light spray helps the breadcrumbs stick and crisp up. Without it, the zucchini may turn out soggy. Just a quick spray before cooking makes a big difference! {{image_2}} You can make your crispy air fryer zucchini even more exciting! - Spicy version: Add some chili flakes to the breadcrumb mix for a kick. The heat works well with the mild zucchini. - Herbs and spices: Customize the mix by adding your favorite herbs. Try Italian seasoning or even Cajun spice for a unique twist. If you don’t have an air fryer, don’t worry! You can still enjoy crispy zucchini. - Oven-baked zucchini: Preheat your oven to 425°F (220°C). Place the coated zucchini on a baking sheet lined with parchment paper. Bake for 15-20 minutes, flipping halfway through until crispy and golden. - Pan-fried option: Heat oil in a skillet over medium heat. Cook the zucchini for 3-4 minutes on each side. This gives you a nice golden color and crispiness without the air fryer. Crispy zucchini pairs well with many dishes and dips. - Dips: Serve with marinara sauce, tzatziki, or even ranch dressing. Each adds a fresh taste to the crunch. - Pairing options: Enjoy the zucchini as a side with grilled chicken or fish. It also works great in salads or as a topping for pasta. For the full recipe, check the Crispy Air Fryer Zucchini Delight! To keep your cooked zucchini fresh, let it cool first. Place the leftovers in an airtight container. This keeps moisture out and keeps the zucchini tasty. I recommend using glass or plastic containers with tight lids. They are easy to stack in your fridge. When you want to enjoy your crispy zucchini again, use the air fryer or oven. Preheat your air fryer to 350°F (175°C). Place the zucchini in the basket for about 3-5 minutes. This method keeps them crispy. Avoid using the microwave, as it makes them soggy. To freeze your zucchini, start by letting it cool completely. Then, lay the pieces on a baking sheet in a single layer. Freeze them for about an hour until solid. After that, transfer the zucchini to a freezer-safe bag or container. When you want to use them, thaw in the fridge overnight before reheating. This keeps the flavor and texture good. To make your air fryer zucchini extra crispy, start by drying the zucchini slices. Use a paper towel to remove moisture. Moisture can make them soft. Next, use panko breadcrumbs instead of regular ones. Panko gives a crunchier texture. Also, spray the zucchini lightly with cooking spray before cooking. This helps them brown better. Lastly, avoid overcrowding the air fryer basket. Give each piece space for air to flow. Yes, you can use yellow squash instead of zucchini. Both have similar textures, but yellow squash is a bit sweeter. The cooking method stays the same. You can mix them for a colorful dish. Just cut the yellow squash in similar sizes as the zucchini. This ensures even cooking. The taste will change slightly, but it will still be tasty. Cooking zucchini in the air fryer takes about 10 to 12 minutes. The time varies based on thickness. If your slices are thick, they may need more time. Thin slices cook faster, around 8 to 10 minutes. Always check for a golden-brown color. Flip them halfway through cooking for even crispiness. Enjoy your perfectly cooked zucchini! In this post, we covered how to make crispy air-fried zucchini. You learned about the ingredients, and step-by-step cooking instructions, and explored helpful tips to achieve the best results. Remember, choosing the right seasonings and cooking technique makes a big difference. Experiment with flavors and cooking methods to find your favorite. Storing and reheating your leftovers correctly keeps them delicious. Enjoy creating tasty zucchini dishes that are sure to impress!
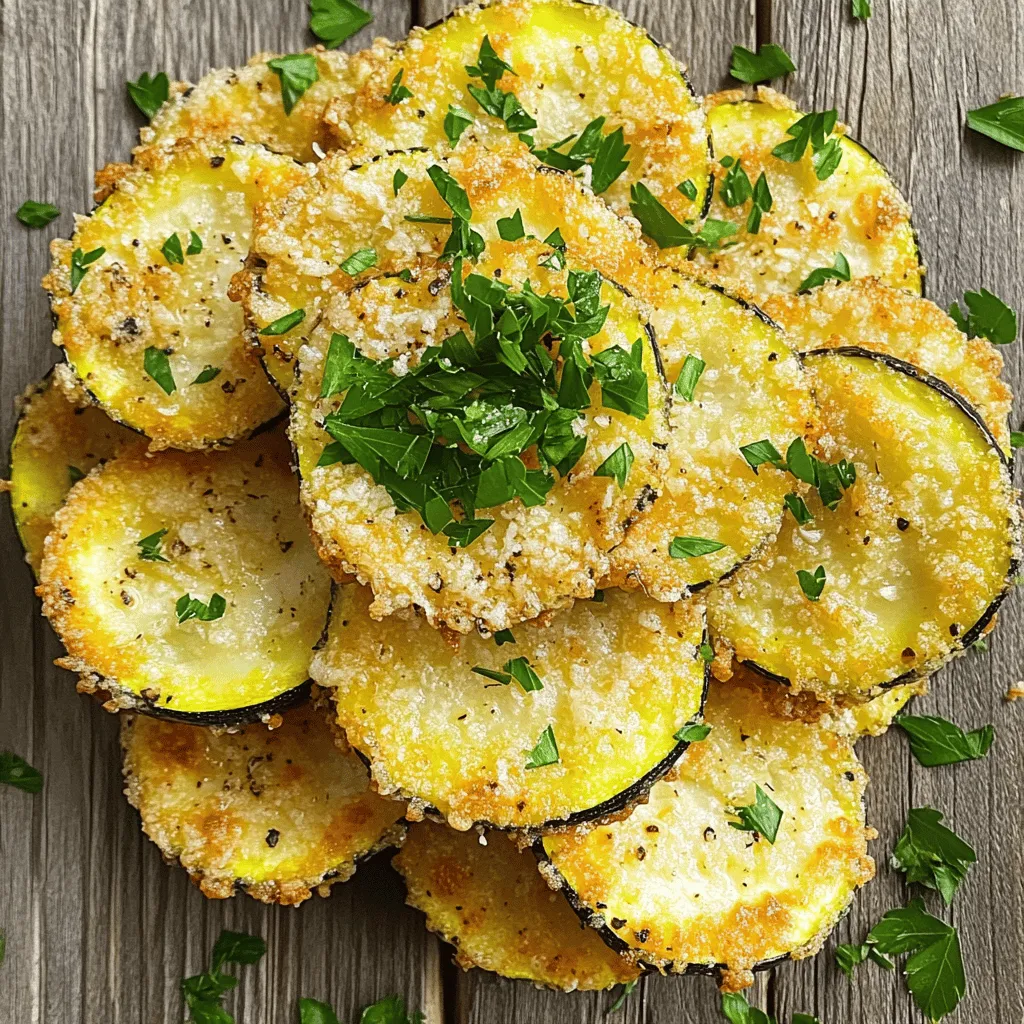
Crispy Air Fryer Zucchini Simple and Tasty Recipe
Are you ready for a tasty snack that’s also healthy? This Crispy Air Fryer Zucchini recipe will make your mouth water. With simple ingredients and
- 2 medium zucchinis, sliced into thin strips - 1 cup panko breadcrumbs - ½ cup grated Parmesan cheese - 1 teaspoon garlic powder - 1 teaspoon Italian seasoning - ½ teaspoon salt - ¼ teaspoon black pepper - 2 large eggs, beaten - Cooking spray or olive oil for drizzling To get the best zucchinis, you should: - Look for firm, shiny skin. - Choose medium-sized zucchinis for even cooking. If you want to try something different, consider these swaps: - Substitute with gluten-free breadcrumbs. - Use nutritional yeast for a dairy-free option. Crispy baked zucchini is a great choice for healthy snacking. You can enjoy the crunch without guilt! For the full recipe, check the earlier section. - Preheat the oven to 425°F (220°C) and line a baking sheet with parchment paper. - In a shallow bowl, combine the panko breadcrumbs, grated Parmesan cheese, garlic powder, Italian seasoning, salt, and black pepper. Mix well. - Dip each zucchini strip into the beaten eggs, letting the extra drip off. - Coat the strip in the breadcrumb mixture, pressing lightly to make it stick. - Arrange the coated zucchini on the baking sheet in a single layer, making sure they do not touch. - Lightly spray or drizzle the tops with cooking spray or olive oil for extra crispiness. - Bake for 20-25 minutes, flipping the strips halfway through to ensure even cooking. You can find the full recipe for these crispy baked zucchini strips above. Enjoy your healthy snack! To make your crispy baked zucchini amazing, use panko breadcrumbs. They add a great crunch. Panko is lighter than regular breadcrumbs. This helps your zucchini stay crisp. Make sure your zucchini strips do not touch each other on the baking sheet. Spacing them out allows hot air to circulate. This makes every piece crunchy and golden brown. Crispy baked zucchini tastes great with dips. You can pair it with marinara sauce or ranch dip. Both add flavor and fun to your snack. For an extra touch, sprinkle fresh herbs on top. Chopped parsley or basil brightens up the dish. It also adds a lovely pop of color. Watch your zucchini closely as it bakes. Check for doneness around 20 minutes. This step helps avoid burning. When they look golden brown, they are ready. After baking, let them cool slightly. This helps keep their texture perfect for eating. Warm zucchini strips are tasty, but cool ones are easier to handle. {{image_2}} You can spice up your crispy baked zucchini by adding cayenne pepper to the breadcrumb mix. This will give your zucchini a fun kick. You can also mix in herbs like thyme or rosemary for a fresh taste. These herbs add a nice aroma and enhance the flavor. Experimenting with flavors makes this dish exciting and new each time. If you want a quicker option, use an air fryer. Set it to 400°F (200°C) and cook for about 10-15 minutes. This method gives you that crunchy texture with less oil. You can also grill zucchini strips for a smoky flavor. Just brush the strips with oil, season them, and place them on a hot grill. Grill each side for about 3-4 minutes until they get nice grill marks. Cheese adds a lot to crispy baked zucchini. Try crumbled feta for a tangy twist that pairs well with the zucchini. If you prefer a richer taste, cheddar cheese works great too. Each cheese option can change the whole vibe of the dish, making it fun to try different flavors. Don't forget to check out the Full Recipe for more ideas! To keep your crispy baked zucchini fresh, store leftovers in an airtight container. Place parchment paper between layers to avoid sogginess. Store them in the refrigerator for up to three days. For the best crunch, reheat them in an oven or toaster oven rather than a microwave. This method brings back the crispiness. You can freeze unbaked zucchini strips for later use. Lay them on a baking sheet in a single layer and freeze until solid. Once frozen, transfer them to a freezer-safe bag. For reheating, bake the frozen strips directly from the freezer. This helps maintain their texture and crunch. For the best taste, consume the leftovers within three days. After that, the quality may decline. Signs of spoilage include a change in color or a slimy texture. Always check before eating to ensure safety. Yes, but the texture will differ slightly. Panko breadcrumbs are light and crispy. Regular breadcrumbs might not give the same crunch. If you use regular breadcrumbs, your zucchini strips may be softer. Ensure to coat them thoroughly and bake without overcrowding. The key is to give each strip space. This allows hot air to circulate. You want them to crisp up nicely. Yes, prepare ahead and reheat for best results during serving. You can store them in the fridge. When ready, pop them in the oven to warm up. This keeps them crispy and tasty. Marinara, ranch dressing, or a garlic aioli are excellent choices. Each sauce adds a different flavor. Marinara is classic, while ranch is creamy and cool. Aioli gives a nice garlic kick. Use flax eggs as a substitute for regular eggs and nutritional yeast in place of cheese. Flax eggs are simple to make. Just mix ground flaxseed with water. Nutritional yeast gives a cheesy flavor without dairy. In this blog post, we explored how to make crispy baked zucchini strips. We covered fresh zucchini selection, tasty ingredient alternatives, and easy preparation steps. I shared tips for achieving perfect crispiness and fun flavor variations. Remember to store leftovers correctly and check for signs of spoilage. Baking these zucchini strips is not only simple, but also a great way to enjoy veggies. Try out different dips and enjoy this tasty snack or side dish!
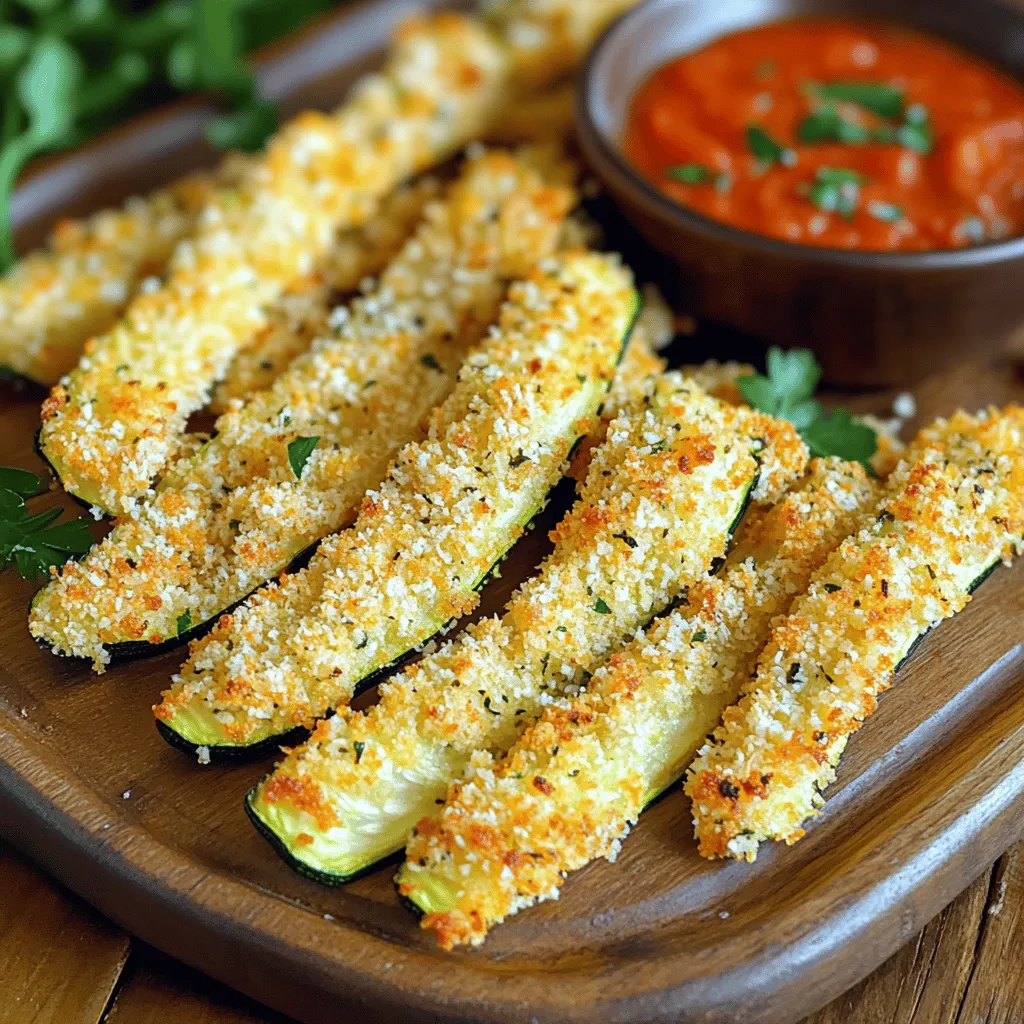
Crispy Baked Zucchini Perfect for Healthy Snacking
Looking for a tasty snack that’s both crispy and healthy? You’ve come to the right place! This Crispy Baked Zucchini recipe is quick, easy, and
- 2 medium yellow squashes, grated - 1 cup grated Parmesan cheese - 1/2 cup all-purpose flour - 2 large eggs, beaten - 1/4 cup chopped green onions - 2 cloves garlic, minced - 1 teaspoon dried oregano - Salt and pepper to taste - Olive oil for frying When making Parmesan yellow squash fritters, I love using fresh, vibrant ingredients. The yellow squashes bring a lovely color and mild flavor. Grating them makes them easy to mix. I recommend using a box grater or food processor to save time. Parmesan cheese is key for that rich, savory taste. It melts beautifully and adds a nice crunch when fried. All-purpose flour helps bind the fritters. The eggs are crucial too, making the fritters hold their shape. Chopped green onions give a fresh, mild onion flavor. Garlic adds depth and a hint of spice. Dried oregano rounds out the flavors nicely. Don't forget to season with salt and pepper to make everything pop! For frying, I prefer olive oil. It adds a subtle flavor and keeps the fritters crispy. Once you gather these ingredients, you’re ready to make a tasty snack. If you want extra flavor, consider garnishing with more Parmesan cheese or a fresh herb dipping sauce. It takes the fritters to the next level! For the full recipe, check out the instructions in the next section. - Wash and grate yellow squash. - Squeeze out excess moisture. First, I wash two medium yellow squashes. I use a box grater or food processor to grate them. After grating, I place the squash in a clean kitchen towel. I squeeze out any extra moisture. This step is key. It helps the fritters hold together better. - Combine grated squash and other ingredients. Next, I grab a large mixing bowl. In it, I combine the grated yellow squash, one cup of grated Parmesan cheese, half a cup of all-purpose flour, and two beaten large eggs. I also add a quarter cup of chopped green onions, two minced cloves of garlic, one teaspoon of dried oregano, and a pinch of salt and pepper. I mix until everything is well combined. The result is a thick batter. - Heat skillet and add oil. - Drop fritter mixtures into skillet and cook. Now it's time to cook! I heat a non-stick skillet over medium heat and add olive oil. I make sure the oil lightly covers the bottom of the skillet. Once it's hot, I scoop about two tablespoons of the fritter mixture. I drop the mixture into the skillet, flattening it slightly with the back of a spatula. I leave space between each fritter. I let them cook for about three to four minutes on each side. I wait until they turn golden brown and crispy. If needed, I adjust the heat to avoid burning. Once done, I transfer the fritters to a paper towel-lined plate to absorb any extra oil. You can find the full recipe for these tasty fritters to enjoy! Draining excess moisture from the yellow squash is key. If you skip this step, your fritters may become soggy. Use a clean kitchen towel to squeeze out as much water as possible. This will help the fritters hold together during cooking. Aim for a thick batter consistency. If your mixture is too runny, add more flour. The right mix makes for a crispy outside and tender inside. To prevent burning, keep an eye on the heat. Start with medium heat and adjust as needed. If the fritters brown too fast, lower the heat. Cooking them slowly helps them cook evenly. Flip them gently with a spatula after 3-4 minutes or when they are golden brown. Make sure to leave enough space between each fritter in the skillet. This allows them to crisp up nicely. Parmesan yellow squash fritters shine as a snack or appetizer. Serve them warm, garnished with extra Parmesan cheese for added flavor. They pair well with a fresh herb dipping sauce. You can also enjoy them on a salad or as a side dish with grilled meat. Try adding fresh herbs or spices to the batter for a twist. These fritters are versatile and fun to eat! Check out the Full Recipe for more ideas. {{image_2}} You can change the cheese in this recipe. Try mozzarella or feta for a new taste. You can also swap yellow squash with zucchini or carrots. Both will give a fun twist. If you need a gluten-free option, use almond flour or gluten-free all-purpose flour. This keeps the fritters tasty and safe for all diets. To make these fritters more exciting, add spices or herbs. Try cayenne for a kick or fresh basil for a sweet touch. You can mix in paprika or thyme for added depth. These small changes can transform the taste. Experiment until you find your favorite flavor combination! Serving with dips can change the whole meal. Try them with ranch or tzatziki sauce. A spicy ketchup or chipotle mayo pairs nicely, too. You can even serve them on a bed of greens for a light meal. The right dip or sauce can make your fritters shine! For the full recipe, check out the steps above. To keep your Parmesan yellow squash fritters fresh, place them in an airtight container. Layer parchment paper between the fritters to stop them from sticking together. Store them in the fridge for up to three days. This method keeps them crispier for longer. When you're ready to enjoy leftovers, heat them in a skillet instead of the microwave. Warm a little olive oil over medium heat. Add the fritters and cook for about two minutes on each side. This method helps them regain their crispy texture and taste fresh again. Yes, you can freeze Parmesan yellow squash fritters! First, let them cool completely. Then, place them in a single layer on a baking sheet. Freeze until solid, about one hour. After that, transfer them to a freezer-safe bag. They will keep well for up to three months. When ready to eat, just reheat them in the skillet as mentioned above. To make Parmesan yellow squash fritters crispy, you need to remove the extra moisture from the squash. After grating the squash, squeeze it in a clean kitchen towel. This step is crucial. The less moisture in the mixture, the crispier the fritters will be. Also, use enough oil in the skillet. This helps fry the fritters evenly and gives them that golden color. Yes, you can use pre-packaged shredded cheese. However, fresh grated Parmesan offers better flavor and texture. Pre-packaged cheese often contains anti-caking agents. These can affect how your fritters bind and cook. If you have fresh cheese, I recommend using it for the best results. Parmesan yellow squash fritters pair well with many dishes. They make a great side for grilled chicken or fish. Serve them with a fresh salad for a light meal. You can also enjoy them as a snack with a dipping sauce, like ranch or tzatziki. Their flavor complements many foods. To make this recipe vegan, swap the eggs for a flax or chia seed mixture. Mix 1 tablespoon of ground flaxseed with 2.5 tablespoons of water. Let it sit for a few minutes to thicken. You can also use a dairy-free cheese alternative for the Parmesan. This will keep the fritters crispy and tasty. Leftovers can last up to 3 days in the fridge. Store them in an airtight container to keep them fresh. When you're ready to eat, reheat them in a skillet for the best texture. You can also warm them in the oven. This helps regain their crispiness. If you want more details about this recipe, check out the Full Recipe. We covered how to make tasty Parmesan yellow squash fritters. You learned about the ingredients and step-by-step cooking. I shared tips for perfect texture and suggested variations to customize your fritters. Lastly, I provided storage and reheating advice to keep them fresh. Enjoy experimenting with this dish. It’s a fun way to use squash!
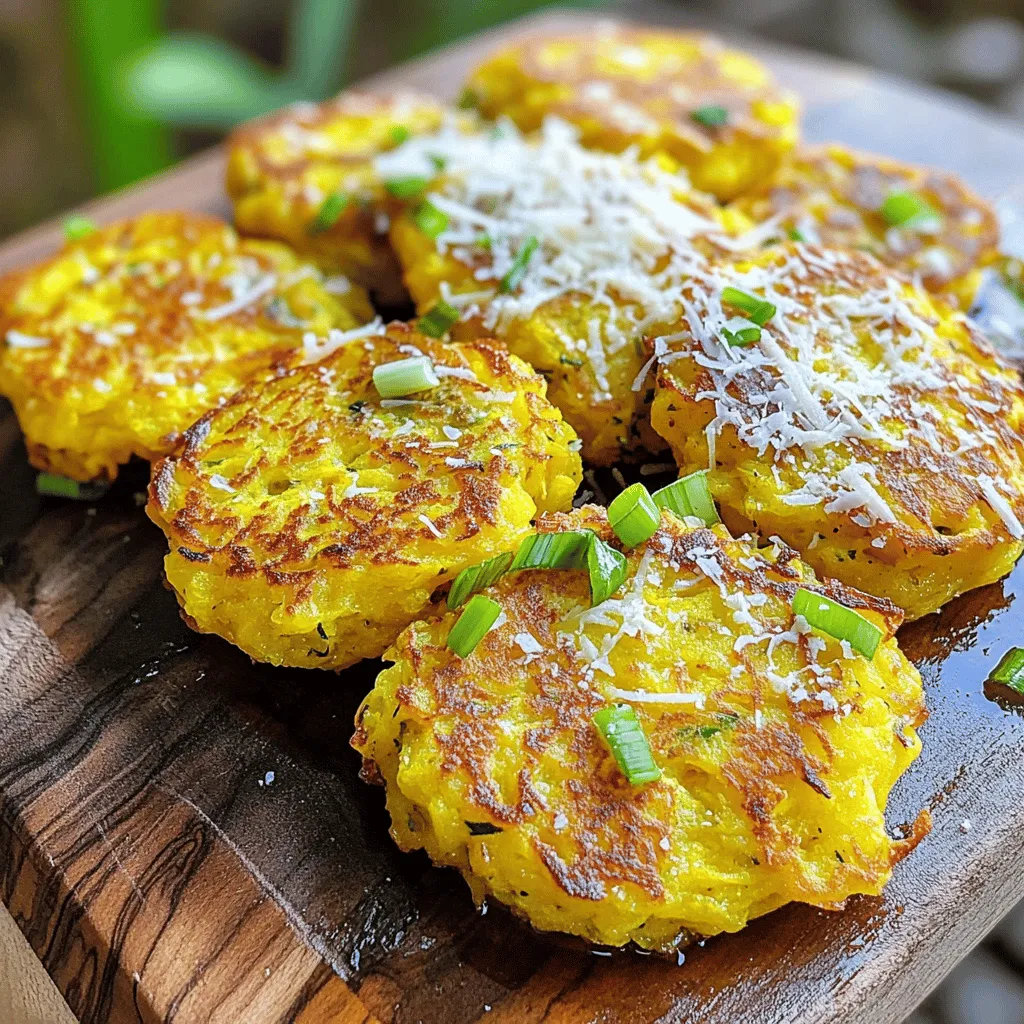
Parmesan Yellow Squash Fritters Crispy and Tasty Snack
Looking for a tasty snack that’s both crispy and easy to make? My Parmesan Yellow Squash Fritters will be your new go-to! These fritters are
To make this fresh dish, you'll need: - 3 medium zucchinis, sliced into ½ inch rounds - 1 red bell pepper, cut into 1-inch squares - 1 yellow bell pepper, cut into 1-inch squares - 1 red onion, cut into wedges - 3 tablespoons olive oil - 2 teaspoons garlic powder - 1 teaspoon smoked paprika - Salt and pepper to taste - Fresh parsley, chopped (for garnish) - Lemon wedges (for serving) Choose zucchinis that feel firm and have smooth skin. Look for bright, vibrant colors. Avoid those with soft spots or blemishes. When picking peppers, go for ones that feel heavy for their size. They should have shiny skin and no wrinkles. Fresh red onions should be firm and have a strong scent. You can swap zucchinis for eggplant or mushrooms for a different taste. If you prefer a vegan option, use vegetable oil instead of olive oil. For a gluten-free dish, ensure all your seasonings are certified gluten-free. You can also try adding other veggies like cherry tomatoes or corn for a colorful twist. To start, gather your ingredients. You will need three medium zucchinis, a red bell pepper, a yellow bell pepper, and a red onion. Slice the zucchinis into ½ inch rounds. Cut the bell peppers into 1-inch squares. Cut the red onion into wedges. Next, mix the vegetables in a large bowl. Drizzle three tablespoons of olive oil over them. Then, add two teaspoons of garlic powder, one teaspoon of smoked paprika, and salt and pepper to taste. Toss everything well to coat. Now, thread the veggies onto skewers. Alternate between zucchini, bell peppers, and onion for color. This adds visual appeal and flavor. Preheat your grill to medium-high heat. This ensures the vegetables cook evenly. Once hot, place your skewers on the grill. Avoid overcrowding the grill so that the heat circulates well. Turn the skewers every few minutes. This helps to get nice grill marks and cook all sides. If you want a smokier flavor, close the grill lid while cooking. Cook the skewers for about 8-10 minutes. Check for tenderness; they should be soft but not mushy. The key is to watch them closely. Once cooked, remove the skewers from the grill. Let them rest for a few minutes. This helps the flavors settle. Serve warm, and don't forget the fresh parsley and lemon wedges for added zest. For the full recipe, check the details above. To grill zucchini well, cut it into thick slices. Thin slices can fall apart. Aim for about ½ inch thick. Always preheat your grill to medium-high heat. This helps the zucchini cook evenly. Brush the grill grates with oil to prevent sticking. This small step makes a big difference. Turn the zucchini often for even cooking. Look for grill marks to know when they are ready. Marinades bring out the best in zucchini. For a simple mix, use olive oil and lemon juice. Add garlic powder for a burst of flavor. Smoked paprika adds a nice touch, too. Salt and pepper are must-haves for seasoning. Let your zucchini marinate for at least 30 minutes. This allows the flavors to soak in. You can also try balsamic vinegar or herbs for more variety. Using skewers makes grilling easier and more fun. Wooden skewers work well, but soak them in water first. This helps prevent burning. Metal skewers are great, too, and can be reused. A good pair of tongs is essential for flipping your skewers. They help you handle hot food safely. A basting brush can help apply marinades while grilling, keeping the veggies moist. For the full recipe, check out Zesty Grilled Zucchini Skewers. {{image_2}} You can make your zucchini skewers even better. Try adding cherry tomatoes for a sweet burst. You can also use mushrooms for a meaty texture. If you like spice, sliced jalapeños bring heat. For a fun twist, add pineapple chunks for a sweet and smoky flavor. Each veggie adds a new taste that makes your skewers special. This recipe is great for all diets. To keep it vegetarian, simply follow the recipe. For a vegan version, ensure your olive oil is pure and skip any animal-based garnishes. You can add extra veggies like eggplant or squash. These changes keep the dish fresh and tasty while fitting your diet. Serving these skewers is easy and fun. I like to pair them with a light salad. A simple mix of greens, lemon, and olive oil works well. You can also serve them with rice or couscous for a filling meal. For a refreshing drink, try iced tea or lemonade. These pairings enhance the meal and keep it bright and fresh. Check out the Full Recipe for all the details! To store leftover zucchini skewers, let them cool first. Place them in an airtight container. You can keep them in the fridge for up to three days. If you want to enjoy them later, wrap them tightly in plastic wrap. This keeps them fresh and tasty. When reheating zucchini skewers, I suggest using a skillet. Heat the skillet over medium heat. Add a splash of olive oil to keep them moist. Cook for about three to five minutes, turning often. This method keeps the veggies crisp and flavorful. You can also use the microwave if you’re in a hurry. Just heat them in short bursts of 30 seconds. Check often to avoid overcooking. You can freeze grilled zucchini skewers for future meals. First, let them cool completely. Then, lay them flat on a baking sheet. Freeze them for about two hours until solid. After that, transfer them to a freezer bag. Be sure to remove as much air as you can. They can last for up to three months in the freezer. When you’re ready to eat, let them thaw overnight in the fridge. Reheat them on the grill or skillet for the best taste. Enjoy your delicious dish! For the full recipe, check out the Zesty Grilled Zucchini Skewers. You can make zucchini skewers in your oven or on a stovetop. If you use an oven, set it to broil. Line a baking sheet with foil. Place the skewers on the sheet and broil for 10-12 minutes. Turn them halfway through cooking. If you use the stovetop, a grill pan works well. Heat the pan over medium heat. Cook the skewers for 8-10 minutes, turning to get nice marks. You can add many veggies for fun flavors. Here are some great options: - Cherry tomatoes - Mushrooms - Bell peppers - Onions - Eggplant - Asparagus - Corn Mix and match to find your favorites. Just keep the sizes similar for even cooking. Zucchini cooks fast. It should be tender but not mushy. You can test it with a fork. If it slides in easily, it’s done. Look for nice grill marks, too. This shows it’s cooked well. Enjoy the bright colors and taste! This blog post offers a simple way to enjoy summer zucchini. We covered key ingredients, like fresh zucchini, and how to pick the best ones. I shared step-by-step instructions for grilling and tips for perfect flavor. You learned creative ways to add variety, plus how to store your leftovers. In the end, grilling zucchini skewers is fun and easy. These tips make healthy meals enjoyable. Give it a try and delight in every bite!
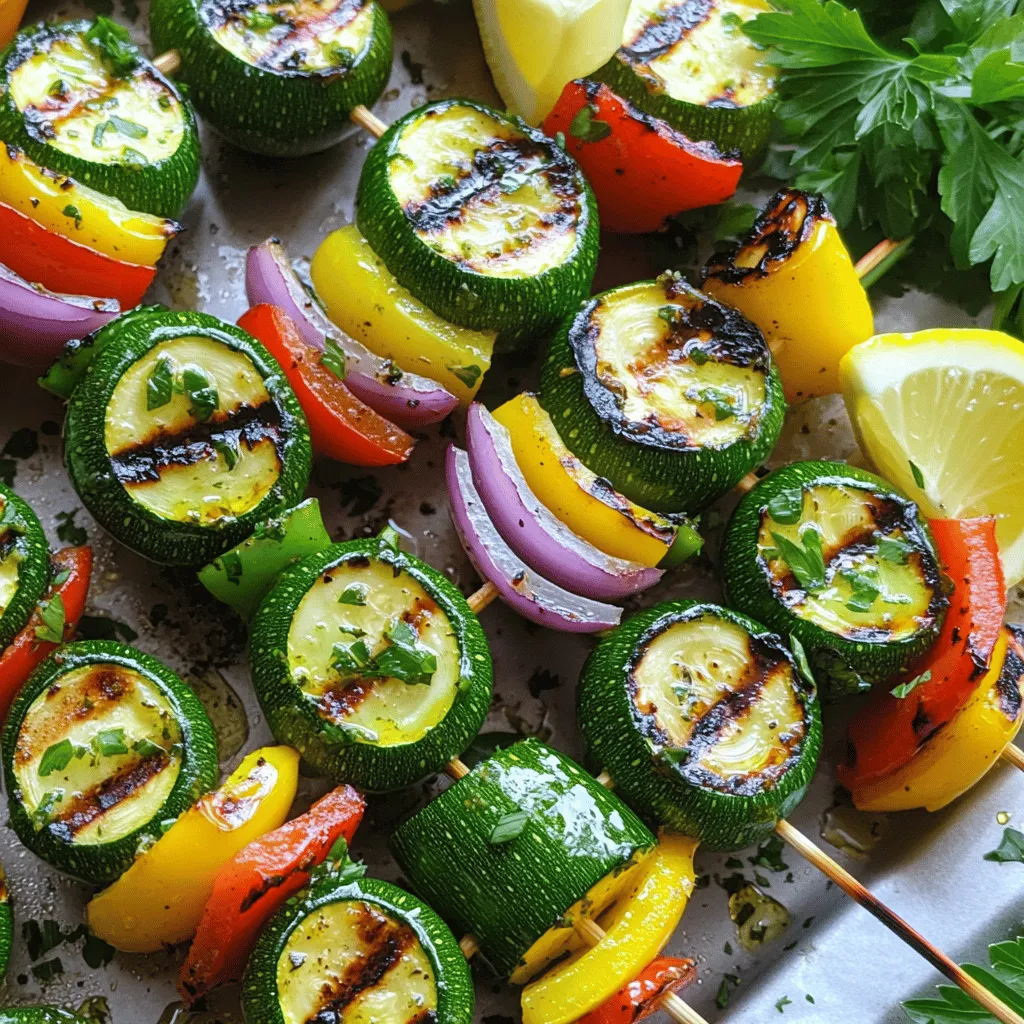
Easy Summer Zucchini Dish for a Fresh Flavor Boost
Looking for a burst of fresh flavor this summer? I’ve got the perfect easy zucchini dish for you! This zesty grilled zucchini skewers recipe is
To make Crispy Zucchini Scarpaccia, gather these items: - 2 medium zucchinis, thinly sliced - 1 cup all-purpose flour - 1 teaspoon baking powder - 1/2 teaspoon salt - 1/4 teaspoon black pepper - 1/2 cup grated Parmesan cheese - 1/2 cup water - 2 tablespoons olive oil - 1 tablespoon fresh thyme leaves (or 1 teaspoon dried thyme) - 1 clove garlic, minced - Optional: Fresh basil leaves for garnish The heart of this dish is the zucchini. They provide a fresh taste and great texture. Use medium zucchinis for the best results. The flour and baking powder create a nice, crispy batter. Parmesan cheese adds a rich, savory flavor. Olive oil gives a lovely golden hue when cooked. Fresh thyme and garlic lift the taste to new heights. When picking zucchinis, look for firm ones that feel heavy for their size. The skin should be bright green and shiny. Avoid zucchinis with soft spots or blemishes. If possible, choose organic zucchinis for better taste and health benefits. Fresh zucchinis can make your Crispy Zucchini Scarpaccia shine. First, we need to prep our ingredients. Start by washing the zucchinis. Slice them thinly; this helps them cook evenly. Grab a large bowl and mix flour, baking powder, salt, and black pepper. This mixture gives our scarpaccia a great base. Next, slowly add water to the dry mix. Stir until it forms a thick batter. It should be smooth enough to coat the zucchini slices well. Now, fold in the grated Parmesan cheese, thyme, and minced garlic for flavor. Get ready for a tasty treat! Heat olive oil in a large skillet over medium heat. Once hot, spoon the zucchini mixture into the skillet. Spread it out into one layer. Cook for about 5-7 minutes. You want the bottom to turn golden and crispy. Then, flip the scarpaccia carefully to cook the other side. Give it another 5-7 minutes until both sides are crispy and golden. After cooking on the stove, it’s time for the oven. Transfer the scarpaccia to a lined baking sheet. Bake it at 425°F (220°C) for 10-15 minutes. This extra step makes it even crispier. When it’s golden brown, take it out and let it cool a little. Slice it into wedges, and it’s ready to serve! Enjoy your Crispy Zucchini Scarpaccia! Check out the Full Recipe for more details. To make the best batter, start with the right mix of flour and water. You want a thick batter, not too runny. It should coat the zucchini well. If it's too thin, add a bit more flour. If it’s too thick, just add a little water. This balance keeps your scarpaccia crispy. For crispiness, heat your skillet well before adding the zucchini mix. This helps create a perfect sear. Spread the zucchini in a single layer. Don't crowd the pan. This allows steam to escape and keeps each piece crisp. After flipping, let each side cook until golden brown. Finally, bake in the oven for that extra crunch. Once your scarpaccia is ready, serve it warm on a nice platter. You can garnish with fresh basil for color. Pair it with marinara sauce for dipping or a yogurt dip for a cool touch. These accompaniments add flavor and make your dish even more delightful. For the full recipe, check the earlier section. {{image_2}} If you want a gluten-free version, I have you covered. You can use almond flour or chickpea flour instead of all-purpose flour. Both options work well and give a nice flavor. Just make sure you adjust the liquid. You might need a little less water. This keeps your batter thick and helps the zucchini stay crispy. To make your Crispy Zucchini Scarpaccia even tastier, think about adding herbs and spices. Fresh herbs like oregano or parsley can add a nice touch. You can also try using spices like paprika or cayenne for a bit of heat. Don’t be shy! Experiment with flavors to find what you like best. These small changes can turn a simple dish into something special. Zucchini is great, but don’t stop there! You can also use other veggies like eggplant, bell peppers, or carrots. Just slice them thinly, like the zucchini. Each vegetable brings its own unique taste and texture. This makes the dish fun and colorful. Try mixing different veggies for a beautiful and tasty meal. For the full recipe, check out the Crispy Zucchini Scarpaccia guide. To keep your leftover scarpaccia fresh, first let it cool. Place it in an airtight container. You can store it in the fridge for up to three days. If you want to enjoy it later, you can freeze it as well. For the best taste, reheat your scarpaccia in the oven. Set the oven to 350°F (175°C). Place the scarpaccia on a baking sheet. Bake it for about 10 minutes. This helps it regain its crispiness. You can also use an air fryer for a quick reheat. Just heat it at 350°F (175°C) for about 5 minutes. To freeze scarpaccia, first slice it into wedges. Wrap each piece tightly in plastic wrap. Then, place them in a freezer bag. Make sure to remove as much air as possible. You can store it in the freezer for up to three months. When you're ready to eat, thaw it in the fridge overnight before reheating. Enjoy your Crispy Zucchini Scarpaccia any time! To get the full recipe, check the Full Recipe section. Crispy Zucchini Scarpaccia comes from Italy. It is a type of savory cake. This dish uses fresh zucchini, flour, and cheese. Traditional recipes vary by region. In Tuscany, scarpaccia is a popular dish. It often features local herbs and seasonal veggies. The goal is to create a crispy, flavorful treat. You can find it at fairs and family gatherings in Italy. Yes, this recipe is already vegetarian. It uses zucchini, flour, and cheese. You can easily swap out ingredients if needed. For example, try using vegan cheese for a dairy-free option. Just be sure to check that all your ingredients are plant-based. Enjoy the flavors without meat! You know the scarpaccia is done when it is golden brown. The edges should be crispy, and the center firm. Use a knife to check the inside. If it comes out clean, it's ready! Baking it for an extra 10-15 minutes helps achieve that perfect crunch. For the best results, keep an eye on it as it cooks. For the full recipe, check out the instructions above. We explored the key ingredients and steps needed to create Crispy Zucchini Scarpaccia. Selecting fresh zucchinis and mastering the right batter consistency is crucial for success. Remember to bake your dish for that perfect crunch and consider variations for added flavors. Store leftovers correctly to enjoy them later. Overall, this recipe is not only tasty but also versatile. Enjoy cooking and impressing everyone with your delicious scarpaccia!
Crispy Zucchini Scarpaccia Flavorful and Easy Recipe
Looking for a delicious way to enjoy zucchini? You’ll love Crispy Zucchini Scarpaccia! This dish is easy to whip up and perfect as a snack
- 2 medium zucchinis, sliced into 1/4-inch rounds - 1 can (15 oz) chickpeas, drained and rinsed - 3 tablespoons olive oil - Juice and zest of 1 lemon - 1 teaspoon garlic powder - 1 teaspoon smoked paprika - Salt and pepper, to taste - Fresh parsley, chopped - Optional pairings, like quinoa or couscous When choosing your zucchinis, look for firm ones with shiny skin. This ensures they are fresh and flavorful. For the chickpeas, canned ones work great. Just remember to rinse them well to remove excess sodium. Olive oil adds richness and helps everything grill nicely. The lemon juice and zest brighten the dish. Garlic powder adds depth, while smoked paprika gives it a warm flavor. Salt and pepper enhance all these tastes. After cooking, I love to sprinkle fresh parsley on top. It adds color and a fresh taste. For serving, I often pair this with fluffy quinoa or couscous. These grains soak up the lemon juice and balance the dish. You can find the full recipe details above to guide your cooking! 1. Preheat your grill or grill pan: Set it to medium-high heat. This step ensures that your zucchini gets those perfect grill marks. 2. Prepare the chickpeas: In a bowl, combine the drained chickpeas with 1 tablespoon of olive oil, garlic powder, smoked paprika, salt, and pepper. Toss them well. This seasoning will add a nice kick to your chickpeas. 1. Roast chickpeas in the oven: Spread the seasoned chickpeas on a baking sheet. Roast them at 400°F (200°C) for 20-25 minutes. Stir halfway through. They should become crispy and golden. 2. Grill zucchini slices: In another bowl, mix the sliced zucchinis with olive oil, lemon zest, salt, and pepper. Once the grill is hot, place the zucchini slices directly on the grill. Grill for about 3-4 minutes on each side. They should be tender with nice grill marks. 1. Drizzle with lemon juice: After grilling, remove the zucchini and squeeze fresh lemon juice over them. This adds a bright, zesty flavor. 2. Arrange on a platter: Place the grilled zucchini on a large platter. Sprinkle the crispy chickpeas on top. Garnish with fresh chopped parsley for a pop of color. For more detailed instructions, check the Full Recipe. To make your chickpeas crispy, start with dry chickpeas. Drain and rinse them well. Pat them dry with a kitchen towel. Use a good amount of olive oil for even coating. Roast them at 400°F for 20-25 minutes. Stir halfway through for even cooking. You can try different seasonings too. Add cumin for a warm flavor or cayenne for heat. Each change will give you a new taste. For grilled zucchini, heat your grill to medium-high. This temperature helps create nice grill marks. Place slices directly on the grill. Grill for about 3-4 minutes on each side. Check for tenderness; they should be soft but not mushy. Remember, overcooking can lead to loss of flavor and texture. When serving, choose a large white plate. Arrange the zucchini in a circular pattern. Scatter the crispy chickpeas on top for a colorful look. Add a lemon wedge on the side for zest. Finally, sprinkle fresh parsley for an eye-catching finish. This makes the dish pop and invites everyone to dig in. For the full recipe, check the details above. {{image_2}} You can switch up the veggies in this dish. Try bell peppers, asparagus, or eggplant. Each adds its own flavor. For seasonings, consider using cumin or Italian herbs. These can give a unique twist to your meal. This recipe is naturally vegan, which is great for plant lovers. If you need gluten-free options, you’re in luck! The dish is gluten-free as it stands. For low-sodium diets, skip the added salt. Use herbs and spices to boost flavor instead. Serve your dish in a bowl for a casual meal. Just layer the zucchini and crispy chickpeas. This makes a great main dish or a side dish for grilled meats. Either way, it looks and tastes amazing. To store leftovers, let the dish cool first. Place the zucchini and chickpeas in an airtight container. This keeps them fresh and tasty. Use glass or plastic containers with tight lids for the best results. Store in the fridge for up to three days. You can freeze this dish, but it’s best to do it separately. Freeze the chickpeas on a baking sheet first. Once frozen, transfer them to a freezer bag. For zucchini, blanch it before freezing. This helps keep the color and texture. You can freeze both for up to three months. To reheat, use the oven or a stovetop. For chickpeas, heat them at 350°F (175°C) to keep them crispy. You can add a drop of olive oil if they seem dry. For zucchini, warm it gently. You want it to heat up without becoming mushy. Enjoy your leftovers! To get crispy chickpeas, start by drying them well. Use a clean towel to remove moisture. This helps them crisp up nicely. Next, coat them lightly with olive oil and spices. Don’t overcrowd the baking sheet; this allows hot air to circulate. Roast them at 400°F for 20-25 minutes. Stir them halfway through for even crispiness. Yes, you can prep this dish in advance. You can cook the chickpeas early and store them in an airtight container. Keep the grilled zucchini and chickpeas separate. This helps maintain their texture. When ready to serve, you can reheat the chickpeas in the oven for a few minutes. This dish goes well with a fresh salad or a grain bowl. You might try it with quinoa or brown rice. It also complements grilled meats or fish nicely. For a light meal, serve it with hummus and pita bread. For detailed recipe instructions, check the [Full Recipe](#). This article covered how to make Lemony Grilled Zucchini with Crispy Chickpeas. We started with key ingredients and explored their flavors. Next, we walked through preparation and cooking steps. I shared tips for achieving tasty textures and beautiful presentations. We also discussed variations and storage options. Remember, cooking is about fun and creativity. Experiment with these ideas to make this dish your own. Your kitchen can be a place for healthy, joyful meals!
Lemony Grilled Zucchini & Crispy Chickpeas Delight
Are you ready to enjoy a fresh, tasty dish that packs a punch? My Lemony Grilled Zucchini & Crispy Chickpeas Delight is the perfect blend
Crispy Air Fryer Parmesan Zucchini 🥒 Ingredients: - 2 medium zucchinis, sliced into ½-inch rounds - ½ cup grated Parmesan cheese - 1 teaspoon garlic powder - ½ teaspoon onion powder - ½ teaspoon Italian seasoning - 1 tablespoon olive oil - Salt and pepper to taste - Fresh parsley, chopped (for garnish) When I cook, I love to work with fresh ingredients. For this easy no-breading air fryer Parmesan zucchini, you need just a few items. Here’s what you will gather: - 2 medium zucchinis, sliced into ½-inch rounds - ½ cup grated Parmesan cheese - 1 teaspoon garlic powder - ½ teaspoon onion powder - ½ teaspoon Italian seasoning - 1 tablespoon olive oil - Salt and pepper to taste - Fresh parsley, chopped (for garnish) These ingredients come together to make a tasty dish. The zucchini gives a nice crunch, and the Parmesan adds a savory kick. This recipe is simple but packed with flavor. Fresh parsley on top makes it look great, too! When you prepare this dish, make sure to have everything ready. It helps to keep the process smooth and fun. Enjoy the cooking! Start with two medium zucchinis. Wash them well under cool water. Slice each zucchini into ½-inch rounds. Make sure the slices are even. This helps them cook at the same rate. Place the slices in a large bowl. You want to coat them well with olive oil. In a separate bowl, mix the dry ingredients. Add ½ cup of grated Parmesan cheese. Then, include 1 teaspoon of garlic powder. Add ½ teaspoon of onion powder and ½ teaspoon of Italian seasoning. Season with salt and pepper to taste. Stir this mixture until well combined. This will be the flavorful coat for your zucchini. - Preheat your air fryer to 400°F (200°C) for about 5 minutes. - Coat the zucchini rounds with 1 tablespoon of olive oil. Toss them gently to ensure they are evenly coated. - Sprinkle the cheese and seasoning mix over the zucchinis. Toss again until all slices are well coated. - Place the zucchini in the air fryer basket in a single layer. If the basket is small, work in batches to avoid overcrowding. Cook for 10-12 minutes. Shake the basket halfway through cooking to ensure even crisping. The zucchinis should turn golden brown and crispy. Once done, remove them and garnish with fresh parsley. Enjoy your Easy No-Breading Air Fryer Parmesan Zucchini! For the complete details, check the Full Recipe. To get your zucchini crispy, start by slicing them evenly. Each piece should be about ½ inch thick. This ensures they cook at the same rate. Coating them with olive oil helps the Parmesan stick and adds flavor. The air fryer needs to be at 400°F (200°C) to create that golden crunch. If you don't have Parmesan, try using Pecorino Romano. It has a sharp flavor that works well. Garlic powder can be swapped for fresh garlic if you prefer more bite. For a spicy kick, add red pepper flakes. You can also use any dried herbs you have on hand instead of Italian seasoning. - Evenly coat zucchinis: Make sure to mix the olive oil well with the zucchini. This helps every slice absorb flavors. - Avoid overcrowding: Place zucchinis in a single layer in the air fryer basket. This allows hot air to circulate and crisp them up. If you have too many, cook in batches. - Adjust cooking time based on desired crispiness: Check your zucchinis around the 10-minute mark. If you want them crispier, let them cook for another 2-3 minutes. This way, you get them just how you like it. For the full recipe, check the detailed section above. {{image_2}} You can change the flavor by using different seasonings. Try adding smoked paprika for a smoky taste. You might also enjoy a pinch of cayenne pepper for heat. For a fresh twist, add lemon zest or fresh herbs like thyme. These options make the dish fun and unique each time. If you want to switch things up, consider using other vegetables. Eggplant works well and gives a rich flavor. Bell peppers add a nice crunch and sweetness. You could even try carrots or sweet potatoes for a colorful dish. Each vegetable brings its own taste and texture. You can play with cheese types for variety. Mozzarella gives a gooey texture, while feta adds a tangy kick. Goat cheese offers a creamy depth that is hard to resist. For a bold flavor, try blue cheese. Blending these cheeses with zucchini or other veggies creates new flavor layers. Incorporate other vegetables for blending flavors. Mixing zucchinis with yellow squash can enhance the dish’s color and taste. You could add spinach or kale for a nutritious boost. The balance of flavors will keep you coming back for more. For the Full Recipe, check the earlier section. After making your Easy No-Breading Air Fryer Parmesan Zucchini, you may want to save some for later. Let the zucchini cool down to room temperature first. Then, place them in an airtight container. They will stay fresh for about 3 to 5 days in the fridge. Make sure to separate layers with parchment paper. This helps keep them from sticking together. When you want to enjoy your leftovers, the air fryer is your best friend. Preheat your air fryer to 350°F (175°C). Place the zucchini in the basket in a single layer. Heat them for about 5 to 7 minutes, shaking the basket halfway through. This method keeps your zucchini crispy and tasty. The oven can work too, but it may not keep the same crunch. If you plan to freeze your zucchini, it's best to do it right after cooking. Let them cool before freezing. Use an airtight container or a freezer bag. Try to remove as much air as possible to prevent freezer burn. They can stay good for about 2 to 3 months in the freezer. - Airtight container recommendations: Glass containers or heavy-duty freezer bags work well. - Reheating using the air fryer for best results: Follow the same steps as reheating leftovers. This keeps them crispy and fresh when you’re ready to eat again. Yes, you can use frozen zucchini. However, it may not get as crispy. Frozen zucchini has more water, which can lead to a softer texture. If you choose to use frozen, thaw and drain the zucchini first. Pat them dry with a paper towel to remove excess moisture. This step helps improve crispiness when you air fry. To make this recipe dairy-free, swap the Parmesan cheese for a dairy-free alternative. You can use nutritional yeast for a cheesy flavor without dairy. Another option is to try vegan cheese that melts well. Make sure to check the labels for any hidden dairy ingredients if you choose a store-bought option. - Popular sauces that pair well - Marinara sauce is a classic choice. - Ranch dressing adds a creamy touch. - Garlic aioli brings a nice flavor kick. - Healthier dipping alternatives - Greek yogurt dip offers protein and creaminess. - Hummus gives a nutty taste for a fun twist. - Salsa adds a fresh, tangy option that is low in calories. These sauces enhance the flavor and make your air fryer Parmesan zucchini even more enjoyable. This blog post provided a complete guide for making crispy air-fried zucchini. You learned the key ingredients and detailed steps to achieve the perfect texture. We discussed useful tips, variations, and storage methods. Remember, feel free to swap ingredients or add your favorite dips. This recipe is flexible and easy. Enjoy your crunchy zucchini, and share it with friends and family for a tasty treat!
Easy No-Breading Air Fryer Parmesan Zucchini Recipe
Are you looking for a quick and tasty veggie dish? This Easy No-Breading Air Fryer Parmesan Zucchini Recipe is just what you need! With just