Appetizers
. Enjoy creating this delicious dish! - Preheating the grill: Start by preheating your grill to medium-high heat. This step is key for the perfect char. The heat makes the corn sweet and smoky. - Soaking wooden skewers (if using): If you plan to use wooden skewers, soak them in water for 30 minutes. This keeps them from burning on the grill and helps you handle the corn easily. - Timing and turning the corn: Place the husked corn directly on the grill. Cook it for 10-15 minutes. Turn the corn every few minutes. This helps it cook evenly and get those beautiful grill marks. - Mixing ingredients for the sauce: While the corn grills, make the elote sauce. In a bowl, mix 1/2 cup of mayonnaise, 1/2 cup of crumbled cotija cheese, 1 teaspoon of chili powder, 1 teaspoon of smoked paprika, and the juice of 1 lime. Add salt and pepper to taste. Stir until it’s smooth and creamy. - Coating the corn with elote sauce: Once the corn is grilled, take it off the heat. Let it cool for a minute. If you want, pierce each ear with a skewer. Brush the elote sauce generously on the corn. Make sure every bite gets that rich flavor. - Adding toppings: Finally, sprinkle more cotija cheese and a pinch of chili powder on top. For a fresh touch, add chopped cilantro as a garnish. This adds color and flavor, making the dish even more appealing. For the Full Recipe, refer to the top section. To get the best char on your corn, grill it over medium-high heat. This high heat creates those beautiful grill marks and a sweet flavor. Turn the corn every few minutes while it cooks. This way, it cooks evenly. If you can't grill, you can boil or bake the corn instead. Boiling takes about 8-10 minutes. Baking needs 20-25 minutes at 400°F. You can switch up the sauce to fit your needs. If you want a dairy-free version, use avocado or a vegan mayo. For spice lovers, add more chili powder or some hot sauce for a kick. You can also mix in fresh herbs like parsley or dill to change the flavor. Elote pairs wonderfully with sides like tortilla chips or a fresh salad. Serve it at gatherings on a big platter. You can even set up a DIY elote bar. Guests can add extra toppings like more cheese, lime wedges, or spices. This makes it fun and interactive! {{image_2}} You can turn elote into a fresh salad. Start with grilled corn, then cut the kernels off the cob. Mix the kernels with diced tomatoes, red onion, and avocado. Add the same elote sauce made from mayonnaise and cotija cheese. This salad is bright, tasty, and perfect for hot days. It’s a fun twist on the classic! Cotija cheese is great, but you can try other cheeses too. Feta adds a salty taste, while queso fresco gives a softer texture. Parmesan can also work for a nutty flavor. Each cheese brings a unique touch to your elote. Feel free to experiment with what you have on hand. If you like heat, add jalapeños or hot sauce to your elote. Chop fresh jalapeños and mix them into the elote sauce. You can also drizzle hot sauce over the grilled corn before serving. This spicy kick can make your elote exciting and bold. Adjust the heat to fit your taste! To store leftover elote, let it cool first. Wrap each ear in plastic wrap. Place the wrapped corn in an airtight container. This keeps it fresh. You can also store the elote sauce separately. The shelf life of the prepared elote is about three days in the fridge. The corn may lose some texture, but it will still taste good. The sauce lasts about a week. Just make sure to check for any signs of spoilage. To reheat corn without losing flavor, use a skillet. Heat it on medium for a few minutes. Add a bit of water to keep it moist. Cover the skillet to trap steam. This helps keep the corn juicy. You can also use the microwave. Place the corn in a microwave-safe dish. Add a splash of water and cover it. Heat it in short bursts, checking often. This way, you can enjoy your elote just like fresh off the grill. Elote is a popular Mexican street food. It features grilled corn on the cob. Vendors serve it with toppings like mayonnaise, cheese, and spices. People enjoy elote for its rich flavors and creamy texture. This dish holds cultural significance in Mexico. It brings people together during festivals and celebrations. Sharing elote makes for a fun and tasty experience. You can use frozen corn, but fresh corn is best. Fresh corn gives a sweeter flavor and better texture. Frozen corn may lack the same juiciness when grilled. If you use frozen corn, thaw it first. Grill it on skewers or in a grill basket for even cooking. Elote is tasty but can be high in calories. One ear of elote has about 200 calories. It also offers fiber and vitamins. Corn contains antioxidants that can boost your health. The mayonnaise and cheese add some fat, so enjoy in moderation. To make elote vegan, swap mayonnaise with vegan mayo. Use nutritional yeast instead of cotija cheese. You can also try vegan cheese options. Add lime juice and chili powder for flavor. This way, everyone can enjoy elote at your gathering. Grilling corn gives it a nice char. Start by preheating your grill to medium-high heat. Place the corn directly on the grill grates. Turn it every few minutes for even cooking. Grill for 10 to 15 minutes until it’s tender and slightly charred. This method enhances the flavor and adds that smoky taste we love. Enjoy grilling your corn for elote! For the full recipe, check out the Elote Fiesta Corn. Elote is a tasty, fun dish made with fresh corn and bold flavors. We explored key ingredients, including cotija cheese and lime juice. You learned how to grill corn perfectly and create a rich elote sauce. We shared helpful tips on customization and serving suggestions. Finally, we discussed storage and reheating advice. Now you can enjoy elote in many ways, whether as a salad or spicy treat. Embrace this delicious dish and make it your own at home!](https://tossedrecipes.com/wp-content/uploads/2025/06/91161840-2f10-4177-a76f-8d6070c0bfab.webp)
Easy Elote Recipe Deliciously Grilled for Everyone
If you’re craving a tasty treat that’s easy to make, look no further! My Easy Elote Recipe is a delightful way to enjoy grilled corn
![To make quick pickled carrots, you need these main ingredients: - 4 medium carrots, peeled and cut into thin strips or rounds - 1 cup distilled white vinegar - 1 cup water - 2 tablespoons granulated sugar - 1 tablespoon salt - 1 teaspoon black peppercorns - 1 teaspoon mustard seeds - 2 cloves garlic, peeled and smashed These ingredients work together to create a tasty and tangy flavor. The vinegar and sugar balance the crunch of the carrots perfectly. You can also add optional ingredients to boost the flavor: - 1 small piece of fresh ginger, sliced (optional) - Red pepper flakes to taste (optional) Adding ginger gives a warm spice, while red pepper flakes add heat. Feel free to adjust these to your taste. You will need some simple tools to make these pickles: - A medium saucepan - A clean glass jar or container for storing - A stirring spoon These items make it easy to prepare and store your pickled carrots. With these ingredients and tools, you can quickly make a delightful snack. For the full recipe, check out the detailed steps. Start by peeling your carrots. It’s best to use medium-sized carrots for this recipe. Cut them into thin strips or rounds. Thin pieces absorb the pickling liquid better. You want them to be uniform in size for even pickling. Grab a medium saucepan. Add 1 cup of distilled white vinegar and 1 cup of water. Then, put in 2 tablespoons of sugar and 1 tablespoon of salt. Add 1 teaspoon of black peppercorns and 1 teaspoon of mustard seeds. Stir this mixture over medium heat. Keep stirring until the sugar and salt dissolve. Once dissolved, remove the pan from heat. This is your pickling liquid. Take the smashed garlic and ginger, if you choose to use it. Add these to your pickling liquid. Let it sit and cool down. While it cools, pack your carrot slices tightly into a clean glass jar. If you like a kick, sprinkle some red pepper flakes over the carrots. Once the liquid cools, pour it over the carrots. Make sure they are fully submerged. Seal the jar tightly. Let it sit at room temperature for about 30 minutes to an hour. You can also refrigerate it for up to 24 hours. The flavors will deepen overnight. The pickled carrots are ready to eat after just one hour. Check out the Full Recipe for more details! One common mistake is slicing carrots too thick. Thin strips or rounds pickle better. Another mistake is not letting the carrots sit long enough. They need time to soak up the flavors. Avoid using old carrots; fresh ones taste best. Ensure your jar is clean. This keeps the carrots safe to eat. You can easily change the sweetness and spice levels. If you want sweeter carrots, add more sugar. Start with an extra half tablespoon. For a spicier kick, add more red pepper flakes. You can also try fresh jalapeños for heat. Taste the pickling liquid before pouring it over the carrots. This way, you can adjust as needed. Adding extra ingredients can create new flavors. Try adding sliced radishes for a zing. Fresh herbs like dill or cilantro make great additions. You can also use citrus peels for a bright taste. A splash of soy sauce adds depth. Just remember to keep the balance of vinegar and sugar. This way, your carrots stay tangy and delicious. For the full recipe, visit the section above. {{image_2}} You can use many vegetables for quick pickling. Think about cucumbers, radishes, or even cauliflower. Each vegetable adds its own taste and crunch. For a fun twist, try pickling bell peppers or green beans. Just slice them thinly and follow the same pickling steps as carrots. You will enjoy their unique flavors! While distilled white vinegar is a classic choice, you can switch it up. Apple cider vinegar adds a fruity taste. Rice vinegar is milder and sweeter. If you want a bolder flavor, try red wine vinegar or balsamic vinegar. Each vinegar will change the taste of your pickles. Experiment to find your favorite! Want to spice things up? Add fresh herbs like dill or cilantro to your pickling mix. You can also include whole spices like cinnamon sticks or cloves for warmth. If you enjoy heat, try adding jalapeño slices or mustard seeds. For a sweet touch, toss in some sliced peaches or mango. These flavors will make your pickles stand out! For the full recipe, check out the Zesty Quick Pickled Carrots. Store your quick pickled carrots in a clean glass jar. Make sure the jar is tightly sealed. Keep them in the fridge to keep them fresh. Avoid leaving them at room temperature for long. This helps maintain their crispness and flavor. Always use a clean utensil to take out the carrots. This prevents germs from getting in the jar. Quick pickled carrots can last about two to four weeks in the fridge. They taste best within the first week. After that, they may start to lose crunch. If you see any mold or off smells, toss them out. Always trust your senses when it comes to food safety. Don’t throw away the leftover pickling liquid! You can use it to add flavor to salads or sauces. It also makes a great marinade for meats or tofu. Just pour it over your favorite veggies and let them soak. You can even pickle other vegetables in the same liquid for a new twist. It's a smart way to reduce waste and keep those flavors going. For the full recipe, check out the [Full Recipe]. Quick pickled carrots are ready in about one hour. You can eat them right away! If you let them sit longer, they soak up more flavor. I recommend refrigerating them overnight for the best taste. They can last well in the fridge for about two weeks. Yes, you can use different types of vinegar. Apple cider vinegar adds a nice fruity flavor. Rice vinegar gives a milder taste. Just remember, each type of vinegar changes the taste. Stick to the same ratio for the best results. No, they are not the same. Quick pickled carrots use a fast process. Traditional pickles take longer and often involve fermentation. Quick pickling gives you fresh flavor in less time. Enjoy these carrots as a bright snack or topping! Quick pickled carrots are easy to make using the right ingredients and steps. We discussed essential items, optional add-ins, and the proper equipment. I shared tips to avoid common mistakes and ways to customize sweetness and spice. You learned about different vegetables and vinegars to try. Remember, stored well, your pickled carrots can last. Enjoy experimenting with flavors and share your creations. Happy pickling!](https://tossedrecipes.com/wp-content/uploads/2025/06/aff702d8-eca0-4d93-8c4b-d63e864ae21b.webp)
Quick Pickled Carrots Easy and Flavorful Delight
Love the crunch of pickled carrots? You’re in the right place! In this guide, I’ll show you how to make quick pickled carrots that are

Oven Baked Chicken Taquitos Crispy and Flavorful Snack
Welcome to your new favorite snack: Oven Baked Chicken Taquitos! These crispy, flavorful bites are perfect for any occasion, from game day to a cozy
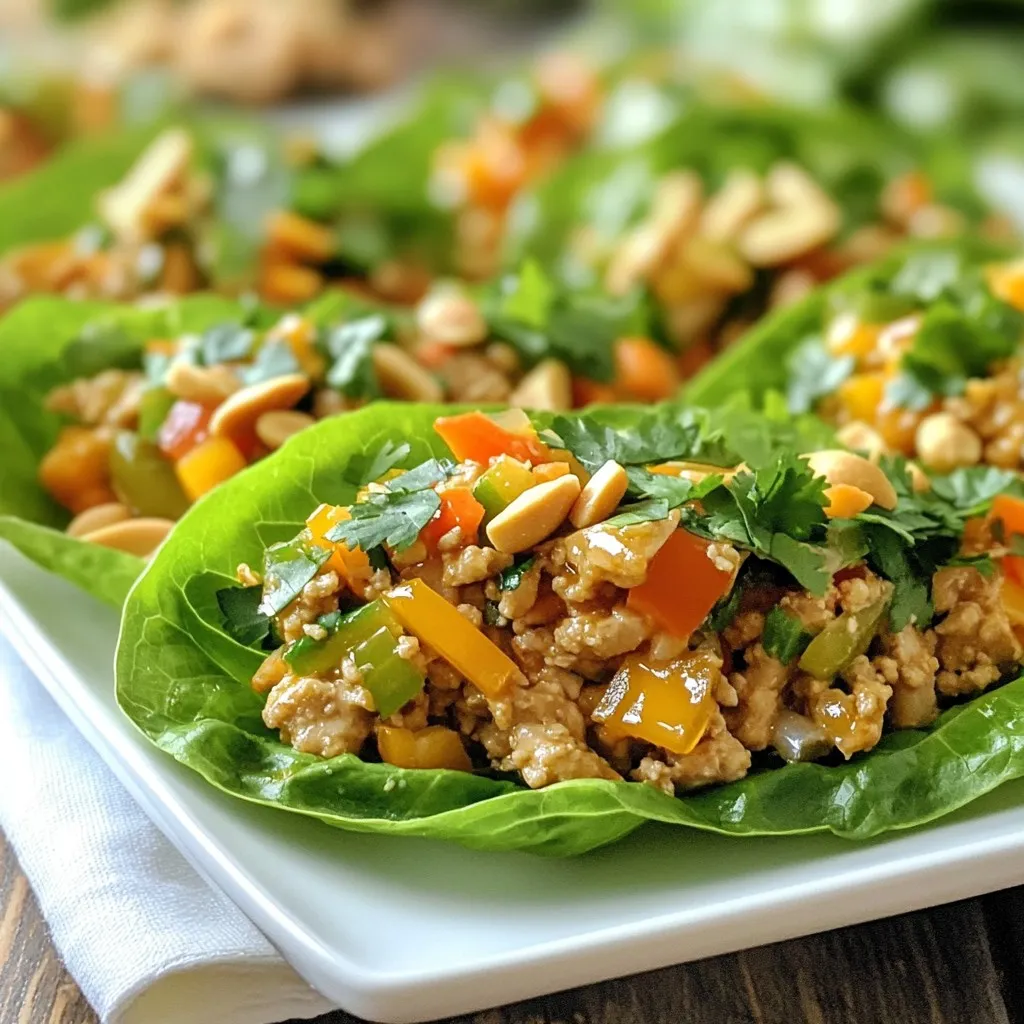
Thai Peanut Chicken Lettuce Wraps Simple and Tasty Meal
Looking for a fun, simple meal? Try my Thai Peanut Chicken Lettuce Wraps! They are packed with flavor and fresh ingredients. With just a few
![- Chicken breast and seasoning - 1 pound chicken breast, cut into bite-sized pieces - 1 teaspoon garlic powder - 1 teaspoon paprika - 1 teaspoon salt - 1/2 teaspoon black pepper - Breading components - 1 cup all-purpose flour - 2 large eggs - 1 cup panko breadcrumbs - Bang Bang sauce ingredients - 1 cup mayonnaise - 2 tablespoons sweet chili sauce - 1 tablespoon sriracha (adjust to taste) - 1 tablespoon honey - 1 teaspoon lime juice - Fresh cilantro, chopped (for garnish) These ingredients make Crispy Bang Bang Chicken a tasty meal. The seasoning blends perfectly with the chicken. The panko breadcrumbs give a great crunch. The Bang Bang sauce adds a sweet and spicy kick. You can easily find these ingredients at any grocery store. Let’s get cooking! Marinating the chicken Start with one pound of chicken breast. Cut it into bite-sized pieces. In a large bowl, mix the chicken with salt, black pepper, garlic powder, and paprika. This gives the chicken great flavor. Let it sit for about 15 minutes. This step helps the chicken absorb the spices. Setting up the breading station Now, prepare your breading station. You will need three bowls. In the first bowl, add one cup of all-purpose flour. Season it with a pinch of salt. In the second bowl, beat two large eggs. In the third bowl, place one cup of panko breadcrumbs. This setup makes breading easy and fun. Frying the chicken Next, heat about half an inch of oil in a large pan over medium-high heat. Once the oil is hot, carefully add the chicken pieces in batches. Make sure not to overcrowd the pan. Fry the chicken for about 4 to 5 minutes on each side. You want them golden brown and crispy. When done, remove the chicken and drain it on paper towels. Combining sauce ingredients In a mixing bowl, whisk together one cup of mayonnaise, two tablespoons of sweet chili sauce, one tablespoon of sriracha, one tablespoon of honey, and one teaspoon of lime juice. This mix creates a creamy and spicy sauce. Achieving the right consistency Keep whisking until the sauce is smooth and creamy. You can adjust the sriracha to your taste. If you like it spicier, add more. Tossing chicken with sauce Once the chicken is crispy, take a large bowl. Toss the chicken pieces with the Bang Bang sauce. Make sure every piece is well coated. This is where the magic happens! Garnishing before serving Plate the chicken on a serving platter. For the final touch, garnish with fresh chopped cilantro. This adds a nice color and fresh flavor. Enjoy your Crispy Bang Bang Chicken! You can find the full recipe in the [Full Recipe]. For the best crispiness, I recommend frying in hot oil. Use a medium-high heat and make sure the oil is about 350°F (175°C). This temperature helps the coating cook fast, keeping it crisp. To prevent a soggy coating, do not overcrowd the pan. Fry the chicken in small batches. This allows steam to escape and keeps the outside crunchy. After frying, let the chicken rest on paper towels. This will soak up any extra oil. Adjusting spice levels can make a big difference. If you like heat, add more sriracha to the sauce. For a milder flavor, reduce the sriracha. You can also add crushed red pepper flakes to the chicken mix for a kick. If you're out of ingredients, don’t worry! You can swap mayonnaise for Greek yogurt for a lighter sauce. You can also use lemon juice instead of lime juice. These small changes can give your Bang Bang Chicken a new twist. For the full recipe, check out the [Full Recipe]. {{image_2}} If you want a healthier meal, try baking instead of frying. Preheat your oven to 400°F. Place the breaded chicken on a baking sheet. Spray lightly with cooking oil for a crispy finish. Bake for about 20-25 minutes, flipping halfway. For gluten-free options, swap regular flour with almond flour or a gluten-free blend. You can use gluten-free breadcrumbs too. This way, you can enjoy the same great taste without gluten. Crispy Bang Bang Chicken pairs well with many sides. Try it with jasmine rice or a fresh salad. The rice soaks up the sauce, while the salad adds crunch. For drinks, a light beer or a sweet tea complements the dish nicely. You might also enjoy a fruity mocktail for a refreshing twist. These sides and drinks enhance the meal's flavor and make it more fun! To keep your Crispy Bang Bang Chicken fresh, use airtight containers. Glass or plastic containers work well. Make sure they are sealed tightly to prevent moisture loss. You can store the chicken in the refrigerator for up to three days. If you want to keep it longer, consider freezing it. Frozen chicken can last for up to three months. Just remember to thaw it in the fridge before reheating. When it’s time to enjoy your leftovers, the best methods are the oven or air fryer. Preheat your oven to 375°F (190°C). Place the chicken on a baking sheet and heat for about 10-15 minutes. This method helps keep the coating crispy. If you use an air fryer, set it to 350°F (175°C) and cook for about 5-7 minutes. This also keeps the chicken crunchy. Avoid using the microwave, as it makes the coating soggy. For the best results, always check that the chicken is heated through before serving. Can I make this recipe in advance? Yes, you can prepare the chicken and sauce ahead of time. Marinate the chicken and store it in the fridge. Make the sauce and keep it in an airtight container. When ready to eat, bread and fry the chicken fresh for the best crunch. What is the origin of Bang Bang Chicken? Bang Bang Chicken comes from Chinese cuisine. It is known for its spicy, creamy sauce. The name "Bang Bang" refers to the sound made by a wooden stick. This stick is used to pound the chicken to make it tender and flavorful. How to tell if the chicken is cooked through? Use a meat thermometer to check the chicken. It should read 165°F (75°C). If you don’t have a thermometer, cut a piece open. The meat should be white, with no pink inside. Can I use other proteins instead of chicken? Yes, you can use shrimp, tofu, or even pork. Adjust cooking times as needed. Shrimp cooks faster than chicken, so watch it closely. What goes well with Crispy Bang Bang Chicken? Serve it with rice or salad for a balanced meal. Steamed veggies like broccoli or snow peas add color and nutrients. You can also pair it with a refreshing drink like iced tea. Is it suitable for meal prep? Absolutely! Crispy Bang Bang Chicken packs well for lunch or dinner. Store the chicken and sauce separately to keep everything fresh. When ready to eat, just combine and enjoy! This blog post covers how to make Crispy Bang Bang Chicken. We explored the key ingredients, steps for preparation, and tips for achieving perfect flavor and texture. Remember, marinating and the right frying technique are crucial. Don't forget to try ingredient swaps for healthier options. In the end, you can enjoy this dish in many ways, and it is easy to store and reheat. Whether for yourself or a gathering, Bang Bang Chicken can impress everyone. Enjoy making and sharing this delicious recipe!](https://tossedrecipes.com/wp-content/uploads/2025/06/49f8d773-08f0-4d00-baa3-445d51ebc10c.webp)
Crispy Bang Bang Chicken Quick and Tasty Meal Idea
Looking for a quick, tasty meal that impresses? Crispy Bang Bang Chicken is your answer! This dish packs a punch with its crunchy coating and
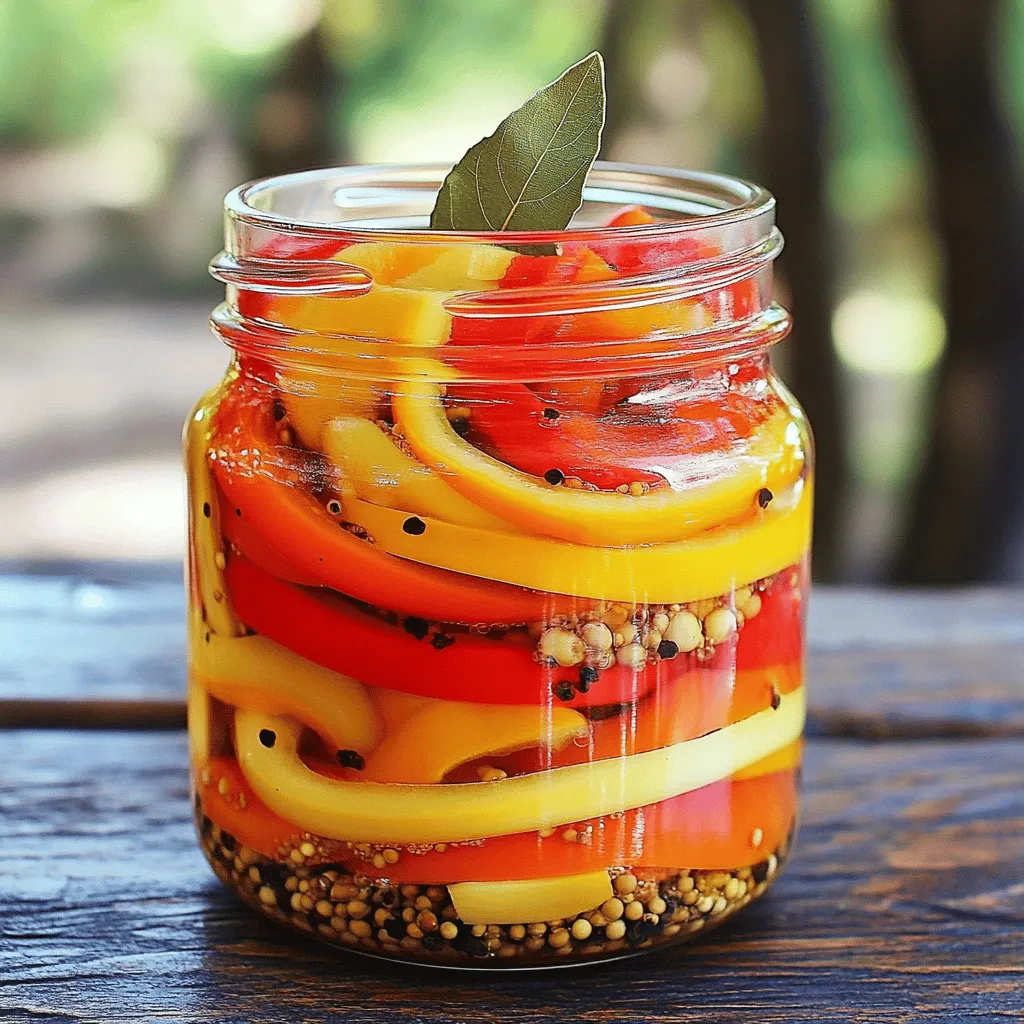
The BEST Pickled Sweet Peppers Flavorful and Simple
Looking to add a burst of color and flavor to your meals? You’ve come to the right place! I’ll show you how to make the
![To make tasty Korean BBQ meatballs, you need some simple ingredients. Here’s the complete list of ingredients: - 1 pound ground beef or ground turkey - 1/2 cup breadcrumbs - 1/4 cup green onions, finely chopped - 1/4 cup sesame seeds - 2 cloves garlic, minced - 1-inch piece ginger, grated - 1/4 cup soy sauce - 2 tablespoons brown sugar - 1 tablespoon gochujang (Korean chili paste) - 1 tablespoon rice vinegar - 1 teaspoon sesame oil - Salt and pepper to taste - Fresh cilantro for garnish Each ingredient plays a special role. The ground beef or turkey is your meat base. Breadcrumbs help give the meatballs a nice texture. Green onions add a fresh taste, while sesame seeds give a nice crunch. Garlic and ginger add warmth and depth. Soy sauce brings umami flavor, while brown sugar balances the saltiness. Gochujang is key for that spicy kick, and rice vinegar adds a touch of acidity. Sesame oil adds a nutty flavor, and salt and pepper enhance everything. Finally, fresh cilantro makes a great garnish. Feel free to explore variations with these ingredients. You can find the full recipe [Full Recipe]. 1. First, preheat the oven to 400°F (200°C). This helps the meatballs cook evenly. 2. Next, prepare a baking sheet by lining it with parchment paper. This makes cleanup easy. 1. In a large bowl, combine the following ingredients: - 1 pound ground beef or ground turkey - 1/2 cup breadcrumbs - 1/4 cup green onions, finely chopped - 1/4 cup sesame seeds - 2 cloves garlic, minced - 1-inch piece ginger, grated - 1/4 cup soy sauce - 2 tablespoons brown sugar - 1 tablespoon gochujang - 1 tablespoon rice vinegar - 1 teaspoon sesame oil - Salt and pepper to taste 2. Mix all the ingredients together well. Use your hands to ensure everything is combined. 1. Shape the mixture into small meatballs, about 1 inch in diameter. Place them on the baking sheet. 2. Bake the meatballs in the preheated oven for 20 to 25 minutes. They should be cooked through and have a nice caramelized look. For more details, check the Full Recipe. To make great meatballs, use the right ingredient ratios. A mix of meat, breadcrumbs, and seasonings gives the best texture. Too many breadcrumbs can make them dry. Too little makes them fall apart. Always remember to mix gently. Over-mixing can lead to tough meatballs. Want to kick up the flavor? Add a bit of chopped cilantro or extra ginger. You can also try different sauces. A sweet chili sauce or teriyaki can give a fun twist. Experiment with your favorite ingredients to find what you love. Serve your meatballs with some rice or noodles for a complete meal. Steamed veggies make a nice side, too. For a fun touch, use a large platter. Arrange the meatballs in a circle and add your dipping sauce in the center. This looks great and makes sharing easy. If you want to impress guests, garnish with sesame seeds and fresh cilantro. {{image_2}} You can switch meats in this recipe. Try chicken or pork for a lighter taste. Both options offer a different texture. Ground turkey works well too. For a vegetarian or vegan version, use lentils or chickpeas. You can mash them and mix with breadcrumbs. This keeps the meatball shape while adding flavor and nutrition. Feel free to add spices for more kick. You might try chili powder or black pepper. They enhance the meatballs with a nice warmth. Adding vegetables like finely chopped carrots or bell peppers will also boost nutrition. They add color and crunch to each bite. You can pan-fry these meatballs for a crispy outside. Heat oil in a pan and cook until browned. Baking works great too, as it cooks evenly. If you want smoky flavor, grill your meatballs. The grill adds a unique taste and makes them extra juicy. For the best results, choose the method that you enjoy most! To keep your Korean BBQ meatballs fresh, store them in the fridge. Place them in an airtight container. This helps prevent moisture loss. You can store leftovers for up to three days. When reheating, gentle heat keeps them juicy and tasty. Freezing is a great option for future meals. First, let the cooked meatballs cool completely. Then, place them in a freezer bag. Remove as much air as possible to avoid freezer burn. Freeze them for up to three months. To reheat, simply thaw in the fridge overnight. Then, warm them in the oven or microwave until hot. Understanding how long your meatballs last is key. In the fridge, they stay good for about three days. In the freezer, they last up to three months. Always check for odd smells or changes in color before eating. Storing them right helps you enjoy these tasty bites longer. For the complete recipe, check out the Full Recipe link. Korean BBQ meatballs blend many flavors in Korean cooking. They reflect street food culture in Korea. These meatballs often use ingredients like soy sauce and gochujang. These flavors make them rich and savory. Korean food emphasizes balance, combining sweet, salty, and spicy notes. This dish showcases the creativity found in Korean kitchens. Eating these meatballs connects people to traditions that span generations. Yes, you can prepare these meatballs in advance. Make the meatball mixture and shape them. Store them in the fridge for up to 24 hours. You can also freeze them for longer storage. Just remember to thaw them overnight in the fridge before baking. This saves time on a busy day and makes meal prep easy. Korean BBQ meatballs pair well with many sides. Here are some great options: - Steamed rice - Kimchi - Roasted vegetables - Asian slaw - Noodles These sides add texture and flavor. They complement the savory taste of the meatballs, creating a full meal. To ensure meatballs are fully cooked, check their internal temperature. They should reach 160°F (71°C) for beef and turkey. Use a meat thermometer for accuracy. If you don’t have one, cut one meatball in half. The inside should be no longer pink and juices should run clear. This ensures safety and the best texture. Yes, ground turkey is a great substitute for beef. It is leaner, which can make meatballs lighter. The taste is slightly different, but still delicious. You can also add more seasoning to enhance flavor. Ground turkey absorbs sauces well, making it perfect for Korean BBQ. This swap keeps the dish healthy without losing taste. For the full recipe, check out the link. This post covered everything you need to make Korean BBQ meatballs. You learned the ingredients, prep steps, and baking instructions. I shared tips to enhance flavor and texture, along with storage methods. Try different meats and flavor variations to find your favorite. Use this guide to create delicious meals. Enjoy your cooking experimentation and serve up those tasty meatballs!](https://tossedrecipes.com/wp-content/uploads/2025/06/4f469120-43aa-48db-b378-ed889e0aa354.webp)
Korean BBQ Meatballs Flavorful and Easy Recipe
Are you ready to jazz up your dinner with a dish that’s packed with flavor? My Korean BBQ Meatballs recipe is not only easy to
![- 2 large flatbreads - 1 cup cooked chicken breast, shredded - 1 cup Romaine lettuce, chopped To make Chicken Caesar Flatbread, you need simple yet fresh ingredients. You start with flatbreads as your base. Choose large ones for a hearty meal. Next, use cooked chicken breast. Shredded chicken works best. It adds protein and texture. Romaine lettuce gives a nice crunch and freshness. - 1/2 cup Caesar dressing (homemade or store-bought) - 1/2 cup cherry tomatoes, halved - 1/4 cup grated Parmesan cheese - 1/4 cup croutons (optional) - Freshly cracked black pepper, to taste - Fresh basil leaves, for garnish The dressing brings all the flavors together. You can use store-bought Caesar dressing or make your own. Next, add halved cherry tomatoes for sweetness. Grated Parmesan cheese adds a salty kick. If you like crunch, sprinkle croutons on top. Finish with cracked black pepper for spice. Fresh basil leaves make a beautiful garnish. This recipe is about freshness and flavor, making each bite delightful. For the full details, check the Full Recipe. - Preheat your oven to 400°F (200°C). - Place flatbreads on a baking sheet lined with parchment paper. First, heating the oven makes sure your flatbreads cook evenly. Parchment paper helps with easy cleanup later. I love this step because it sets the kitchen's mood for cooking. - Spread Caesar dressing evenly over each flatbread. - Add shredded chicken, Romaine lettuce, and cherry tomatoes. Next, I like to spread the Caesar dressing. It gives a rich taste to the flatbreads. Then, layer the shredded chicken on top. Use a good amount so each bite is tasty. After that, sprinkle on some Romaine lettuce and halved cherry tomatoes. This adds crunch and freshness. - Sprinkle grated Parmesan and optional croutons on top. - Bake for 8-10 minutes until crispy and cheese melts. Now, sprinkle grated Parmesan cheese over the toppings. If you want extra crunch, add croutons too. Bake in the oven for 8 to 10 minutes. You want it crispy and the cheese to melt perfectly. Once done, let them cool for a minute. Serve with a sprinkle of black pepper and fresh basil. This simple process makes Chicken Caesar Flatbread a fun dish to share. For the full recipe, you can check the earlier section. To make the best Chicken Caesar Flatbread, focus on cooking time and temperature. Set your oven to 400°F (200°C). This heat crisps the flatbread perfectly. Bake for 8-10 minutes. Keep an eye on them to avoid burning. For crispy flatbreads, use thin flatbreads. Thin ones crisp up better than thick ones. Layer your toppings evenly. This helps heat flow and reduces sogginess. Don't overload the flatbreads with too many toppings. Less is often more. Pair your Chicken Caesar Flatbread with a side salad. A light side salad adds freshness and balance. You can also serve it with carrot sticks or chips for crunch. For a fun presentation, cut the flatbreads into small squares. This makes them easy to pick up. Arrange them on a colorful plate. Garnish with fresh basil leaves for a pop of color. You can also drizzle extra Caesar dressing around the plate for a visual treat. If you want to explore more, check out the Full Recipe for detailed steps. {{image_2}} You can switch up the protein in your Chicken Caesar Flatbread for fun. If you like seafood, try grilled shrimp instead of chicken. It adds a nice touch of flavor. Tofu is a great option too, especially if you're vegan or vegetarian. It soaks up the dressing well and still gives a good texture. For busy days, using rotisserie chicken can save you time. You just shred it and layer it on your flatbread. The dressing can change the whole taste of your flatbread. While Caesar dressing is classic, you can explore other dressings too. A lemon garlic dressing can add a fresh zing. You can also try ranch or a balsamic vinaigrette for a new twist. If you want a vegan option, there are many Caesar dressings made without dairy. These options are creamy and full of flavor, making them perfect for plant-based diets. Adding more toppings can take your flatbread to the next level. Sliced avocado not only tastes good but also adds healthy fats. Bell peppers give a nice crunch and color. If you love cheese, you can mix it up by adding feta or mozzarella. These cheeses will make your flatbread richer and creamier. The more you customize, the more fun it is to eat! For the full recipe, you can check out the [Full Recipe]. To store leftover Chicken Caesar Flatbread, let it cool first. Place the flatbread in an airtight container. This keeps it fresh for up to three days. If you have extra toppings, store them separately. This avoids sogginess and keeps flavors intact. You can use glass or plastic containers. Ensure they are tightly sealed to minimize air exposure. When you’re ready to eat, reheating is key. Use an oven for the best results. Preheat the oven to 350°F (175°C). Place the flatbread on a baking sheet. Heat it for about 10 minutes. This keeps the flatbread crispy. You can also use a microwave, but it may make the flatbread soft. If using a microwave, heat for 30 seconds to 1 minute. Check for warmth throughout. Enjoy your Chicken Caesar Flatbread again with its tasty flavors! Chicken Caesar Flatbread is a tasty dish that combines classic flavors. It features flatbreads topped with shredded chicken, Romaine lettuce, and creamy Caesar dressing. Cherry tomatoes add a sweet burst, while Parmesan cheese gives a rich taste. You can even add croutons for crunch. This dish is simple to make and is great for lunch or dinner. Yes, you can prep ingredients in advance! Chop the lettuce and tomatoes a few hours before. Store them in airtight containers to keep them fresh. You can also shred the chicken ahead of time. Then, when you're ready to eat, just layer the ingredients on the flatbreads and bake. This saves time and keeps it easy. Chicken Caesar Flatbread can be a healthy choice! It has lean protein from the chicken and fiber from the lettuce. To make it even healthier, use whole wheat flatbreads and a lighter Caesar dressing. You can also add extra veggies like peppers or cucumbers. These swaps help boost nutrients while keeping the flavors you love. In this blog post, I shared how to make Chicken Caesar Flatbread. We covered the key ingredients, easy steps, and helpful tips for perfecting your dish. You learned about variations and storage tips. Chicken Caesar Flatbread is tasty and fun to make. Experiment with your favorite proteins and dressings. Enjoy making this meal for yourself or your friends and family. It’s simple, quick, and delivers big flavor!](https://tossedrecipes.com/wp-content/uploads/2025/06/02783f7a-d990-4e45-b586-2f052924f8aa.webp)
Chicken Caesar Flatbread Simple and Tasty Dish
Are you looking for a quick and tasty meal that won’t let you down? Chicken Caesar Flatbread is the perfect choice! It’s easy to make,
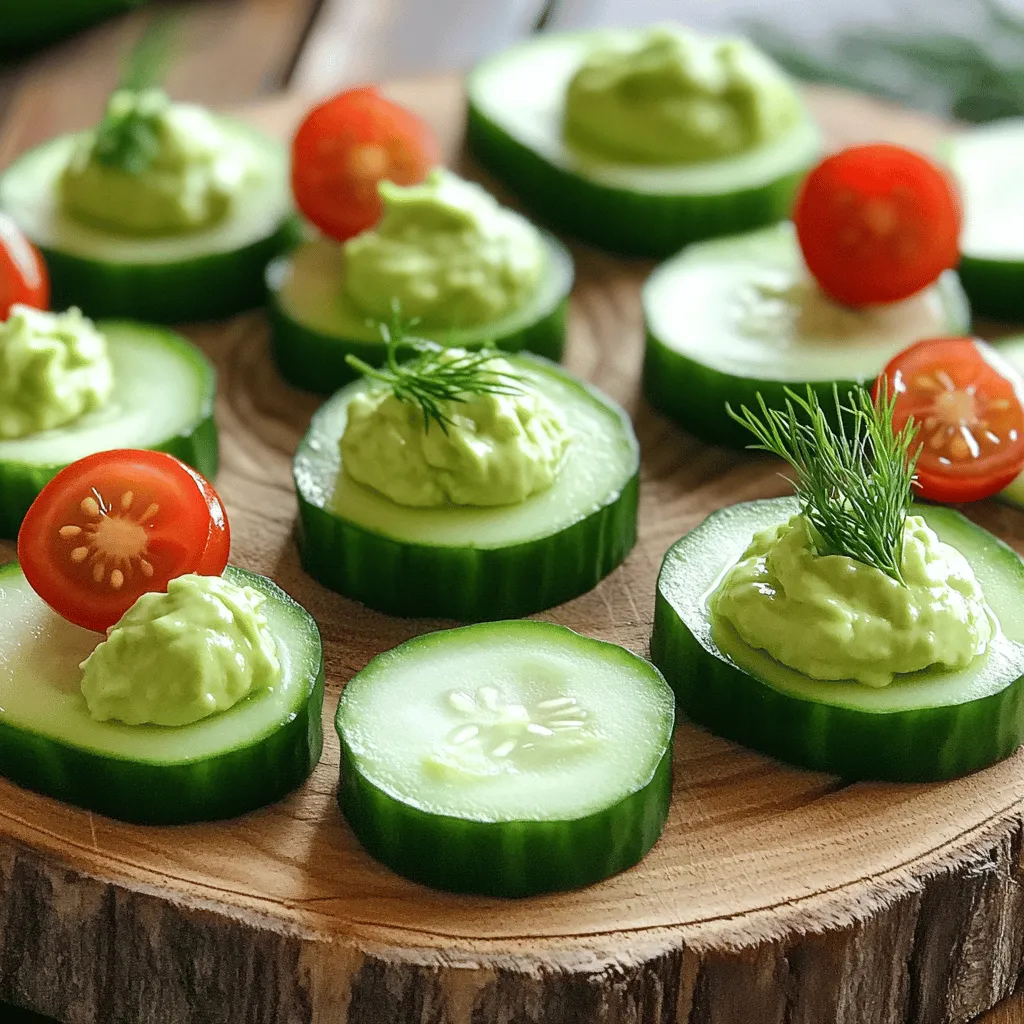
5-Minute Cucumber Snack Refreshing and Easy Recipe
Looking for a quick and tasty treat? My 5-Minute Cucumber Snack is perfect for you! With just a few fresh ingredients, you’ll create a light

Crispy Bang Bang Salmon Bites Irresistible and Tasty
Are you ready to elevate your snack game? These Crispy Bang Bang Salmon Bites are easy to make and packed with flavor. In this guide,