Appetizers
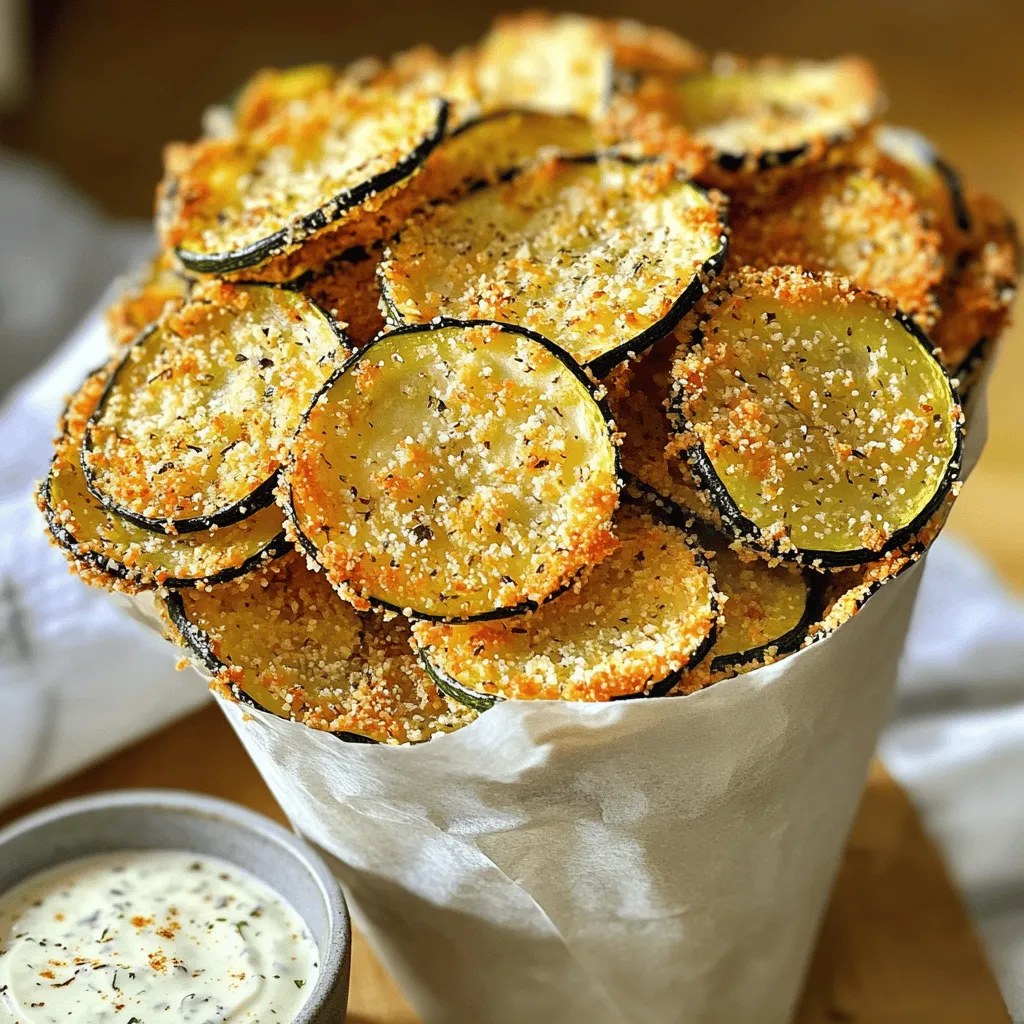
Crispy Baked Zucchini Chips Healthy Snack Delight
Craving a snack that’s both crunchy and healthy? You’re in the right place! Crispy Baked Zucchini Chips are simple to make and perfect for satisfying
. To make the shrimp, heat one tablespoon of olive oil in a medium pan over medium heat. Once the oil is hot, add one pound of peeled and deveined shrimp. Sprinkle one teaspoon of garlic powder, one teaspoon of paprika, and salt and pepper to taste over the shrimp. Cook them for about two to three minutes on each side. You want them to turn pink and opaque. When they are done, take them off the heat and set them aside. Next, we need to prepare the guacamole. Take one ripe avocado and place it in a bowl. Use a fork to mash it until it’s creamy. Add the juice of one lime, one small finely diced red onion, and one minced jalapeño if you like some heat. Season with salt and pepper. Mix everything well until it’s smooth and tasty. Now it’s time to put everything together. On each mini tortilla chip or cucumber slice, place a generous dollop of guacamole. Then, top each piece with a cooked shrimp. For a pretty finish, sprinkle fresh chopped cilantro over the top. For serving, arrange the appetizers on a nice platter. You can add lime wedges on the side for a pop of color and a hint of freshness. This step makes your dish look even more inviting! Find the full recipe [here]. To cook shrimp well, you must avoid overcooking. Overcooked shrimp turn tough and rubbery. Cook shrimp for just 2-3 minutes on each side. Watch for their color change to pink and opaque. This is your cue to remove them from heat. You can enhance flavors by adding spices like garlic powder and paprika, as listed in the Full Recipe. For smooth guacamole, start with a ripe avocado. Mash it with a fork until creamy. Mix in lime juice, diced red onion, and jalapeño if you like spice. This mix gives your guacamole a fresh taste. To prevent browning, squeeze extra lime juice on top. Cover the guacamole tightly with plastic wrap, pressing it to remove air. When plating, arrange your shrimp and guacamole on a colorful platter. Use mini tortilla chips or cucumber slices as a base. For visual appeal, sprinkle fresh cilantro on top. You can serve these with lime wedges for added freshness. For beverages, pair with a light beer or a crisp white wine. This will accentuate the flavors of your shrimp and guacamole bites. {{image_2}} You can switch shrimp for other proteins. Chicken or crab works well too. You can also use tofu for a vegetarian option. For toppings, try diced mango or pineapple. These fruits add a sweet twist to your guacamole. Guacamole can change too. Add diced tomatoes for a fresh taste. You might enjoy adding garlic or cumin for a unique flavor. If you love spice, mix in some hot sauce or diced chili peppers. This recipe is gluten-free. Just make sure your tortilla chips are gluten-free too. For a vegan dish, skip the shrimp. Use chickpeas or black beans instead. They add protein and stay creamy with guacamole. You can serve these as bite-sized snacks. Arrange them on a platter for sharing. This style makes it easy for guests to grab one. You can also use cucumber slices instead of chips. It gives a fresh crunch and is low in carbs. For a fun twist, use small pieces of bread as a base. This adds a different texture and flavor. No matter how you serve these shrimp and guacamole bites, they will impress your guests. Check the Full Recipe to create your version today! To store shrimp and guacamole, keep them in separate airtight containers. This way, the guacamole stays fresh. Use a layer of plastic wrap over the guacamole to reduce air exposure. For shrimp, let them cool before sealing. To reheat shrimp without losing flavor, warm them in a pan over low heat. This keeps them juicy and tasty. To keep guacamole green, add lime juice right after making it. The acid helps slow browning. You can also press plastic wrap onto the guacamole's surface before sealing. For storing in the fridge, use it within two days for the best taste. If you choose to freeze it, use a freezer-safe container. Guacamole can last up to three months in the freezer, but the texture may change. I recommend eating these appetizers within 24 hours for the best flavor. If you store them properly, shrimp can last up to three days in the fridge. Look for signs of spoilage like a sour smell or slimy texture. If you see these signs, it’s best to throw it away. Enjoy your shrimp and guacamole bites fresh for a delightful experience! For this recipe, I recommend using small shrimp. They cook quickly and fit well on chips. Look for shrimp that are peeled and deveined for ease. You can also use medium shrimp if you prefer a bigger bite. Just cook them a bit longer. Sautéing works best, but grilling adds a nice smoky flavor. To prep ahead, cook the shrimp and make the guacamole in advance. Store the shrimp in an airtight container in the fridge for up to two days. For the guacamole, press plastic wrap directly against the surface to avoid browning. This way, both components stay fresh. Assemble the appetizers right before serving for the best taste and texture. Yes, you can serve these appetizers at room temperature. However, they taste best when they are fresh. If you make them ahead, chill them in the fridge and take them out 15 minutes before serving. This allows the flavors to pop. Just avoid leaving them out too long to ensure safety and taste. This blog post shared an easy shrimp and guacamole recipe. We discussed key ingredients, steps for cooking, and tips for perfecting your dish. You learned about adjustments for dietary needs and how to store leftovers. Keep these ideas in mind for your next gathering. Enjoy your tasty, fresh appetizers while impressing your friends and family. Happy cooking!](https://tossedrecipes.com/wp-content/uploads/2025/06/0abfeead-ea77-445b-9c8d-e838ea956971.webp)
Simple Shrimp and Guacamole Appetizers Delight
Looking for a quick and tasty appetizer? My Simple Shrimp and Guacamole Appetizers are here to impress! These bite-sized treats combine flavorful shrimp and creamy
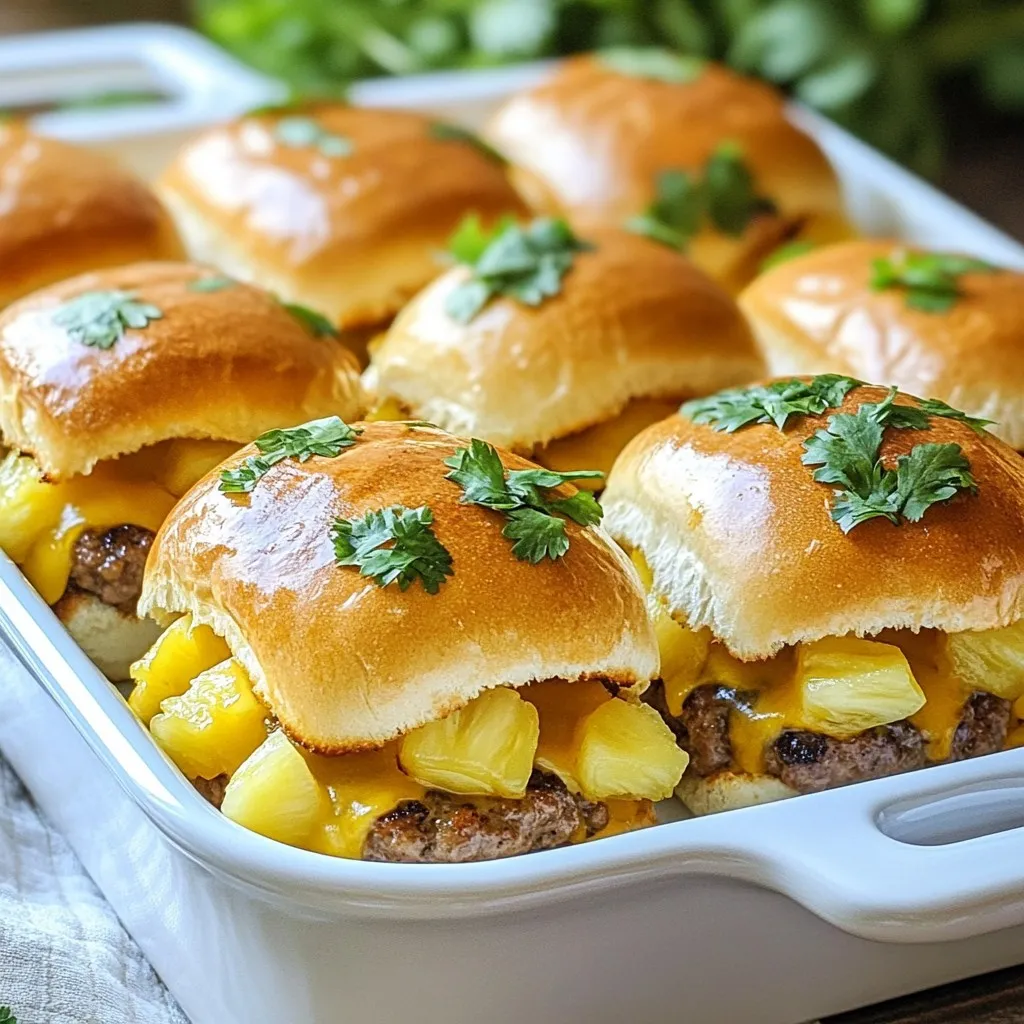
Hawaiian Roll Cheeseburger Sliders Easy and Flavorful Dish
Get ready to delight your taste buds with Hawaiian Roll Cheeseburger Sliders! This easy and flavorful dish brings together juicy beef, sweet pineapple, and melty
![To make Louisiana Voodoo Fries, gather these key items: - 4 large russet potatoes - 1 tablespoon cornstarch - 2 tablespoons olive oil - 1 teaspoon garlic powder - 1 teaspoon paprika - 1 teaspoon Cajun seasoning - 1/2 teaspoon cayenne pepper (adjust for spice level) - Salt and pepper to taste - 1 cup shredded pepper jack cheese - 1/2 cup sliced green onions - 1/2 cup sour cream (optional) - 1/4 cup chopped fresh cilantro (for garnish) You can switch things up with these optional items: - Additional spices like onion powder or chili flakes - Different cheese like cheddar or mozzarella - Fresh herbs like parsley or chives If you need swaps, here’s what you can use: - Sweet potatoes instead of russet potatoes for a sweeter taste - Any oil like canola or avocado oil in place of olive oil - For a dairy-free option, use vegan cheese or omit it These ingredients create a rich and bold flavor in your Louisiana Voodoo Fries. Be sure to check the [Full Recipe] for detailed steps to bring all these flavors together! Start by washing the russet potatoes. Peel them to get rid of the skin. Cut the potatoes into thin, even fries. This helps them cook evenly. Soak the cut fries in cold water for at least 30 minutes. This step removes extra starch, which helps them get crispy. Once the fries have soaked, drain the water. Pat the fries dry with paper towels. This is key for crispiness. In a large bowl, toss the dried fries with cornstarch. Make sure every fry is well-coated. Drizzle olive oil over the fries. Then, add garlic powder, paprika, Cajun seasoning, cayenne pepper, salt, and pepper. Toss everything until the fries are fully coated with spices. Preheat your oven to 425°F (220°C). Spread the seasoned fries in a single layer on a lined baking sheet. This prevents sticking and makes cleanup easy. Bake for 25-30 minutes. Flip the fries halfway through for even cooking. They should turn golden and crispy. Once done baking, remove them from the oven. Sprinkle shredded pepper jack cheese over the hot fries. Return the fries to the oven for 5 more minutes, or until the cheese melts. Remove the fries and top with sliced green onions and cilantro. Serve with sour cream on the side if you like. Enjoy your tasty Louisiana Voodoo Fries! For the full recipe, check the details above. To get those fries crispy, start by soaking the cut potatoes. This step removes extra starch. Soak them in cold water for 30 minutes. After soaking, dry them well with paper towels. A dry surface helps the fries crisp up nicely. Toss the fries in cornstarch before seasoning. This makes them even crunchier when baked. You can control the heat in your Louisiana Voodoo Fries. Start with just a pinch of cayenne pepper. If you like it hotter, add more to taste. You can also swap the Cajun seasoning for other spices you enjoy. Just remember to taste as you go. Adjust the spices to fit your palate and those of your guests. Serve your Louisiana Voodoo Fries with a side of sour cream. This cool dip balances the spice. You can also add extra toppings like sliced jalapeños or more green onions. For a fun twist, pair the fries with a tangy dipping sauce. The Full Recipe gives you all the steps to create this tasty dish. Enjoy these fries as a snack, side, or even a main dish! {{image_2}} If you want a vegetarian version, skip the cheese. Use a plant-based cheese or no cheese at all. You can also add more vegetables. Try adding roasted bell peppers or jalapeños for extra flavor. These veggies bring a nice crunch and color to the dish. You can change the toppings to fit your taste. Try adding black beans for protein. They add a nice texture and a bit of earthiness. You could also use guacamole instead of sour cream for a fresh twist. For a bit of sweetness, add some roasted corn. It pairs well with the spicy fries! Think about mixing cultures! You can make a taco-inspired version. Add taco meat, diced tomatoes, and a drizzle of salsa. Or go Italian and top with marinara sauce and mozzarella cheese. This will give you a fun pizza fry. The options are endless, and they all taste great. You can mix and match to create your own unique dish. Enjoy your culinary journey with Louisiana Voodoo Fries! After enjoying your Louisiana Voodoo Fries, you may have some left. Place them in an airtight container. Store them in the fridge for up to three days. This helps keep them fresh and tasty. To reheat, the oven is your best friend. Preheat your oven to 375°F (190°C). Spread the fries on a baking sheet. Bake for about 10-15 minutes until they are hot and crispy again. You can also use an air fryer for a quicker option. Heat them at 350°F (175°C) for about 5-7 minutes. You can freeze Voodoo Fries too! First, let them cool completely. Spread them in a single layer on a baking sheet. Freeze for 1-2 hours until firm. Then, transfer them to a freezer bag. They can last up to two months in the freezer. When ready to eat, bake from frozen. Increase the baking time to ensure they heat through. For the best results, use the Full Recipe for fresh fries. Louisiana Voodoo Fries are a tasty dish that combines crispy fries with bold flavors. They start with fried potatoes. Then, they get coated in spices like garlic powder, paprika, and Cajun seasoning. The dish tops off with melted pepper jack cheese and fresh green onions. You can also add cilantro for a fresh touch. It's all about layers of flavor that create a fun and satisfying meal. You can find great Louisiana Voodoo Fries in many places. Look for Cajun or Creole restaurants, especially in Louisiana. Food trucks often serve delicious versions too. Some bars and pubs have them as a fun appetizer. If you can't find them nearby, making them at home is easy with the Full Recipe! To make your Louisiana Voodoo Fries spicy, add more cayenne pepper. Start with a little, then taste and adjust. You can also mix in some hot sauce into the seasoning. Another option is to use spicy cheese, like jalapeño jack. These simple tweaks can bring out the heat while keeping the great flavors. Experiment until you find your perfect spice level! In this article, we covered how to make Louisiana Voodoo Fries. We discussed key ingredients, optional add-ins, and better ways to use them. You learned to bake perfect fries and achieve crispiness. We shared tips for spice levels and flavor boosts. Remember, you can store leftovers or freeze extra fries. Experiment with variations and enjoy! Making fries can be fun, tasty, and easy.](https://tossedrecipes.com/wp-content/uploads/2025/06/b3684d4f-e52c-4e23-b056-7ec6cf0230e8.webp)
Louisiana Voodoo Fries Flavorful and Fun Recipe
If you crave a fun and flavorful snack, Louisiana Voodoo Fries are a must-try! This dish packs a punch with tasty spices and crispy potatoes.
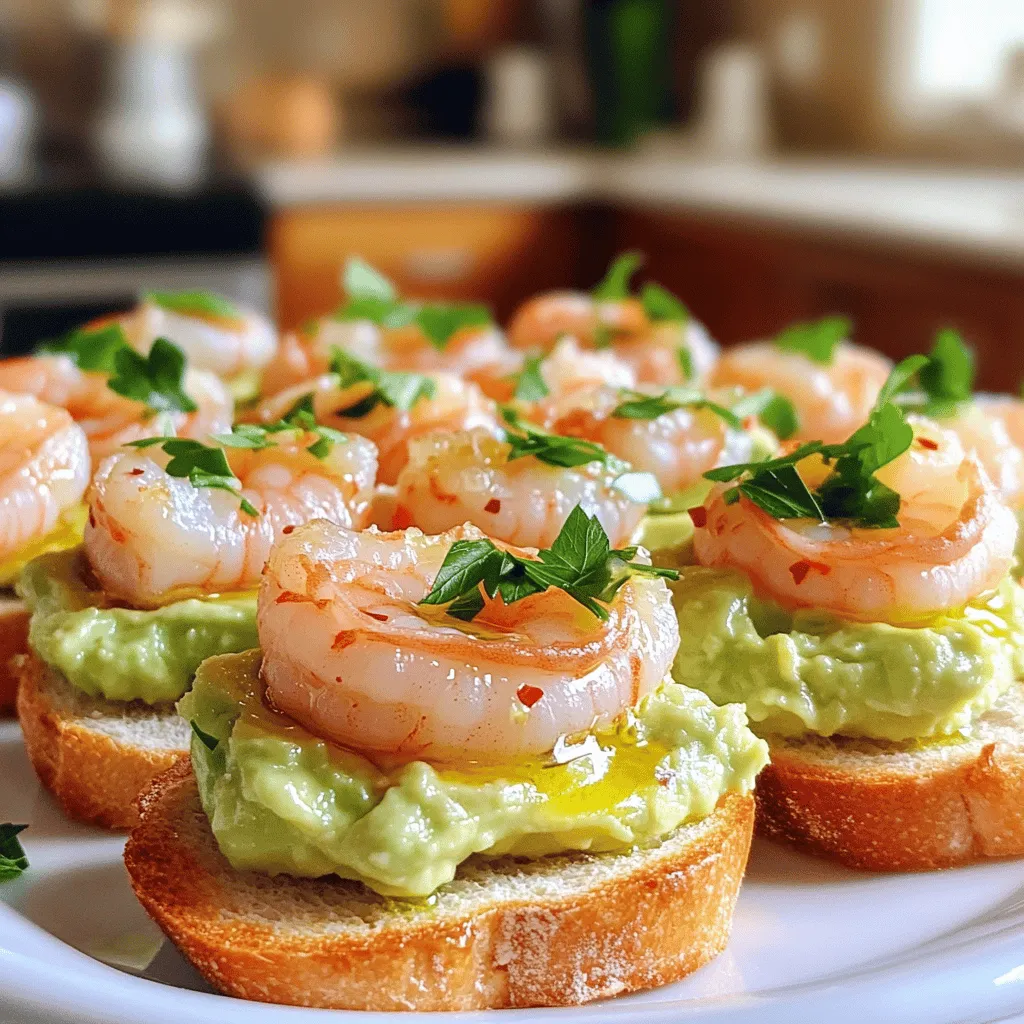
Garlic Shrimp Crostini with Avocado Delight
Are you ready to impress your guests with a tasty appetizer? My Garlic Shrimp Crostini with Avocado Delight is a simple, yet delicious dish that
![- 1 cup fresh spinach, finely chopped - 1 cup canned artichoke hearts, drained and chopped - 1 cup cream cheese, softened - 1 cup sour cream - 1 cup grated Parmesan cheese - 1 cup shredded mozzarella cheese - 2 cloves garlic, minced - 1 teaspoon lemon juice - 1/2 teaspoon red pepper flakes (optional) - Salt and pepper to taste When I make Spinach Artichoke Parmesan Dip, I start with fresh ingredients. Fresh spinach gives the dip a bright flavor. Canned artichokes add a nice texture and taste. For creaminess, I use cream cheese and sour cream. Parmesan cheese brings depth, while mozzarella adds stretch. Minced garlic adds a punch, and lemon juice brightens the mix. I sometimes add red pepper flakes for heat. This dip is so satisfying. Each bite is creamy, cheesy, and packed with flavor. This dip offers a mix of protein, fats, and carbs. Each serving is rich in calcium and fiber. This recipe makes 6-8 servings. Perfect for gatherings or cozy nights in! Enjoy with toasted baguette or veggie sticks for dipping. For the full recipe with instructions, check the [Full Recipe]. First, gather all your ingredients. You will need fresh spinach, artichoke hearts, cream cheese, and sour cream. Also, grab Parmesan cheese, mozzarella cheese, garlic, lemon juice, and red pepper flakes. You can chop the spinach and artichokes finely to help mix them well. This step makes a big difference in texture. Next, take a mixing bowl and add the softened cream cheese, sour cream, and lemon juice. Use a spatula to blend them until the mix is smooth. Then, stir in the grated Parmesan and shredded mozzarella. This cheesy base is key to the dip's flavor. After that, fold in the spinach, artichokes, and minced garlic. Don’t forget to add salt and pepper to taste. Mix everything well until combined. Now, preheat your oven to 375°F (190°C). Once ready, transfer your dip mixture into a baking dish. Spread it evenly for even cooking. Bake it for 25 to 30 minutes. You want it bubbly and golden brown on top. Keep an eye on it. The smell will be amazing! Let the dip cool for a few minutes after baking. Serve it warm with toasted baguette slices, pita chips, or crunchy veggie sticks. You can sprinkle some extra Parmesan on top for a stylish touch. Fresh herbs like parsley add color and flavor. Enjoy every bite of this creamy delight! For the full recipe, check the details above. To get the creamiest texture, use softened cream cheese. This helps mix well. A good blend of sour cream adds to the creaminess. I suggest stirring the cheeses slowly. Ensure even mixing of spinach and artichokes. If you want a richer taste, add more cheese. Bake until bubbly and golden brown. This gives a nice crust while keeping the inside soft. One common mistake is not draining the artichokes well. Excess water makes the dip watery. Another mistake is overbaking. Keep an eye on the dip after 20 minutes. You want it hot, not dry. Avoid using low-fat cream cheese; it does not melt as well. Lastly, don’t skip seasoning with salt and pepper. They bring out the flavors. For dipping, toasted baguette slices work great. Pita chips add a nice crunch. Fresh vegetable sticks like carrots and celery are healthy choices. You can also try tortilla chips for a fun twist. For extra flavor, serve with a sprinkle of herbs or extra cheese on top. Each dipper adds its own fun touch to the dip. {{image_2}} You can add more flavor to your dip. Try adding a teaspoon of Worcestershire sauce. It gives a nice umami kick. You can also mix in some sun-dried tomatoes. They add a sweet and tangy taste. If you like spice, add jalapeños or hot sauce. This will give your dip a nice heat. If you have dietary needs, there are easy swaps. For a dairy-free version, use vegan cream cheese and sour cream. Nutritional yeast can replace Parmesan cheese for a cheesy taste. If you are gluten-free, serve with gluten-free chips or veggies. You can also use fresh herbs if you're avoiding certain spices. Cheese is key to a tasty dip. You can mix different types to change the flavor. Try using goat cheese for a tangy twist. For a more robust taste, mix in sharp cheddar. You could also add cream cheese with garlic and herbs for depth. Each cheese adds a unique touch, making your dip special. For the full recipe, check out the Spinach Artichoke Parmesan Dip details. After enjoying your dip, let it cool down. Place leftovers in an airtight container. Store it in the fridge for up to three days. This keeps it fresh and tasty for your next snack. To reheat the dip, use your oven for the best results. Preheat your oven to 350°F (175°C). Transfer the dip to a baking dish. Heat it for about 15-20 minutes or until warm. You can also microwave it. Place the dip in a microwave-safe bowl. Heat on medium for 1-2 minutes. Stir halfway to ensure it warms evenly. You can freeze this dip if you want to save some for later. First, let it cool completely. Place it in a freezer-safe container. It can last up to three months in the freezer. When ready to eat, thaw it in the fridge overnight. Reheat it as mentioned above for a fresh taste. You can serve many tasty options with this dip. I love toasted baguette slices. They add a nice crunch. Pita chips are also great for dipping. Fresh veggies work well too. Try carrot sticks, celery, or bell pepper slices. They bring a fresh taste and color to your spread. Yes, you can make this dip ahead of time. Mix all the ingredients and place them in a baking dish. Cover it tightly with plastic wrap. Store it in the fridge for up to two days. When you are ready, bake it as usual. This makes hosting easy and fun. You can create a vegan version of this dip. Substitute cream cheese with a vegan cream cheese. Use dairy-free sour cream and cheese as well. Make sure to check for vegan artichokes. This version tastes great and is perfect for everyone. Bake the dip for 25 to 30 minutes. Look for a golden brown top and bubbling edges. The dip should be warm throughout. If you like it extra crispy, broil it for a few minutes at the end. Just keep an eye on it to avoid burning. To reheat the dip, use the oven for best results. Preheat it to 350°F (175°C). Place the dip in an oven-safe dish. Cover it with foil to keep it moist. Heat for about 15 to 20 minutes, or until warm. If you want a crispy top, remove the foil for the last few minutes. This blog post covered everything you need for a tasty Spinach Artichoke Parmesan Dip. We discussed the key ingredients and shared steps for preparation. I gave tips to perfect the texture and avoid mistakes. We also explored variations and how to store leftovers. Enjoy making this dip! You have all the tools to impress your guests. The flavors will shine through, and you’ll be the star of any gathering. Make it your own and have fun!](https://tossedrecipes.com/wp-content/uploads/2025/06/cb346ab3-4554-4b90-8e4d-5a9bfd7189d6.webp)
Spinach Artichoke Parmesan Dip Creamy Delight Recipe
Are you ready to impress your friends at your next gathering? My Spinach Artichoke Parmesan Dip is the perfect creamy delight! This easy recipe blends
![- 2 cups cooked chicken, shredded or diced - 1 cup shredded cheddar cheese - ½ cup cream cheese, softened - 3 cloves garlic, minced - 2 tablespoons fresh parsley, chopped - ¼ teaspoon black pepper - ¼ teaspoon paprika - 4 large flour tortillas - 1 cup baby spinach leaves - Olive oil for frying When I make my Cheesy Garlic Chicken Wraps, I start with great ingredients. The cooked chicken is the hero, whether shredded or diced. I love using cheddar cheese for its rich flavor, paired with creamy cream cheese for a smooth texture. Next, I add garlic, fresh parsley, black pepper, and paprika. Garlic adds a punch of flavor. Parsley gives a fresh touch. The black pepper and paprika bring a hint of warmth. For the wrap, I choose large flour tortillas. They are soft and hold everything well. I love adding baby spinach leaves. They add crunch and color. Lastly, I use olive oil for frying. It helps to get a nice golden brown finish. These ingredients come together beautifully in the full recipe. Trust me; you’ll want to try them! First, grab a large mixing bowl. Add the cooked chicken, shredded cheddar cheese, and softened cream cheese. Next, toss in the minced garlic, chopped parsley, black pepper, and paprika. Mix everything until it blends well. This cheesy filling is where the magic starts! Now, lay a flour tortilla flat on your clean surface. Scoop a generous portion of the cheesy chicken mixture into the center of the tortilla. Then, add a handful of fresh baby spinach leaves on top. To wrap it up, fold the sides of the tortilla inward. Roll it tightly from the bottom to keep the filling secure. Repeat this with the other tortillas until you have all your wraps ready. Heat a skillet over medium heat and add a splash of olive oil. Once hot, place the wraps seam-side down in the skillet. Cook for 3 to 4 minutes until the bottom turns golden brown. Carefully flip each wrap and cook the other side for another 3 to 4 minutes. This will give you that crispy texture. After cooking, let them rest for a couple of minutes. Then, slice them in half and get ready to enjoy! For the complete recipe, check out the Full Recipe section. You can make Cheesy Garlic Chicken Wraps your own. First, add vegetables like bell peppers, onions, or mushrooms. These will boost the flavor and nutrition. You can also toss in spices like cumin or chili powder for a kick. If you want to switch proteins, use turkey or tofu. Both options work well and keep the dish tasty. You can choose how to cook your wraps. Pan-frying gives a nice, crispy outside. Heat olive oil in a skillet and cook each wrap until golden. It takes about 3-4 minutes on each side. Baking is another great option. Preheat your oven to 400°F (200°C). Place the wraps on a baking sheet and bake for about 10-15 minutes. This method is easier and requires less oil. To achieve that perfect crispiness, make sure the skillet is hot before adding the wraps. Avoid overcrowding the pan so they fry evenly. Serve your wraps warm for the best taste. Pair them with fresh salsa or guacamole for dipping. Both add a nice contrast to the cheesy filling. For a pretty presentation, sprinkle chopped parsley on top. It adds color and a fresh taste. You can also slice the wraps in half for easy eating. Enjoy your meal! {{image_2}} You can switch up the cheese in your cheesy garlic chicken wraps. If you want a different taste, try using mozzarella or pepper jack cheese. Mozzarella gives a nice stretch, while pepper jack adds a bit of heat. Both melt well and create a creamy texture. For those who prefer dairy-free options, many great alternatives exist. Brands now offer vegan cheese that melts nicely. Look for options made from nuts or soy. Just make sure they fit your taste and dietary needs. Tortillas are great, but you can explore other options too. Whole wheat tortillas are a healthy choice with more fiber. They add a nutty flavor that pairs well with the cheesy filling. Gluten-free tortillas are also available for those with gluten sensitivities. If you want to keep it light, try lettuce wraps. Crisp lettuce like romaine or butter lettuce works well. They add crunch and freshness, making your wraps feel bright and zesty. To spice things up, think about adding hot sauce. Just a few drops can really enhance the flavor. You can also mix in your favorite spices for a kick. Fresh herbs bring a whole new level to these wraps. Try adding basil, cilantro, or even dill. These herbs add a burst of freshness and make your wraps more colorful. They complement the garlic and cheese perfectly. For the full recipe, check out the [Full Recipe]. To store your cheesy garlic chicken wraps, let them cool first. Wrap each one in plastic wrap or foil. This keeps them fresh and tasty. You can also use a sealed container. They stay good in the fridge for about 3 days. After that, they may lose their flavor and texture. To freeze your wraps, follow these steps: 1. Let the wraps cool completely. 2. Wrap each one tightly in plastic wrap. 3. Place the wrapped wraps in a freezer bag. 4. Seal the bag, removing as much air as possible. This method helps keep them fresh for about 2 months. When ready to eat, take them out of the freezer. Let them defrost overnight in the fridge. For a quick thaw, you can use the microwave. To reheat your wraps and keep them crispy, use one of these methods: - Microwave: Heat on low for 30 seconds. Flip the wrap and heat for another 30 seconds. - Skillet: Heat a skillet over medium heat. Add a little olive oil. Cook each wrap for about 2-3 minutes on each side. This makes them crispy again. With these tips, you can enjoy your cheesy garlic chicken wraps anytime! For the full recipe, check the details above. Cheesy Garlic Chicken Wraps can last up to three days in the fridge. Store them in an airtight container. This keeps them fresh and tasty. If you want to keep them longer, consider freezing them instead. Yes, you can make these wraps ahead of time. Prepare the cheesy chicken filling and store it in the fridge. You can fill the tortillas just before cooking them. This keeps the wraps fresh and crispy. These wraps pair well with many sides. Consider serving them with: - Salsa for dipping - Guacamole for a creamy touch - A fresh salad for crunch - Sweet potato fries for a fun twist For the complete recipe details, check out the [Full Recipe]. This blog post covers a tasty recipe for Cheesy Garlic Chicken Wraps. We explored the key ingredients, including chicken, cheeses, and seasonings. I shared step-by-step instructions for preparing, assembling, and cooking the wraps. You can customize these wraps with various options and learn tips for perfecting your cooking method. In closing, these wraps are simple, versatile, and delicious. Try them out, and enjoy experimenting with flavors. Whether you reheat leftovers or serve them fresh, they are sure to please everyone.](https://tossedrecipes.com/wp-content/uploads/2025/06/a587355d-e627-4b4c-9fa3-7e1a7cd9ece5.webp)
Cheesy Garlic Chicken Wraps Flavorful and Quick Meal
Looking for a quick and tasty meal? Cheesy Garlic Chicken Wraps are your answer! With creamy chicken, melty cheese, and a hint of garlic, they’re

Cheese Stuffed Garlic Bread Balls Irresistible Snack
If you crave a snack that’s gooey, garlicky, and packed with flavor, I’ve got the perfect treat for you: Cheese Stuffed Garlic Bread Balls! Imagine
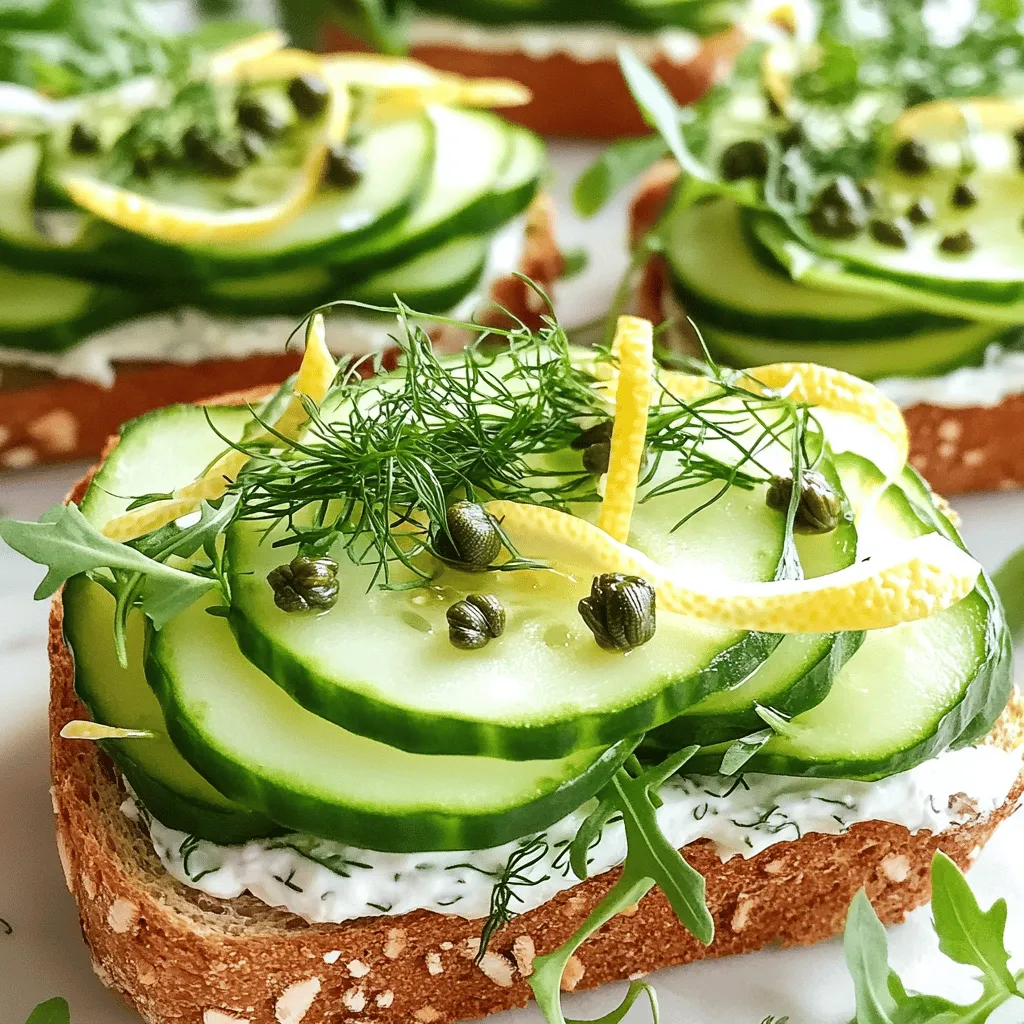
Cucumber Sandwiches Fresh and Easy Party Delight
Looking to impress your guests with a fresh and easy snack? Cucumber sandwiches are the perfect choice! They are light, crisp, and full of flavor.
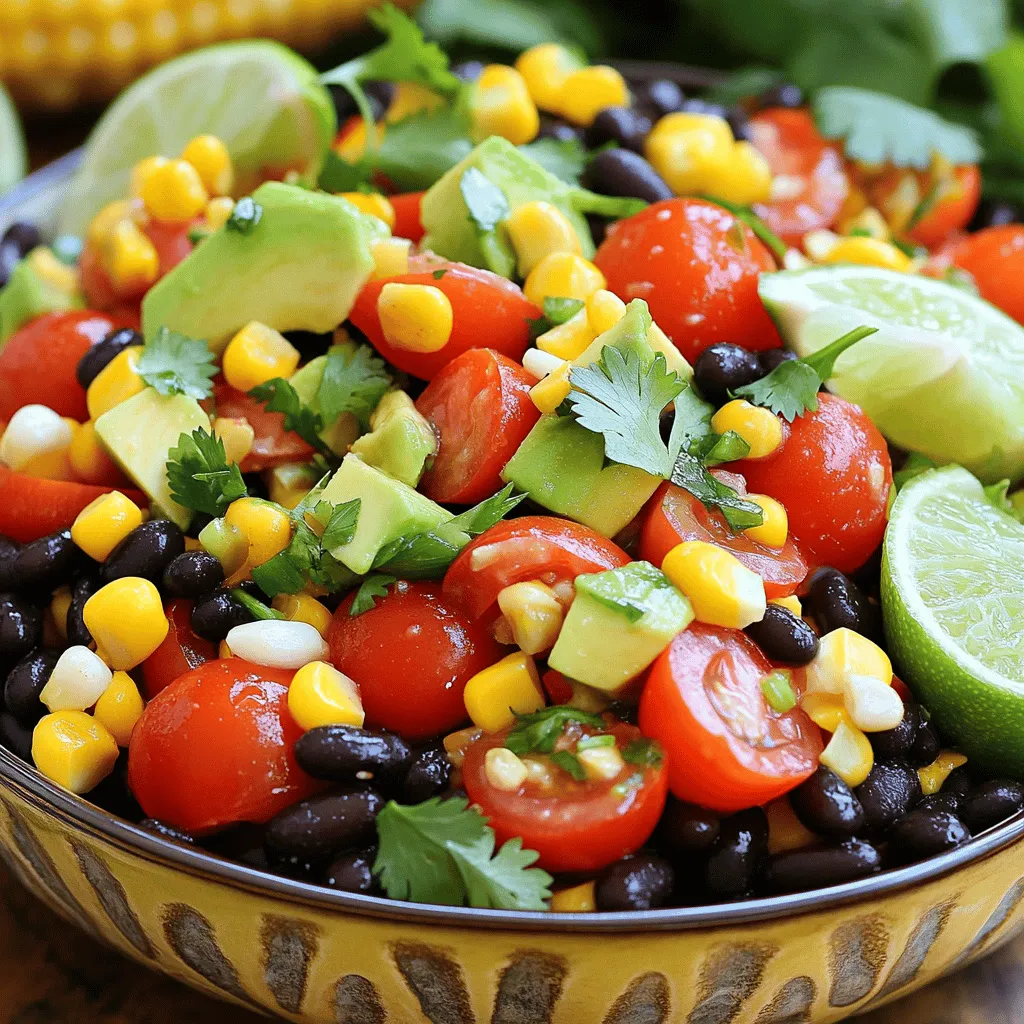
Cowboy Caviar Healthy Dish for Every Occasion
Cowboy Caviar is a fun and colorful dish perfect for any gathering. Packed with black beans, fresh veggies, and zesty lime, this recipe is as