Appetizers
![- 4 large buttery croissants - 8 slices of deli ham - 8 slices of Swiss cheese - 2 tablespoons Dijon mustard - 2 tablespoons unsalted butter, melted - 1 teaspoon garlic powder - 1 teaspoon fresh thyme (or ½ teaspoon dried) - Salt and pepper to taste - Optional: 1 tablespoon chopped fresh parsley for garnish You can easily swap ingredients to fit your taste. If you don’t have Swiss cheese, try cheddar or provolone. For ham, turkey or roast beef works well too. If you want to skip mustard, use mayonnaise or cream cheese. Fresh thyme can be replaced with oregano or basil. If you want a lower-fat option, use low-fat cheese. Each serving provides a balanced mix of protein and carbs. One croissant has about 400 calories. It contains around 20 grams of protein, 25 grams of fat, and 30 grams of carbs. This meal offers vitamins and minerals, too. The ham adds iron, while the cheese provides calcium. Enjoy this tasty meal while getting some nutrients! For the full recipe, check out Cheesy Dreamy Ham Croissants. 1. Preheat your oven to 375°F (190°C). This makes sure your croissants bake evenly. 2. Carefully slice each croissant in half lengthwise. Keep one side attached for easy filling. 3. Spread a thin layer of Dijon mustard on the inside of each croissant half. This adds a nice kick. 4. Layer two slices of deli ham and two slices of Swiss cheese inside each croissant. Make sure the ham and cheese are evenly spread. 5. Close the croissants gently. Place them on a baking sheet lined with parchment paper. 6. In a small bowl, mix melted butter, garlic powder, thyme, salt, and pepper. 7. Brush this garlic butter mixture generously over the tops of the croissants. This adds flavor and a golden finish. 8. Bake in the preheated oven for 12-15 minutes. Look for golden brown croissants with melted, bubbly cheese. 9. Remove from the oven and let them cool slightly. This makes them easier to handle. 10. For an extra touch, sprinkle chopped fresh parsley over the top before serving. This adds color and freshness. 11. Serve warm with a side salad or fresh fruit. Enjoy the crispy, cheesy goodness! You can find the full recipe for Cheesy Dreamy Ham Croissants here. To get crispy croissants, focus on the oven temperature. Preheat your oven to 375°F (190°C). This heat makes the layers of dough puff up. Brush the croissants with the garlic butter mix before baking. This gives them a nice golden color. Bake until they are brown and the cheese melts. Watch them closely, as oven times can vary. These croissants pair well with a variety of sides. A simple green salad adds freshness. You can also serve them with a bowl of soup. Tomato soup is a classic choice. For a drink, try sparkling water or a light white wine. These options balance the rich flavors of the croissants. One common mistake is overfilling the croissants. Too much ham or cheese can make them hard to close. Another mistake is not using enough butter. The garlic butter mix adds flavor and helps with browning. Make sure to slice the croissants carefully to keep them intact. Lastly, don’t skip the preheating step. It’s key for a great bake. For more details, check the Full Recipe to make your own Baked Ham and Cheese Croissants! {{image_2}} You can easily make a vegetarian version of baked ham and cheese croissants. Instead of ham, use roasted veggies like bell peppers or zucchini. Spread some pesto or hummus inside for added flavor. If you want a protein boost, add sliced avocado or beans. These swaps keep the dish tasty and satisfying. While Swiss cheese is classic, feel free to mix it up. Try sharp cheddar for a bolder flavor or creamy mozzarella for a milder taste. Gouda adds a nice smokiness, while pepper jack gives a spicy kick. Each cheese brings a unique twist. Experiment until you find your favorite blend. To enhance the taste, add herbs or spices. Fresh basil or oregano can brighten the dish. A sprinkle of red pepper flakes adds heat. You could also mix in caramelized onions or sautéed mushrooms for a savory touch. These extra flavors create a fun and exciting meal. For a full recipe on how to make these delicious baked ham and cheese croissants, check out the [Full Recipe]. To keep your leftover croissants fresh, place them in an airtight container. This helps to lock in moisture and keeps them soft. You can also wrap them in plastic wrap before putting them in the container. Store them at room temperature for up to two days. If you need to keep them longer, consider freezing. Reheating your croissants is easy. Preheat your oven to 350°F (175°C). Place the croissants on a baking sheet. Heat them for about 10 minutes, or until warm. This method keeps the croissants crispy. You can also use a microwave, but they may become soft. Heat for about 20 seconds, but check often. Freezing croissants is a great way to save them for later. Wrap each croissant tightly in plastic wrap. Place the wrapped croissants in a freezer bag. They can stay in the freezer for up to three months. When you are ready to enjoy them, just follow the reheating instructions. Enjoy your cheesy dream ham croissants anytime! You can find the full recipe [here]. Yes, you can use various types of ham. I often try honey-baked ham for a sweet twist. Black forest ham adds a nice smoky flavor. If you prefer turkey, that works too! Just make sure it slices easily. Each type of ham gives the croissant a unique taste. Feel free to experiment based on what you like! These croissants pair well with many sides. A fresh salad adds color and crunch. You can also serve them with a bowl of soup, like tomato or potato. Chips or pickles make great crunchy sides too. For a fun twist, try a fruit platter with grapes or berries. Each side enhances the meal experience! Customizing this recipe is easy. Start by changing the cheese. Cheddar or gouda can give a different flavor. You can add veggies too, like spinach or bell peppers, for extra nutrients. If you love spice, add jalapeños or red pepper flakes. For a sweet touch, try adding a slice of apple or pear. Don't hesitate to make it your own! For the full recipe, check out Cheesy Dreamy Ham Croissants! In this blog post, we covered the essential ingredients and simple steps to make tasty ham and cheese croissants. I shared tips for perfect crispness and pairing options to elevate your dish. We explored variations to fit dietary needs and discussed storage methods for freshness. Remember, with some practice and creativity, you can make delicious croissants tailored to your taste. Embrace the joy of baking, and enjoy your culinary creations!](https://tossedrecipes.com/wp-content/uploads/2025/05/e65744c7-7d30-4755-9415-0eaa04ce4a35.webp)
Baked Ham and Cheese Croissants Tasty and Simple Meal
Craving a quick and delicious meal? Baked Ham and Cheese Croissants are your answer! These flaky pastries are packed with savory ham and melted cheese,

Bite into Bliss Garlic Parmesan Cheeseburger Treats
Are you ready to take your taste buds on a journey? In this post, I’ll show you how to make Garlic Parmesan Cheeseburger Bombs that
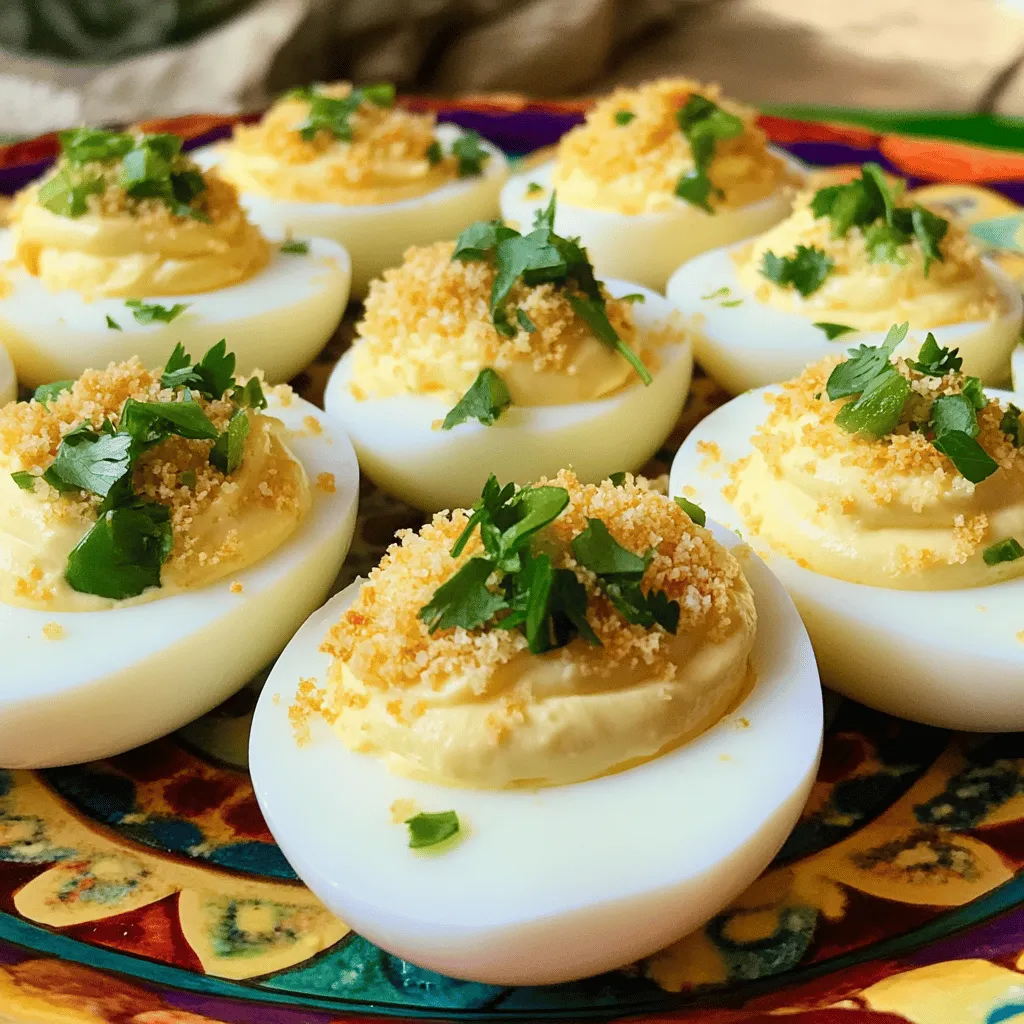
Jalapeño Popper Deviled Eggs Flavorful Party Treat
Get ready to spice up your next party! Jalapeño Popper Deviled Eggs are the perfect blend of zesty and creamy. These tasty bites take classic
. {{image_2}} You can make Air Fryer Taco Bombs without meat. Replace the ground beef or turkey with beans. Use black beans or pinto beans for a hearty filling. Mash the beans a bit to help them blend well. Add veggies like bell peppers, corn, or spinach for more flavor and color. These fillings are healthy and tasty. Mix up the cheese to change the taste. Try Monterey Jack or pepper jack cheese for a twist. You can also add different sauces, like ranch or barbecue, inside the bombs. If you like heat, add spices like chili powder or cayenne pepper. You can even toss in diced jalapeños for an extra kick. These small changes can make each batch unique and fun. For the full recipe, check out the detailed instructions above! To keep your Air Fryer Taco Bombs fresh, store them in the fridge. Use an airtight container. This helps prevent them from drying out. Place a paper towel in the container to absorb moisture. Taco bombs stay good for about three days. For the best taste, reheat your taco bombs in an air fryer. Set the air fryer to 350°F (175°C) for about 5 minutes. This keeps them crispy. You can also use an oven. Preheat it to 350°F (175°C) and place the taco bombs on a baking sheet. Heat them for about 10 minutes. Enjoy them warm and tasty! For the full recipe, check out the Air Fryer Taco Bombs section. Air Fryer Taco Bombs stay fresh for about 3 to 4 days in the fridge. Store them in an airtight container. This helps keep them moist and tasty. If you want to enjoy them later, make sure they cool down before you put them away. Yes, you can freeze Air Fryer Taco Bombs! They freeze well for up to 2 months. To freeze, place them in a single layer on a baking sheet. Once frozen, transfer them to a freezer bag. Make sure to remove as much air as possible. When you're ready to eat, just air fry them straight from the freezer. They will be just as yummy! Air Fryer Taco Bombs pair well with many sides. Here are some great options: - Guacamole for a creamy dip - Fresh salsa for a zesty kick - Mexican rice to add some heartiness - A side salad for a fresh crunch These sides make your snack more fun and filling! For the full recipe, check the section above. Air Fryer Taco Bombs are fun and easy to make. You need simple ingredients like ground beef, cheese, and crescent dough. First, cook the filling and shape the dough. Then, air fry for that perfect crunch. Don’t forget to get creative with flavors and garnishes. These tasty bites can fit anyone’s taste. Store leftovers properly and reheat easily. Enjoy these delicious snacks at your next gathering or family night!](https://tossedrecipes.com/wp-content/uploads/2025/05/38e57fc6-1a23-438d-a83b-b827e452dff6.webp)
Air Fryer Taco Bombs Flavorful and Fun Snack Treat
Get ready for a snack that’s packed with flavor and fun! Air Fryer Taco Bombs blend tasty ground beef, spicy cheese, and crunchy crescent dough
![To make taco ranch bites, you need a few simple ingredients. These tasty snacks come together quickly and are perfect for sharing. Here’s the complete list of ingredients you'll need: - Ground beef or turkey - Taco seasoning packet - Ranch dressing - Cheddar cheese - Diced tomatoes - Chopped green onions - Corn tortillas - Olive oil - Salt and pepper - Fresh cilantro Each ingredient adds flavor and texture to your taco ranch bites. The ground beef or turkey forms the base protein, while taco seasoning gives it that classic flavor. Ranch dressing adds creaminess, and cheddar cheese gives it a nice melt. Diced tomatoes and chopped green onions add freshness. Corn tortillas serve as the crunchy base. Using olive oil helps crisp up the tortillas. Don't forget salt and pepper to enhance the taste. Lastly, fresh cilantro is a great garnish for color and flavor. For the full recipe, check out the detailed instructions! 1. Preheat oven: Start by setting your oven to 350°F (175°C). This step ensures your bites cook evenly and become crispy. 2. Cook the meat mixture: In a large skillet, heat olive oil. Add ground beef or turkey. Cook it for about 5-7 minutes. Break the meat apart with a spatula as it cooks. Drain any excess fat. Then, add the taco seasoning and a splash of water. Let it simmer for 5 minutes. Season with salt and pepper to taste. 3. Bake tortillas: While the meat is cooking, prepare a baking sheet with parchment paper. Spread the tortilla triangles evenly. Bake them for 8-10 minutes, or until they are crispy and slightly golden. 1. Combining ingredients: Once your meat mixture is ready, take it off the heat. Add the ranch dressing, shredded cheese, diced tomatoes, and chopped green onions to the meat. Stir everything together until it’s well mixed. 2. Baking the topped tortilla bites: Take the crispy tortilla triangles from the oven. Top each triangle with a spoonful of the taco ranch mixture you just made. Return the tray to the oven for 5 more minutes. This helps the cheese melt perfectly. 3. Final touches before serving: After baking, let the bites cool for a minute. If you like, garnish with fresh cilantro. Serve them warm for the best taste. Check out the Full Recipe for more details! - Avoiding soggy tortillas: Bake the tortilla triangles until they are crispy. Make sure they are golden before adding toppings. This keeps them crunchy and tasty. - How to enhance flavors: Use fresh ingredients like tomatoes and green onions. You can also add a squeeze of lime for a bright kick. Mixing ranch dressing with a bit of hot sauce gives a nice twist. - Proper seasoning techniques: Always season the meat well. Add salt and pepper while cooking. Taste as you go to ensure the flavors are just right. - Best sides to pair with: Serve with a fresh salad or guacamole. Chips and salsa also make great sides. You can even add some spicy jalapeños for extra heat. - Presentation tips for serving: Use a large platter for a fun display. Arrange the bites neatly in rows. Add a small bowl of extra ranch dressing for dipping. A sprinkle of fresh cilantro on top makes it look appealing. For the full recipe, check out [Full Recipe]. {{image_2}} You can swap out proteins if you want to mix things up. Ground chicken or pork works great. For a lighter option, use lentils or black beans. These choices keep the flavor while adding nutrients. If you need dairy-free options, try a plant-based ranch dressing. There are many brands out there. You can also use dairy-free cheese. Look for options made from nuts or soy. They melt well and taste good too! Want some heat? Add jalapeños or hot sauce to the beef mix. You can sprinkle chili powder for extra spice. This gives a nice kick and wakes up your taste buds. For a vegetarian take, use a mix of black beans and chopped bell peppers. You can also add corn for sweetness. This way, everyone can enjoy Taco Ranch Bites. Explore these variations to make your snack even more exciting. Check out the Full Recipe to get started! After enjoying Taco Ranch Bites, you may have some bites left. To store them properly, follow these steps: - Refrigeration methods: Let the bites cool down first. Place them in an airtight container. They will stay fresh for up to three days in the fridge. - Freezing guidelines: If you want to keep them longer, freezing is an option. Wrap each bite in plastic wrap and place them in a freezer bag. They can last up to three months. To enjoy them again, reheating is key. Here is how to do it: - Best practices to maintain crispiness: Use the oven for the best results. Preheat it to 350°F (175°C). Place the bites on a baking sheet and heat for about 10 minutes. This keeps them crispy. - Microwave vs. oven reheating: The microwave is quick but can make them soggy. If you use it, heat them for 30 seconds at a time. Check if they are warm enough. The oven is better for crispiness, so choose it if you can. With these tips, your Taco Ranch Bites will taste delicious even after storage! For the full recipe, check out the steps above. Can I make this recipe ahead of time? Yes, you can prep Taco Ranch Bites ahead. Cook the meat and mix it with the ranch dressing, cheese, tomatoes, and onions. Store this mixture in the fridge for up to two days. When you are ready, bake the tortilla triangles and add the topping for a fresh snack. What can I serve with Taco Ranch Bites? Taco Ranch Bites pair well with many sides. You can serve them with fresh guacamole, salsa, or a side salad. For a fun twist, add extra tortilla chips or a bowl of ranch dressing for dipping. How to make Taco Ranch Bites spicier? To spice up your Taco Ranch Bites, add diced jalapeños or a splash of hot sauce to the meat mixture. You can also try using spicy taco seasoning or sprinkle some cayenne pepper over the finished bites for extra heat. What is the best way to store Taco Ranch Bites? Store any leftovers in an airtight container in the fridge. They will last for about three days. If you want to keep them longer, you can freeze the meat mixture separately from the tortilla triangles. This keeps them crunchy and fresh longer. For the full recipe, check out the details provided in the recipe section above. Taco Ranch Bites offer a tasty treat with simple ingredients. We covered the must-have items, from ground beef to fresh cilantro. I explained each cooking step, ensuring your bites turn out just right. Tips and variations help you customize these bites to your taste. Plus, I shared storage tips to keep leftovers fresh. Now, you can enjoy these bites at your next gathering or as a quick meal. Happy cooking!](https://tossedrecipes.com/wp-content/uploads/2025/05/bc60878c-8b78-4f45-9068-4cb643470c23.webp)
Taco Ranch Bites Savory and Easy Snack Idea
Looking for a quick and tasty snack? Taco Ranch Bites are perfect for you! These savory treats combine savory meat, creamy ranch, and crunchy tortillas,
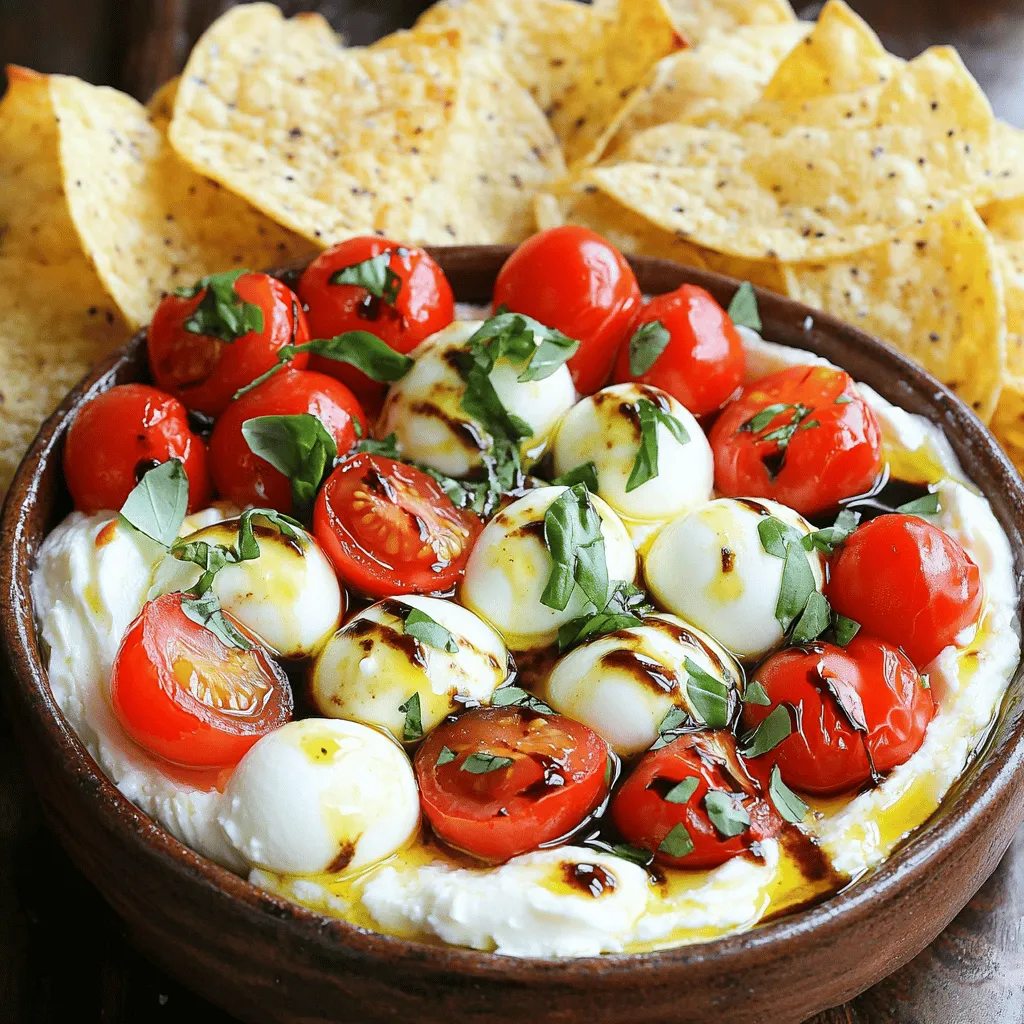
Easy Caprese Dip Flavorful and Creamy Delight
Looking for a quick and tasty snack? This Easy Caprese Dip is your answer! It’s creamy, flavorful, and made with fresh ingredients you love. Perfect
![- 8 oz cream cheese, softened - ½ cup crab meat (fresh or canned) - ½ cup shredded mozzarella cheese - ¼ cup green onions, finely chopped - 2 cloves garlic, minced - 1 tsp Worcestershire sauce - 1 tsp soy sauce - ½ tsp sesame oil - Salt and pepper to taste - 12 wonton wrappers - Oil for frying or baking - Optional: Sweet chili sauce for dipping Crab Rangoon Dip is fun and easy to make. The key is in the blend of flavors. Start with cream cheese, which gives the dip its creamy base. This mix pairs perfectly with crab meat, which adds a sweet and savory touch. Adding mozzarella makes the dip stretchy and cheesy. Green onions add a fresh crunch, while garlic brings a warm flavor. The Worcestershire sauce and soy sauce give it a little kick. Sesame oil adds a nutty note. Don't forget salt and pepper for balance. Now, let’s talk about the wonton chips. These are super crispy and perfect for dipping. You can fry or bake them. Wonton wrappers are easy to find and fun to work with. Cut them into triangles for chips. You can add sweet chili sauce for dipping if you like a little sweetness. For the full recipe, check the section above. Enjoy creating this tasty snack! In a large mixing bowl, add the softened cream cheese. Next, mix in the crab meat and shredded mozzarella cheese. Then, add the chopped green onions and minced garlic. Pour in Worcestershire sauce, soy sauce, and sesame oil. Season with a pinch of salt and pepper. Stir all ingredients together until the mixture is creamy and smooth. First, preheat your oven to 350°F (175°C) if you plan to bake the chips. If frying, heat oil in a deep pan over medium heat. Next, take the wonton wrappers and cut them into triangles. You can cut each wrapper into four pieces. Set them aside while you prepare to cook. For baking, place the wonton triangles on a lined baking sheet. Brush them lightly with oil and sprinkle with salt. Bake them for 8-10 minutes or until they are golden and crispy. Flip them halfway through for even cooking. For frying, carefully place the wonton triangles in the hot oil. Cook them for 2-3 minutes until they turn golden brown. Flip them occasionally to cook evenly. Once ready, remove them and place them on paper towels to absorb extra oil. Transfer the crab dip mixture into a baking dish. Bake the dip for 15-20 minutes or until it heats through and bubbles slightly on top. When ready, place the warm dip in the center and arrange the crispy wonton chips around it for easy dipping. For a fun twist, you can drizzle sweet chili sauce over the dip or keep it on the side. For a rich flavor, use fresh crab meat. It brings a sweet taste to the dip. Canned crab meat works, but it can lack freshness. If you use canned, choose a high-quality brand for the best results. The cream cheese must be soft. This helps it blend smoothly with the other ingredients. If it's too firm, the dip may end up chunky. Aim for a creamy texture that spreads easily on the wonton chips. To bake wonton chips, brush them with a light layer of oil. This makes them crispy. Bake at 350°F (175°C) for about 8-10 minutes. Flip them halfway to ensure even browning. Keep an eye on them, so they do not burn. If you prefer frying, heat oil in a deep pan. Fry the wonton triangles for 2-3 minutes. They should turn golden brown. Use a slotted spoon to remove them and place them on paper towels. This drains excess oil and keeps them crispy. Garnishing the dip makes it more appealing. You can add extra chopped green onions. A sprinkle of sesame seeds also adds a nice touch. For added flavor, drizzle sweet chili sauce on top or serve it on the side. This gives a pop of color and an extra layer of taste. Explore more about the Crab Rangoon Dip with the [Full Recipe]. {{image_2}} You can add spicy jalapeños or sriracha to this dip for a kick. These ingredients bring a zesty flavor that many love. If you want to switch up the cheese, try using cheddar or cream cheese. Each cheese adds its own unique taste. Mixing different cheeses can make your dip even creamier and more flavorful. For a fun twist, pair this dip with various sauces. Sweet chili sauce works well, adding a nice contrast. You could also serve it in a bread bowl. The bread will soak up the flavors and give a nice touch when you dip. Both options will impress your guests and make for a great presentation. To keep your crab rangoon dip fresh, store it in an airtight container. Place it in the fridge right after serving. The dip stays good for about 3 to 5 days. If you want to save it for longer, you can freeze it. Just make sure it's in a freezer-safe container. When you want to eat it again, let it thaw in the fridge overnight before reheating. Leftover wonton chips are best stored in a zip-top bag. Keep them at room temperature. They can lose their crunch if stored in the fridge. If they get soft, you can crisp them up again. Preheat your oven to 350°F (175°C) and bake them for about 5 minutes. This will bring back their crunch! Enjoy your crab rangoon dip with fresh, crispy chips again. For the full recipe, check the details above. Yes, you can make this dip ahead of time. Just mix the ingredients and store them in the fridge. Cover it well to keep it fresh. When you’re ready to serve, bake it until hot and bubbly. This will save you time during a party. If you need a substitute for crab meat, use cooked shrimp or even canned tuna. For a vegetarian option, you can use artichoke hearts or mushrooms. These choices keep the dish tasty while meeting dietary needs. To make wonton chips in an air fryer, cut the wrappers as usual. Spritz them with cooking oil for even crisping. Air fry at 350°F for about 3-5 minutes. Check often to avoid burning. This method gives you a healthier snack without frying. For the complete recipe, check out the [Full Recipe]. This blog post covered how to make Crab Rangoon Dip and crispy wonton chips. We explored the main ingredients, preparation steps, and variations to make it your own. Don’t hesitate to try new flavors or dips. Storing leftovers properly ensures you can enjoy this treat later. With these tips, you'll impress guests at your next gathering. Enjoy creating a snack that everyone will love!](https://tossedrecipes.com/wp-content/uploads/2025/05/d7508ec5-1356-4c96-8179-d76170efea85.webp)
Crab Rangoon Dip with Wonton Chips Tasty Easy Recipe
Are you ready to impress your friends at the next gathering? This Crab Rangoon Dip with Wonton Chips recipe is a crowd-pleaser! It’s creamy, savory,

Crispy Bang Bang Salmon Bites Flavorful and Easy Dish
If you’re craving a dish that’s both crispy and packed with flavor, you’re in the right place. My Crispy Bang Bang Salmon Bites are simple
![To make these tasty bites, you need a few key ingredients: - 4 large flour tortillas - 8 oz cream cheese, softened - 1 cup shredded cheddar cheese - 1 cup fresh spinach, chopped - 1/2 red bell pepper, finely diced - 1/2 teaspoon garlic powder - 1/2 teaspoon onion powder - Salt and pepper to taste - 1 cup salsa (for dipping) These ingredients create a creamy and crunchy snack. The cream cheese gives a rich base, while the cheddar adds a nice flavor. Fresh spinach and red bell pepper add color and nutrition. You can mix things up with optional ingredients. Here are some ideas: - Cooked and crumbled bacon - Diced tomatoes - Black olives, sliced - Chopped green onions - Avocado slices - Hot sauce for extra kick Feel free to get creative! Each add-in adds a new layer of flavor. You can adjust based on what you like or have on hand. Having the right tools makes cooking easier. For this recipe, you will need: - A large mixing bowl - A sharp knife for slicing - A cutting board - A spatula or spoon for mixing - A serving platter These tools help you mix, roll, and slice the tortilla bites easily. With the right setup, you can make these snacks quickly and enjoy them with friends. For the full recipe, click [Full Recipe]. Start by gathering your ingredients. You need cream cheese, cheddar cheese, spinach, and bell pepper. In a mixing bowl, add 8 oz of softened cream cheese. Next, add 1 cup of shredded cheddar cheese. Then, toss in 1 cup of chopped spinach and 1/2 red bell pepper that you finely diced. Now sprinkle in 1/2 teaspoon of garlic powder and 1/2 teaspoon of onion powder. Don’t forget to season with salt and pepper. Mix all these together until smooth and creamy. Take your first large flour tortilla and lay it flat on a clean surface. Use a spatula or a knife to spread a generous layer of the cream cheese mixture over the tortilla. Make sure to leave a small border around the edges. Now, start at one end and roll the tortilla tightly. Keep the filling sealed inside as you go. Repeat this for each of the remaining tortillas until you finish the cream cheese mixture. After rolling all the tortillas, grab a sharp knife. Slice each roll into bite-sized pieces, about 1-2 inches thick. Arrange the tortilla bites on a serving platter. You can place them upright or lay them flat for a nice look. Serve these tasty bites with a small bowl of salsa in the center for dipping. Enjoy your Cream Cheese Tortilla Bites, the perfect snack for any party! For more details, check the Full Recipe. You can prepare these tortilla bites a day before your event. Just follow the full recipe. After rolling the tortillas, wrap them in plastic wrap. Store them in the fridge until you are ready to serve. This keeps them fresh and ready to slice. When it's time to eat, just cut and serve. Your guests will love them! For a fun look, arrange the bites on a colorful platter. You can place them upright in a muffin tin. This way, they stand out and are easy to grab. Add a small bowl of salsa in the center for dipping. You can also sprinkle some chopped herbs on top for a pop of color. A little garnish makes a big difference! Be careful not to overfill the tortillas. If you add too much filling, they can fall apart. Make sure to spread the cream cheese mixture evenly. Also, let the cream cheese soften before mixing. This helps it blend smoothly. Lastly, don’t forget to season your filling. A little salt and pepper can enhance the flavor! {{image_2}} You can customize your cream cheese tortilla bites to suit your taste. Here are some fun ideas: - Mexican Style: Add taco seasoning and diced jalapeños for a kick. - Italian Twist: Mix in sun-dried tomatoes and fresh basil. - Mediterranean Flair: Include feta cheese and olives for a savory touch. - Sweet Option: Use fruit spreads or cream cheese with honey and nuts. If you want to make these bites healthier, swap some ingredients: - Low-Fat Cream Cheese: Use this to cut calories. - Whole Wheat Tortillas: These add fiber and nutrients. - Veggies Galore: Substitute the bell pepper with carrots or cucumber. - Greek Yogurt: Mix it with cream cheese for a tangy flavor and fewer calories. Dips can enhance your cream cheese tortilla bites. Try these options: - Salsa: A classic choice that adds freshness. - Guacamole: This gives a creamy, rich taste. - Ranch Dressing: Perfect for those who love a creamy dip. - Hummus: A healthy option that pairs well with the flavors. Feel free to explore these variations and make the recipe your own! For more details, check out the full recipe. After your party, you may have leftover tortilla bites. To keep them fresh, place them in an airtight container. This helps prevent them from drying out. Store the container in the fridge. They can last up to four days. Make sure to keep them separated if possible, so they don’t stick together. If you want to save your tortilla bites for later, freezing is a great option. First, let them cool completely. Next, place them on a baking sheet in a single layer. Freeze them for about an hour. Once frozen, transfer the bites to a freezer-safe bag or container. They can stay in the freezer for up to three months. Just remember to label the bag with the date. When you're ready to enjoy the frozen bites, you can easily reheat them. Preheat your oven to 350°F. Place the bites on a baking sheet and cover them with foil. Heat for about 15 minutes. This keeps them soft and tasty. If you’re in a hurry, you can microwave them for about 30 seconds. Just make sure to check if they are warm throughout. For the best taste, I recommend the oven method. For more details, refer to the Full Recipe. You can replace cream cheese with Greek yogurt or cottage cheese. Both options give a nice texture. They also add protein and can be lower in fat. You might want to mix them with herbs for flavor. This keeps the taste fresh and fun. Yes, you can easily add heat! Mix in jalapeños or hot sauce with the cream cheese. You can also use pepper jack cheese instead of cheddar. This will give your bites a nice kick. Just remember to balance the spice with something cool, like sour cream, for dipping. These bites stay fresh in the fridge for about 3 days. Make sure to store them in an airtight container. If you notice any moisture, it’s best to eat them sooner. You want to enjoy them at their best! Cream Cheese Tortilla Bites offer tasty fun for any occasion. We explored the needed ingredients, optional add-ins, and tools. I discussed how to prepare the mixture, roll tortillas, and serve the bites. Remember tips for make-ahead prep and ways to avoid common mistakes. You can try various flavors and healthier options too. Store leftovers easily and enjoy them later. Keep these ideas in mind to create delicious snacks. Your friends and family will love them. Enjoy making and sharing your tortilla bites!](https://tossedrecipes.com/wp-content/uploads/2025/05/b72a1efa-1fad-48f6-bdae-e5d227867c45.webp)
Cream Cheese Tortilla Bites Easy Party Snack Idea
Looking for a quick and tasty snack for your next get-together? Cream Cheese Tortilla Bites are the perfect solution! These easy-to-make bites are creamy, crunchy,

Italian Stromboli Flavorful and Simple Dish to Enjoy
If you crave a dish that’s both tasty and easy, Italian Stromboli is the answer! With layers of gooey cheese, savory meats, and fresh veggies