Appetizers
![- 1 can of refrigerated croissant dough - 1 cup mozzarella cheese, shredded - 1 cup pepperoni slices - 1 teaspoon Italian seasoning - 1/2 teaspoon garlic powder - 1 tablespoon olive oil - 1 egg, beaten (for egg wash) - Fresh basil leaves for garnish (optional) When measuring cheese, use a dry measuring cup. Fill it lightly and level it off. For spices, use a measuring spoon and level it for accuracy. If you don’t have mozzarella, use provolone or cheddar. You can swap pepperoni for turkey or veggie options. Use fresh herbs instead of dried for a fresh taste. First, preheat your oven to 375°F (190°C). This step helps the croissants bake evenly. Next, take your can of croissant dough and unroll it on a clean surface. You will see triangles of dough. Carefully separate each triangle. Make sure to keep them in good shape. This dough will be the base of your rolls. In a bowl, mix together the shredded mozzarella, pepperoni slices, Italian seasoning, and garlic powder. Stir well until all the ingredients combine. This filling will bring flavor to your croissant rolls. To avoid sogginess, do not overfill each triangle. Just use a generous tablespoon of the mixture. This way, the filling stays inside when you bake them. To roll the croissants, start at the wide end of each triangle. Gently roll it toward the pointy end. Make sure to tuck the filling inside as you roll. This helps keep everything secure. Place each rolled croissant on a baking sheet lined with parchment paper. For a nice golden color, brush each croissant with the beaten egg. This egg wash gives them a beautiful finish. Finally, bake in your preheated oven for 12 to 15 minutes. When they are golden brown and crispy, they are ready to enjoy. For the full recipe, check the details above. To make your Mozzarella Pepperoni Croissant Rolls even tastier, consider adding herbs and spices. You can mix in some dried oregano, crushed red pepper, or even a sprinkle of paprika. These will boost the flavor and add a nice kick. You can also experiment with different types of cheese. Try using provolone or cheddar for a unique twist. Mixing cheeses can create new flavors and textures that will surprise your taste buds. For a crunchy texture, make sure to bake the croissants on a parchment-lined baking sheet. The parchment helps the heat circulate evenly. If your oven tends to run hot, lower the temperature by 25°F. This adjustment can prevent burning and keep the inside gooey and warm. Always keep an eye on baking time. Ovens can vary, so check your croissants a few minutes early. You want them golden brown and puffy, which usually takes about 12 to 15 minutes. Pair your croissant rolls with dips or sauces to enhance your snack. Marinara sauce or a creamy ranch dip works great. They add flavor and make the dish more fun. For a complete meal, serve your croissant rolls with a fresh salad or some crispy veggies. A side of fruit can also add sweetness and balance the savory flavors. Enjoying them this way makes for a tasty and satisfying meal. {{image_2}} You can get fun with the fillings in your croissant rolls. Try using other meats like sausage or ham. These add a rich taste and are easy to find. If you prefer a veggie option, consider spinach or artichoke. These ingredients give your rolls a fresh twist and are great for meatless meals. You don't have to stick to croissant dough. Puff pastry works well too. It gives a flakier texture and a different taste. If you need gluten-free options, look for gluten-free dough. It’s becoming easier to find, and it tastes great! Mixing flavors can make your rolls even more special. You can choose sweet fillings like chocolate or fruit jams. This creates a nice balance with the savory taste of cheese and meats. You can also explore other cuisines. Think about adding Mexican spices or Mediterranean herbs. This can really spice up your snack! For the full recipe to guide your cooking adventure, check out the [Full Recipe]. Store your baked croissant rolls in an airtight container. This helps keep them fresh. You can also wrap them in plastic wrap for added protection. When you want to reheat, use an oven to keep them crispy. Preheat your oven to 350°F (175°C) and bake for about 5-7 minutes. This method revives the crunchy texture. You can freeze these rolls before or after baking. If you freeze them before baking, place the unbaked rolls on a tray. Once firm, transfer them to a freezer bag. This way, you can bake them fresh later. To freeze after baking, let them cool completely first. Then, wrap each roll in foil, and place them in a freezer bag. When ready to eat, thaw in the fridge overnight. For baked rolls, reheat in the oven as mentioned earlier. In the refrigerator, these rolls last about 3-4 days. Check for signs of spoilage like mold or an off smell. If they feel hard or dry, it's best to discard them. Enjoy your Mozzarella Pepperoni Croissant Rolls fresh for the best taste, but knowing how to store them helps you savor the leftovers longer! For the full recipe, refer to the section above. Making these croissant rolls is fun and easy. Start with a can of refrigerated croissant dough. You’ll need mozzarella cheese, pepperoni, Italian seasoning, and garlic powder. Mix the cheese and pepperoni with the seasonings in a bowl. Roll out the dough and cut it into triangles. Place a spoonful of the filling at the wide end. Roll it up tightly, then bake until golden. For the full recipe, check the earlier section. Yes, you can prepare these rolls ahead of time. You can fill and roll them, then place them on a baking sheet. Cover and store them in the fridge for a day. When ready to eat, just bake them straight from the fridge. This keeps them fresh and tasty. If you have leftovers, reheat them in the oven for a crispy finish. These croissant rolls pair well with many sides. You might serve them with a fresh salad or some crunchy veggies. Try adding marinara sauce for dipping. For drinks, a simple soda or lemonade works nicely. You can also serve them alongside a warm soup for a cozy meal. No special equipment is needed! You only need basic kitchen tools. A baking sheet, mixing bowl, and a whisk for the egg wash are all you need. A pizza cutter can help with cutting the dough if you like. Simple tools make this recipe easy to follow. This article covers the tasty Mozzarella Pepperoni Croissant Rolls. We explored the ingredients, step-by-step instructions, and tips for flavor and cooking. You learned about variations to make it your own, plus storage and reheating advice. These croissant rolls are fun and easy to make. Enjoy your cooking adventure and share these rolls with friends and family. Happy baking!](https://tossedrecipes.com/wp-content/uploads/2025/05/39de5a06-e56b-4f1c-a309-068ab4db61d1.webp)
Mozzarella Pepperoni Croissant Rolls Easy Snack Idea
Looking for a quick and tasty snack that’s sure to impress? Mozzarella Pepperoni Croissant Rolls are your answer! These simple delights combine flaky croissant dough
![To make arancini, you need a few key items. Here’s what you need: - 2 cups Arborio rice - 4 cups vegetable broth - 1 cup grated mozzarella cheese - 1/2 cup grated Parmesan cheese Arborio rice is special. It has a high starch content, which makes it creamy when cooked. Vegetable broth adds depth of flavor and keeps it vegetarian-friendly. The mozzarella and Parmesan cheeses bring a wonderful richness. Next, you will want some extra ingredients to add flavor and texture: - 1 medium onion, finely chopped - 2 cloves garlic, minced - 1/2 cup frozen peas, thawed - 1 teaspoon dried oregano - 1/2 teaspoon red pepper flakes (optional) - Salt and pepper to taste - 1 cup all-purpose flour - 3 large eggs, beaten - 2 cups breadcrumbs (preferably panko) - Vegetable oil for frying Onion and garlic create a savory base. Peas add a pop of color and sweetness. Oregano gives a nice herby taste. Red pepper flakes can spice things up if you like heat. The flour, eggs, and breadcrumbs help form a crispy coating. You will also need some tools to make cooking easier: - Large pot for cooking rice - Pan for sautéing - Deep skillet for frying - Measuring cups and spoons - Mixing bowls for breading - Serving dishes for presentation Having the right tools makes cooking fun and easier. A large pot helps cook the rice evenly. A deep skillet is perfect for frying, giving you that lovely crispy texture. For the complete guide, check out the Full Recipe. 1. To start, heat your vegetable broth in a large pot. Bring it to a gentle simmer. This will flavor the rice well. 2. In a separate pan, add a tablespoon of olive oil. Heat it over medium heat. Toss in the chopped onion and minced garlic. Cook until they turn soft and clear. 3. Next, add the Arborio rice to the pan. Stir it for about two minutes. This toasting step adds great flavor. 1. Slowly pour the hot vegetable broth into the rice mixture. Use a ladle and add it bit by bit. Stir often. Wait until the rice absorbs the liquid before adding more. 2. Keep cooking until the rice is al dente, about 18 to 20 minutes. Once done, remove it from the heat. 3. Mix in the mozzarella, Parmesan, peas, oregano, red pepper flakes, salt, and pepper. Let this mixture cool completely. 1. After cooling, take small amounts of the rice mixture. Form them into balls, about the size of a golf ball. This is the fun part! 2. Set up a breading station. Place flour on one plate, beaten eggs in a bowl, and breadcrumbs in another dish. This makes breading easy. 1. In a deep skillet, pour in vegetable oil. Heat it to about 350°F (175°C). This oil will make your arancini crispy. 2. Fry the arancini in batches. Do not overcrowd the pan. Cook them for about 3 to 4 minutes on each side. They should turn golden brown. 3. Once cooked, take them out and place them on a paper towel-lined plate. This helps to remove any extra oil. For the full recipe, you can check out the details above. Enjoy the process and the tasty results! To make great arancini, cook the rice al dente. This means the rice should be firm but not hard. Starchy Arborio rice is perfect for this. Cook it with care, adding broth slowly. Stir often, letting the rice absorb the broth before adding more. This helps create a creamy texture. To ensure a crispy exterior, use panko breadcrumbs. They fry up light and crunchy. After breading, chill your arancini for about 30 minutes. This helps them hold their shape while frying. When frying, keep the oil hot but not smoking. Fry them in small batches for best results. Spices and herbs can elevate your arancini. Try adding fresh basil or parsley for a burst of flavor. You can also mix in garlic powder or onion powder for depth. Red pepper flakes add a nice kick if you enjoy heat. For fillings, the sky is the limit! You can stuff them with meat, mushrooms, or even spinach. Consider adding sun-dried tomatoes or artichokes. These options bring unique flavors and textures to the dish. Dipping sauces can enhance your arancini experience. A classic marinara sauce pairs wonderfully. For something zesty, try a spicy aioli or garlic sauce. These sauces complement the crispy rice balls nicely. For plating, use a rustic wooden platter. Arrange the arancini in a circle with fresh basil leaves in the center. Place a small bowl of marinara sauce on the side. This not only looks nice but also adds to the dining experience. With these tips and tricks, you will make arancini that impress everyone. For the full recipe, check out the link above. {{image_2}} You can make arancini without meat. Try using vegetables like mushrooms, spinach, or zucchini. These add flavor and texture. For cheese, if you want it vegan, use cashew cheese or nutritional yeast. Both options give a nice, creamy touch. Sicily has many styles of arancini. In Palermo, arancini are often filled with meat sauce and peas. In Catania, they come with a rich ragu. Each region has its own twist, making them unique. You can also find different flavors, like saffron or eggplant, giving arancini a special taste. Arancini are now popular around the world. People add flavors from their own kitchens. For example, you can find arancini with Indian spices or Mexican cheese. These fusion recipes bring new life to the classic dish. Try fillings like pulled pork or roasted peppers for a fresh take. For the complete recipe, check out the Full Recipe section. To keep arancini fresh, store them in a sealed container. Place them in the fridge. They will last for up to three days. Before you store them, let the arancini cool completely. This step helps avoid sogginess. When you're ready to eat the leftovers, reheating is key. To keep them crispy, use an oven. Preheat the oven to 350°F (175°C). Place the arancini on a baking sheet. Heat for about 10-15 minutes, until they are warm and crisp again. If you want to freeze arancini, you can choose either unbattered or battered. For unbattered arancini, place them on a baking sheet. Freeze them until firm, then transfer to a bag. This way, they don’t stick together. For battered arancini, follow the same steps. First, freeze them on a sheet. Once firm, put them in a bag. Always label your bags with the date. When reheating frozen arancini, use the oven as well. Preheat the oven to 375°F (190°C). Bake the frozen arancini for about 20-25 minutes. This method helps them regain their crispness. For the full recipe, check out the details above. Enjoy your delicious arancini! To stop arancini from breaking, use the right binding agents. The key ingredients are cheese and eggs. They help hold the rice balls together. Here are some tips: - Use enough cheese: Mozzarella and Parmesan add great flavor and help bind. - Chill the rice mixture: Let it cool completely before shaping. This helps it firm up. - Form tight balls: Squeeze the mixture firmly, but don't overdo it. Yes, you can prepare arancini in advance. Here’s how: - Make the rice mixture: Cook it one day before. Store it in the fridge. - Shape the balls: Form the arancini but don’t bread them yet. - Cover and chill: Place the shaped balls in the fridge until you are ready to cook. - Fry when ready: Just bread and fry them when you want to serve. Dipping sauces can enhance the flavor of arancini. Here are some great options: - Marinara sauce: A classic choice, it pairs well with the crispy rice. - Aioli: A garlic-rich dip adds a creamy texture. - Spicy tomato sauce: For those who like a kick, this sauce is perfect. - Pesto: A fresh and herby option that adds brightness. Yes, arancini can be baked. Baking is a healthier choice. Here’s how to do it: - Preheat your oven: Set it to 400°F (200°C). - Coat well: Use enough oil on the outside to help it crisp. - Bake until golden: Cook for about 20-25 minutes or until they are golden brown. Keep in mind, baked arancini may not be as crispy as fried ones. Arancini come from Sicily, Italy. They date back to the 10th century. They were first made by Arabs who ruled Sicily. The name "arancini" means "little oranges" in Italian. They get their name from their round shape and golden color. These rice balls are a staple in Sicilian cuisine, often served at festivals and family gatherings. To cook rice well, follow these tips: - Use Arborio rice: It has a high starch content, giving a creamy texture. - Check for doneness: The rice should be tender but still firm to the bite (al dente). - Taste test: Take a few grains and taste them before finishing the cooking. When cooked, the rice should not be mushy but should hold its shape well. For a full recipe to create these delightful treats, check the [Full Recipe]. In this post, we explored arancini and its delicious ingredients, including Arborio rice and cheese. We walked through each step, from cooking the rice to frying the balls. I shared tips for perfect texture and serving ideas that brighten your table. Remember, you can adapt arancini with different fillings or shapes. You can store leftovers easily and even freeze arancini for later. Enjoy making this tasty treat, whether for a casual meal or a special occasion!](https://tossedrecipes.com/wp-content/uploads/2025/05/315a53bb-e40f-427c-b881-6ddce1173c54.webp)
Arancini di Riso: Sicilian Rice Balls Delightfully Crisp
If you crave a tasty treat that brings a taste of Sicily to your kitchen, look no further. Arancini di Riso, or Sicilian rice balls,

Homemade Mozzarella Sticks in 30 Minutes Delight
Craving a tasty snack that you can whip up in no time? You’re in the right place! In this guide, I’ll show you how to
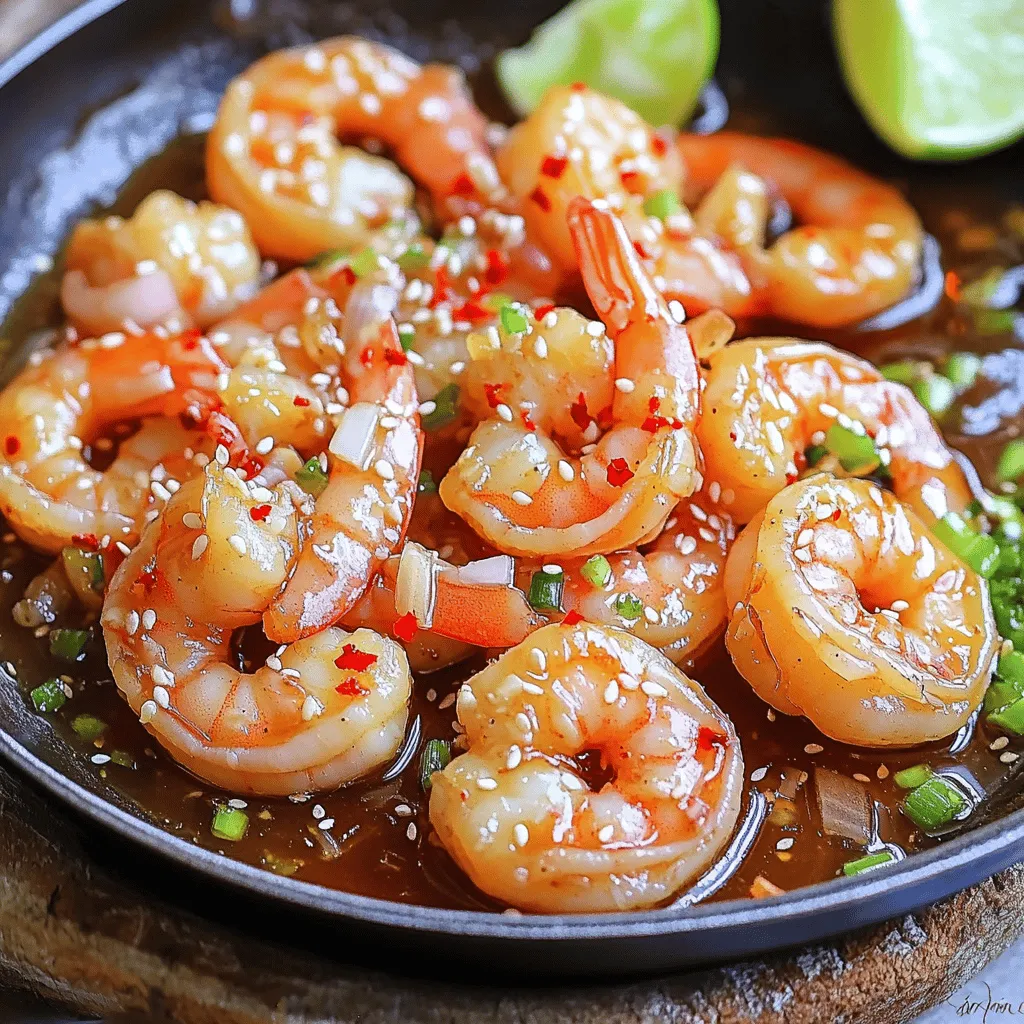
Spicy Honey Garlic Shrimp Flavorful and Easy Recipe
If you’re craving a burst of flavor, look no further than Spicy Honey Garlic Shrimp. This dish combines sweet honey, zesty lime, and a kick

Cheesy Garlic Breadsticks Simple and Delicious Recipe
If you love cheesy garlic breadsticks, you’re in for a treat! This simple and delicious recipe will help you make mouthwatering sticks right at home.

Feta Spinach Stuffed French Bread Savory Delight
Are you ready to take your taste buds on a delicious ride? My Feta Spinach Stuffed French Bread is a savory delight that combines rich
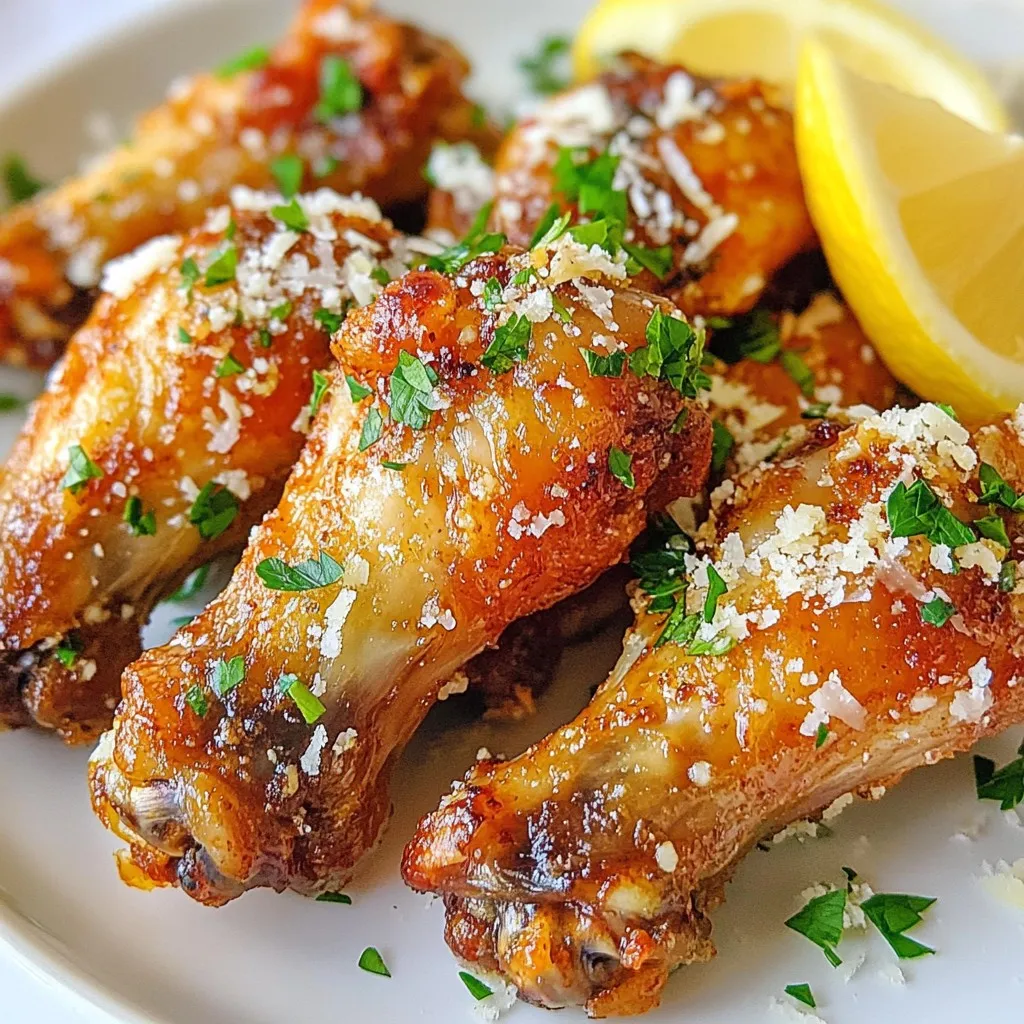
Air Fryer Garlic Parmesan Wings Crispy and Flavorful
Are you ready to elevate your snack game? My Air Fryer Garlic Parmesan Wings are crispy, flavorful, and a total crowd-pleaser. In just a few

Savory Air Fryer Buffalo Cauliflower Recipe to Enjoy
Are you ready to spice up your snacking? This Savory Air Fryer Buffalo Cauliflower Recipe delivers bold flavors and crispy texture in every bite. Perfect

Beef & Cheddar Sliders Tasty and Easy Party Treat
If you’re looking for a crowd-pleaser at your next gathering, you’re in the right place! Beef and cheddar sliders are the perfect mix of tasty

Classic Buffalo Chicken Dip Flavorful Party Delight
Are you ready to impress your friends at the next party? This Classic Buffalo Chicken Dip is a must-have! It’s creamy, spicy, and loaded with