Appetizers

To make Cheddar Jalapeño Cornbread Muffins, gather these ingredients: - 1 cup cornmeal - 1 cup all-purpose flour - 1 tablespoon baking powder - 1/2 teaspoon salt - 1/4 teaspoon black pepper - 1 cup buttermilk - 1/3 cup vegetable oil - 1 large egg - 1 cup shredded sharp cheddar cheese - 1/2 cup fresh jalapeños, finely chopped (seeds removed for less heat) - 2 tablespoons honey (optional, for a hint of sweetness) You can add a few optional ingredients to boost flavor: - Fresh herbs like cilantro or chives for a fresh note - A pinch of garlic powder for savory depth - Crumbled bacon for a smoky crunch Don’t worry if you lack some ingredients. Here are some swaps: - Use almond milk or oat milk instead of buttermilk. - Substitute coconut oil for vegetable oil to add a hint of sweetness. - Replace sharp cheddar with pepper jack for extra heat. These substitutions keep the muffins tasty while catering to your needs. Enjoy the process of making these flavorful muffins! {{ingredient_image_1}} First, I start by preheating my oven to 400°F (200°C). This temperature helps the muffins rise well. I then grease a muffin tin or line it with paper liners. This step keeps the muffins from sticking. Next, I grab a large mixing bowl. In it, I combine 1 cup of cornmeal, 1 cup of all-purpose flour, 1 tablespoon of baking powder, 1/2 teaspoon of salt, and 1/4 teaspoon of black pepper. I whisk these together until they blend nicely. This mix gives the muffins their base. In another bowl, I mix the wet ingredients. I add 1 cup of buttermilk, 1/3 cup of vegetable oil, and 1 large egg. I stir these until they look smooth. This mixture adds moisture and richness to the muffins. Now, I pour the wet mix into the dry mix. I gently stir until just combined. It’s key not to overmix here. Then, I fold in 1 cup of shredded sharp cheddar cheese and 1/2 cup of finely chopped jalapeños. If I want a touch of sweetness, I add 2 tablespoons of honey. This step layers in flavor and texture. I divide the batter evenly among the muffin cups, filling each about two-thirds full. Then, I place the muffin tin in the oven. I bake them for 15-20 minutes. I check for doneness by inserting a toothpick into the center. If it comes out clean, they're ready! After baking, I let them cool in the tin for about 5 minutes. Then, I transfer them to a wire rack to cool completely. To get a great muffin texture, I focus on mixing. I mix the dry and wet ingredients separately. When I combine them, I stir gently. This helps keep air in the batter. Overmixing can make them dense. I like to see small lumps in the mix; this is normal. Jalapeños can be spicy or mild. To control the heat, I remove the seeds. If you want less spice, use fewer jalapeños. For more heat, add more chopped jalapeños. You can also mix in some crushed red pepper for extra kick. Each baker can adjust to their taste. I love serving these muffins warm. A dollop of butter on top makes them special. You can also pair them with a spicy dipping sauce. For a fun look, add a slice of jalapeño on top. These muffins work great as a side dish for chili or soup. They can also be a tasty snack on their own. Pro Tips Fresh Jalapeños: Using fresh jalapeños adds vibrant flavor and heat. If you prefer less spice, remove the seeds and membranes before chopping. Buttermilk Substitute: If you don’t have buttermilk, you can make a quick substitute by mixing 1 cup of milk with 1 tablespoon of vinegar or lemon juice. Let it sit for 5 minutes before using. Don’t Overmix: Mix the batter just until combined to ensure your muffins are light and fluffy. Overmixing can lead to dense muffins. Storage Tips: Store leftover muffins in an airtight container at room temperature for up to 2 days or freeze them for longer storage. Reheat in the oven for the best texture. {{image_2}} You can swap out cheddar cheese for other tasty options. Try pepper jack for a spicy kick. Or, use Monterey Jack for a milder flavor. If you like blue cheese, it adds a bold taste too. Each cheese brings its own unique flavor. Feel free to get creative with your muffins. You can add whole corn kernels for extra texture. Chopped green onions lend a fresh taste. Consider mixing in cooked bacon bits for a savory touch. You can even fold in sun-dried tomatoes for a hint of sweetness. You can make sweet or savory cornbread muffins. To make them sweet, add honey or sugar to the batter. You can also mix in blueberries or cranberries. For a savory twist, skip the honey and add herbs like thyme or rosemary. Both versions taste great and fit different meals. Store your leftover muffins in an airtight container. This keeps them fresh. You can place a paper towel inside to absorb any moisture. Let them cool completely before storing. They will stay good for up to three days at room temperature. For longer storage, move them to the fridge. They stay fresh for about a week this way. Reheat your muffins in the oven for the best taste. Preheat the oven to 350°F (175°C). Place the muffins on a baking sheet. Heat them for about 5 to 10 minutes. This keeps them soft and warm. You can also microwave them for 15 to 20 seconds. But this may make them a bit chewy. Freezing is a great option for long-term storage. Wrap each muffin tightly in plastic wrap. Then, place them in a freezer bag. They will last for up to three months in the freezer. When you want to eat them, thaw them in the fridge overnight. Reheat them in the oven for a tasty treat. Yes, you can make these muffins gluten-free. Simply swap out the all-purpose flour for a gluten-free flour blend. Look for blends that include xanthan gum for the best results. This change keeps the muffins light and fluffy without gluten. To adjust the heat level, you can change the amount of jalapeños. Use fewer jalapeños if you want less spice. If you love heat, add more or leave some seeds in. For a milder flavor, try using roasted red peppers instead. These muffins pair well with many dishes. Serve them warm with butter for a simple treat. They are great alongside chili, soups, or stews. You can also enjoy them with a spicy dipping sauce for added flavor. These muffins stay fresh for about 2-3 days at room temperature. Store them in an airtight container to keep them moist. You can also freeze them for up to 3 months. Just thaw before serving for the best taste. In this blog post, we explored the key ingredients for Cheddar Jalapeño Cornbread Muffins. You learned about optional ingredients to boost flavor and smart substitutions. We also covered step-by-step instructions for mixing, baking, and cooling. Tips for the perfect texture and serving ideas were shared, along with variations to make them your own. Finally, we discussed the best ways to store and reheat leftovers. Now, you’re ready to bake delicious muffins that everyone will love. Enjoy experimenting with flavors and sharing your creations!
Cheddar Jalapeño Cornbread Muffins Flavorful Delight
Are you ready to elevate your snack game with Cheddar Jalapeño Cornbread Muffins? These flavorful delights combine the rich taste of cheese and the perfect
- 1 pound ground beef - 4 large flour tortillas - 1 cup shredded cheddar cheese - 1 cup shredded Monterey Jack cheese The main ingredients create the base of our smashburger quesadillas. The ground beef is the star. It brings a rich, savory flavor. The flour tortillas hold everything together. They add a nice bite. The cheese varieties melt beautifully and add creaminess. Cheddar and Monterey Jack blend well for a tasty kick. - 1/2 cup diced tomatoes - 1/4 cup pickles, diced - 1/4 cup diced red onion - 1 tablespoon onion powder - 1 tablespoon garlic powder - 1 teaspoon smoked paprika - Salt and pepper to taste Diced tomatoes and pickles add freshness and crunch. The red onion gives a bit of bite. Seasonings like onion powder, garlic powder, and smoked paprika enhance the beef’s flavor. Salt and pepper round out the taste, making every bite delicious. - 1/4 cup mayonnaise - 1 tablespoon ketchup The dipping sauce is simple yet tasty. Mixing mayonnaise and ketchup creates a creamy, tangy dip. This sauce pairs perfectly with the crispy quesadilla. It adds a nice contrast to the warm flavors. Enjoy this quick and easy dip with each bite! {{ingredient_image_1}} - In a mixing bowl, combine 1 pound ground beef with 1 tablespoon onion powder, 1 tablespoon garlic powder, 1 teaspoon smoked paprika, and salt and pepper to taste. - Mix well until everything is evenly combined. - Divide this seasoned beef into four equal parts. - Shape each part into a small, flat patty. This helps achieve that smashburger effect. - Heat a skillet over medium-high heat. - Once hot, press each patty onto the skillet. - Cook for 3-4 minutes on one side until it’s browned. - Flip and cook the other side for another 3-4 minutes. - The patties should be fully cooked through. Remove them and let them cool for a bit. - Grab a large flour tortilla. - On one half, layer 1/2 cup shredded cheddar cheese and 1 cup shredded Monterey Jack cheese. - Add one smashburger patty on top. - Sprinkle 1/2 cup diced tomatoes, 1/4 cup diced pickles, and 1/4 cup diced red onion over the patty. - Top with more cheese and fold the tortilla in half. - In the same skillet, add a little cooking oil. - Place the folded quesadilla in the skillet. - Cook for 3-4 minutes on one side until crispy and golden. - Flip it and cook the other side for another 3-4 minutes. - Remove and let cool for a minute. - Cut it into wedges and enjoy! To avoid soggy tortillas, I recommend using a small amount of oil in your skillet. Heat it until hot before adding the quesadilla. This way, the tortilla gets crispy. Use medium-high heat to achieve that perfect golden-brown color. Flip the quesadilla gently to keep all the fillings inside. Adding spices can elevate your quesadilla. Besides the onion and garlic powders, try a pinch of chili powder or cumin for a kick. For sauces, consider hot sauce for heat or barbecue sauce for sweetness. You can also add extra fillings like cooked bacon or sautéed peppers for more flavor. When cutting the quesadilla, use a sharp knife or pizza cutter. Cut it into wedges for easy serving. For visual appeal, place the wedges on a colorful plate. Add a small bowl of dipping sauce in the center. Garnish with fresh herbs like cilantro for a pop of color. Pro Tips Use Fresh Ingredients: Always opt for fresh ground beef and vegetables to enhance the flavor of your quesadillas. Even Cooking: Ensure your skillet is hot enough before adding the quesadilla to achieve a crispy texture on both sides. Experiment with Cheese: Feel free to mix different types of cheese such as pepper jack or gouda for an extra flavor twist. Customize Your Fillings: Add your favorite toppings like jalapeños or avocado for a personalized touch to your quesadillas. {{image_2}} You can switch up the meat in your quesadillas. Ground turkey or chicken works great. If you prefer a meat-free option, try black beans or lentils. Each choice adds a unique taste and texture. Ground turkey has a mild flavor, while chicken can give a nice bite. When using beans or lentils, season them well to add flavor. Cheese makes quesadillas special. You can use a mix of cheeses for more flavor. Try pepper jack for a spicy kick or gouda for a smoky taste. Blend different cheeses like feta or provolone to surprise your taste buds. The melting cheese holds the fillings together, creating a delicious bite. Add fun flavors by including jalapeños or hot sauce. These ingredients bring heat and excitement. You can also try adding barbecue sauce or salsa for a twist. Experiment with fresh herbs like cilantro or green onions for extra brightness. Tweak the flavors to suit your own taste, and make this dish your own! To store leftovers, let the quesadillas cool first. Wrap each one in plastic wrap or foil. Place them in an airtight container. This keeps them fresh for up to three days in the fridge. When you're ready to eat, you can enjoy them warm and crispy! For the best taste, reheat the quesadillas in a skillet. Heat the skillet over medium heat. Cook each side for about three minutes. This keeps the outside crispy and warm. You can also use an oven. Preheat it to 375°F (190°C) and bake for about ten minutes. This method also helps maintain that great crunch. To freeze quesadillas, wrap each one in plastic wrap. Then, place them in a freezer bag. Make sure to remove as much air as possible. They can stay fresh for up to three months. To reheat, take them out of the freezer and let them thaw in the fridge overnight. Then, follow the skillet method to enjoy a hot, crispy quesadilla again! A serving of Smashburger Quesadillas has about 600 calories. You get protein from the beef and cheese. Each quesadilla packs around 30 grams of protein. The cheese adds calcium, which is good for your bones. Plus, the tomatoes and pickles give you some vitamins. Keep in mind that these quesadillas have fats from the cheese and oil, so enjoy them in moderation. Yes, you can prep these quesadillas ahead of time. Cook the beef and let it cool down. Assemble the quesadillas but don’t fry them yet. Wrap them in plastic wrap and store them in the fridge. When you’re ready, just heat a skillet and fry them until crispy. This saves time when you want a quick meal. Yes, you can find gluten-free tortillas at most stores. Look for brands made from rice or corn. Just ensure they are labeled gluten-free. Be careful about cross-contamination if you have a gluten allergy. Always check the labels to keep your meal safe and tasty. Smashburger quesadillas are fun and tasty. We covered the main ingredients like ground beef, flour tortillas, and cheese. I shared steps for cooking and assembling, plus tips to avoid sogginess. Experiment with different meats and cheeses to find your favorite blend. You can store leftovers carefully and enjoy them later. Smashburger quesadillas are easy to customize for any taste. Try them today and enjoy a new twist on a classic dish!
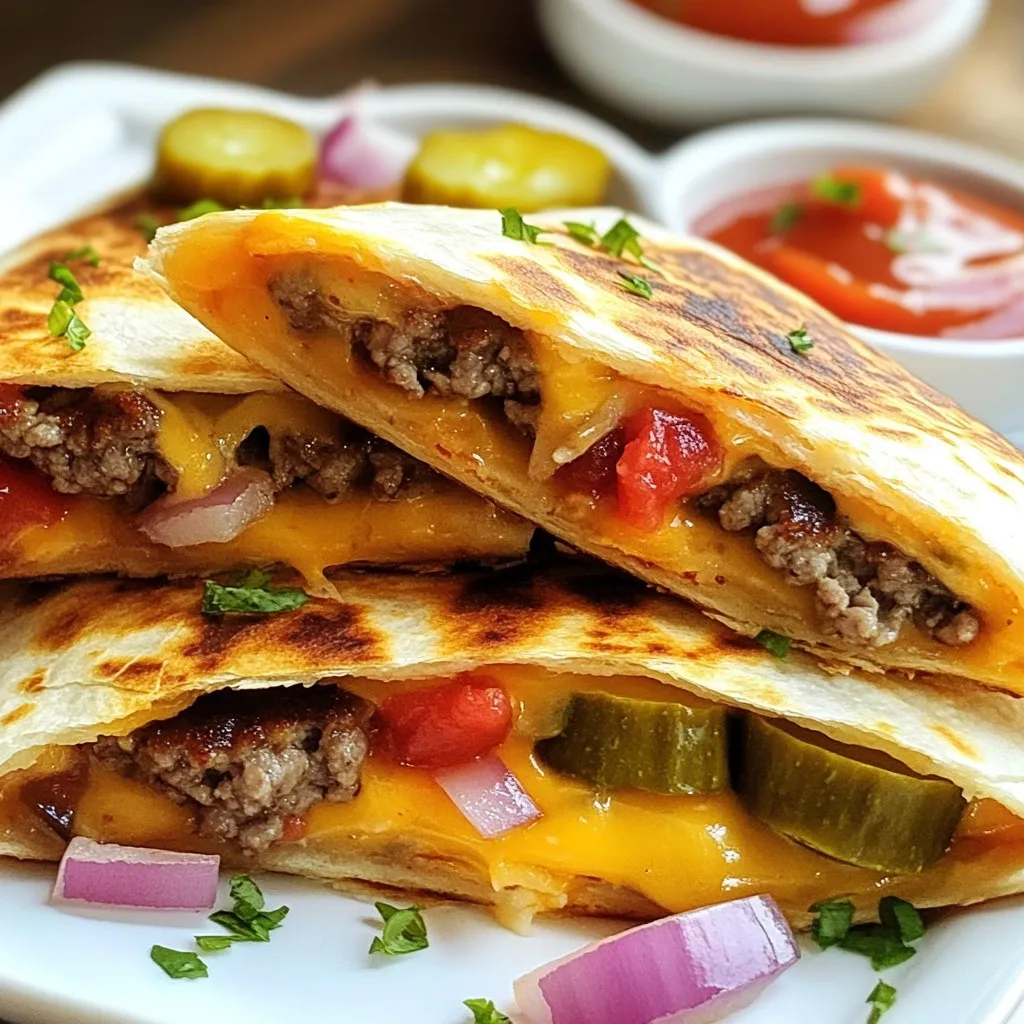
Smashburger Quesadillas Packed with Flavorful Fillings
Want a dish that’s easy to make and full of bold flavors? Smashburger quesadillas are just the ticket! With savory ground beef, melty cheese, and
- 2 cups cooked chicken, shredded - 1 cup BBQ sauce (your favorite brand) - 1 cup shredded cheddar cheese - 1 cup shredded mozzarella cheese - 4 large flour tortillas - 1/2 cup red onion, thinly sliced - 1/2 cup bell peppers (mixed colors), sliced - 2 tablespoons olive oil - Fresh cilantro, for garnish - Sour cream and guacamole, for serving The main ingredients give the quesadillas their core flavor. Cooked chicken adds protein. BBQ sauce brings sweetness and tang. Cheddar and mozzarella create a cheesy delight. Flour tortillas wrap everything together. You can use optional ingredients to enhance taste. Red onion adds a sharp bite. Bell peppers give color and crunch. Olive oil helps cook veggies. Fresh cilantro brightens the dish. Serving suggestions like sour cream and guacamole add creamy richness. Feel free to mix and match these ingredients. Your BBQ chicken quesadillas can be as simple or complex as you want. Enjoy exploring flavors! {{ingredient_image_1}} Start by combining the shredded chicken with BBQ sauce in a bowl. Mix well until the chicken is fully coated. Set this mixture aside for later. Next, heat one tablespoon of olive oil in a large skillet over medium heat. Add the thinly sliced red onion and bell peppers to the skillet. Sauté these veggies for about 3 to 4 minutes. You want them to be tender and slightly caramelized. Once done, remove them from the skillet and set aside. Now, wipe the skillet clean and add another tablespoon of olive oil. Place one flour tortilla in the skillet. Sprinkle half of the cheddar and mozzarella cheese over the tortilla. Then, add half of the BBQ chicken mixture and half of the sautéed veggies on top. Place another tortilla on top. Cook this quesadilla for about 3 to 4 minutes until the bottom is golden brown. Carefully flip it over and cook for another 3 to 4 minutes. You want the other side to be golden and the cheese to melt. Remove the quesadilla from the skillet and let it cool for a minute. Cut it into wedges. Repeat these steps with the remaining ingredients to make a second quesadilla. For serving, garnish each quesadilla with fresh cilantro. Serve with sides of sour cream and guacamole. This adds a nice touch and gives you extra flavors. Enjoy your delicious BBQ chicken quesadillas! To get the best flavor, sauté your veggies well. Heat the olive oil over medium heat. Add the red onion and bell peppers. Cook them for about 3-4 minutes. They should be soft and a bit caramelized. This step adds sweetness and depth. For crispy quesadillas, use a hot skillet. After adding the first tortilla, layer half the cheese. Then, add the BBQ chicken and veggies. Top with another tortilla. Cook until golden brown on both sides. This method gives you a crunchy outside and melted cheese inside. Spice up your BBQ chicken quesadillas with extra flavors. You can add smoked paprika for a warm, smoky taste. A dash of cayenne pepper adds heat. You can also drizzle some hot sauce for a kick. When it comes to cheese, don’t stick to just cheddar and mozzarella. Try pepper jack for spice or Gouda for a rich flavor. Mixing different cheeses enhances the taste and makes the quesadillas more interesting. Pro Tips Use Leftover Chicken: Save time and enhance flavor by using leftover rotisserie chicken for a quicker meal. Cheese Options: Experiment with different types of cheese, like pepper jack for a spicy kick or gouda for a smoky flavor. Cooking Method: For a crispier quesadilla, consider using a panini press instead of a skillet. Serving Suggestions: Pair with a fresh salsa or an avocado salad for a refreshing contrast to the richness of the quesadillas. {{image_2}} You can change the meat in BBQ chicken quesadillas. Pulled pork or beef works great. These meats bring their own taste and texture. They also pair well with BBQ sauce. Try using the same method to prepare them. For a vegetarian option, use black beans or grilled mushrooms. These options still give a hearty feel. You can also add extra cheese for creaminess. BBQ sauce comes in many flavors. You can choose sweet BBQ or spicy BBQ. Sweet BBQ adds a nice caramelized taste. Spicy BBQ gives a kick that wakes up your taste buds. You can also mix sauces for a unique flavor. Adding different vegetables or herbs can change the taste. Try corn, zucchini, or spinach for added nutrition. Fresh herbs like cilantro or parsley add a fresh touch. Don’t be afraid to experiment. Your BBQ chicken quesadillas can become your signature dish! To keep your BBQ chicken quesadillas fresh, wrap them tightly in plastic wrap or foil. You can also use an airtight container. This will prevent them from drying out. Store them in the fridge for up to 3 days. If you want to keep them longer, consider freezing them. They can last up to 2 months in the freezer. Just make sure to label them with the date. When it's time to enjoy your leftovers, the best way to reheat them is in a skillet. Heat the skillet over medium heat. Place the quesadilla in the skillet and cook for 2-3 minutes on each side. This method keeps the tortilla crispy and the cheese melty. You can also use a microwave if you're in a hurry. Place the quesadilla on a microwave-safe plate. Heat it for 30-60 seconds. However, this may make the tortilla a bit soft. If you want the best taste, stick with the skillet! Can I use store-bought BBQ chicken? Yes, you can use store-bought BBQ chicken. It saves time and still tastes great. Just shred it and mix it with your favorite BBQ sauce. This makes the recipe quick and easy for busy days. What is the best type of cheese for quesadillas? Cheddar and mozzarella are my top picks. Cheddar gives a sharp flavor, while mozzarella melts nicely. You can also mix in some pepper jack for a kick. How do I make BBQ sauce from scratch? To make BBQ sauce, mix these ingredients in a bowl: - 1 cup ketchup - 1/4 cup apple cider vinegar - 1/4 cup brown sugar - 1 tablespoon Worcestershire sauce - 1 teaspoon garlic powder - 1 teaspoon onion powder - Salt and pepper to taste. Stir well and adjust to your taste. Can I prepare these quesadillas in advance? Yes, you can prep these quesadillas ahead of time. Assemble them, but don’t cook yet. Wrap them in plastic wrap and store in the fridge. When you’re ready, just cook them in the skillet until golden and melty. This blog post covered everything you need to make delicious BBQ chicken quesadillas. We explored the main and optional ingredients, shared step-by-step cooking instructions, and provided tips to enhance the flavors. You can customize these quesadillas with different meats or vegetables to match your taste. In conclusion, you can easily create this fun meal. Enjoy experimenting with flavors and find what you love best. Happy cooking!
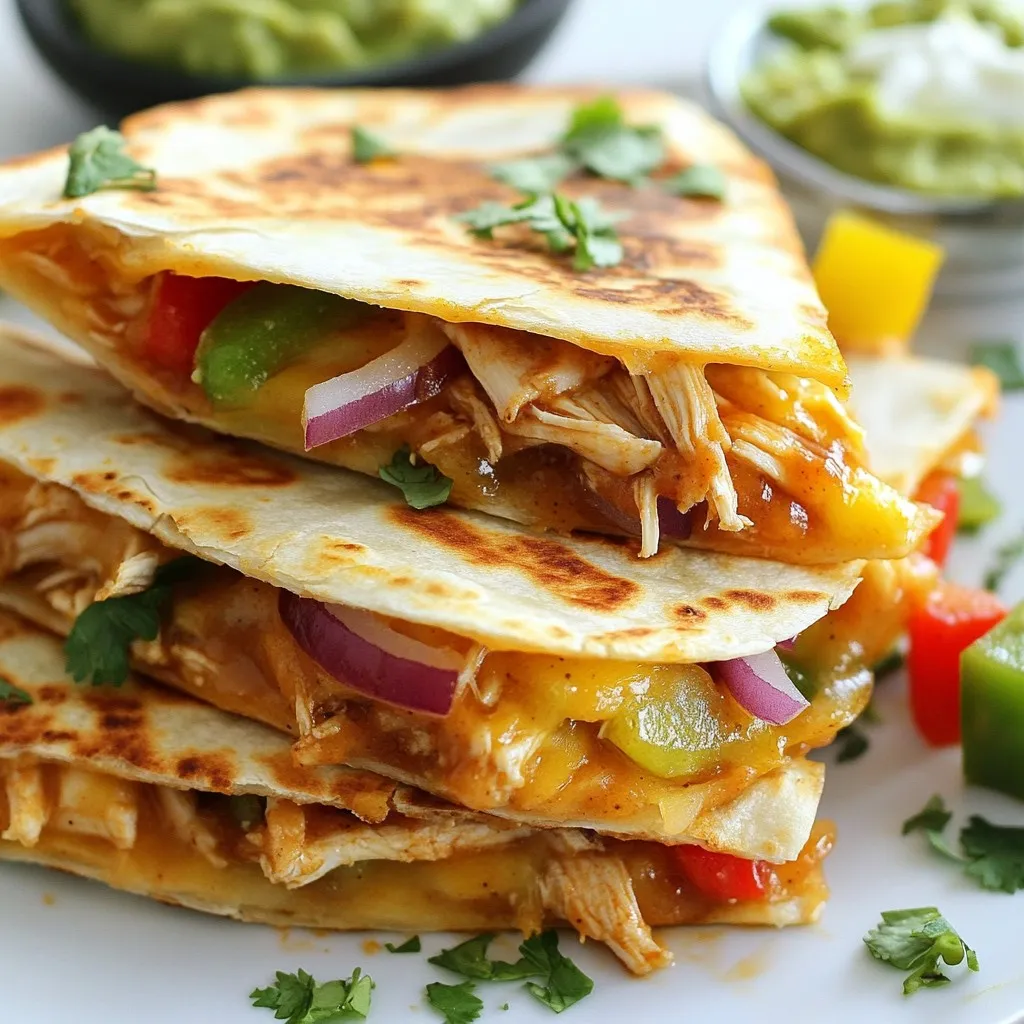
BBQ Chicken Quesadillas Flavorful and Easy Recipe
Looking for a quick and tasty meal? BBQ Chicken Quesadillas are your answer! Packed with tender chicken, gooey cheese, and zesty BBQ sauce, these quesadillas