Appetizers

- 2 cups all-purpose flour - 1 tablespoon baking powder - 1/2 teaspoon salt - 1 teaspoon dried oregano - 1 teaspoon garlic powder - 1 cup milk - 1/2 cup olive oil - 1 large egg - 1 cup cheddar cheese, shredded - 1 cup mini pepperoni or diced bell peppers (vegetarian option) - 1/2 cup marinara sauce (for dipping) To make easy pizza muffins, gather these simple ingredients. Start with the main ingredients like flour and baking powder. The wet ingredients include milk and olive oil, which add moisture. Finally, choose your add-ins. You can use mini pepperoni or bell peppers for a vegetarian twist. Don't forget the marinara sauce for dipping! Using fresh ingredients ensures the best flavor. This recipe is perfect for any snack time. If you want the full recipe, check out the detailed instructions. 1. First, preheat your oven to 375°F (190°C). This step is key for a good bake. 2. Line a muffin tin with paper liners. You can also spray it with non-stick cooking spray. 3. In a large bowl, combine the dry ingredients: - 2 cups all-purpose flour - 1 tablespoon baking powder - 1/2 teaspoon salt - 1 teaspoon dried oregano - 1 teaspoon garlic powder Mix these well until they are even throughout. 1. In a separate bowl, whisk together the wet ingredients: - 1 cup milk - 1/2 cup olive oil - 1 large egg Keep whisking until everything blends nicely. 2. Pour the wet mixture into the dry ingredients. Stir gently until just combined. Don’t worry if you see a few lumps; it's okay! 1. Now, fold in the tasty bits: - 1 cup cheddar cheese, shredded - 1 cup mini pepperoni or diced bell peppers Mix carefully to keep the cheese and pepperoni intact. 2. Spoon the batter into your muffin tin. Fill each cup about 2/3 full. 3. Bake in the preheated oven for 18 to 20 minutes. Look for golden brown tops and test with a toothpick. It should come out clean. 4. Once done, take them out and let them cool for about 5 minutes in the pan. Then, transfer them to a wire rack. These easy pizza muffins are fun to make and great as a snack. Enjoy with marinara sauce for dipping! For the full recipe, check out the details above. To get the best pizza muffins, avoid overmixing the batter. Mixing too much makes them tough. Just stir until everything is combined and a few lumps remain. This keeps the muffins light and fluffy. To check if your muffins are done, use a toothpick. Insert it into the center of a muffin. If it comes out clean, they are ready. If it has wet batter, bake for a few more minutes. Serve your pizza muffins warm. Pair them with a small bowl of marinara sauce for dipping. This adds flavor and fun. For a nicer look, garnish your plate with fresh basil or parsley. The green adds color and makes the dish pop. You can prep ingredients in advance. Chop the pepperoni or bell peppers a day before. This saves time when you are ready to bake. If you have leftover muffins, freeze them. Place them in a freezer bag and seal tightly. They stay fresh for up to three months. When you want one, just thaw it overnight in the fridge. Enjoy your easy pizza muffins anytime! {{image_2}} For a tasty vegetarian muffin, swap the mini pepperoni for diced bell peppers or mushrooms. You can also add spinach or zucchini for extra veggies. For a vegan version, replace the egg with a flaxseed meal. Mix one tablespoon of flaxseed with three tablespoons of water and let it sit for five minutes. Use plant-based milk and vegan cheese to keep it dairy-free. You can change up the cheese to make these muffins more fun. Try mozzarella for a classic taste or feta for a tangy kick. You can also add toppings like sliced olives, bell peppers, or even jalapeños if you like heat. Mix and match to find your favorite combo! If you're looking for gluten-free options, use almond flour or a gluten-free flour blend. Check the labels to ensure they work well in baking. For lower-fat muffins, you can use Greek yogurt instead of olive oil. This keeps them moist while cutting down on fat. To keep your pizza muffins fresh, store them in an airtight container. This prevents them from drying out. You can refrigerate them for up to four days. If you want them to last longer, freezing is a great option. When it’s time to enjoy your muffins again, you have two main options: the microwave or the oven. For the microwave, place a muffin on a plate and heat for about 30 seconds. This keeps them moist. If you prefer the oven, preheat it to 350°F (175°C). Wrap the muffins in foil and heat for about 10 minutes. This method restores their crispness. If you want to freeze your muffins, let them cool completely first. Wrap each muffin in plastic wrap, then place them in a freezer bag. This helps prevent freezer burn. When you’re ready to eat them, take a muffin out and thaw it in the fridge overnight. You can also microwave it for a quick warm-up. Enjoy your pizza muffins later with their fresh taste! Easy pizza muffins are a fun twist on pizza. They use a simple batter filled with cheese and your favorite toppings. You can eat them as a snack or serve them at a party. They are easy to make and taste great! Yes, you can make these muffins ahead of time! Here are some tips: - Prep the batter: You can mix the dry ingredients and wet ingredients separately. Keep them in the fridge for up to 24 hours. - Baking: Bake them fresh when you are ready to eat. This keeps them warm and fluffy. - Freezing: You can freeze the baked muffins. Just place them in a freezer bag. They stay good for about three months. You can customize your pizza muffins with many toppings. Here are a few ideas: - Cheese: Try mozzarella, pepper jack, or feta. - Meats: Use crumbled sausage, bacon bits, or ham. - Veggies: Add bell peppers, mushrooms, or olives. - Sauces: Mix in pesto or barbecue sauce for a twist. Feel free to experiment and find your favorite combo! For the full recipe, check out the recipe section. You learned how to make easy pizza muffins using simple steps and ingredients. We discussed the main, wet, and add-in ingredients, and I shared tips for perfect results. You can try different flavors and easy swaps for dietary needs. Storing and reheating these muffins is just as easy. Enjoying pizza muffins at home is fun and tasty. Now, you can impress friends and family with your homemade treats. So grab your ingredients and start baking!
Easy Pizza Muffins Quick and Tasty Snack Recipe
If you’re craving a snack that’s both quick and satisfying, look no further than easy pizza muffins! With simple ingredients like cheese, pepperoni, and spices,
- 1 package (13.8 oz) refrigerated pizza dough - 1 cup shredded mozzarella cheese - 1/2 cup pepperoni slices, cut into quarters - 1/4 cup grated Parmesan cheese - 2 tablespoons garlic powder - 2 tablespoons olive oil - 1 teaspoon Italian seasoning - 1/2 teaspoon crushed red pepper flakes - Parchment-lined baking sheet - Rolling pin - Mixing bowl Making pizza rolls is fun and easy. You can use simple ingredients. The main ingredients are the pizza dough, cheese, and pepperoni. For added flavor, you can include garlic powder, olive oil, and seasonings. The pizza dough serves as your base. I always use refrigerated dough for quick prep. Shredded mozzarella is key for that gooey texture. The pepperoni slices add a classic taste. You can cut them into quarters for better distribution. The grated Parmesan cheese gives a nice finish. If you want extra flavor, try the optional ingredients. Garlic powder gives a great aroma. Olive oil helps the rolls brown nicely. Italian seasoning adds depth. If you like heat, sprinkle in some crushed red pepper flakes. For the equipment, a parchment-lined baking sheet is a must. It keeps your rolls from sticking. A rolling pin helps flatten the dough evenly. A mixing bowl is useful for blending your seasonings. With these ingredients and tools, you’re ready to make tasty pizza rolls. For the full recipe, check out the detailed cooking instructions. - Preheat oven to 400°F (200°C). - Lightly flour a clean surface and roll out the refrigerated pizza dough into a rectangular shape, about 1/4 inch thick. - Sprinkle the shredded mozzarella cheese evenly over the dough. Leave a small border around the edges. - Add the quartered pepperoni slices on top of the cheese. Then, sprinkle the grated Parmesan cheese over everything. - Starting from one edge, carefully roll the dough up tightly. Pinch the seams to seal. Tuck the ends to close the roll. - Slice the roll into 1-inch pieces and place them cut side up on a parchment-lined baking sheet. - In a small bowl, whisk together olive oil, garlic powder, Italian seasoning, and crushed red pepper flakes. Brush this mixture over the tops of the pizza rolls. - Bake in the preheated oven for 15-18 minutes, or until golden brown and bubbly. - Remove from the oven and let them cool for a few minutes before serving with marinara sauce for dipping. These steps will guide you to create delicious, cheesy pizza rolls that everyone will love! To make perfect pizza rolls, focus on how you roll the dough. Start with a clean, lightly floured surface. Roll the dough into a rectangle, about 1/4 inch thick. This will help the rolls bake evenly. Be gentle; if you press too hard, the dough can tear. Next, you want that golden crust. Brush the tops with a mix of olive oil and garlic powder before baking. This will give your pizza rolls that crispy, golden look. Bake them until they are bubbly and slightly brown, about 15-18 minutes. What’s a pizza roll without a great dip? Marinara sauce is classic. It’s rich and pairs well with cheesy bites. You can also try ranch dressing or spicy aioli for a twist. For garnish, fresh basil leaves add a nice touch. They bring color and a hint of freshness. You can also sprinkle some grated Parmesan on top just before serving. One common mistake is burning the edges. Keep an eye on the time while they bake. If they look dark, take them out early. Another mistake is overstuffing the rolls. If you add too many toppings, they can burst open. Stick to the amounts listed in the Full Recipe for the best results. {{image_2}} For those who prefer vegetarian pizza rolls, skip the pepperoni. You can add veggies like bell peppers, mushrooms, and spinach. These add great flavor and texture. Try mixing in some olives or artichokes too. If you need a gluten-free version, use gluten-free pizza dough. Many stores sell good options. Just roll it out like regular dough. Fill it with your favorite toppings and bake as usual. You can change the flavor of your pizza rolls easily. Different cheeses work wonders. Try provolone, cheddar, or feta for a unique taste. Mixing cheeses can create a rich and creamy filling. For a spicy kick, add jalapeños or crushed red pepper flakes. If you prefer sweet, try a drizzle of honey or a sprinkle of cinnamon sugar on top after baking. Sweet and savory makes a fun twist! Dipping sauces can elevate your pizza rolls. Marinara is a classic, but you can try ranch dressing or garlic aioli. For a zesty touch, mix sour cream with lime juice. Want to make homemade marinara? Just blend canned tomatoes, garlic, and basil. Heat it on the stove for a quick sauce. It’s fresh and tastes fantastic with pizza rolls! Enjoy exploring these variations to make your pizza rolls unique and tasty! To keep your pizza rolls fresh, store them in an airtight container. Place a paper towel in the container to absorb moisture. This helps maintain their crunch. Refrigerate them for up to three days. For longer storage, consider freezing them. When freezing, wrap each roll in plastic wrap. Then, place them in a freezer bag. Make sure to remove as much air as possible. This will prevent freezer burn. You can freeze pizza rolls for up to three months. To enjoy pizza rolls again, you need to reheat them. The oven gives the best results. Preheat it to 375°F (190°C). Place the rolls on a baking sheet. Bake them for about 10-12 minutes until they are warm. This method keeps them crispy. If you're short on time, you can use a microwave. Place a few rolls on a plate and cover them with a damp paper towel. Heat them for about 30-60 seconds. They may not be as crunchy but will still taste great. An air fryer is also a good choice. Set it to 350°F (175°C) and heat for 5-7 minutes for a crispy finish. In the fridge, pizza rolls last for about three days. If you freeze them, they can last for three months. Always check for signs of spoilage before eating. Look for mold or an off smell. If you see either, it's best to throw them away. Enjoy your pizza rolls while they are fresh and tasty! To make pizza rolls from scratch, follow these key steps from the Full Recipe: - Preheat your oven to 400°F (200°C). - Roll out refrigerated pizza dough into a rectangle, about 1/4 inch thick. - Sprinkle shredded mozzarella cheese on the dough, leaving a border. - Add quartered pepperoni and grated Parmesan cheese on top. - Roll the dough tightly into a log shape and seal the edges. - Cut the roll into 1-inch pieces and place them cut side up on a baking sheet. - Brush olive oil, garlic powder, Italian seasoning, and red pepper flakes over the rolls. - Bake for 15-18 minutes until golden brown. Yes! You can get creative with your fillings. Here are some suggestions: - Swap pepperoni for cooked sausage or ham. - Try vegetables like bell peppers, mushrooms, or spinach for a veggie twist. - Use different cheeses, like cheddar or gouda, for unique flavors. - Add herbs like basil or oregano for extra taste. - Experiment with barbecue sauce or pesto instead of marinara. You have a few options for cooking frozen pizza rolls: - Oven: Preheat to 425°F (220°C). Bake for 12-15 minutes. This gives a nice crisp. - Microwave: Heat for 2-3 minutes. It’s quick, but rolls may be softer. - Air Fryer: Cook at 400°F (200°C) for about 8-10 minutes. This keeps them crunchy. Each method has its perks. Choose what works best for you! Making pizza rolls is fun and easy. You learned the key ingredients, equipment, and steps needed. I shared tips to make them better, different ways to enjoy them, and how to store leftovers. Remember, you can get creative with fillings and sauces. Whether you prefer classic or unique flavors, these rolls can fit your taste. With these instructions, you can impress your friends and family. Enjoy your tasty pizza rolls!
Pizza Rolls Crunchy and Cheesy Snack Recipe
Do you crave a snack that’s both crunchy and cheesy? You’re in the right place! In this article, I’ll share my favorite recipe for homemade
To make a fresh and zesty salsa verde, you need these main ingredients: - 1 pound tomatillos, husked and rinsed - 1 medium onion, quartered - 2 cloves garlic, peeled - 1-2 jalapeños, stems removed (adjust for heat) - 1 cup fresh cilantro leaves, loosely packed - 2 tablespoons lime juice - Salt to taste These ingredients create a bright flavor. Tomatillos add a lovely tang. Onions and garlic give depth. Jalapeños bring heat, while cilantro offers freshness. Lime juice ties it all together. You can add some optional ingredients to make your salsa unique: - Avocado for creaminess - A pinch of cumin for warmth - A splash of apple cider vinegar for extra tang Feel free to play with these options. Adding avocado makes the salsa richer. Cumin adds a smoky note. Vinegar can brighten the taste even more. If you can’t find tomatillos, green tomatoes work well. For a milder salsa, use bell peppers instead of jalapeños. If you don’t have fresh cilantro, parsley is a good substitute. Always use fresh ingredients for the best taste. Look for bright green tomatillos and firm onions. Store herbs in water to keep them fresh longer. When making salsa, the fresher the ingredients, the better the flavor. For the complete recipe, check out the Full Recipe. First, we need to get our oven ready. Preheat your oven to 425°F (220°C). This makes the tomatillos roast well. Next, take your tomatillos, onion, and garlic. Place them on a baking sheet. If you want, drizzle some olive oil on them. A sprinkle of salt helps too. Now, it's time to roast! Put the baking sheet in the oven. Roast for 15-20 minutes. You will know they are done when the tomatillos feel soft and turn a bit dark. The onion and garlic should also look nice and caramelized. Once done, take them out and let them cool for a few minutes. After cooling, it’s blending time! Grab a blender or food processor. Add the roasted tomatillos, onion, and garlic. Don’t forget the jalapeños, cilantro, and lime juice! Blend until you reach the texture you like. You can make it smooth or leave it a bit chunky. Now, taste your salsa. If it needs more salt or lime juice, add it in. This step is key to getting the flavor just right. Once you finish blending, transfer the salsa verde into a bowl. Chill it in the fridge for at least 30 minutes. This waiting time helps the flavors mix together. To serve, use a rustic bowl. Garnish with extra cilantro leaves and lime wedges for color. Enjoy your salsa with tortilla chips, tacos, or grilled meats. This zesty salsa verde will surely impress your friends and family. For the full recipe, check out the earlier section! To get the best texture for your salsa verde, blending is key. A smooth salsa works well for dipping. For a chunkier style, just pulse the blender a few times. Start with the tomatillos, onion, and garlic as a base. Make sure they are cool before blending. This helps keep the texture right. If you want a thinner salsa, add a bit of water or lime juice. Always taste and adjust as needed. You can make your salsa verde shine with a few simple tweaks. Try adding a pinch of sugar to balance out the tartness. If you like spice, toss in some extra jalapeños or even a dash of hot sauce. For a smoky flavor, add a chipotle pepper. You can also mix in diced avocado for creaminess. Fresh herbs like parsley or mint can brighten the taste. Experiment and find what makes your taste buds dance! Store your salsa verde in an airtight container. This keeps it fresh and tasty. Place a piece of plastic wrap directly on the salsa before sealing. It helps reduce air exposure. Salsa verde can last up to a week in the fridge. If you want to keep it longer, consider freezing it. Just pour it into freezer-safe bags and remove the air. Thaw it overnight in the fridge when you want to enjoy it again. {{image_2}} For a creamy twist, try avocado salsa verde. Just blend ripe avocados with the zesty salsa verde. Use about one ripe avocado for each batch. This adds a rich flavor and a smooth texture. Serve it with tortilla chips or as a topping on your tacos. It’s a crowd-pleaser! If you want a unique flavor, use tomatillos as the base. Tomatillos have a bright taste that shines in any dish. Roast them like in the full recipe. Blend them with fresh herbs, lime juice, and jalapeños. This version is vibrant and delicious, setting it apart from other salsas. For those who love sweet and spicy, mix honey or mango into your salsa. Add a spoonful of honey to balance the heat. You can also mix in diced mango for a fruity touch. This combination gives you a fresh burst of flavor, perfect for summer gatherings. Enjoy this sweet twist with grilled chicken or fish. To keep your salsa verde fresh, store it in a clean jar. Make sure the lid seals tightly. Place it in the fridge. It can last up to one week. Always use a clean spoon to scoop out salsa. This keeps it safe and tasty. You can freeze salsa verde for later. Use freezer-safe containers or bags. Leave some space at the top, as it will expand when frozen. Salsa verde can stay fresh for up to three months in the freezer. When ready, thaw it in the fridge overnight before using. Salsa verde can spoil if not stored properly. Signs include a change in color or smell. If you see mold or separation, it’s best to discard it. Always trust your senses. If something seems off, don’t take a chance. Enjoy your fresh salsa verde while it lasts! For the full recipe, check the earlier section. Salsa verde is a fresh green sauce made from tomatillos. It has a tangy, zesty flavor. You usually mix it with onions, garlic, and jalapeños. This sauce is common in Mexican dishes. It can be used as a dip or a topping. The bright green color makes it eye-catching on any plate. To lower the heat, remove the seeds from jalapeños. You can also use fewer jalapeños. Another great option is to add more tomatillos. This will keep the flavor but reduce the spice. Adding more lime juice can help balance the heat too. Always taste as you go to find the right level for you. Salsa verde shines with many dishes. It's great with tacos, grilled meats, or fish. You can also use it as a dip for tortilla chips. It adds flavor to quesadillas and enchiladas. Try it on eggs for a delicious breakfast twist. The bright flavors complement many foods. Yes, you can use store-bought ingredients if you're short on time. Look for canned tomatillos or jarred salsa verde. Just check the labels for quality. Fresh ingredients will give you the best flavor, but store-bought can work in a pinch. Always taste and adjust seasoning when using pre-made options. For the full recipe, check out the details above. Salsa verde is a versatile and tasty sauce you can easily make at home. We covered the key ingredients and how to prepare them, plus tips for the right texture and flavor. You learned how to store salsa for later use and explored fun variations to try. In conclusion, salsa verde can elevate your meals. Don't hesitate to personalize it to fit your taste. Enjoy making it, sharing it, and savoring every bite!
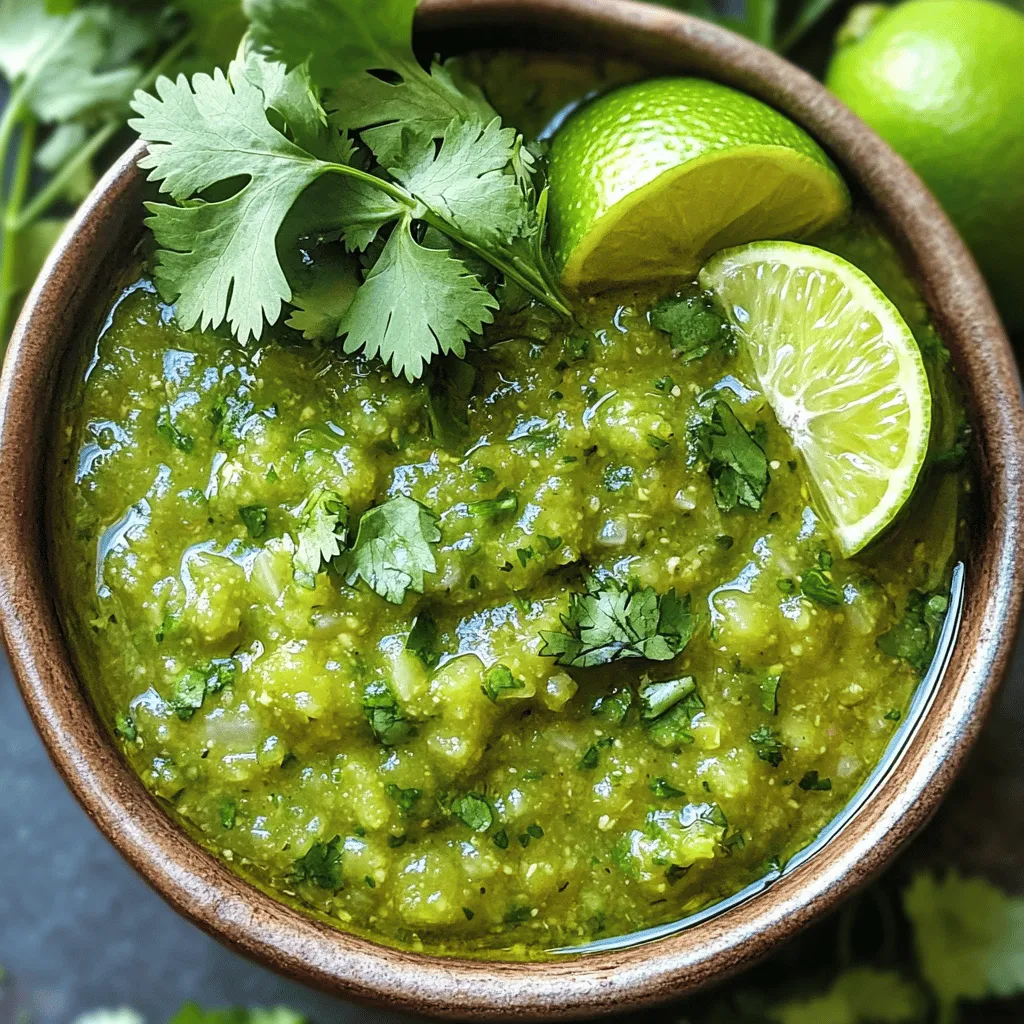
Salsa Verde Recipe Fresh and Flavorful Creation
Ready to elevate your meals with an easy Salsa Verde recipe? This fresh and flavorful creation is a must-try for any home cook. I’ll guide
- Store-bought or homemade pizza dough - Pizza sauce - Mozzarella cheese - Topping options (pepperoni, bell peppers, olives) To make your mini pizzas, you need some simple ingredients. First, you can use store-bought pizza dough or make your own. Store-bought saves time and works great. Next, grab some pizza sauce. This will give your mini pizzas that classic flavor. Mozzarella cheese is a must-have for that gooey, melty goodness. When it comes to toppings, the options are endless. You can use pepperoni, diced bell peppers, or sliced olives. Feel free to mix and match based on your taste. This flexibility allows everyone to enjoy their own creations. - Fresh basil leaves for garnish - Different types of cheese (cheddar, Parmesan) - Variety of toppings (mushrooms, onions, spinach) Want to make your mini pizzas special? Add fresh basil leaves on top for a burst of flavor. You can also change the cheese. Cheddar and Parmesan add a nice twist. For even more fun, try different toppings like mushrooms, onions, or spinach. This lets you get creative and find your favorite flavor combos. - Dried oregano - Garlic powder - Olive oil for brushing To take your mini pizzas to the next level, add some seasonings. Dried oregano gives a nice Italian touch. Garlic powder adds a delicious kick. Brush the dough with olive oil before baking. This helps it turn golden brown and crisp. For the full recipe, check the details above. Enjoy crafting your mini pizzas! - Preheat the oven to 425°F (220°C). - If you're using store-bought dough, take it out. If homemade, roll it out. - Roll the dough on a floured surface. Aim for 1/4 inch thick. - Use a round cutter to make circles about 3 inches wide. - Place the mini bases on a baking sheet. - Lightly brush each base with olive oil. This helps them brown nicely. - Spread a small spoonful of pizza sauce on each base. Leave some edge. - Sprinkle shredded mozzarella on top of the sauce. Use as much as you like. - Add your favorite toppings like pepperoni, bell peppers, or olives. - Sprinkle dried oregano and garlic powder for added flavor. - Bake the mini pizzas for 10-12 minutes. Keep an eye on them! - Check if the cheese is bubbly and the edges are golden. - When done, take them out and let cool for a minute. - If you like, add fresh basil leaves for a pop of color and taste. You can find the full recipe for more details on cooking these mini delights! To ensure your mini pizzas come out just right, start with a hot pizza stone. A hot stone helps the dough cook evenly. It gives you a crisp crust that everyone loves. If you don’t have a pizza stone, a baking sheet will work too. Just preheat it with your oven. Prepping your toppings ahead of time makes cooking easier. Chop your veggies and slice your meats before you start. This way, you can assemble the pizzas quickly. You’ll have fun doing it, and your mini pizzas will bake faster. When hosting a party, arrange the mini pizzas on a big platter. This makes it easy for guests to grab their favorites. You can also serve extra pizza sauce on the side for dipping. This adds flavor and fun to the meal. For side dishes, consider a fresh salad or crunchy veggie sticks. They balance the meal and keep it light. Pair the mini pizzas with fizzy drinks or iced tea for a refreshing touch. Using pre-made dough saves time and effort. You can find it in most stores. This lets you focus on your toppings and sauce. Making mini pizzas in advance is another great tip. You can prepare them and freeze them before baking. Just bake them when you need a quick meal. They will taste fresh and delicious! For the full recipe, check out the detailed instructions earlier in the article. {{image_2}} For those who love veggies, you have many choices. You can use toppings like zucchini or artichokes. Both add great texture and flavor. If you want vegan cheese, use a nut-based option. It melts well and tastes great on your mini pizzas. If you crave meat, mix it up! You can add sausage or ham for a savory kick. Combine different meats for an even richer taste. Think pepperoni with sausage or ham with bacon. Each bite will be packed with flavor. Mini pizzas don't have to be savory! You can easily create dessert pizzas. Start with a base of pizza dough. Spread Nutella for a sweet sauce. Top with fruits like bananas or strawberries for a fun treat. They are perfect for parties or a sweet snack. For the full recipe, check the instructions above! To keep your mini pizzas fresh, place them in an airtight container. You can stack them, but add parchment paper between layers. This prevents them from sticking together. Store the container in the fridge. Leftovers will stay good for about 3 to 4 days. You can reheat mini pizzas in either an oven or a microwave. The oven gives a better result for crispiness. Preheat your oven to 375°F (190°C). Place the pizzas on a baking sheet and heat for about 10 minutes. For the microwave, heat for 30 seconds to 1 minute. But be careful! The crust may get soft. To keep them crispy, use a microwave-safe plate with a paper towel under the pizza. To freeze mini pizzas, let them cool completely first. Place them on a baking sheet and freeze until firm. Then, transfer them to a freezer bag or container. Make sure to label it with the date. They can last for up to 2 months. To thaw, place them in the fridge overnight. Reheat as mentioned before for best results. Enjoy your tasty mini pizzas anytime! Mini pizzas cook quickly. Preheat your oven to 425°F (220°C). Bake them for 10-12 minutes. The cheese should bubble, and the edges should be golden brown. Keep an eye on them to avoid burning. Yes, you can! Many stores sell gluten-free pizza dough. Look for brands that fit your taste. You can also make your own gluten-free dough. Use almond flour or gluten-free all-purpose flour for great results. While pizza sauce is classic, you have options. Try barbecue sauce for a sweet twist. Pesto adds a fresh flavor, and even Alfredo sauce works for creamy pizzas. Mix and match to find your favorites! Making dough is easy! Combine flour, yeast, water, and salt to form a dough. Knead it until smooth, then let it rise. For a quick version, mix equal parts flour and Greek yogurt. Roll it out, and you’re ready to go! For the full recipe, check out the Mini Pizza Party section. In this post, we covered everything you need for easy homemade mini pizzas. We discussed required ingredients, steps for preparation, and tips for perfect baking. I shared fun variations, storage tips, and answers to common questions. Remember, you can customize these pizzas to fit your taste and dietary needs. Whether for a party or a family meal, mini pizzas are fun and simple. Enjoy making them your own!
Easy Homemade Mini Pizzas Quick and Fun Recipe
Looking for a fun, easy recipe that everyone can enjoy? Say hello to homemade mini pizzas! With just a few simple ingredients, you can create
- 1 lb boneless, skinless chicken breasts - 1 cup whole wheat bread crumbs - 1/2 cup grated parmesan cheese The main ingredients set the stage for your chicken nuggets. Using boneless, skinless chicken breasts keeps them lean and tasty. Whole wheat bread crumbs add a nice crunch and extra fiber. Finally, grated parmesan cheese gives a savory kick that enhances the flavor. - 1 teaspoon garlic powder - 1 teaspoon onion powder - 1 teaspoon paprika - 1/2 teaspoon black pepper - 1/2 teaspoon salt Seasoning is key to great taste. Garlic powder adds a bit of warmth. Onion powder gives depth, while paprika adds a slight smokiness. Black pepper and salt bring all the flavors together. These spices make your nuggets not just good, but great! - 2 large eggs - 1 tablespoon olive oil - Cooking spray Binding the chicken is crucial for sticking your coating. The eggs help the bread crumbs cling well. Olive oil adds moisture and flavor. A light spray of cooking spray ensures a crispy finish. With these ingredients, your nuggets will turn out perfect every time! For the full recipe, check the detailed instructions on how to create these delicious bites! - Preheat oven to 400°F (200°C) - Line baking sheet with parchment paper Before you start, it’s time to get your kitchen ready. Preheating the oven ensures even cooking. Lining the baking sheet with parchment paper stops the nuggets from sticking. Plus, it makes cleanup a breeze. - Create the coating mixture - Prepare egg wash Now, let’s make the coating. In a large bowl, mix the whole wheat bread crumbs, grated parmesan cheese, garlic powder, onion powder, paprika, black pepper, and salt. Stir well to blend all flavors. In a separate bowl, beat the eggs and add the olive oil. This egg wash helps the crumbs stick to the chicken. - Dip chicken in egg mixture and coat with breadcrumb mixture - Bake for 15-20 minutes, flipping halfway Grab your chicken pieces. First, dip each piece into the egg mixture. Let any extra egg drip off. Next, roll it in the bread crumb mixture. Press gently so the crumbs stick well. Place the coated nuggets on the baking sheet, leaving space between them. Lightly spray the tops with cooking spray for extra crispiness. Bake in the preheated oven for 15-20 minutes. Remember to flip them halfway for even browning. When they are golden brown, they are ready. Enjoy your homemade healthy chicken nuggets! Check out the Full Recipe for all details. To get that crispy outer layer, you need to coat the chicken well. First, ensure you completely cover each piece in the egg mixture. This helps the breadcrumbs stick better. Press the chicken into the breading mix firmly. This ensures an even coating. Spacing on the baking sheet is key. If the nuggets touch, they will steam instead of crisp. Place them about an inch apart. This allows hot air to circulate and makes them crunchy all around. Don't skip spraying the tops with cooking spray before baking. This helps them brown nicely. If you want to switch things up, use crushed cornflakes or oats instead of breadcrumbs. They add a different flavor and crunch. Another idea is to use almond flour for a gluten-free option. It's tasty and healthy too. You can also change the cheese. Try using low-fat mozzarella or even nutritional yeast for a vegan twist. This adds flavor without too many calories. Dips can make your meal fun! Serve these chicken nuggets with homemade honey mustard or a fresh veggie dip. You can also offer ranch or BBQ sauce for variety. For a colorful platter, add fresh veggies like carrot sticks and cucumber slices. Garnish with parsley or basil for a pop of color. This makes the dish look more appealing and healthy! {{image_2}} You can jazz up your chicken nuggets by adding spices. Try mixing in cayenne for heat or adding smoked paprika for a smoky taste. Think about using cumin for a warm flavor or even curry powder for a fun twist. Herbs can also enhance your nuggets. Try adding dried oregano or thyme to the coating. You can even use fresh herbs like parsley and basil for a bright flavor. Just chop them finely and mix them into your breadcrumb mix for a fresh kick. If you want a faster option, use an air fryer. The air fryer cooks the nuggets in about 10-12 minutes. This method gives you that crispy texture without much oil. Just preheat the air fryer, arrange the nuggets in a single layer, and let it work its magic. For a classic touch, you can pan-fry the nuggets. Heat some olive oil in a skillet over medium heat. Cook each side for 3-4 minutes until they turn golden brown. This method gives you a crunchy outside and juicy inside. To make your nuggets gluten-free, switch the breadcrumbs. You can use ground almonds or gluten-free breadcrumbs. Both options work well and keep the nuggets tasty. If you’re dairy-free, use nutritional yeast instead of parmesan cheese. It adds a cheesy flavor without any dairy. You can also use almond milk or oat milk in place of eggs for binding. These swaps keep your nuggets healthy and delicious. For the complete recipe, check out the Full Recipe section. To store baked chicken nuggets properly, let them cool first. Place them in an airtight container. This keeps them fresh and tasty. If you want to keep them longer, try freezing. - Refrigerator: Store nuggets for up to 3 days. - Freezer: They last about 2 to 3 months. Reheating can make your chicken nuggets tasty again. The best way is to use an oven. This keeps them crispy. Preheat your oven to 375°F (190°C) and bake for 10-15 minutes. You can also use a microwave, but this may make them soft. If you choose the microwave, heat them in short bursts. Check often to avoid overcooking. Enjoy your crispy chicken nuggets again! To make chicken nuggets healthier, focus on the ingredients and cooking method. Use lean chicken breasts instead of thighs. Choose whole wheat bread crumbs for added fiber. You can also add herbs and spices for flavor without extra calories. Opt for baking instead of frying. This cuts down on grease and fat. Yes, you can freeze homemade chicken nuggets. After baking and cooling them, place the nuggets in a single layer on a baking sheet. Freeze them for about one hour. Once frozen, transfer them to a freezer bag. This way, they won’t stick together. To thaw, leave them in the fridge overnight. Reheat them in the oven for best results. Many sauces go well with chicken nuggets. Honey mustard is a classic choice. You can also make a simple BBQ sauce by mixing ketchup and your favorite BBQ sauce. Another great option is ranch dressing. For a spicy kick, try mixing sriracha with mayonnaise. You can easily make these sauces at home for a fresh taste. You now have a complete guide to making healthy chicken nuggets. We covered the best ingredients, step-by-step instructions, and useful tips. You learned variations and how to store leftovers. By trying out these methods, you can enjoy a tasty, nutritious meal. Don't shy away from experimenting with flavors or cooking techniques. Healthy eating can be fun, easy, and delicious. Enjoy your homemade nuggets with your favorite sides and sauces!
Homemade Healthy Chicken Nuggets Crispy and Simple Recipe
Looking for a tasty and healthy twist on a classic? I’ll show you how to make crispy, homemade chicken nuggets that are simple and fun.
- 3 ripe tomatoes, diced - 1 small red onion, finely chopped - 1 jalapeño, seeded and minced - 2 cloves garlic, minced - 1/4 cup fresh cilantro, chopped Fresh produce is key for great salsa. Ripe tomatoes bring sweetness and juiciness. Red onion adds a nice crunch and a bit of sharpness. The jalapeño gives it heat, but you can adjust this. Garlic adds depth, while cilantro provides a fresh taste. - Juice of 2 limes Lime juice is essential. It brightens the salsa and adds acidity. This helps balance the flavors from the tomatoes and onion. Fresh lime juice is best for the best taste. - Salt and pepper to taste - 1/4 teaspoon ground cumin (optional) Salt and pepper are simple but necessary. They bring out the flavors in your salsa. Ground cumin adds warmth and earthiness, if you like. Just a little bit can change the whole flavor. You can find the Full Recipe at the beginning of this article to guide you through the process of making this delicious salsa in just five minutes. First, grab a medium mixing bowl. In this bowl, combine the diced tomatoes, chopped onion, minced jalapeño, and minced garlic. This mix forms the base of your salsa. The fresh tomatoes add sweetness, while the onion brings a nice crunch. The jalapeño adds heat, so you can adjust it to your taste. Next, add in the fresh cilantro and lime juice. The cilantro gives a fresh flavor, and the lime juice adds brightness. Make sure to squeeze the limes well to get all the juice. Now, it's time to season. Sprinkle the mixture with salt, pepper, and ground cumin if you choose to use it. Salt brings out the flavors, while pepper adds a little kick. Cumin adds earthiness and depth if you like it. Use a fork or spoon to mix all the ingredients thoroughly. You want everything to blend well. This step helps the flavors marry together. After mixing, it's time to taste your salsa. Adjust the seasoning if needed. You can add more salt, lime juice, or pepper to fit your taste. Everyone's palate is different, so make it just right for you. For presentation, serve the salsa in a small bowl. Place tortilla chips on the side for dipping. You can also garnish with a sprig of cilantro on top for color. A beautiful presentation makes your homemade salsa even more inviting. Enjoy this zesty five-minute salsa with friends or family! For the complete recipe, check out the [Full Recipe]. Selecting ripe tomatoes is key for great salsa. Look for tomatoes that feel firm but slightly soft. They should have a rich red color and a sweet scent. These signs show they are fresh and ready to eat. Picking the perfect jalapeño can change your salsa. If you want heat, choose a bright green one with smooth skin. If you like it mild, pick a jalapeño with a softer feel. Remember, remove the seeds for less heat. You can easily customize heat levels in your salsa. If you like it spicy, add more jalapeño or even a pinch of cayenne pepper. For a milder salsa, try bell peppers or skip the jalapeño altogether. Enhancing freshness with herbs adds depth to your salsa. Fresh cilantro is a classic choice, but you can also try parsley or basil. Just chop them finely and mix in. This adds a nice touch and brightens the flavor. Salsa pairs well with many foods. Serve it with tortilla chips for a crunchy snack. It also goes great on tacos or grilled chicken. You can even use it as a salad dressing for a zesty twist. If you have leftovers, store them in an airtight container. Salsa stays fresh in the fridge for about three days. If it starts to smell sour or looks off, it’s best to toss it. Enjoy your zesty five-minute salsa! For the full recipe, check out the details above. {{image_2}} You can add a fun twist to your salsa by mixing in fruit. Try adding diced mango or pineapple. These fruits bring a sweet touch and balance the spice from the jalapeño. You can also use fresh peaches for a summer flavor. They add a lovely juiciness that makes the salsa refreshing. Do you want milder salsa? Simply remove the seeds from the jalapeño. This will cut down the heat. You can also add more tomatoes to tone it down even more. If you love spice, consider adding more jalapeño or even some diced serrano peppers. A dash of hot sauce can also kick up the heat. You can switch things up by using green tomatoes or tomatillos. These add a tangy flavor. If you want more texture, mix in some black beans. They not only add a nice bite but also make the salsa heartier. You can easily adapt this recipe to suit your taste! For the complete recipe, check out the Full Recipe. To keep your homemade salsa fresh, store it in the fridge. Use a clean, airtight container. Glass jars or plastic containers work well. Ensure you seal it tight to lock in flavor. This helps prevent air from spoiling your salsa. Homemade salsa can last about 5 to 7 days in the fridge. Always check for signs of spoilage. Look for off smells, changes in color, or mold. If you see any of these, it’s best to throw it away. Yes, you can freeze salsa! Freezing helps extend its life. Use a freezer-safe container or a zip-top bag. Leave some space for expansion as it freezes. To thaw frozen salsa, place it in the fridge overnight. You can also run the bag under cold water. Once thawed, stir well before using. This helps mix any separated liquid. Enjoy your salsa fresh as always! For a quick and easy recipe, check out the Full Recipe for zesty five-minute salsa. Homemade salsa stays fresh for about 3 to 5 days in the fridge. Store it in an airtight container. This keeps out air and moisture, which can spoil the salsa. Always check for off smells or changes in color before eating. Yes, you can make salsa without cilantro. If you find cilantro too strong, try using parsley instead. Parsley adds a fresh taste without the bold flavor. You can also skip herbs and still enjoy a tasty salsa. If you want less heat, use a bell pepper. It adds crunch without the spice. If you like more heat, try a serrano pepper. It is spicier than jalapeño but still gives great flavor. You can use canned tomatoes in salsa. Canned tomatoes are convenient and save time. They have a softer texture, which can change the salsa's feel. Fresh tomatoes add a bright taste and crunch, making them often the better choice. Making fresh salsa is simple and fun. We explored key ingredients like ripe tomatoes, onions, and jalapeños, plus flavor-boosting lime juice. You learned how to combine these items and adjust flavors to your taste. Remember, you can customize your salsa with fruits or alternative bases for variety. Proper storage helps keep it fresh for longer. Enjoy your salsa with your favorite dishes! With these steps, you can create a delicious treat that suits your flavor. Now, get cooking!
Delicious Homemade Salsa in Five Minutes Recipe
Craving fresh, zesty salsa but short on time? You’re in the right place! This Delicious Homemade Salsa in Five Minutes Recipe is your go-to for
To make Rosemary Garlic Pull Apart Bread, you need these simple ingredients: - 3 ½ cups all-purpose flour - 1 packet (2 ¼ teaspoons) active dry yeast - 1 cup warm water (110°F/45°C) - ¼ cup olive oil - 2 teaspoons sugar - 1 teaspoon salt - 4 cloves garlic, minced - 2 tablespoons fresh rosemary, chopped (or 1 tablespoon dried) - ½ teaspoon black pepper - ½ cup unsalted butter, melted - Extra rosemary sprigs for garnish (optional) These ingredients work together to create a soft, flavorful bread. The all-purpose flour gives the bread its structure. Yeast helps it rise and become fluffy. Warm water activates the yeast. Olive oil adds moisture and flavor. Sugar feeds the yeast, while salt enhances taste. Garlic and rosemary provide the savory punch that makes this bread special. Black pepper adds a hint of spice. Finally, unsalted butter makes each bite rich and delicious. For more details, check the Full Recipe. Start by mixing warm water, sugar, and yeast in a small bowl. This mixture needs time to foam. Let it sit for about 5 to 10 minutes. You want it to look bubbly and frothy. This shows that your yeast is active and ready. In a large bowl, combine the flour and salt. Make a well in the middle. Pour in your yeast mixture and olive oil. Use a wooden spoon to mix it all together until a dough starts to form. Don’t worry if it feels sticky; that’s normal at this stage. Next, transfer the dough to a floured surface. Knead it for about 5 to 7 minutes. This makes the dough smooth and elastic. It should feel soft but not sticky. If it sticks to your hands, sprinkle a bit more flour. Now, place the dough in a lightly greased bowl. Cover it with a damp cloth. Let it rise in a warm place for about 1 hour. It should double in size. This step is key for a fluffy bread. Once your dough has risen, punch it down gently. Divide the dough into small pieces, about 1 to 1.5 inches each. In a separate bowl, mix melted butter, minced garlic, chopped rosemary, and black pepper. Dip each dough piece into this mixture. Stack them in a greased bundt pan or cake pan, making layers. Cover the stacked dough with a cloth again. Let it rise for another 30 minutes. Preheat your oven to 350°F (175°C). Bake the bread for 25 to 30 minutes. It should turn golden brown and smell amazing. Let it cool for a few minutes before flipping it onto a serving platter. You can add fresh rosemary sprigs for a nice touch. For the full recipe, check out the complete details I provided! To make the best dough, start with fresh yeast. Old yeast may not rise well. Use warm water to activate the yeast, but avoid water that is too hot. A good range is 110°F (45°C). Make sure to knead the dough enough. Kneading lets the gluten form and gives the bread a nice texture. Aim for about 5-7 minutes of kneading. The dough should feel smooth and elastic. When baking, preheat your oven fully. A hot oven helps the bread rise better. Use a bundt pan or cake pan for unique shapes. Line the pan with parchment paper for easy removal. Check the bread towards the end of baking. It should be golden brown and sound hollow when tapped. One common mistake is over-proofing the dough. If it rises too much, it can collapse. Keep an eye on the dough during the rise. Another mistake is not using enough flour when shaping. Too much stickiness can make the dough hard to handle. Lastly, don't skip the second rise. It enhances the bread's texture. For more details, refer to the Full Recipe. {{image_2}} You can change the flavor of your Rosemary Garlic Pull Apart Bread easily. Try adding cheese like mozzarella or parmesan for a creamy touch. You can swap rosemary for other herbs, like thyme or oregano, to create a new taste. Adding sun-dried tomatoes or olives gives a nice Mediterranean twist. For a spicy kick, mix in red pepper flakes. Each change adds a new layer to your bread. If you have dietary needs, you can still enjoy this bread. Use gluten-free flour to make it gluten-free. Replace the butter with a plant-based option for a dairy-free version. If you're avoiding sugar, try a sugar substitute like honey or maple syrup. You can also use a low-sodium salt to reduce sodium intake. With these swaps, everyone can enjoy this tasty treat. Serving this bread is simple and fun. You can enjoy it warm with olive oil for dipping. Pair it with soups or salads for a complete meal. For a snack, serve it with cheese and cured meats. You can even make it a part of a brunch spread with eggs and fruit. The options are endless, and each way brings out the flavors of the bread. For the full recipe, check out the complete guide above. After enjoying your rosemary garlic pull apart bread, store any leftovers properly. First, let the bread cool to room temperature. Then, wrap it tightly in plastic wrap or aluminum foil. You can also place it in an airtight container. This keeps the bread soft and fresh. Store it at room temperature for up to three days. If you notice any dryness, try adding a slice of apple to the container. This helps keep the bread moist. If you want to save your delicious bread for later, freezing is a great option. Cut the bread into individual pieces for easy serving. Wrap each piece tightly in plastic wrap. Then, place them in a freezer-safe bag or container. Label the bag with the date. You can freeze the bread for up to three months. When ready to eat, let it thaw in the fridge overnight. Reheating your rosemary garlic pull apart bread is simple. For the best results, preheat your oven to 350°F (175°C). Place the bread on a baking sheet and cover it with foil. This keeps it from drying out. Heat for about 10-15 minutes or until warm. If you prefer, you can also use a microwave. Heat individual pieces for about 15-20 seconds. Just be careful not to overheat them. Enjoy your warm, savory bread just like the first day! Making this bread takes about 2 hours total. This includes prep time and two rising times. The first rise takes about 1 hour. The second rise lasts about 30 minutes. Baking the bread takes 25 to 30 minutes. Yes, you can use fresh garlic. If you prefer fresh garlic, chop it finely. Use about 4 cloves, just like in the recipe. Fresh garlic gives a strong flavor. It can make your bread extra tasty. This bread pairs well with many dishes. You can serve it with soup or salad. It also goes great with pasta or as a side for grilled meats. You can even enjoy it alone with some olive oil for dipping. To check if your bread is done, look for a golden brown color. You can also tap the top gently. If it sounds hollow, it is ready. Use a toothpick to test the center. If it comes out clean, it’s fully baked. For the full recipe, check the details provided earlier. In this post, we covered how to make Rosemary Garlic Pull Apart Bread. We looked at the key ingredients, from flour to rosemary, and detailed step-by-step instructions. You learned useful tips to perfect your dough and avoid common mistakes. We also explored flavor variations, dietary options, and how to store leftovers. Baking bread is fun and rewarding. Try out different flavors or serve with your favorite dishes. Enjoy the warm, homemade taste that will impress anyone who tries it. Happy baking!
Rosemary Garlic Pull Apart Bread Savory and Simple Recipe
Who doesn’t love warm, fresh bread? In this post, I’ll show you how to make Rosemary Garlic Pull Apart Bread. It’s savory, simple, and perfect
- 1 pound ground beef or turkey - 1 cup pineapple chunks - 1/2 cup teriyaki sauce For ground meat, you can use ground chicken or pork. These options work well too. If you want a vegetarian choice, try black beans or lentils. They give a nice texture. For teriyaki sauce, you might use soy sauce mixed with honey or maple syrup. This mix gives a sweet and salty flavor. You can also find gluten-free teriyaki sauces if needed. When choosing pineapple, fresh is best for flavor. It adds a juicy taste. Canned pineapple is fine and saves time. Just drain it well before using. For teriyaki sauce, look for brands with natural ingredients. Avoid those with too many additives. A good sauce should be thick and shiny, with a balanced sweet and savory taste. 1. Preheating the oven: First, set your oven to 400°F (200°C). This ensures even cooking. Preheating is key for great meatballs. 2. Preparing the baking sheet: Line a baking sheet with parchment paper. This makes cleanup easy. It also keeps the meatballs from sticking. 1. Combining ground meat and teriyaki sauce: In a large bowl, add 1 pound of ground beef or turkey. Pour in half a cup of teriyaki sauce. Mix well but do not overwork it. You want a tender meatball, not a dense one. 2. Adding pineapple and forming meatballs: Now, fold in 1 cup of pineapple chunks. Mix gently until just combined. Then, scoop out portions and shape them into meatballs. Aim for 1 to 1.5 inches in size. This helps them cook evenly. 1. Cooking time and temperature: Place the formed meatballs on the prepared baking sheet. Brush or drizzle the remaining teriyaki sauce over the top. Bake them in the oven for 20-25 minutes. 2. Signs of doneness: The meatballs should be golden brown and firm to the touch. You can check their internal temperature. It should reach 165°F for safety. Enjoy the sweet and savory aroma filling your kitchen! For more detailed steps on creating these tasty meatballs, check out the [Full Recipe]. To make sure your meatballs stay juicy, mix the ground meat and teriyaki sauce well. Use your hands to gently combine the ingredients. This helps keep the meat tender. Avoid overmixing, as it can make them tough. Baking time is also key. Cook the meatballs at 400°F for 20-25 minutes. Check for a golden brown color. You want them cooked through but not dry. You can add extra spices to boost flavor. Try garlic powder or ginger for a kick. A pinch of red pepper flakes adds warmth without overwhelming the dish. Garnishes can make your meatballs pop. Fresh green onions or chopped cilantro add color and freshness. You can also use extra pineapple chunks on top for a sweet touch. For serving, you can place the meatballs on a bed of rice or noodles. This adds texture and makes the dish filling. When plating, arrange the meatballs neatly. Drizzle some teriyaki sauce over them for shine. Use a sprinkle of sesame seeds for a nice finish. This makes your dish look appealing and ready to enjoy! For the [Full Recipe], check the instructions to create these delicious meatballs! {{image_2}} You can use different proteins for your Hawaiian meatballs. Ground chicken or pork makes a great swap. Both options give a nice flavor. They also stay juicy while baking. If you’re looking for vegetarian options, try using lentils or chickpeas. Mash them up and mix with the teriyaki sauce. This gives a tasty twist without meat. While teriyaki sauce is great, you can mix it up. Try barbecue sauce for a smoky flavor. You can also use sweet and sour sauce for a tangy kick. If you love spice, add sriracha or chili paste to your sauce. This sweet and spicy mix can make your meatballs pop with flavor. Pair your Hawaiian meatballs with rice or quinoa. Both are perfect for soaking up sauce. You could also serve them with a fresh salad for a healthy side. For drinks, try a light beer or a tropical smoothie. Both complement the sweet and savory taste well. To keep your meatballs fresh, refrigerate them in an airtight container. They will stay good for up to three days. Make sure to let them cool down before sealing. If you want to enjoy them later, freezing is a great option. Place the meatballs in a single layer on a baking sheet first. Freeze them for about an hour before transferring them to a freezer bag. This way, they won’t stick together. When it’s time to eat again, you can reheat your meatballs easily. The best methods are the oven or the microwave. For the oven, preheat it to 350°F (175°C). Place the meatballs on a baking sheet and warm them for 10-15 minutes. If using a microwave, place them on a plate and cover with a damp paper towel. This helps keep them moist. Heat for about one to two minutes, checking to ensure they’re hot throughout. Making these meatballs ahead of time saves you time on busy nights. You can prepare the meatballs and freeze them raw. Just follow the full recipe and freeze them before baking. When ready to cook, bake them straight from the freezer. They will take a few extra minutes to cook. This method is perfect for quick weeknight dinners. You can serve them with rice or noodles for a full meal that’s ready in no time. You can tell when the meatballs are done by checking a few signs. First, look for a nice, golden-brown color on the outside. You can also use a meat thermometer. The center should reach 165°F (74°C) for safe eating. If you don't have a thermometer, just cut one open. It should be no longer pink inside. The juices should run clear too. Yes, you can make these meatballs ahead of time! To do this, prepare the meatballs as directed. Then, place them on a baking sheet and freeze them. Once frozen, transfer them to a freezer bag. You can store them for up to three months. When you're ready to cook, bake them straight from the freezer. Just add a few extra minutes to the cooking time. Hawaiian meatballs go well with many sides. You can serve them with white rice or fried rice for a filling meal. Stir-fried vegetables add color and crunch. A fresh salad with a light dressing can balance the richness of the meatballs. For a fun twist, try them in a slider bun with some slaw. These meatballs can be made gluten-free with a few changes. First, check the teriyaki sauce. Some brands add gluten. Look for gluten-free labeled sauces instead. You can also use ground turkey or beef, which are naturally gluten-free. Just ensure all your ingredients are safe for gluten-free diets. Enjoy your delicious meatballs without worry! For the full recipe, check out the detailed instructions above. This blog post covered how to make delicious Hawaiian meatballs. We discussed key ingredients, replacements, and the best quality choices. The step-by-step guide detailed preparation, mixing, and baking for perfect meatballs. I shared tips for juiciness and flavorful enhancements, along with exciting variations to try. Finally, we explored storage and reheating options for leftovers. In closing, I hope this simple recipe brings joy to your meals and sparks creativity in your kitchen. Enjoy making these tasty treats with family and friends.
Savory 3 Ingredient Hawaiian Meatballs Recipe
Craving a sweet and savory dish that’s simple and delicious? Let me introduce you to my Savory 3 Ingredient Hawaiian Meatballs! Made with just ground
To make these tasty Greek turkey meatballs, you need simple and healthy items. Here is what you will need: - 1 pound ground turkey - 1/2 cup whole wheat breadcrumbs - 1/4 cup grated Parmesan cheese - 1/4 cup fresh parsley, finely chopped - 2 cloves garlic, minced - 1 teaspoon dried oregano - 1 teaspoon salt - 1/2 teaspoon black pepper - 1 large egg, lightly beaten These ingredients blend well to give you juicy meatballs. Turkey keeps them light, while the breadcrumbs add texture. Parmesan cheese gives a nice flavor boost. This creamy sauce pairs perfectly with the meatballs. Here’s what you need for the tzatziki: - 1/2 cup plain Greek yogurt - 1/2 cucumber, grated (and excess moisture squeezed out) - 1 clove garlic, minced - 1 tablespoon fresh dill, chopped - 1 tablespoon lemon juice - Salt to taste Using Greek yogurt makes the sauce rich without extra fat. The cucumber adds a fresh crunch, while dill and lemon juice brighten the flavors. To make your dish look even better, consider these garnishes: - Chopped parsley for fresh color - Lemon wedges for added zing Garnishing your meatballs enhances their appeal. A sprinkle of parsley adds a pop of green, and lemon wedges invite guests to squeeze fresh juice on top. For the full recipe, refer to the instructions above. Enjoy your cooking! First, I set my oven to 400°F (200°C). This temperature helps the meatballs cook evenly. Next, I line a baking sheet with parchment paper. This step keeps the meatballs from sticking and makes clean-up easy. In a large bowl, I add the ground turkey and whole wheat breadcrumbs. Then, I sprinkle in the grated Parmesan cheese and fresh parsley. I also add the minced garlic, dried oregano, salt, and pepper. Finally, I pour in the beaten egg. I mix everything gently. I want to combine the ingredients without overworking the meat. Overmixing can make the meatballs tough. Once mixed, I use my hands to shape the mixture into balls about 1 inch in diameter. I place them on the prepared baking sheet, making sure to leave space between each one. I put the baking sheet in the preheated oven and set a timer for 20-25 minutes. During this time, the meatballs cook through and turn golden brown. For even cooking, I flip them halfway through. The aroma filling the kitchen makes my mouth water! While the meatballs bake, I prepare the tzatziki. I take a medium bowl and add the plain Greek yogurt. Then, I grate the cucumber and squeeze out the excess moisture. This keeps the sauce from becoming watery. I add the grated cucumber, minced garlic, fresh dill, lemon juice, and a pinch of salt to the yogurt. I mix everything well and refrigerate it until the meatballs are ready. This sauce adds a cool and refreshing touch to the warm meatballs. You can find the full recipe at the end of the article. To make your meatballs fluffy and moist, use fresh ingredients. Fresh herbs add great flavor and moisture. I prefer using whole wheat breadcrumbs. They give the meatballs a nice texture. Do not overmix the meat mixture. Overmixing makes the meatballs dense. When forming the meatballs, use a light hand. Make them about one inch wide for even cooking. To boost flavor, add spices and herbs. I like using garlic and oregano in my meatballs. Fresh parsley also brightens up the dish. You can experiment with other herbs like basil or mint. A bit of grated cheese adds richness. Parmesan is a great choice, but you can try feta for a twist. For a kick, add a pinch of red pepper flakes. The perfect tzatziki should be thick yet smooth. Start with plain Greek yogurt for the best base. Grate your cucumber finely, then squeeze out excess water. This step keeps the sauce from getting runny. Mix in fresh dill and lemon juice for tang. Adjust the salt to taste. For a creamier tzatziki, add more yogurt. Taste as you go to find your ideal balance. For the complete recipe, check out the Full Recipe section. {{image_2}} You can easily change the flavors of your Greek turkey meatballs. Here are some ideas to try: - Ground Meat: Use ground chicken or lamb for a different taste. - Breadcrumbs: Swap whole wheat breadcrumbs for gluten-free options like almond flour. - Cheese: Substitute Parmesan with feta for added tang. - Herbs: Try mint or cilantro instead of parsley for fresh notes. These swaps can give your dish a unique twist while keeping it healthy. You don't have to bake these meatballs in the oven. Here are two fun methods: - Air Fryer: Preheat your air fryer to 375°F (190°C). Cook the meatballs for about 12-15 minutes, shaking the basket halfway. This method gives you crispy edges without extra oil. - Grilling: Preheat your grill to medium heat. Place the meatballs on skewers and grill for 10-15 minutes, turning until cooked through. Grilling adds a smoky flavor that's hard to beat. Pair your meatballs with tasty sides to make a complete meal: - Salad: A fresh Greek salad with tomatoes, cucumbers, and olives complements the flavors well. - Pita Bread: Serve your meatballs in warm pita pockets for a fun twist. - Rice or Quinoa: Pair with a side of lemon-infused rice or quinoa for a filling dish. You can also serve the meatballs with the tzatziki sauce for a refreshing dip. For the full recipe, check out the Greek Delight Turkey Meatballs with Tzatziki. To keep your healthy Greek turkey meatballs fresh, store them in an airtight container. Let the meatballs cool down to room temperature first. If you have tzatziki sauce left over, store it in a separate container. This helps prevent the meatballs from getting soggy. Place the containers in the fridge. They will stay good for about three days. If you want to save your meatballs for later, freezing is a great option. First, let them cool completely. Then, arrange the meatballs on a baking sheet in a single layer. Freeze them for about one hour. Once frozen, transfer the meatballs to a freezer-safe bag. This prevents them from sticking together. Tzatziki can also be frozen, but it may lose some texture. Store it in a freezer-safe container and use it within one month for best taste. Reheating is simple. For meatballs, place them on a baking sheet and heat in a preheated oven at 350°F (175°C) for about 10-15 minutes. If you prefer the microwave, heat them in short bursts, checking often. For tzatziki, just take it out of the fridge and stir. It’s ready to enjoy. Always check the temperature to make sure everything is warm before serving. Yes, you can use chicken or beef. Both options work well. Chicken gives a lighter taste. Beef adds a richer flavor. Adjust cooking time based on the meat. Chicken may cook faster, while beef may take longer. Greek turkey meatballs pair well with many sides. Here are some ideas: - Brown rice or quinoa for a healthy base. - A fresh Greek salad with cucumbers and tomatoes. - Roasted vegetables for a colorful plate. - Pita bread for a fun, handheld option. - Hummus as a tasty dip. Leftovers stay good for about 3 to 4 days. Store meatballs in an airtight container. Make sure to cool them before sealing. This keeps them fresh longer. Yes, you can make tzatziki ahead of time. It tastes better after chilling for a bit. Prepare it a day in advance for the best flavor. Just store it in the fridge until you are ready to serve. You can find the full recipe for these delicious meatballs and tzatziki above. In this post, we explored making healthy Greek turkey meatballs with tasty tzatziki. We discussed the main ingredients needed and shared tips for the best flavor and texture. I provided options for various cooking methods and serving suggestions. Remember, you can customize this dish to suit your taste. Whether you’re enjoying leftovers or trying new variations, these meatballs are a satisfying meal. Happy cooking!
Healthy Greek Turkey Meatballs with Tzatziki Recipe
Craving a healthy twist on classic comfort food? I’ve got the perfect recipe for you: Healthy Greek Turkey Meatballs with Tzatziki. These meatballs are juicy,
- 1 pound fresh green beans, trimmed - 1 cup water - 1 cup distilled white vinegar - 2 tablespoons granulated sugar - 2 tablespoons kosher salt - 4 cloves garlic, peeled and smashed - 1 tablespoon dill seeds - 1 teaspoon red pepper flakes (adjust to taste) - 1 teaspoon mustard seeds - 1 teaspoon black peppercorns - Optional: fresh dill sprigs for garnish To make spicy dilly beans, you need a few tools: - A large pot for blanching - A medium saucepan for the brine - Sterilized jars (like pint jars) for storage - A bowl of ice water - Tongs or a slotted spoon for handling beans When selecting green beans, look for bright green ones. They should be firm and crisp. Avoid beans with brown spots or wrinkles, as these may indicate age. Fresh beans have a sweet smell and snap when bent. Choose organic if possible. This choice often means better taste and fewer chemicals. Freshness makes all the difference in your spicy dilly beans. For the best flavor, use them within a few days of purchase. First, you need to blanch the green beans. Start by boiling water in a large pot. Add the trimmed green beans to the pot. Boil them for 3-4 minutes. You want them bright green and tender-crisp. After boiling, remove the beans and quickly place them in ice water. This stops the cooking. Let them cool for about 5 minutes. Then, drain them and set aside. This step keeps your beans crunchy. Next, we’ll make the brine. In a medium saucepan, combine 1 cup of water, 1 cup of distilled white vinegar, 2 tablespoons of sugar, and 2 tablespoons of kosher salt. Heat this mixture over medium-high heat. Stir until the sugar and salt dissolve. Once dissolved, add in the smashed garlic, dill seeds, red pepper flakes, mustard seeds, and black peppercorns. Lower the heat and let it simmer for 5 minutes. This helps the flavors mix well and gives a kick to your beans. Now, it’s time to pack the jars. Use sterilized jars for best results. Stand the blanched green beans upright in the jars. Pack them tightly to fit as many as possible. Pour the hot brine over the beans until they are fully submerged. Leave about ½ inch of space at the top of each jar. If you want, add fresh dill sprigs on top. This adds more flavor and looks nice. Allow the jars to cool to room temperature. Once cool, seal the jars with lids. Place them in the fridge for at least 24 hours. The flavors will grow stronger over the next week. You can find the full recipe in the main article to guide you through these steps. To get that perfect crunch in your spicy dilly beans, follow these steps. First, always use fresh beans. Look for bright green, firm beans; they should snap easily. When blanching, don't cook them too long. Just 3-4 minutes will keep them crisp. Next, plunge the beans into ice water right away. This stops the cooking and locks in the crunch. To really pack a punch in flavor, let the beans soak in the brine. After you make the brine, let it simmer with spices for five minutes. This helps the flavors mingle. Use red pepper flakes to control the heat level. If you like it spicy, add more! Optional fresh dill sprigs on top add a nice herbal touch. One common mistake is using old or limp beans. They won’t hold up well in the brine. Another pitfall is not packing the beans tightly in the jars. Leave some space, but not too much! Also, be sure to leave headspace for the brine. This helps preserve the beans better. Lastly, don't skip refrigeration. Let them chill for at least 24 hours before eating. This time allows the flavors to develop fully. For the full recipe, check the earlier section. {{image_2}} You can customize your spicy dilly beans by adding extra spices. Try adding coriander seeds for a citrusy taste. A pinch of turmeric adds a warm color and flavor. You can also use fresh chili peppers for more heat. Each spice adds its own unique flavor. Remember, start small. You can always add more to taste. Dilly beans can be both sweet and savory. For a sweet version, add more sugar or honey to the brine. This creates a nice balance with the vinegar and spices. If you prefer savory, skip the sugar. Focus on garlic, dill, and black pepper. Both styles taste great, so experiment to find your favorite! You can use other vegetables instead of green beans. Try carrots, cucumbers, or even cauliflower. Each vegetable offers a different crunch and flavor. Just make sure to cut them into similar sizes for even pickling. You can use the same brine recipe, and the results will be delicious. Enjoy the fun of trying new veggies! For more ideas, check out the Full Recipe for spicy dilly beans and get inspired! To keep your spicy dilly beans fresh, store them in the fridge. Use clean, airtight jars. Make sure the beans are fully submerged in the brine. This helps keep them crunchy and flavorful. If you don’t have a jar, a plastic container works too. Just ensure it seals well. When stored correctly, spicy dilly beans last about 3 to 4 weeks in the fridge. You can enjoy them right after making. However, the taste gets even better after a week. The flavors meld together and create a richer taste. Always check your dilly beans before eating. Look for any unusual smells or colors. If you see mold or the brine looks cloudy, it’s best to toss them. Any off-putting smell is also a red flag. Enjoy your spicy dilly beans while they are at their best! For full details on making this tasty dish, check the Full Recipe. Dilly beans are pickled green beans. They are crunchy and full of flavor. The brine mixes vinegar, dill, and spices. This makes them tangy and a bit spicy. You can enjoy them as a snack or side dish. They pair well with sandwiches and salads. You should refrigerate the beans for at least 24 hours. This allows the flavors to blend well. However, for the best taste, wait a week. The longer they sit, the better they get. You will love the intense flavor after one week! Yes, you can can spicy dilly beans for long-term storage. Just use proper canning methods. Ensure your jars are sterilized before packing. This helps keep them safe for up to a year. Always check for seals and signs of spoilage before eating. You can find spicy dilly beans at local farmers' markets. Many grocery stores also carry them. Look in the pickle aisle or the refrigerated section. If you can't find them, try making your own. The full recipe is easy and fun! This post covered all you need to know about making spicy dilly beans. We explored the right ingredients, special tools, and how to prepare and pack them. I shared tips for achieving that perfect crunch and ways to infuse flavors. We discussed variations, ensuring you can customize to your taste. Finally, I provided storage tips and answered common questions. Making dilly beans is fun and rewarding. Try it, and enjoy a tasty treat all year long!
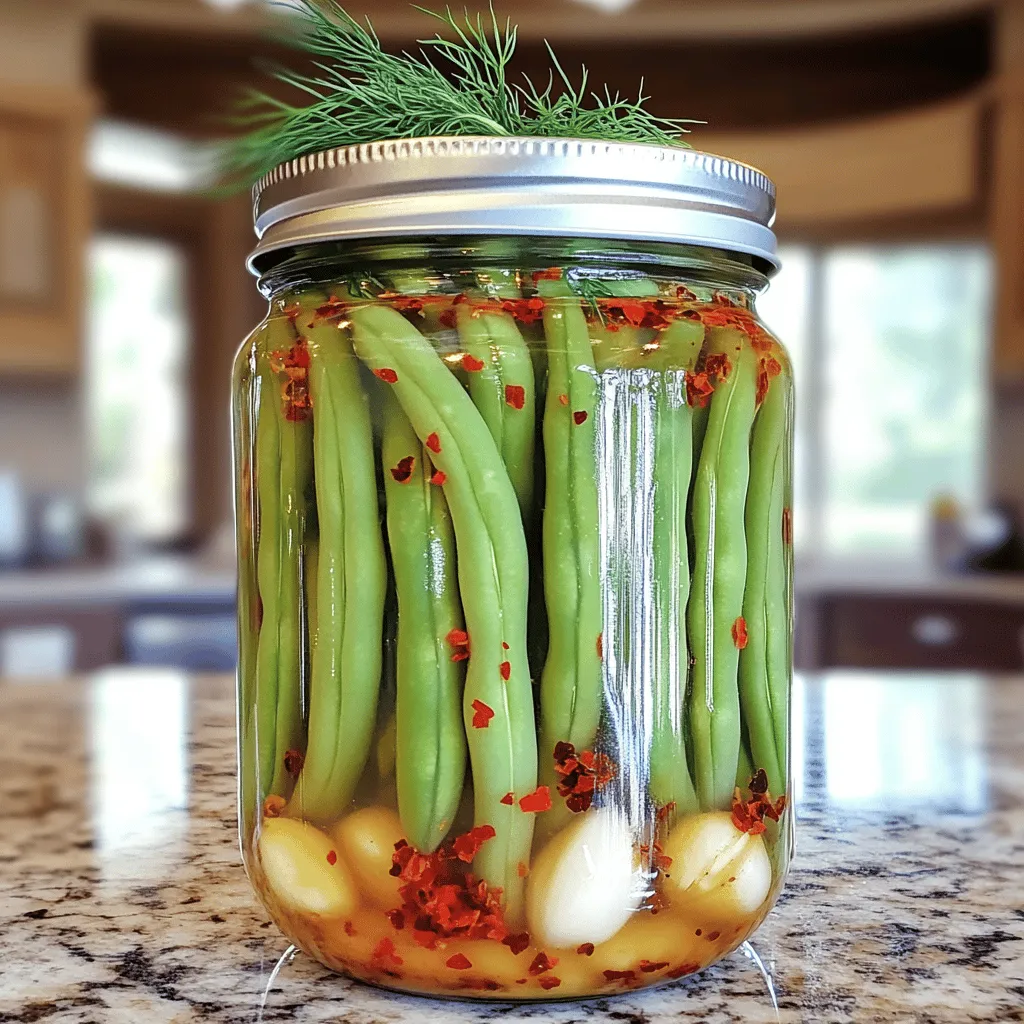
Spicy Dilly Beans Crunchy and Flavorful Delight
Are you ready to spice up your snack game? Spicy Dilly Beans are not just crunchy; they burst with flavor in every bite. In this