Breakfast
![Mediterranean Baked Feta Eggs is a quick and tasty dish. This meal combines eggs, feta cheese, and bright veggies. You can make it in just about 30 minutes. It serves two people, making it perfect for a cozy breakfast or brunch. Here is what you need for this dish: - 200g feta cheese - 4 large eggs - 1 cup cherry tomatoes, halved - 1/2 cup kalamata olives, pitted and halved - 1 tablespoon olive oil - 1 teaspoon dried oregano - 1 teaspoon paprika - Salt and pepper to taste - Fresh basil or parsley for garnish - Crusty bread for serving Each ingredient adds a unique taste. The feta cheese brings creaminess. The olives give a nice salty bite. The tomatoes add sweetness. You can swap some ingredients if needed: - Use goat cheese instead of feta for a different flavor. - If you don’t have cherry tomatoes, try regular diced tomatoes. - Any olives work, but kalamata gives the best taste. - Fresh herbs like cilantro or dill can replace basil or parsley. - For a vegan option, use tofu instead of eggs and cheese. These swaps make the dish fit your taste or diet. Enjoy experimenting! To start, gather your ingredients. You need feta cheese, eggs, cherry tomatoes, kalamata olives, olive oil, dried oregano, paprika, salt, pepper, and some fresh herbs. Preheat your oven to 375°F (190°C). This step is key for even cooking. Next, take a medium-sized baking dish. Place the halved cherry tomatoes and kalamata olives in it. Spread them out evenly. Now, crumble the feta cheese over the top. Make a little well in the center for the eggs. This will keep the eggs cozy. Drizzle olive oil over the feta and veggies. Sprinkle dried oregano, paprika, salt, and pepper on top. This mix will create a burst of flavor when baked. Once your prep is done, it’s time to bake. Carefully crack the eggs into the well you made in the feta. If you need more space, gently move the tomatoes and olives. Pop the dish in the oven. Bake for about 15 to 20 minutes. You want the egg whites to set but keep the yolks a bit runny. This creates a lovely sauce when you dip bread. When baking is complete, take the dish out. Let it cool for a minute. This helps avoid burns when you dig in. To make your eggs perfect, watch the time closely. If you leave them too long, the yolks will firm up. A runny yolk adds richness to the dish. Use fresh ingredients for the best flavor. If your tomatoes are sweet, it makes a big difference. Also, feel free to add fresh basil or parsley right before serving. This adds a nice color and aroma. Serve your Mediterranean Baked Feta Eggs with crusty bread. This is great for dipping into the feta and egg mix. Enjoy every bite! For the complete recipe, refer to the Full Recipe section. To make Mediterranean Baked Feta Eggs, you need a few simple tools: - Medium-sized baking dish - Mixing spoon - Knife for chopping - Measuring spoons - Oven mitts for safety These tools help you prepare and bake your dish without fuss. They keep your kitchen organized and fun to work in. Here are some common mistakes to watch for: - Overbaking the eggs: Check them at 15 minutes. You want runny yolks. - Not using enough salt: Feta can be salty, but you still need more. Taste and adjust. - Crowding the dish: Leave space for the eggs. This way, they cook evenly. Avoid these errors to create a perfect dish every time. You can easily enhance the flavors in this dish: - Add fresh herbs: Basil and parsley bring brightness. - Use different cheeses: Try goat cheese for a tangy twist. - Mix in spices: Red pepper flakes can add heat. These tips will help you create a dish full of flavor, making every bite a delight. For the full recipe, check out the guide above. {{image_2}} You can easily adjust this dish to fit different diets. If you want a dairy-free option, try using vegan feta. For gluten-free diets, skip the bread or use gluten-free bread. If you follow a low-carb plan, enjoy it without the bread or add more veggies. To add more flavor, think about spices and veggies. You can use fresh herbs like thyme or dill for a unique twist. Chopped spinach or bell peppers add color and nutrition. If you like heat, sprinkle some red pepper flakes on top. You can also cook this dish in different ways. If you don’t have an oven, use a skillet. Just cook it on low heat, covering it with a lid. This method keeps the eggs soft. You can also use a microwave for a quick meal. Just make sure to use a microwave-safe dish. For the complete recipe, check out the [Full Recipe]. To store leftovers, let the dish cool down. Then, cover it tightly with plastic wrap or transfer it to an airtight container. Place it in the fridge where it will stay fresh for up to three days. When you reheat it, the flavors will still be delightful. Reheating is simple. Preheat your oven to 350°F (175°C). Place the Mediterranean baked feta eggs in an oven-safe dish. Cover it with foil to keep moisture in. Heat for about 10-15 minutes until warm. You can also microwave individual portions. Heat for 1-2 minutes, checking to avoid overcooking. You can freeze this dish, but the texture may change. To freeze, first cool the eggs completely. Then, cut into portions and place them in freezer bags or containers. Make sure to remove as much air as possible. This way, it can last for up to two months. To enjoy, thaw it overnight in the fridge before reheating. This method helps keep the flavors intact from the full recipe. Feta cheese is perfect for this dish. It melts well and adds a creamy taste. You can also use goat cheese if you want a different flavor. It has a tangy taste that goes well with eggs. Other cheeses, like ricotta, may not give the same result. Yes, you can prepare some parts ahead. Chop the tomatoes and olives the day before. You can also crumble the feta cheese early. When you are ready to cook, just follow the steps in the Full Recipe. Baking it fresh will give you the best taste. This dish pairs well with crusty bread for dipping. You can also enjoy it with a simple salad. A green salad with lemon dressing brightens the meal. If you want extra protein, serve it with turkey or chicken sausage. In this blog post, we explored the joys of baking feta eggs. I shared a full recipe overview, detailed ingredient lists, and smart substitutions. You learned step-by-step instructions for preparation and baking, plus tips for perfect results. I provided kitchen tools and common mistakes to help you succeed. Variations for dietary needs and flavor swaps were included too. Lastly, we covered storage tips and frequently asked questions. Follow these steps, and you’ll enjoy delicious feta eggs any time!](https://tossedrecipes.com/wp-content/uploads/2025/05/a530e2c0-a528-4ba9-ac59-25236ccd123a.webp)
Mediterranean Baked Feta Eggs Flavorful and Easy Meal
Looking for a quick yet tasty meal? You’ll love Mediterranean Baked Feta Eggs! This dish is simple, full of rich flavors, and packed with goodness.
![To make a Berry Bliss Smoothie Bowl, gather the following items: - 1 cup frozen mixed berries (strawberries, blueberries, raspberries) - 1 banana, sliced - 1/2 cup Greek yogurt (or dairy-free alternative) - 1/2 cup coconut milk (or any milk of choice) - 1 tablespoon honey or maple syrup (optional) These ingredients blend together to create a creamy, fruity base. The frozen berries give a nice chill, while the banana adds sweetness and creaminess. Greek yogurt boosts protein, making this bowl filling and nutritious. Once you have your base ready, consider these fun toppings to enhance your bowl: - Fresh berries - Sliced banana - Granola - Chia seeds - Shredded coconut - Mint leaves These toppings not only add flavor and texture but also make your bowl look stunning. You can mix and match based on what you enjoy or have on hand. When choosing berries, freshness matters. Look for: - Bright colors - Firm textures - Pleasant smells Ripe berries will taste sweeter and more flavorful. If using frozen berries, ensure they are from a trusted brand. This ensures they are picked at peak ripeness and retain their nutrients. Enjoy making this Berry Bliss Smoothie Bowl with your chosen ingredients for a tasty treat. For the complete recipe, refer to the Full Recipe section. Start by gathering your ingredients. You need frozen mixed berries, a banana, Greek yogurt, and coconut milk. If you like, add honey or maple syrup for sweetness. This step takes just a few minutes. When you blend, add the frozen mixed berries first. Then, add the banana, Greek yogurt, and coconut milk. Blend on high until smooth. If it’s too thick, add a splash of milk. Remember, you want a thick texture. Stop to scrape the sides of the blender if needed. This helps mix everything well. Once you blend your smoothie, pour it into a bowl. Now comes the fun part! Use a line of granola down the center. Then, add fresh berries and banana slices around it. Sprinkle chia seeds and shredded coconut on top. Finish with mint leaves for a pop of green. This makes your bowl look amazing and colorful! Enjoy your Berry Bliss Smoothie Bowl with a spoon. It's a treat for both your eyes and your taste buds. For the complete recipe, check out the [Full Recipe]. For a thick and creamy smoothie bowl, texture is key. Start with frozen mixed berries. They help chill the mix and keep it thick. Use ripe bananas for added creaminess. If your smoothie is too thick, add a splash of coconut milk. Blend it well, but don't over-blend. You want a smooth mix, not a liquid. Sweetness can change your Berry Bliss experience. If you want it sweeter, add honey or maple syrup. Start with one tablespoon. Taste it and add more if needed. You can also use ripe bananas for natural sweetness. If you prefer low-sugar options, skip the sweeteners. The berries are sweet enough! Making this bowl dairy-free is easy. Just swap Greek yogurt for a plant-based yogurt. Coconut yogurt works great! For milk, use almond, oat, or soy milk. This keeps the flavor rich and creamy. If you avoid honey, use maple syrup instead. Your Berry Bliss will still be tasty and fresh! {{image_2}} You can add greens to your smoothie bowl for extra nutrients. Spinach or kale works great. Just one small handful will do. Blend the greens with your berries and banana. This adds color and health benefits without changing the taste much. You won't even notice the greens! For a fun twist, try adding pineapple. Pineapple brings a fresh, sweet flavor to your bowl. Use about half a cup of fresh or frozen pineapple. Blend it in with the berries and banana. This makes the smoothie bowl taste like a summer vacation. It’s a delightful change! If you want more protein, there are easy ways to boost it. You can add a scoop of protein powder or nut butter. Almond butter or peanut butter are great choices. They mix well with the flavors and help keep you full. Greek yogurt also adds protein if you use more. These options make your smoothie bowl a tasty meal. Try these variations to keep your Berry Bliss Smoothie Bowl exciting. You can find the full recipe above to get started! If you have leftover Berry Bliss Smoothie Bowl, store it in the fridge. Use an airtight container. This keeps it fresh for up to 24 hours. When you're ready to eat, give it a quick stir. If it looks thick, add a splash of milk to loosen it up. You can freeze your smoothie mix for later. Just blend your ingredients as usual. Then, pour the mix into ice cube trays or a freezer-safe bag. This makes for easy and quick prep. When you want a smoothie bowl, just blend a few cubes with your favorite milk. Use glass or BPA-free plastic containers for storing smoothies. Glass is best for keeping flavors fresh. Look for containers that seal tightly to prevent spills. You want your smoothie to taste great and stay safe. Yes, you can use fresh berries. Fresh berries give a bright taste. However, frozen berries make the smoothie colder and thicker. If you use fresh berries, add ice to chill the mix. This keeps your smoothie bowl refreshing and enjoyable. You can replace Greek yogurt with many options. Try regular yogurt, dairy-free yogurt, or even silken tofu. Each choice adds a unique flavor and texture. If you're vegan, choose a plant-based yogurt for a creamy base. To get a thicker smoothie bowl, use less liquid. Blend less coconut milk or skip the honey. Also, add more frozen fruit, like bananas or berries. You can even add oats or chia seeds to thicken it up. Adjusting these ingredients helps create your perfect smoothie bowl. For the complete recipe, check out the Berry Bliss Smoothie Bowl. You now have all you need to create a Berry Bliss Smoothie Bowl. We covered essential ingredients, blending tips, and fun topping ideas. The variations allow you to explore flavors and add nutrition. Proper storage keeps your smoothie bowls fresh for later enjoyment. Don’t forget to try the FAQs for extra insights. Enjoy your tasty and healthy creation. You’ll love how easy it is to make and customize this bowl. It’s perfect for breakfast or a snack!](https://tossedrecipes.com/wp-content/uploads/2025/05/cc92b05d-172d-43ac-af64-b2c7699cf3ec.webp)
Berry Bliss Smoothie Bowl Simple and Nutritious Treat
Are you ready to dive into a deliciously refreshing Berry Bliss Smoothie Bowl? This simple and nutritious treat packs a punch of flavor and health.
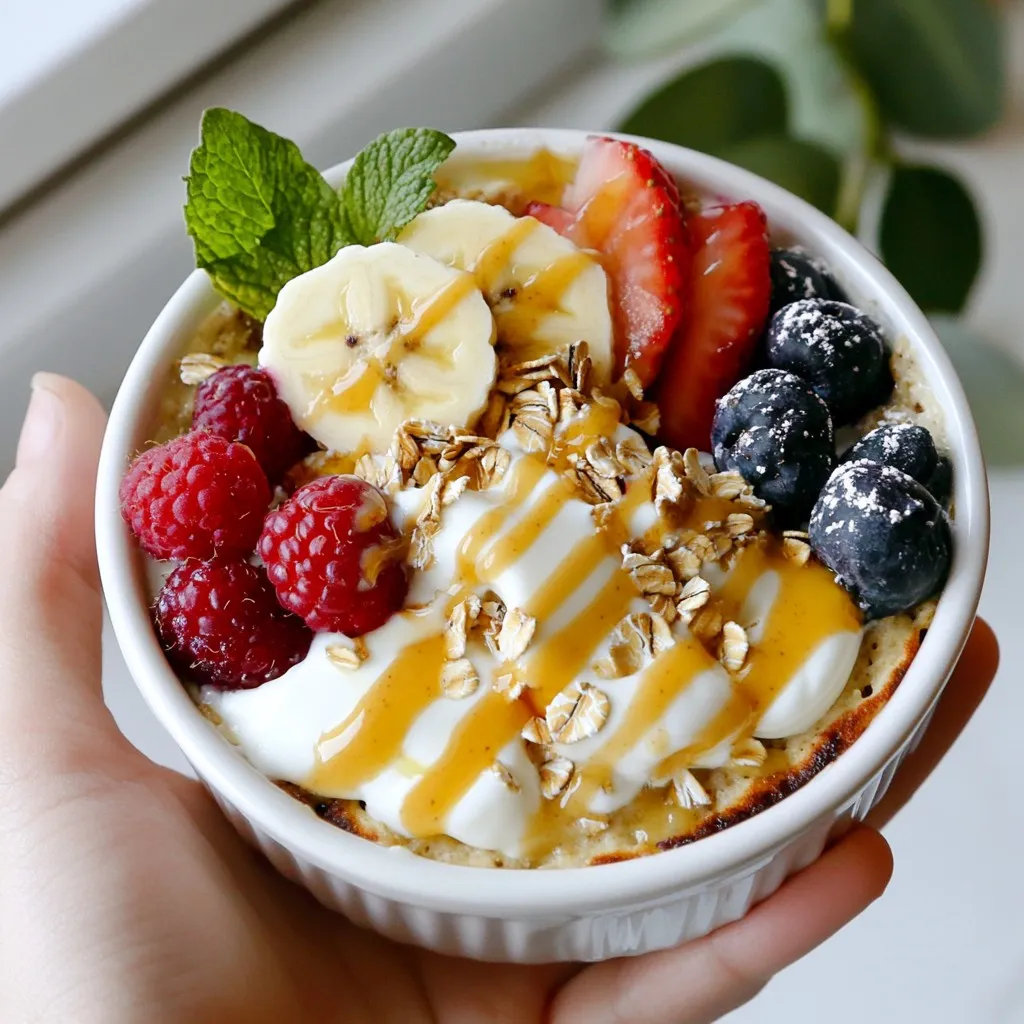
Baked Protein Pancake Bowls Healthy and Delicious Meal
Baked protein pancake bowls are the perfect, healthy meal for any time of day! They are easy to make, packed with protein, and oh so
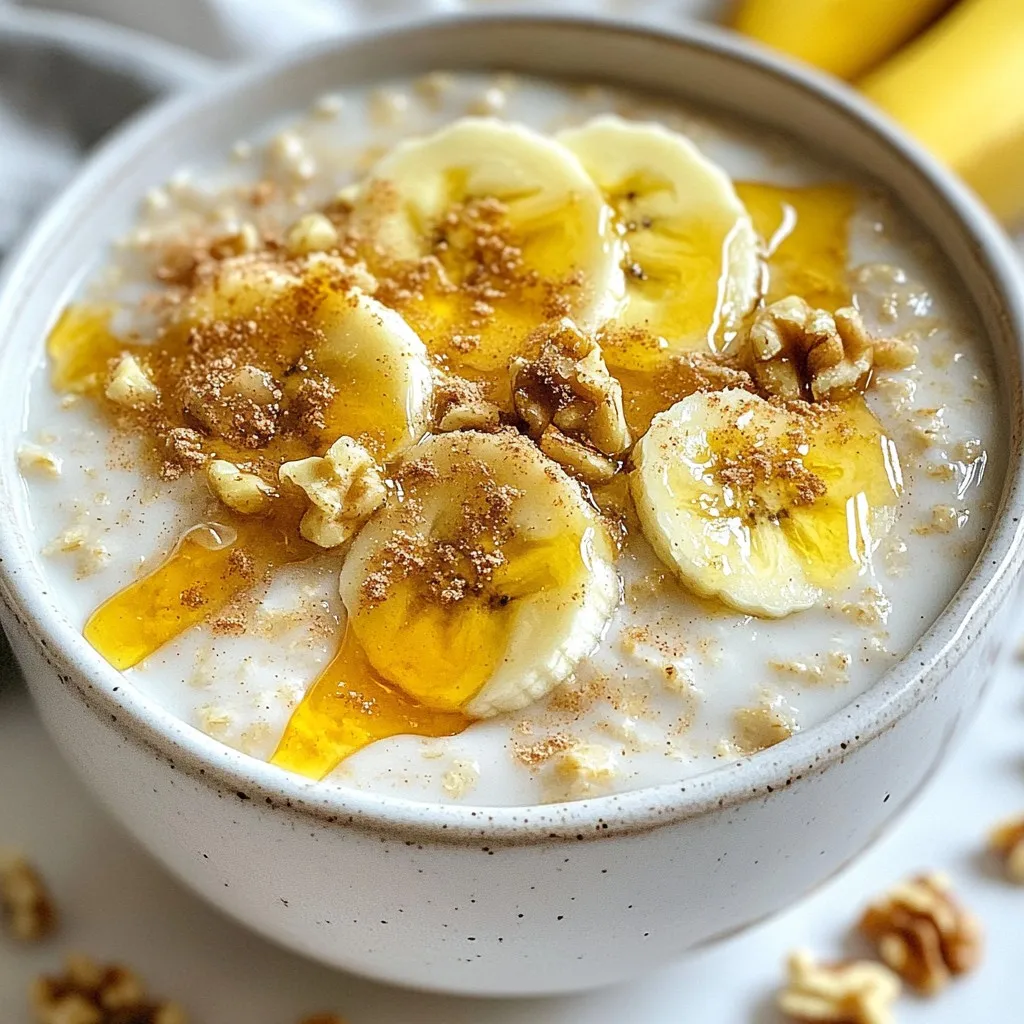
Brown Sugar Overnight Oats Delicious and Easy Recipe
Looking for a quick and tasty breakfast? Try my Brown Sugar Overnight Oats! This recipe is simple, delicious, and perfect for busy mornings. With just