Breakfast

To make Greek yogurt zucchini bread, you need a few simple ingredients. This recipe uses fresh zucchini, Greek yogurt, and eggs as the main components. These ingredients add moisture and flavor to the bread. The sugar gives it sweetness, while the oil helps keep it soft. Flour, baking soda, and baking powder create the perfect rise. Cinnamon and salt enhance the taste. You can also add nuts or chocolate chips for extra crunch. Here’s a quick list of what you need and how much to use: - 2 cups grated zucchini (about 2 medium zucchinis) - 1 cup Greek yogurt - 3 large eggs - 1/2 cup vegetable oil - 1 cup granulated sugar (or coconut sugar) - 1 teaspoon vanilla extract - 2 cups all-purpose flour (or whole wheat flour) - 1 teaspoon baking soda - 1/2 teaspoon baking powder - 1 teaspoon ground cinnamon - 1/2 teaspoon salt - 1/2 cup chopped walnuts or pecans (optional) - 1/2 cup raisins or chocolate chips (optional) You can easily change some ingredients to fit your needs. For a healthier option, use coconut sugar instead of granulated sugar. Whole wheat flour can replace all-purpose flour for more fiber. If you want a dairy-free version, try using a plant-based yogurt. You can skip the nuts or chocolate chips if you want a simpler taste. Each swap can still give you a tasty loaf! First, set your oven to 350°F (175°C). This step is crucial for even baking. Grease a 9x5-inch loaf pan or line it with parchment paper. Grab two medium zucchinis and grate them using a box grater. Squeeze the grated zucchini in a clean kitchen towel. This removes excess moisture and helps the bread bake better. Set the zucchini aside for later. In a large bowl, whisk together the Greek yogurt, three large eggs, vegetable oil, sugar, and vanilla extract. Mix until the mixture is smooth and well combined. This will create a rich base for your bread. In another bowl, whisk together the all-purpose flour, baking soda, baking powder, ground cinnamon, and salt. This step ensures that the leavening agents and spices are evenly distributed throughout the flour. Now, gently fold the grated zucchini into the wet mixture. If you choose to add nuts or raisins, fold them in at this stage too. Be careful not to overmix; you want the batter to stay light and fluffy. Pour the batter into the prepared loaf pan. Smooth out the top with a spatula. Bake it in the preheated oven for 50-60 minutes. Check it by inserting a toothpick into the center. If it comes out clean, your bread is ready! Once baked, take the bread out of the oven. Let it cool in the pan for about 10 minutes. After that, transfer it to a wire rack to cool completely. When cool, slice it into pieces. Enjoy your Greek yogurt zucchini bread! For the complete recipe, refer to the Full Recipe! To make your zucchini bread moist, use fresh zucchinis. Grate them right before mixing. This keeps their moisture intact. Squeeze out some excess water with a clean towel. Too much water can make bread soggy. Greek yogurt adds creaminess and moisture too. It helps bind the ingredients without making the bread heavy. Use a box grater or a food processor to grate zucchini. Grating it thin helps it blend well into the batter. Always wash the zucchini first to remove any dirt. I like to leave the skin on for extra color and nutrients. If you have time, let the grated zucchini sit for a bit. This allows more moisture to escape before you mix it in. Good ingredients make great bread. Choose ripe zucchinis that feel firm. Fresh Greek yogurt adds a rich flavor. Use high-quality eggs for better texture. When it comes to flour, I recommend all-purpose flour or whole wheat for a heartier taste. For sweetness, try coconut sugar as a healthier option. Stick to fresh spices, like cinnamon, for the best aroma. If you want to dive deeper into the recipe, check out the Full Recipe. {{image_2}} You can make Greek yogurt zucchini bread even healthier. Try using coconut sugar instead of granulated sugar. Coconut sugar has a lower glycemic index. You can also use whole wheat flour instead of all-purpose flour. This adds fiber and nutrients to your bread. It will still taste delicious, and you won’t lose the moistness. Adding flavors can make your zucchini bread special. Try mixing in spices like nutmeg or ginger. They add warmth and depth. You can also fold in nuts like walnuts or pecans. They give a nice crunch. If you want a sweet touch, stir in chocolate chips or raisins. These add sweetness and texture, making each slice delightful. If you want a vegan version, it’s simple to adapt. Replace the eggs with flaxseed meal. Mix one tablespoon of flaxseed meal with three tablespoons of water. Let it sit for a few minutes to thicken. You can also swap Greek yogurt with a dairy-free yogurt. This keeps the bread moist without using any animal products. Enjoy your vegan zucchini bread without missing out on taste! You can store Greek yogurt zucchini bread at room temperature for up to three days. Keep the bread wrapped in plastic wrap or in an airtight container. This helps it stay fresh and moist. Avoid direct sunlight or heat, as these can dry it out. For longer storage, place the bread in the fridge. It will last about a week. Wrap it tightly in plastic wrap, then put it in a container. To freeze, cut the bread into slices. Wrap each slice in plastic wrap and place them in a freezer bag. This way, it stays fresh for up to three months. When ready to eat, just thaw the slices in the fridge overnight. To enjoy your zucchini bread warm, preheat your oven to 350°F (175°C). Place the slices on a baking sheet and heat for about 10 minutes. You can also use a microwave. Heat each slice for 15-20 seconds. Be careful not to overheat, or it may dry out. Enjoy your Greek yogurt zucchini bread fresh and tasty! For the full recipe, check the recipe section above. Greek yogurt adds moisture and richness to your baked goods. It gives a nice texture to the bread. The tangy flavor balances the sweetness of the sugar. Plus, it is high in protein compared to regular yogurt. This helps the bread rise and become fluffy. Using Greek yogurt can also make your zucchini bread healthier. It cuts down on the fat needed in the recipe. Yes, you can use frozen zucchini! Just make sure to thaw it first. Drain any extra water after thawing. This will help keep your bread from getting too wet. Frozen zucchini can save time and reduce food waste. It’s great if you have leftover zucchini from summer. The best way to check is to use a toothpick. Insert it into the center of the bread. If it comes out clean, your bread is done. If it has wet batter on it, bake a bit longer. You can also look for a golden-brown color on the crust. The edges should pull away slightly from the pan. Yes, you can skip the nuts or chocolate chips if you want. The bread will still taste good without them. If you prefer a plain bread, just leave those ingredients out. You can also add other mix-ins like dried fruit or seeds if you like. The recipe is flexible to suit your taste! For the full recipe, check out the details above. This blog post covered all the key steps to bake perfect zucchini bread. We looked at ingredients, measurements, and substitutions. I shared simple, step-by-step instructions for baking and cooling. Also, I provided tips for moisture and ingredient choice, plus fun variations. Store your bread right for the best taste. Remember, baking is fun, and small changes can create big flavors. Use this guide to bake your tastiest zucchini bread yet! Enjoy experimenting with flavors and sharing your delicious results.
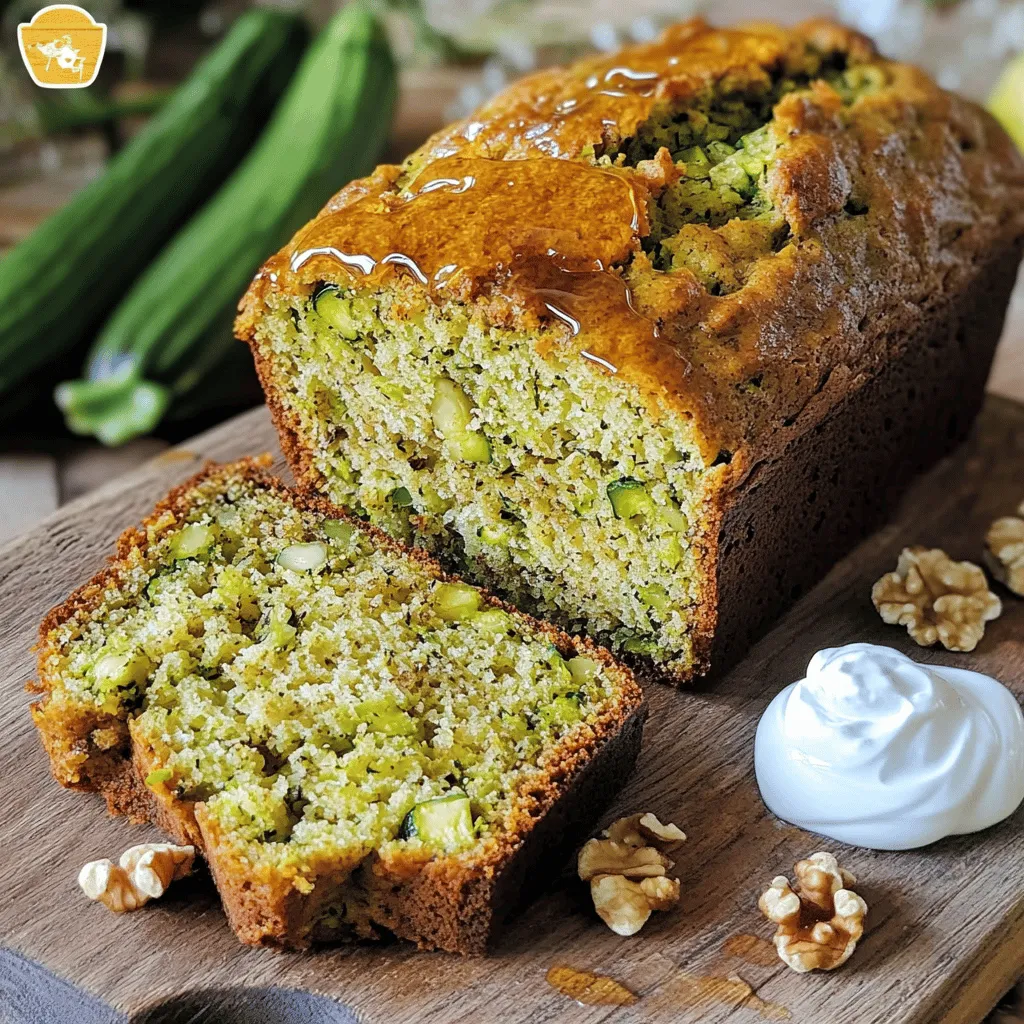
Greek Yogurt Zucchini Bread Simple and Tasty Recipe
Looking for a simple way to enjoy a delicious twist on classic zucchini bread? My Greek Yogurt Zucchini Bread is the answer! This moist, flavorful
To make Protein French Toast, gather these ingredients: - 4 slices of whole grain bread - 2 large eggs - 1 cup unsweetened almond milk - 1 scoop vanilla protein powder - 1 teaspoon cinnamon - 1 tablespoon vanilla extract - 1 tablespoon maple syrup (optional) - 1 tablespoon coconut oil (for cooking) - Fresh berries (for topping) - Greek yogurt (for serving) For whole grain bread, I like brands that use natural grains. Look for breads with high fiber and no added sugars. For protein powder, choose one that is low in sugar and blends well. My favorite is a plant-based vanilla powder. Almond milk should be unsweetened for a healthy choice. I prefer brands that are fortified with vitamins. When it comes to cinnamon, fresh ground provides the best flavor. Always use pure vanilla extract for the best results. Protein French Toast is not just tasty; it’s also healthy. Each serving contains: - About 20-25 grams of protein, thanks to eggs and protein powder. - Whole grain bread adds fiber, which helps with digestion. - Fresh berries provide antioxidants and vitamins. - Greek yogurt adds creaminess and extra protein. This dish keeps you full and energized for the day ahead, making it a perfect breakfast choice! To make Protein French Toast, gather your ingredients. You need whole grain bread, eggs, almond milk, protein powder, cinnamon, vanilla extract, maple syrup, and coconut oil. Here’s how to prepare it: 1. In a bowl, whisk together the eggs and almond milk. 2. Add the protein powder, cinnamon, vanilla extract, and maple syrup. Mix until smooth. 3. Heat a non-stick skillet over medium heat. Add coconut oil and let it melt. 4. Dip each slice of bread into the egg mixture. Make sure both sides are coated well. 5. Let any extra mixture drip off before cooking. 6. Place the bread slices on the skillet. Cook for 3-4 minutes on each side until golden brown. 7. Remove the slices from the skillet. Keep them warm if needed. Cooking Protein French Toast requires some simple techniques to ensure the best results: - Heat Control: Keep the skillet at medium heat. Too hot can burn your toast. - Even Coating: Make sure each slice is fully coated. This helps the bread soak up all that flavor. - Flipping: Use a spatula to flip gently. This keeps the slices intact and prevents them from breaking. Testing if your Protein French Toast is ready is easy. Here’s what to do: - Visual Check: Look for a golden-brown color on both sides. This shows the toast is cooked. - Texture Test: Press down lightly. It should feel firm but springy. If it feels too soft, give it more time. - Taste Test: The best way to know is to taste it! If it’s warm and delicious, you did it right. Enjoy making your Protein French Toast! For the Full Recipe, check the recipe section above. To get that fluffy texture, start with fresh bread. Whole grain works best here. Use thick slices for a hearty bite. When you mix the batter, whisk it well. This adds air, making it light. Soak the bread just enough. Too long makes it soggy. You can change the flavor with spices and add-ins. Try nutmeg or cardamom for warmth. A pinch of salt helps balance sweetness. Want a twist? Add mashed banana or pumpkin puree. For crunch, mix in chopped nuts. Top with peanut butter or almond butter for richness. Avoid using stale bread; it won’t hold up. Don't skip the vanilla; it adds depth. If your skillet is too hot, the outside burns while the inside stays raw. Always preheat the pan before adding oil. Lastly, resist the urge to flip too soon; wait until golden brown. For the full recipe, be sure to check out the detailed steps. {{image_2}} You can easily make a vegan version of protein French toast. To start, swap the eggs for a flaxseed mixture. Just mix one tablespoon of ground flaxseed with three tablespoons of water. Let it sit for five minutes until it thickens. Use plant-based milk like almond or oat milk in place of dairy. This keeps it creamy and rich. If you need a gluten-free option, use gluten-free bread. Many stores sell great-tasting options now. Ensure your protein powder is also gluten-free. This way, you can enjoy the same fluffy texture without the gluten. Cook it just like the original recipe. You'll have a tasty breakfast that fits your needs! Toppings can take your protein French toast to the next level. Fresh fruits, like bananas or strawberries, add natural sweetness. You can also sprinkle nuts for extra crunch. A drizzle of almond butter or peanut butter gives a rich flavor. For a fun twist, try a dollop of coconut yogurt. It’s a great way to mix things up while enjoying your delicious meal. For the full recipe, check out the section above! To store leftover Protein French Toast, first let it cool. Place the slices in a single layer on a plate. Cover them with plastic wrap or aluminum foil to keep them fresh. If you have a lot of leftovers, stack them with parchment paper between each slice. This will help prevent sticking. Store the covered toast in the fridge for up to three days. When you're ready to eat your leftover French toast, you can reheat it. The best way is to use a skillet. Heat the skillet on low and add a bit of coconut oil. Place the toast in the skillet and warm it for about 2-3 minutes on each side. This keeps it crispy. You can also use a toaster or oven. If using an oven, preheat it to 350°F (175°C) and heat the toast for about 10 minutes. If you want to keep your Protein French Toast for longer, freezing is a great option. After your toast cools, wrap each slice in plastic wrap. Place the wrapped slices in a freezer bag. This way, they can last up to two months in the freezer. When ready to eat, take out the slices and let them thaw in the fridge overnight. You can also reheat them from frozen. Just add a few extra minutes to your reheating time. Enjoy your delicious breakfast again! The best protein powder for French toast is whey or plant-based. Both options mix well and add protein. I prefer vanilla flavor. It gives a nice taste to the toast. Brands like Optimum Nutrition or Garden of Life work great. Always check for added sugars. You want a clean option. Yes, you can make French toast without eggs. Try using mashed bananas or flaxseed meal instead. Mix one tablespoon of flaxseed with three tablespoons of water. Let it sit for a few minutes to thicken. This will help bind the mixture. You can also use silken tofu blended until smooth. It works well and keeps it creamy. You can add more protein in several ways. Use more protein powder in the mix. You can also top the toast with Greek yogurt or cottage cheese. Adding nuts or seeds can boost protein too. Almonds, walnuts, or chia seeds are good choices. For a sweet touch, try nut butter. It adds flavor and protein. For the complete recipe, see the Full Recipe section above. Protein French toast is a tasty and healthy option. We explored the best ingredients, cooking tips, and even variations like vegan and gluten-free options. Remember to store leftovers properly for the best taste later. With these insights, you can make this meal your own. Experiment with flavors and enjoy your protein-packed breakfast. Making delicious French toast is easy when you follow these steps. Now, get cooking and make your mornings special with this fun dish!
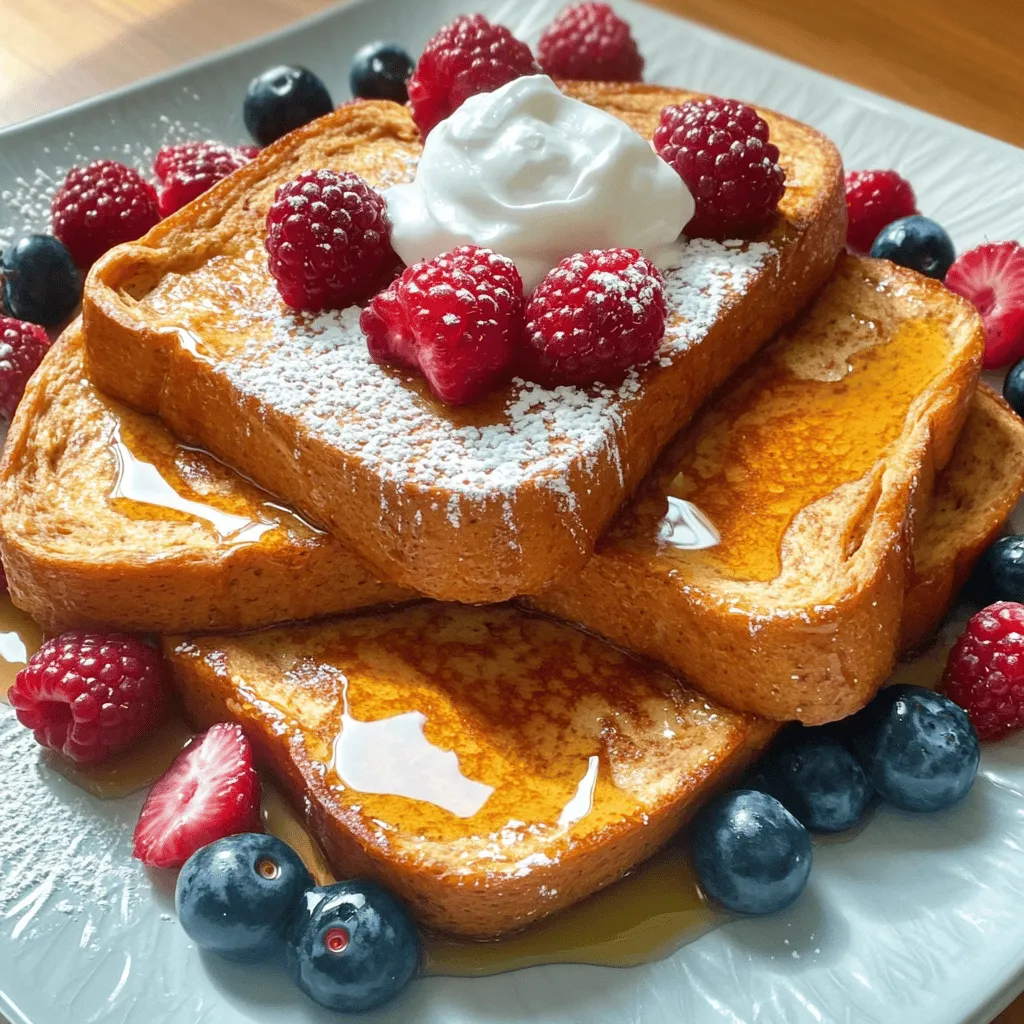
Protein French Toast Flavorful Breakfast Delight
Are you looking for a breakfast that’s both tasty and packed with protein? You’ve landed in the right place! I’ll guide you through making Protein
To make a tasty Loaded Breakfast Hash, you need some key ingredients. Here’s what you’ll need: - 3 large russet potatoes, diced - 1 cup bell peppers (red, yellow, and green), diced - 1 small red onion, chopped - 1 cup cooked sausage (chicken or turkey), crumbled - 1 cup spinach leaves, chopped - 4 large eggs - 1 teaspoon smoked paprika - 1 teaspoon garlic powder - Salt and pepper to taste - 2 tablespoons olive oil The potatoes give a nice base. They should be crispy on the outside and tender inside. The bell peppers and onions add sweetness and color. Crumbled sausage brings a savory flavor, while spinach adds a healthy touch. The eggs are the star, providing protein and richness. You can make your hash even better with some fun toppings. Consider these options: - Avocado slices - Fresh parsley, chopped - Hot sauce for serving Adding avocado gives a creamy texture. Fresh parsley brightens the dish with color and flavor. A drizzle of hot sauce adds a kick, making it a perfect morning treat. You can find the full recipe for this delightful dish to explore each step! To make crispy potatoes, start with russet potatoes. Dice them into small cubes for even cooking. Heat one tablespoon of olive oil in a large skillet over medium heat. Add the diced potatoes, and season them with salt, pepper, garlic powder, and smoked paprika. This adds a great flavor. Cook the potatoes for about 10-12 minutes. Stir them occasionally until they turn golden brown. You want them crispy on the outside and soft inside. Next, we add the veggies. Chop a small red onion and some bell peppers into small pieces. When the potatoes are ready, add these chopped veggies to the skillet. Sauté for about 4-5 minutes. Caramelization is key here; it brings out the natural sweetness of the onions and peppers. This step gives the hash a nice flavor and texture. Now it’s time for the meat. Use cooked sausage, either chicken or turkey, crumbled into small bits. Add it to the skillet and stir to combine. Cook for another 2-3 minutes until it heats through. While the meat warms, crack four large eggs in a separate pan. Fry them sunny side up or to your liking. Once everything is ready, it's time to assemble the dish. Divide the loaded breakfast hash on plates, top with a fried egg, and sprinkle with fresh parsley. If you like, add avocado slices for a tasty touch. For a kick, drizzle with hot sauce. Enjoy your delicious loaded breakfast hash! You can swap ingredients to suit your taste. For a vegetarian option, use mushrooms or zucchini instead of sausage. You can also add black beans for extra protein. If you prefer meat, try bacon or ham for a different flavor. Spice lovers can add jalapeños or chili powder for heat. Adjust the spice levels to match your comfort zone. Choose different cooking oils to boost taste. Olive oil adds a fruity flavor, while avocado oil has a mild taste. Butter gives a rich, creamy touch. Use these oils in a mix for extra depth. For perfect eggs, fry them low and slow. This leads to a tender white and a runny yolk. Use a lid to cook them evenly. Arrange your loaded hash on a large plate for a beautiful look. Add the fried egg on top and sprinkle with fresh parsley for color. Serve with avocado slices for creaminess. A drizzle of hot sauce adds a pop of color and flavor. You can pair your hash with toast or a fruit salad for a complete meal. For the full recipe, check out the Loaded Breakfast Hash section. {{image_2}} You can easily make a veggie-loaded breakfast hash. Use seasonal vegetables like zucchini, asparagus, or tomatoes. Fresh veggies add flavor and nutrition. They bring colors that make your dish pop. Adding more greens, like kale or arugula, boosts the health factor. Greens are rich in vitamins and minerals. They keep you full longer and add fiber to your meal. Try mixing in different vegetables to keep it exciting. Switching up the protein sources makes your breakfast hash even better. You can use lean meats like turkey bacon or chicken sausage. These options give you flavor without too much fat. Beans or tofu are great for adding protein. Black beans or chickpeas offer a hearty texture. Tofu is an excellent plant-based choice that soaks up flavors well. Both options keep your meal filling and nutritious. Adding cheese brings extra richness to your hash. Cheese melts beautifully and creates a creamy texture. It also adds a savory flavor that pairs well with other ingredients. The best types of cheese to use include cheddar, feta, or gouda. Cheddar gives a classic taste. Feta adds a tangy kick, while gouda provides a smooth finish. Sprinkle your favorite cheese on top for a delightful breakfast treat. For the full recipe, refer to the Loaded Breakfast Hash section. To keep your loaded breakfast hash fresh, start by letting it cool. Once cooled, place it in an airtight container. This helps to keep moisture in and air out. Store it in the fridge. It will stay good for up to three days. Make sure to label the container with the date. When you are ready to eat, you can use several methods to reheat your hash. The best way is to use a skillet. Heat it on medium and add a splash of olive oil. Stir often until it gets hot. You can also use the microwave. Just place it in a microwave-safe dish and cover it. Heat for one to two minutes. This keeps the hash nice and soft, but it may lose some crunch. If you want to save some for later, freezing is a great option. Use a freezer-safe container for this. Divide the hash into smaller portions for easy use later. It can stay in the freezer for up to three months. When you want to eat it, move it to the fridge to thaw overnight. Reheating from frozen may change the texture. Use the skillet method to bring back some crispiness. Just cook it over medium heat until hot. Enjoy your loaded breakfast hash whenever you want! For the full recipe, check out the earlier sections. Yes, you can make Loaded Breakfast Hash ahead of time. It stores well in the fridge for about three days. To keep it fresh, place it in an airtight container. Just reheat it in a skillet or microwave before serving. This method saves time on busy mornings. You can also prep the potatoes and veggies the night before. This makes morning cooking a breeze. I love using russet potatoes for their fluffy texture. They get crispy on the outside and soft inside. Yukon gold potatoes are another great option. They have a creamy feel and rich taste. Red potatoes can also work well, as they hold their shape nicely. Each type brings a unique flavor to your dish. Choose what you like best for your hash. To make Loaded Breakfast Hash healthier, try these tips. Use turkey or chicken sausage instead of pork for less fat. You can also add more veggies, like zucchini or mushrooms, for extra nutrients. Swap out some potatoes for cauliflower for a lower-carb choice. Use less oil when cooking or choose a spray oil. Lastly, serve with a side of fresh fruit for a balanced meal. Loaded breakfast hash is a hearty and customizable dish. You start with potatoes, sausage, and eggs, then add your favorite veggies. With tips for perfect cooking and tasty variations, it's easy to suit your taste. You can also store leftovers well, so nothing goes to waste. Finally, remember, you can make this ahead of time to enjoy a quick meal. Get creative and make breakfast hash your own!
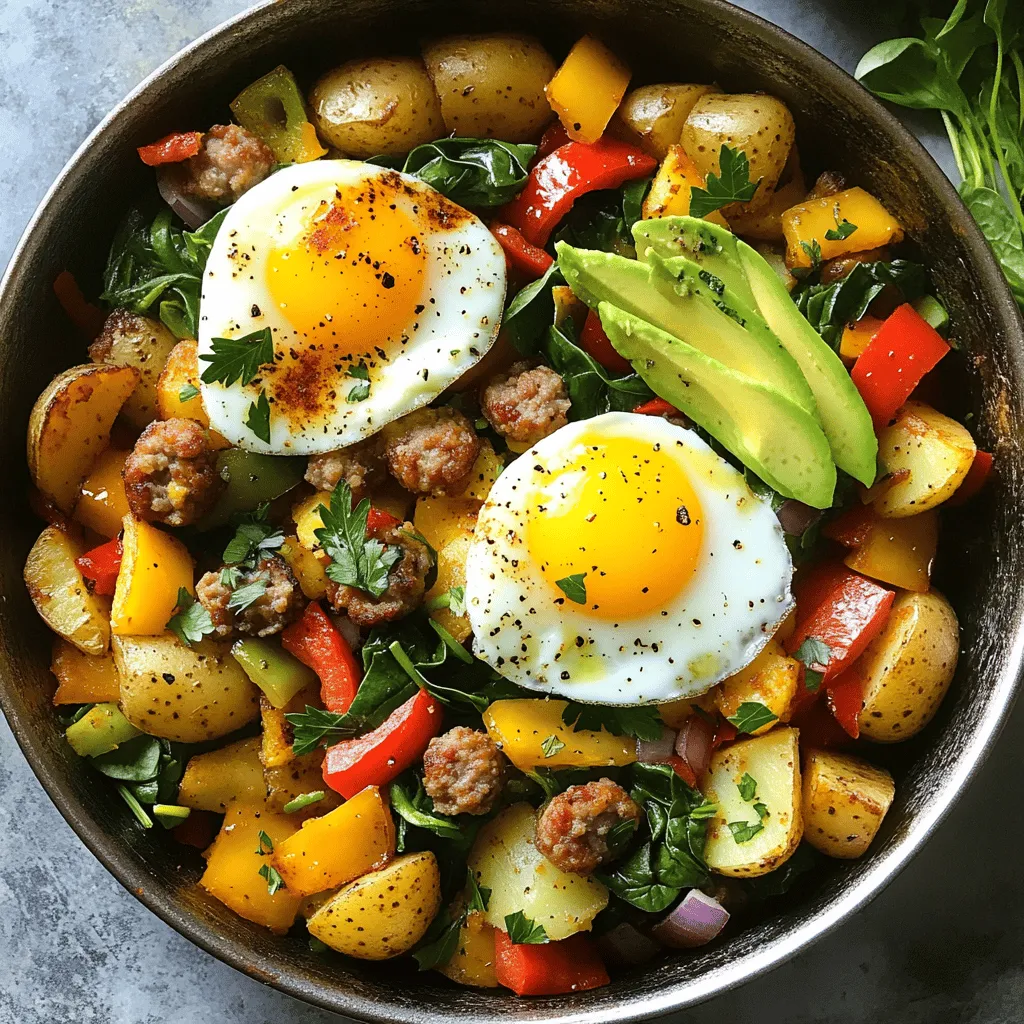
Loaded Breakfast Hash Flavorful Morning Delight
Start your day with a burst of flavor! Loaded Breakfast Hash is the perfect way to kick off your morning. With crispy potatoes, savory sausage,
To make a tasty Low Carb Breakfast Burrito Bowl, gather these ingredients: - 4 large eggs - 1 tablespoon olive oil - 1 cup cauliflower rice (fresh or frozen) - 1/2 bell pepper (red or green), diced - 1/2 small onion, diced - 1/4 cup black beans, rinsed and drained - 1/4 cup diced tomatoes - 1/2 avocado, sliced - 1/4 teaspoon cumin - 1/4 teaspoon paprika - Salt and pepper to taste - Fresh cilantro, for garnish - Hot sauce, optional This dish is not only delicious but also low in carbs. Here’s a simple breakdown of what you get per serving: - Calories: About 350 - Protein: 20g - Carbohydrates: 12g - Fiber: 5g - Fats: 25g This bowl keeps your energy up while keeping carbs low. You get healthy fats from the eggs and avocado, and fiber from the beans and cauliflower. - Eggs: Choose large, fresh eggs for the best taste. Look for organic or pasture-raised for quality. - Cauliflower Rice: Fresh is best, but frozen works too. Check for no added ingredients. - Bell Peppers and Onions: Pick bright and firm ones. They should feel heavy for their size. - Black Beans: Rinse canned beans well to reduce sodium. Dried beans are a great option if you have time. - Avocado: Look for avocados that yield slightly when pressed. This means they are ripe. By choosing fresh, high-quality ingredients, you can make your Low Carb Breakfast Burrito Bowl even more enjoyable. For the full recipe, check the detailed instructions above. Start by gathering your ingredients. You will need eggs, olive oil, cauliflower rice, bell pepper, onion, black beans, diced tomatoes, avocado, cumin, paprika, salt, and pepper. 1. Heat the olive oil in a large skillet over medium heat. 2. Add the diced onion and bell pepper. Sauté for about 3-4 minutes until they soften. 3. Stir in the cauliflower rice. Cook for another 5 minutes until tender. 4. Season the mix with cumin, paprika, salt, and pepper. Stir well. 5. In a bowl, beat the eggs. Pour them into the skillet, mixing until scrambled, about 3-4 minutes. 6. Add the drained black beans and diced tomatoes. Stir gently to warm them through. 7. Remove from heat. Transfer the mix into serving bowls. 8. Top each bowl with avocado slices and fresh cilantro. Serve with hot sauce if you want. For more flavor, use fresh spices. Fresh cumin and paprika will give your dish a richer taste. Sauté your vegetables until golden brown for extra depth. This caramelization adds sweetness and complexity. Another tip is to season the eggs well. A pinch of salt while beating the eggs can boost their flavor. You can also use garlic powder for a kick. This helps create a well-rounded dish that excites your taste buds. Feel free to make this bowl your own. You can swap black beans for kidney beans or chickpeas. Both add great taste and nutrition. For a spicy kick, try adding diced jalapeños or chili powder. If you want a creamier texture, mix in some cheese before serving. You can also add fresh veggies like spinach or zucchini for more nutrients. Just sauté them with the onion and bell pepper. Each change can make the dish unique and suit your taste. Check out the Full Recipe for more ideas! To cook eggs just right, start with fresh eggs. Crack them into a bowl and whisk until mixed. Use a non-stick skillet to avoid sticking. Heat the skillet on medium. Pour in the eggs and stir gently. Keep stirring until they are soft and fluffy. Remove them from heat before they are fully set. This keeps them creamy. For the best veggies, chop them small. This helps them cook more evenly. Heat olive oil in your skillet. Add the onion and bell pepper first. Sauté them for about 3-4 minutes. Wait until they are soft and smell great. Next, add the cauliflower rice. Stir it in for about 5 minutes. This makes the rice tender and full of flavor. You can add many tasty toppings to your burrito bowl. Try fresh salsa for a zesty kick. Cheese adds creaminess, too. You might like a dollop of Greek yogurt as a healthier sour cream. Fresh herbs like cilantro brighten the dish. Don't forget slices of jalapeño if you want some heat! For a crunch, try adding nuts or seeds. Each topping can make your bowl unique and delicious. Check out the Full Recipe for more ideas! {{image_2}} You can easily swap proteins in this breakfast bowl. Chicken or turkey works great if you want lean meat. Simply cook the meat in the skillet before adding the veggies. Tofu is an excellent choice for a vegetarian option. For tofu, just press it to remove extra water, then cube it and sauté until golden. This adds a nice texture and flavor. If you prefer a vegetarian bowl, skip the eggs and add more veggies. Spinach, zucchini, or mushrooms are tasty choices. You could also add cheese for extra creaminess. Feta or cheddar both melt well and add flavor. This way, you still enjoy a filling meal that fits within a low-carb diet. Adjusting the spice level is easy. If you like heat, add chopped jalapeños or a pinch of cayenne pepper to your mix. For a milder dish, leave out the hot sauce or use less cumin. You can also try smoked paprika for a smoky flavor without the heat. Customize it to match your taste! To keep your Low Carb Breakfast Burrito Bowl fresh, store it in an airtight container. Make sure to let it cool to room temperature first. You can keep it in the fridge for up to three days. This method helps preserve the flavors and texture of the dish. When you are ready to eat the leftovers, reheat them on the stove. Use a skillet over medium heat. Stir the mixture often to heat it evenly. You can also use the microwave. Place it in a microwave-safe bowl and cover it. Heat for one to two minutes, checking to see if it is hot throughout. If you want to save your burrito bowl for later, freezing is a great option. Use a freezer-safe container and portion out the bowls. Make sure to label the container with the date. You can freeze it for up to three months. To thaw, place it in the fridge overnight before reheating. This keeps the taste fresh and ready for you. You can find the full recipe in the main article. You can use shredded zucchini or broccoli rice. Both options are low in carbs and add texture. If you want something heartier, try using chopped spinach or kale. Each substitute brings a unique flavor and keeps the dish healthy. Just make sure to squeeze out excess water from zucchini to avoid sogginess. Yes, this recipe is great for meal prep. You can make the burrito bowl ahead of time and store it in the fridge. Just divide it into portions in airtight containers. This way, you have a tasty breakfast ready to go. It stays fresh for up to four days, making it perfect for busy mornings. Absolutely! You can prepare this dish in advance and reheat it. Just allow it to cool before storing in the fridge. When ready to eat, heat it in the microwave until warm. You can also use a skillet over low heat. This keeps the flavors intact and the eggs tender. This post covered how to make a Low Carb Breakfast Burrito Bowl. You learned about the key ingredients, their nutrition, and tips for choosing the best ones. I shared step-by-step instructions and cooking techniques to boost flavor. We explored variations with protein swaps and customization. Lastly, I provided storage tips for leftovers. You now have the tools to create a tasty, low-carb meal whenever you want. Enjoy trying out different flavors and make this recipe your own!
Low Carb Breakfast Burrito Bowl Tasty and Easy Recipe
Start your day with a burst of flavor and energy! My Low Carb Breakfast Burrito Bowl is packed with ingredients that keep you full without
To create a delicious Blueberry Buttermilk Pancake Casserole, you will need these simple ingredients: - 2 cups all-purpose flour - 2 tablespoons sugar - 1 tablespoon baking powder - 1 teaspoon baking soda - 1/2 teaspoon salt - 2 large eggs - 2 cups buttermilk - 1/4 cup melted butter - 1 cup fresh or frozen blueberries - 1 teaspoon vanilla extract - 1 teaspoon lemon zest - Optional: Maple syrup for serving Each ingredient plays a vital role in making this casserole rich and fluffy. The flour gives structure, while the buttermilk adds moisture and tang. The blueberries burst with flavor, making each bite special. The lemon zest brings brightness, enhancing the overall taste. You can easily adjust the recipe based on what you have at home. For instance, if you don’t have buttermilk, you can make a simple substitute with milk and vinegar. This flexibility helps you create a dish that fits your taste. For the full recipe, check out the Blueberry Buttermilk Pancake Casserole 🥞🫐. Enjoy the process of gathering your ingredients and preparing this delightful treat! First, preheat your oven to 350°F (175°C). While it warms up, grease a 9x13 inch baking dish. This will help the pancake casserole not stick. Next, in a large mixing bowl, combine the dry ingredients. Whisk together 2 cups of all-purpose flour, 2 tablespoons of sugar, 1 tablespoon of baking powder, 1 teaspoon of baking soda, and 1/2 teaspoon of salt. Make sure these are mixed well. In another bowl, whisk together the wet ingredients. You will need 2 large eggs, 2 cups of buttermilk, 1/4 cup of melted butter, 1 teaspoon of vanilla extract, and 1 teaspoon of lemon zest. Mix until everything is smooth. After that, pour the wet mixture into your dry ingredients. Stir until just combined; a few lumps are okay. Now, it’s time for the star of the show: the blueberries! Gently fold in 1 cup of fresh or frozen blueberries into the batter. This will make the casserole sweet and juicy. Pour the batter into your prepared baking dish. Spread it out evenly so it cooks well. Place the dish in the oven and bake for 25-30 minutes. To check if it's done, insert a toothpick in the center. If it comes out clean, it’s ready. The top should be golden brown. Let the casserole cool for about 5-10 minutes before slicing it into squares. It tastes best warm. For a fun presentation, serve it on a large platter. You can drizzle maple syrup over it for extra sweetness. If you want to get creative, try adding whipped cream or fresh fruit on top. This dish is versatile and can please anyone at the table. For the full recipe, check out the details above. To make your blueberry buttermilk pancake casserole rich and fluffy, avoid overmixing. Mixing too much makes the batter tough. Just combine the wet and dry ingredients until you see some lumps. That’s okay! If you don't have buttermilk, you can substitute it easily. Use regular milk and add a tablespoon of vinegar or lemon juice. Let that sit for about five minutes. This will create a similar tang. You can also try yogurt or sour cream mixed with a bit of milk. For even cooking, choose a 9x13 inch baking dish. This size works well for the batter and helps it bake evenly. Make sure to grease the dish with butter or oil to prevent sticking. When mixing, use a large bowl and a whisk. A rubber spatula is great for folding in the blueberries. For serving, a sharp knife helps you cut clean squares. A spatula makes it easy to serve the casserole onto plates. For the full recipe, check the section above. Enjoy your cooking! {{image_2}} You can change the fruits in this recipe. Instead of blueberries, try raspberries or strawberries. These fruits add a new taste and make the dish colorful. You can also mix different fruits together for even more fun. If you need a gluten-free option, swap the all-purpose flour for a gluten-free blend. Many stores sell these blends. Just make sure it is a 1:1 substitute. This way, everyone can enjoy this tasty dish. Adding spices can make your casserole special. Try cinnamon or nutmeg for warmth. A few drops of almond or coconut extract can give it an extra kick. You can even mix in some chopped nuts for added crunch. To make this recipe vegetarian-friendly, use a plant-based milk like almond or oat milk. Just replace the buttermilk with the same amount of your chosen milk. You can add a splash of lemon juice to mimic the tangy flavor of buttermilk. These small changes keep all the deliciousness while making it fit for different diets. For the full recipe, check back to ensure all swaps fit your taste! To store leftovers, let the casserole cool. Then, cut it into squares. Place the squares in an airtight container. This keeps them fresh and moist. You can keep it in the fridge for up to four days. If you want to enjoy it later, you might want to freeze some. To freeze portions, cut the casserole into squares. Wrap each square tightly in plastic wrap. Then place them in a freezer-safe bag or container. Make sure to label it with the date. This method helps you keep track of how long it’s been frozen. You can freeze it for up to three months. When you’re ready to eat, remove a square. Thaw it overnight in the fridge. For the best results, reheat it in the oven at 350°F (175°C) for about 15-20 minutes. This way, it will warm evenly. You can also microwave it for 1-2 minutes, but the oven gives a better texture. Enjoy your delicious Blueberry Buttermilk Pancake Casserole again! For the full recipe, check the main article. Can I use frozen blueberries instead of fresh? Yes, you can use frozen blueberries. They work great in this recipe. Just toss them in the batter while they are still frozen. This helps prevent them from getting mushy. How do I know when the casserole is done baking? Check if the top is golden brown. Also, insert a toothpick into the center. If it comes out clean, the casserole is done. It should be firm to the touch but not dry. What to do if the casserole is too dry or too wet? If it's too dry, you can add a splash of buttermilk to the batter next time. This will keep it moist. If it’s too wet, try baking it a bit longer. Keep an eye on the top to prevent burning. Solutions for preventing burnt tops or undercooked centers To avoid a burnt top, you can cover it with foil halfway through baking. This keeps it from browning too much. For undercooked centers, make sure to bake it long enough. Use a toothpick to check for doneness. Overview of calories and macronutrients per serving Each serving has about 200 calories. It includes around 6 grams of protein, 8 grams of fat, and 30 grams of carbs. This makes it a tasty yet balanced meal. Tips for calorie-conscious modifications You can use less sugar or a sugar substitute to reduce calories. Also, try using whole wheat flour for added fiber without losing flavor. You now have a complete guide to make a delicious blueberry casserole. We covered the key ingredients, step-by-step instructions, and tips to get it just right. Remember to avoid overmixing for fluffiness and to explore ingredient swaps for fun variations. Store leftovers properly to enjoy later. This recipe is simple, tasty, and versatile. You can easily adapt it to fit your needs. With practice, you'll master this dish and impress your friends and family. Enjoy your cooking journey!
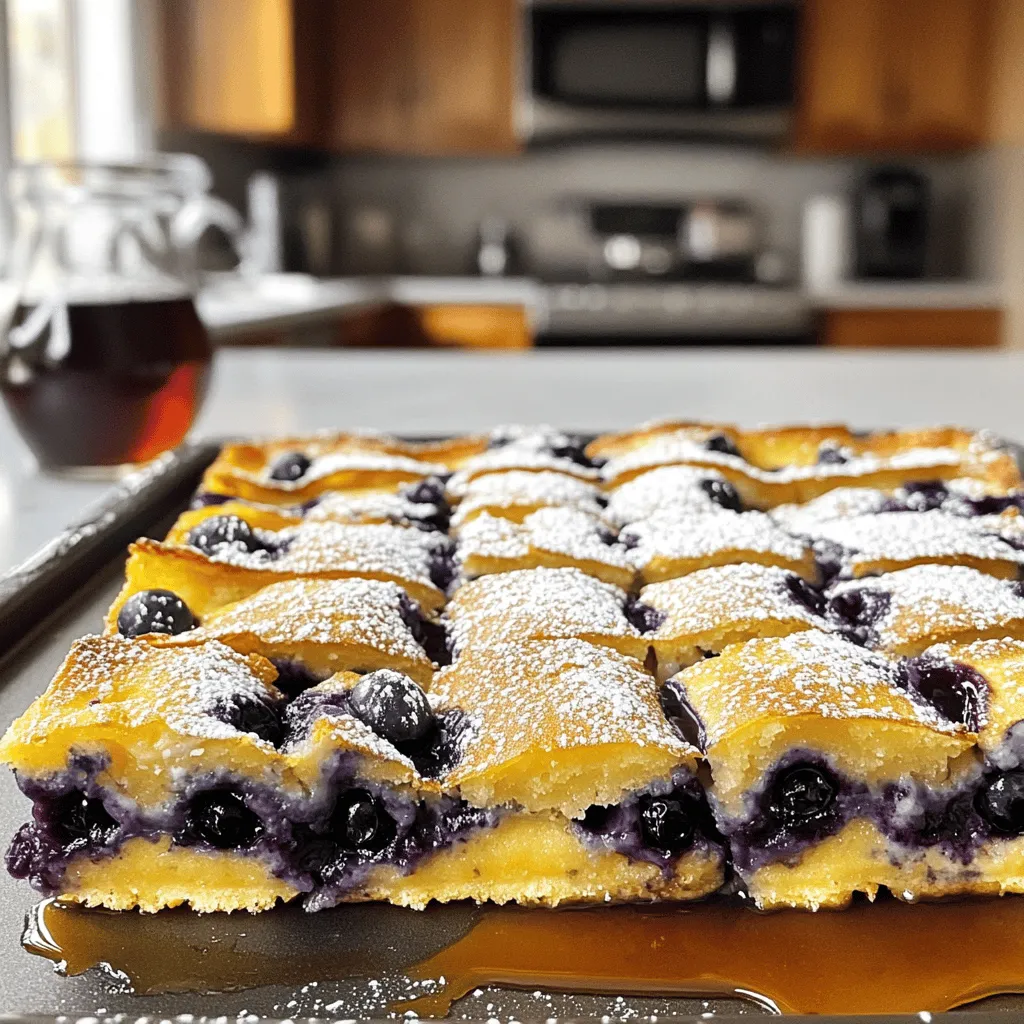
Blueberry Buttermilk Pancake Casserole Rich and Fluffy
Are you ready to transform your breakfast routine? This Blueberry Buttermilk Pancake Casserole is rich, fluffy, and oh-so-delicious! Imagine biting into layers of pancake goodness,
- 4 large eggs: Eggs are key for protein and texture. Use large eggs for best results. - ½ cup Greek yogurt (plain): Greek yogurt adds creaminess and protein. It makes the eggs fluffy. - ½ cup cooked quinoa: Quinoa brings more protein and a nice texture. It helps you feel full. - 1 small cucumber, diced: Cucumber adds fresh crunch. It also brings hydration to your meal. - 1 medium tomato, diced: Tomatoes add juiciness and flavor. They balance the dish well. - ¼ cup feta cheese, crumbled: Feta gives a tangy kick. It is a classic Greek ingredient. - 2 tablespoons fresh dill, chopped: Dill adds a fresh taste. It pairs well with eggs and yogurt. - ½ teaspoon garlic powder: Garlic powder adds depth. It enhances the overall flavor. - Salt and pepper to taste: Use these to season the eggs. They help to bring out flavors. - 2 whole wheat tortillas: Tortillas hold everything together. Whole wheat adds more fiber. - Olive oil for cooking: Olive oil prevents sticking. It adds a hint of flavor as well. This recipe highlights protein-rich ingredients. Each component plays a role in creating a tasty breakfast. The combination of flavors and textures makes this dish a delight. You can find the Full Recipe in the main article. To start, I whisk the eggs. In a bowl, combine 4 large eggs, ½ cup Greek yogurt, and ½ teaspoon garlic powder. Add salt and pepper to taste. Whisk until smooth and creamy. Next, I prepare the vegetables and cheese. I dice 1 small cucumber and 1 medium tomato. I also crumble ¼ cup of feta cheese. These fresh ingredients add great flavor. For the quinoa, I use ½ cup of cooked quinoa. If you haven’t cooked it yet, bring 1 cup of water to a boil. Add ½ cup of quinoa, lower the heat, and cover it. Cook for about 15 minutes. Once done, fluff it with a fork, and it's ready to go. I heat a non-stick skillet over medium heat. I lightly coat it with olive oil. Then, I pour in the whisked egg mixture and let it cook for about 2 to 3 minutes. I stir gently until the eggs start to set but are still slightly runny. Next, I fold in the cooked quinoa, diced cucumber, diced tomato, chopped dill, and crumbled feta. I stir gently until everything combines well. I cook for about 2 more minutes until the eggs are fully set. Now, I remove the skillet from the heat and let the mixture cool slightly. I take a whole wheat tortilla and place it on a plate. I spoon half of the egg and vegetable mixture onto one half of the tortilla. Then, I fold the tortilla over, pressing down gently to seal it. I heat the same skillet over medium heat again. I add the folded tortilla to the skillet and cook for about 2 to 3 minutes on each side. I aim for a golden brown color and a slightly crispy texture. I repeat the process for the second tortilla using the remaining filling. Once ready, I cut the tortillas in half and serve them warm. Enjoy this high protein Greek-style breakfast tortilla delight! For the full recipe, check out the details provided. - Tips for fluffier eggs: Whisk the eggs well with Greek yogurt. This makes them light and fluffy. You want a smooth mix for the best texture. Don't overcook the eggs. They should be soft but not runny. - Cooking tips for crispy tortillas: Heat your skillet before adding the tortillas. This helps them get nice and crispy. Use a bit of olive oil to coat the skillet. Cook each side for 2-3 minutes until golden brown. - Flavor enhancement suggestions: Fresh herbs are key! Dill adds great flavor. You can also try parsley or mint. For more spice, add a pinch of red pepper flakes. A dash of lemon juice brightens everything up. - Prepping ingredients in advance: Dice the cucumber and tomato ahead of time. Cook quinoa the night before. This saves you time in the morning. You can even whisk the egg mix and store it in the fridge. - Storing leftovers: Wrap any leftover tortillas tightly in foil. Store them in an airtight container in the fridge. They will stay fresh for up to three days. To reheat, place them back in the skillet for a few minutes. This keeps them crispy! {{image_2}} You can easily change up the protein in this dish. If you want to try chicken, use cooked pieces. If you prefer a plant-based option, tofu works great too. Both add texture and flavor. Next, consider alternative vegetables. Bell peppers, spinach, or even mushrooms can enhance your breakfast tortilla. Each adds a fresh taste and more nutrients. Feel free to mix and match based on what you have at home. Cheese options also offer variety. If feta isn’t your favorite, try goat cheese or even shredded mozzarella. Each cheese will bring a unique taste to your tortilla. For those needing gluten-free options, swap the whole wheat tortillas for corn tortillas. They work just as well and keep the dish tasty. If you follow a vegan diet, you can replace the eggs with a chickpea flour mix. Combine chickpea flour with water to create a batter. Use nutritional yeast to add a cheesy flavor. Opt for plant-based yogurt and skip the feta for an equally satisfying meal. After you make your High Protein Greek-style Breakfast Tortilla, store any leftovers in an airtight container. This keeps the flavors fresh and the tortilla moist. Place the container in your fridge. Your leftovers will stay good for about 3 days. Make sure to let the tortilla cool to room temperature before sealing it for storage. You can freeze individual portions of your breakfast tortilla if you want to save some for later. Wrap each portion tightly in plastic wrap and then place them in a freezer bag. This method helps prevent freezer burn. You can freeze them for up to 2 months. When you’re ready to enjoy a frozen tortilla, take it out and let it thaw in the fridge overnight. To reheat, warm it in a skillet over medium heat. This keeps the tortilla crispy and delicious. You can also microwave it for about 1-2 minutes, but the skillet method gives a better texture. Enjoy your tasty breakfast anytime! Eating protein in the morning helps you feel full. It keeps hunger at bay, so you eat less later. Protein also helps build and repair muscles. It supports your body in many ways. A high-protein breakfast like this Greek-style tortilla gives you energy. It fuels your day right from the start. Yes, you can prep this breakfast tortilla in advance. Cook the filling and store it in the fridge. You can also assemble the tortillas ahead. Just heat them on busy mornings. This makes your mornings easier and saves time. Simply warm them up in a skillet or microwave. You can pair this tortilla with many sides. A simple side salad adds freshness. Fresh fruit is a sweet option that balances the meal. You could also serve it with yogurt for extra creaminess. Olive oil drizzled on top can enhance the flavors. Enjoy exploring different combinations for a tasty breakfast! This blog post covered how to create a high-protein Greek-style breakfast tortilla. We explored ingredients like eggs, Greek yogurt, quinoa, and fresh veggies. I shared cooking steps and tips for the best results. Remember, you can swap ingredients to fit your taste or dietary needs. With proper storage, leftovers can last. A protein-packed breakfast sets a strong tone for your day. Enjoy experimenting and finding your favorite flavors in this healthy dish.
High Protein Greek-style Breakfast Tortilla Delight
Are you ready to kickstart your day with a burst of flavor and protein? In this post, I’ll show you how to make a High
- 1 pound frozen tater tots - 1 pound breakfast sausage (pork-free) - 1/4 cup all-purpose flour - 2 cups milk (whole or your choice) The main ingredients create a hearty base. Tater tots add crunch, while sausage gives rich flavor. The flour and milk form a smooth gravy. This dish is filling and fun. - 1 teaspoon garlic powder - 1 teaspoon onion powder - Salt and pepper to taste Spices enhance the taste. Garlic powder adds warmth, and onion powder gives depth. Salt and pepper bring balance. Adjust to your liking for the best flavor. - 4 large eggs - 1 cup shredded cheddar cheese - 1 tablespoon chopped fresh parsley (for garnish) Toppings make this dish special. Eggs add protein and creaminess. Cheddar cheese melts beautifully on top. Fresh parsley brightens the bowl. These finishing touches elevate your meal. For the full recipe, check out the detailed instructions. Enjoy making this breakfast magic! First, preheat your oven as stated on the tater tots package. This step ensures they cook evenly. Next, take a baking sheet and spread the frozen tater tots in a single layer. Bake them for about 20-25 minutes until they turn golden and crispy. Keep an eye on them to avoid burning. While the tater tots bake, grab a large skillet. Heat it over medium heat and add the breakfast sausage. Cook the sausage until it's browned and breaks apart, which takes about 5-7 minutes. If there's extra grease, drain it off. Now, sprinkle 1/4 cup of flour over the sausage and mix well. This will help thicken your gravy. Let it cook for 1-2 minutes. Slowly pour in 2 cups of milk, stirring constantly. This helps prevent lumps. Add 1 teaspoon of garlic powder, 1 teaspoon of onion powder, and season with salt and pepper. Bring the mixture to a simmer and cook until it thickens, around 5-7 minutes. Remove it from heat and set it aside. In another non-stick pan, you can fry or scramble the eggs. Cook them to your liking, whether you prefer sunny-side up or scrambled. This usually takes just a few minutes. Lightly season the eggs with salt and pepper. Now, you're ready to put it all together! For the full recipe, check out the complete instructions. To get your tater tots nice and crispy, follow these steps: - Spread Evenly: Place the tater tots in a single layer on your baking sheet. This helps them cook evenly. - Don't Overcrowd: Give them space. If they touch, they will steam instead of crisp. - Flip Halfway: About halfway through baking, flip the tots for even browning. - Use High Heat: Bake them at a higher temperature, around 425°F, for a crispier finish. These tips ensure your tater tots are golden and crunchy, perfect for the base of your breakfast bowl. To make a smooth and creamy gravy, follow these tricks: - Cook the Flour: After adding flour to the sausage, cook it for 1-2 minutes. This helps avoid a raw flour taste. - Add Milk Slowly: Pour in the milk a little at a time. Stir constantly to prevent lumps. - Simmer Gently: Once you add the milk, keep the heat low and let it simmer. This helps it thicken slowly. These steps help you create a rich and creamy sausage gravy without any lumps. You can cook your eggs in different ways to suit your taste: - Fried Eggs: Cook them sunny-side up for a runny yolk. This adds a nice creaminess to your dish. - Scrambled Eggs: For a fluffier texture, scramble the eggs with a bit of milk. Cook on low heat for best results. Feel free to season your eggs with salt and pepper. You can also add a sprinkle of cheese or herbs for extra flavor. {{image_2}} If you want a plant-based version, swap the sausage for a vegan brand. Look for options made from soy or pea protein. You can also use lentils for a hearty touch. Instead of milk, try almond, soy, or oat milk. These choices keep the dish creamy and tasty while being vegan-friendly. Cheese adds flavor, but you can skip it if you wish. Try using vegan cheese for a dairy-free option. Nutritional yeast also gives a cheesy taste without dairy. If you’re not vegan but want a lighter option, use mozzarella or feta instead of cheddar. Each cheese adds a unique twist to your bowl. Mix in some veggies for added nutrition. Spinach or kale works well and adds color. You can also toss in bell peppers or onions for more flavor. Want more protein? Add black beans or chickpeas. These additions make your Tater Tot Breakfast Bowl more filling and fun. To store leftovers, let the Tater Tot Breakfast Bowl cool. Place it in an airtight container. This keeps the dish fresh for up to three days in the fridge. Be sure to separate the gravy and eggs if you can. This helps maintain the texture of each item. To reheat, use the oven for the best results. Preheat the oven to 350°F (175°C). Place the bowl in the oven for about 10-15 minutes. This warms everything evenly. If you're in a hurry, use the microwave. Heat in short bursts, about 30 seconds at a time. Stir between each round to avoid hot spots. You can freeze the components of this dish. The tater tots freeze well, so do the sausage gravy and eggs. Just make sure they cool before you pack them. Use freezer-safe bags or containers. Label them with the date. When ready to eat, thaw in the fridge overnight. Reheat as mentioned above. Enjoy the same great taste! Yes, you can prepare parts of this meal ahead. Cook the tater tots and sausage gravy, then store them in separate containers. Keep them in the fridge for up to 2 days. You can also scramble or fry the eggs in advance. When you're ready to eat, reheat the tater tots in the oven for crispiness. Warm the gravy on the stove, and cook fresh eggs to top the bowl. This way, you save time and still enjoy a hot breakfast. If you don't have sausage, don't worry! You can use ground turkey, chicken, or even plant-based sausage. These proteins work well with the gravy and fit into the bowl nicely. For a lighter option, try diced ham or crumbled bacon. Each choice adds its own flavor twist. Just cook them the same way as the sausage, and you'll be on your way to a tasty meal. To change the flavor, play with your spices! Add some cayenne for heat or smoked paprika for a smoky touch. You can also mix in chopped veggies like bell peppers or spinach for extra nutrition. If you want a cheesy twist, try adding cream cheese to the gravy. Fresh herbs like thyme or chives can brighten the dish too. Get creative and make this bowl your own! For the full recipe, check out the details above. This recipe combines tasty ingredients like tater tots and sausage to make a filling meal. You learned how to prepare crispy tater tots and creamy gravy, plus how to cook eggs just right. Consider different toppings or variations, like vegan options and cheese switches, to make it your own. Remember to store any leftovers well for tasty meals later. Enjoy your cooking adventure and feel free to experiment with flavors to find your favorite twist!
Tater Tot Breakfast Bowl with Sausage Gravy Magic
Are you ready to transform your breakfast game? The Tater Tot Breakfast Bowl with Sausage Gravy Magic is a fun, hearty meal packed with flavor.
To make this tasty dish, gather these main ingredients: - 2 medium sweet potatoes - 4 large eggs - 1 tablespoon coconut oil - 1 teaspoon ground cinnamon - 1 tablespoon maple syrup - 1/4 cup Greek yogurt (or dairy-free alternative) - 1/4 cup chopped pecans (or nuts of choice) - Fresh berries (strawberries, blueberries, or raspberries) for topping - Pinch of salt Sweet potatoes provide a hearty base. They are sweet and full of vitamins. Eggs add protein and richness. Coconut oil gives a nice flavor while cooking. Cinnamon adds warmth and sweetness. Maple syrup brings a touch of natural sweetness. Greek yogurt adds creaminess and tang. Pecans add crunch, and fresh berries give bright flavor. You can add a few optional toppings to enhance the dish: - Sliced bananas - Chia seeds - Shredded coconut - Honey or agave syrup - Nut butter (like almond or peanut) These toppings allow you to mix flavors and textures. Feel free to get creative with what you love. This recipe serves 2 people. Each person can enjoy a sweet potato half and two eggs. If you're serving more guests, you can easily double the recipe. You can also adjust the toppings based on personal taste. For a family breakfast, make extra sweet potatoes and toppings. This dish is filling, fun, and perfect for sharing. For the full recipe, check out Breakfast Sweet Potato Delight! Start by preheating your oven to 400°F (200°C). Next, scrub the sweet potatoes until they are clean. Use a fork to poke holes in each potato. This helps steam escape while they cook. Place the sweet potatoes on a baking sheet. Roast them in the oven for 45-50 minutes. You want them to be tender when done. Once cooked, take them out and let them cool for a few minutes. Cut each sweet potato in half lengthwise. Gently scoop out some flesh to make a small well for toppings. Save this flesh for later use. While the sweet potatoes roast, heat 1 tablespoon of coconut oil in a skillet over medium heat. Crack four large eggs into the skillet. Cook them how you like—sunny side up or scrambled. Add a pinch of salt to bring out their flavor. Keep an eye on them to avoid overcooking. Once the sweet potatoes are ready, it is time to assemble your dish. Drizzle maple syrup over the sweet potato halves. Sprinkle ground cinnamon on top for added warmth. Now, spoon a dollop of Greek yogurt into each well of the sweet potato. Place the cooked eggs on top next. Finish by adding chopped pecans and fresh berries. Serve warm, and drizzle with more maple syrup if you wish. Enjoy this easy and wholesome dish! For the complete recipe, check out the [Full Recipe]. To roast sweet potatoes well, start by selecting medium-sized ones. You want them fresh and firm. Scrub them clean and poke holes with a fork. This helps steam escape during roasting. Preheat your oven to 400°F (200°C) and place the potatoes on a baking sheet. Roast for 45-50 minutes. They should be soft when you poke them with a fork. This method gives you a sweet, tender inside with a slightly crisp skin. Cooking eggs is simple, yet there are many ways to do it. For this recipe, I like sunny-side up eggs. Start by heating coconut oil in a skillet over medium heat. Crack the eggs gently into the pan. Let them cook until the whites are firm but the yolks stay runny. If you prefer scrambled, beat the eggs in a bowl. Pour them into the hot skillet and stir gently until they are just set. Both methods add great taste to your dish. You can enhance your Breakfast Sweet Potato Delight with fun toppings. Consider adding a sprinkle of ground cinnamon for warmth. Drizzle extra maple syrup for sweetness. Fresh berries like strawberries or blueberries provide a burst of flavor and color. Chopped pecans or other nuts add a nice crunch. You can also try a dollop of Greek yogurt for creaminess. These toppings make each bite exciting and delicious. For the complete recipe, check the Full Recipe section. {{image_2}} You can easily make this dish dairy-free and gluten-free. For a dairy-free option, swap Greek yogurt for coconut yogurt. This keeps it creamy and delicious. Use gluten-free oats or a gluten-free flour blend for any flour needs. You can also add nut milk if you like it creamier. These changes keep the flavors while making it suitable for more diets. If you want a twist, try a sweet potato hash. Dice the sweet potatoes and cook them with bell peppers, onions, and spinach. This mix adds texture and color. Fry them in coconut oil until golden and crisp. Top with fried or poached eggs for a filling meal. This version gives you a savory spin on the classic sweet potato delight. For a fun breakfast, make sweet potato pancakes. Mash the cooked sweet potatoes and mix them with eggs and flour. Add a pinch of cinnamon for flavor. Cook them on a skillet until golden on both sides. Serve with maple syrup or fresh fruit. This transforms sweet potatoes into a fun pancake dish that kids will love. You can find more ideas in the [Full Recipe] section. After you make Breakfast Sweet Potato Delight, you may have leftovers. Store them in an airtight container. Place the container in the fridge. Leftover sweet potatoes will stay fresh for up to four days. If you have cooked eggs, add them to the same container. Keep the toppings separate to maintain texture and taste. To reheat sweet potatoes, you can use the oven or microwave. For the oven, preheat it to 350°F (175°C). Wrap the sweet potatoes in foil and heat for about 15 minutes. If using a microwave, place the sweet potato halves on a plate. Heat for 1-2 minutes, checking often. Avoid overheating, as this can dry them out. Sweet potatoes last about a week in a cool, dark place. Eggs can last 3-5 weeks in the fridge. Maple syrup remains good for about a year unopened. Greek yogurt lasts 1-3 weeks after opening. Always check for signs of spoilage before using any ingredient. Yes, you can use leftover sweet potatoes. They add great flavor and save time. Just make sure they are cooked and cool. Cut them in half and scoop out a bit of the flesh. This creates space for your toppings. The rest of the recipe stays the same. You can still drizzle maple syrup and add your favorite toppings. Sweet potatoes are very versatile for breakfast. Try making sweet potato hash by dicing them and cooking with onions and peppers. You can also mash them with spices and serve them on toast. Another idea is to blend them into smoothies for a creamy texture. Sweet potato pancakes are a fun option too. They are sweet and filling, perfect for any morning. To make this recipe vegan, swap the eggs for tofu or chickpea scramble. Use a dairy-free yogurt instead of Greek yogurt. You can still use sweet potatoes, coconut oil, maple syrup, and pecans. Follow the same steps for roasting sweet potatoes and assembling your dish. Your Breakfast Sweet Potato Delight will taste just as good! Check out the Full Recipe for more details. This blog post covers how to make a tasty breakfast sweet potato. You learned about key ingredients, optional toppings, and serving sizes. I shared easy steps to prep your sweet potatoes and cook eggs. You also found tips for roasting and added flavor ideas. With variations for health needs and storage tips, you can enjoy this dish in many ways. Now, you have all the tools to create a delicious breakfast. Try it out and make it your own!
Breakfast Sweet Potato Delight Easy and Wholesome Dish
Are you ready to kickstart your mornings with a burst of flavor? Look no further than my Breakfast Sweet Potato Delight. This easy and wholesome
To make the BEST Cinnamon Roll French Toast Bites, you will need: - 1 can of refrigerated cinnamon roll dough (8 rolls) - 4 large eggs - 1/4 cup milk (dairy or non-dairy) - 1 teaspoon vanilla extract - 1 teaspoon ground cinnamon - 1/4 teaspoon nutmeg - 1 tablespoon powdered sugar (for dusting) - Optional: maple syrup for serving You can swap some ingredients if you need to. Use almond milk or oat milk instead of regular milk. If you don’t have nutmeg, you can skip it or use allspice. For a fun twist, try adding chocolate chips or nuts to the mix. You can also use a different type of cinnamon roll dough, like pumpkin spice or apple cinnamon, for a new flavor. You will need a few tools to make this recipe. Get a large mixing bowl for the egg mixture. Use a whisk to mix the eggs and milk. You will also need a muffin tin or a baking sheet to bake the bites. Don’t forget non-stick spray or butter to grease the tin. Finally, have a spatula ready to remove the bites once they are baked. For the best results, make sure your oven is preheated before you start. Check the [Full Recipe] for more details on the steps. Start by preheating your oven based on the package directions. This is usually 375°F (190°C). Next, open the can of cinnamon rolls. Carefully separate each roll and cut them into four equal pieces. This makes them easy to coat and bake. In a large bowl, crack four eggs. Add 1/4 cup of milk, 1 teaspoon of vanilla extract, and spices. Mix in 1 teaspoon of ground cinnamon and a pinch of nutmeg. Whisk everything until it blends well. This egg mixture gives the bites flavor and helps them cook right. Grease a muffin tin or baking sheet with non-stick spray. If using a muffin tin, fill each cup with the cinnamon roll pieces. Keep them snug but not too tight. Place the pan in the oven and bake for 12 to 15 minutes. You want them puffed and golden. After baking, let them cool for one minute before removing them from the tin. Dust with powdered sugar and serve with warm maple syrup. This adds sweetness and makes every bite delightful. For a full recipe, check the details above. To get the best texture, follow a few key steps. First, don't skip the egg mixture. It keeps the bites moist and rich. Make sure to coat each piece of cinnamon roll well. This helps them soak in all the flavors. Baking time matters too. Watch for a golden brown color. You want them fluffy, not dense. These bites shine when served warm. You can dust them with powdered sugar. A drizzle of maple syrup adds sweetness. You can also pair them with fresh fruit. Strawberries or blueberries work great. They make the dish colorful and fresh. For a fun twist, serve them with whipped cream on top. Avoid cutting the rolls too large. If the pieces are too big, they won't cook evenly. Also, don’t rush the baking. Let them puff up in the oven. Overcrowding the muffin tin is another mistake. Keep space between the bites for even cooking. Lastly, remember to let them cool slightly before serving. This helps them hold their shape. You can find the complete recipe in the Full Recipe section. {{image_2}} You can boost the flavor of your cinnamon roll French toast bites. Add chocolate chips for a sweet twist. Fresh berries, like blueberries or strawberries, add a fruity touch. Try mixing in some chopped nuts for crunch. These small changes can make each bite a new delight! Toppings can change the whole dish. Drizzle warm caramel sauce over your bites for added sweetness. Whipped cream adds a light, fluffy texture. You could also use cream cheese frosting for a rich finish. Don’t forget a sprinkle of cinnamon or nutmeg on top for that extra kick. You can easily make these bites gluten-free or vegan. Use gluten-free cinnamon roll dough to keep it tasty. For a vegan option, swap eggs with mashed bananas or a flaxseed mix. Use plant-based milk for a creamy touch. These options let everyone enjoy this treat! For the complete recipe, check out the [Full Recipe]. Store any leftover cinnamon roll French toast bites in an airtight container. Keep them in the fridge for up to three days. If you want to keep them longer, freezing is a great option. To reheat, use an oven or microwave. For the oven, preheat to 350°F (175°C). Place bites on a baking sheet and warm for about 5 to 10 minutes. In the microwave, heat in 15-second intervals until warm. Both methods help keep them soft and tasty. You can freeze these bites for later enjoyment. Place cooled bites in a freezer-safe bag. Make sure to remove as much air as possible. They can last up to two months in the freezer. When you’re ready to eat, thaw them in the fridge overnight before reheating. Enjoy them fresh and warm! Full Recipe can guide you through this tasty treat. Yes, you can use homemade cinnamon rolls. Just cut them into small pieces. The size should be similar to store-bought rolls. This adds a personal touch to your dish. Fresh rolls may taste even better. You can prepare the bites in advance. First, follow the recipe steps up to baking. Then, place the coated cinnamon roll pieces in the fridge. When ready to bake, let them sit at room temperature for about 15 minutes. Bake as directed for fresh bites in no time. These bites pair well with many sides. Consider serving them with warm maple syrup. Fresh fruit adds color and flavor. You can also serve them with whipped cream for a sweet touch. Some people enjoy a sprinkle of nuts for extra crunch. Check the Full Recipe for more ideas! You now have all the steps to make cinnamon roll French toast bites. We covered the ingredients, tools, and step-by-step instructions to help you succeed. Remember the tips to avoid common mistakes and ensure the best texture. Explore flavor variations and storage options to make this dish even better. With a little practice, you can enjoy these tasty bites anytime. Cooking is fun, and sharing food with others makes it even better!
Scrumptious BEST Cinnamon Roll French Toast Bites Recipe
If you love cinnamon rolls and French toast, wait until you try my BEST Cinnamon Roll French Toast Bites! This fun twist combines two favorites
- 4 large cinnamon rolls (store-bought or homemade) - 4 large eggs - 1 cup milk (whole or almond) - 1 teaspoon vanilla extract - 1 teaspoon ground cinnamon - 1/4 teaspoon nutmeg (optional) - 2 tablespoons butter (for frying) - Powdered sugar (for dusting) - Maple syrup (for serving) To make Cinnamon Roll French Toast, gather these simple ingredients. You can use store-bought cinnamon rolls for ease or make your own if you prefer. I often choose almond milk for a nutty twist, but whole milk works just as well. The eggs create a rich batter that binds everything together. The key flavor notes come from the vanilla extract and ground cinnamon. You can add nutmeg for a warm spice touch. Always keep butter handy for frying, as it gives a nice golden color. Finally, have powdered sugar and maple syrup ready for a sweet finish. Trust me; these toppings elevate the dish! This recipe is quick and fun to make, perfect for breakfast or brunch. For the full recipe, check out the details above! - Slice the cinnamon rolls in half horizontally. - Gather all ingredients to make the process smooth. - In a large bowl, whisk together: - 4 large eggs - 1 cup milk (whole or almond) - 1 teaspoon vanilla extract - 1 teaspoon ground cinnamon - 1/4 teaspoon nutmeg (optional) This mix will soak into the cinnamon rolls. - Dip each cinnamon roll half into the egg mixture. Soak for 20-30 seconds on each side. - Heat a large skillet over medium heat and add 2 tablespoons of butter. - Once the butter melts, place the soaked cinnamon rolls cut side down. - Cook for 3-4 minutes until golden brown, then flip. - Cook the other side for an additional 2-3 minutes. - Ensure both sides are golden and the insides are warm. - Remove from the skillet and place on a plate. - Dust with powdered sugar and drizzle with warm maple syrup. These steps create a tasty dish you’ll enjoy. For the complete guide, check the Full Recipe. - Optimal frying temperature: Heat your skillet to medium heat. This keeps your French toast from burning. Use a small drop of water to test if the skillet is ready. If it sizzles, you’re good to go! - Ensuring even cooking: When frying, keep an eye on the cinnamon rolls. Flip them carefully to cook both sides evenly. If one side cooks faster, it may burn. - Garnishing ideas with berries: Fresh berries add color and flavor. Try strawberries, blueberries, or raspberries. Scatter them over your French toast for a pretty look. - Serving suggestions with syrup: Serve warm with a drizzle of maple syrup. You can also add a dusting of powdered sugar for sweetness. Stack them high on a plate for a delightful feast! For the full recipe, check out the detailed steps above to make this delicious dish! {{image_2}} You can spice up your cinnamon roll French toast in fun ways. One great option is to add a cream cheese filling. To do this, mix softened cream cheese with a bit of sugar and vanilla. Spread this mixture onto the cut sides of the cinnamon rolls before soaking them. This creates a rich, creamy taste that pairs well with the cinnamon. You can also experiment with different spices. Instead of just cinnamon, try adding ginger or cardamom. These spices give a warm and inviting flavor. You can even mix in some cocoa powder for a chocolate twist. Each spice can add a unique touch to this dish. If you need dairy-free options, you can use almond milk or coconut milk. These alternatives work well and keep the taste delicious. You can also swap out the eggs for a mix of ground flaxseed and water. This mix binds ingredients like eggs do. For those who need gluten-free alternatives, use gluten-free cinnamon rolls. Many stores carry these. Just ensure they are fresh and tasty. This way, everyone can enjoy cinnamon roll French toast, regardless of their dietary needs. For the full recipe, check the earlier section. To keep your Cinnamon Roll French Toast fresh, store leftovers in the fridge. Place slices in an airtight container to avoid drying out. They should stay good for up to three days. If you want to save them longer, consider freezing. Wrap each slice in plastic wrap, then place them in a freezer bag. They can last in the freezer for about two months. When you're ready to enjoy your leftover slices, there are a few easy ways to heat them up. You can use a microwave for a quick option. Just place a slice on a microwave-safe plate and heat for about 30 seconds. If you want a crispy texture, use a skillet. Heat a little butter in the pan and warm each slice for 1-2 minutes on each side. This will keep them nice and toasty. Can I use frozen cinnamon rolls? Yes, you can use frozen cinnamon rolls for this recipe. Just thaw them first. Place them in the fridge overnight or let them sit at room temperature for a few hours. Once thawed, slice them as directed in the recipe. Using frozen rolls saves time and still gives you great taste. How to make this recipe ahead of time? To prepare in advance, you can mix the egg batter and store it in the fridge. Slice the cinnamon rolls and soak them right before cooking. You can also cook them the night before and reheat them in the morning. This keeps your breakfast quick and easy. What’s the best way to ensure they don’t stick to the pan? To prevent sticking, use a non-stick skillet or add enough butter. Melt the butter until it sizzles, then add the soaked cinnamon rolls. Make sure to keep the heat at medium to avoid burning. It’s all about that perfect balance for a great cook! This blog post shows you how to make yummy cinnamon roll French toast. We covered the ingredients, from cinnamon rolls to eggs and spices. I provided clear steps to prepare and cook this tasty dish. Tips for cooking and presenting your meal were shared, along with fun variations and storage info. In closing, this recipe is easy and fun. You’ll impress everyone at breakfast. Enjoy every bite of this sweet delight!
Cinnamon Roll French Toast Delightful and Easy Recipe
Are you ready to wake up to something delicious? This Cinnamon Roll French Toast recipe is both easy and delightful! With just a few common