Desserts

- 1 cup canned pumpkin puree - 1 cup sugar - 1 cup water - 1 teaspoon vanilla extract - 1 teaspoon ground cinnamon - 1/2 teaspoon ground nutmeg - 1/4 teaspoon ground ginger - 1/4 teaspoon salt - 1/2 cup mini marshmallows The main ingredients for this syrup include canned pumpkin puree, sugar, water, and vanilla extract. Canned pumpkin puree adds rich flavor and a nice texture. Sugar gives sweetness, while water helps to mix everything smoothly. Vanilla extract enhances the overall taste, making it warm and inviting. For spices, we use cinnamon, nutmeg, ginger, and salt. Ground cinnamon brings warmth and sweetness. Ground nutmeg adds a hint of earthiness, while ground ginger gives a slight zing. A pinch of salt balances the sweetness and round out the flavors. Finally, we have mini marshmallows. These little treats melt into the syrup, creating a creamy finish. They add a fun texture and extra sweetness. This syrup is not just for coffee; you can drizzle it over pancakes or waffles too. To start, gather your ingredients. In a medium saucepan, combine: - 1 cup canned pumpkin puree - 1 cup sugar - 1 cup water Stir these together over medium heat. Keep stirring until the sugar dissolves completely. This step is key for a smooth syrup. After the sugar dissolves, it’s time to add flavor. Stir in: - 1 teaspoon vanilla extract - 1 teaspoon ground cinnamon - 1/2 teaspoon ground nutmeg - 1/4 teaspoon ground ginger - 1/4 teaspoon salt Mix well to blend all the spices. Let the mixture simmer gently for about 10 minutes. Stir occasionally to avoid any sticky spots. This simmering time helps develop rich flavors. Once simmered, remove the saucepan from the heat. Let the syrup cool for a few minutes. Then, stir in: - 1/2 cup mini marshmallows Mix until they melt into the syrup, creating a creamy texture. Now, strain the syrup through a fine mesh sieve into a clean jar. This step removes any lumps and ensures a smooth syrup. Allow it to cool completely before sealing it in an airtight container. You can store it in the fridge for up to two weeks. - Alternative sweeteners: You can swap sugar for honey or maple syrup. This change adds a unique flavor. Just remember to adjust the amount since these sweeteners are sweeter than sugar. - Using fresh pumpkin puree: If you use fresh pumpkin, roast it first. This step brings out a deeper flavor. Simply blend it until smooth before adding it to the pot. - Preventing sticking during simmering: Stir the mixture often. This action helps keep it smooth and prevents it from sticking to the pan. Use a silicone spatula for easy scraping. - Achieving the perfect consistency: Keep an eye on the syrup as it simmers. You want it to thicken slightly but not become too thick. If it gets too thick, add a little water to adjust. - Ways to enjoy the syrup: Drizzle this syrup over pancakes or waffles. It also works great in coffee. Just stir it in for a sweet boost. - Creative pairings for beverages and desserts: Try pairing the syrup with whipped cream or ice cream. You can also mix it into hot chocolate for a fun fall twist! {{image_2}} You can make your Pumpkin Marshmallow Coffee Syrup even more special. Adding chocolate or caramel flavors can create a rich twist. For chocolate, simply stir in cocoa powder while mixing the syrup. If you love caramel, consider drizzling caramel sauce in the mix. This adds sweetness and a creamy texture. Experimenting with different spices can also transform the flavor. Try adding a pinch of cardamom or allspice. These spices bring out warmth and depth. A dash of clove can give it a holiday feel. Just remember, a little goes a long way. If you want a sugar-free option, you can use sugar substitutes. Sweeteners like stevia or monk fruit work well. They can add sweetness without extra calories. Just make sure to check the package for conversion ratios. You may need less of the substitute than regular sugar. Mix it in just like you would with sugar. This way, you can enjoy the same great flavor without the added sugar. For those who avoid dairy, adapting this recipe is easy. Use non-dairy alternatives like almond milk or oat milk. You can mix these into your hot coffee with the syrup. This creates a lovely creamy drink without dairy. When serving, try topping your drink with coconut whipped cream. It adds a fun flair and a hint of coconut flavor. This way, everyone can enjoy your tasty syrup, no matter their dietary needs. To keep your pumpkin marshmallow coffee syrup fresh, use an airtight container. A glass jar works great. Make sure the lid seals tightly. This helps to lock in the flavors and keep out air. You can store the syrup in your fridge for up to two weeks. After that, check for signs of spoilage. If you see mold or notice an off smell, it’s best to toss it out. Always trust your senses! If you want to save some for later, you can freeze the syrup. Pour it into an ice cube tray for easy portions. Once frozen, transfer the cubes into a freezer-safe bag. To thaw, just leave them in the fridge overnight or pop them in the microwave for a quick warm-up. You can enjoy this syrup in many ways. Here are some popular uses: - Coffee: Add it to your morning brew for a warm flavor. - Pancakes and Waffles: Drizzle it over your breakfast favorites. - Milkshakes: Mix it with ice cream and milk for a tasty shake. - Oatmeal: Stir it into your oatmeal for a sweet touch. - Ice Cream: Pour it over vanilla ice cream for a fall-inspired dessert. This syrup adds a cozy flavor to any dish. Its rich taste and creamy texture will brighten your meals. Yes, you can make this syrup ahead of time. Here are some tips for meal prep and storage: - Make It Early: You can prepare this syrup up to two weeks in advance. - Cool and Store: Let it cool completely, then place it in an airtight container. - Refrigerate: Store your syrup in the fridge to keep it fresh. - Use It Often: Just shake it before each use to mix the ingredients. Having this syrup ready ahead of time makes mornings easier and more delicious! This syrup can be vegan-friendly with a few changes. Here’s what to consider: - Sugar: Some sugar types aren’t vegan. Look for organic or raw sugar. - Mini Marshmallows: Regular mini marshmallows have gelatin. Choose vegan marshmallows instead. - Other Ingredients: All other ingredients in this recipe are vegan. By making these small swaps, you can enjoy this syrup without worry! This blog post covered everything you need to know about making pumpkin marshmallow coffee syrup. We discussed key ingredients, preparation steps, and added helpful tips. You can enjoy this syrup in many ways, and it’s easy to store. Get creative with flavors and make it your own! Keep experimenting, and don’t hesitate to adjust the recipe for your needs. With simple steps, you can have a delicious syrup ready to enhance your drinks and desserts.
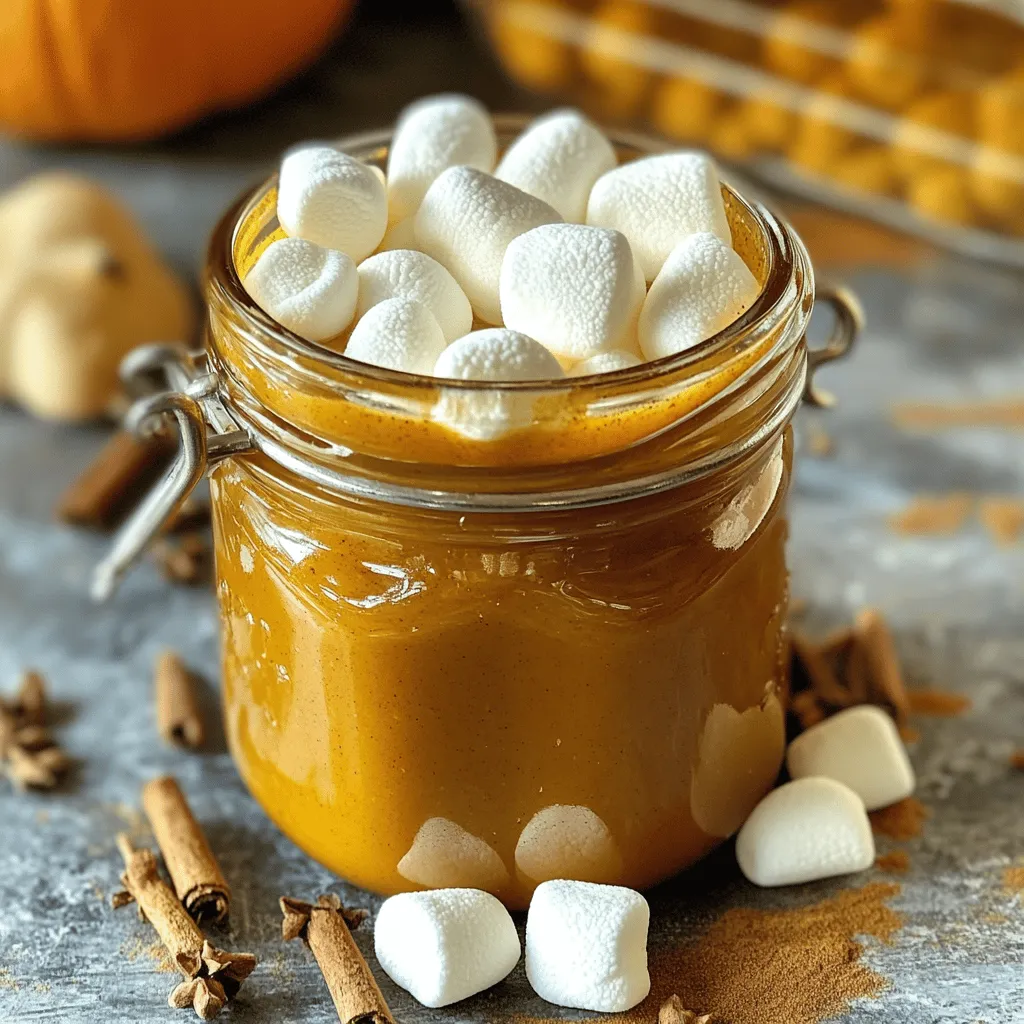
Pumpkin Marshmallow Coffee Syrup Simple and Tasty Treat
Get ready to elevate your coffee game with my Pumpkin Marshmallow Coffee Syrup! This simple and tasty treat combines the warm flavors of pumpkin, spices,
- 1 ½ cups all-purpose flour - 1 teaspoon baking soda - ½ teaspoon baking powder - ½ teaspoon salt - 1 teaspoon ground cinnamon - ½ teaspoon ground nutmeg - ½ teaspoon ground ginger - 1 cup canned pumpkin puree - 1 cup granulated sugar - ½ cup brown sugar, packed - ½ cup vegetable oil - 2 large eggs - 1 teaspoon vanilla extract - 1 cup semi-sweet chocolate chips - ½ cup chopped walnuts (optional) When you gather your ingredients, focus on quality. Fresh spices make a big difference. Always check the date on your baking soda and powder; old ones can ruin your bread. The pumpkin puree is key for moisture and flavor. I prefer canned for its consistency. If you want a little crunch, add chopped walnuts. They pair well with chocolate chips. Feel free to skip them if you like a smoother texture. The semi-sweet chocolate chips add sweetness and richness. Don't be afraid to use a bit more if you love chocolate! - Preheat oven to 350°F (175°C). - Grease or line the loaf pan. Preheating the oven is key. It helps the bread rise well. Greasing or lining the pan ensures easy removal later. I prefer parchment paper. It keeps the bread from sticking. - Combine dry ingredients. - Mix wet ingredients. - Incorporate dry and wet ingredients. First, grab a medium bowl. Whisk together flour, baking soda, baking powder, salt, and spices. This step blends the dry ingredients. Next, in a large bowl, mix the pumpkin, sugars, oil, eggs, and vanilla. Blend until smooth and creamy. Now, add the dry mix to the wet mix. Stir gently; leave some lumps. Overmixing can make the bread tough, and you want it soft and tender. - Fold in chocolate chips and walnuts. - Pour batter into the prepared pan. - Bake and cool times. Gently fold in the chocolate chips and walnuts. Make sure they spread evenly. Then, pour the batter into the pan. Smooth the top to create an even surface. Bake for 55 to 65 minutes. Check with a toothpick. It should come out clean. Once done, let it cool in the pan for 10 minutes. Then, move it to a wire rack. This cooling step is vital for the best texture. How to know when it's done To check if your bread is done, insert a toothpick into the center. If it comes out clean, the bread is ready. If it has wet batter on it, bake for a few more minutes. Keep an eye on it after 55 minutes. Avoiding overmixing tips Mix your wet and dry ingredients gently. Stir until they just blend, and it's okay if some lumps remain. Overmixing can make your bread tough. Remember, it should be soft and tender. Suggestions for spices and extracts You can add more spices for extra flavor. Try a pinch of allspice or cloves. For a twist, add a splash of maple extract. This will give your bread a sweet, warm taste that pairs well with pumpkin. Pairing ideas with the bread This bread tastes great with a cup of coffee or tea. You can also serve it with cream cheese or butter. For a fun treat, try it with a scoop of vanilla ice cream. Serving suggestions Serve your bread on a wooden cutting board. Slice it into thick pieces for a rustic look. You can also place it on a pretty plate for a special touch. Garnishing tips Sprinkle some cinnamon on top or add a few chocolate chips. A drizzle of honey or maple syrup can also add charm. Use fresh herbs like mint for a pop of color. {{image_2}} You can change the nuts in your bread. I love adding chopped pecans for a new crunch. They add a nice flavor. You can also try using different types of chocolate. Dark chocolate gives a rich taste, while white chocolate adds sweetness. Each choice makes the bread unique. If you want a gluten-free option, use gluten-free flour. It works well and keeps the texture nice. For sugar, you can swap granulated sugar with coconut sugar or stevia. These options lower the sugar content, making the bread a bit healthier. During the holidays, you can add cranberries or chopped apples. They bring a fresh twist to the bread. Adjusting spices can also make a difference. Try adding cloves or allspice for a festive touch. Each change brings new flavors and fun to this cozy loaf. To keep your chocolate chip pumpkin bread fresh, wrap it tightly in plastic wrap. This helps lock in moisture. You can also place it in an airtight container. Store it at room temperature for about 3 to 4 days. If you want it to last longer, consider refrigerating it. Freezing your loaf is easy. First, let the bread cool completely. Once cooled, wrap it in plastic wrap, then foil. This prevents freezer burn. You can freeze chocolate chip pumpkin bread for up to 3 months. When you're ready to enjoy it, take it out of the freezer. Place it in the fridge overnight to thaw slowly. For a quicker method, leave it at room temperature for 2 to 3 hours. To reheat the bread, preheat your oven to 350°F (175°C). Place the loaf on a baking sheet. Heat for about 10 to 15 minutes, until warmed through. If you're in a hurry, you can use a microwave. Heat individual slices for about 15 to 20 seconds. Enjoy it warm for the best taste! You can use homemade pumpkin puree. Simply roast a pumpkin and blend it smooth. Other options include sweet potato puree or butternut squash puree. Both will give a similar taste and texture to the bread. Check for doneness by inserting a toothpick into the center. If it comes out clean or with a few crumbs, your bread is ready. The top should also be set and slightly golden. Yes, you can! Fill mini loaf pans with batter, but reduce the baking time. Check them after 25-30 minutes. They should be golden and a toothpick should come out clean. This bread lasts about 3-4 days at room temperature. Store it in an airtight container to keep it fresh. You can also refrigerate it for up to a week. Absolutely! Cook fresh pumpkin until soft, then blend it into a puree. Make sure to drain any excess water for the right consistency. This blog post covered how to make delicious chocolate chip pumpkin bread. We talked about the best ingredients, like spices and add-ins, for a great flavor. I shared tips on mixing batter, baking, and storing the bread. You now know variations to try and how to make it fit your diet. Baking this bread can be fun and easy. Enjoy the process and share it with others!
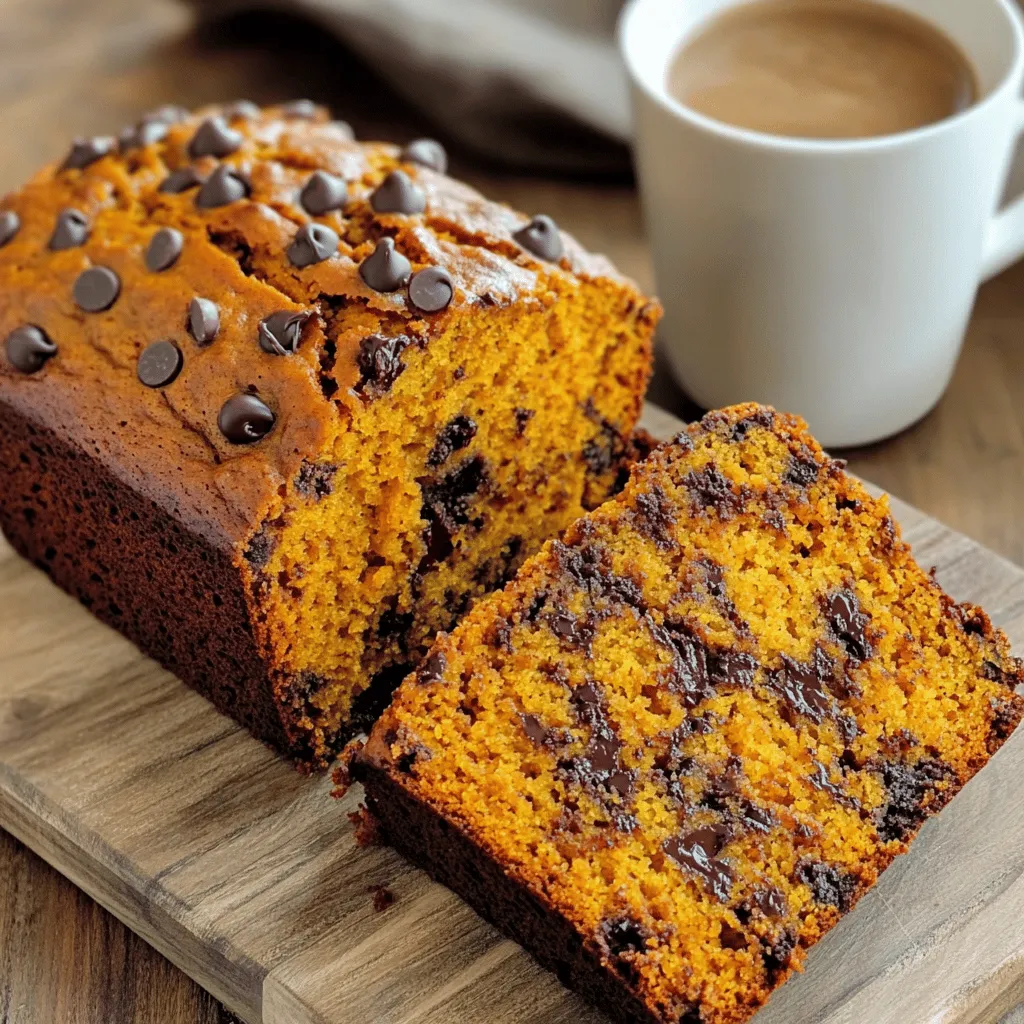
Chocolate Chip Pumpkin Bread Cozy and Flavorful Loaf
Get ready to enjoy a warm slice of Chocolate Chip Pumpkin Bread! This cozy and flavorful loaf blends the rich taste of pumpkin with sweet
- 2 cups graham cracker crumbs - 1/2 cup unsalted butter, melted - 1/4 cup granulated sugar - 2 (8 oz) packages cream cheese, softened - 1 cup granulated sugar - 1 teaspoon vanilla extract - 2 large eggs - 2 cups apples, peeled and diced - 1 teaspoon ground cinnamon - 1/4 teaspoon nutmeg - 1/2 cup caramel sauce, plus more for drizzling - 1/4 cup all-purpose flour To make Caramel Apple Cheesecake Bars, gather these ingredients. The graham cracker crumbs form a sweet base. You will need unsalted butter, which helps bind the crumbs. Granulated sugar adds sweetness to both the crust and the filling. Two packages of softened cream cheese create the creamy texture we love. You will also need more granulated sugar for the filling. Vanilla extract brings a lovely flavor to the mix. Use two large eggs to help set the cheesecake. For the apple flavor, choose two medium apples and dice them. Adding ground cinnamon and nutmeg gives a warm spice to the dish. Caramel sauce is a must for that sweet drizzle on top. Lastly, a bit of all-purpose flour helps the cheesecake hold together. These ingredients blend to create a rich and delightful dessert. Enjoy each step as you create these tasty bars. 1. Preheat your oven to 325°F (160°C). Line a 9x13 inch baking dish with parchment paper. Leave some paper hanging over the sides. This helps with easy removal later. 2. In a medium bowl, mix 2 cups of graham cracker crumbs, 1/2 cup melted butter, and 1/4 cup granulated sugar. Stir until it looks like wet sand. 3. Press this crumb mix evenly into the bottom of the baking dish. Bake for about 10 minutes. Remove from the oven and let it cool slightly. 1. In a large bowl, beat 2 packages of softened cream cheese with an electric mixer until it is smooth. 2. Add 1 cup of granulated sugar and 1 teaspoon of vanilla extract. Mix until it is well combined. 3. Beat in 2 large eggs, one at a time. Make sure each egg is fully mixed in before adding the next. 4. Add 1/4 cup of flour, 1 teaspoon of ground cinnamon, and 1/4 teaspoon of nutmeg. Mix until everything is combined. 5. Gently fold in 2 cups of peeled and diced apples. Make sure the apples are evenly mixed into the cheesecake batter. 1. Pour the apple cheesecake mixture over the cooled graham cracker crust. Spread it evenly. 2. Drizzle 1/2 cup of caramel sauce over the top. Use a knife or toothpick to swirl the caramel into the cheesecake batter. This creates a pretty marbled effect. 3. Bake the cheesecake bars for 30-35 minutes. Check for doneness. The edges should be set, and the center should be slightly jiggly. 4. Allow the bars to cool at room temperature. After cooling, chill them in the fridge for at least 3 hours or, for best results, overnight. 5. Once chilled, lift the bars out using the parchment paper. Slice into squares, and drizzle with more caramel sauce before serving. To get that creamy texture, start with soft cream cheese. If it is cold, it won't mix well. Leave it out for about 30 minutes before using. This step is key for smooth cheesecake. Chilling time is also important. After baking, let the bars cool to room temp. Then, refrigerate them for at least three hours. For the best taste, chill them overnight. This helps the flavors blend and sets the texture nicely. For a beautiful presentation, serve these bars on a wooden platter. You can add thin apple slices on the side. A sprinkle of cinnamon adds a nice touch. Drizzle extra caramel sauce over the bars before serving. This makes them look even more tempting. One common mistake is overmixing the cheesecake batter. Mix just until combined. Overmixing adds too much air, which can cause cracks. Another mistake is not cooling the crust properly. If the crust is warm when you add the cheesecake mixture, it can melt. Make sure it is cool before pouring the batter on top. This helps keep the layers distinct. {{image_2}} You can change some ingredients to fit your needs. For a gluten-free version, use gluten-free graham crackers. They taste great and keep the same texture. Many brands sell these options in stores. If you want a vegan treat, substitute the cream cheese with vegan cream cheese. You can find it at most grocery stores. This swap helps keep the bars creamy without using dairy. You can mix in some nuts or other fruits for extra taste. Chopped walnuts or pecans add a nice crunch. Diced pears or peaches also work well. The fruit can add a new twist to the classic flavor. Try different sauces too! A drizzle of chocolate or butterscotch sauce can elevate your bars. These toppings bring a fun surprise to every bite. Serve your bars with a scoop of ice cream or a dollop of whipped cream. Vanilla ice cream pairs nicely with the caramel flavor. You can also add a sprinkle of cinnamon on top for a nice touch. For parties, cut the bars into fun shapes or smaller bites. Arrange them on a wooden platter, adding thin apple slices as decoration. This makes your dessert look festive and inviting. To keep your caramel apple cheesecake bars fresh, store them in the refrigerator. - Refrigerator: Place the bars in an airtight container. They can last up to a week. - Freezing: You can freeze the bars for later. Wrap them tightly in plastic wrap, then place in a freezer bag. They can stay good for up to three months. These cheesecake bars taste best fresh, but they hold up well over time. - Duration for quality retention: If stored properly, they remain tasty for about a week in the fridge. In the freezer, they can last for three months without losing flavor. - Signs of spoilage: Watch for any changes in smell or color. If they develop a sour smell or look off, it’s best to toss them. Yes, you can swap out the apples for other fruits. Here are some great options: - Pears: They add a sweet flavor. - Peaches: Fresh or canned, they work well. - Berries: Blueberries or raspberries add a nice tartness. - Cherries: Pitted and chopped, they add a fun twist. Make sure to adjust the spices to match your fruit choice. Check the edges of the bars. They should be set and not wobbly. The center can jiggle slightly. Here are some tips: - Use a toothpick: Insert it in the center. If it comes out clean or with a few crumbs, they are done. - Look for a slight golden edge: This means the bars are baked just right. Let them cool before slicing for the best texture. Absolutely! Making them ahead is a great idea. Here are some best practices: - Prepare the bars a day in advance for the best flavor. - Store them in the fridge, covered tightly. - If you freeze them, wrap each bar well in plastic wrap. Thaw them in the fridge before serving for the best taste. This blog post covered how to make delicious cheesecake bars using simple ingredients. You learned about preparing the crust, making the creamy filling, and baking techniques. I also shared tips for texture, storage, and serving ideas to enhance your bars. Remember, soft cream cheese and proper chilling are key. Explore variations to make this recipe your own. Enjoy your baking journey!
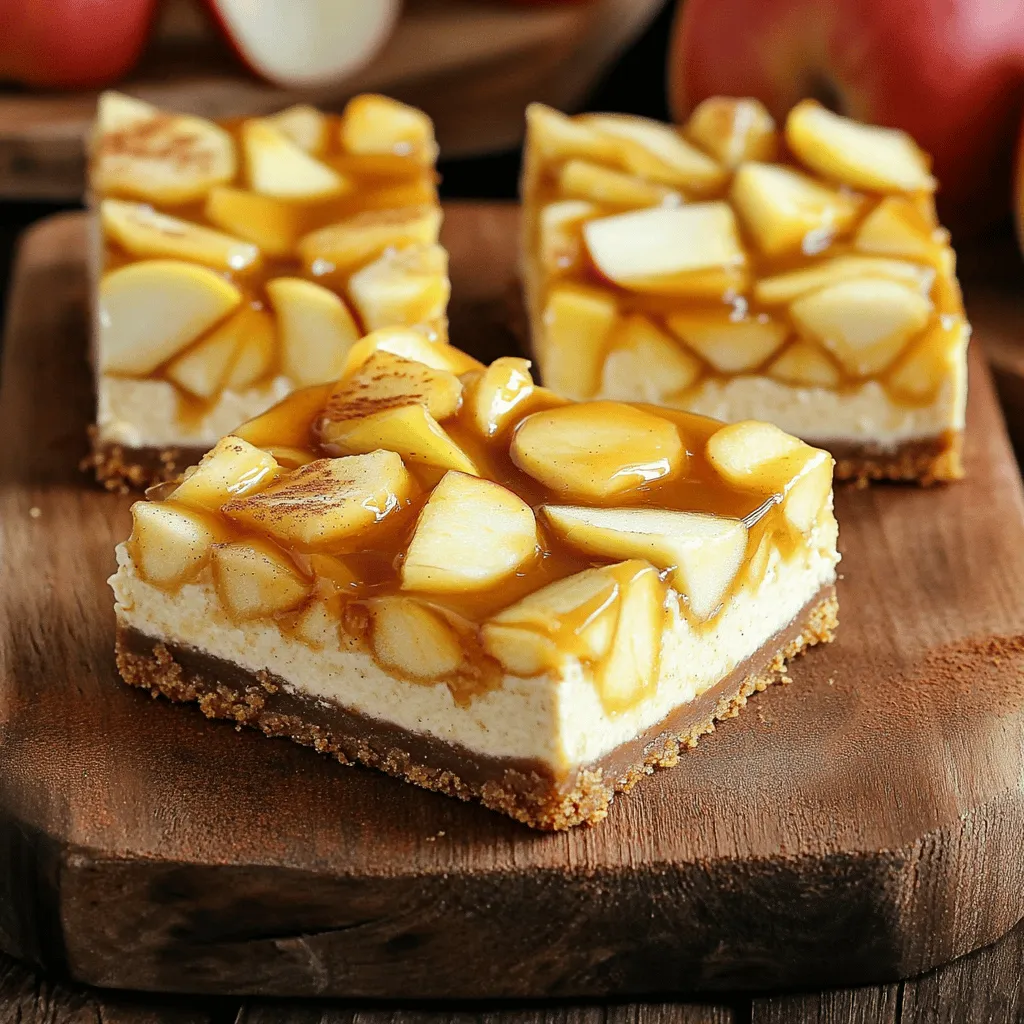
Caramel Apple Cheesecake Bars Simple and Delicious Treat
Are you ready to indulge in a sweet treat that combines creamy cheesecake and juicy apples? My Caramel Apple Cheesecake Bars offer a perfect balance
To make Pumpkin Spice Energy Bites, gather these items: - 1 cup rolled oats - 1/2 cup pumpkin puree - 1/2 cup almond butter or nut butter of your choice - 1/4 cup honey or maple syrup - 1 teaspoon vanilla extract - 1 teaspoon pumpkin spice, or a mix of cinnamon, nutmeg, and ginger - 1/4 teaspoon sea salt - 1/4 cup chopped nuts, like walnuts or pecans - 1/4 cup mini chocolate chips or dried cranberries (optional) These ingredients blend to create a tasty and healthy snack. You can swap ingredients if needed. For example, use peanut butter instead of almond butter. Maple syrup can replace honey for a vegan option. If you want to avoid nuts, leave them out. You can also use seeds, like sunflower seeds, instead. The flavor still stays great. These ingredients pack some nice health benefits: - Rolled oats provide fiber, which helps with digestion. - Pumpkin puree is full of vitamin A, good for your eyes. - Almond butter contains healthy fats and protein, which keep you full. - Honey or maple syrup gives natural sweetness without refined sugars. - Pumpkin spice has cinnamon, which can help regulate blood sugar. - Chopped nuts add crunch and nutrients like omega-3 fatty acids. - Chocolate chips or dried cranberries can provide antioxidants. These energy bites not only taste good but also offer a range of health perks! First, gather your ingredients. You will need: - 1 cup rolled oats - 1/2 cup pumpkin puree - 1/2 cup almond butter (or any nut butter of choice) - 1/4 cup honey or maple syrup - 1 teaspoon vanilla extract - 1 teaspoon pumpkin spice (or a mix of cinnamon, nutmeg, and ginger) - 1/4 teaspoon sea salt - 1/4 cup chopped nuts (e.g., walnuts or pecans) - 1/4 cup mini chocolate chips or dried cranberries (optional) Start by measuring out the rolled oats and pumpkin spice. Place them in a large bowl. Stir them together until they mix well. This blend gives your bites a nice flavor. Next, take another bowl. Mix the pumpkin puree, almond butter, honey, and vanilla extract until smooth. This will be your wet mix. Now, pour the wet mix into the bowl with oats and spice. Stir until everything combines well. Add the sea salt, chopped nuts, and chocolate chips or dried cranberries if you choose. Mix until they spread evenly. Once mixed, use your hands to form small balls. Each ball should be about 1 inch wide. Place them on a parchment-lined tray. This makes clean-up easy later. After forming all the bites, it’s time to chill them. Place the tray in the refrigerator for at least 30 minutes. This step helps them firm up and hold their shape. Once chilled, you can store the energy bites. Use an airtight container and place it in the refrigerator. They will stay fresh for up to one week. Enjoy these tasty snacks anytime! You can easily change these energy bites to fit your taste. Here are some ideas: - Add spices: Try extra cinnamon or a pinch of nutmeg for more warmth. - Use different nut butter: Swap almond butter for peanut butter or sunflower seed butter. - Mix in fun ingredients: Toss in dried fruits, seeds, or coconut flakes. These changes keep the bites fresh and exciting. You can even create seasonal flavors! When making pumpkin spice energy bites, some common errors can happen. Here’s what to watch for: - Not measuring ingredients: Use measuring cups for precise amounts. - Skipping the fridge: Refrigerating helps the bites firm up. Don’t skip this step! - Overmixing: Mix until combined, but don’t overdo it. This keeps the texture just right. Avoiding these issues helps you make the best energy bites. Enjoy these pumpkin spice energy bites in fun ways. Here are some ideas: - As a snack: Grab one on the go for a quick energy boost. - With coffee or tea: Pair them with your favorite warm drink for a cozy treat. - At parties: Serve them on a platter for guests to enjoy. These bites are versatile, making them great for many occasions! {{image_2}} You can change the flavor of your energy bites easily. If you love chocolate, add mini chocolate chips. They bring sweetness and richness to the bites. For a fruity twist, use dried cranberries. They add a tart flavor that pairs well with pumpkin. You can also try adding shredded coconut or raisins for new tastes. Mix and match until you find your favorite flavor. If you want a nut-free version, swap almond butter with sunflower seed butter. This keeps the bites creamy and delicious without nuts. You can also use tahini, made from sesame seeds. It gives a unique taste and is great for those with nut allergies. Always check labels to ensure your ingredients are nut-free. To make these bites vegan, replace honey with maple syrup. This keeps the natural sweetness without any animal products. Use any plant-based butter, like coconut oil, instead of almond butter for extra richness. These small swaps make your energy bites vegan-friendly while still tasting great. Enjoy the pumpkin spice flavor without worry! To keep your pumpkin spice energy bites fresh, store them in an airtight container. I recommend using glass or plastic containers with tight lids. This way, they stay soft and tasty. Place a piece of parchment paper between layers if you stack them. It helps prevent sticking. These energy bites last up to one week in the fridge. To check if they are still good, look for any mold or odd smells. If they start to feel dry, they may not taste as great, but they are still safe to eat. Enjoy them as soon as possible for the best flavor. You can freeze pumpkin spice energy bites for longer storage. To do this, place them in a freezer-safe bag or container. Make sure to separate each bite with parchment paper to avoid clumping. They can last up to three months in the freezer. When you’re ready to eat, just thaw them in the fridge or at room temperature. This way, you always have a tasty snack ready for fall! Pumpkin spice energy bites are small, no-bake snacks. They mix oats, pumpkin puree, and nut butter. You can enjoy them as a quick snack or breakfast option. They taste like fall in every bite! The blend of flavors includes pumpkin spice, honey, and chocolate chips. These bites are healthy and easy to make. Yes, you can make these energy bites gluten-free. Just use gluten-free rolled oats. Many brands offer gluten-free oats. Make sure to check the label. This way, you can enjoy these bites without worry. These energy bites last about one week. Keep them in an airtight container. Store them in the fridge to keep them fresh. If you want to enjoy them later, freezing is also an option. Just thaw them before eating. Yes, some stores sell ready-made pumpkin spice energy bites. Look in the health food section. Check the labels for ingredients and nutrition facts. However, homemade bites often taste better. You can adjust the flavors and sweetness to your liking. In this blog post, we explored the world of energy bites. We covered the ingredients, how to make them, and tips to enhance your recipe. You learned about substitutions, health benefits, and serving ideas. We also shared variations for different diets and preferences. Keep these tips in mind as you create your energy bites. With a bit of practice, you can make them your own. Enjoy the process and taste the benefits of these simple snacks!
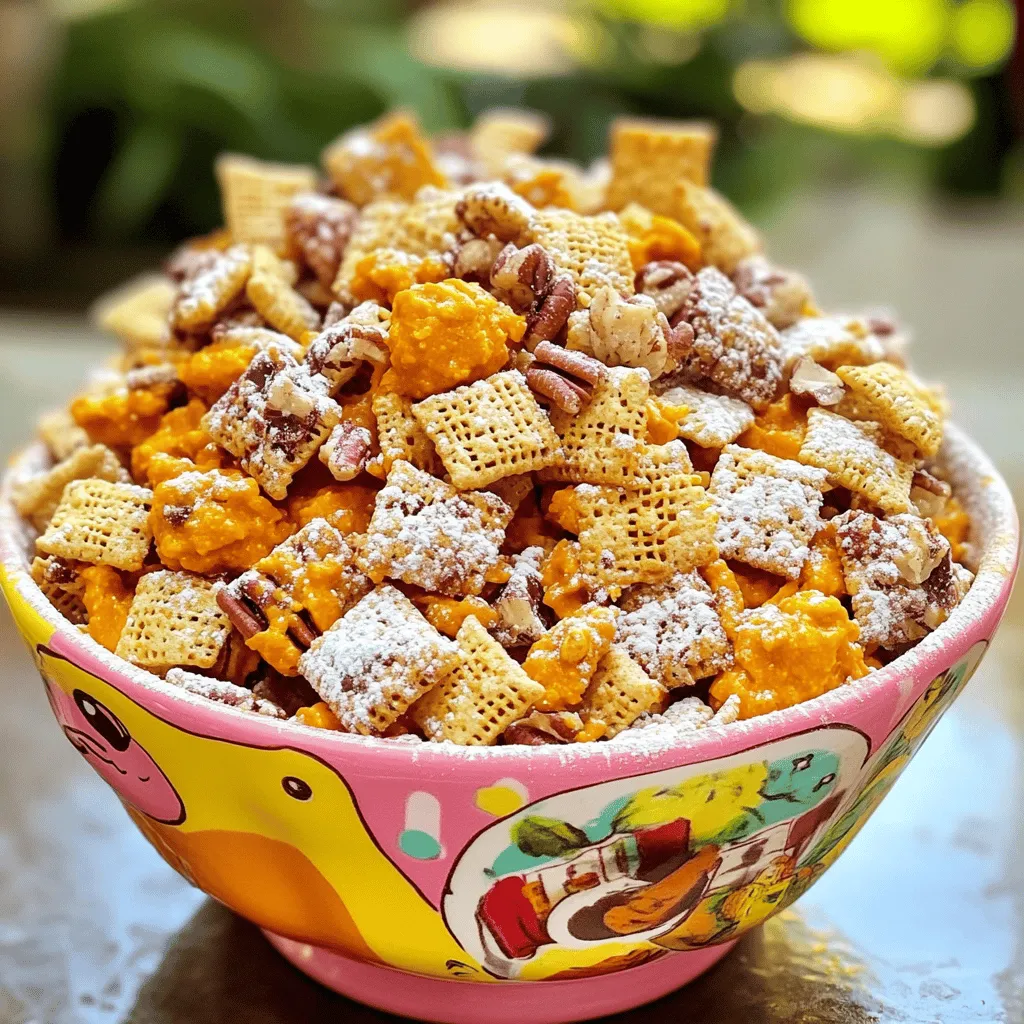
Pumpkin Spice Energy Bites Perfect for Fall Snacks
Fall is here, and it’s time to treat yourself with something delightful and healthy! Pumpkin spice energy bites are the perfect snack. They capture the
- 2 medium apples (Granny Smith or Honeycrisp preferred) - 1 teaspoon cinnamon - 1 teaspoon sugar (optional) - Pinch of salt - Cooking spray (optional) For this tasty snack, I like to use Granny Smith or Honeycrisp apples. They have the right balance of sweet and tart flavors. You need just a few simple ingredients. Cinnamon adds a warm spice. If you want more sweetness, you can add sugar. A pinch of salt helps enhance the flavors too. If you want to avoid sticking, a bit of cooking spray works wonders. When you have these ingredients ready, you can start making your apple chips. They are easy to prepare and taste amazing. You will enjoy the crunch and flavor in every bite! To start, wash and dry the apples well. This step is key for clean and tasty chips. Use cold water and scrub the skin gently. After washing, dry them with a clean towel. Next, you need to slice the apples. I recommend using a mandoline for thin, even slices. Aim for about 1/8 inch thick. If you don’t have a mandoline, a sharp knife works too. Keep the skin on for added texture and nutrients. If you want, you can remove the core with a corer. Now, let’s coat the apple slices. In a bowl, mix the cinnamon, sugar, and a pinch of salt. Use 1 teaspoon of cinnamon and 1 teaspoon of sugar, but you can skip the sugar if you want less sweetness. Toss the apple slices in this mix. Make sure each slice gets a nice coating. This adds flavor and helps them crisp up. Preheat your air fryer to 300°F (150°C) for 3 to 5 minutes. This step helps cook the apple chips evenly. Next, lightly spray the air fryer basket with cooking spray. This keeps the chips from sticking. Arrange the apple slices in a single layer in the basket. Make sure they don’t overlap, or they won’t cook well. Cook the apple slices for 15 to 20 minutes. Shake the basket halfway through to help them cook evenly. Keep an eye on them toward the end. You want them crisp and lightly browned, not burnt. Once done, remove the apple chips and let them cool. This cooling time helps them get even crisper. If you don’t eat them all right away, store them in an airtight container. To get the best crunch from your apple chips, slice the apples evenly. I recommend using a mandoline for this. Aim for 1/8 inch thick slices. Thin slices cook faster and get crispier. Preheat your air fryer to 300°F (150°C) for 3-5 minutes. This helps cook the chips evenly from the start. One common mistake is overcrowding the air fryer. Always arrange the apple slices in a single layer. If they overlap, they won’t cook well. Also, keep a close watch on the cooking time. Shake the basket halfway through to ensure even cooking. Check them often near the end to prevent burning. While cinnamon is a great start, feel free to get creative. Try adding nutmeg or pumpkin spice for a twist. A sprinkle of sugar can add sweetness, but it’s optional. You can also drizzle honey or maple syrup on the chips before air frying for extra flavor. {{image_2}} You can change the flavor of your apple chips by using different apple types. Each apple brings a unique taste. For a tart twist, try Granny Smith apples. They give a nice crunch and a sharp flavor. If you prefer sweetness, go for Honeycrisp apples. They are juicy and sweet, perfect for snacking. Fuji or Gala apples also make great choices for a flavor boost. Experiment with your favorites to find the best fit for you. Adding spices can make your apple chips even more exciting. Besides cinnamon, try nutmeg for a warm flavor. Pumpkin spice is another great option, especially in fall. You can also sweeten them up a bit. A teaspoon of honey or maple syrup can add a lovely touch. Just mix these in with your apple slices before air frying. You will love the added flavor! If you want to change things up, consider savory apple chips. Adding cheese and herbs can create a fun twist. Try mixing in some grated Parmesan cheese for a cheesy crunch. You can also toss in herbs like rosemary or thyme. This savory take gives your apple chips a whole new dimension. Don’t be afraid to get creative and explore different flavor profiles. To keep your apple chips crispy, store them in an airtight container. This helps lock in crunchiness. Place a paper towel inside to absorb any moisture. Avoid storing them in the fridge since humidity can make them soft. Make sure the container is in a cool, dry place. When stored properly, apple chips can last for about a week. If you want them to stay fresh longer, check for any signs of moisture before sealing the container. If they feel soft, it’s best to eat them soon. To restore crispiness, reheat your apple chips in the air fryer. Set it to 300°F (150°C) for about 3-5 minutes. This method helps bring back their crunch without adding oil. Alternatively, you can also use an oven set to a low temperature. Just watch them closely to avoid burning. You can use many types of apples. However, some are better than others. I recommend Granny Smith or Honeycrisp apples. Granny Smith gives a tart flavor, while Honeycrisp is sweet and crunchy. Both hold up well in the air fryer and make tasty chips. Other apples, like Fuji or Gala, work too, but the texture may differ. To make your apple chips sweeter, you have a few options. You can add more sugar to the mix. One teaspoon is a good start, but feel free to adjust. If you want a natural sweetener, add a drizzle of honey or maple syrup. Both options blend well with cinnamon and enhance the flavor. Just toss the slices to coat them evenly. Spraying the air fryer basket is a good idea. It helps prevent the apple slices from sticking. If you don’t have cooking spray, you can use a small amount of oil on a paper towel to coat the basket. This step ensures easy removal of the chips and keeps them intact. It also promotes even cooking, giving you that perfect crunch. Making apple chips is simple and fun. You learned about the ingredients, steps, and tips. Using Granny Smith or Honeycrisp apples sets you up for success. Proper slicing and air frying create a tasty treat. Remember to keep the slices even and check the time. You can try different spices or sweeteners for more flavor. Enjoy your crunchy apple chips and impress your friends and family. Happy cooking!
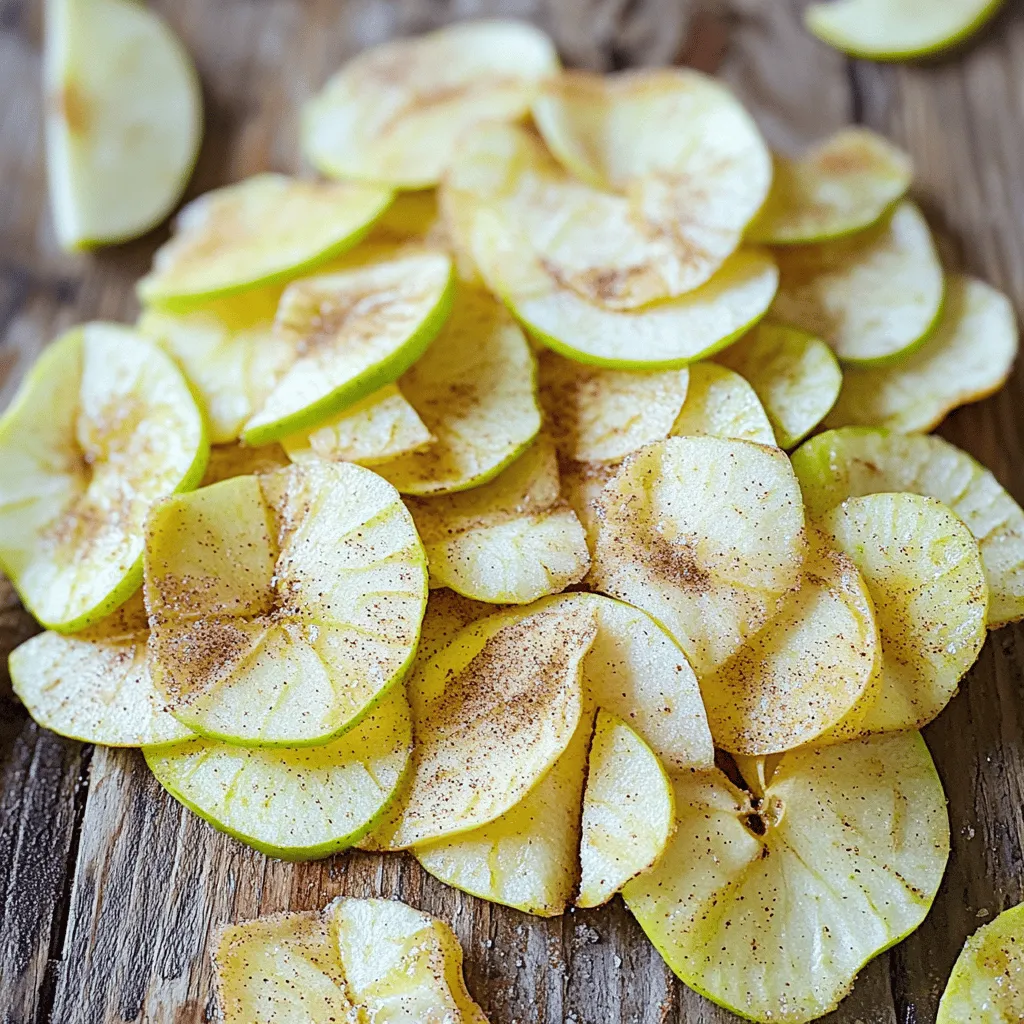
Air Fryer Apple Chips Crunchy and Tasty Snack Recipe
Looking for a crunchy snack that’s both tasty and healthy? You’re in the right place! My Air Fryer Apple Chips recipe is simple and fun,
- 1 cup creamy peanut butter - 1/2 cup honey or maple syrup - 2 cups rolled oats - 1/2 cup almond flour - 1/4 cup cocoa powder The main ingredients create a rich and tasty base for the bars. Creamy peanut butter gives a smooth texture. Honey or maple syrup adds sweetness and helps bind the mix. Rolled oats make these bars filling and hearty. Almond flour adds a nutty flavor and helps with texture. Cocoa powder gives a rich, chocolatey taste. - 1/4 cup chocolate chips - A pinch of sea salt - 1 tsp vanilla extract Optional add-ins let you customize your bars. Chocolate chips add a delightful surprise in every bite. A pinch of sea salt enhances the sweet and savory mix. Vanilla extract brings out the flavors and adds warmth. You can use these add-ins to make the bars more fun. - Medium saucepan - Large mixing bowl - 8x8 inch square baking dish Using the right tools helps you make these bars easily. A medium saucepan is perfect for melting the peanut butter and honey. A large mixing bowl is needed to combine the dry ingredients. An 8x8 inch square baking dish helps shape the bars nicely. These tools make the process smooth and quick. 1. In a medium saucepan, combine 1 cup of creamy peanut butter and 1/2 cup of honey or maple syrup. 2. Heat over low until melted. Stir until it blends smoothly. 1. In a large mixing bowl, combine 2 cups of rolled oats, 1/2 cup of almond flour, and 1/4 cup of cocoa powder. 2. Mix these dry ingredients thoroughly until well combined. 1. Pour the warm peanut butter mixture over the dry ingredients. 2. Mix well until everything is fully combined. If you want chocolate chips, fold in 1/4 cup now. 1. Line an 8x8 inch square baking dish with parchment paper. 2. Press the mixture firmly into the dish. Make sure it’s evenly spread. 3. Refrigerate for at least one hour or until the bars are set. To get the perfect firmness in your no-bake peanut butter bars, make sure to press the mixture firmly into the baking dish. Use your hands or a flat tool to pack it down. This helps the bars hold together well. If the mixture seems too crumbly, add a bit more peanut butter or honey. It will help bind everything together nicely. You can add fun flavors to your bars! Try mixing in some cinnamon or a dash of cocoa powder for more chocolatey taste. If you want more sweetness, add a little extra honey or maple syrup. Taste it as you mix. Adjust until it’s just right for you! If you need nut-free bars, you can use sun butter or soy nut butter instead of peanut butter. These options still give a creamy texture. You can also try using pumpkin seed butter. It adds a unique taste while keeping the bars soft and chewy. Always check for allergies before sharing! {{image_2}} You can make these bars even healthier. Try using low-sugar sweeteners like stevia or monk fruit. These options help cut the sugar while keeping the taste. For a gluten-free treat, swap almond flour with coconut flour or gluten-free oats. These small changes make a big difference. Feel free to get creative with flavors. You can add mashed banana or shredded coconut to the mix. Both add a nice touch and extra nutrients. If you want a protein boost, try mixing in your favorite protein powder. It helps you stay full longer and keeps your energy up. You can change the shape of your treats. Press the mixture into a larger dish for thinner bars, or roll it into bite-size balls for fun snacks. Using a muffin tin also works well for portion control. Each shape offers a different eating experience, making them great for any occasion. To keep your no-bake peanut butter bars fresh, use airtight containers. They help seal in flavor. You can also use covered dishes, but these may not keep them as fresh. Airtight containers prevent air from making the bars dry or stale. You can freeze these bars for later enjoyment. First, wrap each bar in plastic wrap. Then, place them in a freezer-safe bag or container. This keeps them from getting freezer burn. When you're ready to eat them, take them out and let them defrost in the fridge. This helps keep the texture nice and smooth. In the fridge, these bars last about a week. Look for signs of spoilage, like an off smell or a change in texture. If they feel too sticky or hard, it's best to toss them. Keeping an eye on them ensures you enjoy them at their best! Yes, you can use natural peanut butter. The main difference is texture. Creamy peanut butter is smooth and easy to mix. Natural peanut butter may be a bit thicker. It often has oil on top, which you need to stir in. Both types will work, but creamy gives a better texture. To check if the bars are set, gently press on them. They should feel firm and not squishy. If they hold their shape and feel solid, they are ready. You can also refrigerate them for about one hour to ensure they firm up nicely. Yes, these bars are very kid-friendly! They have healthy ingredients that kids enjoy. Peanut butter provides protein, and oats give fiber. Honey or maple syrup adds a touch of sweetness. These bars make a great snack or treat for children. This post showed you how to make tasty peanut butter bars. We covered the ingredients, tools, and steps you need. You learned about options for flavors and different ways to store the bars. Remember, you can customize these bars to fit your taste, whether you prefer nut-free or low-sugar versions. These bars are not just delicious; they are also good for you and your family. Enjoy making your own treats at home!
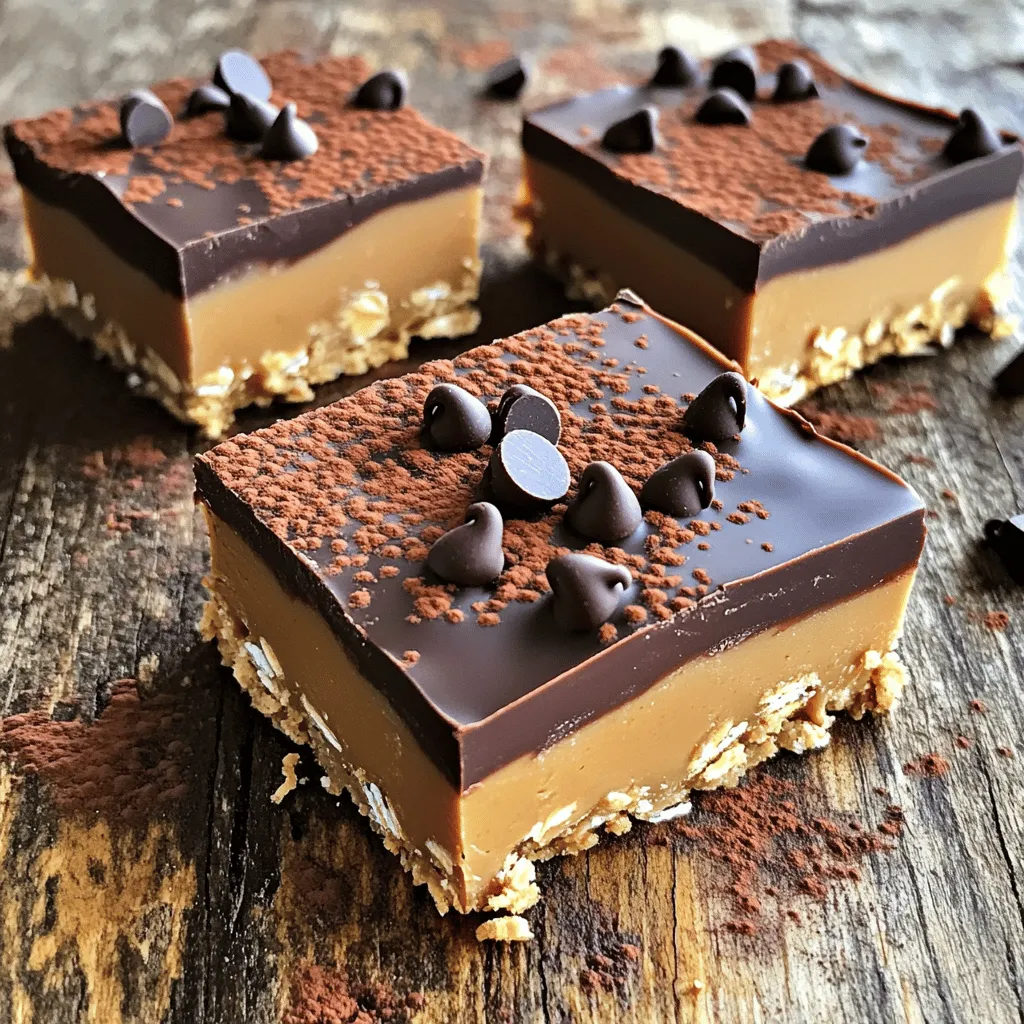
No-Bake Peanut Butter Bars Quick and Tasty Treat
Looking for a quick and easy sweet treat? These No-Bake Peanut Butter Bars are just what you need! With just a few simple ingredients like
For a tasty Salted Honey Pie, you need: - 1 cup clover honey - 3 large eggs - 1/2 cup heavy cream - 1 teaspoon vanilla extract - 1 teaspoon sea salt (for topping) These ingredients create a smooth and sweet filling. The honey gives the pie a rich flavor. Eggs help set the filling, and cream adds a creamy texture. Vanilla extract enhances the taste, while sea salt balances the sweetness. The crust holds everything together. For the crust, gather these items: - 1 ½ cups all-purpose flour - 1/3 cup granulated sugar - 1/2 teaspoon salt - 1/2 cup unsalted butter, cold and cubed - 1 egg yolk - 2 tablespoons ice water This mix creates a flaky crust. Cold butter is key for that perfect texture. Adding an egg yolk helps bind the crust. Use ice water to keep the dough cold and easy to handle. Enhance your pie with fun toppings: - Lightly whipped cream - Extra honey drizzle These toppings add flair and flavor. Whipped cream gives a nice contrast to the filling. A honey drizzle makes every bite sweeter. Feel free to get creative with your presentation! First, gather your pie crust ingredients. You need: - 1 ½ cups all-purpose flour - 1/3 cup granulated sugar - 1/2 teaspoon salt - 1/2 cup unsalted butter, cold and cubed - 1 egg yolk - 2 tablespoons ice water In a large bowl, whisk the flour, sugar, and salt together. Next, add the cold butter. Use a pastry cutter or your fingers to mix until it looks like coarse crumbs. Now, in a small bowl, whisk the egg yolk and ice water. Add this mix to the flour mix. Stir until a dough forms. Don’t overwork it, or your crust will be tough. Wrap the dough in plastic wrap. Chill it in the fridge for at least 30 minutes. This helps it hold its shape. For the filling, you will need: - 1 cup clover honey - 3 large eggs - 1/2 cup heavy cream - 1 teaspoon vanilla extract In a mixing bowl, whisk together the honey, eggs, heavy cream, and vanilla extract. Mix until it is smooth and well combined. Preheat your oven to 350°F (175°C). Roll out your chilled dough on a floured surface. Make it fit a 9-inch pie pan. Place the dough in the pan and trim any extra. You can crimp the edges for a nice look. Blind bake the crust by placing it in the oven. Bake for about 15-20 minutes, or until it is lightly golden. Let it cool slightly. Now, pour the honey filling into the cooled pie crust. Spread it evenly. Bake the pie for another 25-30 minutes. It is ready when the filling is set and slightly puffed. Remove it from the oven and let it cool to room temperature. Before serving, sprinkle the top with sea salt. This adds a nice contrast to the sweet pie. Enjoy your salted honey pie! To make a great pie crust, keep your butter cold. Use unsalted butter for better control of flavor. Mix the flour, sugar, and salt first. Then, add the cubed butter and mix until it looks like coarse crumbs. Avoid overworking the dough. This keeps the crust flaky. Chill the dough for at least 30 minutes. This helps the crust hold its shape while baking. When serving Salted Honey Pie, let it cool to room temp. This helps the filling set well. I like to slice it and place each piece on a plate. Add a dollop of lightly whipped cream on top. Drizzle a bit of honey for extra sweetness. You can also sprinkle some sea salt on top. This gives a nice contrast to the honey flavor. One big mistake is overmixing the dough. This can make it tough. Another mistake is not chilling the dough. This step is key for a good crust texture. Watch the pie while it bakes. If the edges brown too quickly, cover them with foil. Finally, ensure you let the pie cool completely before slicing. It helps the filling set and makes serving easier. {{image_2}} You can tweak your salted honey pie in fun ways. Try adding a hint of lemon zest for brightness. You can also mix in cinnamon or nutmeg for warmth. If you love nuts, chop some and sprinkle them on top. They add crunch and flavor. Another great idea is to swirl in some chocolate or caramel. Each change brings a new taste to enjoy. If you want a different sweetener, consider maple syrup or agave. They change the flavor but still keep the pie sweet. Use the same amount as honey in the recipe. For a low-calorie option, try stevia or monk fruit. Just check the package for the right amount to use. Each sweetener gives the pie a unique twist. To make a gluten-free pie, swap the all-purpose flour with a gluten-free blend. Many blends work well, so pick one you like. Make sure to check that the blend has xantham gum. This helps the crust stay together. The filling remains the same, so you keep that sweet taste. This way, everyone can enjoy this treat! To keep your salted honey pie fresh, cover it with plastic wrap. You can also place it in an airtight container. Store it in the fridge for up to 3 days. The pie tastes best when served cold, so chilling it helps maintain its texture. If you want to freeze your pie, wrap it well in plastic wrap. Then, place it in a freezer-safe bag or container. The pie can freeze for up to 2 months. When you’re ready to enjoy it, let it thaw in the fridge overnight. To reheat the pie, preheat your oven to 350°F (175°C). Place the pie in the oven for about 10-15 minutes. This warms it up without making it soggy. If you want, you can serve it warm or cold! Salted honey pie is a sweet dessert made with honey and a touch of salt. The filling is creamy and rich. It blends honey, eggs, and cream into a smooth mix. The pie has a flaky crust that complements the sweet filling. The salt on top enhances the flavors, creating a balance. This pie is simple but truly delightful. Yes, you can make salted honey pie ahead of time. Bake the pie and let it cool. Once cool, cover it with plastic wrap. Store it in the fridge for up to three days. This allows the flavors to meld beautifully. Just remember to add the sea salt topping before serving for freshness. Salted honey pie pairs well with many treats. Here are some great options: - Whipped cream: A dollop adds lightness. - Vanilla ice cream: The creaminess contrasts the pie’s texture. - Fresh berries: They add a tart flavor that brightens the dish. - Coffee or tea: A warm drink balances the sweetness. These pairings enhance your dessert experience. Enjoy experimenting! This guide covered how to make a delicious Salted Honey Pie. You learned about key ingredients for both the filling and crust. I shared step-by-step instructions, plus tips to avoid common mistakes. You also found variations to customize your pie, along with storage and reheating tips. Making this pie can be fun and rewarding. Use this knowledge to impress friends and family. Enjoy each bite and explore new flavors as you create your perfect pie masterpiece.
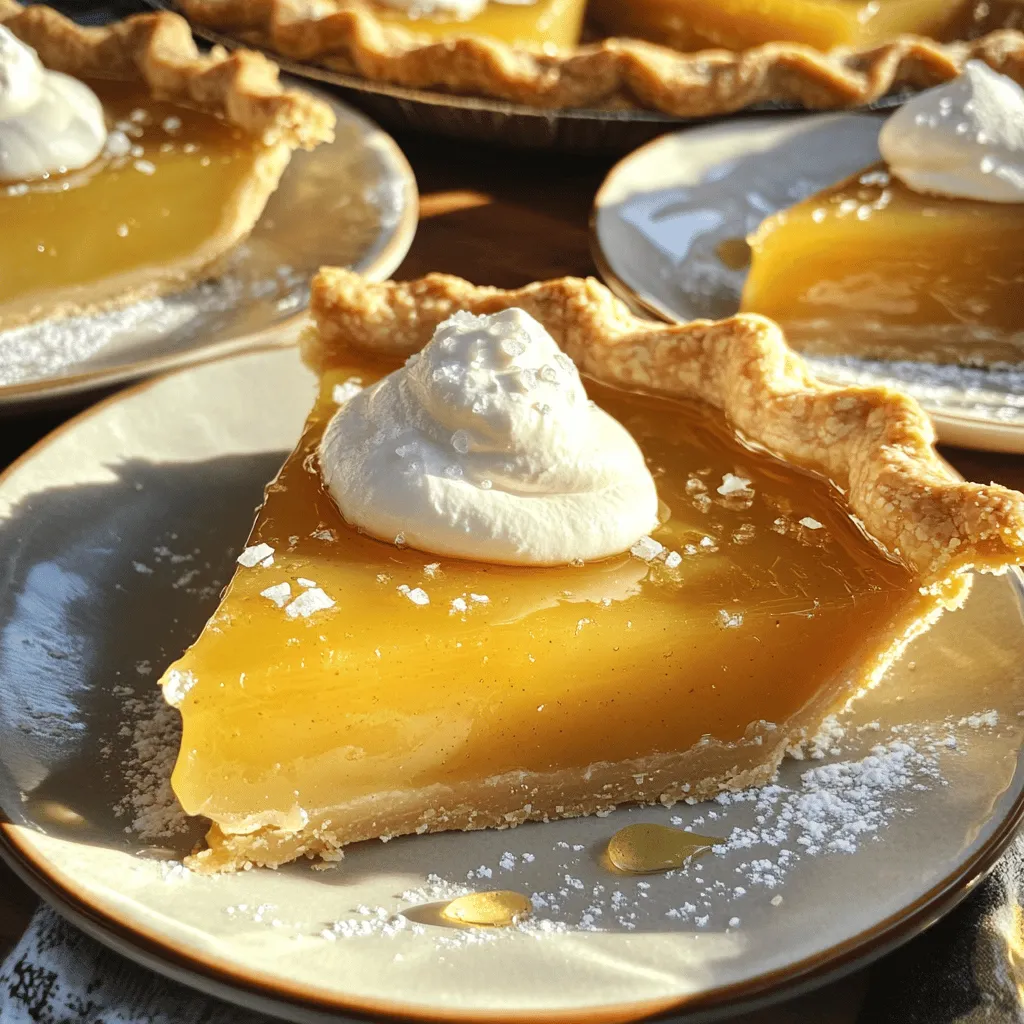
Salted Honey Pie Delightful and Simple Recipe
Are you ready to impress your friends and family with a tasty treat? Salted Honey Pie is a simple yet delightful dessert that combines sweet
- 1 ½ cups all-purpose flour - 1 cup granulated sugar - 1 tsp baking soda - ½ tsp baking powder - ½ tsp salt - 1 tsp ground cinnamon - ½ tsp ground nutmeg - ½ tsp ground ginger - ½ cup vegetable oil - 2 large eggs - 1 cup canned pumpkin puree - 1 tsp vanilla extract - ½ cup chocolate chips - ¼ cup chopped pecans or walnuts These ingredients create a warm and tasty muffin. The dry ingredients mix well to give structure. The flour and sugar work together to create a sweet base. The baking soda and powder help the muffins rise. The spices add that cozy fall flavor. On the wet side, the vegetable oil keeps the muffins moist. Eggs help bind everything together. Pumpkin puree adds a rich taste and texture. Vanilla extract gives a lovely aroma and depth. You can also add chocolate chips for sweetness or nuts for crunch. These choices make each bite exciting. Feel free to mix and match to find your favorite combo! - First, preheat your oven to 350°F (175°C). Line your muffin tin with paper liners or spray it with non-stick spray. - In a large mixing bowl, whisk together these dry ingredients: - 1 ½ cups all-purpose flour - 1 cup granulated sugar - 1 tsp baking soda - ½ tsp baking powder - ½ tsp salt - 1 tsp ground cinnamon - ½ tsp ground nutmeg - ½ tsp ground ginger - In another bowl, mix these wet ingredients until smooth: - ½ cup vegetable oil - 2 large eggs - 1 cup canned pumpkin puree - 1 tsp vanilla extract - Next, pour the wet mixture into the dry ingredients. Stir gently until they just come together. - If you want to add a twist, fold in these optional ingredients: - ½ cup chocolate chips - ¼ cup chopped pecans or walnuts - Divide the batter evenly among the muffin cups. Fill each cup about ¾ full. - Bake in the preheated oven for 18-20 minutes. Check for doneness by inserting a toothpick in the center. It should come out clean. - After baking, let the muffins cool in the tin for 5 minutes. Then, transfer them to a wire rack to cool completely. These steps will help you create delicious, soft pumpkin muffins that bring fall flavors to your kitchen. Enjoy them warm with butter or cream cheese! To make great muffins, avoid overmixing the batter. When you mix the wet and dry ingredients, stop as soon as they come together. Some lumps are okay. This keeps your muffins soft and fluffy. To test for doneness, use a toothpick. Insert it into the center of a muffin. If it comes out clean, your muffins are done. If it has batter on it, bake a few more minutes. You can experiment with spices to boost flavor. Try adding a pinch of cloves or allspice for extra warmth. Fresh pumpkin puree can make your muffins taste richer. If using fresh pumpkin, bake it first to remove excess moisture. Decorate your muffins for a fun look. A light dusting of powdered sugar adds a nice touch. You can also top them with a cream cheese glaze for extra flavor. For serving, warm muffins are best. Pair them with butter or cream cheese. Enjoy with a hot cup of coffee to enhance the fall vibe. {{image_2}} You can make these muffins a bit healthier. First, reduce the sugar or use a substitute like honey or maple syrup. This change keeps the sweet taste but cuts calories. Next, try using whole wheat flour instead of all-purpose flour. This flour adds fiber and nutrients, making your muffins even better for you. Think about adding dried fruits for a twist. Cranberries pair well with pumpkin and add a nice chew. You can also swap out nuts for seeds. Sunflower or pumpkin seeds add crunch and a fun flavor. These tweaks let you customize your muffins to suit your taste. Fall brings many flavors. You can incorporate other favorites, like apple or caramel. Just add small pieces of dried apples for a sweet touch. For the holidays, consider adding spices like cloves or allspice. You can also top the muffins with a cream cheese frosting for a festive treat. These variations keep your pumpkin muffins fresh and exciting all season long! To keep your muffins fresh, store them in an airtight container. You can use a plastic or glass container. Line the bottom with paper towels to absorb moisture. This helps keep the muffins soft. Make sure to place a paper towel on top before sealing. Store the container at room temperature for up to four days. For long-term storage, freeze your muffins. Place them in a freezer-safe bag. Squeeze out as much air as you can before sealing. You can freeze them for up to three months. When you’re ready to eat, let them thaw at room temperature. For a warm treat, you can reheat them in the oven at 350°F (175°C) for about 10 minutes. At room temperature, these muffins last about four days. After that, they may dry out or get stale. Signs that muffins have gone bad include mold or an off smell. If they feel hard or dry, it’s time to toss them. Keep an eye on your muffins to enjoy them at their best! To make your muffins fluffy, use fresh ingredients. Make sure your baking soda and powder are not expired. Mix the wet and dry ingredients gently. Overmixing can lead to dense muffins. Aim for a smooth batter with some lumps. This keeps air in the batter, making it light. Yes, you can use fresh pumpkin! First, roast the pumpkin until soft. Then, scoop out the flesh and mash it until smooth. You need one cup of fresh pumpkin for this recipe. Fresh pumpkin gives a richer taste. Just be sure to measure it the same as canned. You can replace eggs with applesauce. Use 1/4 cup of applesauce for each egg. This keeps the muffins moist and adds a hint of sweetness. Another option is mashed banana. Use the same amount as applesauce. Both substitutes work well in this recipe. Absolutely! These muffins are perfect for beginners. The steps are simple and clear. You only need basic mixing skills. Even kids can help with measuring and stirring. The recipe does not require fancy tools. You'll feel proud serving them to friends and family. To make these muffins gluten-free, swap all-purpose flour with gluten-free flour. Use a 1:1 gluten-free blend for best results. Make sure it has xanthan gum for better texture. Check the labels to ensure no gluten is in other ingredients. This way, everyone can enjoy your delicious muffins! In this post, we explored the key ingredients for pumpkin muffins and laid out clear steps to make them. I shared tips for muffin success, like avoiding overmixing and testing doneness. You learned about tasty variations and how to store muffins for later. Remember, baking is about having fun and experimenting! Enjoy trying new flavors and impressing others with your muffins. You’ve got everything you need to bake them perfectly. Happy baking!
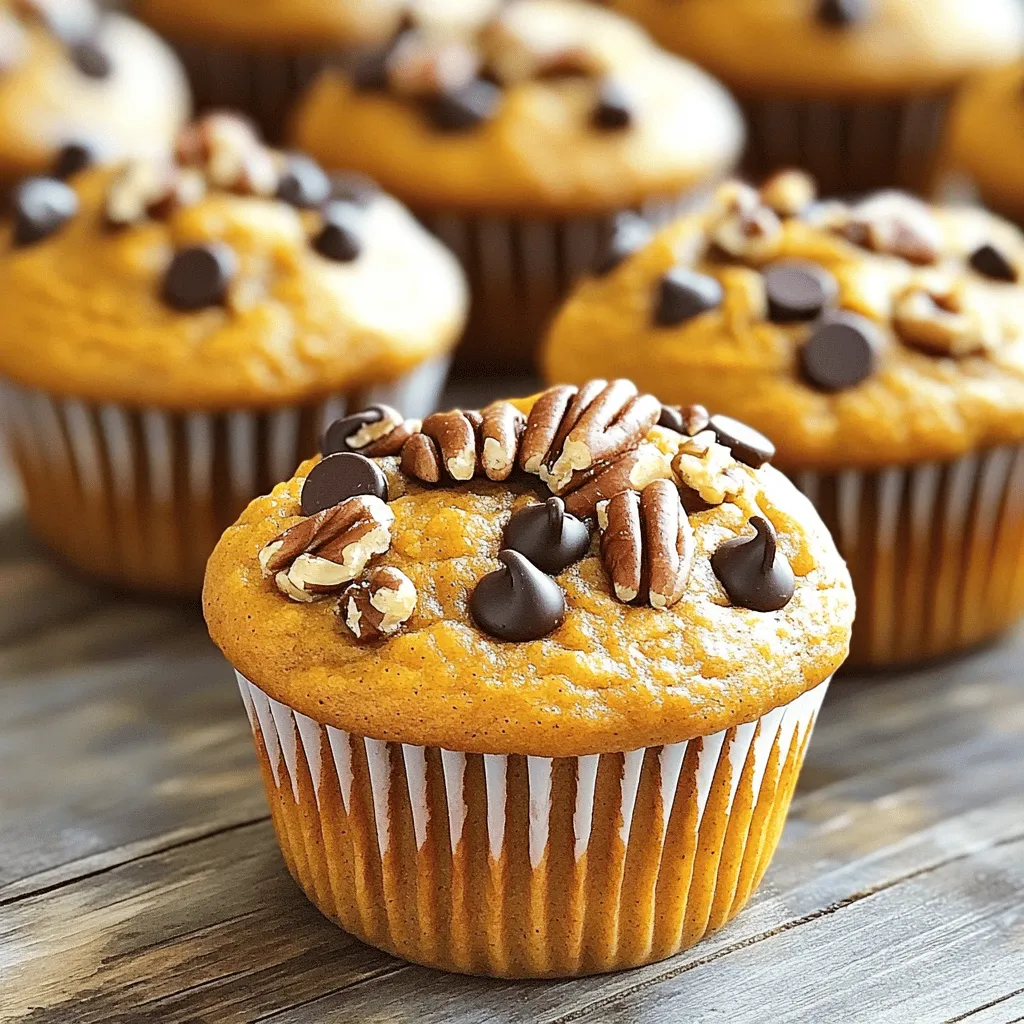
Dunkin Copycat Pumpkin Muffins Easy Fall Treat
Craving that warm, spicy flavor of Dunkin’s pumpkin muffins? You’re in luck! In this post, I’ll show you how to recreate those delightful treats right
To make Lemon Blueberry Yogurt Bars, you need: - 1 cup Greek yogurt - 1/2 cup honey or maple syrup - 1/4 cup fresh lemon juice - Zest of 1 lemon - 1 teaspoon vanilla extract - 1 1/2 cups rolled oats - 1/2 cup almond flour - 1 teaspoon baking powder - 1/2 teaspoon salt - 1 cup fresh blueberries - Optional: powdered sugar for dusting These ingredients blend together to create a tasty treat. The Greek yogurt gives it a creamy texture. The lemon adds a bright flavor, while the blueberries bring sweetness. You can swap some ingredients if you need to. Here are some ideas: - Greek yogurt: Use dairy-free yogurt for a vegan option. - Honey: Maple syrup works well if you want a vegan sweetener. - Almond flour: You can use all-purpose flour if you don't have almond flour. - Rolled oats: Quick oats can replace rolled oats, but they may change the texture slightly. These changes will still yield delicious bars. It’s fun to experiment with what you have at home. These bars are not just tasty; they are healthy too. Here’s a quick look at what you gain from one bar: - Calories: About 150 - Protein: 5 grams - Fat: 4 grams - Carbohydrates: 25 grams - Fiber: 3 grams - Sugar: 6 grams The bars are a good source of protein and fiber. They can boost your energy without too much sugar. This makes them a great snack for kids and adults alike. First, set your oven to 350°F (175°C). This will ensure it heats up while you prepare the batter. Next, take an 8x8 inch baking dish. Line it with parchment paper. Make sure to leave some paper hanging over the sides. This makes it easy to lift the bars out later. In a large bowl, combine the Greek yogurt, honey, lemon juice, lemon zest, and vanilla extract. Use a whisk or a spatula to mix until smooth. Make sure everything is well blended. The mixture should look creamy and inviting. This is where the fresh lemon flavor starts to shine. In another bowl, mix the rolled oats, almond flour, baking powder, and salt. Stir these dry ingredients together until they are well combined. Now, slowly add the dry mix to the wet mixture. Use a spatula to fold gently. Be careful not to overmix. Once just combined, fold in the fresh blueberries. Make sure they spread evenly through the batter. Pour the batter into the prepared baking dish. Use a spatula to spread it evenly across the dish. Bake in your preheated oven for about 25-30 minutes. Keep an eye on it. The top should be lightly golden and set. To check if it’s done, insert a toothpick into the center. If it comes out clean, it’s ready! Once baked, let it cool in the pan for 10 minutes. After that, lift the bars out using the parchment paper. Place them on a wire rack to cool completely. After they cool, cut into squares or rectangles. If you like, dust with powdered sugar before serving. To mix the ingredients well, start with a large bowl. First, blend the Greek yogurt, honey, lemon juice, lemon zest, and vanilla. Use a whisk to make it smooth. Next, combine the dry items in another bowl. This includes oats, almond flour, baking powder, and salt. Mix well but do not overdo it. When adding dry to wet, fold gently. This helps keep the bars soft. To make sure the bars stay together, use both rolled oats and almond flour. These ingredients help give structure. Always mix well but avoid overmixing. This could make the bars tough. Once baked, let them cool well in the pan. The cooling process helps them firm up. If you want extra hold, try adding a bit more almond flour. These bars are perfect for snacks or breakfast. You can serve them plain or dust with powdered sugar. For a fun twist, add some fresh fruit on top. A dollop of yogurt makes a tasty addition too. Cut them into squares or rectangles for easy serving. They are great for sharing at picnics or parties! {{image_2}} You can switch up the sweeteners for your bars. Instead of honey, try maple syrup or agave nectar. Both will add a unique taste. You can also adjust the sweetness based on your preference. If you want a richer flavor, add a splash of almond or coconut extract. These flavors mix well with lemon and blueberry. If you need gluten-free bars, use certified gluten-free rolled oats. For a dairy-free version, swap Greek yogurt for coconut yogurt. This keeps the texture creamy and delicious. You can also use almond milk instead of yogurt in the mix, but the bars may be less thick. These bars are great with different fruits. In spring and summer, use strawberries or raspberries. In fall, try diced apples or pears for a cozy twist. You can even mix fruits for a rainbow effect. Each fruit brings its own taste, making your bars fun and fresh. To keep your Lemon Blueberry Yogurt Bars fresh, store them in an airtight container. Place parchment paper between layers if you stack them. This helps avoid sticking. The bars will stay fresh in the fridge for about five days. You can freeze these bars for future snacks. First, let them cool completely. Then, wrap each bar in plastic wrap or foil. Place them in a freezer-safe container or bag. They will last for up to three months. When ready to eat, thaw them in the fridge overnight. These bars have a good shelf life when stored properly. In the fridge, they last for five days. Frozen bars can last for three months. Always check for signs of spoilage, like an off smell or change in texture. Enjoying them fresh is best, but proper storage keeps them tasty longer. To make these bars vegan, swap Greek yogurt for a plant-based yogurt. Look for almond, coconut, or soy yogurt. Use maple syrup instead of honey. This keeps the sweetness and taste while staying plant-based. Yes, you can use frozen blueberries. Just add them straight from the freezer. They may release more juice, which can make the bars slightly wetter. You might want to reduce baking time by a few minutes to avoid overbaking. To cut the bars neatly, let them cool completely. Use a sharp knife for clean edges. Lightly score the bars before cutting all the way through. This helps guide your cuts and keeps them from falling apart. Lemon blueberry yogurt bars are simple to make and eat. We covered each step, from ingredients to baking. You learned about substitutions and storage tips, plus fun variations. These bars fit many diets and tastes. Remember, mixing well helps them hold together. Try adding your favorite fruits for a new twist. Enjoying these bars can be a healthy choice. Keep experimenting with flavors and storage methods to find what works best for you.
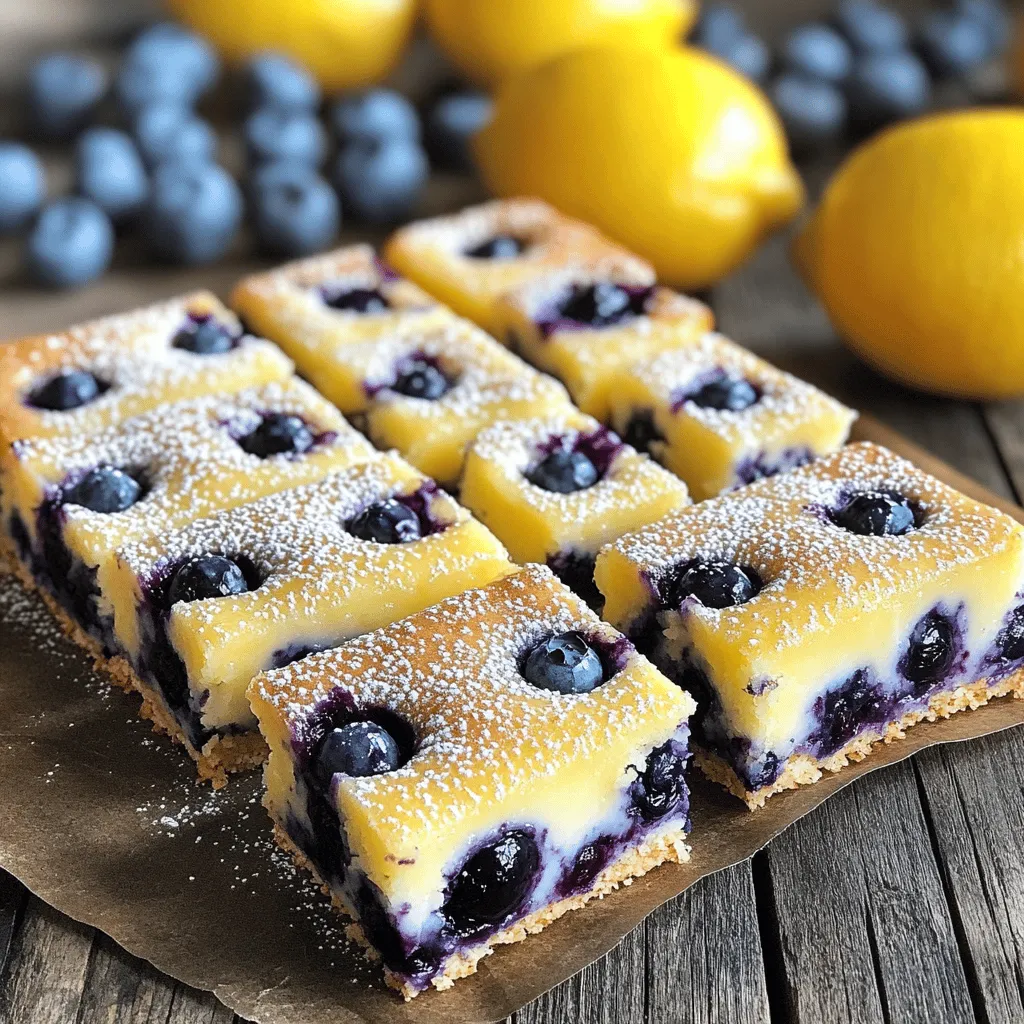
Lemon Blueberry Yogurt Bars Simple and Tasty Recipe
If you love a sweet treat that’s packed with flavor, you’ll adore these Lemon Blueberry Yogurt Bars. Not only are they simple to make, but
- 4 cups Chex cereal (rice or corn) - 1 cup creamy peanut butter - 1 cup canned pumpkin puree - 1 teaspoon vanilla extract - 1/2 teaspoon pumpkin pie spice - 1 cup powdered sugar - 1/2 cup chocolate chips (optional for extra flavor) - 1/4 cup chopped nuts (e.g., walnuts or pecans) This Peanut Butter Pumpkin Puppy Chow has simple and tasty ingredients. The Chex cereal gives it a nice crunch. The creamy peanut butter adds richness, while the canned pumpkin puree brings moisture and flavor. Don't forget the vanilla extract and pumpkin pie spice to elevate the taste! You can use powdered sugar to coat the mixture, adding sweetness. If your pup loves chocolate, you can melt chocolate chips to drizzle on top. Chopped nuts can add texture and flavor too. Just make sure to introduce nuts slowly to your dog's diet. First, grab a large mixing bowl. In it, combine these ingredients: - 1 cup creamy peanut butter - 1 cup canned pumpkin puree - 1 teaspoon vanilla extract - 1/2 teaspoon pumpkin pie spice Mix until smooth. The flavors will blend well and smell nice! Next, take another large bowl. Measure out 4 cups of Chex cereal. You can use rice or corn Chex. Set this bowl aside for now. Now, pour the peanut butter mixture over the Chex cereal. Gently stir to coat each piece. Be careful not to break the cereal. Once it’s coated, transfer everything into a large resealable plastic bag. Add 1 cup of powdered sugar to the bag. Seal it tightly. Shake well until the cereal is fully covered in sugar. It should be nice and sweet! If you want to add chocolate, grab some chocolate chips. Place 1/2 cup of them in a microwave-safe bowl. Microwave in 30-second intervals. Stir after each interval until it’s smooth. Drizzle the melted chocolate over the coated cereal. If you like, you can mix in 1/4 cup of chopped nuts too. Spread the puppy chow onto a parchment-lined baking sheet. Let it cool for about 15-20 minutes. After that, you can serve it in a fun bowl or store it in an airtight container. Enjoy making this treat for your furry friend! To mix the puppy chow without breaking the cereal, use a gentle touch. Start by pouring the peanut butter and pumpkin mixture over the Chex cereal. Then, use a spatula or a large spoon. Stir slowly and carefully. This helps keep the cereal pieces intact. For an even coating with sugar, seal your mixture in a resealable plastic bag. After adding the powdered sugar, press out the air and seal it tightly. Shake the bag gently. This method ensures each piece gets coated evenly without clumping. For fun presentations, serve the puppy chow in a dog-themed bowl. You can also use treat bags for gifting. Choose colorful bags and tie them with a ribbon. This adds a special touch. Consider adding a sprinkle of extra powdered sugar on top before serving. It gives a festive look that is sure to delight both dogs and their owners! {{image_2}} If you want to switch things up, try using different nut butters. Almond butter or cashew butter can work well. Just ensure that your dog is not allergic. Each nut butter has its own taste and texture, adding unique flavors to the treat. You can also play with spices. Instead of pumpkin pie spice, try cinnamon or ginger. These spices add warmth and can enhance the flavor. Just a pinch can make a big difference. Adding dried fruits can boost the flavor and nutrients. Consider small pieces of apples, blueberries, or cranberries. Just be sure they are safe for dogs. Some fruits can be harmful, so do your research. Incorporating carob is a great chocolate substitute. Carob is safe for dogs and offers a sweet taste. It has a similar texture to chocolate, making it an excellent choice for this treat. You can melt it like chocolate and drizzle it on top for added flavor. These variations keep your Peanut Butter Pumpkin Puppy Chow exciting and tasty! To keep your Peanut Butter Pumpkin Puppy Chow fresh, use an airtight container. This helps keep moisture out and maintains crunchiness. It's best to store it in a cool, dry place. If stored properly, it can last up to two weeks. For longer storage, consider freezing as it preserves the treat well. You can freeze your puppy chow for up to three months. To freeze, place the puppy chow in an airtight bag or container. Remove as much air as possible to avoid freezer burn. When you want to enjoy it, take it out and let it thaw at room temperature. This process usually takes about an hour. Enjoy the treat fresh and tasty! Can dogs eat pumpkin? Yes, dogs can eat pumpkin. It is safe and healthy for them. Pumpkin helps with digestion. It is rich in fiber and vitamins. Just use plain canned pumpkin, not pie filling. Is Peanut Butter Puppy Chow safe for all dog breeds? Peanut Butter Puppy Chow is safe for most dog breeds. Always check for allergies first. Some dogs may have issues with peanut butter. If unsure, consult your vet. How long can I store homemade puppy chow? You can store homemade puppy chow for up to two weeks. Keep it in an airtight container. Make sure it stays cool and dry to keep it fresh. Can I make it lower in calories? Yes, you can make it lower in calories. Use less peanut butter or a light version. You can skip the powdered sugar too. Substitute with a small amount of honey for sweetness. What can I use instead of Chex cereal? You can use other cereals like Rice Krispies or oat cereal. Just ensure they are safe for dogs. You can also use popped popcorn, but avoid butter and salt. This blog post covered how to make Peanut Butter Pumpkin Puppy Chow, from the main and optional ingredients to final storage tips. You learned step-by-step instructions to create a tasty treat for your dog. Remember, mixing carefully ensures the cereal stays whole, and feel free to try variations for fun flavors. Proper storage keeps your treats fresh longer. Enjoy making this fun snack, and your dog will surely love it!
Peanut Butter Pumpkin Puppy Chow Tasty Dog Treat
Looking to treat your furry friend to something special? My Peanut Butter Pumpkin Puppy Chow is the perfect snack! Simple to make and packed with