Desserts
![To make these soft and delicious Pumpkin Cheesecake Cookies, you will need: - 1 cup all-purpose flour - 1/2 teaspoon baking powder - 1/4 teaspoon baking soda - 1/4 teaspoon ground cinnamon - 1/4 teaspoon ground nutmeg - 1/4 teaspoon salt - 1/2 cup unsalted butter, softened - 3/4 cup brown sugar, packed - 1/4 cup granulated sugar - 1 large egg - 1 teaspoon vanilla extract - 1/2 cup canned pumpkin puree - 1/2 cup cream cheese, softened - 1/4 cup powdered sugar - 1 teaspoon pumpkin spice For the best results, I recommend using fresh ingredients. Here are some of my favorites: - Butter: Use a good quality unsalted butter for the best flavor. Brands like Kerrygold or Land O'Lakes work great. - Flour: All-purpose flour from King Arthur Baking Company gives great texture. - Pumpkin puree: Libby’s is a trusted brand for canned pumpkin. - Cream cheese: Philadelphia cream cheese is always creamy and easy to work with. If you cannot find some ingredients, here are some easy swaps: - Butter: You can use coconut oil for a dairy-free version. - Sugar: Substitute brown sugar with coconut sugar for a different flavor. - Egg: Use a flax egg (1 tablespoon ground flaxseed mixed with 2.5 tablespoons water) as a vegan option. - Pumpkin spice: If you don’t have pumpkin spice, mix equal parts of cinnamon, nutmeg, and ground ginger. These small changes can help you customize the cookies to fit your diet and taste. Enjoy the fun of baking! Start by gathering your tools. You need a mixing bowl, a whisk, and a baking sheet. A cookie scoop helps too. Make sure your oven is clean and ready. Preheat your oven to 350°F (175°C). Line your baking sheet with parchment paper to keep cookies from sticking. This is a simple step that saves time and mess. 1. In a medium bowl, whisk together the flour, baking powder, baking soda, cinnamon, nutmeg, and salt. Set this mix aside for later. 2. In a large bowl, cream the softened butter with brown and granulated sugar. Mix until it looks light and fluffy. 3. Beat in one egg and the vanilla extract. Make sure it’s well combined. 4. Add the pumpkin puree to your butter mix and stir until smooth. This gives the cookies that rich pumpkin flavor. 5. Gradually add the dry ingredients from your earlier bowl. Stir until just combined, but don’t overmix. 6. In another bowl, mix the softened cream cheese with powdered sugar and pumpkin spice until smooth. This will be your creamy filling. 7. Using a cookie scoop or a tablespoon, drop cookie dough onto the prepared baking sheet. 8. Create a small dip in the center of each cookie. This is where you will add the cream cheese mix. 9. Fill each dip with a little of the cream cheese mixture. It should look like a tiny dollop. 10. Bake for 12-15 minutes. Look for lightly golden edges to know they are done. 11. Let the cookies cool on the baking sheet for a few minutes. Then, move them to a wire rack to cool completely. To get a soft and chewy cookie, don’t overmix the dough. Mix just until the dry ingredients are combined. Also, make sure your butter is soft but not melted. This helps keep the cookies light. When baking, keep an eye on the time. Each oven is different, so check for that golden edge. Enjoy your delicious Pumpkin Cheesecake Cookies! For the complete recipe, refer to the Full Recipe. When making pumpkin cheesecake cookies, some common mistakes can ruin your batch: - Overmixing: Mixing too much can make cookies tough. Mix until just combined. - Wrong oven temp: Always preheat your oven. A cold oven can lead to uneven baking. - Skipping the chill: If your dough is too warm, cookies may spread too much. Chill for 30 minutes if needed. - Not measuring: Use proper measuring cups and spoons for accuracy. This helps keep your cookies soft. To make your cookies the best they can be, consider these expert tips: - Soft butter: Ensure your butter is soft but not melted. This adds air while mixing. - Use fresh spices: Fresh spices can boost flavor. Check your spice rack for freshness. - Cream cheese filling: Make sure your cream cheese is at room temp. This helps it blend smoothly. - Dough scoop: Use a cookie scoop for even sizes. This ensures even baking. Enhancing your cookies is easy with these simple ideas: - Add nuts: Chopped pecans or walnuts can add crunch and flavor. - Drizzle icing: A light cream cheese or vanilla glaze can add sweetness and flair. - Garnish: Top with a sprinkle of cinnamon or pumpkin spice for a pretty finish. - Serve warm: Warm cookies taste best. Serve them fresh out of the oven for a delightful treat. For the complete recipe, check out the [Full Recipe]. {{image_2}} You can add new flavors to your pumpkin cheesecake cookies. Try mixing in chocolate chips for a sweet surprise. You can also add white chocolate chunks for a creamy twist. If you like nuts, chopped pecans or walnuts can add a nice crunch. For a fun flavor kick, consider adding a hint of orange zest. It gives the cookies a bright taste. If you need gluten-free cookies, swap the all-purpose flour for a gluten-free blend. Look for one that works well in baking. For a dairy-free version, use coconut oil instead of butter. You can also use a dairy-free cream cheese for the filling. This way, everyone can enjoy these tasty treats. These cookies fit perfectly with the seasons. In winter, use peppermint extract for a festive touch. For spring, add lemon zest to brighten the flavor. In summer, you might try adding fresh berries to the mix. Each season brings a new way to enjoy these pumpkin cheesecake cookies. You can make them all year round! For the full recipe, check out the detailed steps above to create these delightful cookies. To keep your pumpkin cheesecake cookies soft and fresh, store them in an airtight container. This method prevents air from drying them out. You can stack the cookies with parchment paper between layers. This helps avoid sticking. I recommend keeping them at room temperature for up to a week. If you want to keep them longer, refrigeration is best. Just remember to bring them back to room temperature before serving. Freezing pumpkin cheesecake cookies is a great way to save some for later. First, let the cookies cool completely. Then, place them in a single layer on a baking sheet. Freeze them for about two hours. Once frozen, transfer them to a freezer bag or container. Make sure to squeeze out as much air as possible. You can keep them in the freezer for up to three months. When you're ready to eat, just thaw them on the counter. These cookies can last up to a week at room temperature. If stored correctly, they can stay fresh for even longer in the fridge. The cream cheese filling may change texture over time, but it will still taste great. For the best flavor, eat them within a few days. If you notice any change in smell or texture, it's best to discard them. Enjoy your cookies at their peak freshness! For the full recipe, check out the detailed instructions. Pumpkin Cheesecake Cookies stay fresh for about one week. Store them in an airtight container. This keeps them soft and tasty. You can also freeze them. They last up to three months in the freezer. Just make sure to wrap them well. Thaw them in the fridge before enjoying. Yes, you can use fresh pumpkin! Just cook and puree the pumpkin first. Choose a sugar pumpkin for the best flavor. Make sure it is smooth and not watery. Fresh pumpkin adds a nice touch to your cookies. However, canned pumpkin is easier and saves time. Both options will yield delicious cookies. Serve Pumpkin Cheesecake Cookies warm or at room temperature. They pair well with coffee or tea. For a fun twist, add a drizzle of caramel sauce on top. You can also sprinkle some chopped nuts for a crunchy bite. Another idea is to make a dessert platter with other treats. These cookies are great for sharing! For the full recipe, check out the recipe section. You learned everything about making Pumpkin Cheesecake Cookies. We covered the best ingredients, tips, and tricks. You can swap ingredients, avoid common mistakes, and try fun variations. I shared how to store and freeze cookies for later enjoyment. Remember, the goal is to have fun and be creative in the kitchen. With these steps, you'll bake cookies that wow everyone. Enjoy making your delicious treats!](https://tossedrecipes.com/wp-content/uploads/2025/08/bf6d0466-98fb-4375-b2ec-dd01747be874.webp)
Pumpkin Cheesecake Cookies Soft and Irresistible Treat
If you crave a warm, soft treat, you will love these Pumpkin Cheesecake Cookies. They blend the rich taste of cheesecake with the cozy flavors
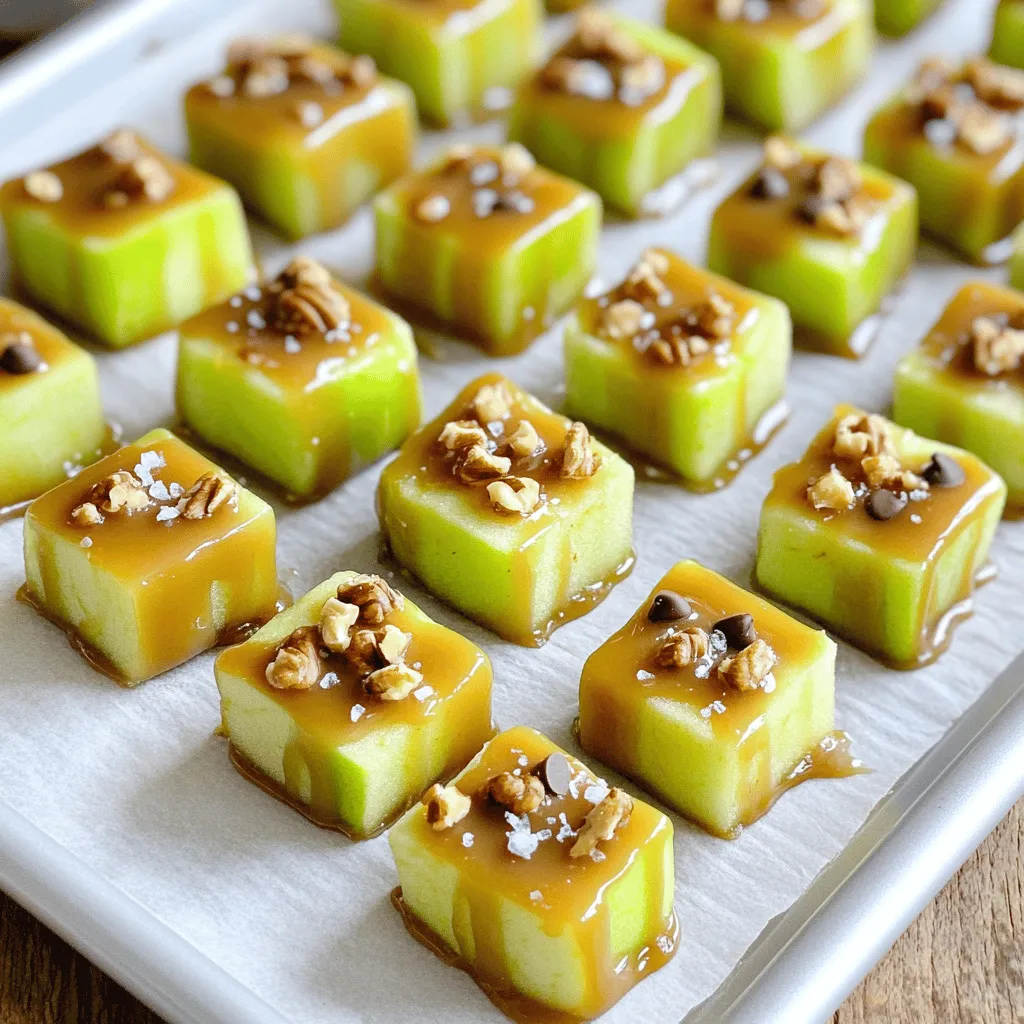
Mini Caramel Apple Bites Sweet and Tasty Treats
Get ready to satisfy your sweet tooth with these Mini Caramel Apple Bites! They’re simple to make, perfect for any occasion, and packed with flavor.
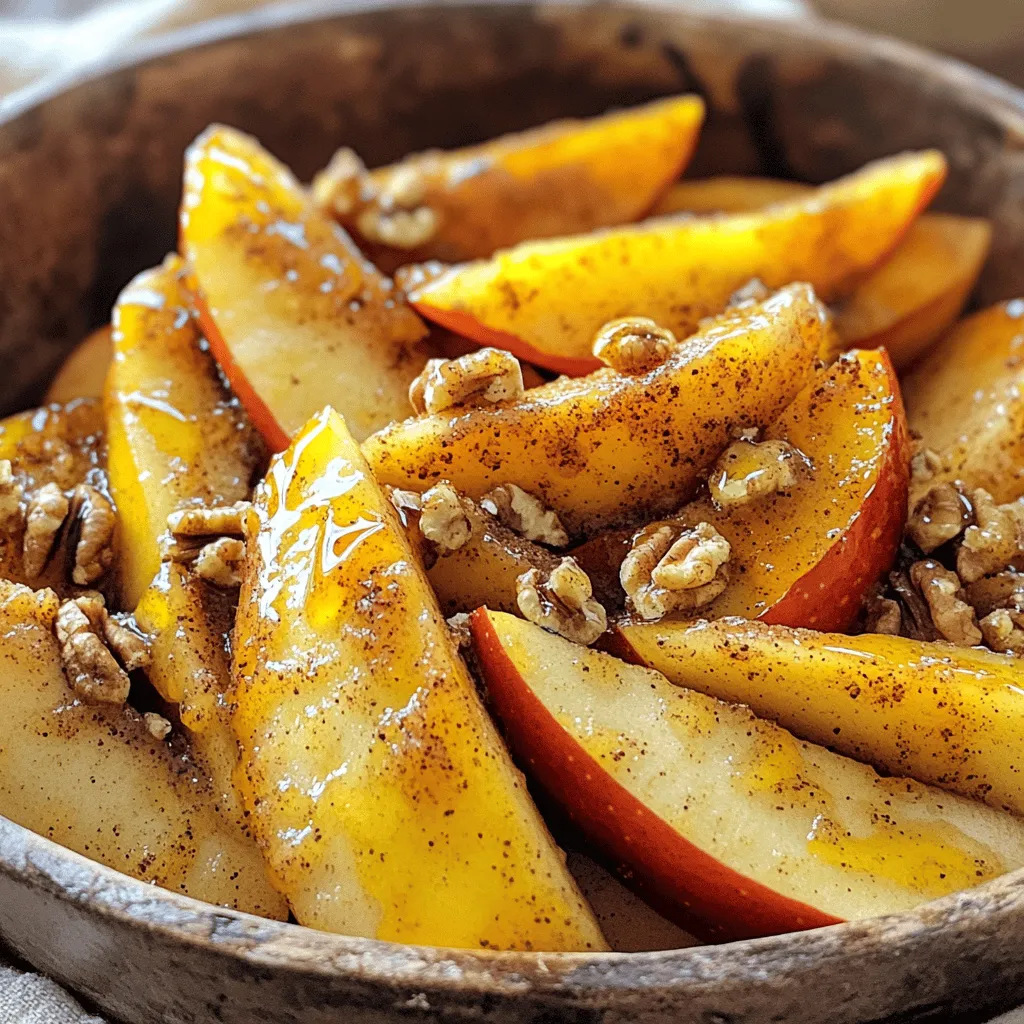
Air Fryer Apples Delightful Sweet and Crunchy Snack
Looking for a sweet and crunchy snack that’s quick to make? You’re in the right place! I’ll show you how to make air fryer apples
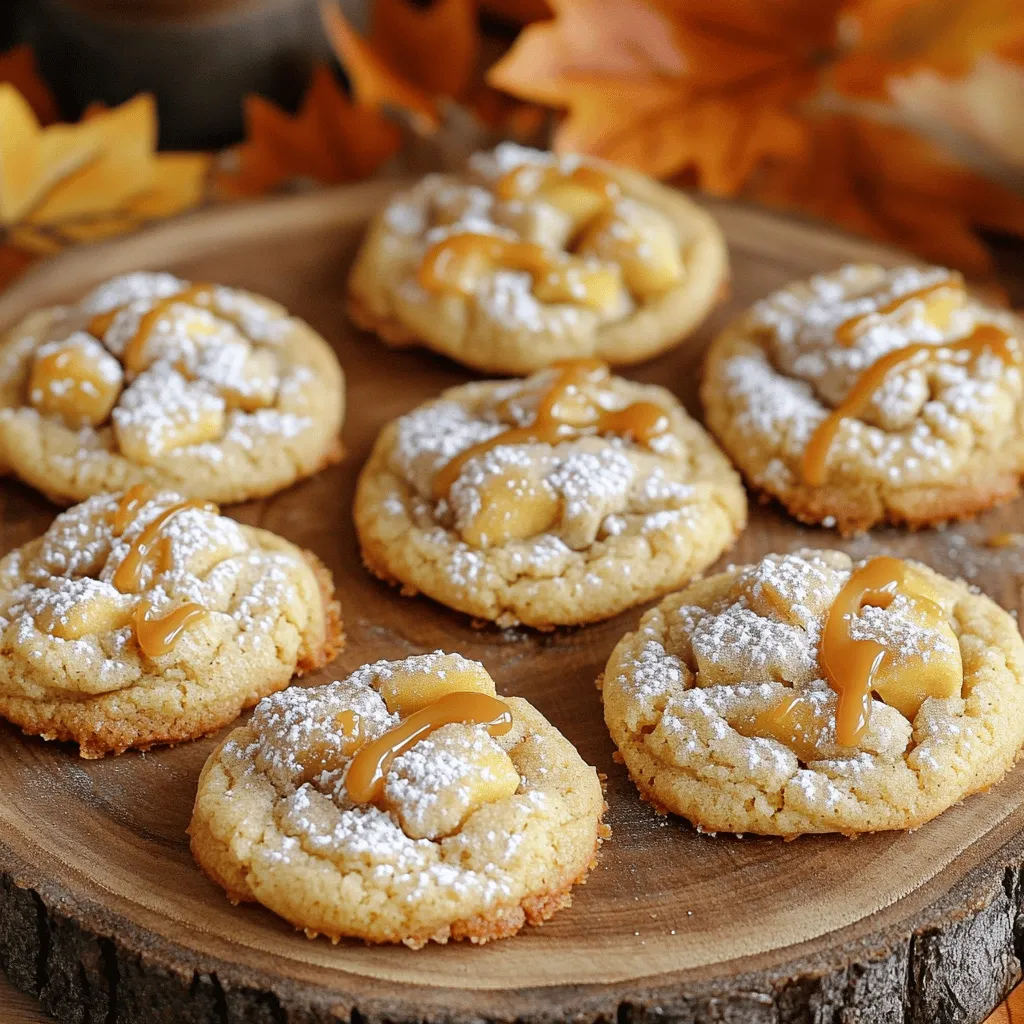
Caramel Apple Cider Cookies Irresistible Fall Treat
Are you ready to indulge in a fall delight? Caramel apple cider cookies are the perfect treat to add warmth to your autumn days. With
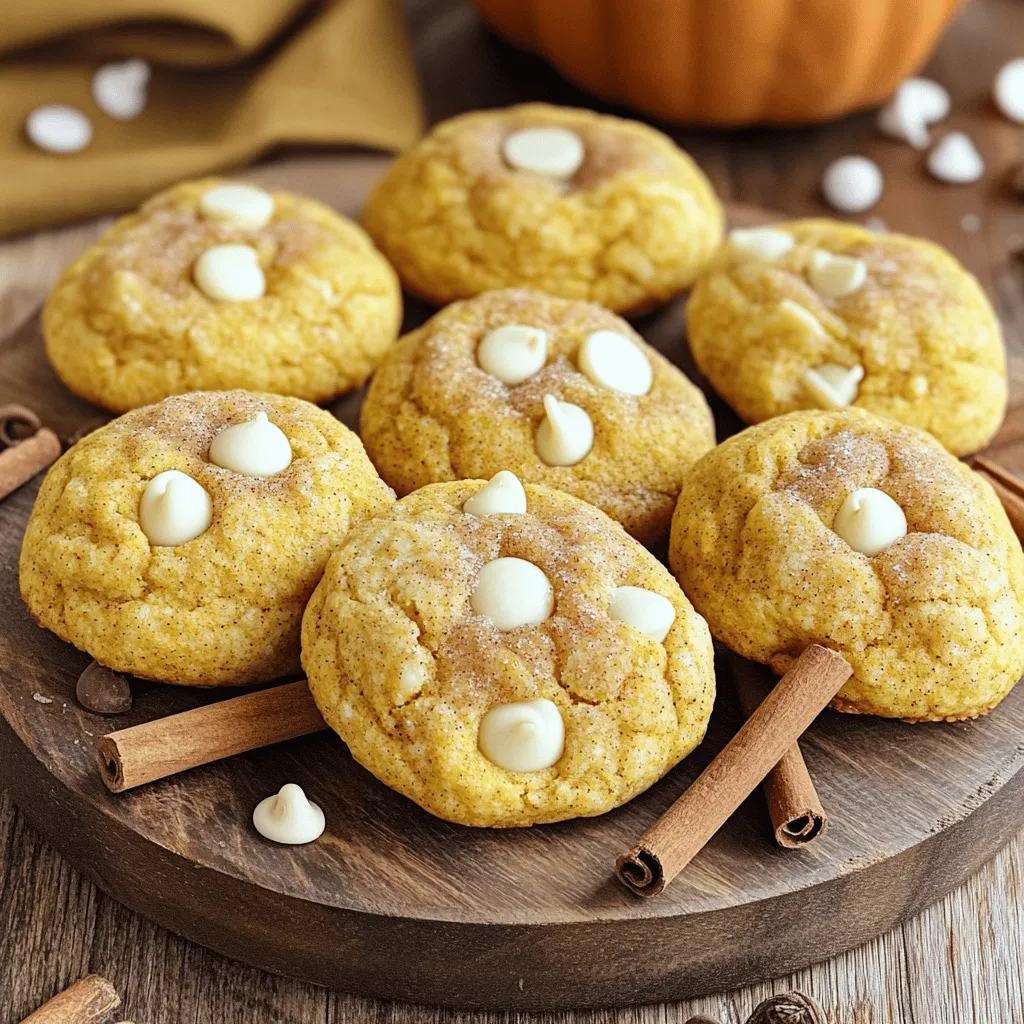
White Chocolate Pumpkin Snickerdoodles Delightful Treat
If you’re on the hunt for a tasty treat that screams fall, look no further! White chocolate pumpkin snickerdoodles are a delightful blend of rich
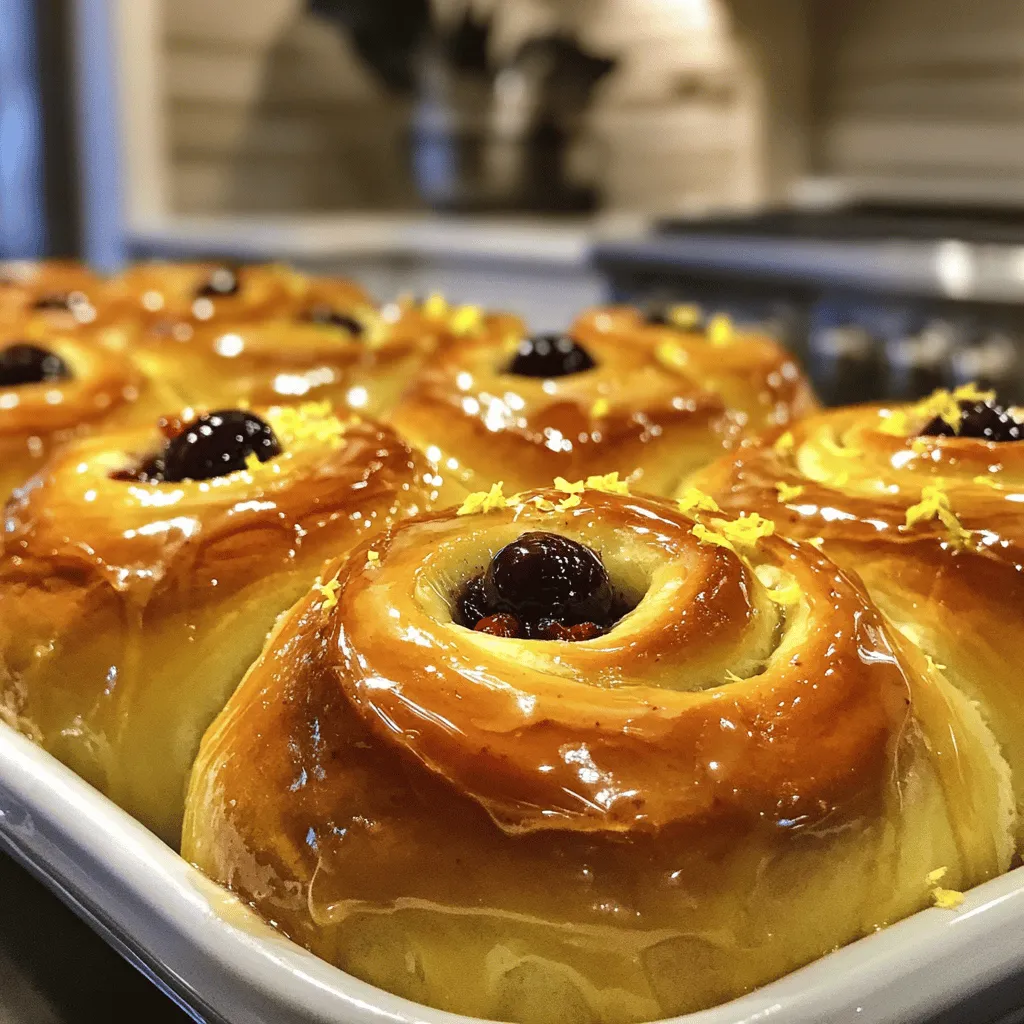
Huckleberry Lemon Sweet Rolls Soft and Yummy Treat
If you’re craving a treat that’s both soft and bursting with flavor, these Huckleberry Lemon Sweet Rolls are perfect for you! With a blend of
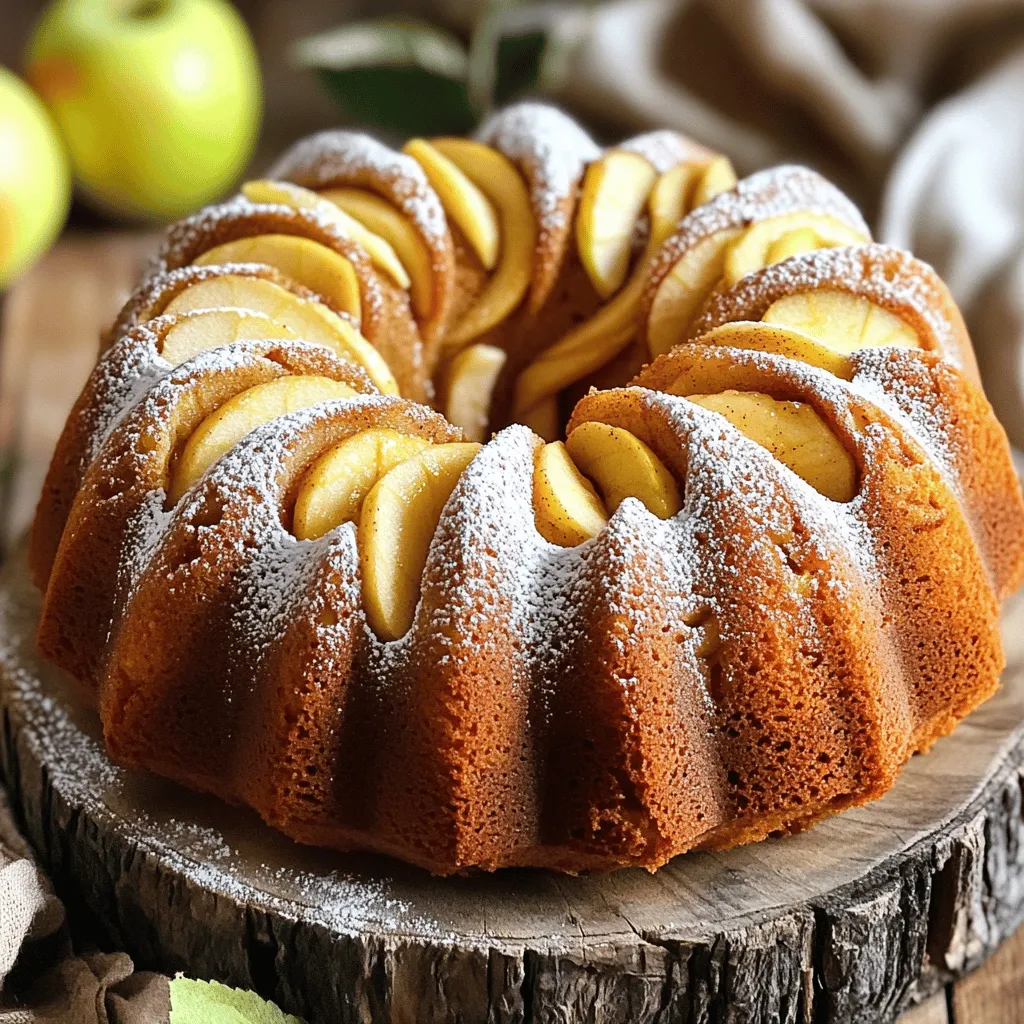
Apple Bundt Cake Delightful and Simple Recipe Guide
Baking an Apple Bundt Cake is easier than you think! In this guide, I’ll share a delightful recipe that will impress everyone. You’ll find tips,
![To make a delightful pumpkin spice coffee cake, you need a few key ingredients. These ingredients create the perfect flavor and texture: - 2 cups all-purpose flour - 1 cup granulated sugar - 1/2 cup brown sugar, packed - 1/2 cup unsalted butter, softened - 1 cup canned pumpkin puree - 2 large eggs - 1/2 cup buttermilk - 1 tablespoon pumpkin spice mix (cinnamon, nutmeg, ginger, allspice) - 1 teaspoon baking soda - 1 teaspoon baking powder - 1/2 teaspoon salt - 1 cup walnuts, chopped (optional) - 1/2 cup powdered sugar (for glaze) - 2 tablespoons milk (for glaze) The pumpkin puree gives the cake moisture and rich flavor. The pumpkin spice mix adds warmth and sweetness. For a little crunch, you can add walnuts, but this is optional. If you want to customize your cake, consider these optional ingredients: - Chocolate chips for a sweet twist - Dried cranberries for a tart kick - Pecans instead of walnuts for a different nutty flavor To bake this delicious coffee cake, you will need some essential tools: - Mixing bowls - Measuring cups and spoons - A whisk - A spatula - An electric mixer or a whisk for creaming - A 9x13 inch baking dish For the baking part, I recommend using a glass or metal baking dish. Glass helps with even baking, while metal gives a nice crust. Make sure to grease and flour the dish to prevent sticking. With these ingredients and tools, you're ready to create a lovely pumpkin spice coffee cake! If you want to see the full recipe, just check the recipe section. First, we need to cream the butter and sugars together. In a large bowl, combine 1/2 cup of softened unsalted butter, 1 cup of granulated sugar, and 1/2 cup of packed brown sugar. Mix these until they are light and fluffy. This step adds air, making the cake soft. Next, we add the pumpkin. Pour in 1 cup of canned pumpkin puree. Mix it well until fully combined. Now, it’s time to add the eggs. Beat in 2 large eggs, one at a time. Make sure to mix well after adding each egg. This helps to bind the ingredients and adds moisture. In a separate bowl, we will combine the dry ingredients. Take 2 cups of all-purpose flour and add 1 tablespoon of pumpkin spice mix, 1 teaspoon of baking soda, 1 teaspoon of baking powder, and 1/2 teaspoon of salt. Whisk these together until well mixed. This will ensure an even spread of flavors and proper rising. Now, we will mix the dry ingredients with our wet mixture. Gradually add the dry mix to the pumpkin mixture, alternating with 1/2 cup of buttermilk. Mix until just combined. Avoid over-mixing, as this can make the cake tough. If you like, fold in 1 cup of chopped walnuts for texture. Now it's time to pour the batter. Grease and flour a 9x13 inch baking dish. Pour the batter into the dish and spread it evenly. Preheat your oven to 350°F (175°C). Bake the cake for 30 to 35 minutes. To check for doneness, insert a toothpick in the center. If it comes out clean, your cake is ready! Let it cool in the pan for about 10 minutes, then transfer it to a wire rack to cool completely. For a delicious finish, you can make a simple glaze with powdered sugar and milk. Whisk together 1/2 cup of powdered sugar and 2 tablespoons of milk until smooth. Drizzle it over the cooled cake. Enjoy this delightful treat with a cup of coffee! For the complete recipe, check out the Full Recipe section. To get the best texture, use room temperature ingredients. This helps the butter mix well with the sugars. Room temperature eggs also blend better, leading to a fluffier cake. Mixing the batter is key. Start slow to combine your wet and dry ingredients. If you mix too hard, the cake may turn out dense. Use a spatula to fold in ingredients gently. This keeps the air in, which makes your cake light and fluffy. You can add fun extras to boost flavor. Walnuts give a nice crunch, but you can also try pecans or even chocolate chips. If you want a twist, add a splash of vanilla or a hint of orange zest. Pair this coffee cake with something warm. A cup of coffee or tea works great. The spices in the cake blend well with the warmth of the drink. This combination makes every bite enjoyable. For the complete recipe, check out the [Full Recipe]. {{image_2}} To make this pumpkin spice coffee cake gluten-free, swap the all-purpose flour with a gluten-free blend. Look for a blend that includes xanthan gum. This helps mimic the texture of wheat flour. You might also try almond flour or coconut flour, but you will need to adjust the liquid in the recipe. While using gluten-free flour, the cake may taste a bit different. It could be denser or crumblier. To keep the taste great, add a bit more pumpkin puree or buttermilk. This will help keep it moist and flavorful. You can change the taste of the coffee cake by adding different spices. Try cardamom or cloves for a new twist. You can also add vanilla extract for a warm, sweet note. Want to add some crunch? Toss in some chopped pecans or almonds. They add a nice texture. If you like fruit, consider folding in some raisins or dried cranberries. These extras make the cake even more fun! To keep your pumpkin spice coffee cake fresh, store it properly. First, let the cake cool completely. Then, wrap it tightly in plastic wrap. This helps prevent it from drying out. For extra protection, place it in an airtight container. You can also use a cake dome if you have one. If you want to store it longer, put the wrapped cake in the freezer. It can stay fresh for up to three months. Just remember to label it with the date. When you are ready to enjoy your cake again, you can reheat it easily. The best way is to use the oven. Preheat your oven to 350°F (175°C). Place the cake on a baking sheet and cover it with foil. Heat for about 10-15 minutes. This method keeps the cake moist. You can also use the microwave. Just heat a slice for about 15-20 seconds. Keep an eye on it to avoid drying out. Enjoy your warm and tasty coffee cake! For the full recipe, check back to the beginning. How to make a pumpkin spice coffee cake from scratch? To make a pumpkin spice coffee cake, gather your ingredients: flour, sugars, butter, pumpkin puree, eggs, buttermilk, and spices. Cream the butter and sugars, then mix in the pumpkin and eggs. Combine the dry ingredients and add them to the wet mix. Pour the batter into a greased pan and bake at 350°F for 30-35 minutes. You can find the full recipe above. Can I use fresh pumpkin instead of canned? Yes, you can use fresh pumpkin! Just cook and puree the pumpkin first. Make sure it is smooth and not watery. This adds a fresh taste and may change the texture slightly. What can I serve with pumpkin spice coffee cake? Serve your cake with coffee or tea for a cozy treat. You can also pair it with whipped cream or a dollop of cream cheese frosting for extra flavor. Adding a side of fruit, like apple slices, brightens the plate. What to do if the cake is too dry? If your cake turns out dry, you can add a little more buttermilk next time. You might also check your oven temperature. An oven that runs hot can dry out baked goods. Why did my coffee cake sink in the middle? A sinking cake often means it was underbaked or the oven was too hot. Make sure to follow the baking time closely and test with a toothpick. If it comes out clean, it's done! In this blog post, we explored how to create a delicious pumpkin spice coffee cake. We covered key ingredients that enhance flavor and texture, essential tools for baking, and step-by-step instructions for success. I shared tips for perfecting the cake's texture and offered variations for different diets. Remember, proper storage is key to keeping the cake fresh. With the right techniques and recipes, you can enjoy this warm treat. Embrace your creativity in the kitchen and make it your own!](https://tossedrecipes.com/wp-content/uploads/2025/08/31f31c09-2642-4ef1-8ff2-5eee53e49c33.webp)
Pumpkin Spice Coffee Cake Delightful and Easy Recipe
Get ready to enjoy the taste of fall with my Pumpkin Spice Coffee Cake! This easy recipe combines warm spices and creamy pumpkin for a
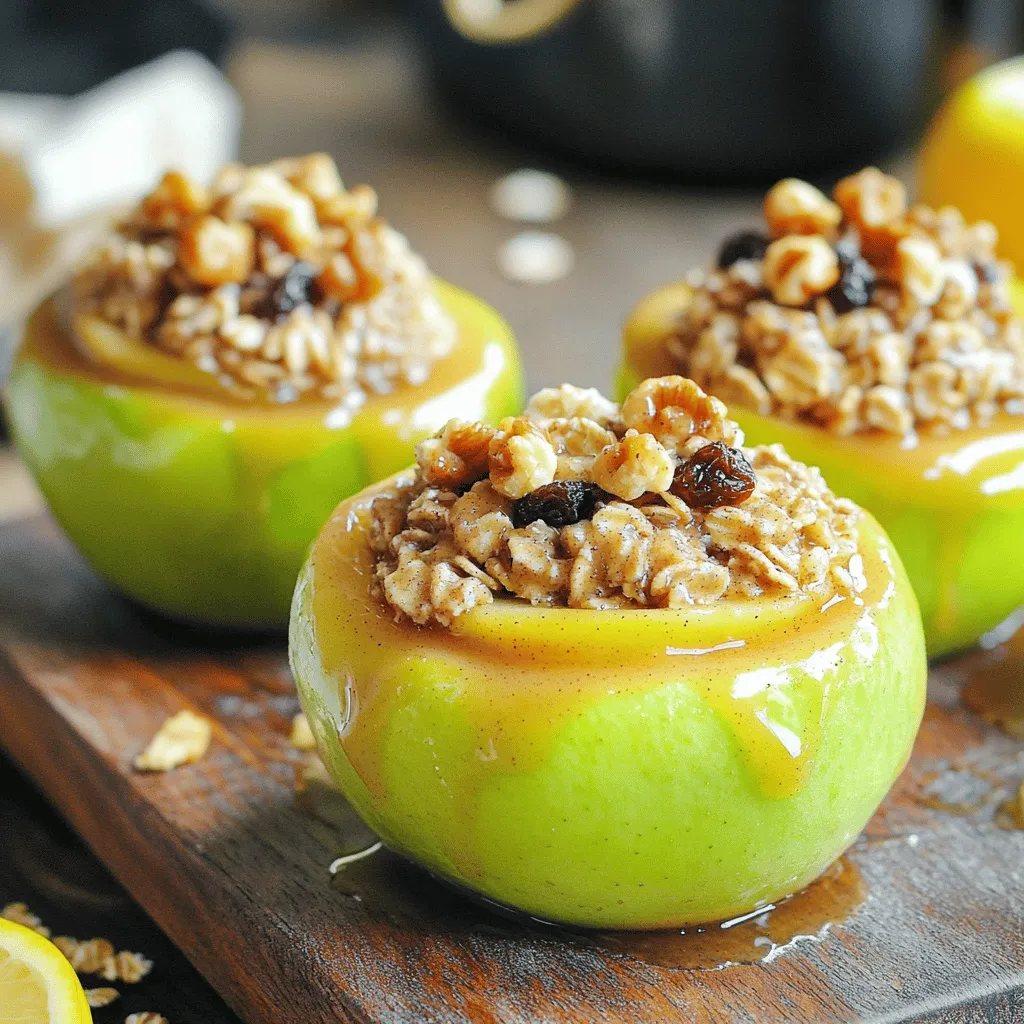
Cinnamon Oatmeal Stuffed Apples Delightful and Easy
Looking for a cozy yet easy dessert? You’ll love my Cinnamon Oatmeal Stuffed Apples! This warm treat is packed with flavor and uses simple ingredients
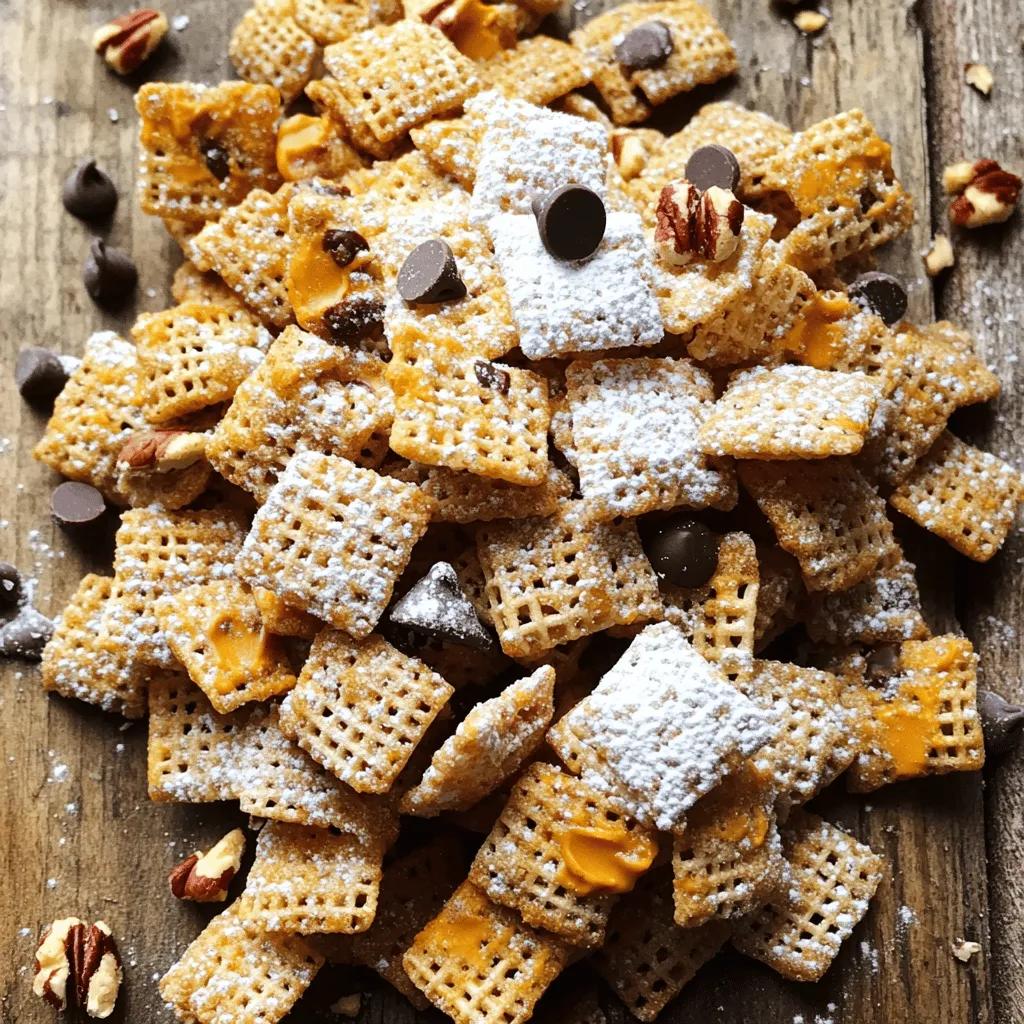
Harvest Puppy Chow Irresistible Dog Snack Recipe
Looking for a tasty treat your dog will love? Look no further! This Harvest Puppy Chow recipe combines pumpkin, peanut butter, and crunchy cereal for