Desserts
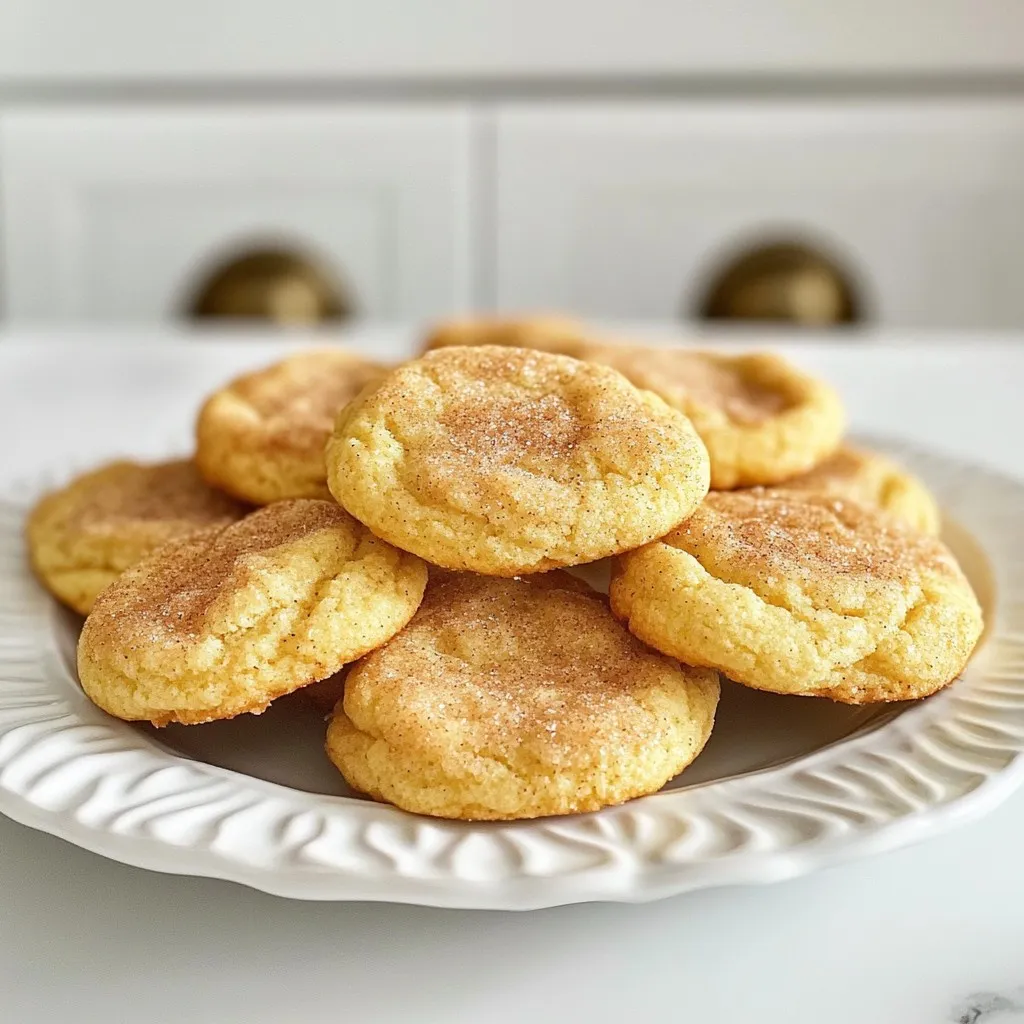
Soft & Chewy Snickerdoodle Cookies Delightful Recipe
Are you ready to bake the most delightful soft and chewy snickerdoodle cookies? This simple recipe will fill your kitchen with warm, sweet aromas, making
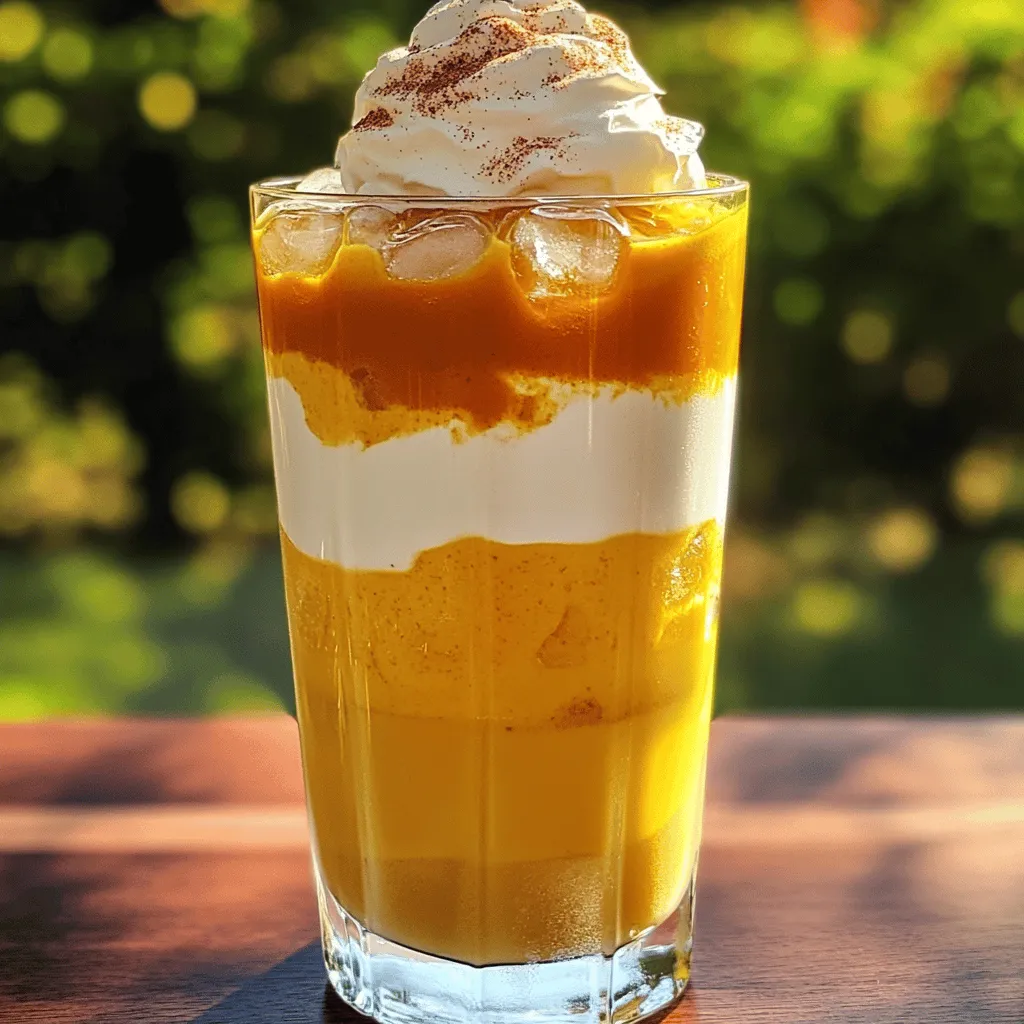
Iced Pumpkin Cream Chai Tea Refreshing Fall Delight
Fall is here, and it’s time to savor the season with Iced Pumpkin Cream Chai Tea! This refreshing drink combines the warm spices of chai

Brown Butter Pumpkin Chocolate Chip Cookies Delight
If you love cookies, you’re in for a treat! My Brown Butter Pumpkin Chocolate Chip Cookies combine fall flavors with rich, nutty butter. Perfectly chewy
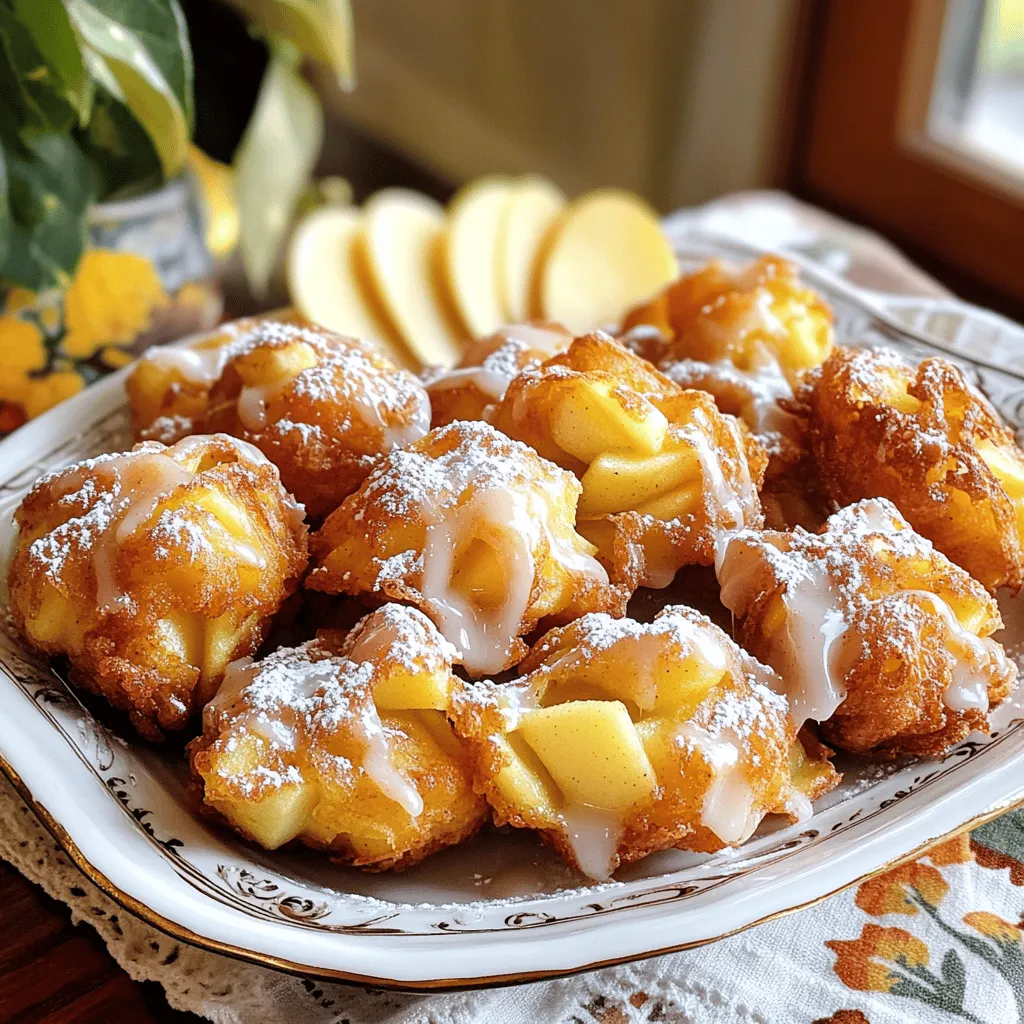
The BEST Homemade Apple Fritters Easy and Delicious
If you’ve ever craved a warm, sweet treat, homemade apple fritters are a must-try! These easy and delicious bites combine fresh apples with crispy, golden
![- 1 cup pumpkin puree - 1/2 cup granulated sugar - 1/4 cup brown sugar For these donuts, pumpkin puree is key. You can use canned or homemade. It brings a warm, rich taste. The sugars help sweeten and add moisture. You can swap the brown sugar for white sugar if needed. - 1 cup powdered sugar - 2 tablespoons pure maple syrup - 1 to 2 tablespoons milk The maple glaze makes these donuts shine. Use pure maple syrup for the best flavor. The powdered sugar helps to thicken the glaze. Adjust the milk to get your desired thickness. You want a smooth, dip-able mix. - Ground spices (cinnamon, nutmeg, ginger) - Unsweetened applesauce Adding spices can enhance your donuts. Cinnamon, nutmeg, and ginger create a cozy fall flavor. You can also include applesauce for added moisture. It makes the donuts even softer. For the full recipe, check the details above. Now you are ready to gather these ingredients and start cooking! Start by preheating your oven to 350°F (175°C). While the oven heats, grease a donut pan with cooking spray. This step helps your donuts come out easily. In a large mixing bowl, combine the pumpkin puree, granulated sugar, brown sugar, applesauce, eggs, oil, and vanilla extract. Whisk these ingredients together until the mix is smooth and all ingredients are blended well. In a separate bowl, whisk together the dry ingredients. This includes the flour, baking powder, baking soda, cinnamon, nutmeg, ginger, and salt. Make sure these dry items are mixed evenly. Gradually add the dry mix to the wet ingredients. Stir gently until just combined. Be careful and do not overmix. Overmixing can make your donuts tough. Now, spoon the batter into the prepared donut pan. Fill each cavity about three-quarters full. Bake the donuts for 12 to 15 minutes. Use a toothpick to check if they are done. Insert it into the center of a donut; it should come out clean. Once baked, cool the donuts in the pan for about 5 minutes. Then, move them to a wire rack to cool completely before glazing. Using fresh pumpkin puree makes a big difference. Fresh puree has a rich flavor and adds moisture. If you must use canned puree, choose a high-quality brand. It’s best to avoid pumpkin pie filling, as it has added sugars and spices. Overmixing the batter can ruin the texture. When you combine wet and dry ingredients, mix gently. Stop when you see a few flour streaks. The batter will finish mixing as you spoon it into the pan. To get the right glaze thickness, adjust the milk. Start with one tablespoon and add more if needed. The glaze should be thick but pourable. If it’s too thin, add more powdered sugar until it reaches your desired consistency. You can use alternative sweeteners for the glaze. Honey or agave syrup can work well. Just remember that this will change the flavor a bit. Present your donuts on a decorative plate. Drizzle extra maple glaze on top for a beautiful look. You can also sprinkle some cinnamon for added flair. Pair your baked pumpkin donuts with coffee or tea for a cozy treat. They also go well with hot cider or milk. For a fun twist, serve them with a scoop of vanilla ice cream. For the full recipe, check out the [Full Recipe]. {{image_2}} You can make baked pumpkin donuts even more fun. Try adding chocolate chips or nuts. Chocolate adds a rich taste that pairs well with pumpkin. Chopped nuts give a nice crunch and boost the flavor. You can also play with spices. Instead of just cinnamon, add cardamom or allspice for a warm twist. Mixing in a bit of cocoa powder gives a chocolate pumpkin donut that is a delight. If you want to make these donuts healthier, consider using applesauce instead of oil. This swap keeps them moist while cutting down on fat. You can also use gluten-free flour. Almond flour or a gluten-free blend works well. This way, everyone can enjoy these tasty treats without worry. As the seasons change, so can your donuts. Use fun decorations for holidays. Sprinkles or themed colors make them festive. You can also mix in other fall flavors. Try adding caramel or pecans for a rich taste. These little changes can make your baked pumpkin donuts a seasonal star. For the full recipe, check out the detailed instructions above. After you bake your pumpkin donuts, let them cool completely. Store the leftover donuts in an airtight container. This method keeps them fresh for about 3 to 4 days. If you want to keep them extra soft, add a slice of bread to the container. The bread will help retain moisture. You can freeze your pumpkin donuts for later enjoyment. To do this, wrap each donut tightly in plastic wrap. Then, place them in a freezer-safe bag. They will stay good for up to three months. When you're ready to eat them, simply take them out of the freezer. Let them thaw at room temperature for a few hours. To revive frozen donuts, you can warm them in the oven. Set the oven to 350°F (175°C) and heat them for about 5-10 minutes. This warms them without drying them out. For the best quality, reheat your donuts in the oven. This method keeps them soft and tasty. Set your oven to 350°F (175°C). Place the donuts on a baking sheet and heat for about 5-7 minutes. Avoid using the microwave if you can. Microwaving can make the donuts tough and dry. Instead, stick to the oven method for a warm, fresh taste. For the perfect treat, pair your reheated donuts with a warm drink or a scoop of ice cream. Enjoy every bite! To make sure your donuts rise well, use baking powder and baking soda. These two leavening agents create bubbles that help your donuts puff up while baking. Baking powder works right away. It needs moisture and heat. Baking soda requires an acid, like pumpkin puree, to activate. Use the right amounts to ensure your donuts are fluffy and light. Yes, you can use pumpkin spice mix! It is a great substitute if you don’t have individual spices. Just replace the listed spices in the recipe with about 1 to 2 teaspoons of your pumpkin spice mix. This way, you still get that warm, festive flavor. Make sure to taste the batter to adjust the spice level to your liking. If you don't have a donut pan, you can still make these donuts! Use a muffin tin instead. Simply spoon the batter into the muffin cups about three-quarters full. Bake them as you would for donuts. They may not have the classic donut shape, but they will still taste delicious! You can even pipe the batter into a makeshift donut shape on a baking sheet lined with parchment paper. For the full recipe, check out the complete instructions above. These baked pumpkin donuts are simple to make and full of flavor. You learned about key ingredients, like pumpkin puree and maple syrup, which bring comfort to your kitchen. Follow the step-by-step instructions for perfect texture and taste. Plus, explore fun variations to keep things exciting. In the end, these donuts are not just treats; they're moments shared. Enjoy making them and celebrating each bite.](https://tossedrecipes.com/wp-content/uploads/2025/07/e1b7cfee-a85f-4b99-8352-517b1362d529.webp)
Baked Pumpkin Donuts with Maple Glaze Delight
Get ready to treat yourself! These Baked Pumpkin Donuts with Maple Glaze are warm, soft, and bursting with fall flavors. I’ll guide you step-by-step to
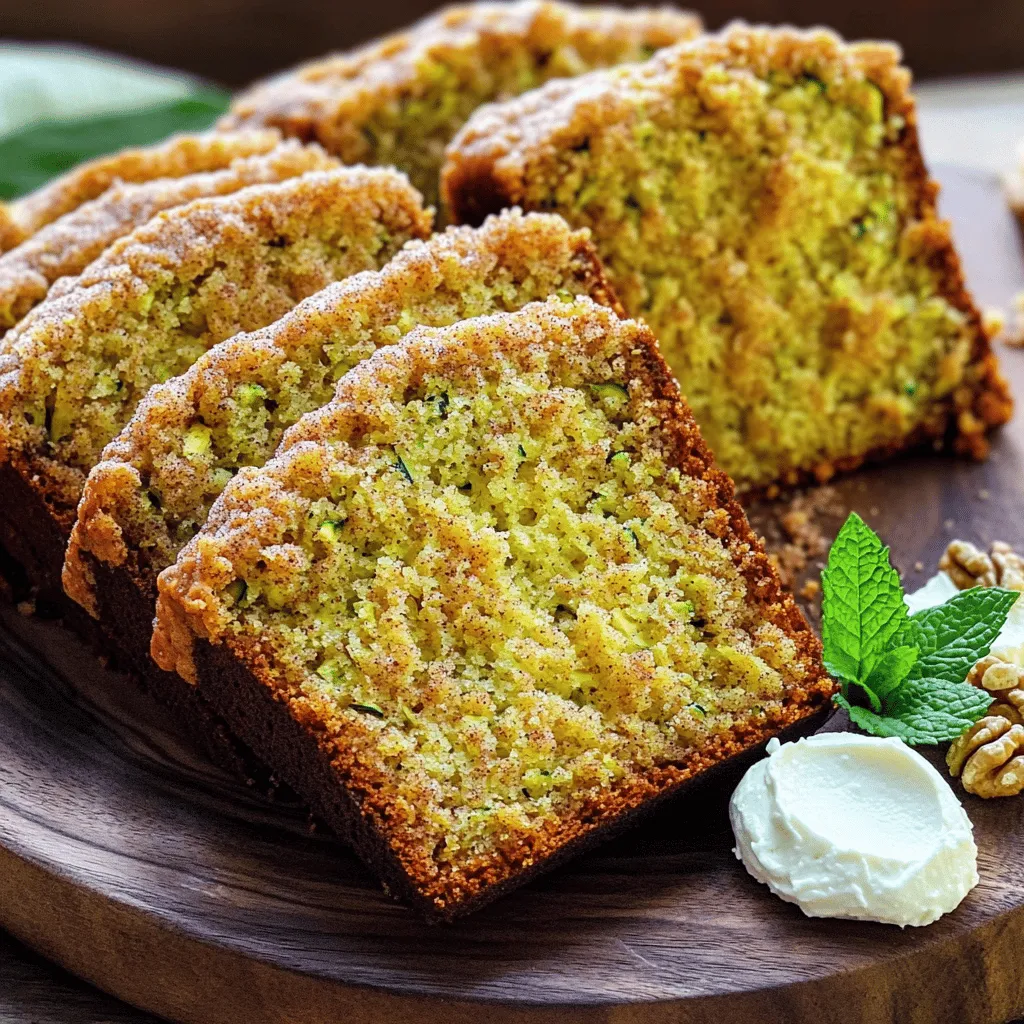
The Best Snickerdoodle Zucchini Bread Delightful Recipe
If you think zucchini bread is just plain and boring, think again! I’m about to share the best snickerdoodle zucchini bread recipe that combines the
![Gathering the right ingredients is key to making delicious caramel apple bark. Here’s what you need: - 2 cups white chocolate chips - 1 cup caramel sauce - 2 medium apples (preferably Granny Smith or Honeycrisp) - 1/2 cup crushed graham crackers - 1/4 teaspoon ground cinnamon - A pinch of salt - Optional toppings: Chopped nuts (walnuts or pecans) These simple ingredients come together to create a sweet and crunchy treat. The white chocolate gives a creamy base, while the caramel adds a rich sweetness. The apples provide a crisp bite, and the graham crackers bring in a nice crunch. Using Granny Smith apples offers a tart flavor that contrasts well with the sweet elements. Honeycrisp apples are also great for their juicy sweetness. You can customize this recipe by adding nuts for extra texture. Walnuts or pecans work well. They add a nutty flavor and a satisfying crunch to each bite. Check out the [Full Recipe] for more details on how to prepare this delightful dessert. - Wash and core apples. - Chop apples into small, bite-sized pieces. Start by washing your apples. This step removes dirt and wax. Next, core the apples to remove the seeds. You can leave the skin on for color and crunch or peel them if you prefer. Then, chop the apples into small pieces. Aim for a size that fits nicely in your mouth. This helps with even distribution in the bark. - Microwave white chocolate chips in intervals. - Stir until completely smooth. Now, let's melt the white chocolate. Place your white chocolate chips in a microwave-safe bowl. Heat them in 30-second intervals. Stir between each interval to avoid burning. When it is smooth, you know it's ready. Smooth chocolate will coat the other ingredients well. - Mix graham crackers, cinnamon, and salt into melted chocolate. - Ensure even coating of ingredients. Once your chocolate is melted, it's time to mix. Add crushed graham crackers, a dash of cinnamon, and a pinch of salt to the bowl. Stir well until every piece is coated in chocolate. This mixture gives your bark a nice texture and flavor. - Line baking sheet with parchment paper. - Pour and spread white chocolate mixture. Next, line a baking sheet with parchment paper. This prevents the bark from sticking. Pour your chocolate mixture onto the parchment. Use a spatula to spread it evenly. Aim for a thickness of about 1/4 inch. This thickness helps it set nicely. - Distribute chopped apples on top. - Drizzle caramel sauce generously. Now, it's time for the fun part! Evenly distribute your chopped apples over the chocolate layer. Then, drizzle caramel sauce across the top. Make sure some caramel touches the apples. This adds sweetness and a lovely shine to your bark. - Refrigerate for 30-45 minutes. - Break into pieces and garnish with chopped nuts if desired. To finish, place your baking sheet in the fridge. Let it chill for 30 to 45 minutes. This helps the chocolate set. Once firm, remove it from the fridge and break it into pieces. If you want, sprinkle some chopped nuts on top for extra crunch. Enjoy your sweet treat! Store any leftover bark in an airtight container. This keeps it fresh. You can enjoy it best within a week. After that, the flavors may fade. For a tart taste, use Granny Smith apples. Their crispness adds a nice balance. If you prefer sweetness, choose Honeycrisp apples. They give a great crunch and flavor. Avoid overheating white chocolate. It can become clumpy and hard. I recommend using a double boiler for better control. This method helps the chocolate melt smoothly. Stir often for a nice, even texture. {{image_2}} You can switch the white chocolate for dark or milk chocolate. This change adds a new taste and richness. I also like to add a swirl of nut butter, like almond or peanut. It gives extra flavor and creaminess to the bark. Try mixing in dried fruits like cranberries or raisins. They add a chewy texture and a sweet punch. You can also experiment with fresh fruits, like strawberries or bananas. Just chop them small so they mix well. Add different nuts for a crunchy bite. Almonds or macadamia nuts work great. Mixing in nut butters also gives extra creaminess and flavor. You can find all these fun ideas in the full recipe for caramel apple bark. - Store your caramel apple bark in airtight containers or ziplock bags. - Keep the containers in a cool, dry place to maintain freshness. - You can freeze the bark for up to 3 months. - To serve, thaw it in the refrigerator for a few hours. - Eat the bark fresh within a week for the best taste. - Watch for signs of spoilage, like an off smell or dry texture. For the full recipe, check out the detailed instructions above! You can follow the step-by-step guide included in the recipe. It’s simple and fun! First, you chop apples, then melt white chocolate. After that, mix in graham crackers, cinnamon, and salt. Spread it out on parchment paper, add apples, and drizzle caramel on top. Finally, chill it and break it into pieces. Yes, you can use dark or milk chocolate. Each type brings a unique flavor. Dark chocolate adds a rich taste, while milk chocolate offers a sweeter bite. Feel free to mix and match! You should use a microwave or a double boiler. If you use a microwave, heat in short bursts. Stir in between until it’s smooth. This helps avoid burning the chocolate. Absolutely! You can use dark chocolate instead of white. Adding more nuts or seeds boosts nutrition too. This way, you enjoy a tasty treat with added health benefits. You can check local bakeries or look online at specialty food stores. Some grocery stores might carry it as well. If you can’t find it, making it at home is super easy! This blog post shared how to make delicious caramel apple bark. We covered the ingredients, from white chocolate to apples and caramel. You also learned the steps to create this treat, along with tips for perfecting it. Vary your bark with nuts or different chocolates for extra fun. Remember to store leftovers properly to keep them fresh. Now, it’s time to enjoy your crunchy, sweet snack. Try making it, and share your results with others!](https://tossedrecipes.com/wp-content/uploads/2025/07/ec669853-5bef-4d11-9737-94e6a5e09985.webp)
Caramel Apple Bark Irresistible No-Bake Treat
If you crave a sweet treat that’s both fun and easy, you’re in the right place. Caramel Apple Bark is a simple no-bake dessert that
![- 2 cups all-purpose flour - 1/2 cup granulated sugar - 1 tbsp cinnamon - 1/4 tsp nutmeg - 1/2 tsp salt - 2 1/4 tsp active dry yeast (1 packet) - 1/2 cup warm milk (110°F) - 1/4 cup unsalted butter, melted - 1 large egg - 1/2 cup brown sugar - 1 tbsp vanilla extract - 1/4 cup chopped pecans or walnuts (optional) - 1/2 cup icing sugar for drizzle Gather these ingredients before you start. Each one plays a key role in making your Cinnamon Roll Pumpkins a delight. The all-purpose flour provides the base. Granulated sugar adds sweetness, while cinnamon and nutmeg bring that warm fall flavor. Salt balances everything out. Active dry yeast helps the dough rise, creating fluffy rolls. Warm milk activates the yeast, so make sure it’s at the right temperature. The melted butter adds richness, and the egg helps bind everything together. Brown sugar gives a deep, sweet flavor to the filling. Vanilla extract enhances the overall taste. If you like, add chopped pecans or walnuts for some crunch. Lastly, the icing sugar will help create a sweet drizzle to finish off these delicious rolls. If you want to make these rolls, check out the Full Recipe for detailed steps. To start, we need to create the dough. First, combine 1/2 cup of warm milk with 2 1/4 teaspoons of active dry yeast in a small bowl. Let it sit for about 5-10 minutes until it becomes foamy. This shows the yeast is active. Next, in a mixing bowl, whisk together 2 cups of all-purpose flour, 1/2 cup of granulated sugar, 1 tablespoon of cinnamon, 1/4 teaspoon of nutmeg, and 1/2 teaspoon of salt. This mix gives our rolls flavor and structure. Now, add the foamy yeast mixture, 1/4 cup of melted unsalted butter, 1 large egg, and 1 tablespoon of vanilla extract to the dry ingredients. Mix until everything combines to form a dough. Once your dough is formed, it’s time to knead! Place the dough on a floured surface and knead it for 5-7 minutes. You want the dough to be smooth and elastic. This step helps develop gluten, making your rolls fluffy. After kneading, place the dough in a greased bowl. Cover it with a damp cloth and let it rise in a warm place for about 1 hour. You’ll know it's ready when it doubles in size. Now, let’s shape our rolls! Roll out the dough on a floured surface into a rectangle about 1/4 inch thick. Spread 1/2 cup of brown sugar evenly over the dough. You can add more cinnamon and some chopped nuts if you like! Starting from one long edge, roll the dough tightly into a log, sealing the edges as you go. Cut the log into 12 equal pieces. Place these rolls in a greased round baking pan or muffin tin. Before baking, let the rolls rise uncovered for another 30 minutes. While they rise, preheat your oven to 375°F (190°C). Bake the rolls for 20-25 minutes or until they are golden brown. Enjoy the sweet aroma filling your kitchen! For the full recipe and more detailed steps, check the [Full Recipe]. For the best cinnamon roll pumpkins, start with warm milk at 110°F. If it's too hot, it can kill the yeast. If it's too cold, the yeast won’t activate. This step is key to fluffy rolls. Kneading dough is simple but crucial. Use your palms to push down, fold, and turn the dough. Do this for about 5 to 7 minutes. You want it smooth and elastic. If it’s sticky, add a bit more flour as needed. To check if your rolls are done, look for a golden-brown color. You can also tap the bottom; it should sound hollow. If they look pale, give them a few more minutes. An oven thermometer helps ensure your oven heats evenly. Many ovens have hot spots that can burn or undercook food. This small tool can save your cinnamon roll pumpkins from disaster. If you have stale rolls, don’t toss them! Cut them into pieces and toast them. They make a great topping for ice cream or yogurt. You can also blend them into a crumb for pie crust. Leftover icing can be a treat too! Drizzle it over pancakes or use it as a dip for fruit. It adds sweetness and a touch of fun to your breakfast or snack. {{image_2}} You can easily change the taste of your cinnamon roll pumpkins. Consider adding spices like pumpkin pie spice or allspice. These spices give a warm flavor that matches fall perfectly. You can also mix in chocolate chips or dried fruits. Chocolate adds a sweet touch, while dried fruits bring a chewy texture. Both options enhance the overall flavor and make them more fun to eat. If you need a gluten-free option, use gluten-free flour. Many brands make great substitutes that work well. For vegan options, replace the egg with a flax egg. Mix one tablespoon of flaxseed meal with three tablespoons of water and let it sit. You can also use plant-based milk instead of regular milk and coconut oil instead of butter. These swaps keep your cinnamon roll pumpkins tasty and friendly for different diets. To make your rolls look more festive, you can decorate them with icing in fun shapes. Use a piping bag for neat designs or drizzle it on for a rustic look. Adding food coloring to your icing can create vibrant shades that match the fall theme. Try orange, brown, or even green to resemble pumpkins. This makes your cinnamon roll pumpkins not only delicious but also visually appealing for any gathering. For the full recipe, check out the detailed guide provided above. To keep your cinnamon roll pumpkins fresh, store them properly. Place the rolls in an airtight container. This will help prevent them from drying out. You can keep them in the fridge for up to five days. If you want to save them for longer, freezing is a great option. Wrap each roll tightly in plastic wrap. Then, place them in a freezer bag or container. You can freeze the rolls for up to three months. When it's time to enjoy your rolls again, reheating is key. The best way to reheat them is in the oven. Preheat your oven to 350°F (175°C). Place the rolls on a baking sheet and cover them with foil. Heat for about 10-15 minutes. This keeps them soft and warm. You can also use a microwave for quick reheating. Place a roll on a microwave-safe plate. Heat for 10-15 seconds. However, this method might make the rolls a bit chewy. Homemade cinnamon rolls can last a while. When stored in the fridge, they stay fresh for about five days. If you freeze them, they can last up to three months. Always check for signs of spoilage. If the rolls smell off or have mold, it’s best to toss them. Freshly baked rolls will have a sweet smell and soft texture. Enjoy your delicious cinnamon roll pumpkins while they are at their best! For the full recipe, check out the earlier sections. To make cinnamon rolls from scratch, follow these basic steps: 1. Activate the yeast: Combine warm milk and yeast in a small bowl. Let it sit for 5-10 minutes until foamy. 2. Mix dry ingredients: In a large bowl, whisk together flour, sugar, cinnamon, nutmeg, and salt. 3. Combine wet and dry: Add melted butter, egg, and the foamy yeast mixture to the dry ingredients. Mix until a dough forms. 4. Knead the dough: Knead the dough on a floured surface for 5-7 minutes until smooth. 5. Let it rise: Place the dough in a greased bowl. Cover it and let it rise for about 1 hour, or until it doubles in size. 6. Roll and fill: Roll out the dough, spread brown sugar, and sprinkle with cinnamon and nuts. Roll it up tightly. 7. Cut and arrange: Cut into 12 pieces and place in a greased pan. Let them rise for 30 minutes. 8. Bake: Preheat the oven to 375°F. Bake for 20-25 minutes until golden brown. This process gives you soft, warm rolls full of flavor. For more details, check the Full Recipe. Yes, you can prepare Cinnamon Roll Pumpkins ahead of time. Here are some tips: - Make the dough: You can make the dough up to 24 hours in advance. After kneading, place it in an airtight container in the fridge. - Shape and chill: After cutting the rolls, you can cover them and refrigerate overnight. In the morning, let them rise for about 30 minutes before baking. - Bake ahead: Bake the rolls and let them cool. You can store them in a container. Just reheat before serving. These steps help save time on busy mornings. Cinnamon Roll Pumpkins pair well with various treats and drinks. Here are some ideas: - Coffee or tea: A warm cup of coffee or chai tea complements the sweetness. - Maple syrup: Drizzling maple syrup adds a lovely flavor. - Cream cheese frosting: For extra richness, top with cream cheese icing. - Fresh fruit: Serve with sliced apples or pears for a refreshing touch. These pairings enhance the experience of enjoying your delicious rolls. Cinnamon rolls are easy and fun to make. You mix simple ingredients, let the dough rise, and bake. Remember, small adjustments can create unique flavors or fit dietary needs. Store leftover rolls properly to enjoy later. You can even repurpose them into creative treats. Follow these steps, and you’ll have delicious rolls every time. Happy baking!](https://tossedrecipes.com/wp-content/uploads/2025/07/850dd8ec-3f20-4403-af68-80abecab115a.webp)
Cinnamon Roll Pumpkins Delightful Fall Treat Recipe
Fall is calling, and there’s no better way to celebrate than with Cinnamon Roll Pumpkins! These sweet treats capture the essence of autumn flavors, all
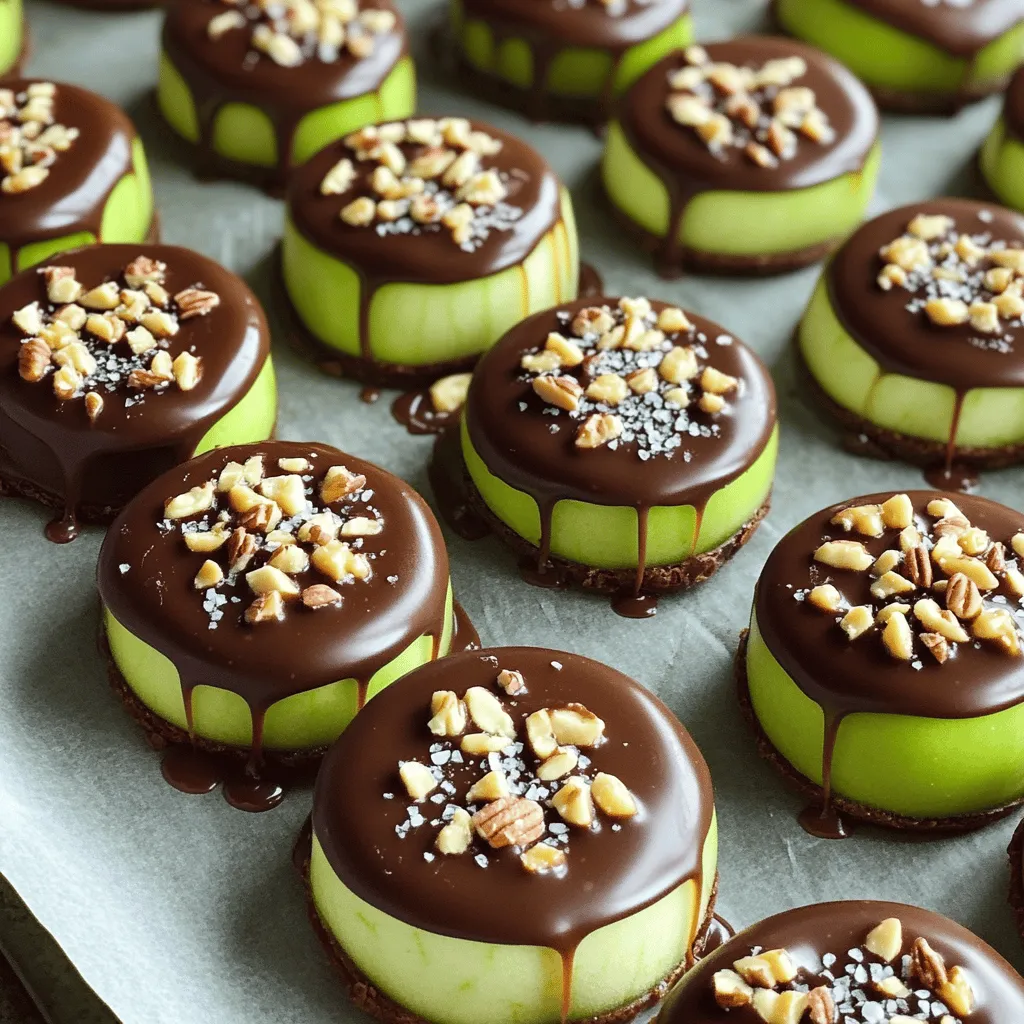
Chocolate Covered Caramel Apple Slices Delicious Treat
Are you craving a sweet treat that’s both fun to make and delicious? Chocolate-covered caramel apple slices offer the perfect blend of flavors and textures.

Espresso Chocolate Chip Cookies Tasty and Easy Treat
Welcome to the world of Espresso Chocolate Chip Cookies! These treats are a perfect blend of rich coffee flavor and sweet chocolate. I’ll guide you