Desserts
. Preheat your oven to 350°F (175°C). This step is crucial for even baking. Line two baking sheets with parchment paper. The paper helps prevent sticking and makes cleanup easy. Start by creaming the butter and sugars. In a large bowl, beat the softened butter, brown sugar, and granulated sugar together until light and fluffy. This takes about 2-3 minutes. Next, mix in the eggs, adding them one at a time. Stir in the vanilla extract until everything is well combined. In a separate bowl, whisk together the dry ingredients. Combine the flour, baking powder, baking soda, salt, and ground cinnamon. Gradually add this dry mix to the wet mixture. Stir gently until just combined. If you want some crunch, fold in chopped nuts at this stage. Using a cookie scoop or a tablespoon, drop dough onto the prepared baking sheets. Make sure to space them about 2 inches apart. Bake for 10-12 minutes. The edges should be lightly golden, while the centers will look soft. They will firm up as they cool. While the cookies are baking, prepare the glaze. In a bowl, whisk together the powdered sugar and milk until smooth. Adjust the thickness by adding more milk if needed. Once the cookies cool slightly, drizzle the glaze over the warm cookies. Let them cool completely on a wire rack. Enjoy your delicious soft cinnamon roll cookies! For the complete recipe, check out [Full Recipe]. To get that soft and chewy texture, focus on mixing. Start by creaming the butter and sugars well. This step adds air, making your cookies light. Mix until fluffy, but stop there. Over-mixing can make cookies tough. Just combine the wet and dry ingredients gently. This way, you keep that soft bite. For even baking, space the cookies apart on the sheet. This helps hot air flow around them. I like to use parchment paper to prevent sticking. Bake the cookies for 10 to 12 minutes. They should be golden around the edges but soft in the middle. Let them cool a bit before moving them. They will set up nicely as they cool. The right glaze adds a sweet finish. Mix powdered sugar and milk until smooth. If it’s too thick, add a bit more milk. To drizzle the glaze, use a fork or a squeeze bottle. Start in the center of each cookie and work your way out. This makes a pretty pattern and adds flavor. Enjoy your cookies with this sweet touch! {{image_2}} You can make these cookies even more fun by adding tasty extras. - Chocolate chips: These make the cookie sweeter. You can mix in a cup for a rich treat. - Pumpkin spice: This gives a warm, seasonal taste. Just add a teaspoon to the dough for a fall twist. If you have special diet needs, I have options for you! - Gluten-free version: Use almond flour instead of all-purpose flour. This keeps the cookies soft and tasty. - Vegan substitutes: Swap the butter for coconut oil and use flax eggs in place of regular eggs. This keeps the flavor but fits vegan diets. Think about how to serve these cookies. - Pairing with coffee or tea: These cookies go great with a hot drink. The sweet cinnamon flavor adds joy to your sip. - Ideas for holiday presentations: Dress them up! Place cookies on a festive plate. You can even sprinkle powdered sugar on top for a snowy look. For the full recipe, check out [Full Recipe]. Enjoy your baking! To keep your cookies fresh, place them in an airtight container. This will help them stay soft and moist. You can also add a slice of bread to the container. The bread keeps the cookies soft by adding moisture. Make sure to store them at room temperature. Avoid refrigerating them, as this can make them hard. You can freeze the cookie dough or the baked cookies. For the dough, scoop the dough onto a baking sheet and freeze until firm. Once frozen, transfer the dough balls to a freezer bag. They can stay there for up to three months. To bake from frozen, add a few extra minutes to your baking time. If you freeze baked cookies, wrap them in plastic wrap and place them in a freezer bag. Thaw them at room temperature before enjoying. These cookies last about a week at room temperature. If you refrigerate them, they may last a bit longer but will lose some softness. For the best taste and texture, eat them fresh within the first few days. Storing them in a cool, dry place helps maintain their flavor and softness. These cookies stand out because they blend the warm spice of cinnamon with a soft, chewy texture. Unlike regular cookies, these have a soft, cake-like feel. The rich brown sugar adds depth and a hint of caramel flavor. This recipe uses butter for richness and eggs for moisture, ensuring a soft bite. The glaze gives a sweet finish that ties everything together. You will find that they are perfect for any occasion, from casual snacks to festive gatherings. Yes, you can make these cookies ahead. You can prepare the dough and chill it for up to 24 hours. Just wrap the dough tightly in plastic wrap. This helps the flavors meld and makes the dough easier to scoop. You can also freeze the dough for up to three months. When ready to bake, just thaw in the fridge overnight. Then, scoop and bake as usual. This makes it easy to have fresh cookies on hand. To avoid overbaking, watch for a few signs. The edges should be lightly golden, while the center looks soft. If the cookies start to crack on top, they might be overbaked. You can also check the bottom; it should be golden and not dark brown. Remember, cookies will firm up as they cool, so take them out a bit early if unsure. Keeping an eye on them helps ensure a soft, delicious treat. These soft cinnamon roll cookies are easy to make and full of flavor. We covered the main ingredients, step-by-step instructions, and helpful tips to ensure perfect results. Add your favorite mix-ins for a unique twist. Don't forget about storage and freezing techniques to keep your cookies fresh. With these simple ideas, you can create delicious treats that everyone will enjoy. So, gather your ingredients and start baking! You will love the warm, sweet smell of these cookies filling your home.](https://tossedrecipes.com/wp-content/uploads/2025/07/56eca124-f514-4219-b6be-731de7b5910d.webp)
The BEST Soft Cinnamon Roll Cookies Recipe Delight
If you crave a sweet treat that’s soft, gooey, and bursting with flavor, you’re in the right place! I’m thrilled to share my recipe for
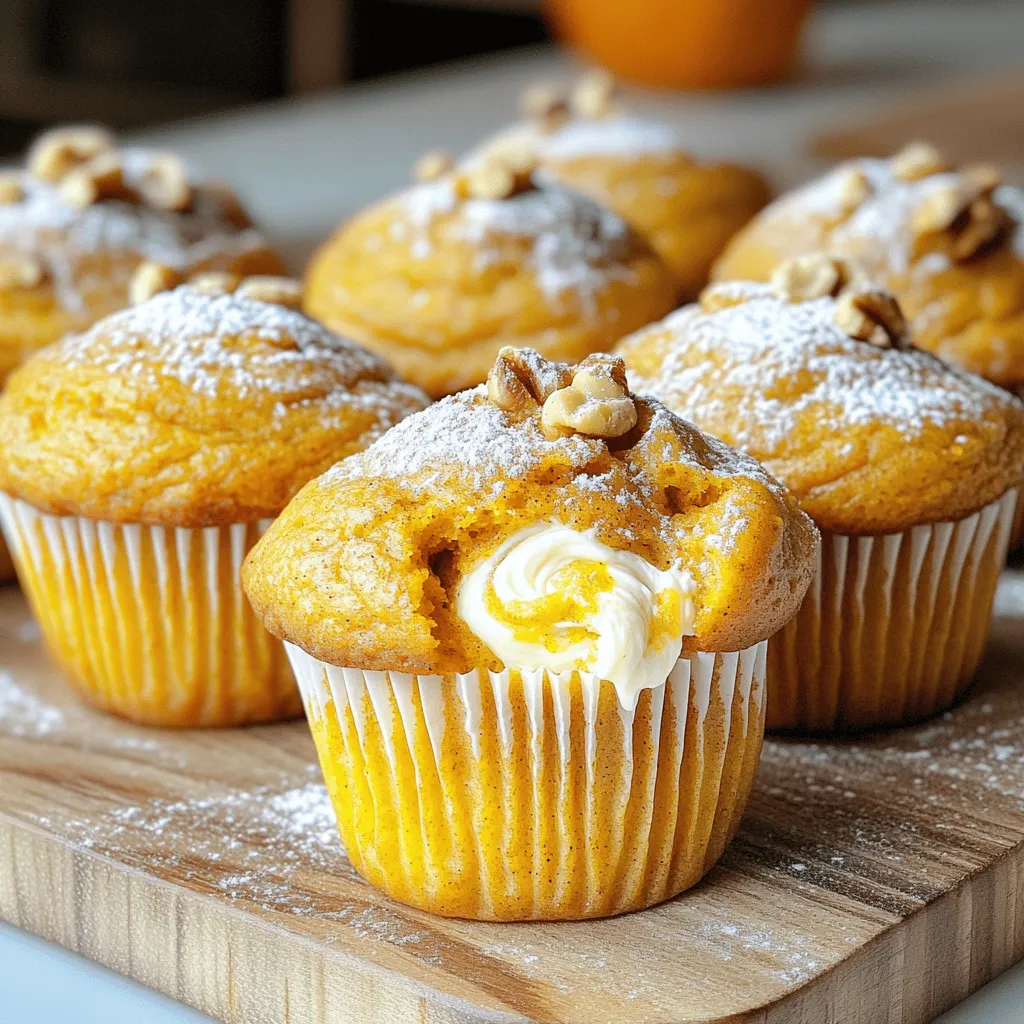
Pumpkin Cream Cheese Muffins Delightful and Easy Recipe
Are you ready to dive into the cozy flavors of fall? My Pumpkin Cream Cheese Muffins are a must-try! They are easy to make and
![To make these tasty blondies, gather the following items: - 1 cup unsalted butter, melted - 1 cup brown sugar, packed - 2 large eggs - 1 teaspoon vanilla extract - 1 ½ cups all-purpose flour - 1 teaspoon baking powder - ½ teaspoon baking soda - ¼ teaspoon salt - 1 cup diced apples (preferably tart apples like Granny Smith) - ½ teaspoon cinnamon - ½ cup chopped walnuts (optional) For the maple frosting, you will need: - 2 tablespoons unsalted butter, softened - 1 cup powdered sugar - 2 tablespoons pure maple syrup - 1 tablespoon milk (adjust for consistency) You can swap some ingredients based on your needs. Use coconut oil instead of butter for a dairy-free option. If you prefer a lower sugar version, try using coconut sugar in place of brown sugar. For a nut-free treat, leave out the walnuts. If you have a gluten-free flour mix, you can use it instead of all-purpose flour. The key to great flavor lies in the apples. I recommend tart apples like Granny Smith. They add a nice balance to the sweet blondies. You can also use Honeycrisp or Fuji apples for a sweeter taste, but keep in mind they will change the flavor profile. Make sure to dice the apples small for even baking. To start, gather your ingredients. You need butter, brown sugar, eggs, and vanilla. Make sure you have flour, baking powder, baking soda, salt, apples, cinnamon, and walnuts ready. 1. Preheat your oven to 350°F (175°C). Grease a 9x9-inch baking pan or use parchment paper. 2. In a large bowl, mix the melted butter and brown sugar. Whisk until it is smooth. 3. Add the eggs one by one. Mix well after each egg. Stir in the vanilla extract. 4. In another bowl, whisk together flour, baking powder, baking soda, salt, and cinnamon. 5. Slowly add the dry mix to the wet mix. Stir until just combined. Do not overmix. 6. Fold in the diced apples and walnuts if you like. Pour this batter into the pan and spread evenly. Bake for 25 to 30 minutes. Check if they are done by inserting a toothpick in the center. If it comes out clean, they are ready. - Tip: Let the blondies cool in the pan for about 10 minutes. Then, move them to a wire rack to cool completely. This helps them set nicely. Once the blondies have cooled, it's time for the frosting. 1. In a medium bowl, mix the softened butter and powdered sugar. 2. Add the maple syrup and milk. Stir until smooth and creamy. 3. Adjust the milk if you want thicker or thinner frosting. Spread the frosting evenly over the cooled blondies. For a fun touch, dust them with cinnamon or drizzle more maple syrup on top. Enjoy your Maple Frosted Apple Blondies! For the complete recipe, check out the Full Recipe section. To get the best texture in your blondies, remember these points: - Don't overmix: After combining wet and dry ingredients, mix until just combined. - Use room temperature eggs: They blend in better and help with even baking. - Check your oven temperature: An oven thermometer can help ensure accuracy. - Cool completely before frosting: This keeps the frosting from melting and sliding off. Here are some common mistakes to watch out for: - Using too much flour: Spoon flour into your measuring cup instead of scooping it out. - Not measuring apples correctly: Dice apples and pack them lightly into your cup. - Skipping the cooling step: Frosting warm blondies can lead to a gooey mess. - Not greasing the pan: It makes it hard to remove the blondies later. When it's time to serve, you have options: - Cut into squares: A perfect bite-sized treat for sharing. - Dust with cinnamon: A light sprinkle adds flavor and appeal. - Pair with ice cream: Vanilla or caramel ice cream complements the flavors well. - Drizzle extra maple syrup: A touch of syrup enhances the maple taste. By following these tips and tricks, you can make your Maple Frosted Apple Blondies a true delight. For the complete recipe, check out the Full Recipe section. {{image_2}} You can change the frosting to fit your taste. Instead of maple, try cream cheese frosting for a tangy twist. A chocolate ganache would make it rich and decadent. For a fruity flavor, use lemon frosting. Each option adds its own fun touch to the blondies. Want to make these blondies a bit healthier? Use coconut oil instead of butter. You can swap some of the brown sugar for mashed bananas or applesauce. This keeps them moist and delicious. If you want to avoid gluten, try using almond flour. These swaps can help you enjoy a treat without the guilt. Don’t be afraid to get creative! Add a handful of dried cranberries or raisins for extra sweetness. You could mix in some chocolate chips for a chocolaty surprise. For a nutty flavor, try adding pecans or hazelnuts. A dash of nutmeg or ginger can also give your blondies a warm spice. There are so many ways to make this recipe your own! For the full recipe, check here: [Full Recipe]. To keep your maple frosted apple blondies fresh, store them in an airtight container. This helps maintain their soft texture and rich flavor. If you want to keep them longer, layer parchment paper between the blondies to prevent sticking. Always let them cool completely before storing. Freezing blondies is easy. First, cut them into squares. Wrap each square in plastic wrap tightly. Then, place them in a freezer-safe bag or container. This way, you can enjoy them later. When you’re ready to eat, let them thaw in the fridge overnight or at room temperature. Maple frosted apple blondies last about three days at room temperature. If you store them in the fridge, they can last up to a week. However, freezing them will keep them tasty for about three months. Always check for signs of spoilage before enjoying any leftovers. You can swap all-purpose flour for a gluten-free blend. Look for a blend that works cup-for-cup. This will keep the texture light and chewy. Always check labels to ensure no gluten sneaks in. Yes, you can use any nut you like. Pecans or almonds work well too. If you prefer no nuts, just leave them out. The blondies will still taste great without them. If you don’t have maple syrup, honey or agave syrup can work. They will give a different flavor but still be sweet. Use the same amount to keep the recipe balanced. Check for a toothpick inserted in the center. It should come out clean or with a few crumbs. The edges should be golden brown, and the center should not jiggle. Yes, you can make these blondies a day before serving. Store them in an airtight container at room temperature. This helps the flavors meld together, making them even more tasty. For the best texture, frost them just before serving. For the full recipe, check the earlier section. In this article, we explored how to make delicious Maple Frosted Apple Blondies. We covered the key ingredients, offered tips for making perfect blondies, and provided variations to try. You learned about ingredient substitutions and how to achieve the best texture. Remember, the right apple type can enhance your treat. Follow our storage tips to keep them fresh. Enjoy making your blondies, and feel free to experiment. These treats offer sweet joy that you can share with friends and family. Happy baking!](https://tossedrecipes.com/wp-content/uploads/2025/07/54887233-cc58-4f09-8ebe-33a356768e9e.webp)
Maple Frosted Apple Blondies Irresistible Dessert Treat
Are you ready to indulge in a sweet treat that combines the flavors of fall? These Maple Frosted Apple Blondies are a must-try dessert that
![To make my best pumpkin muffins, you will need: - 1 cup canned pumpkin puree - 1/2 cup vegetable oil - 1 cup brown sugar, packed - 2 large eggs - 1 teaspoon vanilla extract - 1 1/2 cups all-purpose flour - 1 teaspoon baking soda - 1/2 teaspoon baking powder - 1 teaspoon pumpkin pie spice - 1/2 teaspoon cinnamon - 1/4 teaspoon salt - 1/2 cup chopped walnuts or pecans (optional) - 1/4 cup chocolate chips (optional) Measuring is key for great muffins. Here are some tips to help: - Use dry measuring cups for flour and sugar. - Spoon flour into the cup, then level it off with a knife. - For liquid ingredients, use a clear measuring cup. - Always pack brown sugar for accurate measuring. Want to make your muffins even tastier? Here are some fun add-ins: - Chopped apples for sweetness and texture. - Dried cranberries for a tart kick. - Oats for a hearty touch. - Swap nuts for seeds if you prefer a nut-free option. Feel free to mix and match these add-ins to make your muffins unique! For the full recipe, check out My Best Pumpkin Muffins Recipe. Start by preheating your oven to 350°F (175°C). This step is key to get the muffins just right. While the oven warms up, grab your muffin tin. Line it with paper liners or spray it with cooking spray. This helps the muffins pop out easily after baking. In a large bowl, mix the wet ingredients. Add 1 cup of canned pumpkin puree, 1/2 cup vegetable oil, and 1 cup brown sugar. Crack in 2 large eggs and pour in 1 teaspoon of vanilla extract. Use a whisk to blend everything until it is smooth. This mix gives the muffins their lovely moisture. In another bowl, sift your dry ingredients. Combine 1 1/2 cups of all-purpose flour, 1 teaspoon baking soda, 1/2 teaspoon baking powder, 1 teaspoon pumpkin pie spice, 1/2 teaspoon cinnamon, and 1/4 teaspoon salt. Sifting helps remove lumps and evenly mixes the baking powder and soda. Now, it’s time to add some fun! If you like, fold in 1/2 cup of chopped walnuts or pecans, and 1/4 cup of chocolate chips. Be gentle when you mix them in. You want to keep the batter fluffy and light. Next, divide the muffin batter into the prepared muffin cups. Fill each about 2/3 full. Place the muffin tin in your preheated oven. Bake for about 18-20 minutes. Check for doneness by inserting a toothpick into the center. If it comes out clean, your muffins are ready! After baking, let the muffins cool in the pan for 5 minutes. Then, move them to a wire rack to cool completely. Serve warm for the best taste. If you want, you can dust them with powdered sugar or drizzle a simple icing on top. Enjoy your delicious muffins! Overmixing can ruin your muffins. It makes them tough instead of soft. To avoid this, mix your wet and dry ingredients just until you see no flour. A few lumps are perfectly fine. This keeps your muffins light and fluffy. Remember, gentle hands lead to great results. Even baking is key for perfect muffins. Start by preheating your oven fully. Use an oven thermometer to check the temperature. Place your muffin tin in the center of the oven. This allows hot air to circulate evenly around the muffins. Also, rotate the muffin tin halfway through baking. This helps all muffins bake at the same rate. Both fresh and canned pumpkin can work well. Canned pumpkin is easy and saves time. It has a smooth texture and rich flavor. If you choose fresh pumpkin, roast it, then puree it. This gives you a fresh taste. However, make sure it is well-drained. Too much water can make your muffins soggy. For the best results, I often use the [Full Recipe] with canned pumpkin. It ensures my muffins stay moist and delicious every time. {{image_2}} To make gluten-free pumpkin muffins, replace the all-purpose flour. Use a good gluten-free blend instead. Look for one that includes xanthan gum, which helps with texture. You can follow the same steps in the Full Recipe. The muffins will still be moist and tasty. For vegan pumpkin muffins, swap the eggs with flax eggs. Mix one tablespoon of flaxseed meal with three tablespoons of water for each egg. Let it sit until it thickens. Use a plant-based oil instead of vegetable oil. Check that your sugar is vegan, as some sugar is processed with animal products. Your muffins will be just as delightful! You can boost flavors in your pumpkin muffins easily. Here are some ideas: - Spices: Add a pinch of nutmeg or ginger for warmth. - Extracts: A splash of almond or maple extract can add depth. - Zest: Grate some orange or lemon zest to brighten the flavor. These tweaks make your muffins unique and exciting. Enjoy exploring different tastes! To keep your pumpkin muffins fresh, store them in an airtight container. Place them at room temperature for up to three days. If you want them to last longer, choose the fridge. This method helps prevent mold. Just remember to let them cool completely before storing. You can freeze these muffins for later enjoyment. Wrap each muffin in plastic wrap. Then, put them in a freezer-safe bag or container. They can last for up to three months in the freezer. When you're ready to eat, simply take one out and let it thaw. To reheat your muffins, use the microwave or the oven. For the microwave, heat on low for about 10 to 15 seconds. For the oven, preheat it to 350°F (175°C). Place the muffins on a baking sheet, and warm them for about 5 to 10 minutes. Enjoy them warm for the best flavor! You can check if the muffins are done by inserting a toothpick. If it comes out clean, they are ready. The muffins should also spring back when you touch them lightly. A golden-brown top is a good sign too. Yes, you can swap some ingredients. Use applesauce instead of oil for less fat. You can also use whole wheat flour for more fiber. If you want to make them gluten-free, try almond or oat flour. Just make sure to keep the same ratios. The best toppings for pumpkin muffins include cream cheese frosting or a simple glaze. You can also sprinkle nuts or seeds on top. For a sweet touch, add a dusting of powdered sugar. If you love chocolate, try drizzling melted chocolate over the muffins. To make these muffins healthier, reduce the sugar by using less brown sugar. You can also add healthier mix-ins, like dried fruit or seeds. Use whole wheat flour instead of all-purpose flour. This adds more nutrients and fiber to your muffins. Homemade pumpkin muffins last for about 3 to 5 days at room temperature. Store them in an airtight container to keep them fresh. If you want to keep them longer, freeze them. They can last for up to 3 months in the freezer. Just thaw them before eating. I believe every bite of a pumpkin muffin should feel like a warm hug. This recipe gives you just that. The key to a moist muffin is using the right balance of ingredients. Here’s what you need: - 1 cup canned pumpkin puree - 1/2 cup vegetable oil - 1 cup brown sugar, packed - 2 large eggs - 1 teaspoon vanilla extract - 1 1/2 cups all-purpose flour - 1 teaspoon baking soda - 1/2 teaspoon baking powder - 1 teaspoon pumpkin pie spice - 1/2 teaspoon cinnamon - 1/4 teaspoon salt - 1/2 cup chopped walnuts or pecans (optional) - 1/4 cup chocolate chips (optional) In this recipe, canned pumpkin puree is best. It ensures your muffins stay soft and moist. I often add nuts or chocolate chips for extra flavor. The nuts give a nice crunch, while chocolate adds sweetness. To start, preheat your oven to 350°F (175°C). This step is crucial. A hot oven helps the muffins rise perfectly. Next, mix the pumpkin puree, vegetable oil, brown sugar, eggs, and vanilla extract in a large bowl. Whisk it until smooth. This blend is where the magic begins. In another bowl, combine the dry ingredients: flour, baking soda, baking powder, pumpkin pie spice, cinnamon, and salt. Sifting these together helps avoid lumps in your muffins. Now, slowly add the dry mix to the wet mix. Stir until just combined. This is a key point. Overmixing can lead to tough muffins. A few lumps are perfectly fine. If you want, fold in the chopped nuts and chocolate chips. Do this gently to keep the batter airy. Now, fill your muffin tin. I fill each cup about two-thirds full. This allows room for the muffins to rise without spilling over. Bake for about 18-20 minutes. Check with a toothpick. If it comes out clean, they are done! Let them cool briefly before moving them to a wire rack. Enjoy these muffins warm. A dusting of powdered sugar adds a nice touch. You can even drizzle icing for a sweeter bite. This recipe truly makes my best pumpkin muffins! This blog post covered everything you need to make perfect pumpkin muffins. We discussed the key ingredients and how to measure them. I shared steps to mix and bake, plus tips for best results. You learned about variations for different diets and how to store your muffins. Whether you want a classic recipe or a twist on it, you can create tasty muffins. Enjoy the warm, homemade goodness!](https://tossedrecipes.com/wp-content/uploads/2025/07/736bf571-affe-4316-975c-840cfc61f549.webp)
My Best Pumpkin Muffins Recipe Perfectly Moist Treat
Get ready to bake the tastiest pumpkin muffins you’ve ever had! My best pumpkin muffins recipe delivers a perfectly moist treat that’s sure to impress.
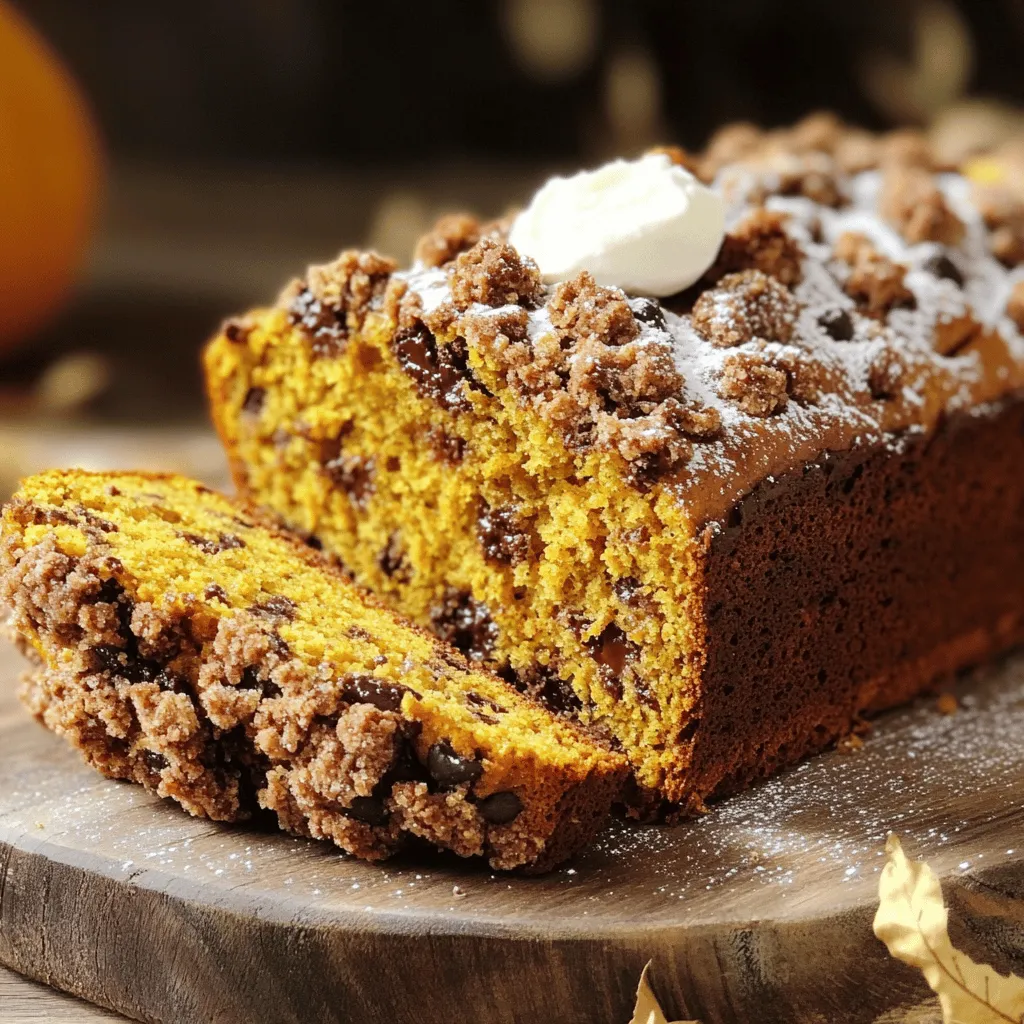
Pumpkin Chocolate Chip Streusel Bread Irresistible Delight
Get ready for a treat that sings autumn! My Pumpkin Chocolate Chip Streusel Bread is an irresistible delight you won’t want to miss. With a
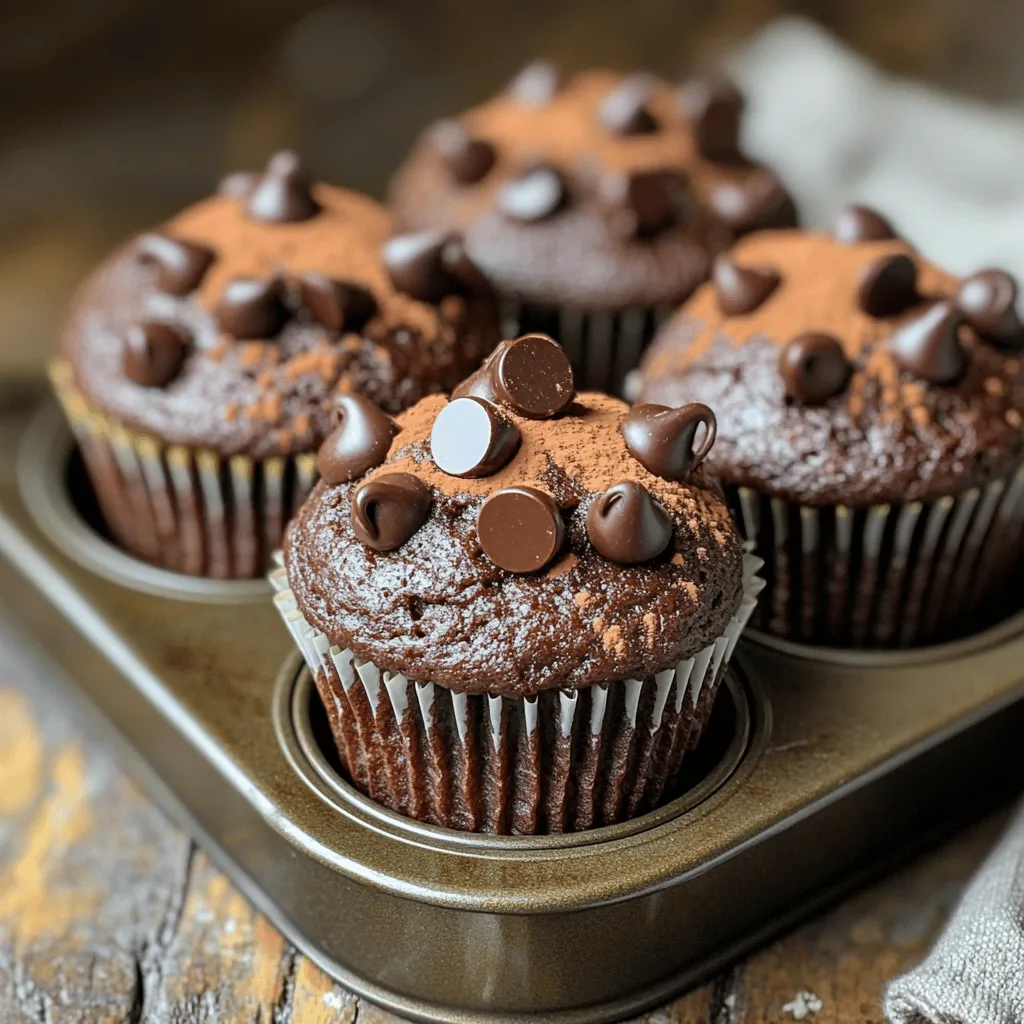
Healthy Fudgy Double Chocolate Muffins Irresistible Treat
Are you ready to indulge in a treat that’s both healthy and delicious? These Healthy Fudgy Double Chocolate Muffins are not just good for you—they’re
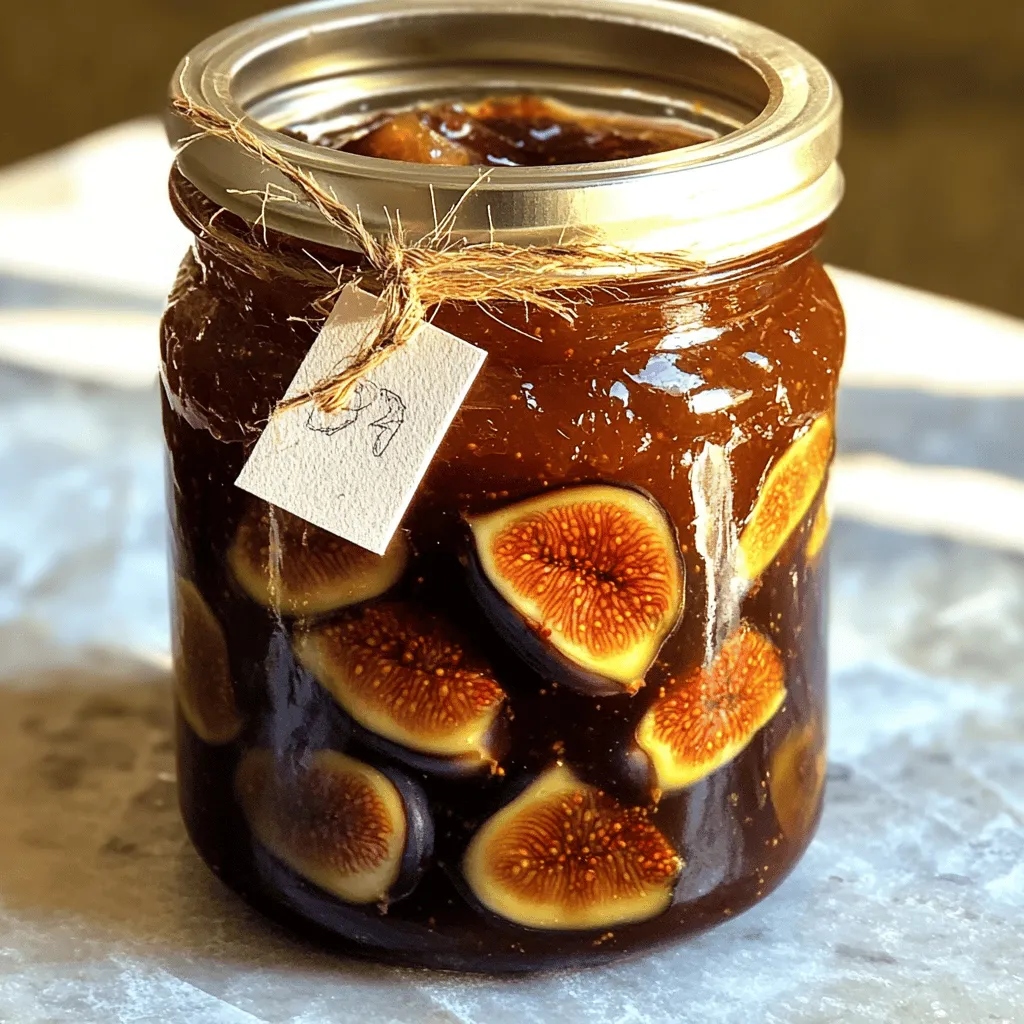
Irresistible Fig Jam Recipes for Tasty Treats
Are you ready to delight your taste buds with homemade fig jam? In this post, I’ll share irresistible recipes that turn fresh figs into sweet,
![To make Hidden Veggie Chocolate Muffins, you need a few key ingredients. These will create a rich, tasty treat. Here's what you'll need: - 1 cup all-purpose flour - 1/2 cup cocoa powder - 1 teaspoon baking powder - 1/2 teaspoon baking soda - 1/4 teaspoon salt - 1/2 cup sugar (or coconut sugar for a healthier alternative) - 1/2 cup unsweetened applesauce - 1/4 cup vegetable oil - 1 teaspoon vanilla extract - 1/2 cup finely grated zucchini (excess moisture squeezed out) - 1/2 cup finely grated carrot - 2 large eggs - 1/2 cup semi-sweet chocolate chips (optional) These ingredients work together to create a moist and flavorful muffin. The cocoa powder gives it a deep chocolate taste, while the veggies add moisture without being detected. Next, you can add optional ingredients for extra flavor or sweetness. Chocolate chips make these muffins even more delicious. You can also use alternative sweeteners if you wish to make them healthier. For variations, you can easily switch to gluten-free flour. You can also use almond milk or coconut milk instead of regular milk. This makes the muffins dairy-free as well. Following the [Full Recipe], you can enjoy these muffins as a healthy treat. They are perfect for breakfast or a snack. 1. Preheat the oven and prepare the muffin tin: First, preheat your oven to 350°F (175°C). This helps your muffins bake evenly. Line a muffin tin with paper liners or grease it with non-stick spray. This keeps the muffins from sticking. 2. Mixing dry ingredients: In a large bowl, combine the flour, cocoa powder, baking powder, baking soda, salt, and sugar. Whisk it all together until it’s well mixed. This step gives your muffins a nice rise and flavor. 3. Combining wet ingredients: In another bowl, whisk together the applesauce, vegetable oil, vanilla extract, and eggs. Mix until it’s smooth. This mix is key for moist and tasty muffins. 1. Combining wet and dry mixtures: Slowly add the wet mix to the dry mix. Stir until just combined. Be careful not to overmix. Overmixing can make your muffins tough. 2. Adding hidden vegetables: Gently fold in the grated zucchini and grated carrot. If you want, you can also add chocolate chips here. This is where the hidden veggies come in. They add moisture and nutrients without changing the chocolate flavor. 3. Baking time and checking for doneness: Divide the batter evenly among the muffin cups, filling each about two-thirds full. Bake for 15-18 minutes. Check for doneness by inserting a toothpick into the center. If it comes out clean, your muffins are ready! 1. Cooling tips: Let the muffins cool in the pan for 5 minutes. Then, transfer them to a wire rack to cool completely. This keeps them from getting soggy. 2. Serving suggestions: Serve these muffins warm. You can dust them with powdered sugar or add a dollop of yogurt on top for extra creaminess. For a rustic touch, place them on a wooden board. Enjoy these tasty treats! To make the best muffins, mix dry and wet ingredients separately. This helps keep the texture light. When you combine them, stir gently. Avoid overmixing; this makes the muffins tough. Aim for a lumpy batter. That’s a sign you did it right! Finely grating or pureeing vegetables works wonders. For zucchini, squeeze out excess moisture first. This keeps the muffins from getting soggy. Carrots add sweetness and color. You can also try sweet potatoes or spinach. They blend well and boost nutrition without changing flavor. Adding veggies to baked goods increases fiber and vitamins. This makes treats healthier without losing taste. Kids often eat more vegetables when they’re hidden in muffins. They’ll enjoy the taste while getting nutrients. It’s a win-win for both parents and kids! Try the Full Recipe to make your own Hidden Veggie Chocolate Muffins. Enjoy deliciousness while sneaking in those healthy veggies! {{image_2}} You can change the flavor of your Hidden Veggie Chocolate Muffins easily. One fun way is to use different types of cocoa powder. Dark cocoa powder adds a rich taste. You can also try Dutch-process cocoa for a smooth flavor. The choice of cocoa can change the muffin's taste and color. Adding spices like cinnamon or nutmeg can also boost flavor. A teaspoon of cinnamon gives warmth and depth. Nutmeg adds a hint of sweetness. These spices pair well with chocolate and enhance the overall taste. If you follow a vegan diet, you can make a vegan version of these muffins. Replace eggs with flaxseed meal or chia seeds mixed with water. Use a plant-based oil instead of vegetable oil. Make sure your cocoa powder is dairy-free. These swaps keep the muffins moist and delicious. You can also make nut-free and low-sugar adaptations. For nut-free, just avoid adding nuts. Use sunflower seeds or pumpkin seeds for crunch instead. For low-sugar, you can cut down on sugar or use a sugar alternative. Coconut sugar is a great choice, as it has a lower glycemic index. Get creative with mix-ins! You can add nuts, seeds, or dried fruits to your batter. Chopped walnuts or pecans add texture. Seeds like chia or flaxseed boost nutrition. Dried fruits like raisins or cranberries add sweetness and chewiness. Swapping applesauce for other fruit purees is another great idea. Mashed bananas work well and add natural sweetness. You can also use pureed pumpkin for a seasonal twist. Each fruit brings its unique flavor and moisture, making your muffins special. For the full recipe, check out the complete guide on Hidden Veggie Chocolate Muffins. To keep your Hidden Veggie Chocolate Muffins fresh, store them at room temperature. Place them in an airtight container to prevent drying out. Enjoy them within three days for the best taste. If you need a longer shelf life, consider refrigerating them. Just be aware that refrigeration can change the texture. For long-term enjoyment, freezing is the best option. Wrap each muffin tightly in plastic wrap. Then place them in a freezer-safe bag or container. This helps to keep them fresh for up to three months. When you’re ready to enjoy, simply thaw them at room temperature. For a warm treat, pop them in the microwave for about 15 seconds. Enjoy your muffins just like fresh! Can I use other vegetables besides zucchini and carrots? Yes, you can! Try using finely grated beetroot, pumpkin, or even sweet potato. Each adds its own flavor and nutrients. Just remember to squeeze out extra moisture for the best texture. How do I make these muffins gluten-free? To make these muffins gluten-free, swap the all-purpose flour for a gluten-free blend. Look for one that includes xanthan gum for the best rise and texture. Can I replace sugar with another sweetener? Absolutely! You can use honey, maple syrup, or coconut sugar. If you use liquid sweeteners, reduce the liquid in the recipe slightly for the right balance. What is the best way to know when muffins are baked? Insert a toothpick into the center of a muffin. If it comes out clean or with a few crumbs, they are done. Avoid any wet batter on the toothpick. Are these muffins suitable for freezing? Yes, they freeze well! Just cool them completely, then wrap them tightly in plastic wrap and place in a freezer bag. They stay fresh for up to three months. What goes well with Hidden Veggie Chocolate Muffins? These muffins pair nicely with a dollop of yogurt or a scoop of ice cream. You can also enjoy them with a glass of milk or a cup of coffee. Can I add frosting or glaze to muffins? Yes! A light glaze of melted chocolate or a simple vanilla icing adds a nice touch. Just keep it light so the muffins remain a healthy treat. You learned how to make delicious Hidden Veggie Chocolate Muffins. We covered key ingredients, steps, and variations. Remember, hiding veggies helps improve nutrition and taste. With tips on storage and common questions, you’re ready to bake. Try out these ideas, and make this recipe your own. I’m sure you’ll enjoy making and sharing these tasty muffins!](https://tossedrecipes.com/wp-content/uploads/2025/07/dd5b610a-a55b-4509-9ccb-e01258e2cc82.webp)
Hidden Veggie Chocolate Muffins Healthy and Tasty Treat
Looking for a tasty treat that sneaks in some veggies? These Hidden Veggie Chocolate Muffins are your answer! Made with simple ingredients, they satisfy sweet
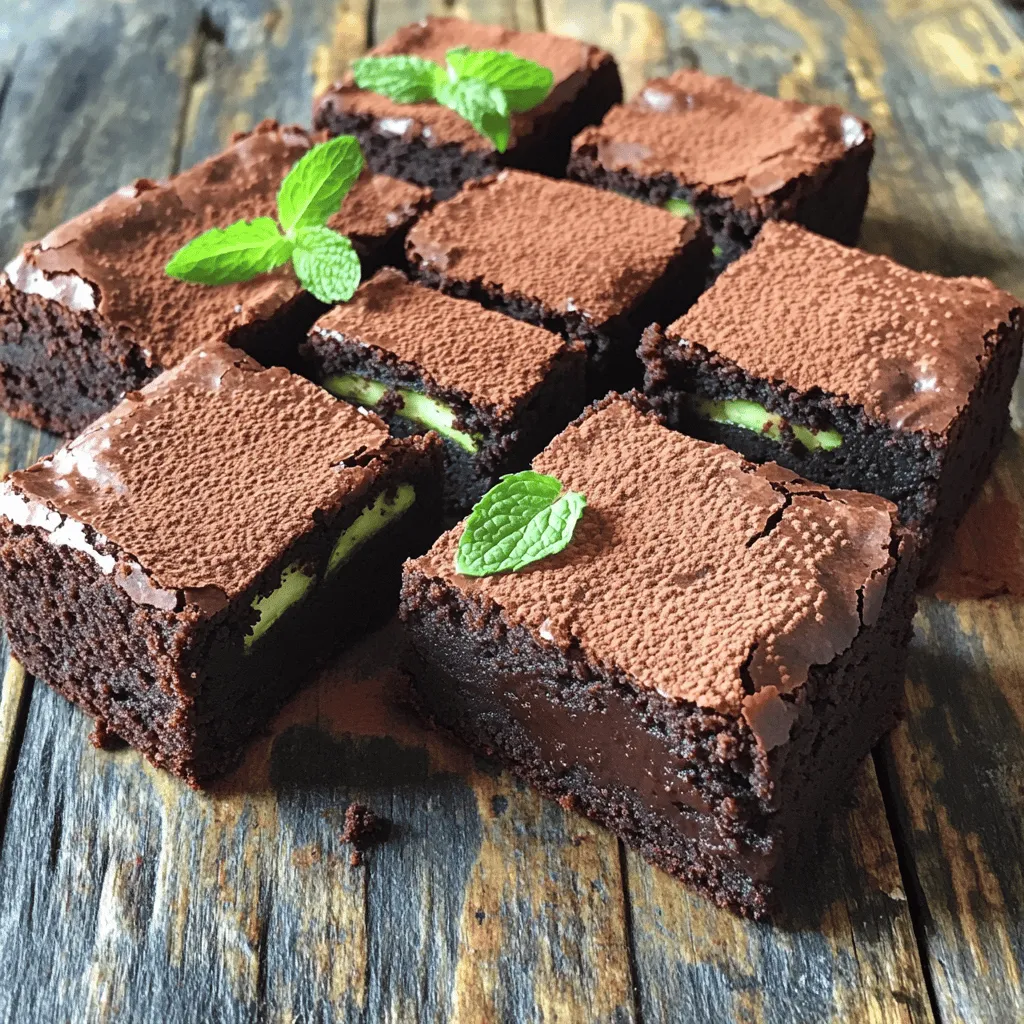
Healthy Zucchini Brownies Rich and Delicious Treat
Love brownies but want a healthier twist? Try my Healthy Zucchini Brownies, the perfect guilt-free treat! These rich and moist brownies use simple ingredients like
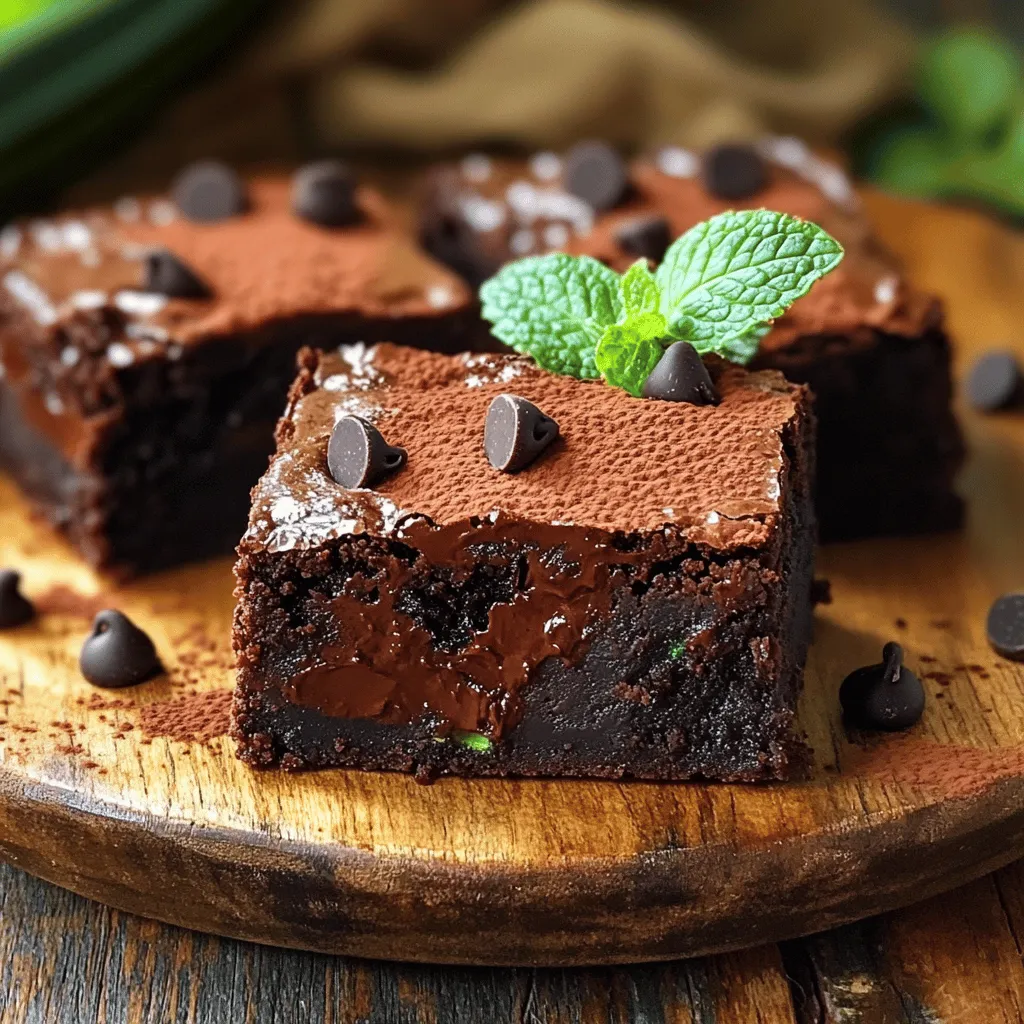
Keto Zucchini Brownie Recipe Easy and Delicious Treat
Looking for a delicious treat that won’t break your diet? Try my Keto Zucchini Brownie recipe! These brownies are easy to make and satisfy your