Desserts
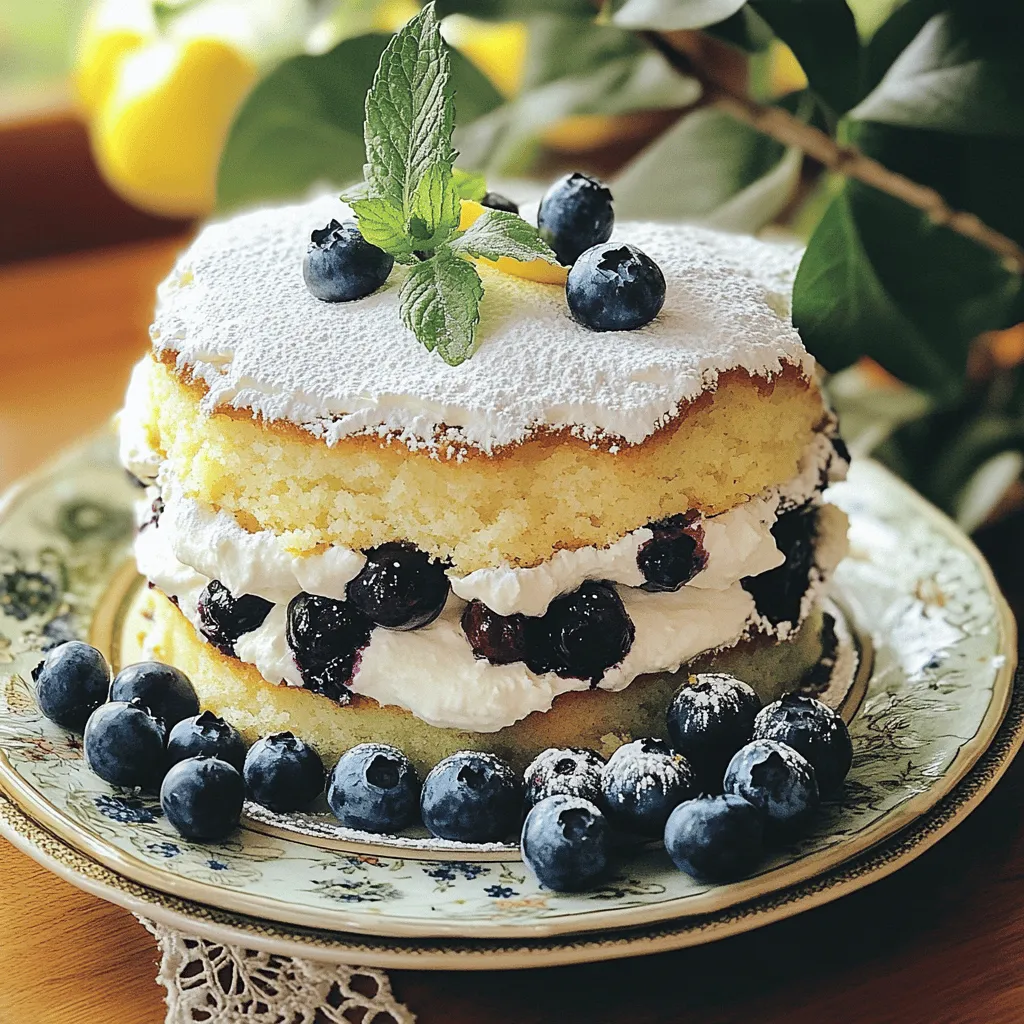
Earl Grey Blueberry Cake Simple and Delightful Dessert
Are you ready to impress your friends and family with a cake that blends classic flavors in a unique way? My Earl Grey Blueberry Cake
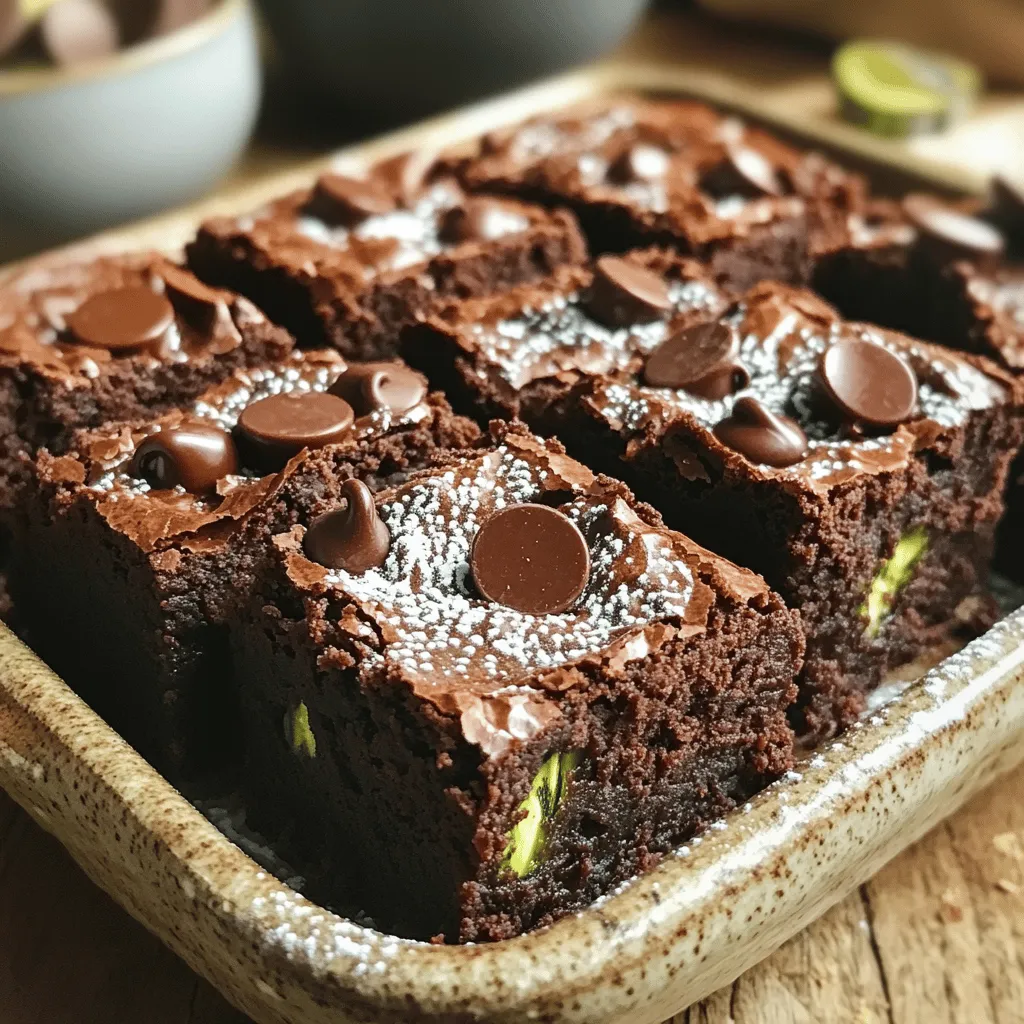
Decadent Chocolate Zucchini Brownies Recipe Delight
Are you ready to indulge in a treat that feels utterly sinful yet secretly healthy? These Decadent Chocolate Zucchini Brownies will satisfy your sweet tooth
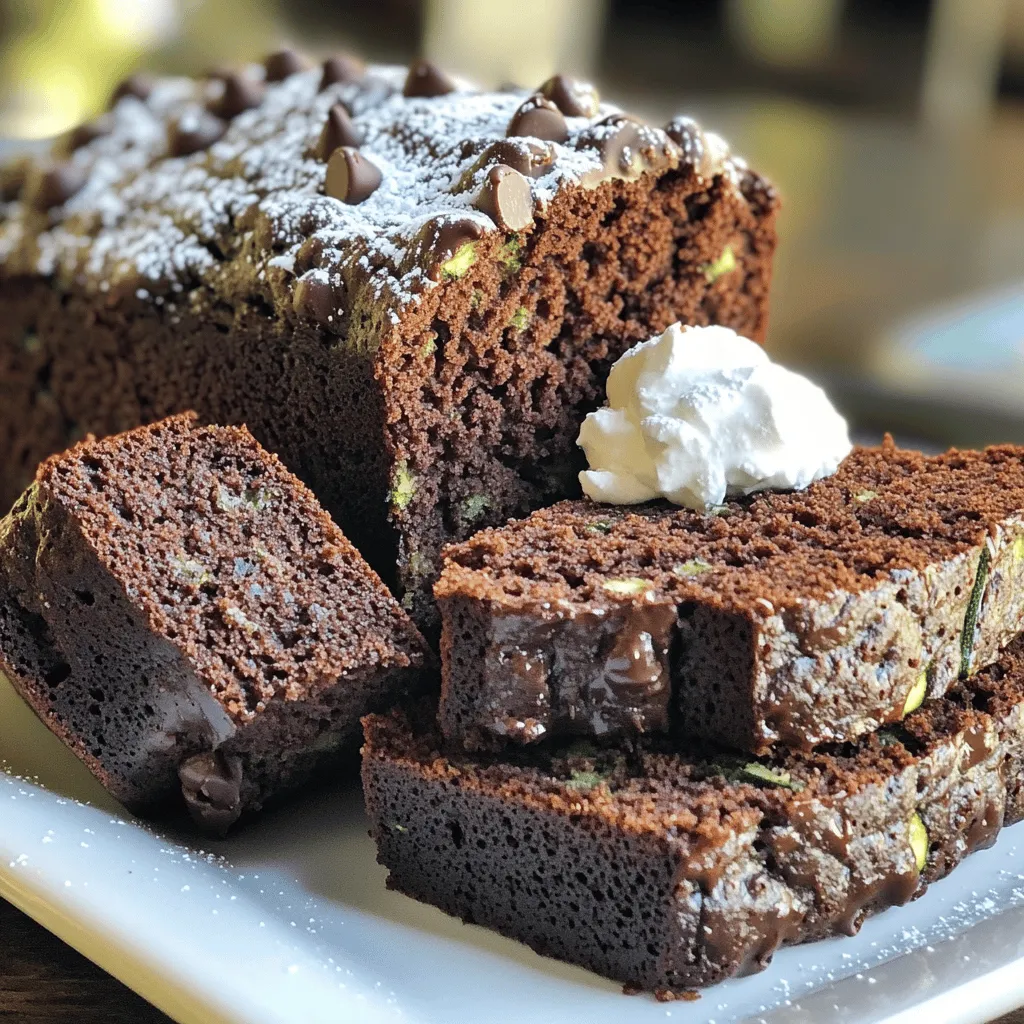
Classic Chocolate Zucchini Bread Delightfully Moist Treat
Are you ready to enjoy a deliciously moist treat? Classic Chocolate Zucchini Bread brings together rich cocoa and fresh zucchini for a sweet, unique twist.
![For this fun treat, you will need these key ingredients: - 1 cup all-purpose flour - 1/2 cup unsweetened cocoa powder - 1 teaspoon baking powder - 1/2 teaspoon baking soda - 1/4 teaspoon salt - 1/2 cup unsalted butter, softened - 1 cup granulated sugar - 2 large eggs - 1 teaspoon vanilla extract - 1/2 cup buttermilk - 1/2 cup strawberries, pureed (fresh or frozen) - 1/2 cup heavy cream - 2 tablespoons powdered sugar - Chocolate ganache (1/2 cup chopped chocolate and 1/2 cup heavy cream) These ingredients work together to create the rich layers and flavors in your cakes. You can make your cakes extra special with these optional garnishes: - Fresh strawberries - Chocolate shavings These garnishes add color and texture, making your mini cakes even more appealing. To get the best outcome, follow these tips: - Use room temperature butter and eggs for a smooth batter. - Sift the cocoa powder and flour to avoid lumps. - For a richer chocolate taste, use high-quality cocoa powder. - Chill the heavy cream before whipping for better volume. - Ensure the brownie layers are fully cool before stacking. These simple tips will help you create perfect mini stacked cakes. Check out the Full Recipe for detailed instructions and enjoy the process! First, I preheat the oven to 350°F (175°C). I grease a mini cake pan or a muffin tin. In a bowl, I sift together the all-purpose flour, cocoa powder, baking powder, baking soda, and salt. This step helps to mix the dry ingredients evenly and avoids lumps. Next, I prepare the brownie batter. I combine the softened butter and granulated sugar in another bowl. I mix them until they are light and fluffy. Then, I add the eggs one at a time, mixing well after each. I stir in the vanilla extract for extra flavor. To finish the brownie layer, I alternate adding the flour mixture and buttermilk to the butter mixture. I start and end with the dry ingredients. I mix just until combined, ensuring I do not overmix the batter. Now, it’s time to bake the brownie layer. I pour the batter into the prepared mini cake pan. I bake for about 12 to 15 minutes. I check if a toothpick comes out clean. Once baked, I let them cool for 10 minutes before moving them to a wire rack. While the brownie layers cool, I whip the heavy cream with powdered sugar in a separate bowl. I mix until soft peaks form. Then, I gently fold in the strawberry puree. This creates a light and tasty strawberry cream that pairs well with the brownie layers. Once the brownie layers cool completely, I cut them into equal rounds. I take one brownie layer and spread a tablespoon of strawberry cream on top. Then, I stack another layer and drizzle it with warm chocolate ganache. I repeat this process until I have a mini stacked cake. For the ganache, I heat heavy cream until it simmers. I pour it over chopped chocolate in a bowl and let it sit for five minutes. After that, I stir until smooth and glossy. To finish, I top the mini cakes with a dollop of the remaining strawberry cream, fresh strawberries, and chocolate shavings. This adds a lovely touch that makes these cakes look as good as they taste! One common mistake is overmixing the batter. This can make your cakes tough. Mix until just combined. Another issue is not cooling the brownie layers completely. If they are warm, the cream will melt. Always let them cool on a wire rack. Lastly, be careful with ganache. If it cools too much, it won't drizzle well. Keep it warm for the best results. For these mini cakes, you need a few key tools: - Mini cake pan or muffin tin - Mixing bowls of various sizes - Whisk or electric mixer - Rubber spatula - Wire rack for cooling - Small saucepan for ganache Having these tools makes the process smooth and fun. To get rich flavor, use high-quality cocoa powder and fresh strawberries. This makes a big difference. For texture, ensure your butter is soft. This helps create a fluffy batter. Also, whip the cream until soft peaks form. This gives a nice lightness to the cream layer. Lastly, stack the cakes gently. This keeps them from toppling over and looks neat. For the full recipe, check out [Full Recipe]. {{image_2}} You can change flavors easily. For the brownie layer, swap cocoa powder for vanilla. This gives a light, sweet layer. For a fruity twist, try using lemon zest in the cake batter. It adds a nice zing. You can also replace strawberry puree with raspberry or even mango. These swaps keep the recipe fresh and fun. Decorations can match any event. For birthdays, add colorful sprinkles on top. They bring joy and color. For holidays, use seasonal fruits like cranberries or slices of oranges. They look great and taste awesome too. For a wedding, try light pastel colors. Adding edible flowers can make them classy and elegant. Explore different fillings and frostings. Instead of strawberry cream, try whipped coconut cream. It gives a nice tropical taste. For frosting, use cream cheese frosting for a tangy touch. You can also layer in fruit jams, like apricot or blueberry. Each choice can change the cake's vibe and taste. To keep your mini stacked Neapolitan cakes fresh, wrap each cake in plastic wrap. Place them in an airtight container. Store them at room temperature for up to three days. If you want to keep them longer, refrigerate them. The cakes will stay fresh for about a week in the fridge. If you need to store the cakes for more than a week, freezing is a great option. First, wrap each mini cake tightly in plastic wrap. Then, place them in a freezer-safe bag or container. You can freeze the cakes for up to three months. When you are ready to enjoy them, simply thaw them in the fridge overnight. When you are ready to serve the cakes, you can enjoy them cold or warm them up. To warm them, remove the plastic wrap and place them in a preheated oven at 350°F (175°C) for about 5-10 minutes. This helps to restore their soft texture. If you prefer them cold, simply serve them straight from the fridge. Either way, they taste delicious! You can find the Full Recipe for more details. Mini stacked Neapolitan cakes stay fresh for about three days. Store them in an airtight container. Keep them in the fridge to maintain their flavor and texture. If left out, they may dry out quickly. Yes, you can make these cakes ahead of time. Bake the layers and store them separately. Wrap them in plastic wrap and keep them in the fridge. Assemble the cakes on the day you plan to serve. This keeps the cream fresh and delicious. To stack mini cakes without collapsing, ensure each layer is completely cool. Use a sturdy filling, like the strawberry cream or ganache. Add a small amount of filling between layers to help them stick. You can also chill the cakes after stacking. This helps set the layers and keeps your mini cakes stable. For more details, check the Full Recipe. In this post, we explored how to create Mini Stacked Neapolitan Cakes. We covered the main ingredients, tips for success, and step-by-step assembly. I shared ideas for variations, storage, and answered common questions. These tasty cakes are fun to make and share. Use your creativity with flavors and designs. Follow the tips to avoid mistakes. Enjoy baking and impressing your friends and family with these delightful treats!](https://tossedrecipes.com/wp-content/uploads/2025/07/dfb3e1c3-038a-4e04-81b5-f1c531668b53.webp)
Mini Stacked Neapolitan Cakes Flavorful and Fun Treat
Get ready to delight your taste buds with Mini Stacked Neapolitan Cakes! These fun treats combine rich chocolate, sweet vanilla, and fruity strawberry flavors in
![- 1 cup finely grated zucchini - 1 cup all-purpose flour - 1/2 cup unsweetened cocoa powder - 1/2 teaspoon baking soda - 1/2 teaspoon baking powder - 1/4 teaspoon salt - 1/2 cup granulated sugar - 1/2 cup brown sugar, packed - 1/3 cup vegetable oil - 2 large eggs - 1 teaspoon vanilla extract - 1/2 cup semi-sweet chocolate chips (plus more for topping) Each ingredient plays a key role in making these brownies moist and rich. The grated zucchini adds moisture without a strong taste, while the cocoa powder gives that deep chocolate flavor. The sugars help create a sweet, tender texture. - Gluten-free flour options: You can use almond flour or a gluten-free blend. These options will keep the brownies moist and flavorful. - Sugar substitutes for healthier variations: Try using coconut sugar or honey. These can reduce refined sugar while adding a unique taste. - Fresh zucchini selection: Look for firm, shiny zucchini with no soft spots. Fresh zucchini will enhance the taste of your brownies. - Cocoa powder variety and quality: Use a high-quality cocoa powder for the best flavor. Dutch-processed cocoa adds richness, while natural cocoa is lighter and more acidic. For the complete recipe, check the Full Recipe link above. 1. Preheat your oven to 350°F (175°C). This step ensures even baking. 2. Prepare an 8x8-inch baking pan by greasing it or lining it with parchment paper. This makes it easier to lift out the brownies later. 3. In a medium bowl, sift together the flour, cocoa powder, baking soda, baking powder, and salt. Sifting helps mix the dry ingredients well and eliminates lumps. 1. In a large mixing bowl, combine the granulated sugar, brown sugar, and vegetable oil. Mix until the mixture is smooth and creamy. This helps the sugars dissolve fully. 2. Add the eggs one at a time. Mix well after each egg. This ensures that the mixture stays light and fluffy. Then, stir in the vanilla extract for flavor. 1. Gradually add the dry ingredients to the wet ingredients. Mix just until they come together. Avoid overmixing to keep your brownies moist. 2. Gently fold in the finely grated zucchini and chocolate chips. This step adds moisture and flavor. Make sure they are evenly distributed throughout the batter. Follow these steps closely, and you will create moist and chocolatey zucchini brownies. For the complete details, refer to the Full Recipe. To make moist brownies, avoid overmixing your batter. Overmixing makes the brownies tough. Mix just until you see no dry flour. This small step helps keep your brownies soft and tender. To check for doneness, use a toothpick. Insert it into the center of the brownies. If it comes out with a few moist crumbs, they are ready. If it comes out wet, bake them a bit longer. You can easily boost the flavor by adding spices or extracts. A pinch of cinnamon or a splash of almond extract makes a big difference. These small changes add depth and warmth to your brownies. Using high-quality chocolate chips is also key. Choose semi-sweet or dark chocolate chips for a richer taste. The better the chocolate, the better your brownies will be. Serve your brownies warm for a delightful treat. Dust them with powdered sugar for a simple touch. If you want to impress, add a scoop of vanilla ice cream on the side. For a creative garnish, try fresh berries or a drizzle of chocolate sauce. These ideas not only make your brownies look great but also add to the flavor. For the full recipe, check out the detailed instructions on how to make these amazing brownies! {{image_2}} You can add fun twists to your brownies. Try mixing in walnuts or pecans for a nutty crunch. They add great texture and flavor. If you want a warm spice note, add a dash of cinnamon or a little espresso powder. These spices enhance the chocolate taste. Each option brings a new layer to your brownies. Want to make your brownies a bit healthier? You can reduce the sugar by using less granulated and brown sugar. This will still keep them sweet but cut calories. Another option is to swap out all-purpose flour for whole grain flour. Whole grains add fiber, making your brownies more filling. You won’t lose flavor with these changes. If you need a vegan version, swap the eggs for flax eggs. Mix one tablespoon of ground flaxseed with three tablespoons of water for each egg. This keeps the brownies moist. For those with allergies, you can make them nut-free and dairy-free. Use coconut oil instead of vegetable oil and dairy-free chocolate chips. Everyone can enjoy these delicious brownies. For the full recipe, check out the [Full Recipe]. To keep your brownies moist, use an airtight container. This prevents air from drying them out. Place parchment paper between layers if you stack brownies. This will help them stay fresh and not stick together. You can freeze brownies for later. First, let them cool completely. Then, wrap them tightly in plastic wrap. After wrapping, place them in a freezer-safe bag or container. Brownies can last up to three months in the freezer. When you're ready to enjoy them, thaw them in the fridge overnight or leave them at room temperature for a few hours. To revive brownies, you have two good options: the microwave or the oven. For the microwave, heat a brownie for 10-15 seconds. Check if it needs more time. In the oven, preheat it to 350°F (175°C). Place the brownies in for about 5-10 minutes. This warms them up nicely without drying them out. Enjoy your delicious brownies warm! You can make your brownies richer by adding more cocoa powder. Try using 3/4 cup instead of 1/2 cup. You can also add more chocolate chips. Use up to 1 cup of semi-sweet chocolate chips for extra chocolatey goodness. If you want a deeper flavor, consider adding a tablespoon of espresso powder. It can boost the chocolate taste without adding coffee flavor. Yes, you can omit the zucchini. However, the brownies will lose moisture and may dry out. Instead, you could use applesauce or mashed bananas. These alternatives will help keep your brownies moist. Use 1/2 cup of applesauce or mashed bananas in place of zucchini. Dry brownies often come from overbaking or not enough moisture. Always check your brownies a few minutes early. If they seem dry, try reducing the baking time next time. You can also add an extra egg to boost moisture. If you find your batter too thick, add a splash of milk to improve texture. You can keep brownies at room temperature for about 3 to 4 days. Store them in an airtight container to keep them moist. If you live in a warm place, it’s best to refrigerate them. Just remember to let them come back to room temperature before serving. For the complete recipe, check out the full recipe for Moist & Chocolatey Zucchini Brownies 🥒. Now you have all the details to make delicious zucchini brownies. We covered the main ingredients and substitutes, plus tips for choosing quality items. You learned step-by-step how to prepare, mix, and bake your brownies while keeping them moist and tasty. We discussed ways to change flavors or make healthier versions. You even got storage tips to keep your brownies fresh. Enjoy baking, and remember, these brownies can be fun and healthy treats!](https://tossedrecipes.com/wp-content/uploads/2025/07/a92d3525-9bb9-4e5c-a046-7afb7f52bfed.webp)
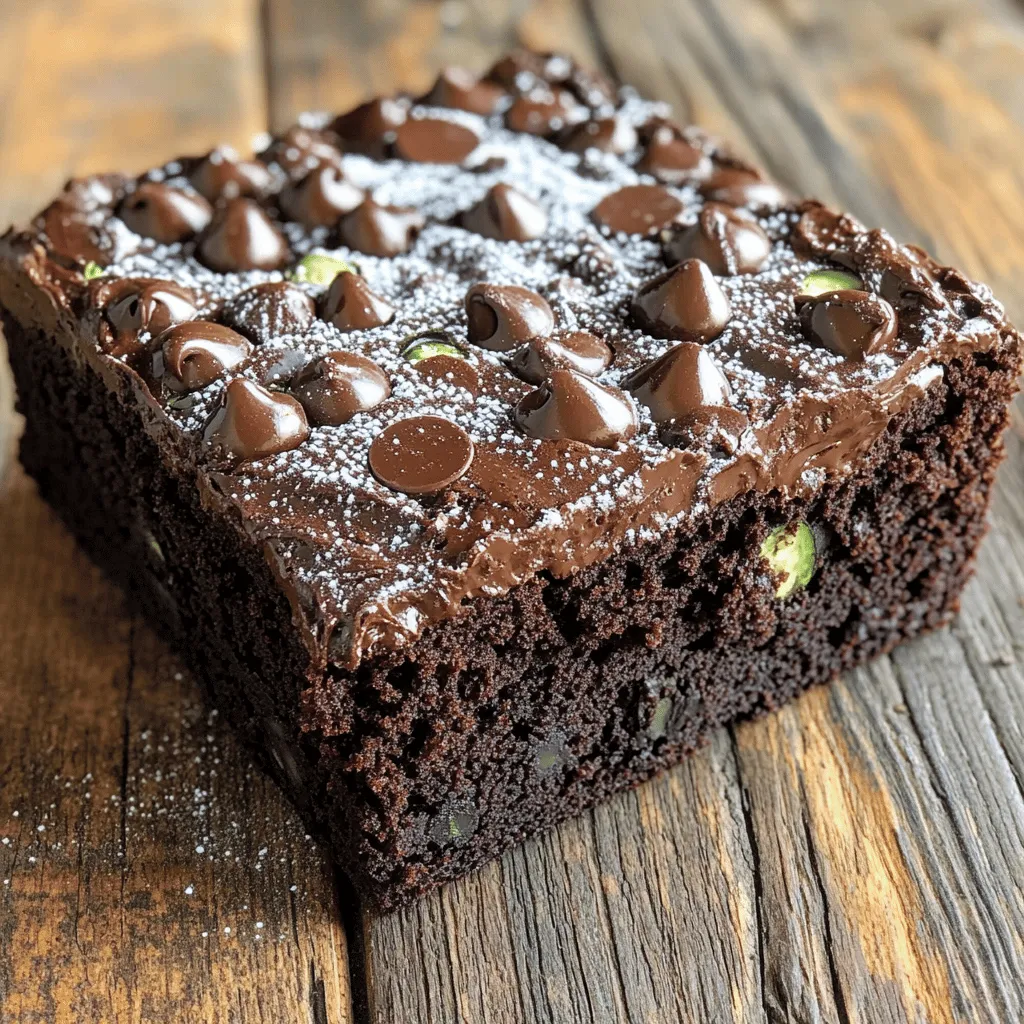
Moist & Chocolatey Zucchini Brownies Easy Recipe Guide
Are you ready to indulge in the ultimate treat that sneaks in some veggies? These Moist & Chocolatey Zucchini Brownies are more than just a
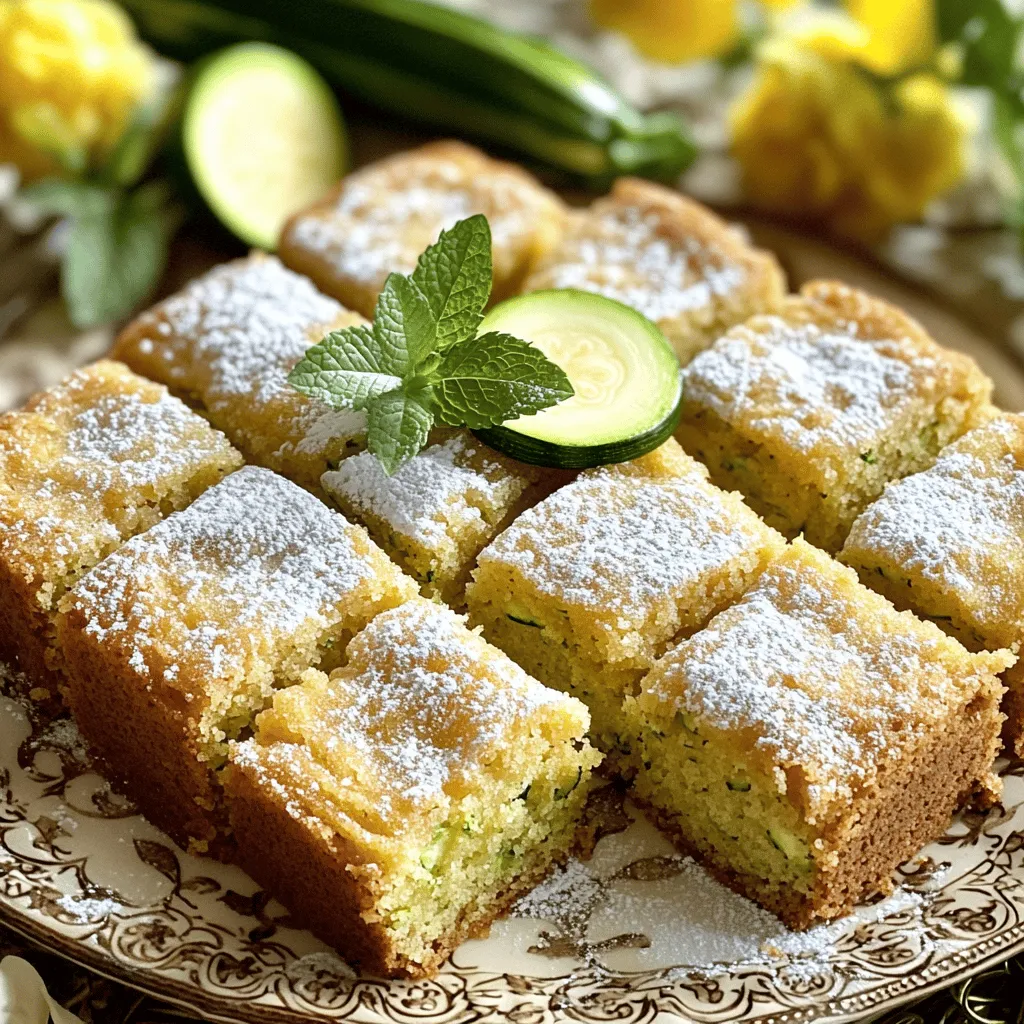
Tender Chocolate Zucchini Cake Delightful and Easy
If you think chocolate cake can’t be healthy, think again! My Tender Chocolate Zucchini Cake is rich, moist, and easy to make. With shredded zucchini
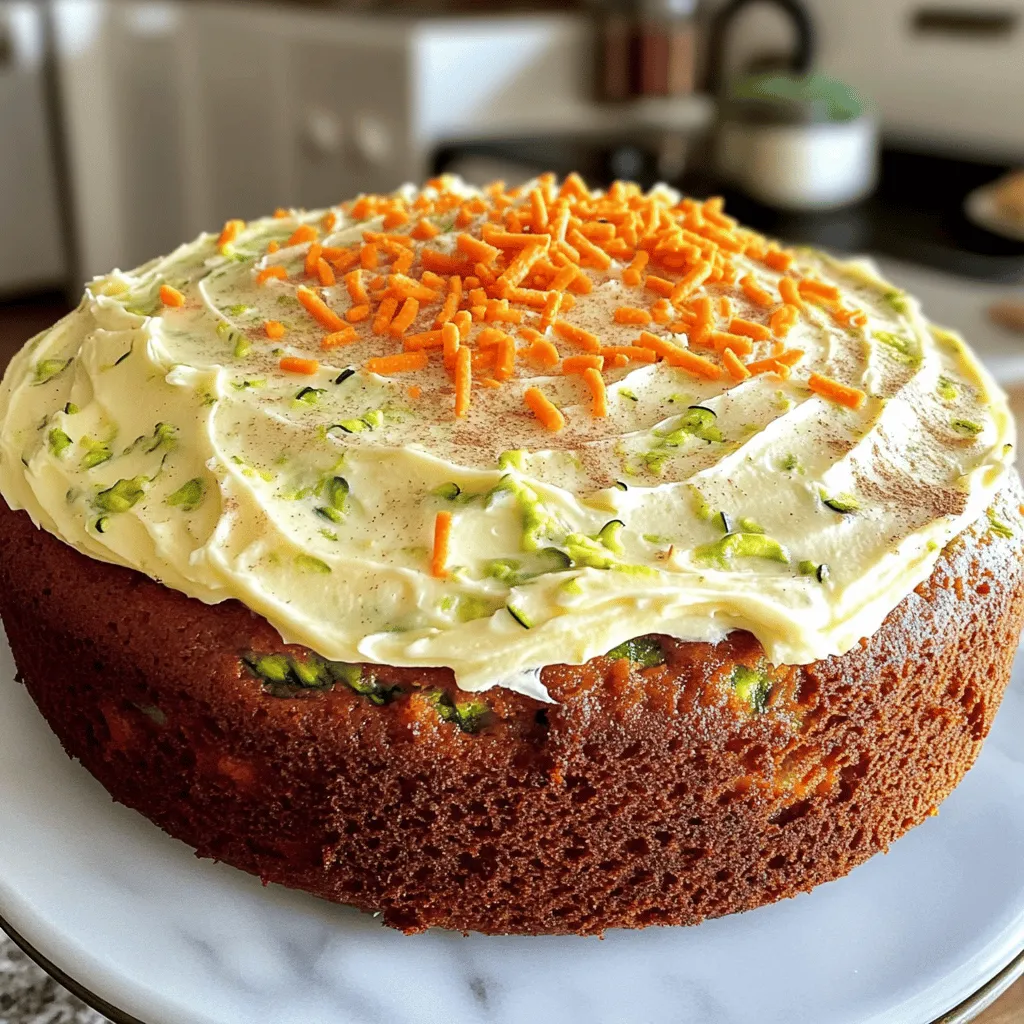
Best Zucchini Carrot Cake Simple and Delicious Recipe
Are you ready to bake the perfect Zucchini Carrot Cake? This simple and delicious recipe combines fresh veggies with sweet flavors. You’ll love how easy
Moist Brown Sugar Zucchini Cake Simple Delightful Treat
If you love moist cakes packed with flavor, you’ll adore my Moist Brown Sugar Zucchini Cake. This simple recipe transforms zucchini into a sweet treat

Neapolitan Cupcakes Delightful Sweet Treat Recipe
Get ready to indulge in the sweet goodness of Neapolitan Cupcakes! This delightful treat blends rich chocolate, fresh strawberry, and creamy vanilla flavors into each
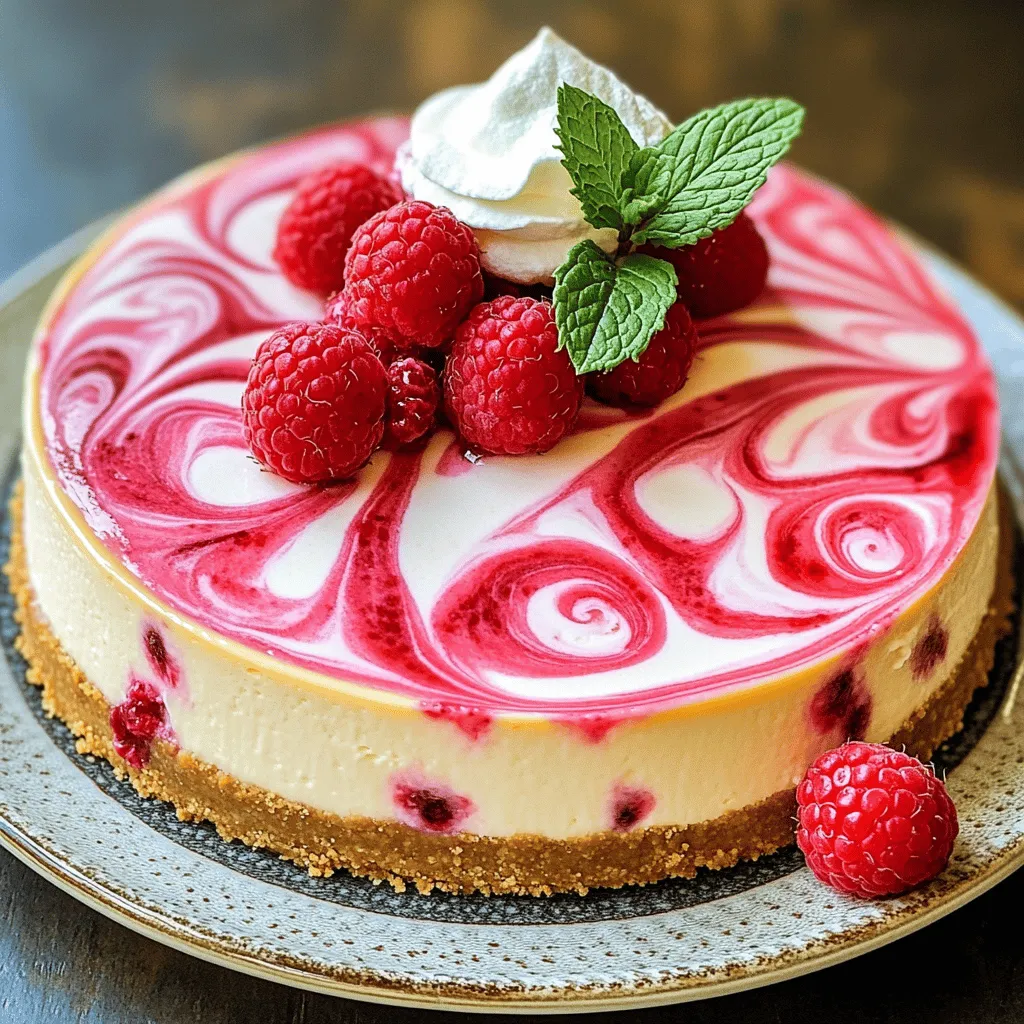
Perfect Creamy Raspberry Cheesecake Delight Recipe
Are you ready to indulge in a treat that’s both creamy and tangy? My Perfect Creamy Raspberry Cheesecake Delight recipe is here to satisfy your