Desserts
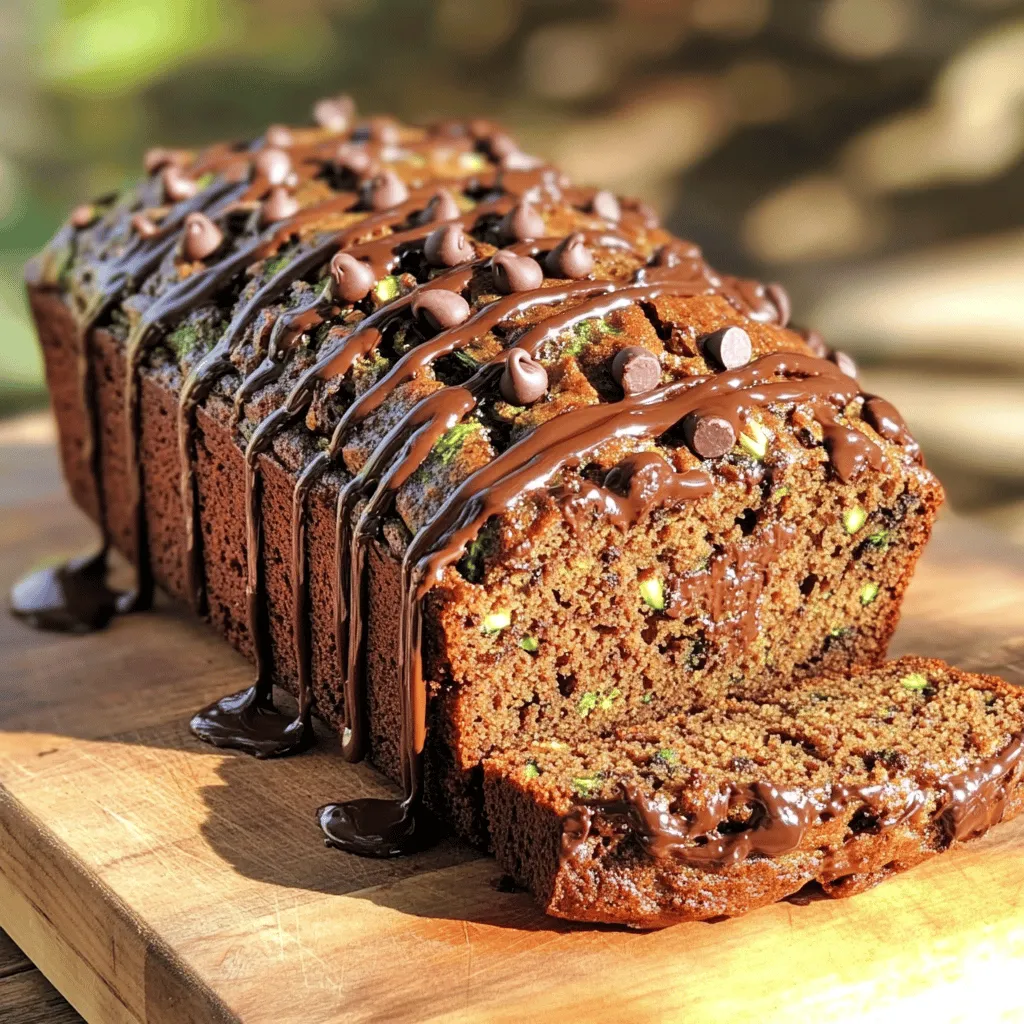
Rich Chocolate Chip Zucchini Bread Irresistible Recipe
Are you ready to elevate your baking game with a treat everyone will love? My Rich Chocolate Chip Zucchini Bread is a perfect blend of
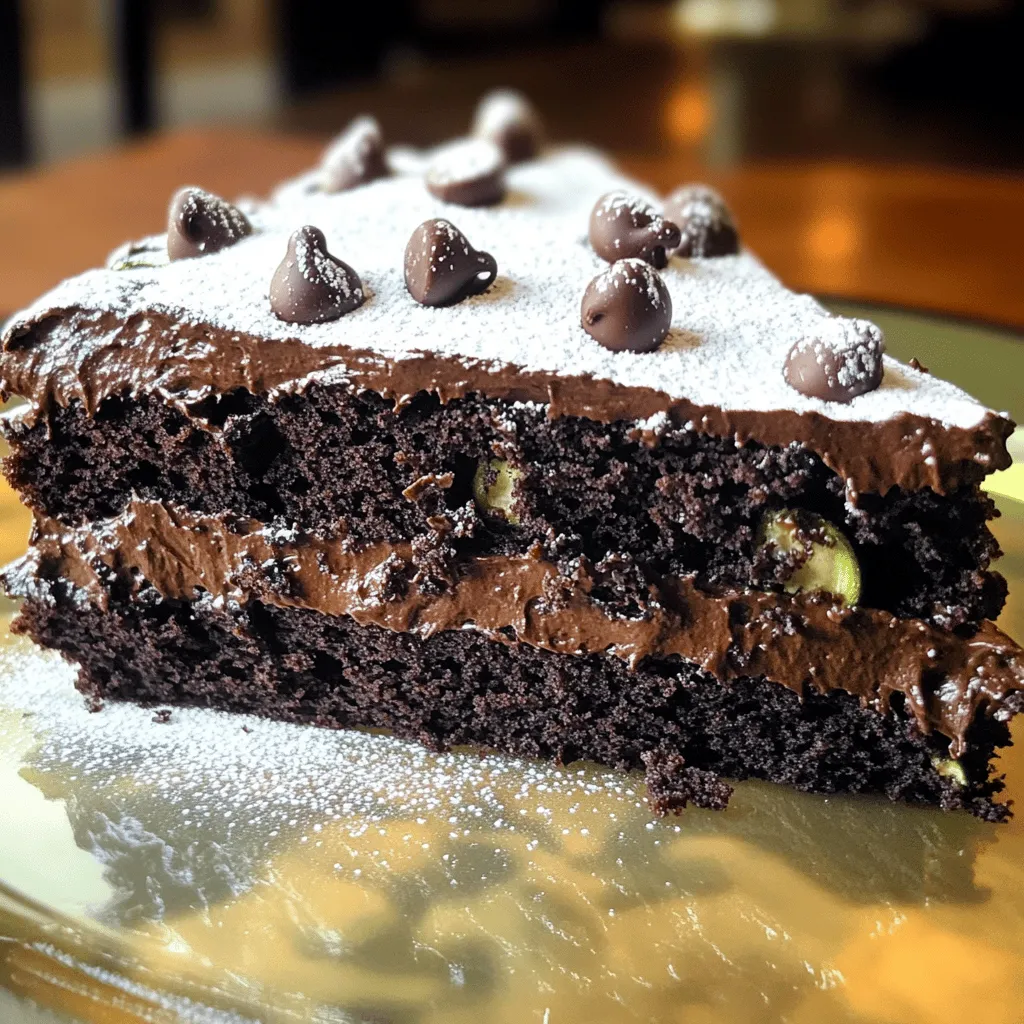
Death By Chocolate Zucchini Cake Decadent and Rich
Are you ready to indulge in a dessert that’s both rich and guilt-free? My Death By Chocolate Zucchini Cake is here to steal the show.
![Detailed Ingredients for Brownies - 1 cup unsalted butter - 2 cups granulated sugar - 4 large eggs - 1 tablespoon vanilla extract - 1 cup all-purpose flour - 1/2 cup unsweetened cocoa powder - 1/2 teaspoon salt - 2 cups semi-sweet chocolate chips Ingredients for Chocolate Mousse - 1 cup heavy cream - 2 tablespoons powdered sugar - 1 teaspoon vanilla extract (for mousse) Garnishing Ingredients - Dark chocolate shavings To make these layered chocolate mousse brownies, you need simple ingredients. Each one adds a unique flavor. The butter makes the brownies rich. The sugar gives them sweetness. Eggs help bind everything together. Vanilla adds a lovely touch. The flour and cocoa powder create the brownie base. For the mousse, heavy cream makes it light. Powdered sugar sweetens it up. The vanilla extract in the mousse gives it a nice flavor boost. Finally, dark chocolate shavings make a beautiful garnish. They add an extra chocolate kick. This combination makes every bite a delight. You can find the complete recipe [Full Recipe] here. First, set your oven to 350°F (175°C). This step ensures even baking. Grease a 9x13-inch baking pan with butter. You can also line it with parchment paper. Parchment helps the brownies come out easily. In a medium saucepan, melt the butter over low heat. After it melts, take it off the heat. Stir in the granulated sugar until it blends well. Next, add the eggs, one at a time. Mix well after each egg. Then, add in the vanilla extract. In another bowl, mix the flour, cocoa powder, and salt. Slowly fold the dry mix into the wet ingredients. Be gentle to keep the batter fluffy. Finally, fold in the chocolate chips for that gooey texture. Pour the batter into the prepared pan and spread it evenly. Now, bake your brownies for 20-25 minutes. Check if a toothpick comes out slightly moist but no wet batter remains. Once baked, let the brownies cool completely in the pan. This cooling step is key for a great mousse layer. While the brownies cool, prepare the mousse. In a medium bowl, beat the heavy cream with powdered sugar and vanilla extract. Beat until stiff peaks form. This step adds lightness to your mousse. Take half of the whipped cream and gently fold it into the melted chocolate. Make sure the chocolate is cool first. This helps mix the chocolate without losing air. Then, fold in the rest of the whipped cream. This creates a light, airy texture. Once your brownies are cooled, it's time to add the mousse. Spread a generous layer of chocolate mousse over the brownies. Use a spatula to smooth it out. Afterward, refrigerate the layered brownies for at least 2 hours. This allows the mousse to set and gives you that perfect slice. Refer to the Full Recipe for more details on the ingredients and steps. Ensuring Proper Mixing Mixing is key to great brownies. Start with melted butter and sugar. Stir well until smooth. Then, add eggs one at a time. This keeps the mix creamy. Fold in the dry ingredients gently. Over-mixing can make brownies tough. Aim for a smooth batter with some lumps of flour. Baking Time Adjustments Baking times can vary. Always check the brownies after 20 minutes. Insert a toothpick into the center. If it comes out with a few moist crumbs, they're done. If it has wet batter, they need more time. Let them cool in the pan for perfect texture. Tips for Light and Fluffy Mousse For a light mousse, start with cold cream. Beat it until stiff peaks form. Gently fold in melted chocolate. Don’t stir too hard; you want air in the mousse. This keeps it fluffy and light. Serving Temperature Recommendations Serve the mousse cold. After chilling, it firms up nicely. Cut the brownies into squares after they chill for two hours. The mousse layer will set well, making each bite a delight. Enjoy these treats chilled for the best taste! For the full recipe, check the details above. {{image_2}} Adding Flavored Extracts You can boost the taste of your brownies with flavored extracts. Try almond, mint, or orange. Add just a teaspoon for a nice twist. These flavors mix well with chocolate. They bring out a rich, bold taste. Incorporating Different Chocolate Types Switching chocolate types can change the whole dessert. Use milk chocolate for a sweeter brownie or dark chocolate for a richer flavor. You could even mix different types for depth. This adds a fun layer of taste in every bite. Gluten-Free Options Making gluten-free brownies is simple. Swap all-purpose flour with almond or coconut flour. The texture might change slightly, but the taste stays great. You can also use gluten-free baking mixes, which work well. Substituting Ingredients for Vegan Version To make these brownies vegan, replace eggs with flaxseed meal or applesauce. Use plant-based butter instead of regular butter. For the mousse, substitute heavy cream with coconut cream. This keeps the dessert creamy and delicious while being plant-friendly. For more details, check the Full Recipe to create your perfect layered chocolate mousse brownies! Refrigeration Guidelines Once your layered chocolate mousse brownies are made, store them in the fridge. Use an airtight container to keep them fresh. This helps maintain the rich texture of the mousse and the softness of the brownies. Make sure they are completely cooled before storing. They can stay fresh for up to a week in the fridge. Freezing Brownies and Mousse You can freeze these brownies for later enjoyment. First, cut them into squares. Wrap each piece in plastic wrap. Then, place them in a freezer-safe bag or container. This prevents freezer burn. They can last in the freezer for about three months. Thaw them in the fridge before serving. This keeps the mousse from becoming too soft. How Long Do Layered Chocolate Mousse Brownies Last? Layered chocolate mousse brownies last about 5 to 7 days in the fridge. If frozen, they last about three months. Always check for freshness before eating. Signs of Spoilage Look for changes in texture or smell. If the mousse looks watery or the brownies feel hard, it’s time to toss them. Foul odors or mold are also clear signs that they have gone bad. Enjoy them fresh for the best taste! Can I make these brownies ahead of time? Yes, you can make these brownies ahead of time. Bake them a day before. Once cooled, cover them tightly. This keeps them fresh. You can add mousse the next day. Just remember to refrigerate them until serving. What chocolate should I use for the mousse? Use semi-sweet chocolate for a balanced taste. It adds a rich flavor. Dark chocolate works too if you want it more intense. Make sure to melt the chocolate gently. This helps keep it smooth. How do I make the brownies fudgier? To make fudgier brownies, add an extra egg. You can also reduce the baking time. Check them a few minutes early. Less time means more moisture. Try using less flour as well for a denser texture. What if my brownies are too dry? If your brownies are dry, check your oven temperature. An oven that is too hot can dry them out. You can also add a bit of melted butter or cream. This will help bring back moisture. How to fix runny mousse? If your mousse is runny, make sure your cream is whipped stiff. You can beat it a bit longer. If it's still runny, chill it for a while. This gives it time to set. If needed, you can fold in more melted chocolate to thicken it. In this post, we covered how to make layered chocolate mousse brownies. We looked at the key ingredients, including those for garnishing. Then, I guided you step-by-step through baking the brownies and making the mousse. Tips helped you achieve the best texture and serving experiences. Lastly, I shared variations and storage tips. Enjoy making and sharing this dessert. It’s fun, delicious, and sure to impress!](https://tossedrecipes.com/wp-content/uploads/2025/07/9d5d1a04-9ce7-4e33-bacd-73e97e17c1f9.webp)
Layered Chocolate Mousse Brownies Delightful Treat
Indulging in dessert just got a whole lot sweeter with Layered Chocolate Mousse Brownies! These rich, fudgy brownies topped with smooth chocolate mousse are a
![- 1 cup grated zucchini (about 1 medium zucchini) - 1 cup granulated sugar - 1/2 cup unsalted butter, melted - 2 large eggs - 1 teaspoon vanilla extract - 1 tablespoon lemon zest (from about 1 lemon) - 1/4 cup fresh lemon juice - 1 1/2 cups all-purpose flour - 1 teaspoon baking powder - 1 teaspoon baking soda - 1/2 teaspoon salt - 1 teaspoon ground cinnamon - 1/2 cup chopped walnuts or pecans (optional) To make lemon zucchini bread, you need fresh ingredients. The zucchini adds moisture and texture. The lemon brings a bright and zesty flavor. Sugar adds sweetness, while butter keeps the bread rich and tender. Eggs bind everything together, creating a lovely crumb. You can add more flavors or textures to your bread. Consider using chocolate chips, dried fruit, or spices like nutmeg. If you need to avoid nuts, leave them out or swap them for seeds. You can also use coconut oil instead of butter for a dairy-free option. Gather these kitchen tools for baking: - A large mixing bowl - A whisk or electric mixer - A measuring cup and spoons - A grater for the zucchini - A 9x5-inch loaf pan - Parchment paper (optional for easy removal) Using the right tools helps ensure your bread bakes evenly. A sturdy loaf pan gives the best shape and texture. Be sure to preheat your oven before mixing. This helps your bread rise nicely. You can find the full recipe above to guide you through the process. To start, you need to prepare the zucchini. First, wash the zucchini well. Then, grate it using a box grater. Aim for about one cup of grated zucchini. After grating, place it in a clean kitchen towel and squeeze out excess water. This helps keep your bread from getting too soggy. When measuring and mixing, make sure you use the right tools. Level off your measuring cups when you scoop flour or sugar. This way, you get precise amounts. Use a whisk for dry ingredients to ensure they blend well. Now, let’s mix the batter. Begin by combining the wet ingredients. In a large bowl, add the grated zucchini and granulated sugar. Mix them well and let them sit for ten minutes to draw out moisture. After this, add the melted butter, eggs, vanilla extract, lemon zest, and lemon juice. Stir until everything is well combined. In a separate bowl, whisk together the dry ingredients: flour, baking powder, baking soda, salt, and cinnamon. Slowly add this mixture to the wet ingredients. Mix gently; stop as soon as you see no dry flour. Overmixing can lead to dense bread. If you choose to add nuts, fold them in carefully. Preheat your oven to 350°F (175°C). Grease and flour a 9x5-inch loaf pan well. Pour the batter into the pan and smooth the top with a spatula. Bake for 50-60 minutes. To check for doneness, insert a toothpick into the center. If it comes out clean, your bread is ready. After baking, let the bread cool in the pan for ten minutes. Then, transfer it to a wire rack to cool completely. This cooling step is key to achieving the right texture. Enjoy the lovely combination of zucchini and lemon flavors with every slice! For the full recipe, click here. To get the best texture, mix the wet and dry ingredients gently. Overmixing can make the bread tough. After you add the flour, fold it in slowly. If you want to add nuts, chop them finely. This way, they blend well into the batter. You can use walnuts or pecans for a nice crunch. Remember, you can skip nuts if you prefer a smooth texture. Lemon zucchini bread pairs well with tea or coffee. You can also serve it with fresh fruit. For a nice touch, dust the top with powdered sugar. A lemon wedge on the side adds a fresh look. If you want to impress, slice the bread thick and arrange it neatly on a platter. Let the bread cool completely before wrapping. This step keeps it fresh and moist. Use plastic wrap or a zip-top bag for storage. For the best flavor, keep it at room temperature. If you plan to store it longer, try freezing it. Slice the bread before freezing for easy serving later. Just thaw it in the fridge overnight when you're ready to enjoy it again. {{image_2}} You can easily add new flavors to lemon zucchini bread. Try using spices like nutmeg or ginger for warmth. You can also add herbs like rosemary for a fresh twist. If you want a sweeter bread, add chocolate chips or dried fruit. Each variation brings a unique taste and aroma to your loaf. Think about what you enjoy most when choosing flavors. If you want a healthier version, cut the sugar in half. You can also use honey or maple syrup instead of sugar. For a gluten-free option, use almond or coconut flour. If you follow a vegan diet, replace eggs with flaxseed meal or applesauce. These swaps keep the bread delicious while fitting your health goals. In summer, add fresh berries or peaches for a fruity kick. In fall, mix in pumpkin spice for a cozy flavor. You can also use citrus zest from oranges or limes for a bright taste. During the holidays, try adding cranberries or nuts for a festive touch. Seasonal changes can make this bread exciting all year long. For the full recipe, check the [Full Recipe]. To keep lemon zucchini bread fresh, store it at room temperature. Wrap the bread in plastic wrap or aluminum foil. This will keep it moist. You can also place it in an airtight container. If your kitchen is warm, store it in the fridge. This helps to prolong freshness. Just remember to bring it back to room temperature before serving to enjoy the best flavor. For long-term storage, freezing is your best option. Slice the bread before freezing. Wrap each slice tightly in plastic wrap and foil. Place the wrapped slices in a freezer bag. This way, you can grab one slice at a time. To thaw, simply take a slice out and let it sit at room temperature. You can also reheat it in the microwave for 10-15 seconds. This brings back its soft texture. Lemon zucchini bread stays fresh for about 3-4 days at room temperature. In the fridge, it lasts about a week. If you freeze it, the bread can last for up to 3 months. Signs of spoilage include mold or an off smell. Always check before you eat. For the best taste, enjoy the bread while it’s still fresh! If you want the full recipe, check out the earlier section. How can I tell when my lemon zucchini bread is fully baked? Check for doneness by inserting a toothpick into the center. If it comes out clean, your bread is ready. You can also look for golden-brown edges. The top should feel firm to the touch. Can I use frozen zucchini for this recipe? Yes, you can use frozen zucchini! Just thaw it first and drain any excess water. This will help keep your bread from being too soggy. What are the benefits of using lemon in baking? Lemon adds bright flavor to baked goods. It also helps to balance sweetness and enhance other flavors. Plus, the acidity can make your bread rise better, giving it a lighter texture. Can I substitute the eggs in this recipe? Yes! You can use applesauce or mashed banana as a substitute. Each egg replaces can add moisture and sweetness. Use 1/4 cup of either for each egg you replace. Is this recipe adaptable to mini loaf pans? Absolutely! If you use mini loaf pans, adjust the baking time. Bake for about 30-40 minutes. Keep an eye on them to avoid over-baking. How should I serve lemon zucchini bread? Slice it warm or at room temperature. It’s great on its own or with a spread. Try cream cheese or butter for extra flavor. Can I add toppings before baking? Yes, you can sprinkle nuts or sugar on top before baking. This adds a nice crunch and enhances the flavor. Just be sure they won’t burn during the baking time. For the full recipe, check out the complete instructions above! You learned about making delicious lemon zucchini bread. We explored key ingredients, optional add-ins, and essential tools. I shared step-by-step instructions to help you bake like a pro. Finally, we discussed storage tips and variations to enjoy all year. Baking is fun and can be simple. Experiment and make it your own! Happy baking!](https://tossedrecipes.com/wp-content/uploads/2025/07/0b524e0f-ddbd-4a11-90fd-d460c5cdd7e4.webp)
Lemon Zucchini Bread Delicious and Easy Recipe
Are you ready to enjoy a light and delicious treat? This Lemon Zucchini Bread is not only easy to make, but it’s also a crowd-pleaser.

Chocolate Zucchini Bread Deliciously Rich Delight
If you love a sweet treat that’s easy to make, then this Chocolate Zucchini Bread is for you! With a rich, chocolatey flavor and hidden
![- Grated zucchini - All-purpose flour - Whole wheat flour - Baking powder and baking soda For this recipe, using fresh grated zucchini gives the bread moisture and texture. I prefer a mix of all-purpose and whole wheat flour for a hearty base. The baking powder and baking soda help the bread rise and create a light crumb. - Granulated sugar - Brown sugar - Lemon zest and lemon juice - Vanilla extract The sweetness comes from a blend of granulated and brown sugar. Brown sugar adds a rich flavor. Lemon zest and juice provide a bright, zesty kick. Vanilla extract enhances all the flavors, making the bread taste even better. - Chopped walnuts - Variations on flavorings Chopped walnuts add a nice crunch. You can also try adding chocolate chips or dried fruits for variety. Mix and match to find your favorite flavors. For a twist, consider using spices like nutmeg or cardamom. If you want to learn more about the full recipe, check out the [Full Recipe]. First, you need to grate the zucchini. Use a box grater or food processor. It should be finely grated. Place the grated zucchini in a bowl and sprinkle it with a pinch of salt. Let it sit for about 10 minutes. This will help draw out the moisture. After 10 minutes, take the zucchini and squeeze it gently. This removes excess water. Set it aside. Next, grab a large bowl. Combine one cup of all-purpose flour and one cup of whole wheat flour. Add one teaspoon of baking powder and half a teaspoon of baking soda. Also, add half a teaspoon of salt and half a teaspoon of ground cinnamon. Mix these dry ingredients well to ensure they are evenly combined. In another bowl, whisk together half a cup of granulated sugar and half a cup of packed brown sugar. Add half a cup of vegetable oil and two large eggs. Now, mix in one tablespoon of lemon zest and two tablespoons of fresh lemon juice. You can also add one teaspoon of vanilla extract. Make sure everything is well mixed. Now, it’s time to combine the mixtures. Gradually add the dry ingredients into the wet mixture. Stir until just combined. Be careful not to overmix, as this can make the bread tough. Next, fold in the grated zucchini. If you want, you can also add half a cup of chopped walnuts for some crunch. Prepare your loaf pan by greasing it or lining it with parchment paper. Pour the batter into the pan and smooth the top with a spatula. Preheat your oven to 350°F (175°C). Bake the bread for 50 to 60 minutes. You will know it’s done when a toothpick inserted in the center comes out clean. Once baked, let the bread cool in the pan for about 10 minutes. Then, transfer it to a wire rack to cool completely. Enjoy your fresh lemon zucchini bread! For the complete recipe, check the Full Recipe section. To keep your lemon zucchini bread moist, start with your zucchini. Grate it finely and salt it lightly. This step helps draw out extra moisture. After about 10 minutes, squeeze the zucchini gently to remove excess liquid. This will prevent your bread from becoming soggy. Next, avoid overmixing your batter. When you combine the wet and dry ingredients, mix just until you see no dry flour. Overmixing can lead to a dense texture. Remember, a few lumps are okay! You can easily boost the flavor of your lemon zucchini bread. Try adding a pinch of nutmeg or ginger for warmth. A bit of fresh thyme can also add an interesting twist. If you want more citrus zing, consider using lime zest along with lemon zest. Another great touch is a glaze. A simple lemon glaze made from powdered sugar and lemon juice can add a sweet and tangy finish. Drizzle it over the cooled bread for a lovely shine. Serving your lemon zucchini bread can be fun! You can slice it warm or let it cool completely. Warm slices have a cozy feel, while cooled slices are perfect for afternoon tea. For a tasty topping, try spreading a little cream cheese on a slice. You can also serve it with honey or even lemon curd for extra flavor. Enjoy your delicious creation! {{image_2}} You can easily make this bread gluten-free. Use a blend of gluten-free flours. Some good choices are: - Almond flour - Coconut flour - Gluten-free all-purpose flour These flours add great texture. Be sure to check the blend has xanthan gum. This helps the bread rise and hold together well. If you want a vegan version, it’s simple to swap some ingredients. For eggs, use: - 1/4 cup unsweetened applesauce per egg - 1 tablespoon ground flaxseed mixed with 2.5 tablespoons water per egg For dairy, substitute vegetable oil for butter. Use almond milk or coconut milk instead of regular milk. These swaps keep the bread moist and tasty. Want to mix things up? You can add extra flavors to your bread. Here are a few ideas: - Adding chocolate chips: Stir in 1/2 cup of chocolate chips for a sweet twist. - Incorporating different nuts or fruits: Try adding chopped pecans, hazelnuts, or dried cranberries. These add crunch and flavor. Feel free to experiment! Each variation makes the bread unique and fun. Check out the Full Recipe to get started on this delicious adventure. To keep your lemon zucchini bread fresh, store it at room temperature. Wrap it tightly in plastic wrap or place it in an airtight container. This helps prevent it from drying out. It’s best to eat it within three days for optimal taste. If you want to keep it longer, refrigeration is an option. However, this can change the texture. If you store it in the fridge, place it in a sealed container. It should last up to a week. You can freeze baked lemon zucchini bread for later. First, let the bread cool completely after baking. Then, wrap it tightly in plastic wrap. You can also use aluminum foil for extra protection. Place the wrapped bread in a freezer-safe bag. This helps keep out air and moisture. It can last up to three months in the freezer. When you’re ready to enjoy it, thaw the bread slowly. The best way is to place it in the fridge overnight. If you need it fast, you can leave it at room temperature for a few hours. Once thawed, you can warm it in the oven for a few minutes. This will help restore its fresh-baked feel. Lemon zucchini bread stays fresh for about three days at room temperature. Store it in an airtight container. If you keep it in the fridge, it can last up to a week. Just ensure it’s well-covered to keep it moist. Yes, you can use frozen zucchini. Thaw it and squeeze out excess water before mixing. Fresh zucchini adds a nice texture, but frozen works well too. Just remember that frozen zucchini might have a softer texture. For a vegan version, use mashed bananas or unsweetened applesauce. Each banana replaces one egg, while 1/4 cup of applesauce can replace one egg. This keeps the bread moist and adds a hint of sweetness. Dense zucchini bread can come from overmixing the batter. Mix just until the ingredients combine. Also, if you use too much zucchini or don’t squeeze out enough water, this can lead to density issues. To make this bread gluten-free, use a gluten-free flour blend. Look for blends that contain xanthan gum, which helps mimic the texture of regular flour. Adjust baking times as needed, as gluten-free flours can behave differently. Lemon zucchini bread combines fresh flavors and textures in one delightful loaf. You learned the key ingredients, step-by-step instructions, and several tips for success. Remember, preparing the zucchini well is crucial for moisture. Feel free to experiment with flavors and add-ins for a personal touch. Storing leftovers properly ensures you enjoy this tasty bread longer. Whether vegan, gluten-free, or classic, you can create a version that suits your taste. Happy baking!](https://tossedrecipes.com/wp-content/uploads/2025/07/26c6eddc-ffcc-44f8-8c5d-225cb36e54f6.webp)
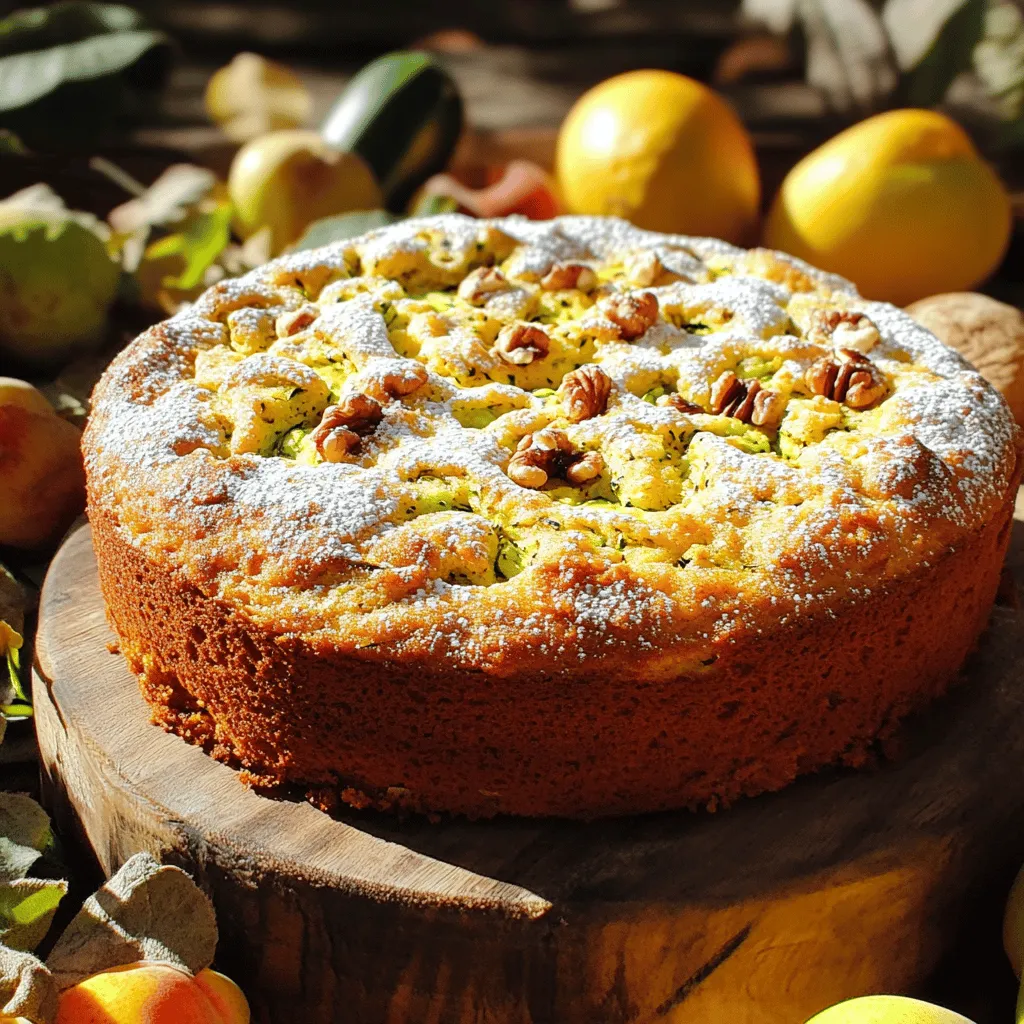
Lemon Zucchini Bread Fresh and Simple Recipe
Are you ready to bring a burst of flavor to your kitchen? This Lemon Zucchini Bread recipe is fresh and simple, perfect for any occasion.
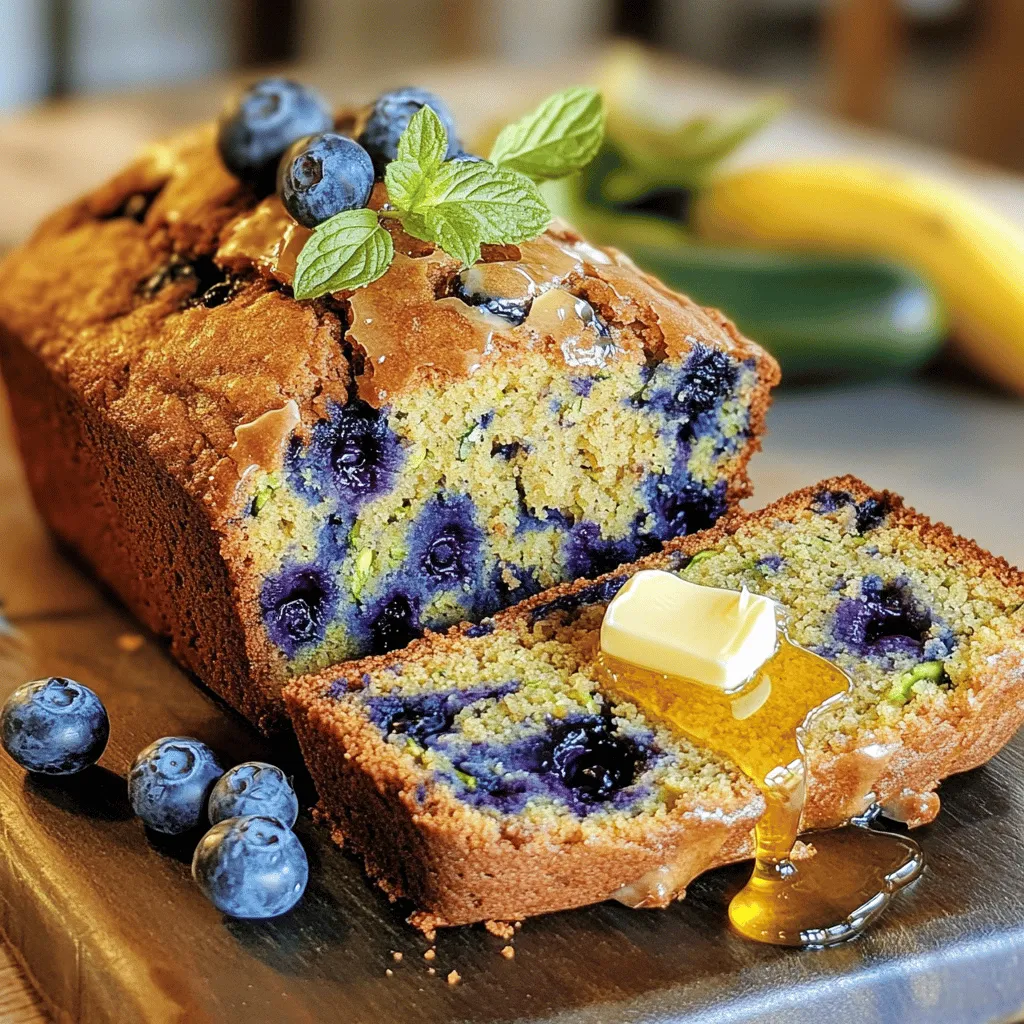
Blueberry Banana Zucchini Bread Simple and Delicious
Craving a delicious treat that feels indulgent yet healthy? You’re in for a treat with my Blueberry Banana Zucchini Bread! This simple recipe combines fresh
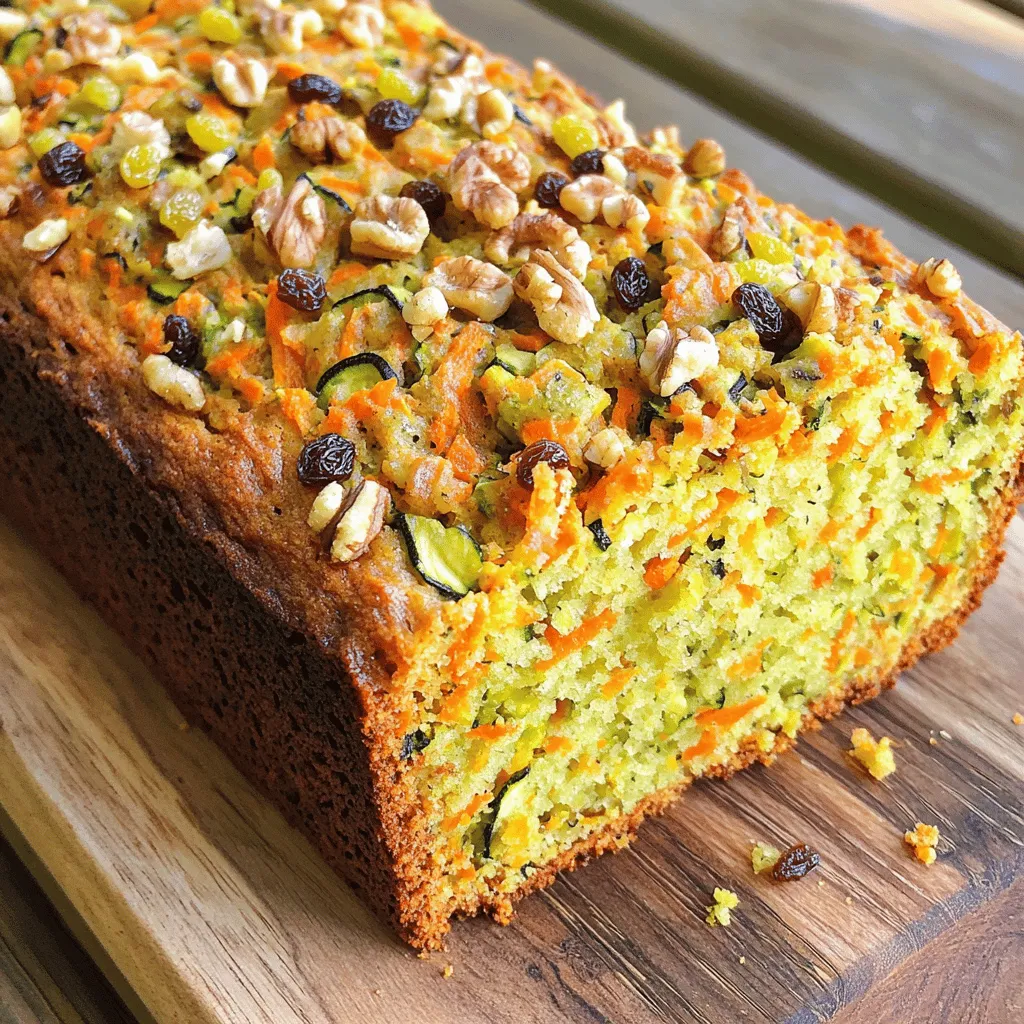
Carrot Zucchini Bread Tasty and Healthy Treat Recipe
Looking for a tasty and healthy treat? This Carrot Zucchini Bread recipe packs in flavor while keeping your wellness goals in mind. You’ll enjoy every
Zucchini Picnic Cake Tasty and Easy Summer Recipe
Looking for a simple summer treat that’s both tasty and a little sneaky? Try my Zucchini Picnic Cake! This cake is moist, sweet, and packed

Peach Bread Pudding Delightful and Easy Dessert Recipe
If you’re seeking a dessert that’s both easy and delicious, you’ve found it! Peach bread pudding combines sweet peaches with soft, buttery bread for a