Desserts
![- 1 cup all-purpose flour - 1 teaspoon baking powder - 1/2 teaspoon baking soda - 1/4 teaspoon salt In this cake, we start with the dry ingredients. I use all-purpose flour as the base. Baking powder and baking soda help the cake rise. A little salt enhances the flavor. - 1 cup Greek yogurt (plain or vanilla) - 1/2 cup granulated sugar - 1/4 cup honey - 2 large eggs - 1 teaspoon vanilla extract Next, we move to the wet ingredients. Greek yogurt gives the cake moisture and a nice tang. I mix in granulated sugar and honey for sweetness. Eggs bind the cake together, while vanilla adds a warm flavor. - 1 cup fresh peaches, diced - 1/2 cup fresh blueberries - Zest of 1 lemon - 2 tablespoons lemon juice Finally, we add the fruit. Fresh peaches and blueberries add bursts of flavor. Lemon zest and juice brighten the cake up. This combo makes every bite special. For the full recipe, check out the complete instructions. - Preheat your oven to 350°F (175°C). - Grease and flour a 9-inch round cake pan. This step helps the cake release easily. - In a medium bowl, measure 1 cup of all-purpose flour. - Add 1 teaspoon of baking powder, 1/2 teaspoon of baking soda, and 1/4 teaspoon of salt. - Whisk these dry ingredients together until mixed well. Set this bowl aside. - In a large mixing bowl, combine 1 cup of Greek yogurt with 1/2 cup of granulated sugar. - Add 1/4 cup of honey, 2 large eggs, and 1 teaspoon of vanilla extract. - Mix these wet ingredients until they are smooth and well-combined. This mixture gives the cake its moist texture. - Gradually add the dry ingredients to the wet mixture. Stir gently until just combined. Be careful not to overmix, as this can make the cake tough. - Gently fold in 1 cup of diced fresh peaches, 1/2 cup of fresh blueberries, the zest of 1 lemon, and 2 tablespoons of lemon juice. This adds flavor and fun colors to the cake. - Pour the batter into the prepared cake pan. Smooth the top with a spatula. - Bake in the preheated oven for 30-35 minutes. Check for doneness by inserting a toothpick in the center. If it comes out clean, the cake is ready. - Allow the cake to cool in the pan for 10 minutes. Then transfer it to a wire rack to cool completely. For the complete recipe, check out the [Full Recipe]. Enjoy your baking! - Avoid overmixing the batter. This can make the cake tough. Mix just until you see no dry flour. - Check for doneness with a toothpick. Insert it in the center. If it comes out clean, the cake is ready. - Dust the top of the cooled cake with powdered sugar. This adds a lovely finish and makes it look special. - Garnish with fresh fruit. Use extra blueberries and peach slices. This brightens the cake and makes it more inviting. - Preparing batter in advance is easy. You can mix the batter a day before. Just keep it in the fridge. Bake it fresh when you’re ready to serve. This saves time and keeps it tasty. I hope these tips help you create the perfect Peach and Blueberry Greek Yogurt Cake! For the complete recipe, check out the Full Recipe. {{image_2}} You can switch out the peaches and blueberries for other fruits. Try using strawberries or raspberries. They will add a different taste and color. Stone fruits like cherries or plums work well too. Just make sure to chop them small so they mix well into the batter. Each fruit brings a unique flavor to the cake, making it fun to experiment. Want to spice things up? Add a pinch of cinnamon or nutmeg to your batter. These spices give the cake a warm, cozy flavor. You can also try a splash of almond extract for a nutty note. Don’t be afraid to play with flavors. A hint of ginger can add a nice twist, too. Remember, a little goes a long way! If you need a gluten-free cake, you can easily substitute the flour. Use almond flour or a gluten-free blend instead. These options keep the cake moist and tasty. Just watch the baking time, as gluten-free flours can change the texture a bit. Always check the cake with a toothpick to ensure it’s done. You will love how light and airy this cake can be! For the full recipe, follow the steps I shared, and enjoy your baking adventure! To store leftovers of your Peach and Blueberry Greek Yogurt Cake, wrap it tightly with plastic wrap. You can also use an airtight container. This keeps the cake fresh and moist. Store it in the fridge for up to five days. If you notice it getting dry, a slice of bread in the container can help. The bread will absorb moisture, keeping the cake soft. If you want to save some for later, freezing is a great option. First, let the cake cool completely. Then, slice it into pieces. Wrap each slice in plastic wrap. After that, place the wrapped slices in a freezer bag. Squeeze out as much air as possible before sealing. To thaw, take out a slice and leave it at room temperature for about an hour. You can also warm it in the microwave for about 10-15 seconds. When stored properly, the cake lasts about five days in the fridge. If frozen, it can stay fresh for up to three months. However, for the best taste and texture, enjoy it within one month. Over time, the flavor may fade, but it will still be safe to eat. Whether fresh or frozen, this cake is a delightful treat to share! Yes, you can use frozen fruits. They are easy to find and great for baking. Frozen fruits can be less sweet than fresh. They also have more moisture, which may change the cake's texture. If you use frozen blueberries or peaches, let them thaw first. Pat them dry to remove extra moisture. This will help keep your cake from becoming soggy. Yes, you can make this cake dairy-free. Use coconut yogurt or almond yogurt instead of Greek yogurt. For eggs, you can use flaxseed meal or a store-bought egg replacer. Substitute honey with maple syrup or agave syrup for sweetness. These swaps will keep your cake tasty and moist while being dairy-free. This cake pairs well with various options. You can serve it with whipped coconut cream for a light touch. A scoop of vanilla ice cream also adds a rich flavor. Fresh mint leaves can brighten the dish. You can also drizzle a bit of honey on top for extra sweetness. For a fun twist, serve with a fruit salad on the side. Enjoy your cake with a cup of tea or coffee for a cozy snack. Check out the Full Recipe for more ideas! In this article, we explored making a delicious Peach and Blueberry Greek Yogurt Cake. You learned about the right dry and wet ingredients, the best fruit add-ins, and the step-by-step instructions for baking. We discussed tips to avoid common mistakes and how to present your cake beautifully. Don't forget the fun variations, storage info, and answers to FAQs. This cake is easy to make and great to share. Enjoy the taste and the smiles it brings. Dive in and get baking today!](https://tossedrecipes.com/wp-content/uploads/2025/06/c2a63252-3547-4ec3-9b52-5a5cc3783d05.webp)
Peach and Blueberry Greek Yogurt Cake Delightful Treat
Are you ready to bake a cake that is both delicious and healthy? This Peach and Blueberry Greek Yogurt Cake is a delightful treat bursting
![To make the best chocolate zucchini bread, you will need these ingredients: - 1 cup grated zucchini - 1 cup all-purpose flour - 1/2 cup unsweetened cocoa powder - 1/2 teaspoon baking powder - 1/2 teaspoon baking soda - 1/2 teaspoon salt - 1/2 cup granulated sugar - 1/2 cup brown sugar - 1/2 cup vegetable oil - 2 large eggs - 1 teaspoon vanilla extract - 1/2 cup chocolate chips (optional) - 1/4 cup chopped walnuts (optional) Each ingredient plays a key role in the final outcome. The grated zucchini adds moisture and texture. Using both granulated and brown sugar gives a nice balance of sweetness. Cocoa powder brings that rich chocolate flavor. The oil keeps the bread tender and moist, while eggs provide structure. Feel free to add chocolate chips for extra chocolatey goodness or walnuts for some crunch. This recipe is flexible, so you can mix and match according to your taste. Check out the Full Recipe for detailed instructions on how to create this delicious treat! - Preheat your oven to 350°F (175°C). Grease a 9x5-inch loaf pan or line it with parchment. - In a medium bowl, combine 1 cup of grated zucchini, 1/2 cup of vegetable oil, 1/2 cup of granulated sugar, 1/2 cup of brown sugar, 2 large eggs, and 1 teaspoon of vanilla extract. Mix well with a whisk. - In a separate large bowl, whisk together 1 cup of all-purpose flour, 1/2 cup of unsweetened cocoa powder, 1/2 teaspoon of baking powder, 1/2 teaspoon of baking soda, and 1/2 teaspoon of salt. - Slowly pour the wet mixture into the dry ingredients. Use a spatula to fold until just combined. Don’t overmix; a few flour streaks are okay. - Gently fold in 1/2 cup of chocolate chips and 1/4 cup of chopped walnuts, if you like. - Pour the batter into the prepared loaf pan. Smooth the top with a spatula. - Bake for 50-60 minutes. Check if a toothpick inserted in the center comes out clean or with a few moist crumbs. - After baking, let the zucchini bread cool in the pan for 10 minutes. Then transfer it to a wire rack to cool completely. For the complete recipe, check the [Full Recipe]. - Alternatives for all-purpose flour: You can use whole wheat flour. This adds fiber and nutrients. Almond flour is another option. It gives a nutty flavor and a moist texture. - Healthier sweetener options: Try using honey or maple syrup instead of sugar. These add sweetness and flavor. You can also use coconut sugar for a lower glycemic index. - Using dark chocolate instead of cocoa: Dark chocolate gives a richer taste. Melt it and mix it in with the wet ingredients. This adds depth and makes the bread even more decadent. - Avoiding overmixing the batter: Mix just enough to blend. Overmixing can make the bread tough. A few flour streaks are okay. - Importance of squeezing excess water from zucchini: Zucchini holds a lot of water. Squeeze it out with a clean cloth. This prevents a soggy bread and maintains the right texture. - Checking doneness with a toothpick: Insert a toothpick into the center of the bread. If it comes out clean or with a few moist crumbs, it's ready. This step is key to avoid underbaking. {{image_2}} You can change the taste of chocolate zucchini bread in fun ways. Adding spices like cinnamon or nutmeg brings warmth and depth. A pinch of cinnamon can make the bread feel cozy. Nutmeg adds a nice twist too. You can also use different nuts or seeds to add crunch. Chopped pecans, almonds, or sunflower seeds work great. They give a nice texture and flavor. Mixing in different types of chocolate is another exciting option. You can use white, milk, or dark chocolate. Each type gives a unique taste! If you need a gluten-free version, you can use almond flour or a gluten-free blend. This keeps the bread moist and delicious. For those who want vegan options, swap the eggs for flax eggs. Just mix one tablespoon of ground flaxseed with three tablespoons of water. Let it sit until it thickens. You can also make a reduced sugar version. Use applesauce or mashed bananas instead of some sugar. This keeps the bread sweet but healthier. You can enjoy the chocolate zucchini bread in many ways! For the full recipe, check the section above. To keep your chocolate zucchini bread fresh, store it properly: - Room temperature storage tips: Place the bread in an airtight container. Keep it in a cool, dry spot. This works well for up to three days. If it's warm, let it cool first to avoid moisture buildup. - Refrigeration options: If you want it to last longer, place it in the fridge. Wrap the bread tightly in plastic wrap or foil. This can keep it fresh for about a week. Just remember, it may become a bit dry. - Freezing for long-term storage: For even longer storage, freeze the bread. Slice it first for easy thawing. Wrap each slice in plastic, then place in a freezer bag. It can last for up to three months in the freezer. If your bread gets a bit stale, here’s how to bring it back to life: - Simple methods for reheating: To reheat, slice the bread and warm it in the microwave for 10-15 seconds. You can also toast it in a pan for a few minutes. This adds a nice crunch. - Reviving moisture in dried out bread: If the bread is dry, try wrapping it in a damp paper towel. Microwave it for about 15-20 seconds. This will help add some moisture back. Enjoy your delicious chocolate zucchini bread again! Yes, you can use frozen zucchini. Just thaw it first. After thawing, drain any extra water. This helps keep the bread from getting too wet. You want the zucchini to stay moist but not soggy. Chocolate zucchini bread lasts about 3 to 4 days at room temperature. Store it in an airtight container. You can tell it's spoiled if it has a strange smell or mold. To extend freshness, keep it in the fridge for up to a week. You can make this recipe without eggs. Use 1/4 cup of applesauce or mashed banana for each egg. This keeps the bread moist and adds some sweetness. However, the texture might change slightly. It may be a bit denser but still delicious. This blog covered everything you need for delicious chocolate zucchini bread. We looked at key ingredients, step-by-step baking, and handy tips. You can also explore fun variations and smart storage methods. Remember, baking is about joy and creativity. Enjoy making this treat your own with extra flavors or healthy swaps. Whether for sharing or a quiet night in, this recipe is a winner! Dive in, have fun, and savor every bite!](https://tossedrecipes.com/wp-content/uploads/2025/06/e9beb55b-2b17-4731-9e22-f9ae50c7a581.webp)
Chocolate Zucchini Bread Simple and Delicious Recipe
Looking for a tasty treat that’s easy to make? Try my Chocolate Zucchini Bread! This recipe mixes chocolatey goodness with healthy zucchini for a delightfully

Lemon Zucchini Bread Fresh and Flavorful Recipe
Looking for a bright twist on classic zucchini bread? My Lemon Zucchini Bread recipe pairs fresh zucchini and sunny lemon for a delightful bake that’s
![- 1 cup grated carrots - 1 cup grated zucchini (excess moisture squeezed out) - 1 cup peeled and grated apple (such as Granny Smith) These fresh ingredients give the bread its vibrant flavor and moist texture. The carrots add sweetness, while zucchini brings a subtle earthiness. The grated apple adds a refreshing note. Together, they create a delightful blend. - 1/2 cup brown sugar - 1/2 cup granulated sugar - 1/3 cup vegetable oil The brown sugar adds a deep caramel flavor. Granulated sugar balances the sweetness. Vegetable oil keeps the bread tender and moist. This mix of sweeteners ensures a perfectly sweet bite. - 1 1/2 cups all-purpose flour - 1 teaspoon baking powder - 1 teaspoon baking soda - 1 teaspoon ground cinnamon - 1/2 teaspoon ground nutmeg - 1/4 teaspoon salt All-purpose flour gives structure to the bread. Baking powder and baking soda help it rise. Ground cinnamon and nutmeg add warmth and spice. A touch of salt brings out the flavors. Together, these ingredients create a balanced and flavorful loaf. For the full recipe, check out the Full Recipe section. First, preheat your oven to 350°F (175°C). This step is key for the bread to bake evenly. While the oven heats, prepare your loaf pan. You can grease a 9x5 inch pan or line it with parchment paper. Either method works well to prevent sticking. In a large bowl, combine the grated carrots, zucchini, and apple. Make sure they are well mixed. In another bowl, blend the brown sugar, granulated sugar, vegetable oil, eggs, and vanilla extract. Stir until the mixture is smooth and creamy. This forms the base of your batter. Next, whisk together the dry ingredients. In a separate bowl, mix the flour, baking powder, baking soda, cinnamon, nutmeg, and salt. Gradually add this dry mix to your wet ingredients. Stir gently until just combined; avoid overmixing. Now, fold in the grated fruits and vegetables. If you like, add chopped nuts or dried fruit for extra texture. Pour the batter into your prepared loaf pan. Spread it evenly across the pan. Bake for 55 to 60 minutes. To check for doneness, insert a toothpick into the center. It should come out clean. Once baked, let the bread cool in the pan for 10 minutes. Then, transfer it to a wire rack to cool completely. Enjoy your delicious Carrot Apple Zucchini Bread! For the full recipe, check the details above. To make your carrot apple zucchini bread great, avoid overmixing. This helps keep the bread light and fluffy. Mix just until you see the dry ingredients disappear. Another key step is to squeeze out excess moisture from the zucchini. Too much water can make the bread dense. Use a clean kitchen towel to wring out the zucchini before adding it to the mix. For a special touch, serve your bread warm with a pat of butter or a layer of cream cheese. Both add creaminess and flavor that pairs well with the spices. You can also dust the top with powdered sugar for a lovely presentation. It makes the bread look fancy and taste even better. One common mistake is using the wrong oven temperature. Make sure your oven is at 350°F (175°C) before baking. If it's too hot, the bread can burn on the outside and stay raw inside. Another mistake is not greasing the pan properly. This can cause the bread to stick, making it hard to remove. Use non-stick spray or grease it with butter or oil to ensure easy release. {{image_2}} You can make this bread even healthier. Try using whole wheat flour instead of all-purpose flour. This change adds fiber and nutrients. You can also swap the sugars. Use honey or maple syrup for a natural sweetness. Both options can make the bread moist and tasty. Want to spice things up? Add ground ginger or cloves to the batter. These spices give the bread a warm flavor and make it unique. Another fun twist is adding citrus zest. Grate some lemon or orange peel into the mix. This will brighten the taste and add a fresh kick. If you have dietary needs, there are great options. To make the bread nut-free, leave out the walnuts or pecans. For gluten-free bread, use a gluten-free flour blend. You can also make it vegan. Replace eggs with flaxseed meal or applesauce. Use a plant-based milk instead of dairy. These swaps keep the bread delicious for everyone. For the full recipe, check out the [Full Recipe]. To keep your Carrot Apple Zucchini Bread fresh, wrap it tightly in plastic wrap. Store it at room temperature in a cool, dry place. A bread box works well for this purpose. You can also use an airtight container for added protection. This method helps keep the bread moist and flavorful for days. If you want to save some bread for later, freezing is a great option. First, slice the bread into pieces. Wrap each slice in plastic wrap, then place them in a freezer bag. Remove as much air as possible before sealing. For thawing, take out a slice and let it sit at room temperature for about 30 minutes. You can also warm it in the toaster for a quick treat. This bread stays fresh for about 4 to 5 days at room temperature. If you freeze it, it can last up to 3 months. Always check for signs of spoilage before eating. Look for mold or an off smell. If it seems dry or hard, it's time to toss it. Enjoy your baking! For the full recipe, check out the details in the earlier sections. Yes, you can use other fruits or veggies. Try using pears instead of apples. They add sweetness and moisture. You can also swap zucchini with shredded yellow squash. Both work well in this bread. Just remember to squeeze out the moisture. To check if the bread is done, look for a golden-brown crust. Gently press the top. If it springs back, it's ready. You can also check with a toothpick. Insert it into the center. If it comes out clean, your bread is done. If not, bake a few more minutes. For clean slices, use a sharp knife. Let the bread cool completely before slicing. This helps prevent squishing. Start at one end and cut straight down. Aim for even thickness to keep slices nice. Yes, you can prepare this bread ahead of time. You can mix the dry and wet ingredients separately. Store them in the fridge for a day. When you're ready, combine and bake. This makes a great gift too! Wrap it in foil or a pretty bag. This blog post covers all you need to know for baking a delicious loaf. You learned about key ingredients, like carrots, zucchini, and apples, along with the right sugars and spices. I shared step-by-step instructions to help you mix and bake with ease. Remember my tips to perfect the texture and avoid common mistakes. Consider exciting variations like whole wheat or citrus zest to personalize your loaf. With these insights, you’re ready to create a tasty treat that your friends and family will love. Enjoy your baking adventure!](https://tossedrecipes.com/wp-content/uploads/2025/06/0a0df910-4277-4cb9-987c-bd31c4a7d3c7.webp)
Carrot Apple Zucchini Bread Fresh and Flavorful Recipe
Craving a sweet, moist treat? You’ve found it! This Carrot Apple Zucchini Bread combines fresh veggies and fruity goodness for a delightful bite. With simple

Easy Peach Crumbles Deliciously Simple Dessert Recipe
Are you ready to satisfy your sweet tooth with an Easy Peach Crumble? This simple dessert recipe makes use of ripe peaches for the best
![- 4 cups fresh peaches, peeled and sliced - 1 cup granulated sugar, divided - 1 teaspoon cinnamon - 1 tablespoon lemon juice - 1 cup all-purpose flour - 1 tablespoon baking powder - 1/2 teaspoon salt - 1 cup milk - 1/2 cup unsalted butter, melted - 1 teaspoon vanilla extract - Optional: whipped cream or vanilla ice cream for serving To make the best peach cobbler, you need fresh peaches. I recommend using ripe, juicy ones for the best flavor. The sugar helps sweeten the peaches and adds a nice caramelized touch when baked. Cinnamon brings warmth, while lemon juice adds a bright note that enhances the peaches’ natural taste. The flour and baking powder create a light and fluffy batter. The milk makes the batter smooth, and melting the butter adds richness. Vanilla extract rounds out the flavors nicely. You can serve the cobbler warm with whipped cream or vanilla ice cream for a delightful treat. Follow the [Full Recipe] for detailed steps, and enjoy this simple yet delicious dessert! Start by preheating your oven to 350°F (175°C). This ensures that your cobbler bakes evenly. In a bowl, mix the sliced peaches with 1/2 cup of sugar, cinnamon, and lemon juice. Toss gently to coat the peaches well. Set this mixture aside. The lemon juice brightens the peach flavor. In another bowl, combine the flour, baking powder, salt, and the remaining 1/2 cup of sugar. Mix these dry ingredients well. Then, stir in the milk, melted butter, and vanilla extract. Stir until just combined, but don’t overmix. The batter should be a bit lumpy, which is perfect for a fluffy texture. Pour the batter into a greased 9x13 inch baking dish. Next, spoon the peach mixture evenly over the batter. Do not stir it together; the batter will rise as it bakes. Bake for about 45-50 minutes. The top should turn golden brown, and a toothpick should come out clean from the center. After baking, remove the cobbler from the oven. Let it cool for at least 10 minutes before serving. This cooling time helps it set up nicely. Enjoy your Peach Cobbler Delight! For the full recipe, check out the Delicious Peach Cobbler Recipe! To make great peach cobbler, choose ripe peaches. Look for peaches that feel soft but not mushy. The skin should have a nice golden hue. If your peaches are firm, let them ripen in a bowl at room temperature. This can take a day or two. Fresh peaches add flavor and sweetness to your dish. You can also mix in some ripe nectarines for variety. For a nice texture, don’t over-mix the batter. Mix just until combined; lumps are okay! Use a greased 9x13 inch baking dish. This helps the batter rise and form a golden crust. Bake at 350°F (175°C) until the top is golden brown. A toothpick should come out clean when done. Let it cool for about 10 minutes before serving. This helps set the filling and makes it easier to serve. Presentation is key! Serve your peach cobbler warm. Add a scoop of vanilla ice cream on top for a creamy touch. A drizzle of cinnamon adds extra flavor and looks great. If you like, you can also add whipped cream for a fun twist. The warm, sweet peaches with cold ice cream create a delightful contrast. Enjoy every bite! {{image_2}} To make a gluten-free peach cobbler, swap all-purpose flour for a gluten-free blend. You can find many blends at stores. Make sure the blend contains xanthan gum for the right texture. The rest of the recipe stays the same. This way, everyone can enjoy this classic dessert. For a vegan version, replace milk with almond or oat milk. Use melted coconut oil instead of butter. Most sugar is vegan, but check labels to be sure. This keeps the cobbler light and tasty without using animal products. You can add more flavor to your peach cobbler by trying different spices. Nutmeg and ginger work great. Just a pinch can bring a warm, cozy taste. Mix these spices with the cinnamon for a delightful twist. Experiment to find your perfect blend. If you want to try these variations, check out the Full Recipe for the main steps. Each option makes this dessert even more fun to enjoy! After you enjoy your peach cobbler, store leftovers in an airtight container. This keeps it fresh. Place it in the fridge if you plan to eat it soon. It will last about 3-4 days. If you want it to stay good longer, freezing is a great option. To reheat, use an oven for the best results. Preheat your oven to 350°F (175°C). Place the cobbler in an oven-safe dish. Cover it with foil to prevent burning. Heat for about 15-20 minutes. If you want a softer texture, add a splash of water. You can also use a microwave. Heat in 30-second intervals until warm. Freezing peach cobbler is easy. First, let it cool completely. Cut it into squares for easy serving. Wrap each piece tightly in plastic wrap. Then, place them in a freezer bag. Label the bag with the date, so you remember when you froze it. It can last up to three months in the freezer. When you're ready to eat, thaw it in the fridge overnight before reheating. Enjoy your peach cobbler delight anytime! You will know the peach cobbler is done when the top turns golden brown. Insert a toothpick in the center. If it comes out clean, it is ready. The edges should be bubbly and slightly crispy. This takes about 45-50 minutes at 350°F (175°C). Yes, you can use canned peaches instead of fresh ones. Drain the peaches well to remove excess juice. Canned peaches are sweeter, so reduce the sugar a bit. Fresh peaches give a better texture, but canned peaches work in a pinch. If you need a substitute for milk, try almond milk, oat milk, or soy milk. These options work well and keep the batter moist. You can also use yogurt or sour cream for a richer taste. Just ensure the substitute is plain and unsweetened. To avoid a soggy bottom crust, follow these tips: - Preheat the oven before baking. - Avoid overloading the peach mixture with juice. - Pour the batter into a hot dish; this helps it rise. - Bake until the top is golden, not just the center. - Underbaking: Always check with a toothpick. If it's wet, bake longer. - Too much liquid: Drain fruits well. Use a slotted spoon if needed. - Batter too thick: If the batter is too thick, add a little more milk. - Not enough flavor: Taste the peach mixture. Add more sugar or lemon juice if needed. These tips help you create a perfect peach cobbler every time! Check out the Full Recipe for all the details. This blog post covered how to make a delicious peach cobbler. We went through the key ingredients and step-by-step instructions, ensuring you get the best results. I shared tips for perfect peaches and baking. We also explored fun variations like gluten-free and vegan options. Lastly, I provided storage advice and answered common questions. Now you can create your own peach cobbler at home. Enjoy sharing this sweet treat with friends and family!](https://tossedrecipes.com/wp-content/uploads/2025/06/aa29e1de-591e-4450-98bb-1598e0fe4539.webp)
Peach Cobbler Delight Simple and Flavorful Recipe
Peach cobbler is a classic dessert that brings joy to any table. I am excited to share this simple and flavorful recipe that uses fresh

Peach Cobbler Ice Cream Delightful Summer Treat
Get ready to savor summer with homemade Peach Cobbler Ice Cream! This delightful treat combines the sweetness of ripe peaches, rich cream, and a hint
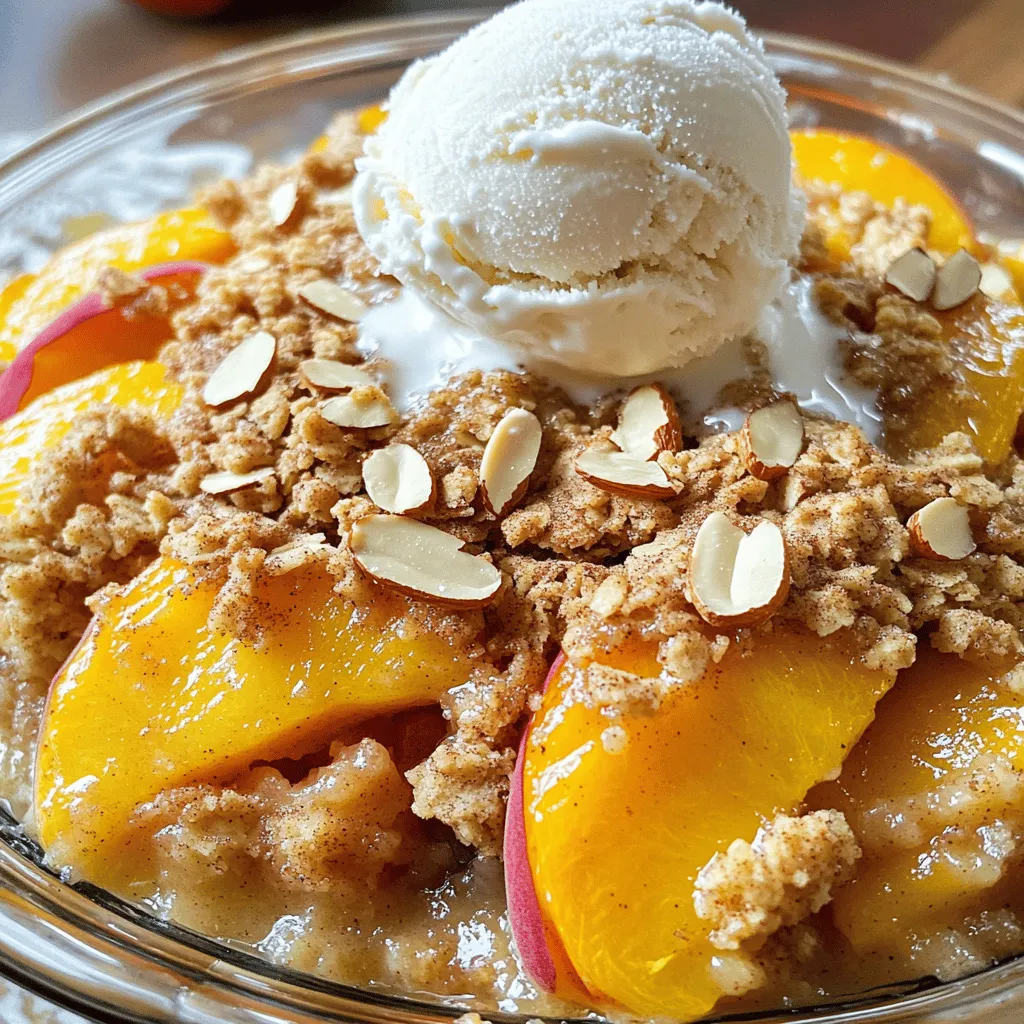
Peach Crisp Delight Easy Recipe for Everyone
If you love warm, sweet desserts, you’ll adore this Peach Crisp recipe. It’s easy to make, and perfect for anyone. You can whip it up
![- 4 ripe peaches, pitted and sliced - 2 cups whole milk - 1/2 cup granulated sugar - 3 large eggs - 1 teaspoon vanilla extract - 3 tablespoons cornstarch - 1/4 teaspoon ground cinnamon - A pinch of salt - Fresh mint leaves for garnish (optional) - Medium saucepan - Mixing bowl - Whisk - 8x8-inch baking dish Choosing ripe peaches Ripe peaches are key for this dessert. Look for peaches that feel soft when you gently squeeze them. They should have a sweet smell and a rich color. Avoid any with bruises or dark spots. Fresh vs. canned peaches Fresh peaches offer the best taste and texture. However, canned peaches can work in a pinch. Just drain them well before using. The flavor may differ, but they are still a good option. For the best results and to make this Easy Peach Custard Dessert shine, always try to use ripe, fresh peaches. The full recipe guides you through the steps to create this delightful treat. First, set your oven to 350°F (175°C). This is the perfect temperature for baking custard. Next, grease an 8x8-inch baking dish. You can use butter or a non-stick spray. This step keeps the custard from sticking, making it easier to serve. Heat 2 cups of whole milk in a medium saucepan. Use medium heat until the milk is steaming, but do not let it boil. Remove the saucepan from the heat. In a mixing bowl, whisk together 3 large eggs and 1/2 cup of granulated sugar. Mix until it looks frothy. Slowly add the warm milk to the egg mixture. Keep whisking. This process is called tempering, which helps prevent the eggs from scrambling. Stir in 3 tablespoons of cornstarch, 1 teaspoon of vanilla extract, 1/4 teaspoon of ground cinnamon, and a pinch of salt. Make sure everything is mixed well and smooth. Now, layer the peaches in the greased baking dish. Use 4 ripe peaches that you have pitted and sliced. Spread them evenly on the bottom. Next, pour the custard mixture over the peaches. Make sure all the peaches are covered. Bake the dish in your preheated oven for 30-35 minutes. The custard should be set and lightly golden on top. Enjoy making this simple yet special treat! Tempering eggs is key for perfect custard. This step gently warms the eggs. It helps prevent them from scrambling. To temper, slowly add warm milk to the beaten eggs while whisking. This method keeps your custard smooth. To check if your custard is set, gently shake the dish. If it jiggles slightly in the center, it's ready. You can also insert a knife. If it comes out clean, your custard is done. Warm custard offers a cozy treat. Chilled custard feels refreshing, especially on hot days. Try serving it warm with a scoop of ice cream. Or enjoy it chilled with whipped cream. Both options delight the taste buds! For garnishing, use fresh mint leaves. They add a nice color and flavor. A light dusting of cinnamon also looks great. It makes your dessert pop even more. You can add spices like nutmeg for extra warmth. A pinch blends well with the peach flavor. Consider mixing in other fruits too. Berries or apples can add new tastes. They make your peach custard even more special. Explore the [Full Recipe] for more details on making this delightful dessert! {{image_2}} You can switch up the fruit in this dessert. Fresh berries like blueberries or raspberries work great. They add a nice tart flavor that mixes well with the creamy custard. Apples also make a tasty choice. Just slice them thin and layer them in the dish. You can even combine different fruits. Mixing peaches with berries can create a colorful and fruity treat. If you need a dairy-free version, use almond or coconut milk instead of whole milk. These options taste great and still keep the custard creamy. For those watching sugar, try cutting the sugar in half. You can also use a sugar substitute like stevia or monk fruit for a lower-calorie treat. Both adjustments help you enjoy this dessert while fitting your diet. Want to save time? You can use a slow cooker. Pour your custard mixture and peaches in the cooker and set it on low for a few hours. This method makes the custard soft and creamy. If you’re in a hurry, try the microwave. Pour the mixture into a microwave-safe dish and cook it in short bursts. Check it often to avoid overcooking. You can find the full recipe to try these methods at home. To store leftovers, let the peach custard dessert cool first. Then, cover it tightly with plastic wrap or transfer it to an airtight container. This helps keep it fresh. You can store it in the fridge for up to three days. Glass containers work well for storage. They don’t absorb odors and are easy to clean. Yes, you can freeze peach custard dessert! Just make sure it is completely cool. Cut it into portions for easier defrosting. Wrap each piece in plastic wrap and then in aluminum foil. This extra layer helps prevent freezer burn. When you’re ready to eat, thaw it overnight in the fridge. To reheat, place the custard in the oven at 350°F (175°C) for about 15 minutes. For the best quality, use leftovers within three days if refrigerated. If frozen, aim to eat it within two months for the best taste. Over time, the texture may change. It might not taste as fresh after a long freeze. Enjoy your peach custard dessert while it is still creamy and delicious! To know if your custard is done, look for a few key signs. First, it should be set in the middle. You can gently shake the dish. If the center jiggles slightly but not too much, it's ready. The top should have a light golden color. This shows that it has baked well. If you insert a knife, it should come out clean. If it’s wet, bake it a bit longer. Yes, you can use frozen peaches. However, they may change the texture a bit. Frozen peaches often become softer when cooked. This can make your custard less firm. The flavor might also be less fresh than ripe peaches. If you use frozen ones, let them thaw and drain excess water. This step helps keep your custard from being too watery. Making this dessert ahead is simple. You can prepare the custard and peaches a day in advance. Just follow the recipe until baking. Cover the dish and store it in the fridge. When you are ready, bake it as directed. The custard can sit in the fridge for up to two days. Just remember to let it cool before serving. No, it is not necessary to use whole milk. You can use other types of milk. Almond milk or oat milk works well too. Just know that the texture might change. Whole milk gives a creamier feel. If you choose a lower fat milk, the custard may be less rich but still tasty. You now know how to make a delicious peach custard dessert. We talked about the ingredients, key steps, and helpful tips. Choosing the right peaches is crucial for taste. Remember, you can customize this dessert with other fruits or methods. Store leftovers in the fridge or freeze them for later. Enjoy making and sharing this treat with friends and family. Your kitchen is now ready for a fun and tasty adventure!](https://tossedrecipes.com/wp-content/uploads/2025/06/0e68ad5c-10af-4363-8698-f6b27dfee2eb.webp)
Easy Peach Custard Dessert Simple and Special Treat
If you’re craving a sweet treat that’s simple yet special, you’re in the right place! This Easy Peach Custard Dessert combines the creamy goodness of

Easy Homemade Peach Cobbler Simple and Delicious Dessert
Get ready to dive into a world of sweet goodness with my Easy Homemade Peach Cobbler! This simple and delicious dessert highlights fresh peaches, making