Desserts
![- 1 cup mashed ripe bananas (about 2-3 bananas) - 1 cup grated zucchini (about 1 medium zucchini, drained) - 1/2 cup granulated sugar - 1/2 cup brown sugar, packed These ingredients are the heart of this delightful bread. The bananas add natural sweetness. The zucchini keeps the bread moist and tender. Using ripe bananas is key; they should be soft and brown for the best flavor. - 1/2 cup chopped walnuts or pecans - 1/4 cup chocolate chips These optional add-ins can take your bread to new heights. Nuts give a nice crunch, while chocolate chips bring a rich sweetness. You can mix and match these add-ins. Feel free to go without them if you prefer a classic taste. - 1 1/2 cups all-purpose flour - 1 teaspoon baking soda - 1/2 teaspoon baking powder - 1/2 teaspoon salt These baking essentials help form the structure of your bread. All-purpose flour is perfect for a light texture. Baking soda and baking powder work together to make it rise. Salt enhances all the flavors in the bread. For the full recipe, make sure to check out the detailed instructions! - Preheat your oven to 350°F (175°C). - Grease a 9x5-inch loaf pan or line it with parchment paper. I always find it helpful to start with the right temperature. Preheating the oven ensures even baking. Greasing or lining the pan stops the bread from sticking. This step is key to a perfect loaf. - In a large bowl, combine mashed bananas, grated zucchini, sugars, oil, eggs, and vanilla extract. Next, I mix the wet ingredients. Bananas and zucchini provide moisture and flavor. The sugars add sweetness, while the oil keeps the bread soft. I use large, ripe bananas for the best taste. - In a separate bowl, whisk together flour, baking soda, baking powder, salt, cinnamon, and nutmeg (if using). Now, I turn to the dry ingredients. Mixing flour with baking soda and baking powder creates the perfect rise. The spices add warmth and depth. If I want a cozy flavor, I always add cinnamon. - Gradually add dry ingredients to the wet mixture, stir gently to combine, and pour into the prepared pan. - Bake for 55-65 minutes or until a toothpick comes out clean. When combining the mixtures, I stir gently. Overmixing can make the bread tough. Pouring the batter into the pan is exciting! I bake it for 55 to 65 minutes. A toothpick test ensures it’s ready. If it comes out clean, I know it’s perfect. The smell of baking bread fills the kitchen, making it a delightful experience. For the full recipe, check the link to ensure you don’t miss any steps! To get the best texture in your zucchini banana bread, avoid overmixing the batter. When you mix, do it gently. A few lumps are okay, and this keeps the bread light. Overmixing can make your bread dense and tough. Let the bread cool in the pan for about 10 minutes. This helps it set up nicely. After that, transfer it to a wire rack to cool completely. Cooling on a rack allows air to flow around the bread, keeping it from getting soggy. This bread tastes best warm or at room temperature. You can also serve it with cream cheese frosting for a sweet touch. Spread it on a slice for a delightful treat. Enjoy your delicious zucchini banana bread with your favorite drink or as a snack! For the full recipe, check the [Full Recipe]. {{image_2}} You can make this bread even more delicious! Try adding chocolate chips for a sweeter treat. The chocolate melts and adds a nice richness. You can also sprinkle in some spices like nutmeg or cardamom. These spices bring a warm, cozy flavor to your loaf. If you need a gluten-free version, it’s simple! Just swap the all-purpose flour with a gluten-free blend. Many brands offer great mixes that work well in baking. This way, everyone can enjoy this yummy bread without worry. Want a vegan loaf? You can replace the eggs with flaxseed meal or applesauce. For each egg, use one tablespoon of flaxseed meal mixed with three tablespoons of water. Let it sit for a few minutes to thicken. Applesauce is also a great choice. It keeps the bread moist and adds a hint of sweetness. Explore these variations to find your favorite twist on The Best Zucchini Banana Bread. Check out the [Full Recipe](#) for all the details! Store your zucchini banana bread at room temperature in an airtight container for up to 3 days. This keeps it fresh and tasty. Make sure the container seals well to keep out air. For extended freshness, keep the bread in the fridge. It can last up to a week this way. Just wrap it well in plastic wrap or foil to avoid drying out. If you want to save some for later, wrap the bread tightly and freeze it. It stays fresh for up to 3 months. When you’re ready, just thaw it overnight in the fridge. Enjoy the flavors just like when it was fresh! For the full recipe, check out the earlier section. Yes, just ensure it's well-drained to avoid excess moisture. Frozen zucchini works well, but if it's too wet, the bread will be soggy. After thawing, squeeze out any extra liquid using a clean cloth or paper towel. This step keeps your bread light and fluffy. A toothpick inserted into the center should come out clean when it's done. If it has batter on it, bake for a few more minutes. Remember, every oven is different, so keep an eye on your bread as it bakes. Checking the mixing method and ensuring not to overmix can help lighten the bread. Overmixing can lead to tough bread, so mix just until combined. If you find your bread dense, consider adding a bit more baking soda next time. It's great on its own or can be served with butter, cream cheese, or your favorite spread. For added fun, try a drizzle of honey or a sprinkle of cinnamon. You can also toast the slices for a warm treat! For the full recipe, click here. The recipe for zucchini banana bread combines ripe bananas and grated zucchini for sweetness and moisture. Optional add-ins like nuts and chocolate chips enhance the flavor. Follow the simple steps to prep, mix, and bake for a delicious loaf. Remember to let it cool before slicing. If you want to try new flavors, variations and storage tips can extend your enjoyment. This bread is easy to make and perfect for any occasion. Enjoy baking and sharing your tasty creation!](https://tossedrecipes.com/wp-content/uploads/2025/06/238aff20-56ed-45ca-a327-368b6d43adae.webp)
The Best Zucchini Banana Bread Delightful Recipe
Are you ready to bake the best zucchini banana bread you’ve ever tasted? This delightful recipe is the perfect blend of sweet bananas and fresh
![- 4 cups fresh peaches, peeled and sliced - 1 cup granulated sugar, divided - 1 teaspoon vanilla extract - 1 teaspoon lemon juice Fresh peaches make the best cobbler. Choose ripe, juicy peaches for great flavor. The sugar helps to sweeten the fruit, while vanilla and lemon juice add depth. The lemon juice brightens the taste and balances the sweetness. - 1 ½ cups all-purpose flour - 1 tablespoon baking powder - ½ teaspoon salt - 1 cup milk All-purpose flour gives the cobbler its structure. The baking powder helps it rise, creating a light texture. Salt enhances the flavors, and milk binds the ingredients together. These basics are key in making the batter. - ½ cup unsalted butter, melted - 1 teaspoon ground cinnamon - Ice cream or whipped cream for serving (optional) Butter adds richness and moisture to the batter. Cinnamon gives a warm, cozy flavor. Serving with ice cream or whipped cream makes it even more special. This classic dessert becomes a treat that everyone will love. For the full recipe, check out the details above! - Preheat your oven to 350°F (175°C). - Take 4 cups of fresh peaches, peeled and sliced. - In a large bowl, add the peaches, ½ cup of sugar, 1 teaspoon of vanilla extract, and 1 teaspoon of lemon juice. - Toss the peaches gently until they are well coated. - Set the peach mixture aside to marinate for about 10 minutes. This helps the flavors mix and the peaches soften. - In another bowl, combine 1 ½ cups of all-purpose flour, 1 tablespoon of baking powder, ½ teaspoon of salt, and the remaining ½ cup of sugar. - Whisk the dry ingredients until they blend well. - Now, mix in 1 cup of milk and ½ cup of melted butter. - Stir until the batter is smooth. It should not be lumpy. - Grease a 9x13-inch baking dish to prevent sticking. - Pour the smooth batter evenly into the dish. - Carefully spoon the marinated peach mixture over the batter. - Do not stir; the peaches will sink down as it bakes. - Finally, sprinkle 1 teaspoon of ground cinnamon over the top for added flavor. - Place the baking dish in the preheated oven. - Bake for 40-45 minutes or until the cobbler is golden brown. - To check if it is done, insert a toothpick in the center; it should come out clean. - Once baked, let the cobbler cool for a few minutes before serving. This step-by-step guide makes it easy to create your classic oven-baked peach cobbler. For the complete recipe, refer to the Full Recipe section. Enjoy this delightful dessert! To make the best peach cobbler, choose ripe, seasonal peaches. Their natural sweetness and flavor will shine through. You can adjust the sugar based on how sweet the peaches are. If they are very sweet, use less sugar. If they are a bit tart, add a little more. Serve the cobbler warm for the best experience. A scoop of ice cream or a dollop of whipped cream pairs perfectly with the warm fruit. You can also garnish the top with a sprinkle of cinnamon. Fresh peach slices on top add a lovely touch too. One common mistake is stirring the peach mixture into the batter. This can ruin the cobbler's texture. Instead, spoon the peaches on top without mixing. Another mistake is not preheating the oven. Make sure your oven is hot before baking to get a nice, golden crust. Follow these tips, and your peach cobbler will shine! For the complete recipe, check out the Full Recipe. {{image_2}} You can switch things up by using different fruits. Try blueberries, blackberries, or apples. Each fruit adds its own taste. Blueberries give a sweet burst, while blackberries add tang. Apples provide a crisp texture that complements the peach cobbler well. Feel free to mix and match your favorites. If you want a healthier version, I have some easy swaps. Use whole wheat flour instead of all-purpose flour. This adds fiber and nutrients. You can also replace sugar with honey or maple syrup. These natural sweeteners can bring a richer flavor. Adjust the amount to your taste. For those needing a gluten-free option, don’t worry! You can use a gluten-free baking mix instead of all-purpose flour. Many brands offer great mixes that work well in baking. Just follow the instructions on the package for best results. Enjoy a delicious dessert that fits your dietary needs! After you enjoy your peach cobbler, store it in an airtight container. It will stay fresh for up to 3 days in the fridge. This keeps the flavors locked in and helps it stay moist. Just be sure to let it cool before storing. To bring back that warm, comforting taste, reheat your cobbler in the oven. Preheat it to 350°F (175°C) and bake for about 10-15 minutes. This method keeps the top crisp and the inside warm. If you need a quicker option, use the microwave. Just heat in short bursts, checking often to avoid overheating. If you want to save some for later, freeze your cooled cobbler in slices. Wrap each piece well with plastic wrap or foil to prevent freezer burn. It can last up to 3 months in the freezer. When you're ready to eat, just thaw it in the fridge overnight and reheat in the oven for the best texture. For the full recipe, check out the [Full Recipe]. Fresh, ripe peaches yield the best flavor and texture. When picking peaches, look for ones that are slightly soft to the touch. The color should be vibrant and rich. Avoid hard peaches, as they won’t have the sweetness you want in your cobbler. The best time to use fresh peaches is during summer when they are in season. Yes, you can prepare your peach cobbler in advance. Mix your peach filling and batter, then store them separately in the fridge. Bake the cobbler just before serving for the best taste. This way, you can enjoy a warm, fresh dessert without a lot of fuss. You know your cobbler is done when it turns a golden brown color. Insert a toothpick into the center; if it comes out clean, your cobbler is ready. If there is batter stuck to the toothpick, bake it a bit longer. Keep an eye on it to prevent overbaking. Yes, you can use canned peaches if fresh ones aren’t available. Just make sure to adjust the sugar in your recipe. Canned peaches are often sweeter, so cut back on the sugar to avoid an overly sweet cobbler. Drain the peaches well before using them to maintain the right texture. This peach cobbler recipe combines fresh ingredients and simple steps for a delightful treat. By using ripe peaches and the right baking essentials, you can ensure a sweet and tasty dessert. Remember to serve it warm with ice cream or whipped cream for extra enjoyment. Feel free to experiment with different fruits or healthier options to make it your own. With these tips, you can avoid common mistakes and create a delicious dish every time. Enjoy your baking adventure and the sweet rewards that follow!](https://tossedrecipes.com/wp-content/uploads/2025/06/341be8dc-d587-42df-9790-6382f633a88b.webp)
Classic Oven-Baked Peach Cobbler Irresistible Dessert Treat
If you’re ready to enjoy a classic dessert treat, you’ve come to the right place! This oven-baked peach cobbler recipe is simple, tasty, and perfect
![To make Raspberry Yogurt Clusters, you need just a few fresh ingredients. Here’s what you’ll need: - 2 cups fresh raspberries - 1 cup Greek yogurt (plain or vanilla) - 2 tablespoons honey or maple syrup - 1 teaspoon vanilla extract - Pinch of salt These ingredients create a tasty and healthy snack. Fresh raspberries give a burst of flavor and nutrients. Greek yogurt adds creaminess and protein, while honey or maple syrup provides sweetness. The vanilla extract adds a lovely aroma, and the salt enhances all the flavors. You can also add a few extras to make these clusters even better. Consider these optional ingredients: - 1/4 cup granola for crunch - Chopped nuts or seeds for added texture - Dark chocolate chips for a sweet twist Granola gives a nice crunch. Nuts add healthy fats and extra protein. Chocolate chips can satisfy your sweet tooth while still keeping it fun. Let’s look at the health benefits of the main ingredients: - Raspberries: These berries are low in calories and high in fiber. They are rich in vitamins C and K, which boost your immune system and help with bone health. - Greek Yogurt: Packed with protein, Greek yogurt helps with muscle growth and keeps you full longer. It also has probiotics, which are good for gut health. - Honey or Maple Syrup: While they add sweetness, these natural sweeteners also contain antioxidants. They can help reduce inflammation in the body. Using these ingredients gives you a snack that is not only delicious but also good for you. For the full recipe, check the earlier section. First, take 2 cups of fresh raspberries. Rinse them gently under cold water. Be careful not to crush them. Use a paper towel to pat them dry. This helps keep the yogurt stick better. Set the raspberries aside for later. Next, grab a medium bowl. Add 1 cup of Greek yogurt, either plain or vanilla. Then, mix in 2 tablespoons of honey or maple syrup. This adds a nice sweetness. Add 1 teaspoon of vanilla extract for flavor. Finally, sprinkle in a pinch of salt. Stir the mixture until it is smooth and creamy. Now, it's time to coat the raspberries. Take a raspberry and dip it into the yogurt mixture. Make sure it is fully covered. Use a fork to lift it out. Let any extra yogurt drip off. Place the coated raspberry on a parchment-lined baking sheet. Repeat this for all raspberries. If you want, you can sprinkle 1/4 cup of granola on top for extra crunch. Once done, put the baking sheet in the freezer. Freeze the clusters for at least 2-3 hours, or until they are hard. When ready, remove them from the freezer. Let them sit for about 5 minutes before serving. Enjoy your tasty frozen snack! For the full recipe, check the details above. To get a nice coat on your raspberries, use thick yogurt. Greek yogurt works best. Dip each raspberry carefully in the yogurt. Make sure it gets fully covered. Use a fork to lift it out. This helps shake off extra yogurt. The thicker coating will freeze better and taste creamier. When freezing, keep the clusters spaced out. Place them on a parchment-lined sheet. This prevents them from sticking together. Freeze them for at least 2-3 hours. If you want them ready quickly, put them in the back of the freezer. This area stays the coldest and helps them freeze faster. You can add more flavor to your clusters easily. Try mixing in spices like cinnamon or nutmeg into the yogurt. You can also add zest from a lemon or lime. This gives a fresh kick that pairs well with raspberries. If you like crunch, sprinkle some granola on top before freezing. This adds texture and taste to every bite. For a fun twist, consider adding mini chocolate chips or nuts for extra flavor. {{image_2}} You can make a dairy-free version of raspberry yogurt clusters. Instead of Greek yogurt, use coconut yogurt or almond yogurt. These options work well with the other ingredients. The taste remains smooth and creamy. Just follow the same steps in the full recipe. This keeps your snack tasty and friendly for those with dairy allergies. Raspberries are great, but you can try other fruits too. Strawberries, blueberries, or blackberries are all good choices. Just make sure the fruit is fresh and ripe. You can also change the toppings. Instead of granola, try nuts or seeds for crunch. Chopped dark chocolate adds a fun twist. Each fruit and topping gives a new flavor to your clusters. You can play with flavors to make your clusters unique. Add a dash of cinnamon to the yogurt for warmth. For a fruity kick, mix in a spoon of lemon zest. You could even try adding a little peanut butter for richness. These small changes can create new taste experiences. Enjoy discovering what combinations you love most! To store your frozen raspberry yogurt clusters, place them in an airtight container. Ensure there is no extra air in the container. This step helps keep them fresh and tasty. You can also use a freezer-safe bag. Just make sure to remove as much air as possible. Label the container with the date to help you remember when you made them. Frozen raspberry yogurt clusters can last in the freezer for up to three months. After this time, they may lose some flavor and texture. To keep them fresh, avoid placing them near strong-smelling foods in the freezer. This helps prevent any unwanted flavors from mixing. Always check for ice crystals or freezer burn before eating. If you see these signs, it’s best to throw the clusters away. You do not need to reheat raspberry yogurt clusters. They are best enjoyed straight from the freezer. However, if you want a softer texture, let them sit at room temperature for about five minutes before eating. This simple step makes them easier to enjoy without losing their delicious taste. Yes, you can use frozen raspberries. They work well in this recipe. Just thaw them first. Thawing helps to prevent excess water from making the yogurt too runny. Be gentle when handling thawed raspberries to avoid squishing them. Greek yogurt is the best choice for this recipe. It is thick and creamy, giving the clusters a nice texture. You can also use plain or vanilla yogurt. Both options add a tasty flavor that pairs well with raspberries. You can keep the clusters in the freezer for up to three months. Make sure to store them in an airtight container. This will help keep them fresh and prevent freezer burn. Yes, Raspberry Yogurt Clusters are a healthy snack. They are low in calories and high in nutrients. Raspberries are full of vitamins and fiber. Greek yogurt adds protein and probiotics, which are good for your gut. Absolutely, you can add protein powder! Just mix in a scoop when you combine the yogurt with the other ingredients. This will boost the protein content and keep you feeling full longer. Adjust the sweetness if needed, as some protein powders may be sweet. Check the [Full Recipe] for more details. Raspberry yogurt clusters are easy to make and fun to eat. You learned about the main ingredients, preparation steps, and helpful tips. We discussed variations like dairy-free options and ways to store them for later. Remember, you can customize these clusters with your favorite flavors. Just keep your ingredients fresh and follow the steps closely for the best results. Enjoy making tasty snacks that are healthy, quick, and satisfying!](https://tossedrecipes.com/wp-content/uploads/2025/06/0ecefdd4-1b2a-41b3-8995-4d116b6bcbe6.webp)
Raspberry Yogurt Clusters Healthy Frozen Snack Idea
Looking for a tasty and healthy treat? You’ll love Raspberry Yogurt Clusters! This easy frozen snack is perfect for hot days or a quick bite.

Chocolate Chip Cheesecake Bars Easy Dessert Delight
Craving a sweet treat that’s easy to make? You’re in the right place! These Chocolate Chip Cheesecake Bars blend creamy cheesecake goodness with rich chocolate
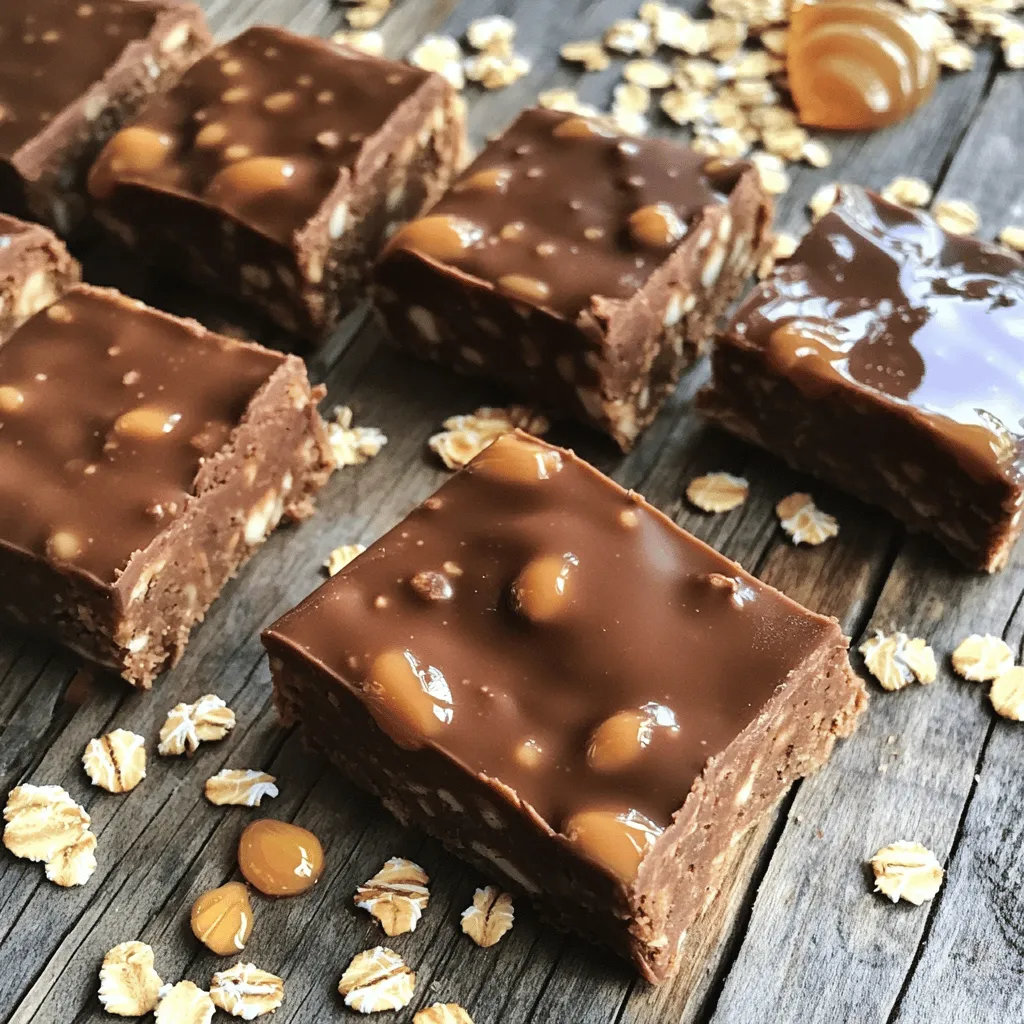
Protein Bars with 4 Ingredients Simple and Tasty Recipe
Are you looking for a quick and easy snack that packs a protein punch? With just four simple ingredients, you can whip up delicious protein
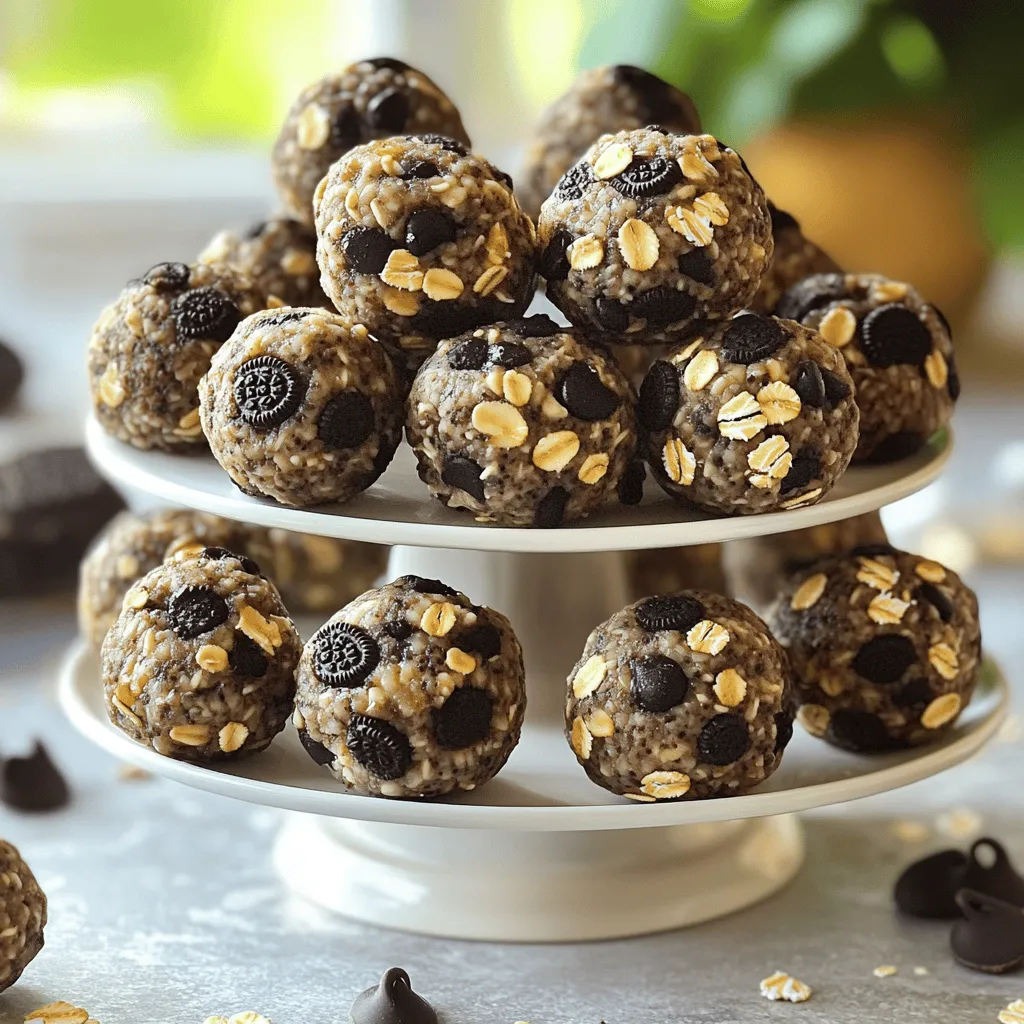
Oreo Protein Balls Easy and Tasty Snack Idea
Looking for a fun and easy snack? Oreo Protein Balls are your answer! Packed with protein and a delightful crunch, these tasty bites are perfect
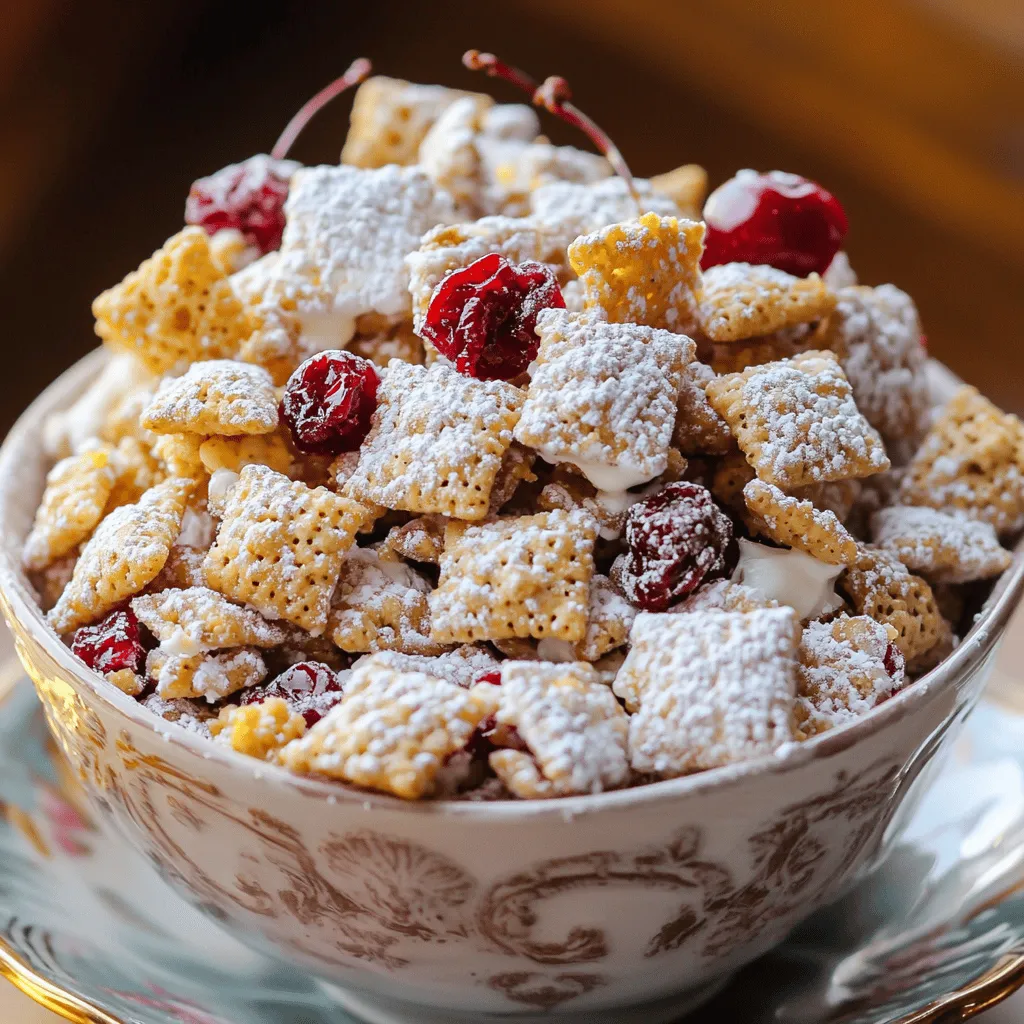
Cherry Cheesecake Puppy Chow Tasty and Fun Treat
If you love sweet snacks that are easy to make, you’ll adore Cherry Cheesecake Puppy Chow! This fun treat mixes crunchy, chewy, and creamy in
![- 1 cup almond flour - 1/2 cup rolled oats - 1/4 cup coconut sugar - 1/4 teaspoon baking soda - 1/4 teaspoon salt - 1/3 cup unsweetened applesauce - 1/4 cup almond butter - 1 teaspoon vanilla extract - 1/2 cup dark chocolate chips - 1/4 cup chopped walnuts (optional) Each ingredient in this recipe plays a vital role. Almond flour gives a nice texture and is gluten-free. Rolled oats add fiber and help keep you full. Coconut sugar is a great choice as it has a lower glycemic index than regular sugar. This means it helps keep your blood sugar stable. Baking soda helps the cookies rise, making them soft and chewy. Salt enhances the flavors in the cookies. Almond flour is rich in vitamin E and good fats. These nutrients promote heart health. Rolled oats are not only filling but also packed with beta-glucan. This helps lower cholesterol. Coconut sugar provides minerals and is less processed compared to white sugar. This makes it a smarter choice for baking. If you need nut butter alternatives, you can use sunflower seed butter or tahini. These options still provide healthy fats and flavor. For gluten-free needs, you can use a gluten-free all-purpose flour mix instead of almond flour. This helps keep the cookies soft while meeting dietary needs. For the full recipe, check the section above. 1. First, preheat your oven to 350°F (175°C). This step warms the oven for even baking. 2. Line a baking sheet with parchment paper. This helps prevent sticking and makes cleanup easy. 3. In a large mixing bowl, combine these dry ingredients: - 1 cup almond flour - 1/2 cup rolled oats - 1/4 cup coconut sugar - 1/4 teaspoon baking soda - 1/4 teaspoon salt Mix them well until they look even. 1. In a separate bowl, whisk together the wet ingredients until smooth. Use these: - 1/3 cup unsweetened applesauce - 1/4 cup almond butter - 1 teaspoon vanilla extract This mixture adds moisture and flavor. 2. Pour the wet mixture into the dry ingredients. Stir gently until fully combined. If the dough feels too dry, add a teaspoon of water. It should be slightly sticky. 3. Now, fold in the dark chocolate chips and walnuts if you choose to add them. 1. Use a tablespoon to scoop out dough portions. Shape them into balls with your hands. 2. Place the dough balls on the baking sheet. Leave some space between each ball. 3. Flatten the balls slightly with your fingers or a fork. This helps them bake evenly. 4. Bake the cookies for 10-12 minutes. Look for golden edges but soft centers. 5. After baking, let the cookies cool on the sheet for 5 minutes. Then, transfer them to a wire rack to cool completely. For the full recipe, check out the detailed instructions. Enjoy your baking! To make your cookies moist, use almond flour and applesauce. Almond flour keeps cookies soft. Applesauce adds moisture without extra fat. Prevent overbaking by watching your cookies closely. Bake them until the edges are golden. The centers should look a little soft. They will firm up as they cool. You can add spices to boost flavor. A pinch of cinnamon or nutmeg makes a big difference. Vanilla extract also enhances the taste. Incorporate dried fruits or seeds for more texture. Chopped dates or cranberries add sweetness. Pumpkin seeds or sunflower seeds offer a nice crunch. Use a large mixing bowl for your dry ingredients. A sturdy spatula helps mix everything well. Choose a baking sheet lined with parchment paper. This helps prevent sticking and makes cleanup easy. A flat spatula is great for transferring cookies once they cool. For the full recipe, check out the details above. Enjoy your baking! {{image_2}} For those who need gluten-free cookies, there are great choices. You can use alternative flours like: - Almond flour - Coconut flour - Oat flour These flours make the cookies tasty and healthy. Almond flour adds a nutty flavor. Coconut flour is light and sweet. Oat flour gives a soft texture. If you want to make these cookies vegan, you can replace eggs easily. Use flaxseed meal or chia seeds mixed with water. This mix acts like eggs in recipes. - Combine 1 tablespoon of flaxseed meal with 2.5 tablespoons of water. - Let it sit for 5 minutes until it thickens. You can also try more plant-based ideas like using: - Maple syrup instead of coconut sugar. - Nut butter or seed butter to add richness. You can change the flavor of your cookies for fun. Try different types of chocolate like: - Milk chocolate - White chocolate - Dark chocolate You can also add flavor extracts. A splash of almond extract or peppermint extract can add a twist. These small changes can make your cookies unique. You can mix and match to find your favorite version. For the full recipe, check out the [Full Recipe]. To keep your healthy chocolate chip cookies fresh, store them in an airtight container. This method helps maintain their softness and flavor. Place parchment paper between layers to prevent sticking. Keep them at room temperature for best results. You can freeze both the cookie dough and baked cookies. To freeze cookie dough, scoop the dough into balls and place them on a baking sheet. Freeze until solid, then transfer to a freezer-safe bag. For baked cookies, allow them to cool completely, then wrap each cookie in plastic wrap. Store them in a freezer-safe container. To thaw baked cookies, simply leave them out at room temperature for about 30 minutes. For dough, place it in the fridge overnight. Bake straight from the freezer, adding a minute or two to the baking time. These cookies can last up to a week at room temperature. If you store them properly, they stay fresh and tasty. Look for signs of spoilage, like a hard texture or an off smell. If they feel dry or stale, it's time to toss them out. Enjoy these treats while they’re at their best! Can I use regular flour instead of almond flour? Yes, you can use regular flour if you prefer. However, this changes the cookie's texture. Almond flour gives a nice nutty taste. It also keeps the cookies moist and chewy. How can I make these cookies lower in sugar? You can replace the coconut sugar with a sugar substitute. Options like stevia or monk fruit work well. You can also reduce the amount of sugar in the recipe. What can I substitute for applesauce? If you don’t have applesauce, try mashed bananas. They will add a slight banana flavor. You could also use yogurt, which keeps the cookies moist. Can these cookies be made in advance? Yes! You can make the dough in advance. Just store it in the fridge for up to three days. You can also freeze the dough for up to three months. How to soften cookies when they harden? If your cookies harden, place them in a sealed bag with a slice of bread for a few hours. The moisture from the bread will soften the cookies. Best ways to serve these healthy cookies Serve these cookies warm with a glass of almond milk. They also pair well with fresh fruit like berries or sliced apples. Caloric content per cookie Each cookie contains about 120 calories. This is much lower than traditional cookies. Comparing to traditional chocolate chip cookies Regular chocolate chip cookies can have around 150-200 calories each. This makes our healthy version a better choice for snacking! For the full recipe, check out the details above. This blog post covered a healthy cookie recipe packed with nutritious ingredients. You learned about almond flour, rolled oats, and coconut sugar, along with their benefits. We discussed practical steps to make and bake the cookies perfectly, as well as variations and storage tips. Don't be afraid to experiment with flavors and substitutions. With these insights, you can now bake delicious cookies that are good for you too. Enjoy your healthy treats!](https://tossedrecipes.com/wp-content/uploads/2025/06/c7aa5b20-173a-462b-b647-6ff4e0c0a45a.webp)
The Perfect Healthy Chocolate Chip Cookies Recipe
Are you on the hunt for a guilt-free treat? Look no further! I’ve created the perfect healthy chocolate chip cookies recipe that satisfies your sweet
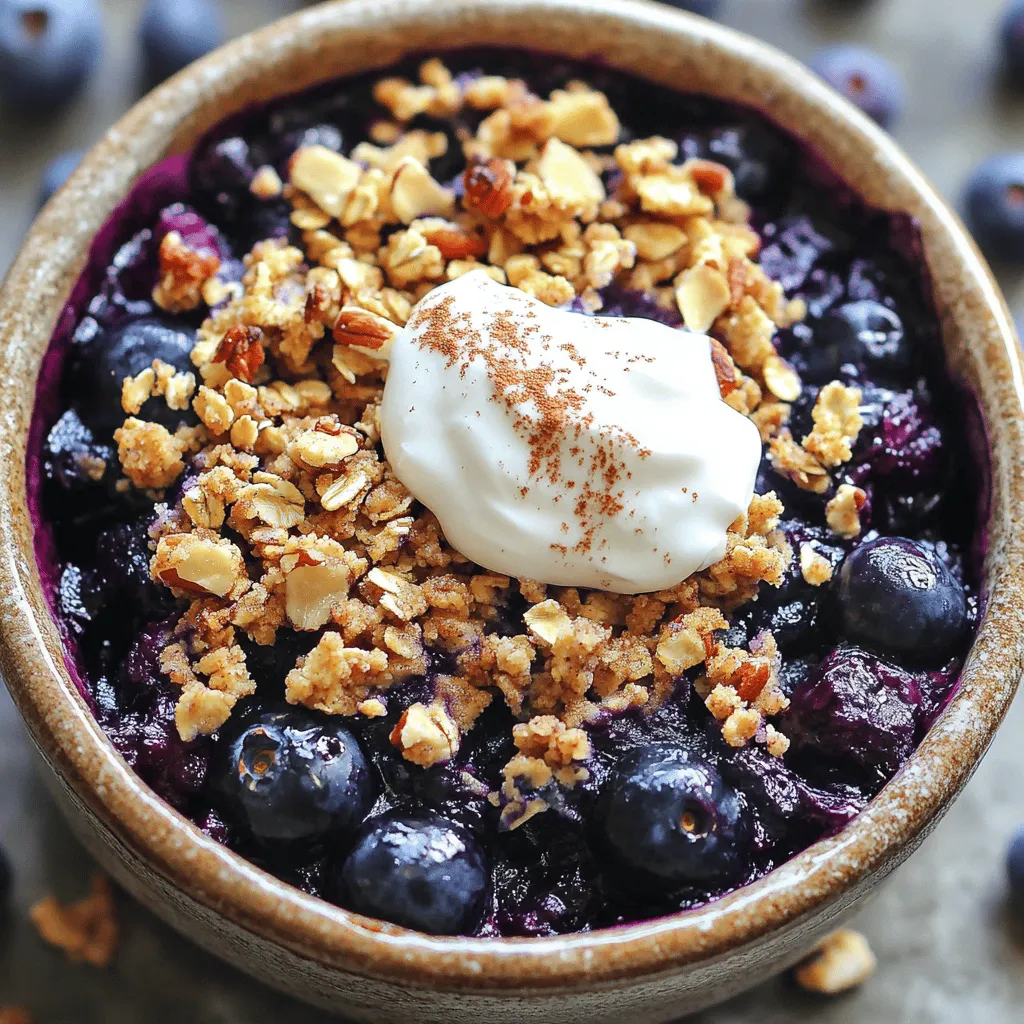
Healthy Blueberry Crumble Simple and Tasty Dessert
Looking for a sweet treat that won’t ruin your healthy eating goals? You’re in the right place! My Healthy Blueberry Crumble is simple and tasty,
![- 3 ripe bananas, mashed - 1/2 cup honey - 1/4 cup unsalted butter, melted - 1 large egg, beaten - 1 teaspoon pure vanilla extract - 1 teaspoon baking soda - 1/2 teaspoon salt - 1 1/2 cups all-purpose flour - 1/2 teaspoon ground cinnamon (optional) - 1/2 cup chopped walnuts or pecans (optional) You can adjust this recipe for different serving sizes. If you want a smaller loaf, halve the ingredients. For a larger loaf, simply double them. You can also swap honey for other sweeteners like maple syrup or agave nectar. Each will add a unique touch to the flavor. When choosing bananas, look for ones that are very ripe. Spots on the skin mean they are sweet and easier to mash. For honey, choose raw or local honey for the best flavor. Always use pure vanilla extract for a rich taste. Avoid imitation vanilla; it lacks depth. 1. Preheat the oven and prepare the loaf pan: Start by setting your oven to 350°F (175°C). This is the perfect temperature for baking. Grease a 9x5-inch loaf pan. You can also line it with parchment paper. This will help you remove the bread easily later. 2. Mashing the bananas: Take your ripe bananas and place them in a large bowl. Use a fork to mash them until they are smooth. The riper the bananas, the sweeter your bread will be. This step is fun and helps release the natural sugars. 1. Combining wet ingredients: In the bowl with the mashed bananas, add 1/2 cup of honey and 1/4 cup of melted unsalted butter. Stir these together until they blend well. Next, mix in 1 large beaten egg and 1 teaspoon of pure vanilla extract. Keep stirring until everything is fully combined. 2. Incorporating dry ingredients properly: In a separate bowl, whisk together 1 teaspoon of baking soda, 1/2 teaspoon of salt, and 1 1/2 cups of all-purpose flour. If you like, add 1/2 teaspoon of ground cinnamon here. Gradually fold this dry mix into the banana mixture. Be careful not to overmix; you want it just combined. 1. Baking time and temperature: Pour your batter into the prepared loaf pan. Smooth the top with a spatula. Place it in the oven and bake for 50 to 60 minutes. 2. Knowing when it's done: The bread is ready when a toothpick inserted in the center comes out clean. If you see any batter on the toothpick, give it more time. Once it’s done, let it cool in the pan for about 10 minutes. Then, transfer it to a wire rack to cool completely. Enjoy this delightful and simple recipe for Honey Vanilla Banana Bread! For the complete details, check the Full Recipe. To avoid common mistakes, make sure your bananas are very ripe. Brown spots on the peel show they are sweet. If you mix too much, your bread will be tough. Combine wet and dry ingredients gently. Use a spatula to fold them together. To perfect the texture and moisture, add the right amount of honey. Honey helps keep the bread moist. If you want a lighter crumb, add a little more flour. Be careful not to pack the flour down. Use a spoon to scoop and level it. For presentation ideas, serve slices on a pretty plate. A drizzle of honey on top looks great. You can also add a dollop of butter. For extra flair, garnish with sliced bananas or a sprinkle of cinnamon. When pairing with toppings or spreads, try cream cheese or nut butter. Both pair well with the sweetness of honey and bananas. You can even add a bit of jam if you like. To store leftover banana bread, wrap it in plastic wrap. You can also use a zip-top bag. This keeps it fresh for several days. If you want to store it longer, freeze it. Just slice it first, so you can take out one piece at a time. For reheating, use a toaster oven or microwave. If using a microwave, heat for only 10-15 seconds. This keeps it soft and warm without drying it out. Enjoy your Honey Vanilla Banana Bread fresh! For the [Full Recipe], check the ingredients and instructions above. {{image_2}} You can easily change the taste of your Honey Vanilla Banana Bread. One popular option is adding chocolate chips. Just fold in about 1/2 cup of semi-sweet or dark chocolate chips to the batter. This sweet touch makes the bread even more delightful. Another great idea is to incorporate spices. Ground cinnamon adds warmth and depth. You can also try nutmeg or a dash of allspice for a unique twist. Each spice brings a new flavor layer to your banana bread. If you need a gluten-free option, swap the all-purpose flour for gluten-free flour. Many blends work well. Just check the package for the right measurements. For a vegan version, replace the egg with a flax egg. To make a flax egg, mix one tablespoon of ground flaxseed with three tablespoons of water. Let it sit for a few minutes to thicken. You can also substitute honey with maple syrup. This keeps the sweetness while making it plant-based. Adding different nuts or seeds can give your banana bread a nice crunch. Walnuts or pecans are classic choices. Try sunflower seeds or pumpkin seeds for a new texture. Dried fruits are another fun option. Raisins, cranberries, or chopped dates add sweetness and chew. They also pair well with the banana flavor and make each slice exciting. For the full recipe, check out the detailed steps provided above. To keep your banana bread fresh, you can store it at room temperature. Wrap it in plastic wrap or place it in an airtight container. This keeps it moist. If you live in a warm area, the fridge is better. The cold helps stop spoilage. Use a glass or plastic container with a tight lid for the best results. Freezing banana bread is simple. First, let the bread cool completely. Then, wrap it tightly in plastic wrap. This keeps out air and moisture. Place it in a freezer bag or container for extra protection. When you want to eat it, take it out and let it thaw on the counter. For faster thawing, slice the bread before freezing. Banana bread lasts about 3-4 days at room temperature. In the fridge, it can last up to a week. If frozen, it stays good for about 3 months. Always check for any signs of spoilage, like a bad smell or mold. Enjoy your Honey Vanilla Banana Bread fresh and tasty! What is the best way to ripen bananas for the recipe? To ripen bananas quickly, place them in a brown paper bag. The bag traps ethylene gas, speeding up ripening. You can also add an apple to boost the effect. Keep the bag at room temperature for a day or two. Can I use frozen bananas for this bread? Yes, you can use frozen bananas. Just thaw them first. Drain any excess liquid before mashing. Frozen bananas may add more moisture, so adjust flour if needed. They will still give you that sweet, banana flavor. Why did my banana bread sink in the middle? Banana bread may sink due to too much liquid or underbaking. Make sure to measure your ingredients accurately. Always check if the bread is fully baked by using a toothpick. If it comes out clean, it’s done. How can I make my banana bread more flavorful? You can enhance flavor by adding spices like cinnamon or nutmeg. Consider using vanilla bean paste instead of extract for a bolder taste. Adding chopped nuts or dark chocolate can also bring depth to the flavor. Can I substitute honey with maple syrup? Yes, maple syrup can replace honey. It will change the flavor slightly but will still be delicious. Use the same amount as the honey in the recipe. What if I don't have ripe bananas? If you lack ripe bananas, you can bake unripe ones. Place them in a 300°F oven for 15-20 minutes. Let them cool before peeling and mashing. This method will soften them to use in your recipe. For the full recipe, check out the details above. You learned how to make delicious honey vanilla banana bread. We covered key ingredients, preparation steps, and tips for baking. You also explored variations and storage options to keep your bread fresh. Remember, the right bananas and honey make a big difference. Enjoy experimenting with flavors and customizing your loaf. This recipe is not just easy; it’s also a chance to make something special. Happy baking!](https://tossedrecipes.com/wp-content/uploads/2025/06/a9560f8a-d039-4eb5-bfce-9e1944373477.webp)
Honey Vanilla Banana Bread Delightful and Simple Recipe
Are you ready to bake something delightful? This Honey Vanilla Banana Bread recipe is both easy and delicious. With just a few key ingredients, you