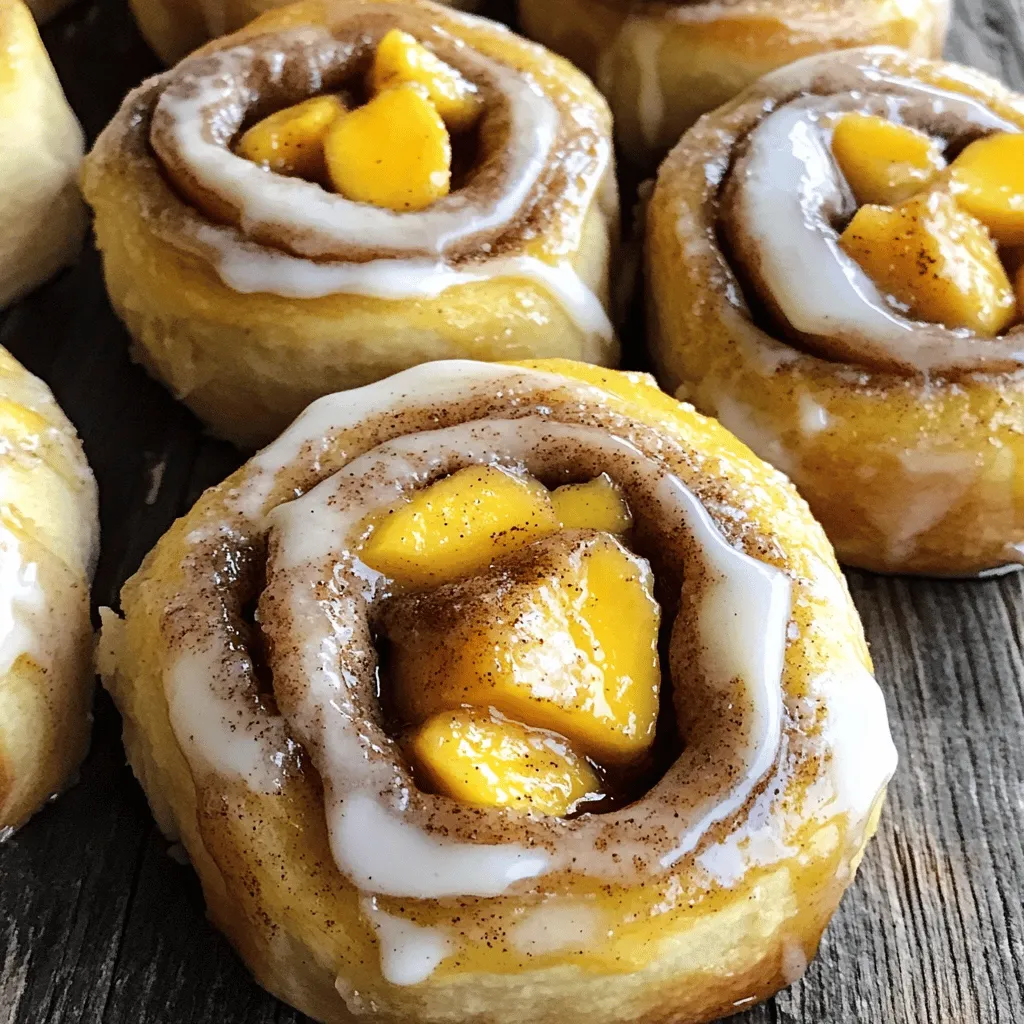
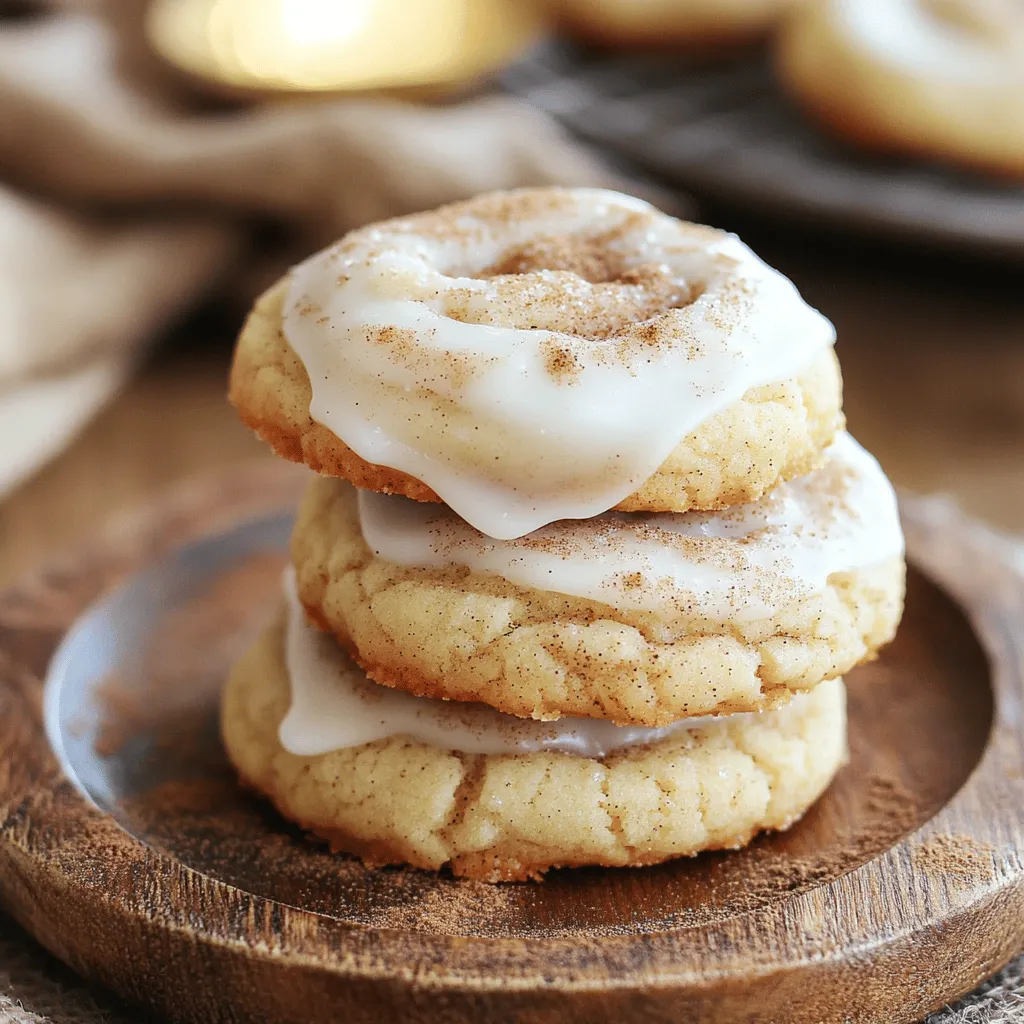
Desserts

To make the Georgia Peach Crumble Cheesecake, you need three main parts: the crust, the cheesecake filling, and the crumble topping. Here’s a detailed list of each ingredient: - 1 ½ cups graham cracker crumbs - ¼ cup granulated sugar - ½ cup unsalted butter, melted The graham cracker crumbs give the crust a sweet, buttery base. The sugar adds a nice touch of sweetness, while the melted butter binds everything together. - 16 oz cream cheese, softened - ½ cup granulated sugar - 2 large eggs - 1 teaspoon vanilla extract - 1 cup fresh peaches, peeled and diced (or canned peaches, drained) Softened cream cheese creates a rich, creamy texture. Sugar sweetens the filling, while eggs help it set. Vanilla extract adds flavor, and fresh peaches bring that juicy, fruity taste. - 1 cup rolled oats - ½ cup all-purpose flour - ½ cup brown sugar - ½ teaspoon cinnamon - ¼ cup unsalted butter, melted Rolled oats provide a hearty crunch. Flour helps to bind the topping, and brown sugar adds a deep sweetness. Cinnamon brings warmth, while melted butter gives that lovely crumbly texture. Ready to bake? You’ll find the full recipe linked above to guide you through every step! Prepping the Crust To start, preheat your oven to 350°F (175°C). In a mixing bowl, combine 1 ½ cups of graham cracker crumbs, ¼ cup of granulated sugar, and ½ cup of melted unsalted butter. Mix these ingredients well until they form a wet sand-like texture. Next, press this mixture firmly into the bottom of a 9-inch springform pan. Bake for 8-10 minutes or until it turns a light golden color. Let the crust cool completely. Making the Cheesecake Filling In another bowl, beat 16 oz of softened cream cheese with ½ cup of granulated sugar. Mix until it is smooth and creamy. Then, add in 2 large eggs, one at a time. Mix well after each addition. Stir in 1 teaspoon of vanilla extract and 1 cup of diced fresh peaches. Make sure the peaches are evenly mixed in before pouring the filling onto the cooled crust. Smooth the top with a spatula. Creating the Crumble Topping For the crumble topping, combine 1 cup of rolled oats, ½ cup of all-purpose flour, ½ cup of brown sugar, and ½ teaspoon of cinnamon in a separate bowl. Then, add ¼ cup of melted unsalted butter and mix until crumbly. This will add a nice crunch on top of your cheesecake. Baking Process and Cooling Now, sprinkle the crumble topping evenly over the cheesecake filling. Bake the cheesecake in the oven for 40-45 minutes, until the edges are set but the center has a slight jiggle. After baking, turn off the oven and crack the door. Let the cheesecake cool for about an hour in the oven. This helps prevent cracking. Once it cools down, let it sit at room temperature. Then, transfer it to the refrigerator for at least 4 hours or overnight. Serve it cold, and enjoy your Georgia Peach Crumble Cheesecake! For the full recipe, check the details above. Avoiding Cracks in Cheesecake Cracks can ruin the look of your cheesecake. To prevent this, always cool the cheesecake slowly. After baking, leave the oven door slightly open. This lets the heat escape gently. It helps the cheesecake cool evenly. Best Peaches to Use Fresh, ripe peaches are the best choice. They add great flavor and texture. Look for firm peaches that give a little when squeezed. If fresh peaches aren't available, use canned peaches. Just make sure to drain them well. Ensuring the Perfect Texture For a creamy texture, make sure your cream cheese is very soft. Let it sit at room temperature for at least 30 minutes before mixing. This makes it easier to blend into a smooth filling. Serving Suggestions Serve slices of cheesecake on colorful plates. This makes the dessert pop. Pair each slice with a scoop of vanilla ice cream for added delight. Garnishes for the Dessert Garnish the cheesecake with extra peach slices. A sprinkle of powdered sugar on top adds a sweet touch. Fresh mint leaves also look nice and add a pop of color. For the full recipe, check out the [Full Recipe]. {{image_2}} You can switch peaches for many other fruits. Try ripe strawberries, tart cherries, or sweet blueberries. Each will change the taste but still taste great. Just remember to adjust the sugar based on the fruit's sweetness. If you want to cut sugar, consider using honey or maple syrup. Both add natural sweetness. You can also try stevia or monk fruit for a low-calorie option. Just make sure to measure correctly, as they can be sweeter than sugar. To make the crust gluten-free, use gluten-free graham cracker crumbs. You can also blend nuts like almonds or pecans for the crust. This adds a nice crunch and flavor while keeping it gluten-free. Spices can really boost flavors. Add a pinch of nutmeg or ginger for warmth. You can also use a bit of cardamom for a unique twist. Just a little goes a long way! Try adding different extracts. Almond or coconut extract can give a new depth. You can also add a splash of lemon juice for brightness. These little changes can make your cheesecake truly special. For the full recipe, check out the Georgia Peach Crumble Cheesecake . - Refrigerating Leftovers After you enjoy your Georgia Peach Crumble Cheesecake, save any leftovers. Place slices in an airtight container. This keeps the cheesecake fresh and tasty. I recommend eating it within 3 to 5 days. - Freezing Tips If you want to store the cheesecake longer, you can freeze it. Wrap each slice tightly in plastic wrap. Then, place the wrapped slices in a freezer bag. This method helps prevent freezer burn. You can freeze it for up to three months. When ready to eat, thaw it overnight in the fridge. - How Long Does it Last? The cheesecake lasts about a week in the fridge when stored properly. If frozen, it will taste great for about three months. Just remember to keep it sealed tight to protect the flavor and texture. Can I use canned peaches? Yes, you can use canned peaches in this recipe. Just make sure to drain them well before using. Fresh peaches give the best flavor, but canned peaches work in a pinch. How do I know when the cheesecake is done? You know the cheesecake is done when the edges are set and the middle has a slight jiggle. The jiggle means it will firm up as it cools. Can this recipe be made ahead of time? Absolutely! You can make this cheesecake the day before. It tastes even better after chilling overnight in the fridge. What is the origin of Peach Crumble Cheesecake? Peach Crumble Cheesecake blends classic cheesecake with a crumble topping. It reflects Southern U.S. flavors, often celebrating summer peaches. How to keep cheesecake from cracking? To prevent cracks, let the cheesecake cool slowly. After baking, crack the oven door and let it sit for an hour. This reduces temperature shock. You now have all the steps for a great Peach Crumble Cheesecake. We covered the ingredients, the process, and tips to prevent cracks. You learned how to store leftovers and about fun variations. Now it's time to enjoy your delicious creation. Baking is fun, so don’t hesitate to try new flavors. Your cheesecake can impress everyone!
Georgia Peach Crumble Cheesecake Easy and Delicious Recipe
Craving a delicious dessert that screams summer? You’re in the right place! This easy Georgia Peach Crumble Cheesecake recipe blends creamy cheesecake with sweet, juicy
To make Mini Pineapple Upside-Down Cheesecakes, you will need: - 1 cup crushed graham crackers - 1/4 cup unsalted butter, melted - 2 tablespoons brown sugar - 8 oz cream cheese, softened - 1/2 cup granulated sugar - 1 teaspoon vanilla extract - 1/2 cup sour cream - 2 large eggs - 1 cup crushed pineapple, drained - Maraschino cherries, for garnish You'll need a few tools to make this dessert: - Muffin tin - Paper liners - Mixing bowls - Electric mixer - Spatula You can switch some ingredients if you need to: - Use coconut crumbs instead of graham crackers for a different flavor. - Swap sour cream with Greek yogurt for a tangy twist. - If you want it dairy-free, use a dairy-free cream cheese. - Maple syrup can replace granulated sugar for sweetness. These simple swaps can keep the recipe fun and fresh. Enjoy making your own version of these delightful cheesecakes! For the full recipe, check the previous section. First, gather your ingredients. You will need: - 1 cup crushed graham crackers - 1/4 cup unsalted butter, melted - 2 tablespoons brown sugar - 8 oz cream cheese, softened - 1/2 cup granulated sugar - 1 teaspoon vanilla extract - 1/2 cup sour cream - 2 large eggs - 1 cup crushed pineapple, drained - Maraschino cherries, for garnish Next, preheat your oven to 325°F (160°C). Line a muffin tin with paper liners. This helps with easy removal later. In a mixing bowl, combine the crushed graham crackers, melted butter, and brown sugar. Mix until everything sticks together. This will be your crust. Now, press about 1 tablespoon of the graham cracker mixture into the bottom of each muffin liner. This forms a nice base for your cheesecake. In a separate bowl, beat the softened cream cheese and granulated sugar until it becomes smooth. This step is key for a creamy texture. Add in the vanilla extract and sour cream. Mix well until everything is blended. Now, add the eggs one at a time. Mix on low speed until just combined. Be careful not to over-mix. This keeps your cheesecake fluffy. Gently fold in the drained crushed pineapple. This adds a sweet and tangy flavor. Pour the cheesecake batter evenly over the crusts in the muffin tin. Fill each liner about 3/4 full to allow for rising. Bake for 20-25 minutes. The edges should be set, but the centers will still jiggle slightly. This is normal. After baking, remove the tin from the oven. Let the cheesecakes cool to room temperature. This step is important to prevent sogginess. Once cooled, refrigerate the cheesecakes for at least 2 hours. This helps them set correctly. When ready to serve, carefully remove each cheesecake from the muffin tin. Top each with a maraschino cherry for a pop of color. For a fun presentation, place each mini cheesecake on a decorative plate. Drizzle with extra crushed pineapple for an extra tropical feel. Enjoy your delightful mini pineapple upside-down cheesecakes! For the full recipe, check the earlier section. To get the right texture, start with room temperature cream cheese. This helps mix it smoothly. When you beat the cream cheese and sugar, do it on low speed. Too much mixing adds air, which can make your cheesecake puff up and crack. Add eggs one at a time, mixing just until blended. Fold in the crushed pineapple gently. This keeps the mixture thick and creamy. These mini cheesecakes look great on a plate. Place each one on a colorful dish. Drizzle extra crushed pineapple over the top. Add a maraschino cherry for a fun touch. You can also sprinkle some toasted coconut for added flavor and crunch. Serve with whipped cream on the side for a rich finish. Pair these cheesecakes with a light drink. A chilled glass of coconut water works well. You can also try a fruity iced tea or lemonade. If you're feeling fancy, a scoop of coconut sorbet complements the tropical taste. These pairings make your mini pineapple upside-down cheesecakes even more delightful. For the full recipe, check out the recipe link. {{image_2}} You can change the flavor of your mini cheesecakes easily. Try adding coconut for a tropical twist. Just mix in 1/4 cup of sweetened shredded coconut with the crushed pineapple. For a chocolate version, add 1/4 cup of cocoa powder to the cream cheese mix. You can also use different fruits, like mango or peach, for exciting new tastes. Each option brings its unique flair, making every bite fun. Toppings can make your mini cheesecakes even better. Aside from maraschino cherries, you can add fresh fruit slices. Strawberries, kiwis, or blueberries work well. If you love nuts, sprinkle some chopped pecans or walnuts on top. Drizzling caramel or chocolate sauce adds a sweet touch too. These toppings not only look great but also add new flavors and textures. You can make these mini cheesecakes gluten-free easily. Use gluten-free graham crackers or almond flour for the crust. For a dairy-free option, swap cream cheese and sour cream with vegan alternatives. Brands like Tofutti or Kite Hill offer great options. Ensure the eggs are from a trusted source if you want to keep it dairy-free. This way, everyone can enjoy these delicious treats! For the full recipe, check out the section above. Store your mini cheesecakes in the fridge. Use a tight container to keep them fresh. Place parchment paper between layers if you stack them. This helps prevent sticking. They will last about five days. You can freeze these mini cheesecakes too! Wrap each cheesecake in plastic wrap. Then, place them in a freezer-safe bag. They keep well for up to three months. To enjoy, thaw them overnight in the fridge. This keeps them creamy and tasty. Reheat mini cheesecakes gently. Place them in a warm oven at 200°F (93°C) for about 10 minutes. This warms them without cooking more. You can also enjoy them cold. Either way, they taste amazing! For the full recipe, check out the details above. Mini cheesecakes can last up to a week in the fridge. Store them in an airtight container. This keeps them fresh and tasty. If you want them to last longer, consider freezing them instead. Yes, you can make these cheesecakes a day or two before serving. Just let them cool and chill in the fridge. This allows the flavors to blend nicely. It also makes your day of serving less hectic. Cracks can happen, but don’t worry! If they do, you can fix them. Once cooled, cover with whipped cream or fruit. This makes them look fancy and hides any cracks. Remember, cracks do not affect the taste. Enjoy your delicious mini pineapple upside-down cheesecakes! For the Full Recipe, check the earlier sections. You now have all you need to create the perfect mini cheesecake. We covered the ingredients, special equipment, and helpful tips for substitutions. I gave you step-by-step instructions from prep to baking and serving. We shared secrets to achieve the best texture and served delicious ideas to pair with your dessert. You can customize flavors and toppings, plus learn to store them effectively. Remember, mini cheesecakes are flexible and fun. Enjoy making them your own!
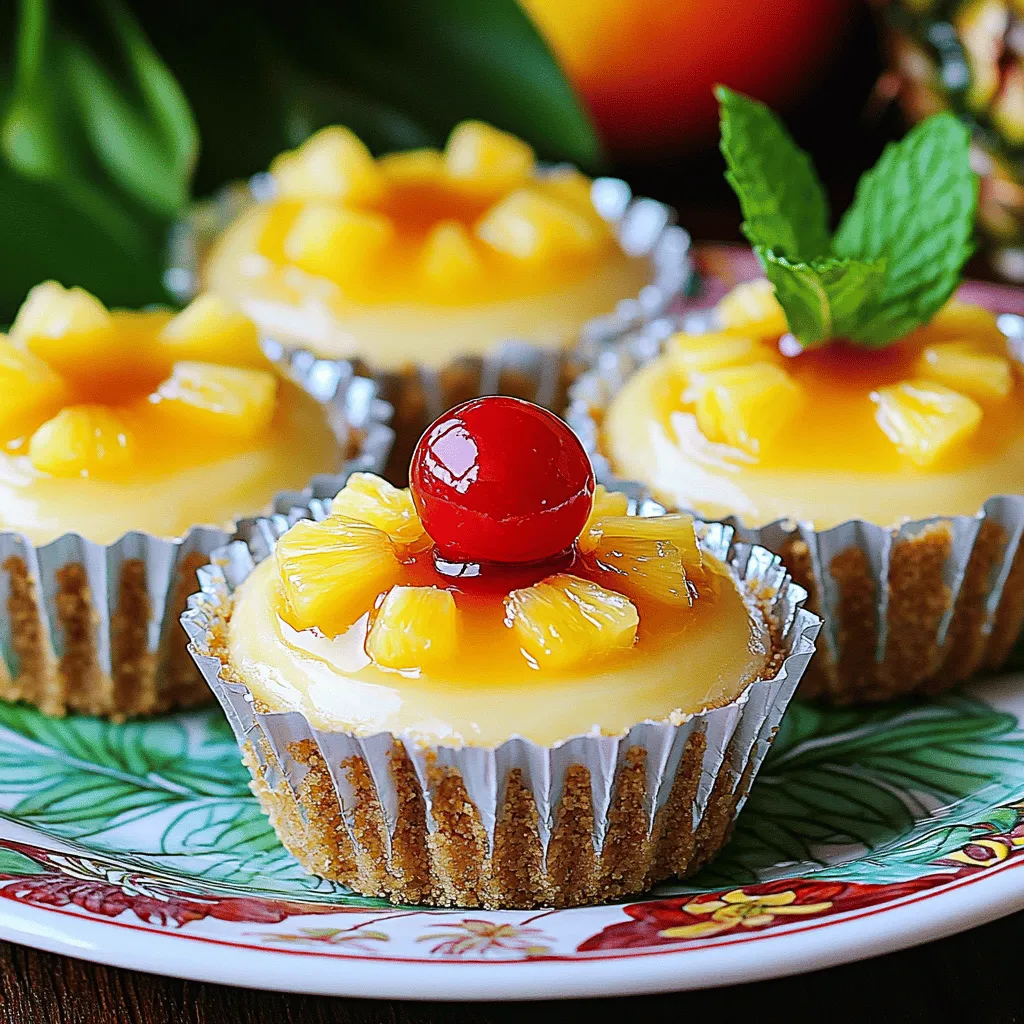
Mini Pineapple Upside-Down Cheesecakes Delight
Craving a sweet treat that’s both fun and easy to make? These Mini Pineapple Upside-Down Cheesecakes are the perfect choice! With a buttery crust, creamy
To make a rich dark chocolate mousse cake, you need some key ingredients. Here’s what you’ll need: - 1 cup dark chocolate (70% cocoa), chopped - 1/2 cup unsalted butter, cubed - 3/4 cup granulated sugar - 2 large eggs - 1 teaspoon vanilla extract - 1/4 cup all-purpose flour - 1/4 teaspoon salt - 1 cup heavy cream - 2 tablespoons powdered sugar - 1 tablespoon cocoa powder (for dusting) - Fresh berries (for garnish) These ingredients come together to create a cake that is both simple and decadent. You can add some optional ingredients to make your cake even better. Consider these options: - Espresso powder: A teaspoon can enhance the chocolate flavor. - Orange zest: A teaspoon adds a fresh, citrus note. - Sea salt: A pinch can balance the sweetness. These optional ingredients can add a personal touch to your dessert. Don't worry if you don't have an ingredient. Here are some easy swaps: - Dark chocolate: Use semi-sweet chocolate if needed. - Unsalted butter: You can replace it with coconut oil. - Heavy cream: Use a non-dairy milk or whipped coconut cream. - Granulated sugar: Swap it with brown sugar for a richer taste. These substitutions help you adapt the recipe to your pantry. You can find the Full Recipe above for more details. First, set your oven to 350°F (175°C). Grease an 8-inch round cake pan. Use a paper liner at the bottom. This helps with easy removal later. Next, grab your dark chocolate and unsalted butter. Place them in a double boiler or a heatproof bowl over simmering water. Stir them together until smooth. This step is key. Let the mix cool a bit before using it. In a new mixing bowl, whisk together granulated sugar and eggs. Beat them until the mix is creamy and light. This will take about 2-3 minutes. Add vanilla extract next and stir it in well. Slowly pour in the melted chocolate mix, stirring until fully combined. Now, sift the flour and salt over the batter. Fold gently, but don’t over-mix. Pour the batter into your prepared pan. Smooth the top with a spatula. Bake for 22-25 minutes. Check with a toothpick. It should come out with a few moist crumbs. Let the cake cool in the pan for 10 minutes. Then, move it to a wire rack to cool completely. Once cool, cut the cake in half. This gives you two layers. Spread whipped cream on the bottom layer. Place the top layer gently on the cream. Cover the top of the cake with more whipped cream. Finish by dusting cocoa powder on top. Add fresh berries for a nice touch. This simple process gives you a rich and creamy dark chocolate mousse cake. You can find the Full Recipe for more details. Melting chocolate sounds simple, but it can be tricky. Use a double boiler for the best results. If you don't have one, place a heatproof bowl over a pot of simmering water. This method helps heat the chocolate evenly. Stir the chocolate and butter together until smooth. Remove it from the heat before it gets too hot. Chocolate can seize if it gets too hot. To whip cream well, start with cold tools. Place your mixing bowl and beaters in the fridge for a bit. Use heavy cream for the best results. Pour it into your chilled bowl and start mixing on low speed. Gradually increase the speed until soft peaks form. Don't overbeat it; this turns it into butter. If you want sweetened cream, add powdered sugar while mixing. One common mistake is overmixing your batter. Mix just until the flour disappears. This keeps your cake light and fluffy. Another mistake is skipping the cooling time. Let the cake cool completely before frosting it. If you frost it too early, the whipped cream can melt. Finally, always check your oven temperature. An oven thermometer can help ensure it’s accurate. Following these tips will help you make the best dark chocolate mousse cake. For the Full Recipe, check out the details above. {{image_2}} You can add flavors to make your dark chocolate mousse cake special. Try adding orange zest for a fresh twist. A little coffee can enhance the chocolate taste too. You can also mix in some mint extract for a refreshing touch. Each flavor adds its own unique flair. Experimenting with flavors makes baking more fun. To make a gluten-free dark chocolate mousse cake, you can swap the all-purpose flour. Use almond flour or a gluten-free blend instead. This change keeps the cake rich and moist. It also ensures everyone can enjoy it. Just make sure the chocolate and other ingredients are gluten-free. Your cake will taste just as good, if not better! If you want a vegan version, there are simple swaps to make. Replace eggs with flaxseed meal or chia seeds mixed with water. Use coconut oil instead of butter for richness. For cream, choose coconut cream or a vegan whipped topping. Dark chocolate can be vegan too; just check the label. These changes create a delicious vegan dark chocolate mousse cake that everyone will love. For the complete steps, check out the Full Recipe. To keep your dark chocolate mousse cake fresh, wrap it well. Use plastic wrap or aluminum foil. Store it in the fridge for the best taste. Avoid placing it near strong-smelling foods. This keeps the flavors intact. If you plan to eat it later, leave the berries off until serving. This prevents them from getting soggy. When stored properly, the cake lasts about 3 to 5 days in the fridge. After five days, the taste may change. If you notice any signs of spoilage, like a strange smell, throw it out. Always check before enjoying your treat. Want to save some for later? You can freeze the cake! First, wrap it tightly in plastic wrap, then foil. Label it with the date for easy tracking. It can last up to 3 months in the freezer. When ready to eat, thaw it in the fridge overnight. Enjoy the same delicious flavor! For the Full Recipe, click here. Dark chocolate mousse cake is a rich dessert that combines the flavors of dark chocolate and creamy mousse. It has a light, airy texture and a deep chocolate taste. The cake is often layered with whipped cream, making it extra special. This cake is perfect for chocolate lovers and great for celebrations. Yes, you can make this cake ahead of time. It stays fresh in the fridge for up to three days. Just cover it well to keep it moist. You can also prepare the cake layers and whipped cream separately. Assemble it right before serving for the best taste. You can find the Full Recipe for Dark Chocolate Mousse Cake in this article. It provides step-by-step instructions and all the ingredients you need. You can serve this cake with fresh berries or a scoop of vanilla ice cream. A drizzle of chocolate sauce also adds a nice touch. You might even pair it with a cup of coffee or a glass of dessert wine to enhance the flavors. You learned about key ingredients for dark chocolate mousse cake and how to use them. I shared tips for melting chocolate and creating whipped cream. Variations like gluten-free and vegan options allow everyone to enjoy this treat. Proper storage keeps your cake fresh and tasty. Now, you can make a delightful mousse cake. I hope you feel ready to bake and share this dessert with friends and family. Enjoy every bite!
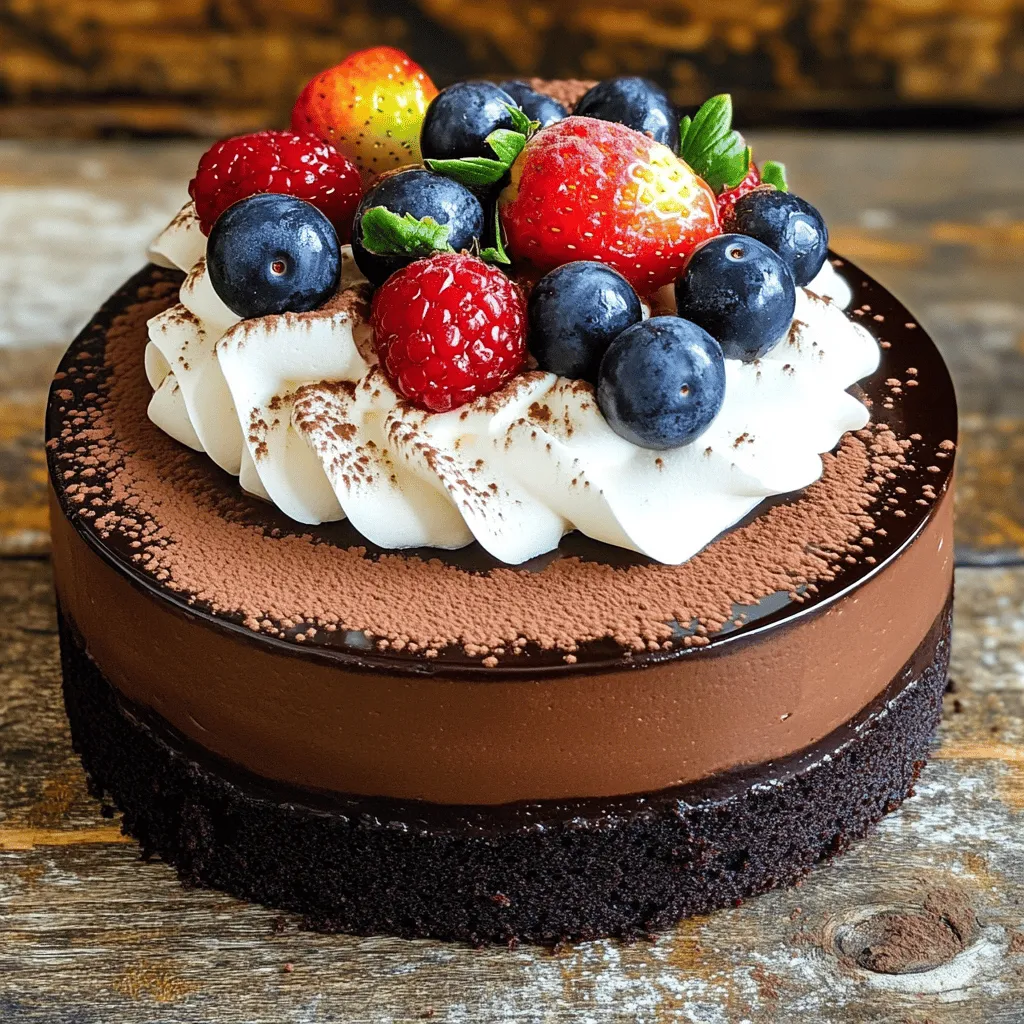
Dark Chocolate Mousse Cake Simple and Decadent Treat
If you love rich, chocolatey desserts, then you’re in for a treat! Dark Chocolate Mousse Cake is the ultimate indulgence, balancing a smooth texture with
Let’s dive into what you need to make Nutella Lava Cookies. This list will help you gather all the right items. - 1 cup all-purpose flour - 1/2 teaspoon baking soda - 1/4 teaspoon salt - 1/2 cup unsalted butter, softened - 1/2 cup granulated sugar - 1/4 cup brown sugar, packed - 1 teaspoon vanilla extract - 1 large egg - 1/3 cup Nutella (plus more for filling) - 1/2 cup chocolate chips (milk or dark) - Sea salt flakes, for sprinkling These ingredients create the base for your cookies. Each item plays a key role. The flour gives the cookie structure. The butter and sugars keep it soft and sweet. The Nutella adds a rich, gooey center that makes these cookies special. Gather some tools to make the process smooth. You’ll need: - Mixing bowls - Whisk - Cookie scoop - Parchment paper - Baking sheet - Wire rack Using the right equipment helps you mix well and bake evenly. The mixing bowls let you combine ingredients easily. A cookie scoop helps form perfect dough balls. Parchment paper keeps cookies from sticking to the sheet. Finally, the wire rack cools them down after baking. With these ingredients and tools, you are ready to create a delicious treat! For the full recipe, check out the detailed instructions. - Preheat your oven to 350°F (175°C) and line a baking sheet with parchment paper. - In a bowl, whisk together 1 cup of flour, 1/2 teaspoon of baking soda, and 1/4 teaspoon of salt. Set this mix aside. - In a large bowl, cream 1/2 cup of softened butter, 1/2 cup of granulated sugar, and 1/4 cup of brown sugar until light and fluffy. This takes about 2-3 minutes. - Beat in 1 teaspoon of vanilla extract and 1 large egg until well mixed. - Gradually add in the dry mix, stirring just until combined. Be careful not to overmix. - Gently fold in 1/3 cup of Nutella and 1/2 cup of chocolate chips into the dough. Make sure they are evenly spread. - Use a cookie scoop to form balls of dough, placing them on the prepared sheet with space in between. - Press your thumb into the center of each ball to make a small well. Fill this well with a dollop of additional Nutella and cover it with more dough. - Sprinkle a pinch of sea salt flakes on top of each cookie before baking. - Bake in the preheated oven for 10-12 minutes. The edges should be golden, and the center should look soft. - Let the cookies cool on the baking sheet for 5 minutes before transferring them to a wire rack. Enjoy them warm for that gooey center! For the full recipe, check out the detailed instructions above! To get that perfect gooey center, you need to bake just right. Start with chilled dough. This helps control spreading. When you form the cookies, make a small well in the center. Fill it with Nutella. This makes every bite rich and melty. Ingredient temperature matters too. Use softened butter for smooth mixing. Cold eggs can make the dough tough. So, bring them to room temp for best results. Avoid overmixing the dough. Mix just until you see no flour. This keeps your cookies soft and chewy. Using too much flour is a common problem. Stick to the amount in the [Full Recipe]. Extra flour makes cookies dry and tough. Letting the cookies cool properly is key. If you move them too soon, they may break. Allow them to sit for five minutes on the sheet. Then, transfer them to a wire rack to cool completely. Misjudging baking time can ruin your cookies. Keep an eye on them. The edges should be golden, and the center soft. If you overbake, the gooey center will disappear. {{image_2}} You can change up Nutella Lava Cookies in fun ways. Here are a few ideas: - Adding nuts or sprinkles: Chopped nuts add crunch. Try walnuts or hazelnuts. Sprinkles bring color and fun. - Different types of chocolate: Swap chocolate chips for white or dark chocolate. Each type gives a unique taste. - Using peanut butter or other spreads: Replace Nutella with peanut butter for a nutty twist. You can also try almond or cookie butter. You can make Nutella Lava Cookies fit different diets. Here are some options: - Gluten-free options: Use a gluten-free flour blend instead of all-purpose flour. This keeps the cookies soft and gooey. - Vegan substitutions: Replace the egg with a flax egg or applesauce. Use vegan butter and dairy-free chocolate chips. - Lower sugar variations: Cut the sugar in half or use a sugar substitute. This helps if you want a less sweet treat. These variations let you enjoy Nutella Lava Cookies your way! For the full recipe, check the earlier section. To keep your Nutella lava cookies fresh, use an airtight container. Glass or plastic containers work well. Store cookies at room temperature. They stay soft and gooey for about three days. If you want to extend their life, put them in the fridge. Refrigerated cookies can last up to a week. Just remember, cold cookies lose some of their gooey charm. You can freeze the cookie dough for later use. Form the dough balls and place them on a baking sheet. Freeze the balls for about an hour until firm. After that, transfer them to a freezer-safe bag. They can stay frozen for up to three months. To bake frozen cookies, do not thaw them. Just add a couple of extra minutes to the baking time. Enjoy warm, gooey cookies anytime! Nutella Lava Cookies are soft, gooey cookies. They have a warm, melting center filled with Nutella. The outside is lightly crispy, while the inside is rich and chocolatey. Each bite brings a burst of flavor that makes them hard to resist. To check if the cookies are done, look for golden edges. The center should look soft and slightly undercooked. You can also gently press the cookies. If they spring back slightly, they are ready. Remember, they will firm up as they cool. Yes, you can make Nutella Lava Cookies ahead of time. Prepare the dough and chill it in the fridge for up to 24 hours. When you are ready, scoop and bake them. You can also freeze the dough for up to three months. Just thaw and bake when you crave them. You can find Nutella in most grocery stores. Look in the baking aisle or near the peanut butter. If you can't find it locally, you can order it online from many retailers. It’s easy to get your hands on this delicious spread. Yes! While Nutella is a favorite, you can use other spreads. Hazelnut or dark chocolate spreads work well. Feel free to experiment with different flavors to find your perfect match in these cookies. You learned how to make delicious Nutella Lava Cookies with easy steps and tips. Use the right ingredients and tools for the best results. Remember to avoid common mistakes to keep your cookies gooey and tasty. You can even try fun variations to mix things up! Enjoy baking and sharing these cookies with friends and family. They are sure to impress! Keep practicing, and you'll become a cookie expert in no time. Happy baking!
Nutella Lava Cookies Irresistible and Gooey Treat
Are you ready to dive into a sweet adventure? Nutella Lava Cookies are the gooey treats you didn’t know you needed! Imagine biting into a
Gather these simple ingredients for Ina Garten's Chocolate Cake. Each one plays a key role in creating a rich and moist dessert. - 1 ¾ cups all-purpose flour - 2 cups granulated sugar - ¾ cup unsweetened cocoa powder - 1 ½ teaspoons baking powder - 1 ½ teaspoons baking soda - 1 teaspoon salt - 2 large eggs - 1 cup whole milk - ½ cup vegetable oil - 2 teaspoons vanilla extract - 1 cup boiling water - 1 cup semi-sweet chocolate chips (optional) Each ingredient adds special flavor and texture. The flour gives structure, while sugar sweetens the cake. Cocoa powder brings a deep chocolate flavor. Baking powder and baking soda help the cake rise. Salt enhances the other flavors. Eggs add moisture and richness. Milk and oil keep the cake soft. Vanilla extract gives a sweet aroma. Boiling water helps mix everything well. If you want extra chocolatey goodness, add chocolate chips. They melt and create pockets of rich chocolate. For the full recipe, check out the complete instructions on how to bring these ingredients together. - Preheat oven to 350°F (175°C). - Grease or line two 9-inch round cake pans. - In a large bowl, mix flour, sugar, cocoa powder, baking powder, baking soda, and salt. - Add eggs, milk, vegetable oil, and vanilla extract to the dry mix. - Stir in boiling water; the batter will be thin. - If desired, fold in chocolate chips for extra richness. - Divide the batter evenly between the pans. - Bake for 30-35 minutes or until a toothpick comes out clean. Follow these steps carefully for a delightful treat! For the complete process, check the Full Recipe. - Ensuring proper oven temperature Always preheat your oven to 350°F (175°C). An accurate oven helps the cake rise well. Use an oven thermometer if you doubt your oven's accuracy. - Testing for doneness with a toothpick Insert a toothpick in the center of the cake. If it comes out clean, your cake is ready. If it has wet batter, bake a bit longer, checking every few minutes. - Best types of chocolate frosting to use I love using a rich buttercream or ganache. Both add a creamy texture and deep chocolate flavor. You can also try cream cheese frosting for a tangy twist. - Tips for an even frosting application Start with a crumb coat. This thin layer traps crumbs. Chill the cake for about 30 minutes. Then, apply a thicker layer of frosting. Use a spatula to smooth it out. - Garnishing with chocolate shavings Use a vegetable peeler to create shavings from a chocolate bar. Sprinkle these on top for a beautiful touch. It adds elegance and extra chocolate flavor. - Using powdered sugar for an elegant finish Dust powdered sugar over the finished cake. This gives a lovely, snowy effect. It’s an easy way to make your cake look sophisticated without much effort. {{image_2}} You can easily boost the cake's flavor. Try adding espresso for a mocha twist. Just mix in one tablespoon of instant espresso powder with the dry ingredients. It adds depth and richness. Another fun option is to add orange zest. Use about one tablespoon of fresh zest from an orange. It gives the cake a bright, citrus note that pairs well with the chocolate. The frosting can change the whole cake. Cream cheese frosting offers a tangy contrast. To make it, beat together cream cheese, butter, powdered sugar, and vanilla. Spread it thickly on the cake for a rich taste. Whipped ganache is another choice. It’s light and airy, which makes it perfect for a less heavy finish. Heat heavy cream, pour it over chocolate, and let it cool. Whip it until fluffy, then frost your cake with it. If you need gluten-free options, almond flour or coconut flour works well. Use a mix that will give you the right texture. For dairy-free variations, substitute almond milk or oat milk for regular milk. You can also use flax eggs instead of chicken eggs. Mix one tablespoon of flaxseed meal with three tablespoons of water. Let it sit for five minutes, and it works great in the cake. For the complete recipe, check the Full Recipe section. Store your cake at room temperature for the best flavor. Keep it in an airtight container. This method keeps the cake soft and moist. If stored right, it stays fresh for about three days. Make sure to place it away from direct sunlight. This will help maintain its taste and texture. If you need to store the cake longer, the fridge works well. Wrap it tightly in plastic wrap or foil. This step keeps it from drying out. The cake can last up to a week in the fridge. Just remember to let it warm up a bit before serving. This helps to bring back its soft texture. Freezing is a great way to save cake for later. You can freeze whole cakes or just the layers. First, let the cake cool completely. Then wrap it tightly in plastic wrap, followed by aluminum foil. This method prevents freezer burn. It can last up to three months in the freezer. When you're ready to enjoy it, thaw it in the fridge overnight. This keeps the cake moist and tasty. To make this cake even more moist, try these tips: - Use buttermilk instead of whole milk. It adds a rich flavor and moisture. - Add an extra egg. This gives the cake more structure and moisture. - Include a bit of sour cream. Just ½ cup can help keep it moist. - Pour in some brewed coffee. It enhances the chocolate flavor and adds moisture. Consider these options to boost your cake's moisture. Each choice adds a unique taste while keeping the cake soft and delicious. Yes, you can make this cake ahead of time. Here are some ideas: - Bake the cakes and let them cool completely. Wrap them tightly in plastic wrap. They can stay fresh for up to three days at room temperature. - You can also freeze the layers. Just wrap them well and store in the freezer. They can last for up to three months. Thaw them in the fridge overnight before frosting. - Make the frosting ahead too. Store it in the fridge for up to a week. Just give it a good mix before using. These tips help you prepare in advance, so you can enjoy the cake stress-free. Frosting a layered cake can be fun! Here’s how to do it neatly: - Start with cooled cake layers. This helps prevent melting. - Place the first layer on a flat surface. Use a cake stand if you have one. - Spread a thin layer of frosting on top. This is called a crumb coat. It seals in crumbs. - Chill the cake for 30 minutes. This helps the crumb coat set. - Add the final layer of frosting. Spread it smoothly with a spatula. - For a clean edge, use a bench scraper. It helps create sharp, neat sides. These steps keep your cake looking beautiful and tasty. Enjoy the process of making it perfect! This article covered a simple, delicious cake recipe. You learned about the ingredients, steps to bake, and ways to store your cake. I shared tips for flavor and frosting variations to keep it exciting. Baking can be fun and easy. With the right steps, anyone can create a tasty treat. Experiment and enjoy the process. Your cake will impress friends and family, and they will love every bite. Happy baking!
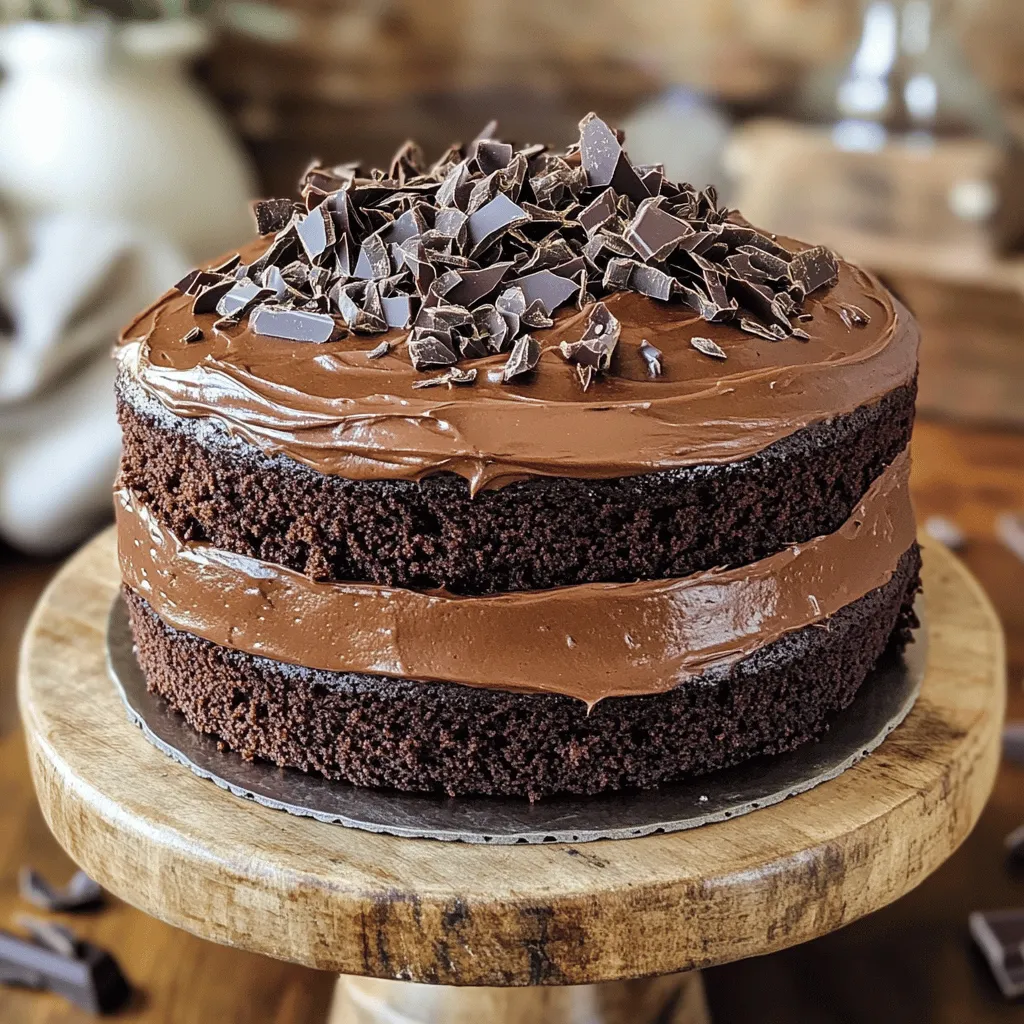
Ina Garten’s Chocolate Cake Delightfully Rich Recipe
If you crave a rich and moist chocolate cake, you’ve found the right recipe! Ina Garten’s Chocolate Cake is easy to make and perfect for
To make these cookies, you need specific items. Here’s what you will need: - 2 ½ cups all-purpose flour - 1 teaspoon baking soda - 1 teaspoon baking powder - ½ teaspoon salt - 1 tablespoon ground cinnamon - 1 cup unsalted butter, softened - 1 cup granulated sugar - 1 cup brown sugar, packed - 2 large eggs - 1 teaspoon vanilla extract - ½ cup powdered sugar (for icing) - 2 tablespoons milk (for icing) - Extra cinnamon sugar for rolling: 3 tablespoons granulated sugar mixed with 1 teaspoon ground cinnamon These ingredients create the soft and chewy texture you’ll love. For best results, measure your ingredients carefully. Use a kitchen scale for the flour if you have one. If you need to make changes, here are some options: - Butter: You can use margarine, but it may change the taste. - Sugar: Coconut sugar can replace brown sugar for a unique flavor. - Eggs: Flax eggs work well for a vegan option. Use one tablespoon of ground flaxseed with three tablespoons of water. These substitutions keep the cookies tasty while fitting your needs. Icing makes these cookies extra special. The icing adds sweetness and a nice finish. Here’s what you can use: - Powdered sugar: This is essential for the icing. - Milk: Use any milk you have, like almond or oat milk. - Extra cinnamon sugar: Sprinkle this on top for added flavor. Feel free to get creative with toppings. You can even add sprinkles for a fun touch. For the full recipe, check out the complete guide. Start by gathering all your ingredients. This will make baking easy and fun. You need: - 2 ½ cups all-purpose flour - 1 teaspoon baking soda - 1 teaspoon baking powder - ½ teaspoon salt - 1 tablespoon ground cinnamon - 1 cup unsalted butter, softened - 1 cup granulated sugar - 1 cup brown sugar, packed - 2 large eggs - 1 teaspoon vanilla extract - ½ cup powdered sugar (for icing) - 2 tablespoons milk (for icing) - Extra cinnamon sugar for rolling: 3 tablespoons granulated sugar mixed with 1 teaspoon ground cinnamon Next, preheat your oven to 350°F (175°C). This step warms up the oven and gets it ready for your cookies. Line two baking sheets with parchment paper. This helps the cookies not stick. First, mix the dry ingredients. In a medium bowl, whisk the flour, baking soda, baking powder, salt, and cinnamon together. This gives the cookies a nice flavor. In a large bowl, cream the softened butter with the granulated and brown sugars. Beat this mixture until it is light and fluffy. This usually takes about 3-4 minutes. Then, add the eggs one at a time, mixing well after each one. Add the vanilla extract last. Now, slowly mix the dry ingredients into the wet mixture. Be careful not to overmix, as this can change the cookie texture. Once combined, cover the dough with plastic wrap. Chill it in the fridge for at least 30 minutes. This makes the dough easier to handle. After chilling, scoop tablespoon-sized balls of dough. Roll each ball in the cinnamon sugar mixture until fully coated. Place the dough balls on your baking sheets. Make sure to leave enough space between them. Bake the cookies for 10-12 minutes. Look for lightly golden edges while the centers remain soft. Once baked, let them cool on the sheets for 5 minutes before moving them to a wire rack. Always keep an eye on your cookies while baking. Ovens can vary in temperature. If you notice your cookies browning too fast, reduce the temperature to 325°F (160°C). For soft and chewy cookies, the centers should look slightly underbaked when you take them out. Check for doneness by gently pressing the edges. They should be firm but not hard. If they flatten too much, your dough might be too warm. Remember, cooling the cookies on a wire rack helps them maintain their soft texture. For perfect icing, whisk together powdered sugar and milk until smooth. Drizzle or pipe this over the cooled cookies for that sweet finish. For more tips and the complete recipe, check out the Full Recipe. To get the best texture, always use room-temperature butter. This helps mix well with sugars. Cream the butter and sugars until light and fluffy. This should take about 3-4 minutes. Chill the dough before baking. This helps the cookies hold their shape. Bake them until the edges are golden but the centers stay soft. This is key for that chewy texture. One big mistake is overmixing the dough. Mix just until combined. Overmixing makes cookies tough. Another mistake is not chilling the dough. Chilling helps with handling and texture. Also, don’t skip the cinnamon sugar coating. It adds flavor and a nice look. Lastly, be careful with baking times. Each oven is different. Start checking your cookies at 10 minutes. Make sure cookies are cool before icing. Warm cookies can melt the icing. Use a whisk for a smooth icing. Mix the powdered sugar and milk until it's not lumpy. You can drizzle or pipe the icing based on your style. For a fun twist, add more cinnamon to the icing. This adds a nice touch. If you want, sprinkle some cinnamon sugar on top too. It makes them even prettier. For the full recipe, check the instructions above! {{image_2}} You can change these cookies easily. For a nutty taste, add chopped walnuts or pecans. Nuts give a nice crunch and pair well with cinnamon. If you love chocolate, mix in chocolate chips. The sweet chocolate will melt your heart. You can also try white chocolate or butterscotch chips for a fun twist. Each add-in can change the flavor and make every batch unique. If you need gluten-free cookies, no problem! Use a gluten-free flour blend instead of all-purpose flour. Many blends work well in cookies. Just look for one that includes xanthan gum. This will help keep the cookies soft and chewy. Be sure to check all other ingredients, like baking soda and baking powder, to ensure they are gluten-free. This way, everyone can enjoy these tasty treats! You can make these cookies vegan too! Swap the butter for vegan butter or coconut oil. Replace the eggs with flax eggs or applesauce. Use 1 tablespoon of flaxseed meal mixed with 2.5 tablespoons of water for each egg. This works great for binding. Also, check your sugar to ensure it’s vegan-friendly. With these swaps, you’ll have soft and chewy cookies that everyone can share. For the full recipe, make sure to check the original source. To keep your soft and chewy cinnamon roll sugar cookies fresh, store them in an airtight container. This helps maintain their soft texture and prevents them from drying out. You can layer parchment paper between the cookies to avoid sticking. For added freshness, try placing a slice of bread in the container. The cookies will absorb moisture from the bread, staying soft longer. Freezing unbaked dough is a smart way to save time. First, scoop dough balls and place them on a baking sheet lined with parchment paper. Freeze them for about an hour until solid. Then, transfer the dough balls to a freezer bag. Make sure to label the bag with the date and type of cookie. When you're ready to bake, just take out the desired amount and bake them straight from the freezer. You may need to add a minute or two to the baking time. When stored properly in an airtight container, these cookies can last up to one week at room temperature. If you freeze them, they can last up to three months. Just remember to let them thaw at room temperature before serving. For the best flavor and texture, enjoy them within the first month after freezing. If you want to impress guests or treat yourself, check out the Full Recipe for all the details! Yes, you can make the dough ahead of time. After mixing, cover it well and chill it in the fridge. This lets the flavors meld and makes the dough easier to shape later. You can store the dough for up to three days. Just remember to let it sit at room temperature for a few minutes before rolling. The secret is in the butter and sugars. Using both granulated and brown sugar gives a nice balance of sweetness. Brown sugar adds moisture, which keeps the cookies soft. Plus, chilling the dough before baking keeps the cookies from spreading too much, maintaining that chewy center. You want to watch for the edges turning golden brown. The centers should look slightly underbaked. They will continue to cook a bit after you take them out. If you let them cool on the baking sheets for five minutes, they will firm up nicely. This method helps you keep that soft and chewy texture. For the full recipe, check the earlier section. You now have all the tools to make soft and chewy cinnamon roll sugar cookies. We've covered essential ingredients, the baking process, and tips to avoid common mistakes. You can even try fun flavor variations and learn to store them well. With this knowledge, you can impress friends and family with your baking skills. Enjoy every bite, and remember, practice makes perfect. Happy baking!
Soft and Chewy Cinnamon Roll Sugar Cookies Delight
If you crave soft and chewy treats, then you are in for a treat! Today, I’ll show you how to make delicious Cinnamon Roll Sugar
To make Oreo Dirt Cake, you'll need these simple ingredients: - 1 package (15.5 oz) Oreo cookies - 1/2 cup unsalted butter, softened - 8 oz cream cheese, softened - 1 cup powdered sugar - 3 cups milk - 1 package (3.4 oz) instant chocolate pudding mix - 1 tub (8 oz) whipped topping (like Cool Whip) - 1 cup gummy worms (optional for decoration) - 1 small potted plant or flower (optional for presentation) These ingredients create a rich and creamy dessert. The Oreos add a crunchy texture. The cream cheese and whipped topping bring a light and fluffy feel. The chocolate pudding gives it a sweet and chocolatey taste. You can easily find these items at any grocery store. Enjoy the fun of making this dessert with kids or friends! Creating Oreo Dirt Cake is easy and fun. Follow these steps to make this delightful no-bake dessert. - Step 1: Crush the Oreo cookies Start by crushing the Oreo cookies. Place them in a sealed plastic bag. Use a rolling pin to crush them into fine crumbs. Alternatively, you can use a food processor. Remember to save about 1 cup of crumbs for topping later. - Step 2: Combine butter and cream cheese In a large mixing bowl, beat the softened butter and cream cheese. Use an electric mixer for a smooth and creamy texture. This step is key for a rich base. - Step 3: Mix in powdered sugar Gradually add the powdered sugar to the butter and cream cheese. Mix until it's smooth and well blended. This gives your dessert a nice sweetness. - Step 4: Prepare pudding mixture In another bowl, whisk together the chocolate pudding mix and milk. Keep whisking for about 2 minutes until it thickens nicely. This will add a delicious chocolate flavor. - Step 5: Fold in whipped topping Gently fold the pudding mixture into the cream cheese mixture. Make sure it’s fully mixed in. You want a fluffy and rich filling for the cake. - Step 6: Layer the dessert In a large trifle dish or individual cups, start layering. First, add half of the crushed Oreo cookies to the bottom. Then, add half of the pudding mixture over the Oreos. Repeat with the remaining Oreo crumbs and pudding mixture. Finish by sprinkling the reserved Oreo crumbs on top. For fun, add gummy worms and place a small potted plant in the center if you like. This process is simple, and it makes a lovely dessert for any occasion. You can find the full recipe for Oreo Dirt Cake in the article. Enjoy making this sweet treat! - How to crush Oreos efficiently: To crush Oreos, place them in a sealed bag. Use a rolling pin to smash them into fine crumbs. This method keeps the mess contained. If you prefer, use a food processor for a quicker option. Just pulse the cookies until they reach a crumbly texture. - Substituting ingredients for dietary needs: If you need a dairy-free version, swap the cream cheese and butter with vegan options. For a gluten-free treat, use gluten-free Oreo cookies. Always check labels to make sure they meet your dietary needs. - Best methods for layering: Use a clear dish to show off the layers. Start with a layer of crushed Oreos, then add the pudding mix. Repeat this until you reach the top. This method creates a beautiful dessert that looks as good as it tastes. - Creative presentation ideas: Use individual cups for serving. Layer the dessert in clear cups to highlight the delicious layers. You can also add a small potted plant or flower on top for a fun touch. It gives a cute garden vibe! - Pairing options with beverages: Oreo Dirt Cake pairs well with milk or coffee. For a fun twist, try it with a chocolate shake. Each drink complements the rich chocolate flavors. - How to serve for different occasions: This dessert fits any celebration! Serve it at birthday parties or family gatherings. For a Halloween party, add gummy worms on top. It makes the cake fun and festive! {{image_2}} Oreo Dirt Cake is very flexible. You can swap out ingredients to fit your needs. - Vegan options for Oreo Dirt Cake: Use vegan cookies and dairy-free cream cheese. Replace the butter with coconut oil or vegan margarine. For the whipped topping, choose a plant-based version. This keeps it creamy and delicious! - Using different cookie flavors: While Oreos are classic, try other cookies. Chocolate mint cookies add a fun twist. Vanilla wafers give a lighter flavor. Experiment with any cookie you love! - Incorporating different toppings: Get creative with toppings! Add crushed candy bars for a crunch. Fresh fruit like strawberries or raspberries brighten the dish. For a fun touch, sprinkle colorful sprinkles or edible glitter on top. You can make Oreo Dirt Cake fit any theme or season. - Halloween variations with spooky decorations: Add plastic spiders or creepy candy eyes on top. Use orange and black sprinkles to set the mood. Kids love the spooky look! - Seasonal fruits as toppings: In spring, use berries for a fresh touch. Summer calls for tropical fruits like pineapple or mango. In fall, add caramel and apple slices for a cozy vibe. Each season brings new flavors! - Kid-friendly and party-themed ideas: Make mini versions in cups for parties. Let kids add their own toppings for fun. Create a dirt cake “bar” with different mixes and toppings for everyone to enjoy! For the full recipe, check out [Full Recipe]. To keep your Oreo Dirt Cake fresh, store it in the fridge. Use an airtight container or cover it tightly with plastic wrap. This keeps the dessert moist and tasty. If you want to save it for longer, you can freeze it. First, ensure it is in a freezer-safe container. You can freeze it for up to three months. When you want to eat it, let it thaw in the fridge overnight. To preserve freshness and texture, avoid adding gummy worms until you are ready to serve. This keeps them from getting soggy. Oreo Dirt Cake lasts about 3 to 5 days in the fridge. If you notice any signs of spoilage, throw it out. Look for changes in color or texture. If it smells off or starts to separate, it is best not to eat it. Always trust your senses! Can I make Oreo Dirt Cake ahead of time? Yes, you can make Oreo Dirt Cake ahead of time. It is best to chill it for a few hours. This allows the flavors to mix well. You can store it in the fridge for up to three days before serving. Can I use homemade whipped cream instead of Cool Whip? Absolutely! You can use homemade whipped cream if you prefer. Just make sure it's stiff enough to hold its shape. This will add a fresh taste to the cake. What can I use instead of gummy worms? If you want a different look, use chocolate sprinkles or crushed candy bars. Fresh fruit like strawberries or raspberries can also make a great topping. Be creative with your choices! Is Oreo Dirt Cake suitable for a gluten-free diet? Regular Oreos contain gluten, so this cake is not gluten-free. However, you can use gluten-free cookies to make it safe for those with gluten sensitivities. Look for gluten-free chocolate sandwich cookies. Can I use regular pudding instead of instant? Using regular pudding may change the texture. Instant pudding thickens quickly and sets well. If you use regular pudding, follow the package instructions to ensure it sets properly. For the full recipe and more details, check out the [Full Recipe]. This blog post guides you through creating a delicious Oreo Dirt Cake. You learned about the key ingredients, step-by-step instructions, and helpful tips to perfect your dessert. We also explored fun variations and storage options to keep it fresh. In summary, this dessert is easy and fun to make. With a few simple tweaks, you can personalize it for any occasion. Enjoy making this treat and share it with family and friends.
OREO DIRT CAKE Delightful No-Bake Dessert Recipe
Looking for a fun, easy dessert? This OREO Dirt Cake is the perfect no-bake treat! With layers of creamy goodness and crunchy cookies, it’s sure
- 2 cups fresh blueberries - 1/4 cup granulated sugar - 1/4 cup all-purpose flour - 1 teaspoon baking powder - 1/2 teaspoon cinnamon - 1/4 teaspoon salt - 2 large eggs - 1/2 cup milk - 1 teaspoon vanilla extract - 1 tablespoon melted butter (for greasing) - Powdered sugar for dusting (optional) I love using fresh blueberries in this recipe. They add a sweet and tangy flavor. The granulated sugar helps balance the natural tartness of the berries. All-purpose flour gives the pie its light texture. Baking powder is key for the rise. A little cinnamon adds warmth and a nice aroma. Salt enhances all the flavors in the pie. Eggs bind everything together and give it structure. Milk adds moisture, making each bite soft. Vanilla extract gives a lovely depth to the taste. Greasing the dish with butter helps prevent sticking. If you want, dusting with powdered sugar makes it pretty and sweet. This simple list of ingredients makes a delicious treat! For the full recipe, check the details above. - Preheat the oven to 350°F (175°C). - Grease a 9-inch pie dish with melted butter. This step helps prevent sticking. - In a bowl, combine 2 cups of fresh blueberries with 1/4 cup of granulated sugar. Stir gently to coat the berries. Set aside to let them release their juices. - In another bowl, mix 1/4 cup of all-purpose flour, 1 teaspoon of baking powder, 1/2 teaspoon of cinnamon, and 1/4 teaspoon of salt. Whisk until well combined. - In a large bowl, beat 2 large eggs until frothy. Add 1/2 cup of milk and 1 teaspoon of vanilla extract. Mix until smooth. - Gradually add the dry mixture to the wet mixture. Stir until just combined. Be careful not to overmix; it can make the pie tough. - Gently fold in the blueberries and any juices from the berries into the batter. - Pour the batter into the greased pie dish, spreading it evenly. - Bake in the preheated oven for 35-40 minutes. Check when the top is golden brown and a toothpick comes out clean. - Once baked, remove it from the oven. Let it cool on a wire rack for about 10 minutes before serving. For the full recipe, refer to the earlier section. Enjoy your crustless blueberry pie! To ensure the perfect baking time, set your timer for 35 minutes. Check the pie with a toothpick. If it comes out clean, it's ready. If not, bake for a few more minutes. Each oven may vary, so keep an eye on it. To avoid overmixing, combine the wet and dry ingredients gently. Stir just until you see no dry flour. This will keep your pie light and fluffy. Overmixing can make it dense and tough. Dust with powdered sugar for a touch of sweetness. It adds a nice look too. A light sprinkle makes your pie feel fancy. Pair your slice with ice cream or whipped cream. The cold creaminess contrasts nicely with the warm pie. Try vanilla or a berry flavor to enhance the dish. Adding lemon zest can brighten the pie’s taste. Just a teaspoon will do. It gives a fresh kick that pairs well with blueberries. You can also substitute spices for unique tastes. Try nutmeg or cardamom for a twist. These spices add warmth and depth to your dessert. {{image_2}} You can make crustless blueberry pie healthier. Swap regular flour for gluten-free flour. Almond flour or coconut flour works well. You can also use low-sugar options. Try stevia or monk fruit sweetener. Both keep the sweetness without the calories. Mix up the flavors by adding other fruits. You can use mixed berries like strawberries or raspberries. Apples or pears also add a nice touch. Just chop them small so they bake well. This gives you a tasty twist on the classic pie. Want a vegan crustless blueberry pie? Replace the eggs with flaxseed meal. Mix 1 tablespoon of flaxseed with 2.5 tablespoons of water. Let it sit for a few minutes to thicken. For milk, use almond or oat milk. This keeps the pie creamy and delicious. You can enjoy this treat without any animal products. For more details, check out the Full Recipe. After you bake your crustless blueberry pie, let it cool. Once it's cool, you can store leftovers in the fridge. Use an airtight container to keep the pie fresh. A glass or plastic container with a tight lid works well. This way, your pie stays moist and tasty for days. If you want to keep your pie longer, you can freeze it. Make sure the pie is completely cool before freezing. Wrap it tightly in plastic wrap, then place it in a freezer-safe bag. This helps prevent freezer burn. When you’re ready to enjoy it, take it out of the freezer. Let it thaw in the fridge overnight for the best results. In the fridge, your crustless blueberry pie can last about 3 to 4 days. Always check for spoilage before eating. Look for signs like an off smell or a change in color. If you see or smell anything strange, it’s best to toss it out. Keeping an eye on your pie ensures you enjoy it at its best! Yes, you can use frozen blueberries. They work well in this pie. Just remember to thaw them first and drain excess juice. This prevents the pie from becoming too watery. Frozen blueberries may be a bit softer after baking, but they taste great! You can replace sugar with a natural sweetener like honey or maple syrup. Use about half the amount of sweetener compared to sugar. You can also try ripe mashed bananas or unsweetened applesauce for sweetness. Adjust the amount based on your taste. You can serve this pie with whipped cream or vanilla ice cream. Both add a nice touch to the warm pie. Fresh mint leaves also make a great garnish. For a fun twist, try a drizzle of chocolate sauce on top! - Can I make this pie ahead of time? Yes, you can bake it a day before. Just store it in the fridge. Reheat it in the oven for a few minutes before serving. - Is this pie gluten-free? You can make it gluten-free by using gluten-free flour. Just substitute it for the all-purpose flour in the recipe. - Can I add other fruits to this pie? Yes! You can mix in other berries or even diced apples. Experiment to find your favorite fruit combo! Crustless blueberry pie is easy and fun to make. You need simple ingredients like blueberries, sugar, and eggs. Follow the steps to bake this tasty treat and use my tips to perfect it. Remember, you can customize it with different fruits or make a vegan version. Store leftovers properly to enjoy later. This pie suits any occasion and pairs well with whipped cream or ice cream. Enjoy this fresh dessert that satisfies your sweet cravings!
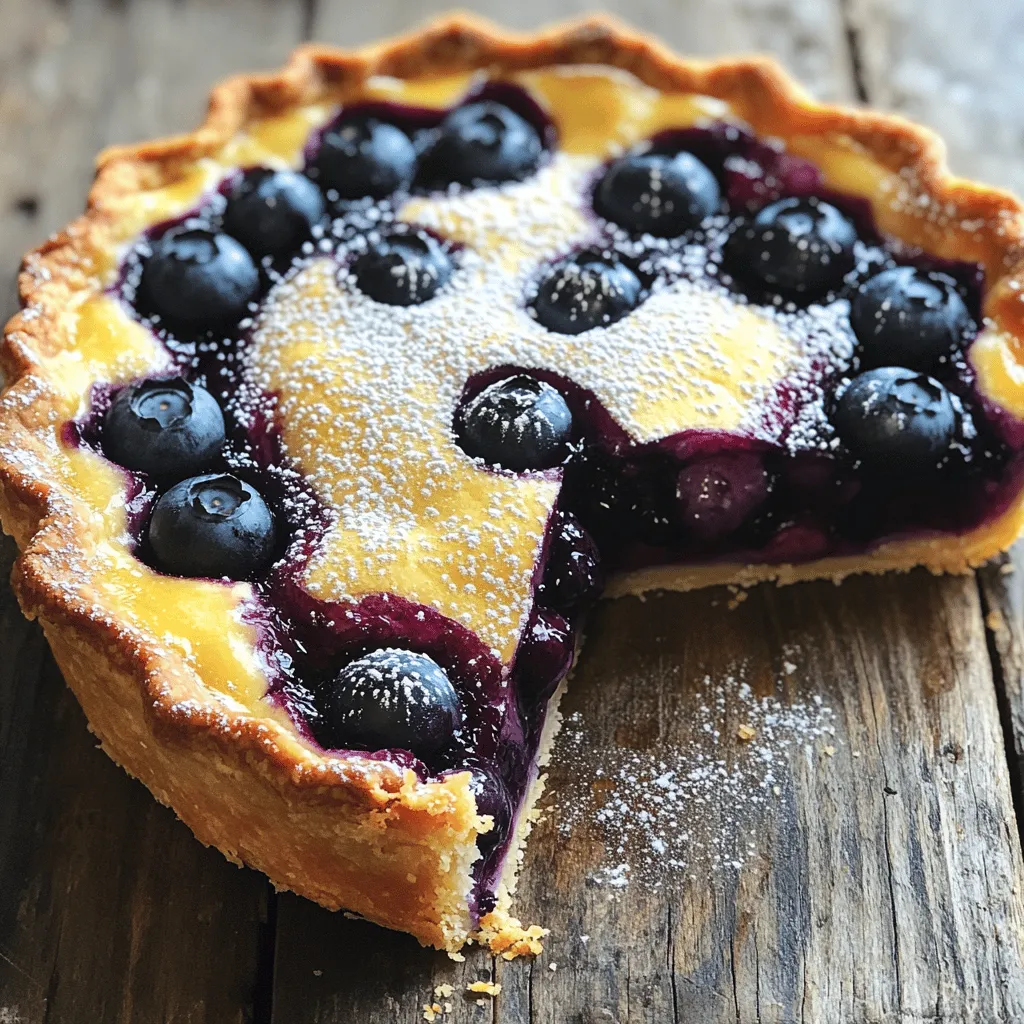
Crustless Blueberry Pie Simple and Delicious Treat
Crustless blueberry pie: a simple dessert that packs a flavor punch! I love this recipe because it’s quick, easy, and perfect for any occasion. With
To make this tasty lemon blueberry loaf, gather these main ingredients: - 1 ½ cups all-purpose flour - 1 teaspoon baking powder - ½ teaspoon baking soda - ¼ teaspoon salt - ½ cup unsalted butter, softened - ¾ cup granulated sugar - 2 large eggs - 1 teaspoon vanilla extract - 1 tablespoon lemon zest - ½ cup fresh lemon juice - 1 ½ cups fresh blueberries (or frozen, if unavailable) Each ingredient plays a key role. The flour gives structure, while the butter adds moisture. The eggs help bind everything together. The blueberries burst with flavor, and the lemon zest and juice bring a fresh kick. For the sweet glaze that tops the loaf, you will need: - 1 cup powdered sugar - 2 tablespoons fresh lemon juice - 1 tablespoon lemon zest This glaze adds a nice shine and extra lemon flavor. It’s simple yet effective. If you need to change the measurements, here are some easy conversions: - 1 cup = 16 tablespoons - ½ cup = 8 tablespoons - 1 tablespoon = 3 teaspoons These conversions can help you adjust the recipe to your needs. For example, if you want a smaller loaf, just halve the ingredients. For the full recipe, check out the Lemon Blueberry Bliss Loaf. First, gather all your ingredients. This makes cooking easier. You need: - 1 ½ cups all-purpose flour - 1 teaspoon baking powder - ½ teaspoon baking soda - ¼ teaspoon salt - ½ cup unsalted butter, softened - ¾ cup granulated sugar - 2 large eggs - 1 teaspoon vanilla extract - 1 tablespoon lemon zest - ½ cup fresh lemon juice - 1 ½ cups fresh blueberries Next, preheat your oven to 350°F (175°C). Grease and flour a 9x5 inch loaf pan. You can also line it with parchment paper for easy removal. In a mixing bowl, stir together the flour, baking powder, baking soda, and salt. Set this dry mix aside. In a large bowl, cream the softened butter and granulated sugar together. You want it light and fluffy, which takes about 3-4 minutes. Add the eggs one at a time. Mix well after each egg. Stir in the vanilla extract, lemon zest, and lemon juice. This adds great flavor! Now, slowly add the dry mix to the wet mix. Stir until just combined. Be careful not to overmix. Gently fold in the blueberries using a spatula. Make sure they are evenly spread without crushing them. Pour the batter into your prepared loaf pan. Smooth the top with a spatula. Bake for 50-60 minutes. To check doneness, insert a toothpick into the center. It should come out clean. While the loaf bakes, you can make the glaze. In a small bowl, whisk together the powdered sugar, lemon juice, and lemon zest until smooth. Once your loaf is baked, let it cool in the pan for 10 minutes. Then transfer it to a wire rack to cool completely. When cooled, drizzle the lemon glaze over the loaf. Let some glaze drip down the sides for a lovely finish. Enjoy this Lemon Blueberry Loaf with Glaze! For the full recipe, check out the details provided earlier. To get a soft and moist loaf, use room-temperature butter and eggs. This helps them mix better. Cream the butter and sugar well until fluffy. This creates air pockets that make your loaf light. Gently fold in the blueberries to keep them whole. This adds texture and flavor in every bite. Overmixing can make your loaf tough. Mix the wet and dry ingredients just until combined. You want to see a few flour streaks in the batter. Use a spatula to fold in the blueberries. This method keeps your loaf tender and fluffy. You’ll need a few tools for this recipe. A 9x5 inch loaf pan is perfect for shape. A mixing bowl for your wet ingredients is essential. Use a whisk for mixing dry ingredients and a spatula for folding. Having a toothpick handy will help check if your loaf is done. These tools make baking smooth and easy. For full details, check the Full Recipe. {{image_2}} If you don't have fresh blueberries, there are many tasty swaps. You can use raspberries, blackberries, or chopped strawberries. Each fruit brings a new flavor. Try using dried blueberries too! Just soak them in warm water for a few minutes to plump them. This makes them juicier when baked. Want to change the flavor? You can add different zest. Try orange or lime for a fun twist. You can also mix in nuts like walnuts or pecans. They add crunch and depth to the loaf. For a spicy kick, add a pinch of cinnamon or nutmeg. These spices work well with lemon and berries. For a gluten-free loaf, swap the all-purpose flour for a gluten-free blend. Make sure it has a good binding agent. For a dairy-free version, use coconut oil or a dairy-free butter substitute. You can also use plant-based milk instead of lemon juice. This keeps the loaf moist while catering to dietary needs. For the complete recipe, check out the Full Recipe section! To keep your lemon blueberry loaf fresh, wrap it tightly. Use plastic wrap or aluminum foil. You can also place it in an airtight container. This helps to keep out air and moisture. Store it at room temperature for up to three days. Avoid storing it in the fridge, as this can make it dry. If you want to enjoy your loaf longer, try these tips. You can place a slice of bread in the container. The bread will help keep the loaf moist. Check the bread every couple of days and change it if it gets hard. For longer storage, consider freezing the loaf. To freeze your lemon blueberry loaf, let it cool completely. Wrap it well in plastic wrap, then in foil. This double wrap protects it from freezer burn. Label it with the date. You can freeze it for up to three months. When you’re ready to eat it, let it thaw in the fridge overnight. For a quick option, you can also thaw it at room temperature for a few hours. Enjoying this loaf can be easy, even after freezing! For the full recipe, check the details above. Yes, you can use frozen blueberries. They work well in this recipe. Just be sure to add them straight from the freezer. Do not thaw them first. Thawing can make them mushy. Frozen berries might change the loaf's color slightly, but the taste stays great. You can tell when the loaf is done by using a toothpick. Insert it into the center of the loaf. If it comes out clean, the loaf is ready. If it has wet batter on it, bake for a few more minutes. The top should also look golden brown. This loaf is great on its own, but you can add some fun twists. Serve it with whipped cream or a scoop of vanilla ice cream. You can also pair it with a cup of tea or coffee. For a nice touch, sprinkle some extra lemon zest on top. Enjoy it fresh or toasted! For the full recipe, check out the full recipe section. In this article, we explored the key ingredients for Lemon Blueberry Loaf and the glaze. We also covered step-by-step instructions to ensure a perfect bake. Remember the tips to avoid overmixing and achieve the right texture. Variations allow for fun twists, and proper storage can keep your loaf fresh. With this knowledge, you can confidently make this delicious treat. Enjoy experimenting in your kitchen and savor each bite of your creation!
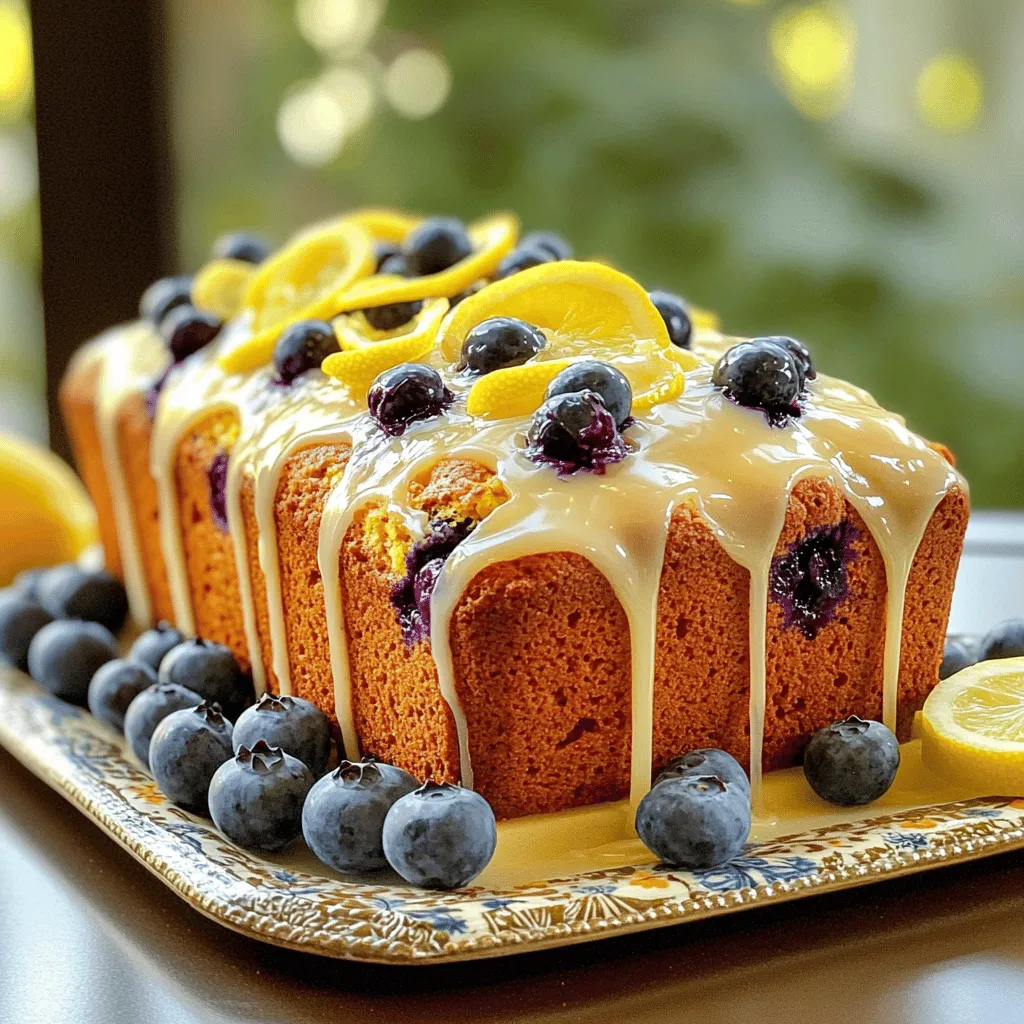
Lemon Blueberry Loaf with Glaze Simple and Tasty Recipe
Are you ready to bake a delightful Lemon Blueberry Loaf with a sweet glaze? This simple and tasty recipe blends the zesty flavor of lemon
To make this easy berry cake, you need these simple ingredients: - 1 cup all-purpose flour - 1 teaspoon baking powder - 1/2 teaspoon baking soda - 1/4 teaspoon salt - 1/2 cup unsalted butter, softened - 1 cup granulated sugar - 2 large eggs - 1 teaspoon vanilla extract - 1/2 cup buttermilk (or milk with 1/2 tablespoon vinegar) - 1 cup mixed berries (strawberries, blueberries, raspberries) - Powdered sugar for dusting Using the right measurements is key for baking. If you don’t have buttermilk, use regular milk with a bit of vinegar. This will help the cake rise well. For the butter, make sure it is softened. This helps it mix better with sugar. If you want a lighter cake, you can use half the sugar or swap for coconut sugar. Just remember, these changes can alter taste and texture. For the best flavor, use a mix of berries. Strawberries add sweetness, while blueberries bring a juicy burst. Raspberries add a nice tang. You can also try blackberries or even cherries. Each berry adds a unique touch. Mixing different berries creates a colorful and tasty cake. Just make sure they are fresh. Fresh berries keep the cake moist and flavorful. Start by preheating your oven to 350°F (175°C). This step is key for even baking. Next, take a 9-inch round cake pan. Grease it with butter, then dust it with flour. You can also line it with parchment paper for easy removal later. In a medium bowl, combine the dry ingredients. Use 1 cup of all-purpose flour, 1 teaspoon of baking powder, 1/2 teaspoon of baking soda, and 1/4 teaspoon of salt. Whisk them together until mixed well. This will help your cake rise nicely. In a large bowl, add 1/2 cup of softened unsalted butter and 1 cup of granulated sugar. Use an electric mixer on medium speed to beat them together. Mix until the blend is light and fluffy—this takes about 3 to 4 minutes. This step adds air to your cake. Now it’s time to add the wet stuff! Beat in 2 large eggs one at a time. Mix well after each one. After that, stir in 1 teaspoon of vanilla extract. Then, slowly add the dry ingredients to the butter mixture. Alternate with 1/2 cup of buttermilk. Start and end with the flour mix. Gently fold in 1 cup of mixed berries like strawberries, blueberries, and raspberries. Be careful not to overmix. You want to keep the berries intact and prevent their color from bleeding into the batter. Pour the batter into your prepared cake pan. Smooth the top with a spatula. Bake in the oven for 25 to 30 minutes. To check if it’s done, insert a toothpick in the center. It should come out clean. Once baked, cool the cake in the pan for 10 minutes. Then transfer it to a wire rack to cool completely. For a sweet touch, dust the cooled cake with powdered sugar. You can find the Full Recipe for more details! For a fluffy cake, start with room temperature butter. This helps it mix well with sugar, creating air pockets. Cream the butter and sugar for about 3–4 minutes. The mixture should look light in color. Don’t skip the baking powder and baking soda; they help the cake rise. Mix your batter until just combined. Overmixing can lead to a tough cake. After adding flour and buttermilk, stir gently. When you fold in the berries, use a spatula. This keeps the berries whole and colorful. Avoid stirring too much to prevent color bleeding. Use fresh berries for the best flavor. Look for ripe strawberries, blueberries, and raspberries. They should smell sweet and look vibrant. Wash the berries gently and pat them dry. If using frozen berries, let them thaw first. Fresh berries give the cake a bright taste and great look. For the full recipe, check the earlier section. {{image_2}} You can use many types of berries in your cake. Strawberries, blueberries, and raspberries work best. Each berry adds its own sweet flavor. You can mix and match them too. Blackberries are another great choice. They add a bold taste and beautiful color. Feel free to experiment! Try using seasonal berries for the freshest flavor. To make your cake even better, add flavor boosts. A little lemon zest gives a bright taste. It pairs well with the berries. Almond extract adds a warm, nutty flavor. Just a small amount can make a big difference. Vanilla extract is great too, but consider mixing it with other flavors. These small tweaks can take your cake to the next level. You can easily make this cake gluten-free. Use a gluten-free flour blend instead of all-purpose flour. Many blends work well for baking. Check the package for the right ratio to use. You may also want to add a bit of xanthan gum. This helps mimic the structure of gluten. Your cake will still be soft and delicious! To keep your Easy Berry Cake fresh, store it in an airtight container. Place it in the fridge for up to four days. If you notice any leftover cake, slice it first. This helps keep each piece moist and ready to enjoy. Always cover the cake with plastic wrap if you don’t have a container. You can freeze your berry cake for longer storage. First, let the cake cool completely. Wrap it tightly in plastic wrap. Then, place it in a freezer bag or container. This method keeps your cake safe for up to three months. When ready to eat, thaw it overnight in the fridge before serving. To reheat your cake, slice it into pieces. Place a slice on a microwave-safe plate. Heat it for about 10-15 seconds. Check if it's warm enough; if not, add a few more seconds. For a more even heat, you can also warm it in the oven. Set the oven to 350°F (175°C) and heat for about 5-10 minutes. Enjoy your cake warm! Yes, you can use frozen berries! They work well in this cake. Just make sure to thaw and drain them first. This keeps the batter from getting too wet. Frozen berries might add a bit more color to the cake, which can look nice. Check the cake with a toothpick. Insert it into the center of the cake. If it comes out clean, the cake is done. You can also gently press the top. It should spring back. If it leaves a dent, it needs more time in the oven. You can serve this cake with whipped cream or ice cream. A scoop of vanilla ice cream adds a creamy touch. Fresh berries on top make it even better. A drizzle of berry sauce can add flavor and style. The cake lasts about two days at room temperature. Cover it well to keep it fresh. If you want it to last longer, store it in the fridge. It can last up to a week there. Yes, you can bake the cake a day or two early. Just store it in an airtight container. You can also freeze it for longer storage. Wrap it tightly in plastic wrap, then foil, and freeze for up to three months. Thaw it in the fridge before serving. For the full recipe, check the Step-by-Step Instructions section. You learned about making an easy berry cake from scratch. We covered ingredients, baking steps, and helpful tips. You can choose different berries and flavors to make it your own. Remember to store leftovers properly and reheat for the best taste. Enjoy the sweet results of your hard work and share it with friends! You’ll impress everyone with your new baking skills. Happy baking, and may your berry cake always be a hit!
Easy Berry Cake Deliciously Simple Dessert Recipe
Are you ready to bake something simple yet delicious? This Easy Berry Cake combines fresh berries with a fluffy texture that will impress everyone. With