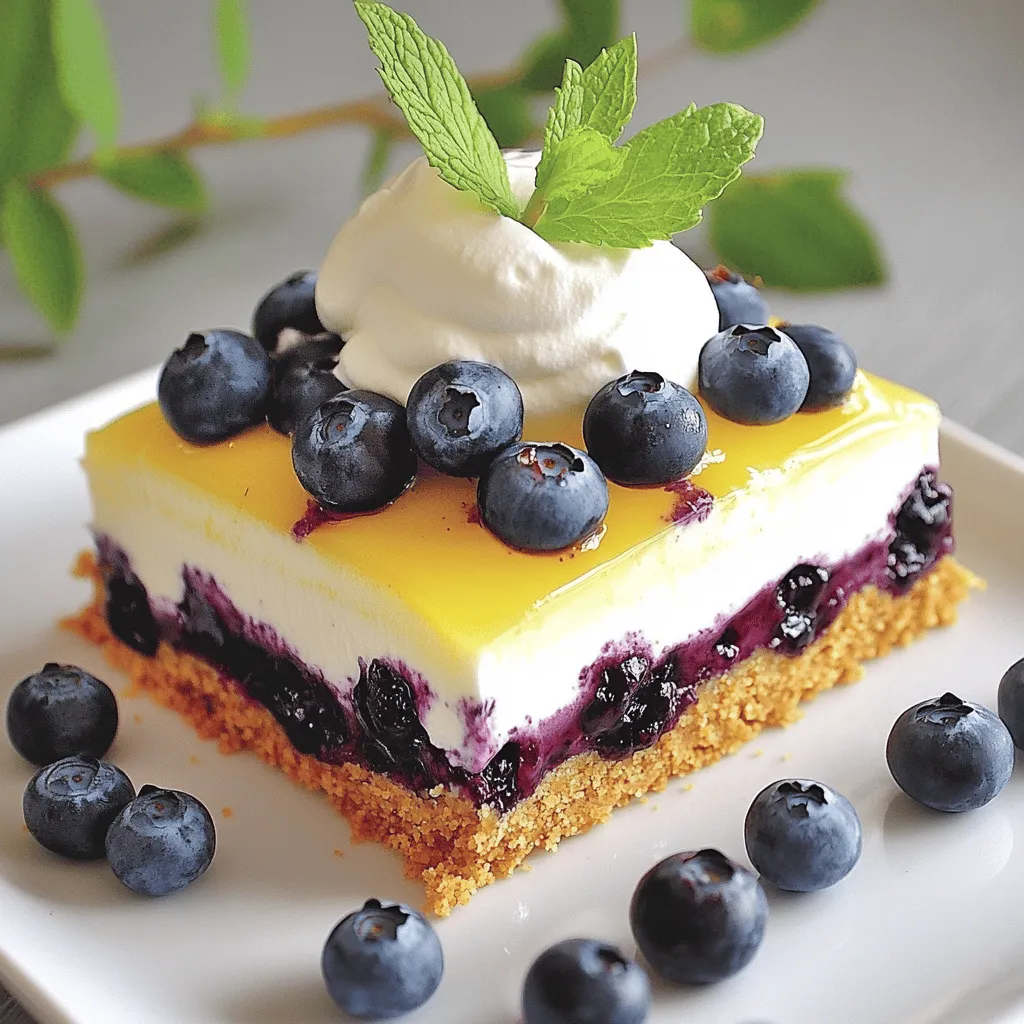
Desserts

To make a delicious Cinnamon Swirl Cake, gather these ingredients: - 2 cups all-purpose flour - 1 ½ cups granulated sugar - ½ cup unsalted butter, softened - 1 cup buttermilk - 3 large eggs - 2 teaspoons baking powder - 1 teaspoon baking soda - 1 teaspoon vanilla extract - 1 teaspoon salt - 2 tablespoons ground cinnamon - 1 cup brown sugar, packed For the creamy frosting, you will need: - 8 oz cream cheese, softened - ½ cup unsalted butter, softened - 4 cups powdered sugar - 1 teaspoon vanilla extract - 2-3 tablespoons milk (if needed for consistency) You can swap some ingredients based on your needs: - For all-purpose flour, use gluten-free flour for a gluten-free option. - Substitute buttermilk with regular milk, adding a splash of vinegar for tang. - Use margarine instead of butter if you want a dairy-free option. - For a lower sugar version, try using a sugar substitute in the cake. These tips help you customize your cake while keeping it tasty. You can find the full recipe linked above to guide you through each step. First, gather all your ingredients. You will need flour, sugar, eggs, butter, and buttermilk. Preheat your oven to 350°F (175°C). This temperature helps the cake rise well. Next, grease and flour a 9x13 inch baking pan. This step prevents the cake from sticking. In a large bowl, cream the softened butter and granulated sugar together. Mix until it becomes light and fluffy. This takes about 2-3 minutes. Then, add the eggs one by one. Make sure to mix well after each egg. Finally, add the vanilla extract. In another bowl, whisk together the flour, baking powder, baking soda, and salt. This combines the dry ingredients. Gradually add the dry mix to the butter mix. Alternate this with the buttermilk. Start and end with the flour mix. Mix until just combined. Now, prepare the cinnamon swirl. In a small bowl, mix the brown sugar with the ground cinnamon. Pour half of the cake batter into the prepared pan. Sprinkle half of the cinnamon mixture over the batter. Then, pour the rest of the batter on top. Sprinkle the remaining cinnamon mixture over the batter. Use a knife or skewer to swirl it gently into the batter. Be careful not to mix it too much. Bake your cake in the preheated oven. It should take about 25-30 minutes. To check if it's done, insert a toothpick into the center. It should come out clean. Once baked, allow the cake to cool completely in the pan on a wire rack. While the cake cools, prepare the cream cheese frosting. In a mixing bowl, beat the softened cream cheese with the softened butter. Mix until smooth and creamy. Gradually add the powdered sugar. Keep mixing until it becomes airy and fluffy. Add the vanilla extract and mix until well combined. If your frosting is too thick, add milk one tablespoon at a time. Mix until you reach your desired consistency. Once your cake is cool, frost the top generously with the cream cheese frosting. For the full recipe, you can refer to the full recipe section. To get that beautiful cinnamon swirl, follow these steps. First, pour half of your cake batter into the pan. Next, sprinkle half of the cinnamon-sugar mix on top. Then, pour the rest of the batter over this layer. Finally, sprinkle the rest of the cinnamon mix. Use a knife to gently swirl. Just go in circles to mix, but don’t blend it fully. You want to see those lovely swirls! Baking is a science, so precision is key. Make sure your oven is preheated to 350°F (175°C) before you start. Use fresh ingredients for the best flavor. Check if your eggs are at room temperature. This helps them mix well. Always measure your flour correctly by spooning it into the cup and leveling it off. A kitchen scale can help if you have one. Bake until a toothpick comes out clean. This can take 25 to 30 minutes. For a smooth cream cheese frosting, start with soft cream cheese and butter. Beat them together until creamy. Gradually add powdered sugar to avoid lumps. If your frosting gets too thick, add milk one tablespoon at a time. This helps you get the right spreadable texture. To frost the cake, start in the center and work your way out. This makes it easy to cover the whole top. You can also use a spatula for nice edges. Now, enjoy your beautiful cake! {{image_2}} You can play with flavors in your Cinnamon Swirl Cake to keep things fresh. Here are a few ideas: - Chocolate Cinnamon Swirl: Add a half cup of cocoa powder to the flour. This gives a rich chocolate flavor that pairs well with cinnamon. - Nutmeg Twist: Mix in a teaspoon of nutmeg with your cinnamon for a warm, spicy kick. - Fruit Additions: Consider folding in some chopped apples or pears for a fruity touch. They add moisture and a sweet surprise. If you need to adjust for dietary needs, here are some easy swaps: - Gluten-Free: Use a gluten-free all-purpose flour blend. This keeps the cake soft and fluffy. - Vegan: Replace eggs with flax eggs or applesauce. Use plant-based butter and non-dairy milk for moisture. - Lower Sugar: Cut down on sugar by using a sugar substitute like stevia or erythritol. When it comes to serving your cake, think about what makes it shine: - Coffee or Tea: Pair a slice with a warm cup of coffee or tea. The flavors meld beautifully. - Fresh Berries: Serve with fresh berries on the side. They add a nice tartness that balances the sweetness. - Ice Cream: A scoop of vanilla ice cream makes a delightful addition. The cold creaminess contrasts well with the warm cake. For a full recipe, you can refer to the complete instructions above. Enjoy experimenting with these variations! To keep your Cinnamon Swirl Cake fresh, store it in an airtight container. This will keep it moist and tasty. Place the container at room temperature for up to three days. If you want to keep it longer, try refrigerating it. Just remember to let it come to room temp before serving again. You can freeze this cake for later! First, let it cool completely. Then, wrap it tightly in plastic wrap. After that, place it in a freezer bag or container. It can last up to three months in the freezer. When you're ready to enjoy it, just thaw it in the fridge overnight. If you want to warm up your cake, do it gently. Preheat your oven to 350°F (175°C). Place the cake on a baking sheet and cover it with foil. Heat it for about 10-15 minutes. This will help keep it moist. You can also use the microwave for a quick reheat. Just warm a piece for about 10-15 seconds. Enjoy your cake with fresh frosting for that delightful taste! For the full recipe, check out the details above. Cinnamon Swirl Cake stays fresh for about 3 to 5 days at room temperature. Keep it in an airtight container. If you store it in the fridge, it can last up to one week. Freezing is also an option. Wrap it well and store it in the freezer for 2 to 3 months. Yes, you can make the cake ahead of time. Bake it, cool it, and wrap it tightly. Store it in the fridge for up to a week. You can also freeze it. Just thaw it before serving. Prepare the cream cheese frosting on the day you plan to eat it for the best taste. If you don't have buttermilk, you can make a quick substitute. Mix 1 cup of regular milk with 1 tablespoon of vinegar or lemon juice. Let it sit for about 5 minutes. This will create an acidic milk that works well in the recipe. You can also use yogurt or sour cream mixed with water. For the full recipe, check out the detailed steps and ingredients list. In this blog, we explored how to make a delicious Cinnamon Swirl Cake. We covered essential ingredients, step-by-step baking, and tips for success. I shared ways to customize the cake and how to store it properly. Remember, small changes can lead to big flavor. Don't hesitate to experiment with flavors and variations. Enjoy baking this treat and share it with friends and family. Happy baking!
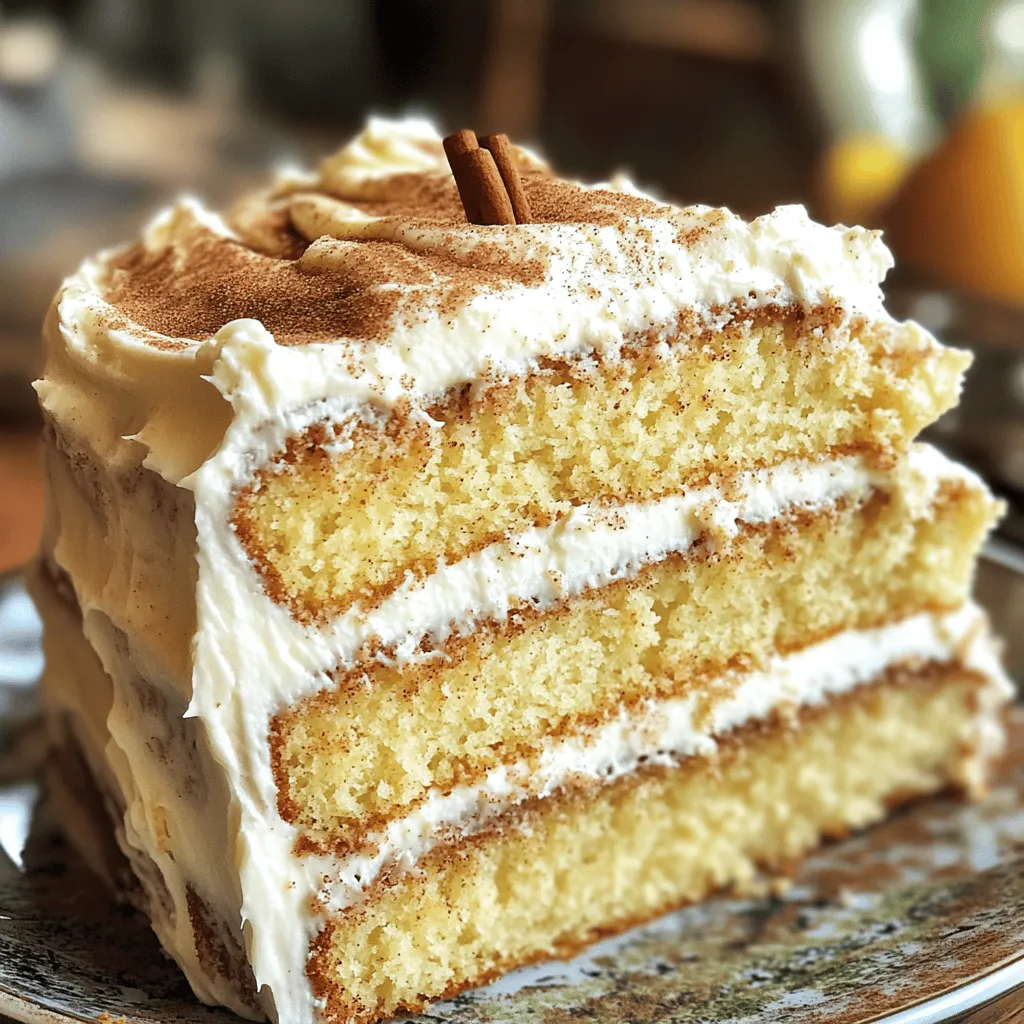
Cinnamon Swirl Cake with Cream Cheese Frosting Delight
Welcome to your new favorite dessert! I’m excited to share my Cinnamon Swirl Cake with Cream Cheese Frosting recipe, which perfectly marries warm spice with
- 500g all-purpose flour - 70g granulated sugar - 10g instant yeast - 1 large egg - 2 egg yolks - 250ml whole milk, lukewarm - 50g unsalted butter, melted - 1/2 teaspoon salt - Vegetable oil for frying To make the fluffy bomboloni, you need quality ingredients. All-purpose flour gives the dough structure. Granulated sugar adds sweetness and helps with browning. The instant yeast makes the dough rise quickly. Eggs and egg yolks provide richness and moisture. Whole milk adds a nice texture and flavor. Unsalted butter makes the dough soft. Salt balances the sweetness. Finally, vegetable oil is key for frying, giving the bomboloni that golden crust. - 250ml whole milk - 2 egg yolks - 50g granulated sugar - 20g cornstarch - 1 tablespoon vanilla extract For the creamy custard, whole milk is your base. Egg yolks give it a rich, smooth texture. Granulated sugar sweetens the custard perfectly. Cornstarch thickens it, creating a lovely consistency. Vanilla extract brings in that classic flavor. This filling will make your bomboloni truly special. For the full recipe, check out the [Full Recipe]. Activating the yeast To start, mix warm milk and sugar in a large bowl. Then, sprinkle the instant yeast on top. Let it sit for 5-10 minutes. You want it to get frothy. This step is key for light and fluffy bomboloni. Mixing wet and dry ingredients Next, add the egg, egg yolks, melted butter, and salt to the frothy yeast mix. Stir until everything is combined. Slowly add the flour to this mixture. Keep mixing until you see a dough form. Kneading the dough Now, it’s time to knead! Dust your counter with flour and place the dough on it. Knead for about 10 minutes. You want a smooth and elastic dough. If it feels sticky, add a little more flour as needed. Heating the milk While the dough rises, prepare the custard. Pour the milk into a saucepan and heat it until steaming, but do not let it boil. This step helps to infuse flavor without burning the milk. Combining ingredients for custard In a bowl, whisk together the egg yolks, sugar, and cornstarch until it's smooth. Once the milk is hot, slowly pour it into the egg mixture while whisking. This helps to temper the eggs and avoid scrambling them. Cooking until thickened Return the mixture to the saucepan. Cook over medium heat, stirring constantly until it thickens. This should take about 5-7 minutes. Remove it from the heat and stir in the vanilla extract. Transfer the custard into a bowl and cover it with plastic wrap. This keeps a skin from forming. Cutting out dough circles Once the dough has risen, punch it down. Roll it out on a floured surface until it's about 1.5 cm thick. Use a cookie cutter to cut out circles, about 7.5 cm wide. Lay these on parchment paper. Second rise time Let the cut-out circles rise for another 30-45 minutes. This gives them a chance to puff up. Make sure to cover them with a cloth to keep them warm. Frying technique and temperature Heat vegetable oil in a deep fryer or heavy pot to 175°C (350°F). Fry the bomboloni in batches. Cook them for about 2-3 minutes on each side until they are golden brown. Once done, place them on paper towels to drain excess oil. Now your delicious Italian custard bomboloni is ready for filling and dusting with powdered sugar! Check out the Full Recipe for complete details. To make the best bomboloni, focus on the dough. Start with kneading. Knead the dough for about 10 minutes. This helps develop gluten. A smooth, elastic dough is what you want. For rising, find a warm place. The ideal temperature is around 75°F to 85°F. You can use the oven with a light on. Just make sure to cover the dough with a damp cloth. This keeps it moist as it rises. Now, let’s talk about frying. First, control the oil temperature. Heat the oil to 175°C (350°F). Use a thermometer for accuracy. If the oil is too hot, the bomboloni will burn. If it’s too cool, they will soak up oil. To avoid greasy bomboloni, fry in small batches. This keeps the oil temperature steady. After frying, place them on paper towels. This helps absorb excess oil. Filling your bomboloni is fun! Use a piping bag for easy filling. Fill it with the cooled custard. Insert the tip into the side of each bombolone. Squeeze gently to fill it. To prevent spillage, don’t overfill. Just a tablespoon of custard is enough. This way, your bomboloni stay neat and tidy. Enjoy your tasty treat! For the complete recipe, check out the Full Recipe. {{image_2}} You can play with different flavors for your custard. Here are some ideas: - Chocolate custard: Mix in cocoa powder or melted chocolate. This adds a rich, sweet taste. - Lemon zest custard: Add fresh lemon zest for a bright, tangy flavor. It gives a refreshing twist. - Hazelnut custard: Stir in hazelnut paste or ground hazelnuts. This creates a nutty, creamy filling. Not a fan of custard? You can fill bomboloni with other tasty options: - Fruit jam options: Use your favorite jam like raspberry or strawberry. This adds a fruity burst. - Whipped cream options: Light and fluffy whipped cream makes a sweet filling. You can mix in vanilla or other flavors. The topping can change the whole look and taste of your bomboloni. Here are some choices: - Glazes vs. powdered sugar: A sweet glaze gives a shiny finish. Powdered sugar adds a classic touch. Choose what you like best. - Sprinkles and other decorations: Add colorful sprinkles for fun. You can also use chocolate shavings or nuts for extra crunch. These variations let you customize your bomboloni. Feel free to mix and match flavors, fillings, and toppings. Get creative! For the full recipe, check out the details above. To keep your bomboloni fresh, store them at room temperature. Place them in an airtight container. This helps them stay soft for one to two days. Avoid stacking them to prevent squishing. If you want to keep them longer, refrigeration is an option. However, this can change their texture. If you choose to refrigerate, wrap each bombolone in plastic wrap. This keeps them moist and prevents them from drying out. Freezing bomboloni is a great way to save leftovers. To freeze the dough, shape it into balls before the second rise. Place them on a baking sheet lined with parchment paper. Freeze them until firm, then transfer them to a freezer bag. They can last up to three months this way. When you’re ready to enjoy them, defrost the dough in the fridge overnight, then let it rise again before frying. If you freeze fried bomboloni, let them cool completely first. Wrap them in plastic wrap and place them in a freezer bag. To reheat, bake them in a preheated oven at 350°F (175°C) for about 10 minutes. This restores their warm, delightful texture. Enjoy your bomboloni fresh, even after freezing! For a full recipe, check out the details above. Bomboloni and doughnuts both offer sweet joy, but they differ in key ways. - Regional differences: Bomboloni hail from Italy, while doughnuts come from various cultures. - Textural variations: Bomboloni are light and airy, thanks to their yeast-based dough. Doughnuts can be denser, depending on the recipe. Yes, you can make bomboloni ahead of time! Here are some best practices: - Prepare the dough and let it rise. Then, punch it down and shape it. - Freeze the shaped dough. Place it on a baking sheet, freeze, and transfer to a bag. - When you're ready, let the dough thaw and rise again before frying. Homemade bomboloni taste best fresh, but they can last a few days. - Shelf life of homemade bomboloni: Store them in an airtight container at room temperature for about 2 days. - For longer freshness, refrigerate them, but they may lose some fluffiness. To make bomboloni, you need simple ingredients like flour, sugar, and eggs. This sweet treat includes a rich vanilla custard filling and offers various tasty options. Follow the guide for perfecting your dough and frying. Remember to store them right for the best taste. Experiment with flavors and fillings to find your favorite. Enjoy the satisfaction of creating these delicious Italian pastries at home. Your efforts will surely impress friends and family!
Italian Custard Bomboloni Delightful and Easy Recipe
Craving a sweet treat that’s fun to make? Look no further than Italian Custard Bomboloni! These pillowy doughnuts filled with rich vanilla custard are simple
- 1 cup unsalted butter, softened - 3/4 cup brown sugar, packed - 1/2 cup granulated sugar - 1 large egg - 2 teaspoons vanilla extract - 2 1/4 cups all-purpose flour - 1/2 teaspoon baking soda - 1/2 teaspoon salt - 1 cup dark chocolate chips - 1/2 cup salted caramel sauce (store-bought or homemade) - Flaky sea salt for sprinkling When making salted caramel chocolate cookies, the right ingredients make all the difference. Quality matters, so choose your items carefully. Dark chocolate chips give the cookies a rich taste. They melt beautifully, creating gooey pockets of goodness. The salted caramel sauce is key, too. It provides a sweet and salty flavor. You can use store-bought sauce if you're in a hurry. However, making it at home can add a personal touch. If you want to make the recipe vegan, use a butter alternative. Plant-based options work well and taste great. You can also swap sugars for alternatives like coconut sugar or agave syrup. If you need gluten-free cookies, a gluten-free flour blend can replace all-purpose flour. Using high-quality dark chocolate is crucial. It enhances the cookie's taste and makes each bite special. Homemade salted caramel is often richer and more flavorful than store-bought. However, if you prefer convenience, a good store-bought option can still delight. For the full recipe, check the recipe section above. Enjoy baking and indulging in these delicious cookies! 1. Start by preheating your oven to 350°F (175°C). This step is key for even baking. 2. Line two baking sheets with parchment paper. This prevents sticking and makes cleanup easy. 3. In a large bowl, cream together 1 cup of softened butter, 3/4 cup of brown sugar, and 1/2 cup of granulated sugar. Mix until it feels light and fluffy. This helps to add air to your cookies. 1. Next, add in 1 large egg and 2 teaspoons of vanilla extract. Stir until fully mixed. This adds moisture and flavor. 2. In a separate bowl, whisk together 2 1/4 cups of all-purpose flour, 1/2 teaspoon of baking soda, and 1/2 teaspoon of salt. This helps to evenly distribute the dry ingredients. 3. Gradually add the dry mix to your wet ingredients. Stir just until combined. Over-mixing can make your cookies tough. 4. Fold in 1 cup of dark chocolate chips. Make sure they are evenly spread throughout the dough. 1. Now it’s time to scoop the cookie dough. Use a tablespoon to form balls and place them on your sheets, spacing them 2 inches apart. 2. Use your thumb to make a small indentation in each ball. This is where you will add the salted caramel. 3. Fill each indentation with 1 teaspoon of salted caramel sauce. This step makes each bite extra special. 4. Bake in your preheated oven for 10-12 minutes. Keep an eye on them, as you want the edges to be lightly golden. 5. Once baked, remove the cookies and sprinkle a pinch of flaky sea salt on top. This enhances the sweet and salty flavor. 6. Allow the cookies to cool on the baking sheets for 5 minutes before moving them to a wire rack. This helps them set perfectly. Make sure to check out the Full Recipe for more details. Enjoy your baking! To make the best cookies, avoid overbaking. Check them at the 10-minute mark. The edges should be golden, and the centers soft. Take them out when they look slightly underbaked. They will firm up as they cool. For cooling, let the cookies rest on the baking sheet for five minutes. This step helps them set without becoming too hard. Then, transfer them to a wire rack. This will keep them soft and chewy. You can add spices to boost flavor. A dash of cinnamon can warm up the taste. Try adding a pinch of sea salt in the dough for depth. Switch up the chocolate too! You can use milk chocolate or even white chocolate. Each type brings a different sweetness and taste. Mix them for a fun surprise in every bite. When serving, arrange the cookies on a decorative platter. This makes them look inviting and special. Drizzle some extra salted caramel over the cookies for decoration. It adds beauty and extra flavor. A few flakes of sea salt on top make a lovely finishing touch. These small details make your cookies shine! For the full recipe, check the link provided! {{image_2}} You can change the flavor of your cookies in fun ways. Adding nuts like pecans or walnuts gives a nice crunch. They also add a rich, nutty taste. You might even try using different types of caramel. For example, a dark caramel can give a deeper flavor. A vanilla caramel can add a sweet twist. Mix and match to find your favorite! If you need gluten-free cookies, use gluten-free flour instead of all-purpose flour. The taste will still be great! You can also make vegan cookies. Use vegan butter and a flaxseed egg. Just mix one tablespoon of ground flaxseed with three tablespoons of water and let it sit until thick. These options keep the cookies tasty while meeting dietary needs. You can make these cookies fit any holiday! For Halloween, add orange sprinkles. For Christmas, mix in cinnamon or nutmeg. These spices give a warm, cozy flavor. Another idea is to use themed cookie cutters for fun shapes. You can even decorate with holiday colors for a festive touch. The possibilities are endless! To keep your salted caramel chocolate cookies fresh, store them in an airtight container. This will help keep the cookies soft and chewy. You can stack the cookies in a single layer, or you can separate layers with parchment paper. When stored this way, the cookies last for about five days at room temperature. If you want to save cookies for later, freezing is a great option. First, let the cookies cool completely. Then, place them in a freezer-safe bag or container. You can freeze them for up to three months. To enjoy later, take out the cookies and let them thaw at room temperature for about 30 minutes. You can also warm them in the oven for a few minutes to regain their fresh-baked taste. If your cookies lose their freshness, don’t worry! You can easily bring them back to life. Place the cookies on a baking sheet and cover them with a damp paper towel. Heat them in the oven at 300°F (150°C) for about 5-10 minutes. This will help soften them and restore their chewy texture. Enjoy your cookies as if they were just baked! How can I make salted caramel chocolate cookies chewy? To make cookies chewy, use more brown sugar. Brown sugar has more moisture than white sugar. You can also bake them for a shorter time. Pull them out when the edges are golden but the middle looks soft. This keeps them chewy inside. Can I use white chocolate instead of dark chocolate? Yes, you can use white chocolate! It gives a sweeter taste. The balance with salted caramel still works well. Just keep in mind that white chocolate has a different flavor profile. Is it necessary to chill the dough before baking? Chilling the dough is not required, but it helps. It firms up the dough, making it easier to scoop. Chilled dough spreads less, giving you thicker cookies. What to do if the dough is too sticky? If the dough is sticky, add a little more flour. Start with one tablespoon at a time. Mix it well until the dough is manageable. You can also chill the dough for 30 minutes to make it easier to handle. How to fix cookies that spread too much? If cookies spread too much, check your butter. If it’s too soft, try chilling the dough. You can also add a bit more flour to the mix. This will help them hold their shape. Where to find the full recipe You can find the full recipe for salted caramel chocolate cookies at the beginning of this article. Suggestions for accompanying drinks or desserts These cookies pair well with milk or coffee. A scoop of vanilla ice cream on the side is a lovely touch, too! For a twist, try them with a rich hot chocolate. Your salted caramel chocolate cookies are now within reach. We explored the key ingredients, including butter, sugars, and chocolate chips. You learned essential tips for baking, like avoiding overbaking and cooling for the best texture. Variations let you adjust to create nutty or seasonal treats. Remember to store your cookies properly for lasting freshness. Baking can be fun and rewarding when you follow these steps. Now, you can impress friends and family with your delicious creations. Happy baking, and enjoy every bite!
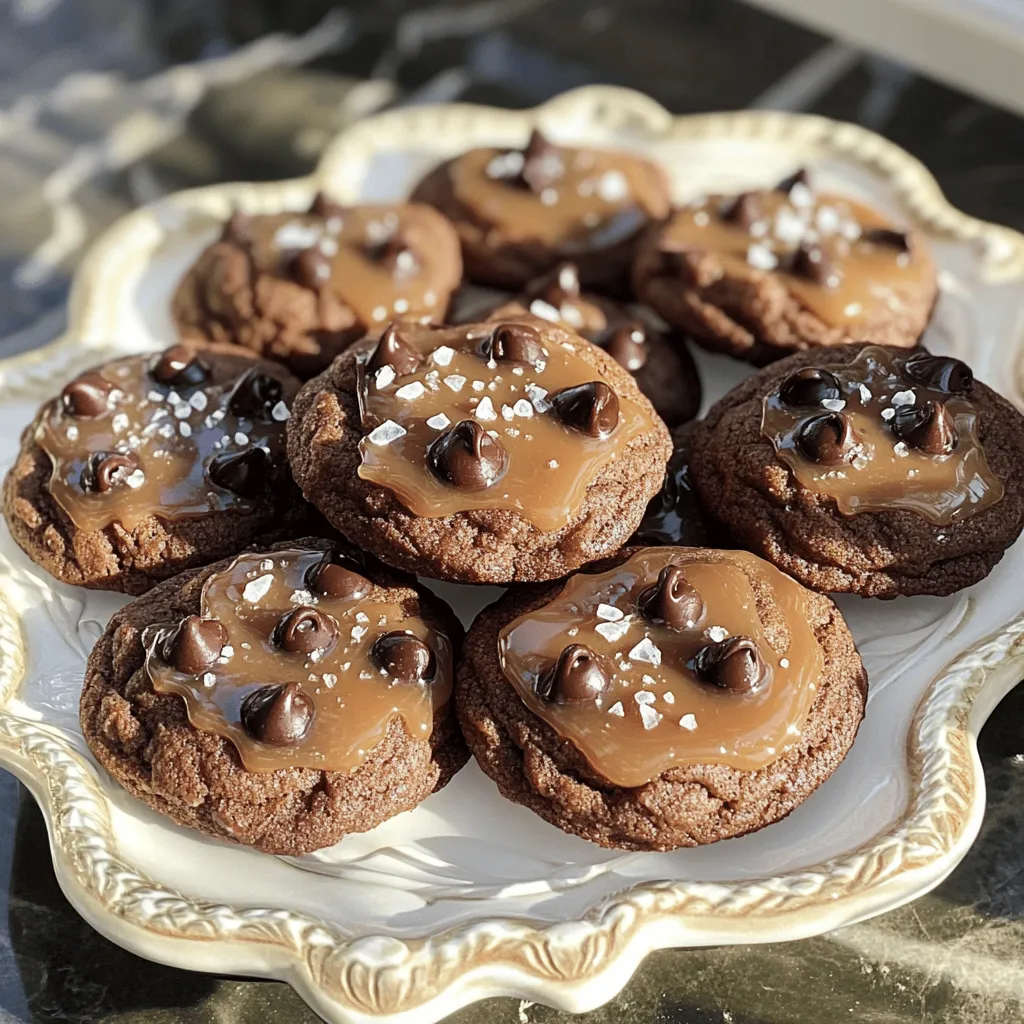
Salted Caramel Chocolate Cookies Irresistible Treat
Craving a sweet treat that blends rich chocolate with a touch of salty goodness? Look no further! These Salted Caramel Chocolate Cookies are the perfect
- Cream cheese - Graham cracker crumbs - Unsalted butter - Sugar - Eggs - Vanilla extract - Instant coffee granules - Heavy cream - Shelled pistachios - Pinch of salt These ingredients come together to create a rich and creamy treat. Let's break down why each one is key. - Cream cheese: This gives the cheesecake its smooth and creamy base. Always use softened cream cheese for a lump-free filling. - Graham cracker crumbs: These form the crust. They add a sweet crunch that balances the creaminess. - Unsalted butter: This helps bind the crust. It also adds a rich flavor. - Sugar: This sweetens the filling and enhances the overall taste. - Eggs: They provide structure. Eggs help the cheesecake set perfectly. - Vanilla extract: This adds a warm flavor. It complements the other ingredients beautifully. - Instant coffee granules: They infuse a coffee flavor. This makes the cheesecake unique and delightful. - Heavy cream: This adds richness and smoothness to the filling. - Shelled pistachios: These provide crunch and a nutty flavor. They make the mini cheesecakes special. - Pinch of salt: This enhances all the flavors. It’s a must for balance. - Additional chopped pistachios - Whipped cream Garnishes can elevate your cheesecakes. A sprinkle of chopped pistachios adds a nice crunch. Whipped cream can make them feel extra fancy. You can mix and match these garnishes based on what you like. Enjoy experimenting! For the complete steps and methods, check the Full Recipe. 1. Preheat your oven to 325°F (160°C). 2. Line a muffin tin with mini cupcake liners. - In a medium bowl, mix: - 1 cup graham cracker crumbs - 1/4 cup unsalted butter, melted - Stir until the crumbs are coated with butter. - Press about a tablespoon of this mixture firmly into the bottom of each liner. - In a large bowl, add: - 2 cups cream cheese, softened - 1/2 cup sugar - Beat with a hand mixer until smooth. - Add the eggs, one at a time, mixing well after each addition. - In a small bowl, dissolve: - 1 tablespoon instant coffee granules in - 1/4 cup heavy cream. - Add this mixture and: - 1 tablespoon vanilla extract to the cream cheese mix. - Mix until well combined. - Gently fold in: - 1/2 cup finely chopped pistachios. - Spoon the cheesecake mixture evenly over the prepared crusts, filling each liner three-quarters full. - Bake in the oven for 18-20 minutes. - Look for centers that are set but slightly wobble when you move the pan. - Remove the cheesecakes from the oven and let them cool. - Refrigerate for at least 2 hours before serving. - Before serving, garnish with extra chopped pistachios for a crunch. For the complete recipe, check the [Full Recipe]. - How to avoid overmixing: Mix the cream cheese on low speed. Add eggs slowly. This keeps the texture smooth. Overmixing can make your mini cheesecakes dense. - Ensuring even baking: Place your muffin tin in the center of the oven. This helps heat circulate. Rotate the tin halfway through baking for best results. - Pairings with coffee or dessert wines: Enjoy these cheesecakes with a rich cup of coffee. They also pair well with sweet dessert wines. This adds extra flavor to your tasting experience. - Creative serving ideas: Serve on a colorful plate. Add fresh berries for a pop of color. You can also drizzle chocolate or caramel sauce for fun. - Uncooled cheesecakes: Let your mini cheesecakes cool in the pan first. Cooling is key for good texture. If you skip this step, they may crack. - Skipping refrigeration: Always chill your cheesecakes for at least two hours. This helps them firm up. Serving them too soon can ruin the taste and texture. {{image_2}} You can change up the flavors in your pistachio coffee mini cheesecakes. Try using different nuts like almonds or hazelnuts. These can add a unique taste and texture. You can also use flavored coffee instead of instant coffee. Vanilla, mocha, or hazelnut coffee can give your cheesecakes a fun twist. If you need to make these mini cheesecakes gluten-free, use gluten-free graham cracker crumbs. You can find these at most stores. For those with allergies, substitute cream cheese with a dairy-free option like cashew cream. You can also replace eggs with flax eggs for a vegan version. Want to make full-sized cheesecakes? Just double the recipe and use a springform pan. Bake it longer, around 30-40 minutes. If you want a different flavor, try adding fruit puree or chocolate to the batter. You can even make mini cheesecakes in other flavors, like lemon or berry, to mix things up. For the full recipe, follow the steps I've laid out above. To store leftovers, place your mini cheesecakes in an airtight container. This keeps them fresh and prevents them from absorbing smells. You can also wrap them tightly in plastic wrap if you prefer. They will last for up to five days in the fridge. Yes, you can freeze these mini cheesecakes! To freeze, place them in a single layer on a baking sheet. Once frozen, transfer them to a freezer-safe container or bag. They will stay fresh for about two months. For thawing, move the cheesecakes from the freezer to the fridge. Let them thaw overnight for the best texture. Enjoy your tasty treat whenever you want! For the full recipe, check out the details above. You can use mascarpone or ricotta cheese. Both have a creamy texture. They will change the taste a bit. If you want a lighter option, try Greek yogurt. It gives a nice tang. Just remember, the final taste will be different. Yes, you can use flavored coffee. Just make sure it is strong. Brew a cup and let it cool. Then, use it in place of instant coffee. This can add a fun twist to your cheesecakes. The cheesecakes are done when the edges are set. The center can still wobble a little. This means they will firm up as they cool. You can also use a toothpick. If it comes out clean, they are ready. Absolutely! These mini cheesecakes are great for making ahead. You can prepare them a day in advance. Just store them in the fridge. This gives the flavors time to blend well. Serve them chilled for the best texture. You can garnish with extra chopped pistachios. A dollop of whipped cream also works well. For a fun twist, pair them with coffee or dessert wine. This makes a delightful treat for guests. Check the Full Recipe for more tips! You've learned how to make delicious Pistachio Coffee Mini Cheesecakes. We covered ingredients, step-by-step instructions, expert tips, variations, and storage advice. Each step is key to making these treats a success. I hope you enjoy creating them. Remember, practice and patience yield the best results. You can impress friends and family with your baking skills. Happy baking!
Pistachio Coffee Mini Cheesecakes Rich and Creamy Treat
Are you ready to indulge in a unique dessert? These Pistachio Coffee Mini Cheesecakes blend rich creaminess with a delightful nutty twist. They are easy
To make these tasty cinnamon roll sugar cookies, you need the following ingredients: - 2 ¾ cups all-purpose flour - 1 teaspoon baking powder - ½ teaspoon baking soda - ½ teaspoon salt - 1 cup unsalted butter, softened (2 sticks) - 1 cup granulated sugar - 1 large egg - 1 teaspoon vanilla extract - 1 teaspoon ground cinnamon - ½ cup light brown sugar, packed For the icing: - 1 cup powdered sugar - 2 tablespoons milk - ½ teaspoon vanilla extract You can swap some ingredients if needed. If you don't have unsalted butter, use salted butter. Just skip adding extra salt. For the egg, you can use a flax egg or applesauce. One tablespoon of flaxseed meal mixed with three tablespoons of water works. For the flour, you can use whole wheat flour or a gluten-free blend. Choosing fresh ingredients makes your cookies taste even better. Here’s what to look for: - Flour: Check for a fresh smell and no lumps. - Butter: It should be cool and firm, not overly soft. - Eggs: Look for clean, uncracked eggs. Check the date for freshness. - Spices: Cinnamon should smell strong and rich. If it smells weak, it may be old. - Sugar: Granulated and brown sugars should be free from hard clumps. These tips will help you get the best flavor in your cinnamon roll sugar cookies. For the full recipe, you can refer to the earlier section. First, gather all your ingredients. You need flour, baking powder, baking soda, salt, butter, sugar, an egg, vanilla, cinnamon, and brown sugar. Measure 2 ¾ cups of flour, 1 teaspoon of baking powder, ½ teaspoon of baking soda, and ½ teaspoon of salt. In a bowl, mix these dry ingredients and set them aside. Next, take 1 cup of softened butter and 1 cup of granulated sugar. Beat them together until the mix is creamy. This takes about 3-4 minutes. Add 1 large egg and 1 teaspoon of vanilla extract next. Beat again until it all blends well. Slowly add the dry mix into the wet mix, stirring until just combined. Now, it's time to shape the cookies. In a small bowl, mix 1 teaspoon of ground cinnamon with ½ cup of packed light brown sugar. Scoop about 1 tablespoon of cookie dough and flatten it slightly. Place a teaspoon of the cinnamon-brown sugar mix in the center. Fold the dough over to form a ball. Place these balls on baking sheets, leaving about 2 inches between them. Preheat your oven to 350°F (175°C) and bake for 10-12 minutes. The cookies will puff up and look slightly underbaked. That's perfect! They will firm up as they cool. After baking, let the cookies cool on the sheets for 5 minutes. Then, transfer them to a wire rack to cool completely. While they cool, prepare the icing. In a small bowl, whisk together 1 cup of powdered sugar, 2 tablespoons of milk, and ½ teaspoon of vanilla extract until smooth. Drizzle the icing over the cooled cookies. Be generous! Let the icing set before you serve. Enjoy your warm, soft Cinnamon Roll Sugar Cookies! For more details, check the Full Recipe. To get that soft and chewy cookie, start with room-temperature butter. When you beat the butter and sugar, aim for a light and fluffy mix. This step helps add air, making your cookies rise well. Next, don’t over-mix the dough once you add the flour. Mix just until combined. This keeps your cookies tender. Finally, let them cool on the baking sheet for a bit. This helps them firm up without losing that soft center. One common mistake is not measuring flour correctly. Too much can make your cookies dry. Always spoon the flour into your measuring cup and level it off with a knife. Another mistake is skipping the chilling step. If your dough feels warm, chill it for about 30 minutes. This helps prevent spreading while baking. Lastly, don’t skip the icing! It adds a sweet finish that makes these cookies shine. For this recipe, you need a few key tools. Use a large mixing bowl and a whisk for the dry ingredients. A stand mixer or hand mixer works great for creamy butter and sugar. Parchment paper is handy for lining your baking sheets. It prevents sticking and makes cleanup easier. Lastly, a wire rack is perfect for cooling your cookies evenly. These tools make your baking experience smooth and fun. You can find the Full Recipe above to guide you through each step. {{image_2}} You can make these cookies even better by adding mix-ins. Try adding chocolate chips for a sweet twist. Or, chop up some nuts for a crunchy bite. Walnuts or pecans work great here. You could also add dried fruits like cranberries or raisins for extra flavor. Each mix-in gives a new taste to the classic cookie. The icing on these cookies is yummy, but you can change it up. For a cream cheese icing, mix cream cheese with powdered sugar and a bit of milk. This adds a tangy flavor. You can also use a simple glaze made with just milk and powdered sugar. If you like spice, add some pumpkin spice to your icing for a warm twist. Change the flavor of your cookies to fit the season. In fall, add pumpkin spice to the dough for a cozy taste. In winter, you can mix in peppermint extract for a refreshing treat. For spring, add some citrus zest, like lemon or orange, for a bright flavor. Each season brings a chance to enjoy these cookies in a new way. For the full recipe, check the details above. Enjoy making these variations! To keep your cinnamon roll sugar cookies fresh, store them in an airtight container. This helps prevent them from drying out. I usually place parchment paper between layers of cookies. It keeps them from sticking together. You can keep them at room temperature for a week. If you want them to last longer, try refrigerating them. Freezing is a great option if you want to save some cookies for later. First, let the cookies cool completely. Then, place them in a single layer on a baking sheet. Freeze them for about an hour until firm. After that, transfer the cookies to a freezer bag or container. Make sure to remove as much air as possible. They stay good in the freezer for up to three months. These cookies last about a week at room temperature. If stored in the fridge, they can stay fresh for about two weeks. If you freeze them, they can last for three months. Just remember to thaw them before enjoying! For the full recipe, check out the complete guide. Yes, you can make these cookies ahead of time. You can prepare the dough and chill it. Chilling the dough helps the cookies hold their shape while baking. Keep the dough in the fridge for up to three days. You can also freeze the dough for up to three months. Just thaw it in the fridge before baking. This makes it easy to bake fresh cookies anytime. Cinnamon rolls are a classic treat in many cultures. They combine sweet dough with warm spices. Sugar cookies are also popular in America. Combining these two treats creates a unique dessert. The idea may come from the need for quick, sweet snacks. These cookies blend the flavors of both treats. They give you a taste of cinnamon rolls in a cookie form, perfect for any occasion. To adjust the icing, change the milk amount. For thicker icing, use less milk. Start with one tablespoon and mix until smooth. For thinner icing, add more milk, one teaspoon at a time. Mixing well helps you achieve the right consistency. You can also add more powdered sugar to thicken it up. Don’t be afraid to test it on a cookie to see if you like it! This blog post covers everything you need for perfect Cinnamon Roll Sugar Cookies. We looked at key ingredients and helpful swaps. You now have tips to select fresh items and avoid common pitfalls. Our step-by-step guide made baking easy, from prep to icing. Remember to store your cookies well for lasting flavor. Experiment with fun variations to keep things exciting. I hope this helps you bake delicious cookies every time!
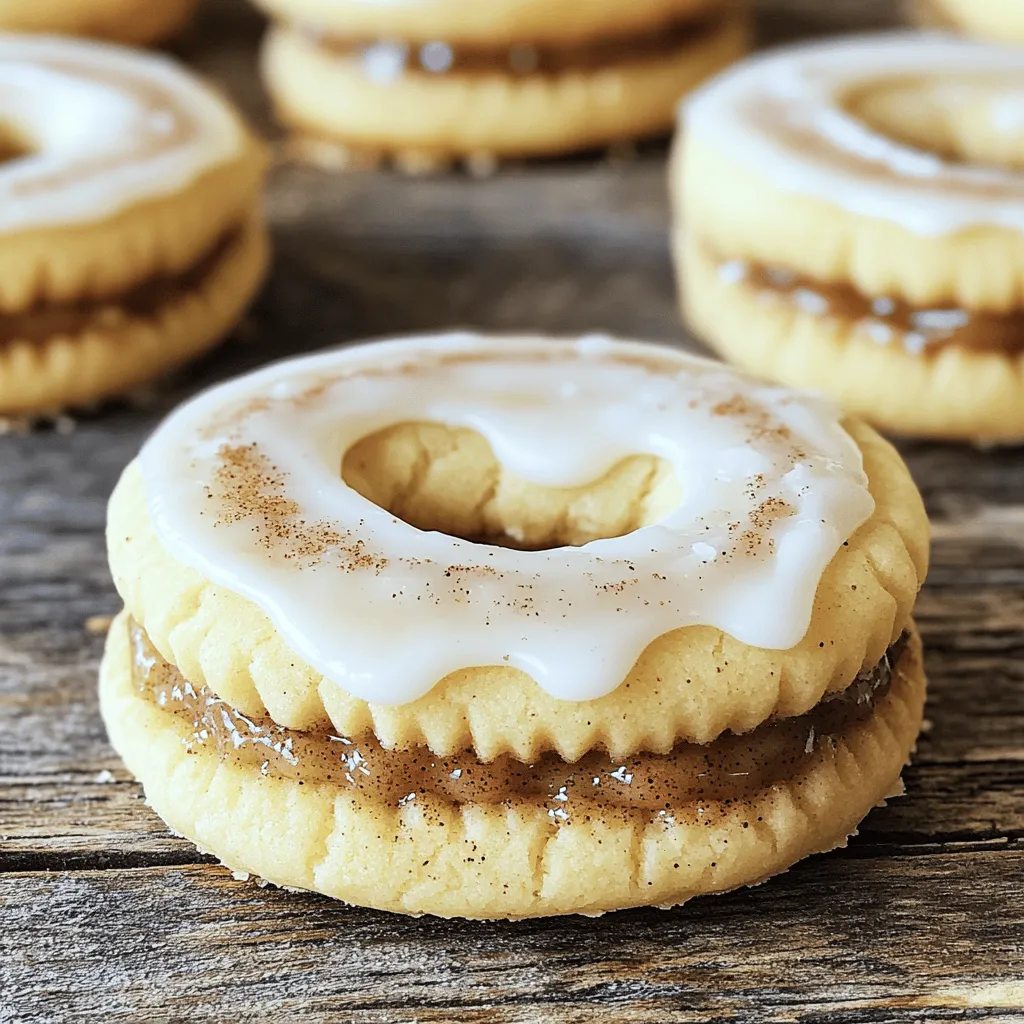
Cinnamon Roll Sugar Cookies Tasty and Easy Treat
Cinnamon Roll Sugar Cookies are the perfect treat for any occasion! Imagine the warm, sweet aroma of cinnamon wafting through your kitchen as you bake.
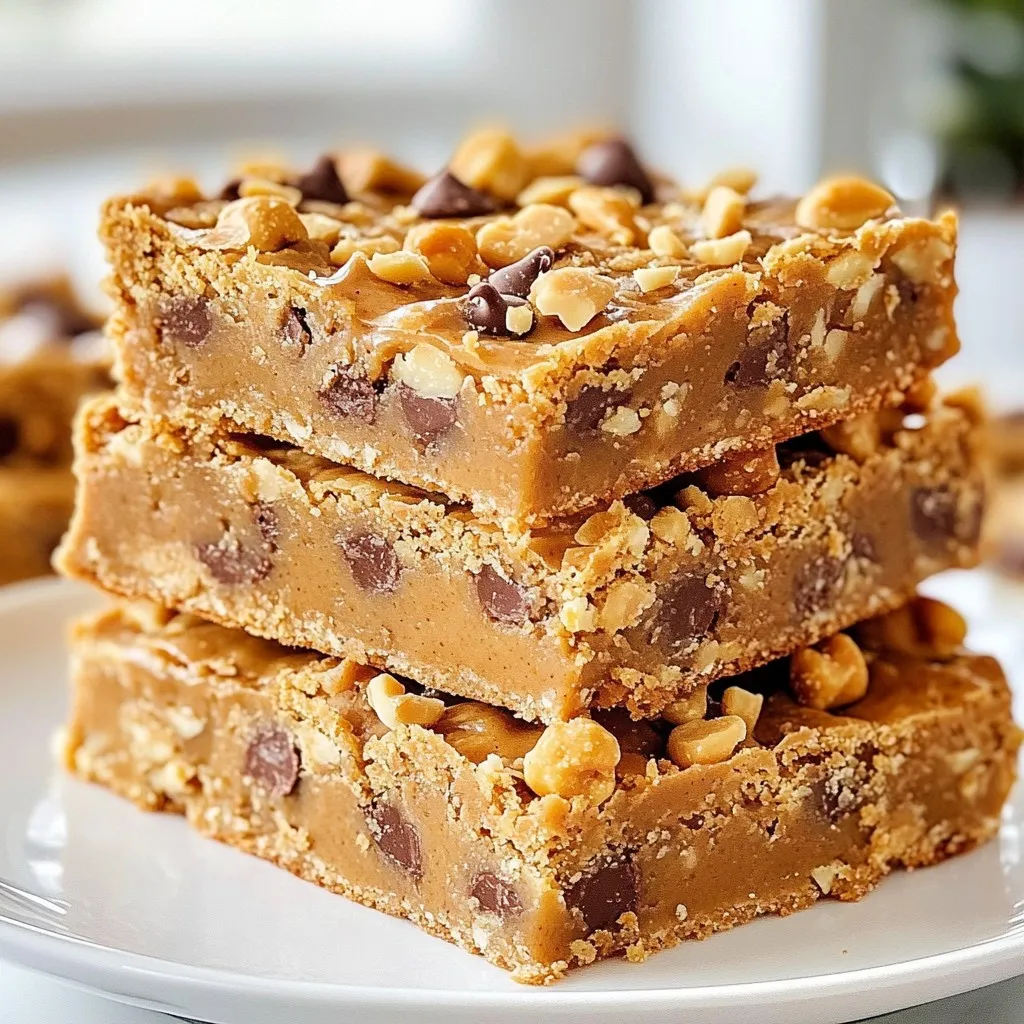
To make these tasty peanut butter cookies, you need: - 1 cup creamy peanut butter - 1 cup brown sugar, packed - 1/2 cup granulated sugar - 1 large egg - 1 teaspoon vanilla extract - 1/2 teaspoon baking soda - 1/4 teaspoon salt These ingredients create a rich and sweet flavor that makes each bite special. Measuring your ingredients is key for great cookies. Here’s how to do it: - Creamy peanut butter: Use a dry measuring cup. Scoop it in and level it off. - Brown sugar: Pack the sugar tightly in the cup. This adds moisture and sweetness. - Granulated sugar: Scoop it in without packing. Just level it off gently. - Egg: Use a large egg for the right moisture and binding. - Vanilla extract: One teaspoon adds a warm flavor. - Baking soda: This helps the cookies rise. Measure carefully. - Salt: A little salt enhances the sweetness. Each ingredient plays a role in the cookie’s texture and taste. You can add fun flavors to your cookies. Here are some great options: - Chocolate chips: Half a cup adds a sweet, melty touch. - Crushed peanuts: A quarter cup gives a nice crunch on top. Feel free to mix and match these add-ins to suit your taste. They make your cookies even more exciting! {{ingredient_image_1}} First, set your oven to 350°F (175°C). This heat is perfect for baking. While the oven warms up, grab a baking sheet and line it with parchment paper. This helps prevent sticking. In a large bowl, add 1 cup of creamy peanut butter, 1 cup of packed brown sugar, and 1/2 cup of granulated sugar. Use an electric mixer to mix on medium speed. Beat until the mix is fluffy and smooth. Next, add 1 large egg, 1 teaspoon of vanilla extract, 1/2 teaspoon of baking soda, and 1/4 teaspoon of salt. Mix until everything blends well. If you want a sweet twist, fold in 1/2 cup of chocolate chips gently. Scoop rounded balls of dough using a tablespoon or cookie scoop. Place them on the baking sheet, leaving 2 inches between each cookie. This space is key because they will spread. To create classic cookie shapes, press down each ball with a fork to make a criss-cross pattern. If you like, sprinkle crushed peanuts on top for more crunch. Bake the cookies for 10-12 minutes. Look for golden edges and soft centers. After baking, let them cool on the sheet for 5 minutes. Then, transfer to a wire rack to cool fully. Enjoy your warm, tasty treats! To stop your dough from sticking, chill it for 30 minutes. This will help it firm up. If it’s still too sticky, add a bit more flour. A little extra flour can make a big difference! For soft and chewy cookies, do not overmix the dough. Mix until just combined. When baking, keep an eye on the time. Take them out when the edges are golden but the middle looks soft. They will firm up as they cool. To boost the flavor, try adding chocolate chips or crushed peanuts. Both add a nice crunch and taste. You can also use a pinch of cinnamon for warmth. A hint of sea salt on top can balance the sweetness, too. Pro Tips Use Room Temperature Ingredients: Allow your peanut butter and egg to reach room temperature before mixing. This helps create a smoother batter and ensures even baking. Experiment with Nut Butters: Try using different nut butters like almond or cashew for a unique flavor twist. Just keep the consistency similar to peanut butter. Don’t Overbake: For soft and chewy cookies, keep a close eye on them while baking. They should look slightly underbaked in the center when you take them out. Store Properly: Keep your cookies in an airtight container at room temperature for up to a week. You can also freeze them for longer storage; just thaw before enjoying! {{image_2}} You can make your peanut butter cookies even better by adding chocolate chips. Just fold in 1/2 cup of chocolate chips into the dough before baking. This little twist makes the cookies rich and sweet. The warm chocolate melts in your mouth and pairs perfectly with the peanut butter flavor. It’s an easy way to impress your family or friends. If you love crunch, try adding nuts. Chopped peanuts work well, but you can use other nuts too. Just add 1/4 cup of chopped nuts into the dough. This addition gives your cookies a nice texture. The nuts add a different flavor that blends well with peanut butter. You get a delightful surprise in each bite! You can easily make these cookies vegan or gluten-free. To make them vegan, swap the egg for a flax egg. Mix 1 tablespoon of ground flaxseed with 2.5 tablespoons of water. Let it sit for a few minutes to thicken. For gluten-free cookies, use gluten-free flour instead of regular flour. These changes ensure everyone can enjoy your tasty treats. Store your peanut butter cookies in an airtight container. This keeps them fresh. You can layer the cookies with parchment paper. This prevents them from sticking together. Keep the cookies at room temperature for up to one week. To freeze your cookies, first let them cool completely. Then, place them in a single layer on a baking sheet. Freeze for about two hours. Once frozen, transfer them to a freezer bag. Label the bag with the date. You can freeze them for up to three months. Peanut butter cookies can last a week at room temperature. If stored in the fridge, they can last up to two weeks. Frozen cookies can taste great for three months. Enjoy them later for a sweet treat! Yes, you can use natural peanut butter. It will make the cookies taste great! Just know that natural peanut butter has oil on top. Stir it well before measuring. This type may make the cookies a bit drier. If you want softer cookies, add a bit more sugar or an extra egg. To make cookies softer, try a few simple tricks. First, don’t overbake them. Take them out when the edges are golden but the centers look soft. Second, chill your dough for 30 minutes before baking. This helps them keep their shape and stay soft. Lastly, add a bit more peanut butter or sugar for extra moisture. If you don’t have brown sugar, you can use white sugar instead. Just replace it with the same amount. Another option is to mix white sugar with a bit of molasses. For each cup of white sugar, add one tablespoon of molasses. This will give your cookies a nice flavor and color. You now know how to make delicious peanut butter cookies. We covered the key ingredients, step-by-step instructions, and helpful tips to ensure perfect cookies every time. Remember, variations like chocolate chips and nuts can enhance your recipe. Proper storage will keep them fresh longer. Enjoy experimenting with different flavors and textures. With this guide, you can create tasty treats your friends and family will love. Happy baking!
Ingredient Peanut Butter Cookies Easy and Flavorful Treat
Do you love warm, soft cookies that burst with peanut flavor? I’m here to share my easy recipe for ingredient peanut butter cookies that you
To make this delicious treat, gather the following items: - 1 cup all-purpose flour - 1/2 teaspoon baking soda - 1/4 teaspoon salt - 1/2 cup unsalted butter, softened - 1/2 cup brown sugar, packed - 1/4 cup granulated sugar - 1 large egg - 1 teaspoon vanilla extract - 1 cup semi-sweet chocolate chips - 1 cup mini marshmallows - 1/2 cup crushed graham crackers - Extra chocolate chips for topping You can adjust the recipe using these alternatives: - Use honey or maple syrup instead of granulated sugar. - For a gluten-free option, try almond or coconut flour. - Replace unsalted butter with coconut oil or vegan butter. Each substitution will change the taste and texture a bit. Experiment to find what you like best! {{ingredient_image_1}} 1. Preheat your oven to 350°F (175°C). This step is key for even baking. 2. In a small bowl, mix the flour, baking soda, and salt. This makes the dry mix. 3. In a large bowl, cream the softened butter, brown sugar, and granulated sugar. Mix until creamy. 1. Add in the egg and vanilla. Mix well to combine everything smoothly. 2. Gradually add the dry mix to the wet mix. Stir until just combined. Don't overmix! 3. Fold in the chocolate chips and crushed graham crackers. This adds flavor and texture. 1. Grease your skillet using cooking spray or butter. This keeps the cookie from sticking. 2. Spread the cookie dough evenly in the skillet. Smooth the top for even baking. 3. Bake for 20-25 minutes. The edges should be golden brown. The center should be slightly soft. 4. Remove the skillet and sprinkle mini marshmallows and extra chocolate chips on top. 5. Broil for 1-2 minutes. Watch closely! You want a toasted top, not burned. 6. Allow to cool for a few minutes before serving. Enjoy warm, maybe with ice cream! - Achieving the right consistency of dough: Mix the butter and sugars well. It should be creamy with no lumps. Then, add the egg and vanilla. This helps create a soft, chewy cookie. - Ideal baking time for gooey center: Bake the cookie for 20-25 minutes. Look for golden edges and a soft center. This means it’s perfect for that gooey texture. - Preventing burning when broiling marshmallows: Keep a close eye when broiling. Set a timer for one minute, then check. If they start to brown too fast, pull it out right away. - Best pairings with ice cream: Serve your skillet cookie warm with a scoop of vanilla ice cream. The cold ice cream melts over the warm cookie. It’s a delightful treat! - Ideas for garnishing with crushed graham crackers: Sprinkle crushed graham crackers on top. This adds crunch and extra flavor. It makes the dish look fancy, too. - Serving warm vs cooling options: Warm is best! But if you want to cool it, let it sit for about 10 minutes. Just remember, the gooey center is what makes it special. Pro Tips Use Room Temperature Ingredients: Ensure your butter and egg are at room temperature for a smoother batter and better incorporation of ingredients. Don't Overmix the Dough: Mix until just combined to keep the cookie soft and chewy. Overmixing can lead to a tougher texture. Customize Your Toppings: Feel free to add other mix-ins like peanut butter chips, nuts, or even a drizzle of caramel for a unique twist! Watch the Broiling Time: Keep a close eye while broiling the marshmallows, as they can burn quickly. Aim for a golden brown color! {{image_2}} You can change the flavor of your S’mores chocolate chip skillet cookie with ease. Here are some fun ideas: - Peanut Butter: Add 1/2 cup of creamy or chunky peanut butter for a nutty twist. - Mint Chocolate Chips: Swap in mint chips for a fresh flavor boost. - Chocolate Types: Use dark or white chocolate instead of semi-sweet for unique tastes. - Flour Types: Try almond or oat flour for a different texture and flavor. These variations help you create a cookie that suits your taste. Experimenting can lead to some delicious surprises! You can enjoy this skillet cookie even if you have dietary needs. Here are some options: - Gluten-Free: Use a gluten-free flour blend instead of all-purpose flour. - Low-Sugar: Replace sugars with stevia or erythritol for a low-sugar version. - Vegan-Friendly: Substitute the egg with a flax egg and use vegan butter. These swaps allow everyone to enjoy this tasty treat. Don't hesitate to customize it to meet your needs! To store leftovers at room temperature, let the skillet cookie cool. Once cool, cover it with plastic wrap. This keeps it fresh for up to two days. If you want to refrigerate, place it in an airtight container. This helps the cookie stay soft and tasty for about a week. For long-term storage, you can freeze the baked cookie. Cut it into slices and wrap each piece in plastic wrap. Then, place them in a freezer bag. This way, they can last for up to three months. When you're ready to eat, take out a slice and let it thaw in the fridge overnight. For a warm treat, heat it in the oven at 350°F for about 10 minutes. This brings back that fresh, gooey goodness. Can I make the cookie dough ahead of time? Yes, you can make the cookie dough ahead of time. Just store it in the fridge for up to 24 hours. This helps the flavors blend well. When ready, spread it in the skillet and bake it. How do I know when my cookie is done baking? Check the edges of the cookie. They should be golden brown. The center should look slightly soft. If it meets these points, it is ready to come out of the oven. Can I use a different type of skillet? Yes, you can use any oven-safe baking dish. Cast iron skillets work best for even baking. Just make sure it’s large enough to hold the cookie dough. What to do if the cookie is too dry/wet? If the cookie is dry, add a little melted butter or a splash of milk. This will help moisten it. If it is too wet, add a bit more flour until you reach the right texture. How to fix burnt marshmallows? If the marshmallows burn, simply scrape off the burnt layer. You can then add fresh mini marshmallows on top. Broil them for a shorter time next time to avoid burning. Steps to take if the dough doesn’t spread properly If the dough doesn’t spread, try letting it sit at room temperature for a few minutes. This helps soften the butter. You can also press it down gently in the skillet to help it spread. In this post, we explored a delicious S’mores Chocolate Chip Skillet Cookie. We covered main ingredients, substitutions, and step-by-step cooking instructions. You learned tips for the perfect bake and various flavor variations to try. Don't forget storage details for leftovers and answers to common questions. This treat is fun and easy to make. Enjoy it warm with ice cream for the best experience. Get creative with flavors or adjustments to suit your needs. Happy baking!
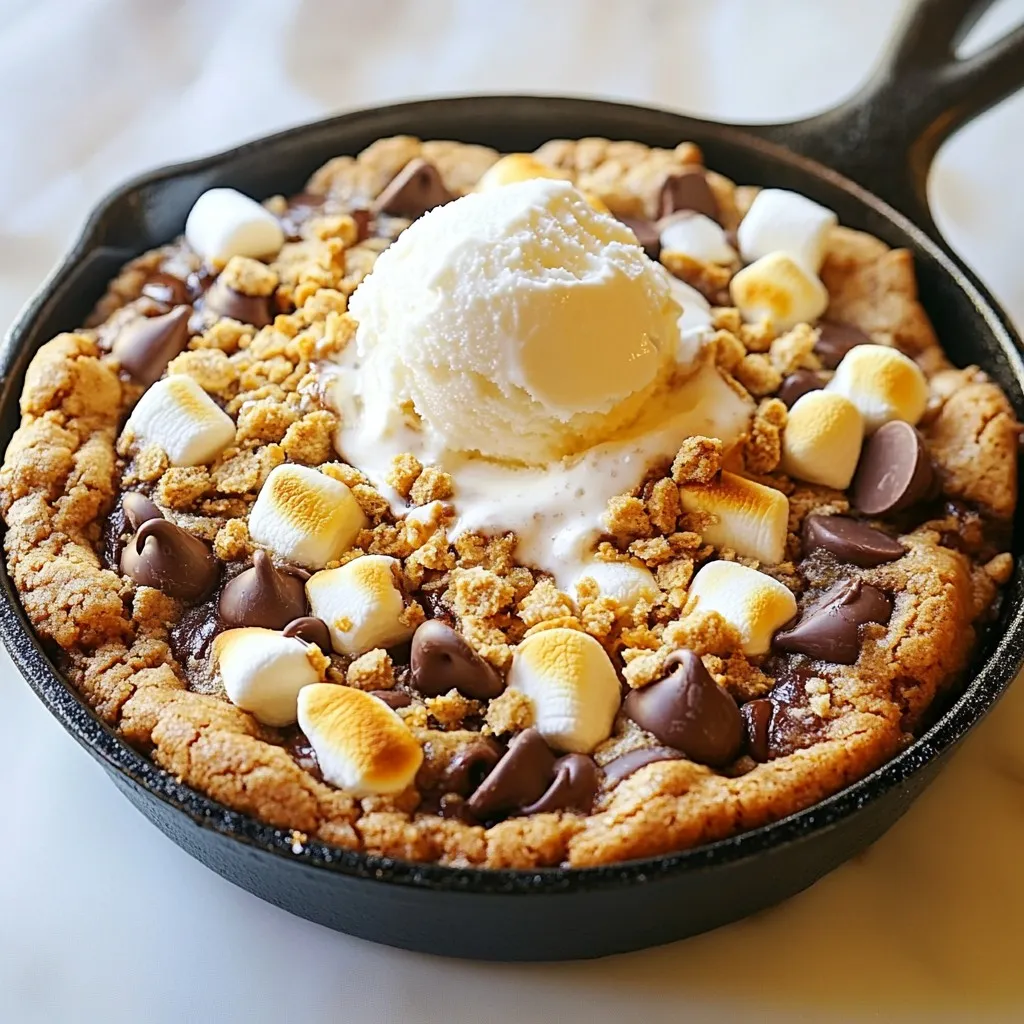
S’mores Chocolate Chip Skillet Cookie Delight
Craving dessert that brings joy to every bite? Meet your new favorite treat: the S’mores Chocolate Chip Skillet Cookie. This warm, gooey delight combines the