Dinner

To make Marry Me Chicken Pasta, you need the following ingredients: - 2 boneless, skinless chicken breasts - 8 ounces of fettuccine pasta - 1 tablespoon olive oil - 3 cloves garlic, minced - 1 cup cherry tomatoes, halved - 1 cup heavy cream - 1 cup chicken broth - 1 teaspoon Italian seasoning - 1/2 cup grated Parmesan cheese - Salt and pepper to taste - Fresh basil leaves for garnish These ingredients create a creamy, delicious dish that is sure to impress. If you want to change things up, here are some easy swaps: - Chicken: Use shrimp or tofu for a different protein. - Pasta: Swap fettuccine for penne or spaghetti. - Cream: Use half-and-half for a lighter sauce. - Tomatoes: Canned diced tomatoes work well if fresh ones aren't available. - Cheese: Try mozzarella or feta instead of Parmesan for a new flavor. These alternatives keep the meal exciting while still tasting great. To prepare this dish, gather the right tools: - Large pot for boiling pasta - Large skillet for cooking chicken and sauce - Wooden spoon or spatula for stirring - Knife and cutting board for slicing ingredients - Measuring cups and spoons for accuracy Having these tools ready will make cooking smoother and more enjoyable. {{ingredient_image_1}} Start by boiling water in a large pot. Make sure to add salt to the water. Once the water is bubbling, toss in the fettuccine. Cook it for about 8-10 minutes. You want it al dente, so check the package for the exact time. When it's ready, drain the pasta in a colander. Set it aside for later. While the pasta cooks, take your chicken breasts. Season both sides with salt and pepper. Heat olive oil in a large skillet over medium-high heat. Place the chicken in the hot skillet. Cook it for 5-7 minutes on each side. The chicken should be golden brown and cooked through. Once done, remove it from the skillet and let it rest on a plate. In the same skillet, add minced garlic. Sauté it for about 30 seconds until it smells great. Next, add the halved cherry tomatoes. Cook them for 2-3 minutes to soften. Now, pour in the heavy cream and chicken broth. Add the Italian seasoning and stir well. Bring this to a gentle simmer. After a minute, add the cooked fettuccine to the skillet. Mix in grated Parmesan cheese until it melts. Taste and adjust with salt and pepper if needed. Slice the rested chicken into strips and serve it over the creamy pasta. Top with fresh basil for a nice touch. To make juicy chicken, start with fresh breasts. Use boneless and skinless for easy cooking. Season with salt and pepper before cooking. This adds flavor right from the start. Heat the olive oil in your skillet until it shimmers. Sear the chicken for 5-7 minutes on each side. Look for a golden-brown color. This means it’s ready. Let the chicken rest for a few minutes before slicing. This keeps it moist. You can play with flavors to suit your taste. If you love garlic, add more minced garlic. For a kick, toss in some red pepper flakes. You can also switch the Italian seasoning for herbs like thyme or oregano. If you prefer tang, add a splash of lemon juice. For richer taste, use more Parmesan cheese. Always taste as you go. This helps you find the perfect balance. One common mistake is overcooking the chicken. This can make it dry and tough. Always check the doneness using a meat thermometer. It should read 165°F. Another mistake is not seasoning enough. Don't skip the salt and pepper; they make a big difference. Lastly, don't rush the sauce. Let it simmer to blend the flavors well. If you skip this, the dish may taste flat. Pro Tips Fresh Ingredients: Always use fresh garlic and ripe cherry tomatoes for the best flavor in your sauce. Perfectly Cooked Chicken: Ensure the chicken is cooked to an internal temperature of 165°F (75°C) for safety and juiciness. Save Some Pasta Water: Before draining the pasta, reserve a cup of the cooking water to adjust the sauce's consistency if needed. Garnish for Flavor: Fresh basil not only adds color but also enhances the overall flavor profile of the dish. {{image_2}} Adding vegetables to your Marry Me Chicken Pasta boosts nutrition. You can use spinach, broccoli, or bell peppers. They add color and taste. Simply sauté them with the garlic before adding the cream and broth. This way, they soak up the flavors while cooking. While fettuccine is classic, you can use other pasta types. Penne, farfalle, or even whole wheat pasta work great. Each type gives a different texture and taste to the dish. Choose what you like best or what you have at home. For a twist, try different proteins. Shrimp or salmon can replace chicken. They cook quickly and add a nice seafood flavor. If you want a vegetarian option, use chickpeas or tofu. Both provide protein and keep the meal hearty. To keep your Marry Me Chicken Pasta fresh, let it cool first. Then, place it in an airtight container. You can store it in the fridge for up to three days. Always label the container with the date so you know how long it lasts. When you're ready to eat the leftovers, you can reheat them easily. Use a microwave-safe dish and cover it with a lid or wrap. Heat it in short bursts, about one minute at a time. Stir in between to heat evenly. If it's too thick, add a splash of chicken broth or cream to loosen it up. If you want to save the dish for later, freezing is a great choice. Portion the pasta and chicken into freezer-safe bags. Try to remove as much air as possible before sealing. You can freeze it for up to three months. To use, thaw it in the fridge overnight and reheat as mentioned above. Marry Me Chicken Pasta is a creamy and savory dish. It features chicken breasts, fettuccine, and a rich sauce made with heavy cream and tomatoes. The name hints at its deliciousness, making it a favorite for special dates or dinner parties. You cook the chicken, then make a sauce with garlic, cream, and broth. Finally, you combine everything for a tasty meal. Yes, you can make Marry Me Chicken Pasta in advance! Cook the fettuccine and chicken ahead of time. Store them separately in the fridge. When ready to eat, reheat the pasta and sauce. Add the sliced chicken just before serving to keep it fresh. This makes it easy for busy nights or meal prep. Several sides go well with Marry Me Chicken Pasta. Here are some ideas: - Garlic Bread: A warm, crusty loaf is perfect to soak up the sauce. - Caesar Salad: Crisp romaine and tangy dressing add a fresh touch. - Steamed Veggies: Broccoli or green beans offer a healthy balance. - Roasted Asparagus: This side adds a nice crunch and flavor. These sides enhance the meal and make it even more enjoyable. We discussed the key parts of making Marry Me Chicken Pasta. You learned about the full ingredient list and useful tools. I shared step-by-step cooking tips for perfect pasta and chicken. You now have ideas for adding veggies and changing proteins. We also talked about how to store leftovers and common questions. With this knowledge, you can create a delicious meal. Enjoy your cooking!
Marry Me Chicken Pasta Simple and Flavorful Meal
Are you ready to impress with Marry Me Chicken Pasta? This simple and flavorful meal combines tender chicken, creamy sauce, and delicious pasta for a
For a tasty pizza pasta bake, you need: - 12 oz penne pasta - 1 cup marinara sauce - 1 cup mozzarella cheese, shredded - 1 cup pepperoni slices - ½ cup green bell pepper, diced - ½ cup black olives, sliced - ¼ cup red onion, diced - 1 teaspoon Italian seasoning - ½ teaspoon garlic powder - Salt and pepper to taste - Fresh basil leaves, for garnish These ingredients work together to create a rich and cheesy dish. The penne pasta acts as the base, soaking up all the flavors. The marinara sauce adds a nice tomato taste. Mozzarella cheese melts beautifully and gives that gooey texture we all love. You can customize your pizza pasta bake with extra toppings. Here are some fun ideas: - Cooked sausage for more meatiness - Mushrooms for an earthy flavor - Spinach for added greens - Jalapeños for a spicy kick - Different cheeses like cheddar or parmesan Feel free to mix and match based on what you like. This way, every bake can be unique! Adding a few spices can enhance the taste of your pizza pasta bake. I recommend: - Italian seasoning for classic flavor - Garlic powder to add depth - Crushed red pepper for heat - Oregano for a fresh touch Using these seasonings can elevate your dish. They help create a well-rounded flavor profile. Don't hesitate to adjust the amounts to suit your taste. {{ingredient_image_1}} Start by preheating your oven to 375°F (190°C). While the oven warms, boil water in a pot. Add 12 ounces of penne pasta to the pot. Cook it until it is al dente, which takes about 8-10 minutes. Drain the pasta and set it aside. It is key to not overcook the pasta. It will bake more in the oven. Grab a large mixing bowl. Combine the cooked penne with 1 cup of marinara sauce. Next, add half of the shredded mozzarella cheese. Then, toss in 1 cup of pepperoni slices. Add in ½ cup of diced green bell pepper, ½ cup of sliced black olives, and ¼ cup of diced red onion. For flavor, sprinkle in 1 teaspoon of Italian seasoning and ½ teaspoon of garlic powder. Finish with salt and pepper to taste. Stir everything together until the pasta is coated well. Now, transfer the pasta mix into a greased 9x13 inch baking dish. Spread it out evenly. Top the pasta with the remaining mozzarella cheese. Make sure to cover it well. Bake this in the oven for 25-30 minutes. Look for the cheese to be bubbly and golden brown. Once done, remove it from the oven and let it cool for a few minutes. Garnish with fresh basil leaves before serving. Enjoy your cheesy pizza pasta bake! To cook pasta just right, use plenty of water. Boil it before adding the penne. Follow the package time for al dente, which means firm to the bite. Keep an eye on it so it doesn’t get mushy. After cooking, drain the pasta well. You want it dry for the bake. For a cheesy topping, use fresh mozzarella cheese. Shred it yourself for the best melt. Spread it evenly over the pasta to cover every bite. This ensures that each scoop has gooey cheese. You can also add more cheese if you're feeling adventurous. Try mixing in some cheddar for extra flavor. Layering is key to a great bake. Start with the pasta mixture at the bottom. Then, add half the cheese directly on top. Next, sprinkle on any extra toppings like pepperoni and veggies. Finally, finish with the rest of the cheese. This method locks in all the flavors and keeps everything moist. Pro Tips Cook Pasta Al Dente: Make sure to cook the penne pasta until just al dente, as it will continue to cook in the oven and absorb some of the sauce, preventing it from becoming mushy. Customize Your Toppings: Feel free to personalize your pizza pasta bake by adding your favorite toppings, such as diced bell peppers, mushrooms, or even cooked sausage for extra flavor. Use Fresh Ingredients: Whenever possible, opt for fresh vegetables and high-quality cheese to enhance the overall taste of your dish and achieve a richer flavor profile. Let It Rest: Allow the pasta bake to cool for a few minutes before serving. This helps the cheese set and makes it easier to cut into portions without falling apart. {{image_2}} You can easily make a vegetarian pizza pasta bake. Skip the pepperoni and add more veggies. Try using mushrooms, zucchini, or spinach. These options bring a fresh taste and color. You can also add artichokes or sun-dried tomatoes for extra flavor. Just mix them with the pasta and sauce as you normally would. For a gluten-free pizza pasta bake, use gluten-free penne pasta. Many brands offer great options that taste just as good. Check the package for the right cooking time. You can also use gluten-free marinara sauce. This makes it simple for those who avoid gluten. Cheese is key in a pizza pasta bake. While mozzarella is a classic choice, feel free to experiment. Try using provolone or gouda for a rich flavor. You can even mix cheeses for a unique taste. As for toppings, consider spicy sausage, bell peppers, or even fresh herbs. Each choice adds its own twist to this dish. To store your pizza pasta bake, let it cool first. Place the leftovers in an airtight container. You can keep it in the fridge for up to three days. If you want to enjoy it longer, freezing is a great option. When it's time to reheat, I recommend using the oven. Preheat your oven to 350°F (175°C). Place your pasta bake in an oven-safe dish. Cover it with foil to keep it moist. Heat for about 15-20 minutes, or until it's warm all the way through. If you're in a hurry, the microwave works too! Heat it in short bursts, stirring in between, until hot. To freeze, cut the pasta bake into portions. Wrap each piece tightly in plastic wrap. Then, place them in a freezer-safe bag or container. You can store it in the freezer for up to three months. When ready to eat, thaw it overnight in the fridge before reheating. This keeps the flavors fresh and tasty! Yes, you can make Pizza Pasta Bake ahead of time. Just follow the recipe steps until you get to the baking part. After mixing the pasta and sauce, cover the dish and store it in the fridge. You can keep it there for up to 24 hours. When you’re ready to eat, bake it as usual. This makes it easy for busy days. If you want to change up the flavor, you can use different sauces. Try pizza sauce or Alfredo sauce for a creamy twist. You can also use pesto for a fresh taste. Just make sure the sauce you choose matches your toppings and spices. To add some heat, mix in red pepper flakes or hot sauce. You can also use spicy pepperoni or add jalapeños. If you really love spice, consider using a spicier cheese, like pepper jack. Adjust the spice level to fit your taste! Pizza Pasta Bake combines tasty ingredients, easy steps, and fun variations. This dish is perfect for families or gatherings. You can mix in any toppings you love, and you'll enjoy cooking it with these tips. Remember, storing leftovers properly makes for quick meals later. Don't hesitate to try new spices or cheese options. Experiment and find what works best for you! Now, grab your ingredients and start creating your own pizza pasta bake masterpiece.
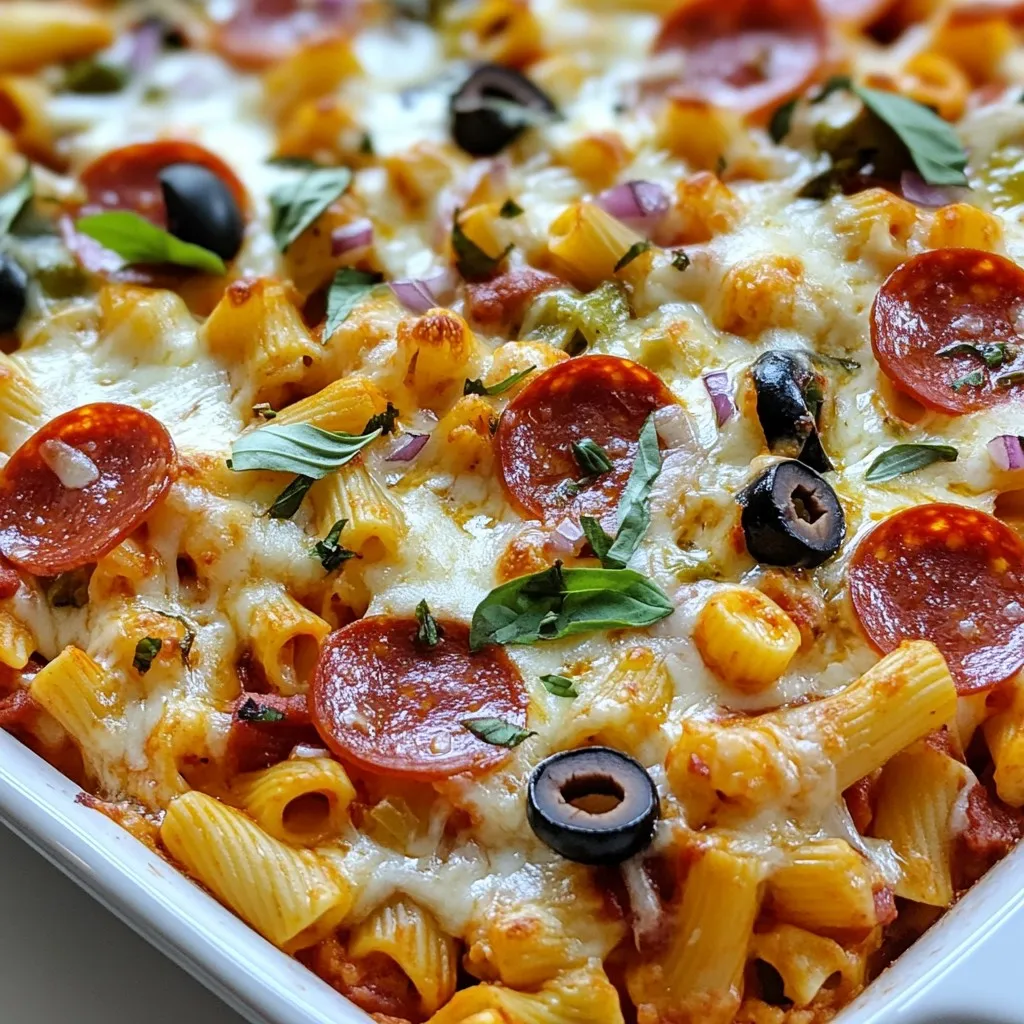
Savory Pizza Pasta Bake Easy and Flavorful Dish
Welcome to your new favorite comfort food! The savory pizza pasta bake is an easy, flavorful dish that combines the best of both worlds: pizza
For Cheesy Tater Tot Burritos, you need to gather a few key ingredients. These items come together to create a tasty and satisfying meal. Here’s your list: - Frozen tater tots - Shredded cheese - Ground beef or black beans - Sour cream - Lettuce and tomato - Salsa These ingredients work perfectly together. The tater tots add crunch, while the cheese brings creaminess. Ground beef gives a hearty touch, or you can use black beans for a great vegetarian option. Sour cream adds tang, and fresh lettuce and tomato provide a crisp bite. Finally, salsa brings the whole dish together with its zesty flavor. With these ingredients, you can make a dish that is not only easy but also fun to eat. You can adjust the amounts based on your needs. Want more crunch? Add extra tater tots! Prefer more spice? Go for a spicier salsa. Play around with these ingredients to make your perfect burrito. {{ingredient_image_1}} First, you need to preheat the oven. Set it to the temperature on the tater tots' bag. This is usually around 425°F (220°C). Next, spread the frozen tater tots on a baking sheet. Make sure they are in a single layer. Bake them for about 25 to 30 minutes. Check them halfway through. You want them golden and crispy. While the tater tots bake, prepare the filling. If you are using ground beef, cook it in a skillet over medium heat. If you prefer black beans, heat them in the skillet. Add taco seasoning, salt, and pepper to the meat or beans. Mix them well until heated through. This adds great flavor to your filling. Now, grab a large flour tortilla. Lay it flat on a clean surface. In the center, layer 4 to 5 crispy tater tots. Then, add a scoop of your seasoned meat or beans. Next, sprinkle some shredded cheese on top. Add a dollop of sour cream and a scoop of salsa. Finish with shredded lettuce and diced tomato. To fold the burrito, fold in the sides first. Then, roll it tightly from the bottom to the top. Repeat this for all the tortillas. To make them crispy, heat a small amount of cooking oil in a skillet over medium heat. Place the burritos seam-side down in the skillet. Cook them for 2 to 3 minutes until golden brown. Then, flip them and repeat on the other side. Once they are crispy and golden, remove them from the skillet. Let them cool a bit before slicing in half to serve. To get that perfect crunch on your burritos, use enough cooking oil. Oil helps them fry evenly and brown nicely. I recommend a light coating. When frying, keep the heat at medium. This way, the burritos cook through without burning. Flip them carefully after a few minutes. You want both sides to be golden and crisp. You can make your burritos even better with extra toppings. Try adding sliced jalapeños for heat. Fresh cilantro adds a nice touch too. Avocado or guacamole brings creaminess. You can also sprinkle some lime juice for a zing. Feel free to mix and match your favorites. Prepping ingredients in advance saves time. You can cook the ground beef or beans the day before. Cut the veggies and store them in the fridge. This way, when you're ready to make the burritos, it’s quick and easy. Keep your tater tots ready to bake too. Meal prep makes this fun dish even simpler to enjoy! Pro Tips Use Frozen Tater Tots: Frozen tater tots are a quick and easy way to add crunch to your burritos without the hassle of making them from scratch. Customize the Protein: Feel free to switch up the protein! Use chicken, turkey, or keep it vegetarian with beans or grilled vegetables for a different flavor profile. Layering is Key: When filling your burrito, make sure to layer the ingredients evenly to prevent any overflow and ensure every bite is delicious. Perfectly Crisp: For an extra crispy burrito, consider baking them in the oven for a few minutes after frying to help set the crunch. {{image_2}} You can easily make a vegetarian version of these burritos. Instead of using ground beef, try black beans. They add protein and flavor. Just heat the black beans in a skillet and season them with taco seasoning. You might also add other vegetable fillings. Consider corn, bell peppers, or spinach. These veggies give a nice crunch and color to your burrito. Cheesy tater tot burritos can have many flavors. Switch up the cheese for a fun twist. Go for pepper jack for a spicy kick or mozzarella for a milder taste. You can also mix in spices. Try adding chili powder or cumin to the meat or beans for more depth. These simple changes can take your burritos to a new level. How you serve your burritos can add to the fun. Pair them with different dips like guacamole or queso. You could also add sides like tortilla chips or a fresh salad. For a zesty touch, serve with lime wedges. These additions make your meal more exciting and enjoyable. To store leftover burritos, wrap each one in plastic wrap or foil. This keeps them fresh. Place the wrapped burritos in an airtight container. They will stay good for about 3 to 4 days in the fridge. If you want the best taste, eat them sooner rather than later. The best way to reheat burritos is in a skillet. Heat a small amount of oil over medium heat. Place the burrito seam-side down and cook for about 2 to 3 minutes. Flip it over and cook for another 2 to 3 minutes. This method helps keep the burrito crispy. You can also use the oven. Preheat it to 350°F (175°C), wrap the burrito in foil, and heat for 10 to 15 minutes. You can freeze both uncooked and cooked burritos. For uncooked burritos, wrap each one tightly in plastic wrap, then place them in a freezer bag. They can last up to 3 months. For cooked burritos, let them cool first. Then, wrap them in foil or plastic wrap. Store them in a freezer bag. They are best eaten within 1 to 2 months. Yes, you can! Cheddar cheese is classic, but other cheeses work well too. Try Monterey Jack for a mild flavor. Pepper Jack adds a nice kick. You can even use cream cheese for a rich, creamy taste. Mix and match cheeses for a unique twist. You have many options! Besides ground beef or black beans, try diced chicken or shrimp. For veggies, add sautéed peppers, onions, or corn. You can also throw in some guacamole or black olives. The sky's the limit! Get creative with your favorite flavors. To make it gluten-free, swap flour tortillas for corn tortillas. Check labels to ensure they are certified gluten-free. You can also use lettuce wraps for a low-carb option. Enjoy the same great taste without the gluten! This blog post showed you how to make tasty burritos with frozen tater tots and ground beef or black beans. You learned about prepping ingredients, cooking steps, and perfecting your burrito's crunch. The tips also helped with meal prep and storage. Remember, you can customize your burritos with various fillings and cheese. Now, you have the tools to enjoy fun and easy meals. Start cooking, and let your taste buds guide you!
Cheesy Tater Tot Burritos Easy and Delicious Recipe
Craving a meal that’s both fun and filling? Look no further! Cheesy Tater Tot Burritos are your go-to choice for a quick, tasty treat. With
- 8 oz linguine pasta - 1 lb flank steak, thinly sliced - 1/4 cup unsalted butter, melted - 2 cloves garlic, minced - 1 teaspoon smoked paprika - 1/2 teaspoon cayenne pepper - Zest and juice of 1 lemon - Salt and pepper to taste - Grated Parmesan cheese for serving - 2 tablespoons fresh parsley, chopped - Cherry tomatoes, halved Cowboy Butter Steak Linguine brings rich flavors to your table. The main stars here are the pasta and flank steak. Flank steak is juicy and tender when cooked right. Use thin slices for even cooking. The butter adds a creamy touch to the dish. It mixes well with garlic and lemon. Garlic gives a nice aroma. Lemon brightens the flavor with zest and juice. Smoked paprika brings warmth, while cayenne adds a kick. Adjust the cayenne to suit your spice level. Don't forget the salt and pepper. They enhance all the other tastes. For a fresh touch, add parsley and cherry tomatoes. They add color and a burst of flavor. The Parmesan cheese completes the dish. It makes it rich and savory. This dish is simple yet full of flavor. You can easily find these ingredients at your local store. With just a few steps, you create a meal everyone will love. Enjoy the process and savor your Cowboy Butter Steak Linguine! {{ingredient_image_1}} Boil a large pot of salted water. Add 8 oz of linguine. Cook it until al dente, as the package says. Drain the pasta and keep half a cup of the water. Set the pasta aside. Take 1 lb of flank steak and slice it thin. Season it well with salt, pepper, smoked paprika, and cayenne pepper. Let it sit for a bit to soak up the flavors. Heat 1 tablespoon of melted butter in a large skillet over medium-high heat. Once hot, add the steak in one layer. Sear each side for 2-3 minutes until it turns brown. Cook it to your liking. Remove the steak from the skillet and let it rest. Lower the heat in the skillet. Add the rest of the melted butter, minced garlic, and lemon zest. Cook for around 30 seconds. Make sure the garlic does not burn; you want it fragrant. Add the cooked linguine to the skillet with the cowboy butter mix. Toss the pasta to coat it well. If it seems dry, add some of the reserved pasta water. Squeeze in the juice of half a lemon and add half of the chopped parsley. Mix it all together. Slice the rested steak into bite-sized pieces. Plate the linguine and top it with the sliced steak. Garnish with the rest of the parsley and a sprinkle of grated Parmesan cheese. Add cherry tomatoes if you like. Enjoy your Cowboy Butter Steak Linguine! To achieve the best sear, use high heat. Preheat your skillet until it’s hot. Add a bit of melted butter to the pan. Place the seasoned flank steak in a single layer. Let it cook for 2-3 minutes without moving it. This helps create a nice crust. Flip the steak and sear the other side. Rest the steak for a few minutes before slicing. This keeps it juicy. Want to boost flavor? Try adding herbs like thyme or rosemary. You can also mix in some crushed red pepper for heat. If you like zest, add more lemon zest for brightness. Chopped scallions or fresh basil can add depth too. Feel free to get creative with your spices. Make it your own! For perfect al dente pasta, follow the package instructions. Start with boiling salted water. Add the linguine and stir it right away to prevent sticking. Check doneness 1-2 minutes before the time is up. The pasta should be firm but not hard. When ready, drain it but save some cooking water. This starchy water can help your sauce stick. Pro Tips Rest the Steak: Allowing the steak to rest after cooking helps retain its juices, ensuring each bite is tender and flavorful. Adjust the Spice: Feel free to modify the amount of cayenne pepper to suit your heat preference. Start with less if you're unsure! Use Fresh Ingredients: Fresh parsley and garlic elevate the flavor profile of this dish. Opt for fresh whenever possible! Add Color: Cherry tomatoes not only add a pop of color but also a fresh sweetness that complements the richness of the butter. {{image_2}} You can make a tasty vegetarian version of Cowboy Butter Steak Linguine. Start by swapping the flank steak for mushrooms or zucchini. These veggies absorb flavor well. Sauté them in the cowboy butter for that rich taste. Use your favorite plant-based pasta for a great texture. You can also add bell peppers or asparagus for extra color and crunch. If you love heat, add more spices to your Cowboy Butter. Consider using crushed red pepper flakes or chili powder. These spices will give your dish a kick. You can also try different pepper types, like jalapeños or serranos. Mix the spices into the butter as it cooks for even flavor. This adds a new layer to the dish. For a creamy version, mix in heavy cream or sour cream. After adding the garlic to the butter, pour in the cream. Stir until it's smooth and thick. This will give your pasta a rich, velvety texture. You can also add a bit of cheese, like cream cheese or ricotta, for extra creaminess. This variation feels indulgent and comforting. To keep your Cowboy Butter Steak Linguine fresh, store leftovers in an airtight container. Make sure to cool the dish to room temperature first. Place it in the fridge within two hours of cooking. It should stay good for up to three days. When you're ready to eat, check for any off smells or changes in texture before reheating. If you want to save your Cowboy Butter Steak Linguine for later, freezing is a great option. First, let the dish cool completely. Then, divide it into single servings for easy access. Use freezer-safe containers or bags to prevent freezer burn. You can freeze it for up to three months. Just remember to label your containers with the date. To reheat your Cowboy Butter Steak Linguine, use a skillet for the best flavor. Heat it over medium-low heat and add a splash of water or broth. Stir often to warm it evenly. You can also use the microwave. Just cover the dish with a microwave-safe lid or wrap. Heat in short bursts, stirring in between, until hot. Enjoy every bite like it's fresh! Linguine is great for this dish. It holds sauce well and pairs nicely with steak. You can also use spaghetti, fettuccine, or even pappardelle. All these pastas will soak up the cowboy butter and lemon flavors. Yes! Flank steak is tasty, but other cuts work too. You can use sirloin, skirt, or even ribeye for a richer flavor. If you're on a budget, try using ground beef or chuck roast. Just slice them thinly to keep the cooking time short. To make this dish gluten-free, swap the linguine with gluten-free pasta. Many brands offer great options like rice, corn, or chickpea pasta. Just cook them according to the package instructions. You can! Make the cowboy butter ahead. Just mix the butter, garlic, and lemon zest, then store it in the fridge. When you are ready to cook, just reheat it in the skillet. This saves time on busy weeknights! This blog post shared a simple and tasty way to make Cowboy Butter Steak Linguine. We covered the main ingredients like flank steak, linguine, and garlic butter. I walked you through each step, from cooking pasta to preparing the steak. You learned tips to perfect your dish and explored fun variations. Enjoy creating this meal! It’s perfect for sharing with family or friends. You can experiment with flavors that fit your taste. Happy cooking!
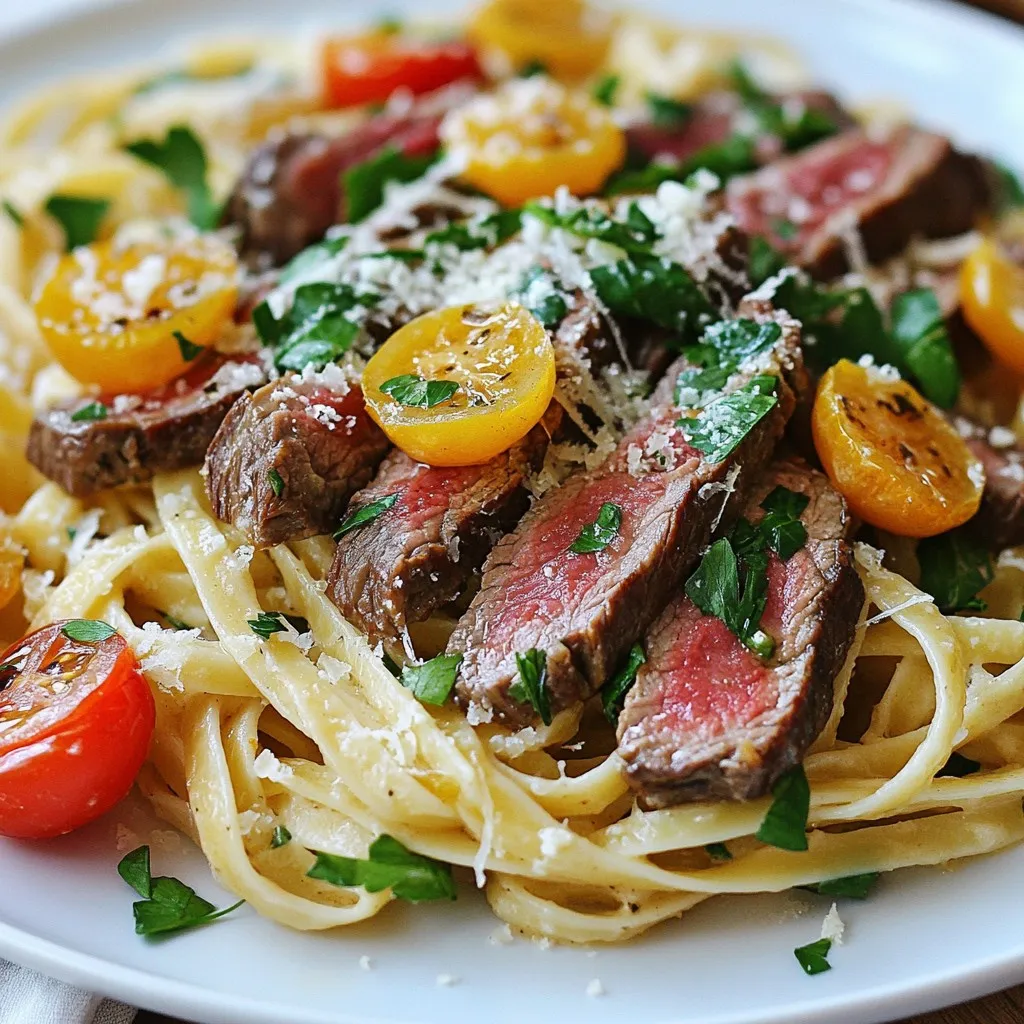
Cowboy Butter Steak Linguine Flavorful and Simple Dish
Get ready to elevate your pasta game with my Cowboy Butter Steak Linguine! This dish merges the juicy flavors of flank steak with creamy, garlic-infused
- Chicken and Seasoning - 4 boneless, skinless chicken breasts - 1 tablespoon olive oil - 1 teaspoon Italian seasoning - Salt and pepper to taste - Vegetables - 4 cloves garlic, minced - 1 cup cherry tomatoes, halved - 1 cup fresh spinach - Cream and Cheese - 1 cup heavy cream - ½ cup grated Parmesan cheese - 1 tablespoon fresh basil, chopped (for garnish) For this creamy garlic Tuscan chicken, you need fresh ingredients. First, select four boneless, skinless chicken breasts. They provide a tender and juicy base. You will also need olive oil to cook the chicken. A touch of Italian seasoning, salt, and pepper adds great flavor. Next, we need vegetables. Garlic is key. Use four cloves, minced for the best taste. Cherry tomatoes bring sweetness. Halve them to release their juices. Fresh spinach adds color and nutrition. Finally, we need cream and cheese. Heavy cream gives the sauce its rich texture. Grated Parmesan cheese enhances the flavor. Don't forget fresh basil. It makes a lovely garnish. With these ingredients ready, you set yourself up for a delicious meal. Each one plays a key role in making this dish flavorful and simple. Enjoy the process of gathering them! {{ingredient_image_1}} - Seasoning the chicken breasts: First, I dry the chicken breasts with paper towels. This step helps the seasoning stick well. Next, I sprinkle Italian seasoning, salt, and pepper on both sides. This adds great flavor right from the start. - Cooking the chicken until golden: I heat olive oil in a large skillet over medium-high heat. Once hot, I add the chicken breasts. I cook them for about 5-7 minutes on each side. I check that they turn a nice golden brown. The chicken is done when it reaches 165°F inside. After cooking, I remove the chicken and set it aside. - Sautéing the garlic: In the same skillet, I lower the heat to medium. I add minced garlic and sauté it for about one minute. This step makes the kitchen smell amazing! I watch carefully so it doesn’t burn. - Adding tomatoes and spinach: Then, I toss in the halved cherry tomatoes and fresh spinach. I cook them for about 2-3 minutes. The spinach wilts, and the tomatoes soften, creating a lovely base for the sauce. - Creating the creamy sauce: Next, I pour in the heavy cream and add the grated Parmesan cheese. I stir until the cheese melts and combines with the cream. I let the sauce come to a slight simmer, thickening it just right. - Combining chicken with sauce: Finally, I return the cooked chicken to the skillet. I nestle it gently into the sauce. I let it simmer for an additional 3-4 minutes. This allows the chicken to soak up all those rich flavors. Each bite will be creamy and full of taste! - Ensuring the chicken is cooked through: Use a meat thermometer. Cook the chicken until it reaches 165°F. This ensures it is safe to eat. Cut into the thickest part to check. If the juices run clear, it is done. - Adjusting seasoning to taste: Start with the basic seasonings. Taste the sauce before serving. If it needs more flavor, add more salt or Italian seasoning. A pinch of red pepper flakes can add a nice kick, too. - Serving suggestions with sides: Serve this dish with garlic bread. It soaks up the creamy sauce well. You can also place it over cooked pasta or rice. This adds extra texture and flavor. - Garnishing for visual appeal: Top the dish with fresh basil. A sprinkle of extra Parmesan cheese adds a nice touch. This makes the dish look vibrant and appetizing. Pro Tips Rest the Chicken: Let the chicken rest for a few minutes after cooking. This helps retain its juices, making it more tender and flavorful. Use Fresh Ingredients: Fresh garlic, spinach, and tomatoes enhance the flavor of the sauce. Always opt for fresh over dried when possible. Adjust the Creaminess: For a lighter version, substitute half of the heavy cream with chicken broth. This maintains flavor while reducing fat. Flavor Variations: Experiment with different herbs like thyme or oregano, or add a splash of white wine for an extra layer of flavor in the sauce. {{image_2}} You can switch chicken for other meats. Try turkey or pork. These meats work well with the sauce. If you want a dairy-free version, use coconut cream. This gives a creamy texture without dairy. You can also use nutritional yeast instead of Parmesan. This adds a cheesy flavor without dairy. Adding fresh herbs can boost the taste. Try thyme or oregano for a different twist. You can also add parsley for freshness. Incorporating other vegetables makes this dish more colorful. Bell peppers or zucchini are great options. They add crunch and nutrients. You can mix in mushrooms for an earthy touch too. After you enjoy the creamy garlic Tuscan chicken, store leftovers in an airtight container. Make sure to let the dish cool to room temperature before sealing it. This helps keep the flavors fresh. You can refrigerate the chicken for up to three days. When you're ready to eat again, reheating is simple. Warm the chicken in a skillet over medium heat. Add a splash of broth or cream to help revive the sauce. Stir gently until heated through. You can also use the microwave, but be cautious. Heat it in short bursts to avoid overcooking. If you want to save some creamy garlic Tuscan chicken for later, freezing is a great option. Allow the dish to cool completely before freezing. Use a freezer-safe container or a heavy-duty freezer bag to store it. It can stay good in the freezer for up to three months. To thaw, place the container in the fridge overnight. This method keeps the chicken juicy. When you’re ready to eat, reheat it in a skillet on medium-low heat. Add a little cream or broth to keep it creamy and delicious. Enjoy the flavors all over again! What can I serve with Creamy Garlic Tuscan Chicken? You can serve this dish with many sides. Garlic bread is a great choice. It soaks up the creamy sauce well. Pasta or rice also works nicely. Both options add a nice base. You might even add a side salad for freshness. Roasted vegetables can add color and nutrients. Can I make this recipe ahead of time? Yes, you can make this dish ahead. Cook the chicken and sauce as directed. Then, store them in the fridge. When you are ready to serve, just reheat. Add a splash of cream to keep it creamy. It tastes great the next day too! Is it possible to make this dish lighter? Absolutely! You can use chicken thighs instead of breasts. They are often juicier and more flavorful. For a lighter sauce, use half-and-half instead of heavy cream. You can also reduce the cheese a bit. Adding more veggies like zucchini can keep it filling and light. This blog post covered the delicious Creamy Garlic Tuscan Chicken recipe. We talked about the key ingredients like chicken, veggies, and sauce. I shared step-by-step instructions for cooking the chicken and making the creamy sauce. You now have tips for cooking and presentation, plus ideas for variations. Don't forget about storage tips to keep your leftovers fresh. Enjoy trying out this recipe and making it your own! Happy cooking!
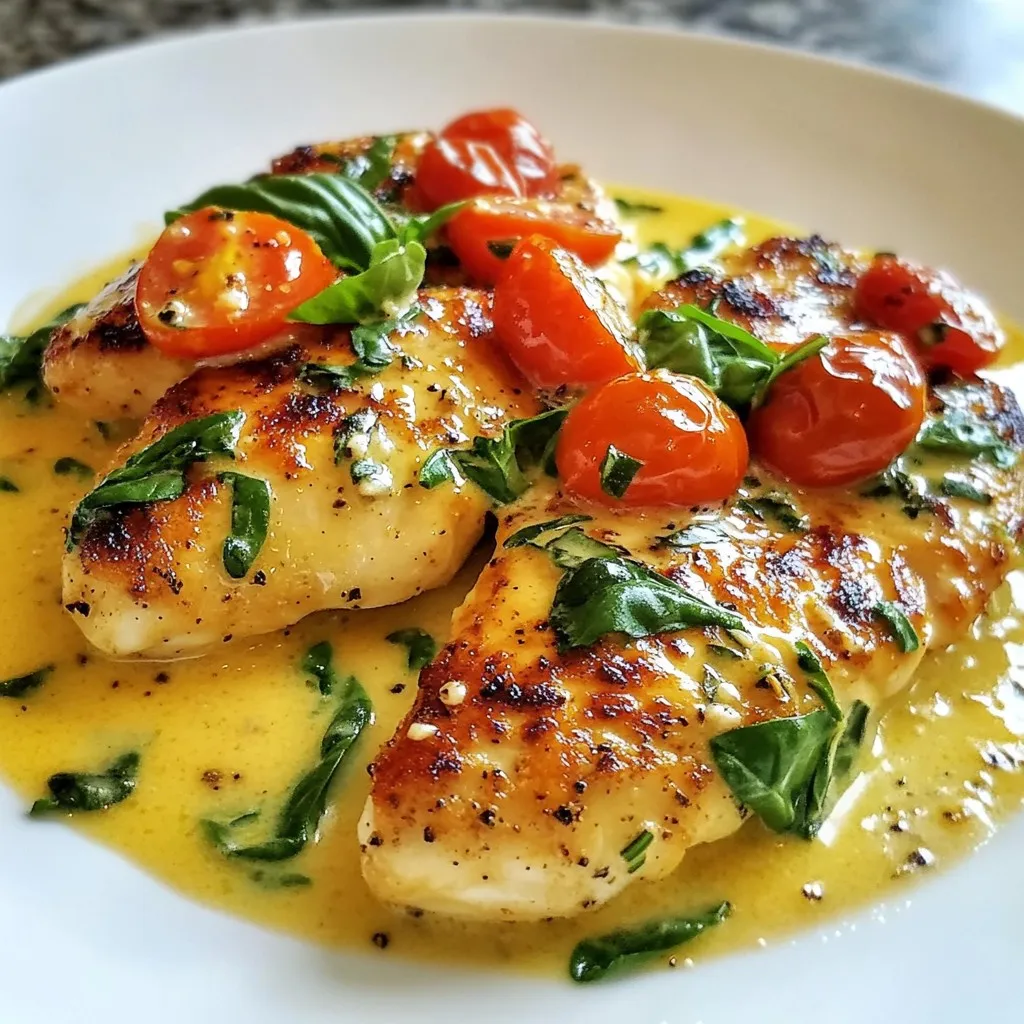
Creamy Garlic Tuscan Chicken Flavorful and Simple Dish
Are you ready to spice up your dinner routine? Creamy Garlic Tuscan Chicken is a must-try dish that’s both flavorful and simple to make! With
- 2 white fish fillets (tilapia or cod work well) - 1 tablespoon olive oil - 1 teaspoon smoked paprika - 1 teaspoon cumin - Salt and pepper to taste - 8 small corn or flour tortillas - 1 ripe mango, diced - 1/2 red onion, finely chopped - 1 jalapeño, seeded and minced - 1/4 cup fresh cilantro, chopped - Juice of 1 lime To create a vibrant dish, I choose fresh ingredients. The fish provides a flaky base, while the mango salsa adds bright, sweet notes. - 1 avocado, sliced - 1/2 cup sour cream or Greek yogurt These toppings enhance the dish. Sliced avocado adds creaminess. A drizzle of sour cream gives a tangy finish. - Lime wedges for extra zest - A light salad or slaw - A refreshing drink like agua fresca Pairing these sides makes your meal complete. The lime brightens flavors. A salad adds crunch, while a drink refreshes. {{ingredient_image_1}} Start by heating your grill or skillet to medium-high. Brush the fish fillets with olive oil. This helps the spices stick. Sprinkle smoked paprika, cumin, salt, and pepper on both sides. These spices add great flavor. Grill or pan-sear the fish for 3-4 minutes per side. You want the fish to be flaky and cooked through. After cooking, remove the fish and let it rest for one minute. In a medium bowl, mix diced mango, chopped red onion, minced jalapeño, and chopped cilantro. The colors will be bright and inviting. Squeeze in lime juice for freshness. Stir well and add salt to taste. This salsa brings a sweet and spicy kick to your tacos. Take a separate skillet and set it on low heat. Warm the tortillas for about 30 seconds on each side. This makes them soft and easy to fold. Warm tortillas are key to good tacos. Now for the fun part! Flake the cooked fish into bite-sized pieces. Place some fish in the center of each tortilla. Top it with a generous spoonful of mango salsa. Add a slice of avocado for creaminess. The flavors will blend perfectly. Finish your tacos with a drizzle of sour cream or Greek yogurt. This adds a nice tang. If you like, sprinkle extra cilantro on top for color and taste. Serve your tacos on a colorful platter with lime wedges for a bright touch. Enjoy the burst of flavors in every bite! To get the best fish, start with fresh fillets. I like tilapia or cod. Brush them with olive oil. This helps them cook well and adds flavor. Use smoked paprika for a nice touch. Season with cumin, salt, and pepper. Cook the fish for 3-4 minutes per side. It should be flaky when done. Let it rest before you flake it. This keeps it juicy. Mango salsa brings a sweet zing to your tacos. Use ripe mango for the best taste. Chop the mango into small pieces. Add finely chopped red onion for crunch. A little minced jalapeño adds heat. Don’t forget fresh cilantro for freshness. Squeeze lime juice over it all. This brightens the flavors. Mix well and taste. Adjust salt as needed for balance. When serving, warm your tortillas for a better bite. Place a flake of fish in each tortilla. Top with a spoonful of mango salsa. A slice of avocado adds creaminess. Drizzle sour cream or Greek yogurt on top. For a pretty look, garnish with extra cilantro. Serve on a colorful platter with lime wedges. This adds flair and makes your meal fun! Pro Tips Choose Fresh Fish: Opt for the freshest fish you can find, as it will significantly enhance the flavor and texture of your tacos. Customize the Heat: Adjust the amount of jalapeño in the salsa to control the spiciness according to your preference. Experiment with Tortillas: Try using different types of tortillas, such as whole grain or spinach, for added flavor and nutrition. Make Ahead: Prepare the mango salsa in advance and store it in the fridge to allow the flavors to meld together for a more vibrant taste. {{image_2}} You can swap the white fish for many types. Try salmon for a richer taste. Mahi-mahi offers a meaty texture and great flavor. Shrimp also works well; just cook them until pink and opaque. Each fish gives a new spin on these tacos. For a veggie option, use grilled portobello mushrooms or seasoned tofu. They absorb flavors well and add a nice texture. Add black beans for protein and fiber. You still get the yummy mango salsa, making it fresh and tasty. If you like heat, add more jalapeño or a splash of hot sauce. Try diced red chili peppers for a different kick. You can also mix in diced bell peppers for sweetness and crunch. Adjust the spice to fit your taste. You can store leftover tacos easily. Place them in an airtight container. Keep them in the fridge. They will last for about two days. When you are ready to eat, check if they still look good. You can freeze mango salsa too! Use a freezer-safe container. Leave some space at the top as it may expand. It will stay fresh for up to three months. When you want to use it, thaw it in the fridge overnight. To reheat the tacos, warm them in a skillet. Heat on low for about one to two minutes. You want them warm, not hot. For the mango salsa, just stir it before serving. It’s best fresh but still tasty after freezing! Yes, you can use frozen fish. Just thaw it first. Frozen fish may change texture. Make sure to cook it well. To add heat, use more jalapeño in the salsa. You can also add hot sauce. Try using spicy fish seasoning too. Greek yogurt is a great swap for sour cream. It adds creaminess with a tangy flavor. You can also use avocado for a rich taste. You can make the salsa a few hours ahead. Just store it in the fridge. This helps the flavors blend and taste better. White fish like tilapia or cod works great. They cook quickly and flake nicely. You can also try mahi-mahi or snapper for variety. We covered key ingredients, easy steps, and handy tips to make delicious fish tacos. You can adjust the flavors and toppings to fit your taste. Remember to store and reheat leftovers properly for the best experience. Be bold and try different fish options or a vegetarian version too. Enjoy sharing this tasty dish with friends and family!
Mango Salsa Fish Tacos Flavorful and Simple Meal
Are you ready to spice up your dinner routine? Mango Salsa Fish Tacos are a vibrant and simple meal packed with fresh flavors. You’ll be
- 2 boneless chicken breasts, cut into bite-sized pieces - 2 cups fresh spinach, roughly chopped - 1 cup mushrooms, sliced (button or cremini) - 2 cloves garlic, minced - 1 medium onion, diced - 1 tablespoon olive oil - 1 teaspoon dried oregano - 1 teaspoon paprika - Salt and pepper to taste - ½ cup low-sodium chicken broth I love using fresh ingredients. They make a big difference in flavor. For this dish, chicken breasts work well. They cook quickly and stay juicy. Spinach adds color and nutrients. Mushrooms bring an earthy taste. Garlic and onion create a strong base. The spices like oregano and paprika give warmth. - ¼ cup grated Parmesan cheese (optional) - Fresh parsley for garnish Parmesan cheese adds a creamy touch. It melts nicely over the dish. Fresh parsley brings brightness and color. You can skip these, but they enhance the meal. - Large skillet - Sharp knife - Cutting board - Measuring spoons Having the right tools makes cooking easier. A large skillet holds all the ingredients well. A sharp knife helps with chopping. Use a cutting board to keep things tidy. Measuring spoons ensure you get the right amount of spices. {{ingredient_image_1}} Start by cutting the chicken breasts into small pieces. This helps them cook quickly. Next, chop the spinach roughly. You want nice, bite-sized bits. Slice the mushrooms thinly. Dice the onion into small pieces. Finally, mince the garlic. Having everything ready makes cooking easier and faster. Heat the olive oil in a large skillet over medium-high heat. Once hot, add the diced onion. Sauté it for about three minutes until it turns soft and clear. Then, add the minced garlic. Cook for one more minute until you smell that lovely aroma. Now, toss in the chicken pieces, oregano, paprika, salt, and pepper. Cook the chicken for five to seven minutes. Keep stirring until it turns golden brown and is fully cooked. After the chicken is done, add the sliced mushrooms. Cook them for about three to four minutes until they soften. Pour in the chicken broth and bring the mix to a simmer. Let it cook for two minutes so all the flavors mix well. Finally, stir in the chopped spinach. Cook for one to two minutes until it wilts. If you like cheese, sprinkle some grated Parmesan on top and let it melt. This adds a nice creamy touch to your dish. To cook chicken just right, start with even-sized pieces. Cut your chicken breasts into bite-sized bits. This helps them cook evenly. Heat olive oil in your skillet over medium-high heat. Add the chicken and let it sit for a moment. This gives it a nice brown color. Cook for about 5 to 7 minutes. Make sure it is no longer pink inside. Use a meat thermometer if you have one. The chicken should reach 165°F. To boost flavor, use fresh herbs like oregano and parsley. They add bright notes to the dish. Paprika gives a warm, smoky taste. Don’t skip the garlic; it brings depth to your meal. Adding chicken broth makes the dish juicy and rich. If you like cheese, sprinkle some grated Parmesan on top. It melts beautifully and adds creaminess. Season with salt and pepper to make the flavors pop. Serve your skillet dish right in the pan for a rustic look. It makes the meal feel warm and inviting. A sprinkle of fresh parsley adds color and freshness. Pair it with crusty bread to soak up the tasty juices. You can also serve it over quinoa or rice for added texture. This makes the meal hearty and filling. Enjoy your delicious creation with family or friends! Pro Tips Use Fresh Ingredients: Fresh spinach and mushrooms will enhance the flavor and texture of your dish compared to canned or frozen varieties. Cook Chicken in Batches: If your skillet is crowded, cook the chicken in batches to ensure it browns evenly and cooks through properly. Add a Splash of Lemon: A squeeze of lemon juice just before serving brightens the flavors and adds a refreshing touch to the dish. Experiment with Cheese: Try different cheeses like feta or mozzarella for a unique twist instead of Parmesan, enhancing the flavor profile. {{image_2}} You can swap chicken for other proteins. Try turkey or shrimp for a twist. Tofu is a great choice for a plant-based option. Each protein brings its own flavor and texture. Adjust cooking times as needed. For example, shrimp cooks faster than chicken. To make a vegetarian version, skip the chicken. Use firm tofu or tempeh instead. Cube the tofu and sauté it until golden. The mushrooms will add a nice taste. You can add more veggies like bell peppers or zucchini. This keeps the dish colorful and healthy. Boost nutrition with add-ins. Try adding a cup of chickpeas for protein and fiber. You can also toss in some cherry tomatoes for sweetness. Carrots or bell peppers add crunch and vitamins. Don't forget to add nuts like walnuts for a nice texture. These tweaks will make your meal more filling and tasty. After you enjoy your Chicken Spinach Mushroom Skillet, let it cool. Transfer leftovers to an airtight container. I recommend using glass containers for better storage. Store it in the fridge. It will stay fresh for about 3 to 4 days. If you want to keep it longer, consider freezing. To reheat, I suggest using a skillet. Heat it over medium heat. Add a splash of chicken broth to keep it moist. Stir occasionally until it heats through. You can also use the microwave. Place it in a microwave-safe dish and cover it. Heat in short bursts, stirring in between, until hot. If you plan to freeze, pack the skillet in a freezer-safe container. Make sure to leave some space at the top. This lets the food expand as it freezes. It can last for about 2 to 3 months in the freezer. To defrost, move it to the fridge overnight. Then reheat as mentioned above. Yes, you can use frozen spinach. It is a great alternative. Just thaw and drain it well before adding it to the skillet. This helps avoid extra water in your dish. Remember, frozen spinach cooks faster than fresh, so add it toward the end. This way, it warms up without overcooking. To check if the chicken is done, cut a piece open. The inside should be white, not pink. Alternatively, you can use a meat thermometer. The chicken needs to reach an internal temperature of 165°F (75°C). This ensures it is safe to eat. Always check thick pieces for doneness. This dish pairs well with many sides. You can serve it with crusty bread to soak up the juices. Quinoa or rice also works great for added texture. A fresh salad adds crunch and balance. Consider roasted veggies for more flavor and nutrition. Yes, you can prepare this dish a day ahead. Cook it fully, then cool it down and store it in the fridge. When ready to eat, reheat it gently on the stove or in the microwave. Add a splash of broth if it seems dry. This makes for a quick and easy meal later. This blog post covered all you need for a Chicken Spinach Mushroom Skillet. We explored key ingredients, cooking steps, and tips for great flavor. I shared fun variations and storage tips to keep your meals fresh. Remember, you can customize this dish to suit your taste. Enjoy testing different proteins, add-ins, and servings. Cooking can be fun and simple! Now, go create your delicious skillet dish, and happy cooking!
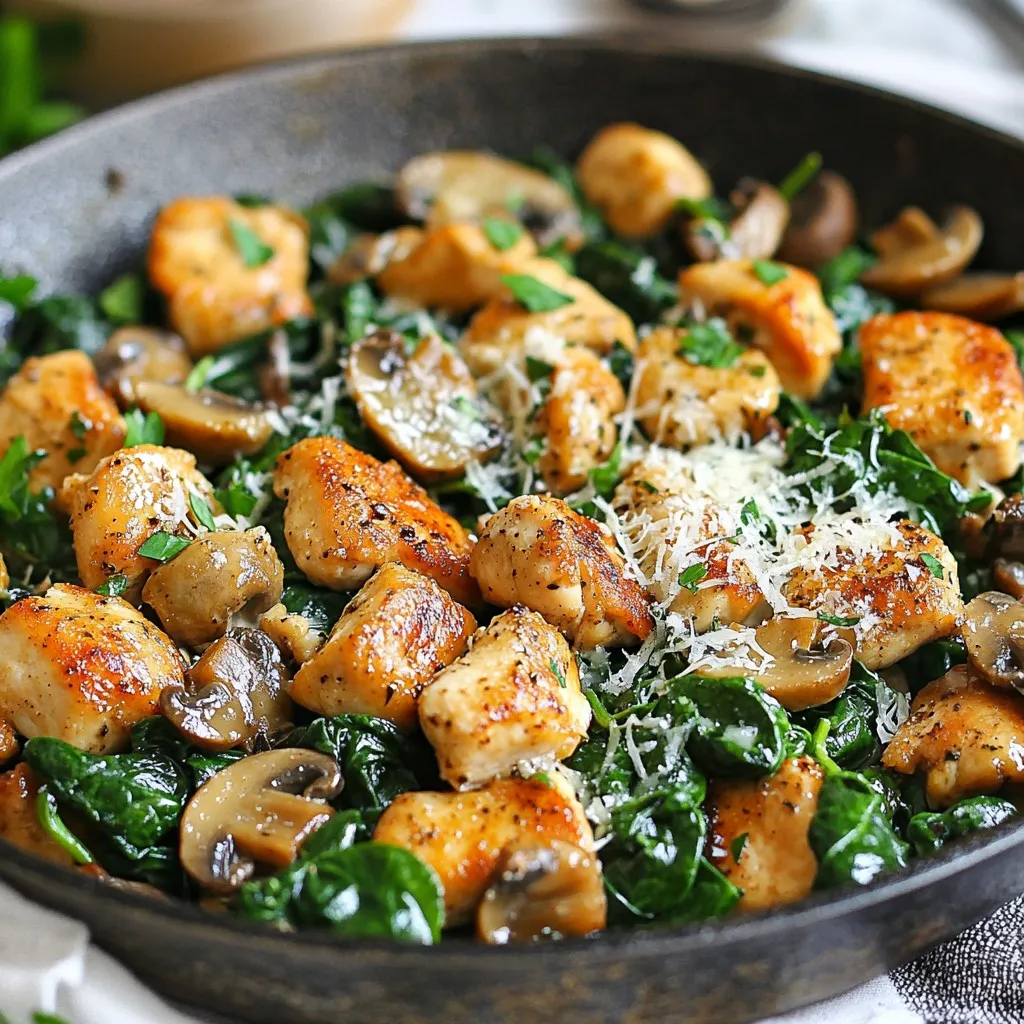
Chicken Spinach Mushroom Skillet Flavorful Dinner Recipe
Looking for a simple yet delicious dinner? This Chicken Spinach Mushroom Skillet recipe brings together juicy chicken, fresh spinach, and hearty mushrooms for a meal
- 1 lb boneless chicken thighs: Cut into bite-sized pieces. Chicken thighs stay juicy and tender. - Spices and seasonings: - 2 tablespoons butter: Adds richness and depth. - 1 medium onion: Finely chopped for a sweet base. - 2 cloves garlic: Minced for aroma. - 1 tablespoon ginger: Grated for warmth. - 1 tablespoon garam masala: Key spice blend for flavor. - 1 teaspoon turmeric powder: Gives color and earthiness. - 1 teaspoon cumin: Adds a warm, nutty flavor. - Cooking base: - 1 cup crushed tomatoes: Provides acidity and sweetness. - 1 cup coconut milk: Adds creaminess and richness. - 1 tablespoon sugar: For balancing flavors, add to taste. - Fresh cilantro: Chopped for a bright garnish. - Rice or naan: Serve butter chicken over fluffy rice or with warm naan. - Garnishes: Add fresh cilantro and a wedge of lime for a zesty touch. These ingredients create the heart of your quick butter chicken. They bring together bold flavors and comforting textures. Using chicken thighs ensures a tender bite, while spices like garam masala and turmeric create depth. Coconut milk makes the sauce creamy and rich. Enjoy exploring these ingredients in your busy night meals! {{ingredient_image_1}} - Begin by cutting 1 lb of boneless chicken thighs into bite-sized pieces. - Finely chop 1 medium onion and set it aside. - Mince 2 cloves of garlic and grate 1 tablespoon of ginger. - Measure out your spices: 1 tablespoon of garam masala, 1 teaspoon of turmeric, and 1 teaspoon of cumin. - In a large pan, melt 2 tablespoons of butter over medium heat. - Add the chopped onion and sauté for 3-5 minutes until it turns translucent. - Stir in the minced garlic and grated ginger, cooking for another 1-2 minutes. - Next, add the chicken pieces to the pan. Season them with salt, garam masala, turmeric, and cumin. - Cook the chicken for 5-7 minutes until it is browned on all sides. - Pour in 1 cup of crushed tomatoes and mix everything well. - Let it simmer for about 5 minutes to blend the flavors. - Then, stir in 1 cup of coconut milk and add 1 tablespoon of sugar if you like. - Bring the mixture to a gentle simmer and cook for another 10 minutes. - Taste the dish and adjust the seasoning, adding more salt or sugar if needed. - Remove from heat and garnish with fresh cilantro before serving. - Sautéing techniques: Start by heating your pan before adding butter. This helps the butter melt evenly. When the butter sizzles, add your onions. Sauté them until they are soft and clear. This brings out their sweet flavor. Stir often to avoid burning. - Melting butter: Use medium heat to melt the butter. Too high heat can burn it. If you see brown bits in the pan, lower the heat. You want the butter to be golden, not dark. - Adjusting spice levels: If you like more heat, add a little chili powder or cayenne. Start with a small amount, then taste as you go. You can always add more, but you can't take it out once it’s in! - Adding creaminess: For a richer sauce, add more coconut milk. If you want it creamier, try stirring in some heavy cream at the end. This makes the dish smooth and velvety. - Serving styles: Serve your butter chicken over a mound of fluffy rice or next to warm naan. The bread is great for scooping up the sauce. Don’t forget to get a good amount of sauce on each plate! - Garnishing tips: Fresh cilantro adds color and flavor. Chop it finely and sprinkle it on top just before serving. A wedge of lime on the side adds a nice touch too. Squeeze it over the dish for a bright, fresh taste. Pro Tips Use Fresh Spices: Freshly ground spices elevate the flavor of the dish. If possible, grind your garam masala and cumin just before adding them to the pan. Marinate the Chicken: For even more flavor, marinate the chicken in yogurt and spices for a couple of hours or overnight before cooking. Adjust the Heat: If you prefer a spicier dish, add a pinch of cayenne pepper or some chopped green chilies when cooking the onions. Make it Ahead: This butter chicken tastes even better the next day! Make a batch in advance and store it in the refrigerator for up to 3 days. {{image_2}} Chicken alternatives You can use turkey or pork instead of chicken. These meats cook well and absorb flavors nicely. Cut them into small pieces like chicken. Adjust cooking time as needed. Vegetarian options For a meatless dish, try using paneer or firm tofu. Both options soak up the sauce well. You can also use chickpeas for added protein. This makes a hearty meal without meat. Spicy versions If you love heat, add more spices. A pinch of cayenne or red chili powder can give a nice kick. You might also use a spicy curry paste for extra flavor. Creamy variations For a richer taste, mix in a little heavy cream or Greek yogurt. These add a smooth texture and a lovely flavor. Just stir them in at the end for the best results. Gluten-free adaptations This dish is naturally gluten-free. Just ensure your spices and any added ingredients are gluten-free. Serve with rice instead of naan for a gluten-free option. Dairy-free options To make this dish dairy-free, keep the butter but use coconut milk only. You can skip the cream or yogurt. It will still taste great and be creamy without dairy. After you enjoy your quick butter chicken, you may have some left. To store it right, wait for it to cool. Place it in an airtight container. It can stay fresh in the fridge for up to three days. When you're ready to eat, reheat it on the stove. Use low heat and stir often. You can also microwave it in a bowl. Cover it with a lid to keep moisture in. Heat for one minute, then stir. If it’s still cold, heat for another minute. If you want to save some for later, you can freeze it! First, let the butter chicken cool down completely. Then, transfer it to a freezer-safe container. Make sure to leave some space at the top. The sauce can expand when it freezes. You can freeze it for up to three months. When you’re ready to eat, take it out of the freezer. Move it to the fridge to thaw overnight. For a quicker method, you can thaw it in the microwave. Just use the defrost setting. Quick butter chicken can last in the fridge for three days. In the freezer, it lasts for three months. If you notice any strange smells or colors, throw it away. Always trust your senses when it comes to food safety. Enjoy your meal again without worry! Quick butter chicken is simple and fast. Start by melting butter in a pan. Add chopped onion and sauté until soft. Then, stir in minced garlic and grated ginger. Next, add bite-sized chicken pieces. Season with salt, garam masala, turmeric, and cumin. Cook until browned. Pour in crushed tomatoes and let it simmer for five minutes. Finally, stir in coconut milk and cook for ten more minutes. Yes, you can use frozen chicken. Just make sure to thaw it first. You can place it in the fridge overnight or use the microwave. Cut the chicken into bite-sized pieces. This helps it cook evenly. Be careful to adjust the cooking time. Frozen chicken may take a little longer to cook fully. Butter chicken pairs well with several sides. Here are some great options: - Cooked rice - Naan bread - Steamed vegetables - A fresh salad These sides soak up the delicious sauce and complete your meal. To store leftover butter chicken, place it in an airtight container. Keep it in the fridge for up to three days. When you want to eat it again, reheat it on the stove or microwave. If you want to store it longer, you can freeze it. Just make sure it is in a freezer-safe container. It can last up to three months in the freezer. This blog post covered how to make delicious butter chicken. We explored the main ingredients, optional items, and serving ideas. You learned to prepare, cook, and add the final touches for great flavor. I shared tips to boost taste and make it look great. You also found variations for different diets and how to store leftovers. In essence, butter chicken is easy to make and customize. Get creative and enjoy every bite!
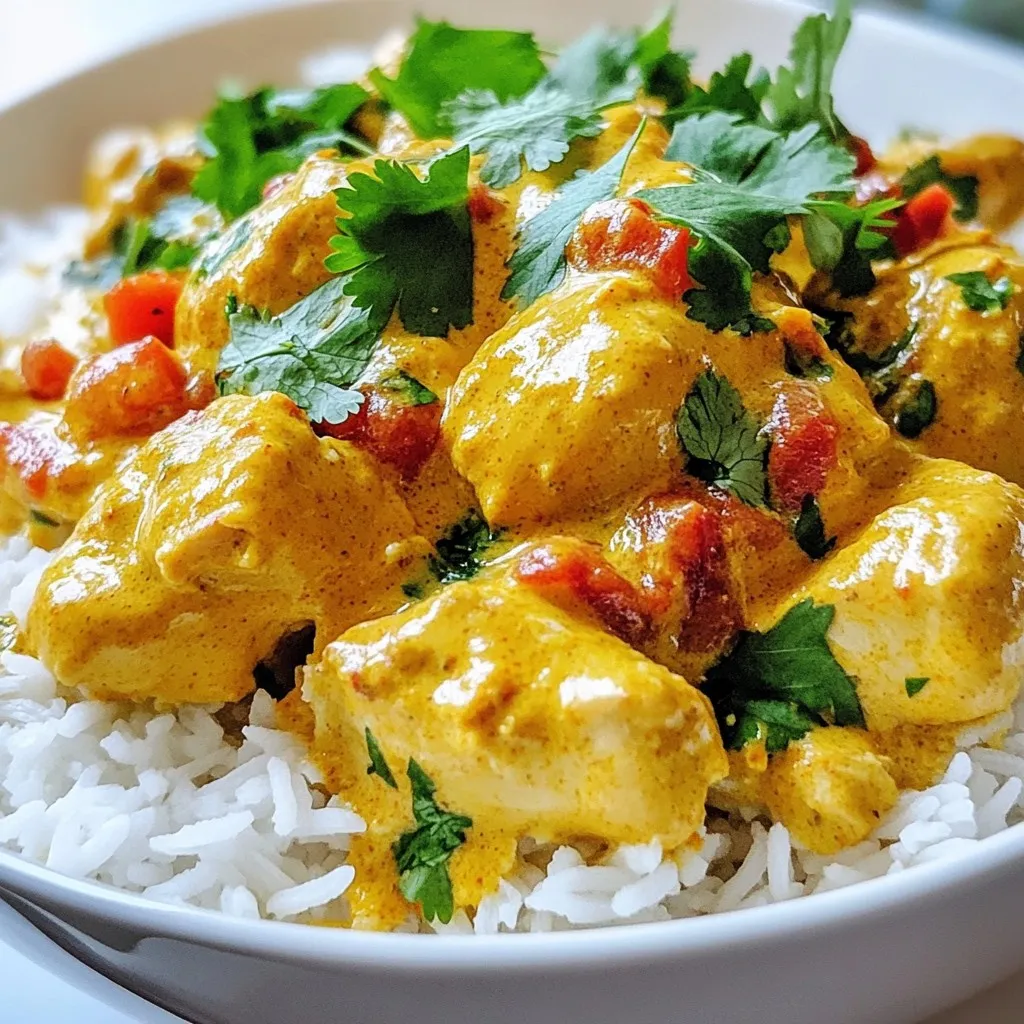
Quick Butter Chicken Easy Recipe for Busy Nights
Are you in need of a delicious meal but short on time? Look no further! In this post, I’ll guide you through a Quick Butter
To make Garlic Butter Shrimp Scampi Orzo, you will need: - 1 pound large shrimp, peeled and deveined - 1 cup orzo pasta - 4 tablespoons unsalted butter - 4 cloves garlic, minced - 1 teaspoon red pepper flakes (optional) - 1 lemon, juiced and zested - 1/2 cup vegetable broth - 1/4 cup fresh parsley, chopped - Salt and pepper to taste - Lemon wedges for garnish Having all the ingredients ready makes cooking smoother. You can swap some ingredients for variety. If you don't have orzo, use any small pasta. You can also choose shrimp that are frozen or fresh, based on what you can find. For a lighter dish, try using olive oil instead of butter. If you want more heat, add more red pepper flakes. For fresh shrimp, look for ones that smell clean, like the ocean. The shells should be firm and shiny. Avoid any shrimp with a strong fishy smell or black spots. If you are buying frozen shrimp, check that they are not stuck together. This means they are fresh and quick to cook. To start, bring a large pot of salted water to a boil. This will help the orzo cook evenly. Once the water boils, add 1 cup of orzo pasta. Cook it until it's al dente, following the package instructions. This usually takes about 8 to 10 minutes. When done, drain the orzo and set it aside. Make sure it doesn't stick together. Next, heat a large skillet over medium heat. Add 4 tablespoons of unsalted butter. Let the butter melt fully. Once it's melted, add 4 cloves of minced garlic and, if you like spice, 1 teaspoon of red pepper flakes. Sauté this for about 1 minute. You want the garlic to smell good but not burn. Then, add 1 pound of peeled and deveined shrimp to the skillet. Season the shrimp with salt and pepper. Cook for 2 to 3 minutes on each side. The shrimp should turn pink and opaque when they're done. Now it’s time to mix everything. Pour in 1/2 cup of vegetable broth, along with the juice and zest of 1 lemon. Bring the mixture to a simmer for about 2 minutes. This helps all the flavors blend well. After that, add the cooked orzo to the skillet. Toss everything together until well combined. Let it cook for another 2 minutes to heat through. Finally, remove from heat and stir in 1/4 cup of chopped fresh parsley. Adjust the seasoning if needed. Serve the dish right away, garnished with lemon wedges for a fresh kick. To cook shrimp just right, start with fresh shrimp. Look for a firm texture and a clean smell. When cooking, heat a skillet on medium. Add butter and minced garlic, then toss in the shrimp. Cook them for 2-3 minutes on each side. They should turn pink and opaque. This step ensures you get juicy shrimp every time. To boost the taste of your dish, add red pepper flakes. They give a nice kick without being too spicy. You can also experiment with fresh herbs like basil or chives. A splash of white wine can add depth too. Just pour it in after cooking the shrimp, and let it simmer. Remember, fresh lemon juice brightens the flavor. Always add it right before serving for the best taste. When cooking orzo, use plenty of salted water. This helps the pasta stay flavorful. Follow the package instructions for cooking time. Drain it when it’s al dente, so it’s still firm. After cooking, toss the orzo with a little olive oil. This prevents it from sticking together. If you plan to mix it with the shrimp, combine them while both are hot. This way, they absorb each other's flavors beautifully. {{image_2}} You can add great flavor and color by including vegetables. Fresh spinach, cherry tomatoes, or bell peppers work well. Just toss them in with the shrimp. Cook them until they soften, then mix in the orzo. This adds nutrients and taste to your dish. If you want to switch things up, use different pasta. Penne, fusilli, or even whole wheat pasta can be great choices. Just be mindful of cooking times, as they may differ from orzo. For a gluten-free option, try rice or quinoa. Each pasta brings a new texture to the dish. You can swap shrimp for other proteins. Chicken or scallops are tasty alternatives. Use about one pound of your chosen protein. Cook them until they are fully done, just like you do with shrimp. You can even go plant-based with tofu or chickpeas. Each protein will give your dish a different spin. To store Garlic Butter Shrimp Scampi Orzo, let it cool first. Place it in an airtight container. This keeps the dish fresh and tasty. You can also use a glass dish with a lid. Make sure to seal it tightly to prevent air from getting in. When you want to enjoy the dish again, reheat it gently. You can use a skillet on low heat. Add a splash of water or broth to keep it moist. Stir often until it's heated through. You can also use the microwave. Heat it in 30-second bursts, stirring in between. Garlic Butter Shrimp Scampi Orzo lasts about 3 days in the fridge. Make sure to check for any signs of spoilage before eating. If it smells off or looks strange, it’s better to toss it out. Enjoy your leftovers while they're fresh for the best taste! Yes, you can make Garlic Butter Shrimp Scampi Orzo ahead of time. Cook the orzo and shrimp separately. This keeps the shrimp tender. Mix them right before serving. If you store it in the fridge, use it within two days for the best taste. You can pair this dish with many sides. A simple green salad works great. Garlic bread is a classic choice too. Roasted vegetables add color and flavor. Lemon wedges on the side brighten the dish. Yes, this recipe is perfect for meal prepping. Each serving fits well in a container. Just reheat it in the microwave. Add a splash of broth to keep it moist. This dish stays tasty, so you can enjoy it all week. You learned how to make Garlic Butter Shrimp Scampi Orzo. We covered the ingredients, tips for cooking, and how to store it. You can swap ingredients or add veggies for new flavors. This dish is easy and fun. Try it out and impress your friends or family. Enjoy your cooking journey!
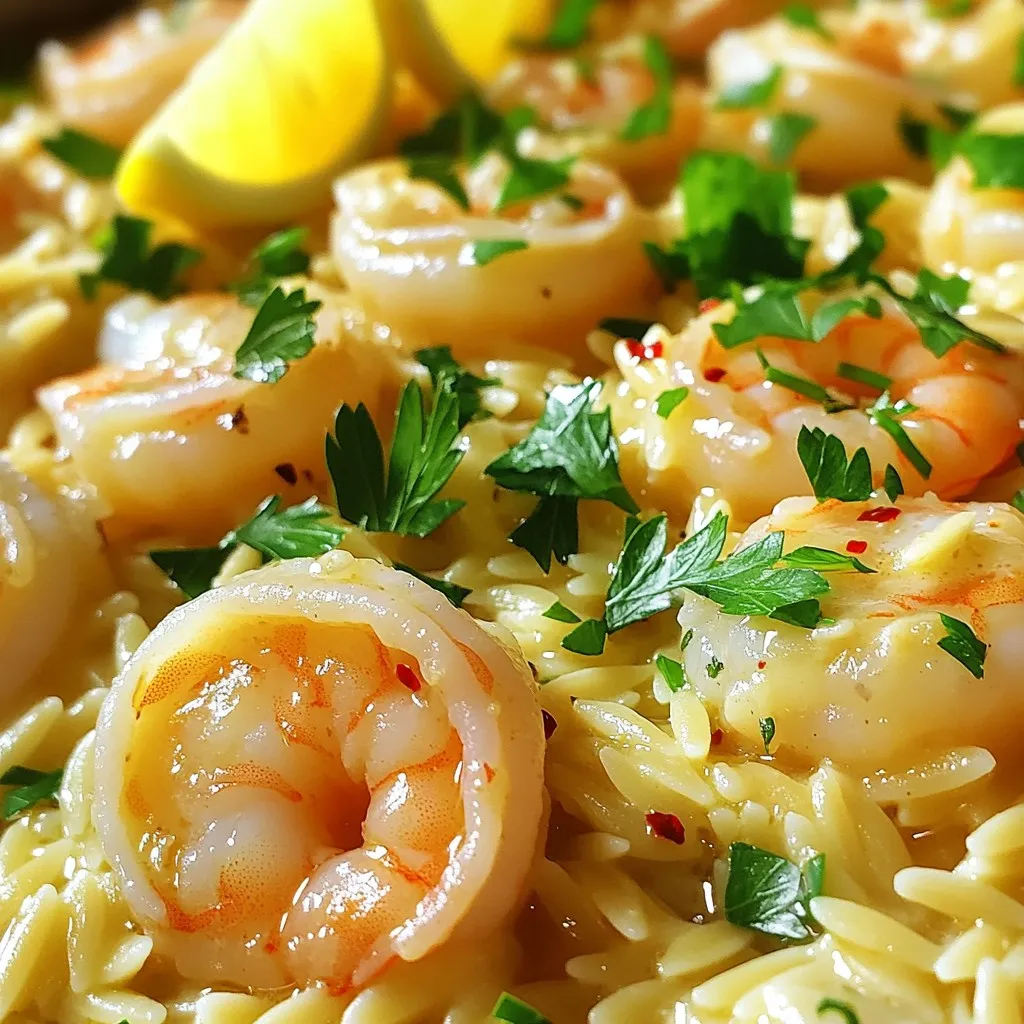
Garlic Butter Shrimp Scampi Orzo Flavorful Main Dish
Welcome to a dish that bursts with flavor! Garlic Butter Shrimp Scampi Orzo is your new go-to meal. Imagine succulent shrimp cooked in rich garlic
- 4 slices of sourdough bread - 1 cup fresh basil pesto - 1 cup shredded mozzarella cheese - 1 cup grated parmesan cheese The main ingredients create a great taste. Sourdough bread brings a tangy flavor. It also gives a nice crunch when toasted. Fresh basil pesto adds a burst of herbal brightness. Mozzarella cheese melts perfectly, while parmesan gives a salty kick. - 1 clove garlic, minced (optional) - 1 tablespoon sun-dried tomatoes, finely chopped (optional) - Pinch of red pepper flakes (optional) You can make this sandwich even better with add-ins. Minced garlic adds depth and aroma. Sun-dried tomatoes give a sweet and tangy note. Red pepper flakes add heat for spice lovers. Feel free to mix and match these options to suit your taste. - Salt and pepper to taste - 2 tablespoons unsalted butter Seasoning is key for flavor. Use salt and pepper to enhance the taste. Unsalted butter is essential for grilling. It helps create that crispy, golden outside. It also adds richness to each bite. 1. Take 4 slices of sourdough bread. Set them on a clean surface. 2. Spread a nice layer of fresh basil pesto on one side of each slice. This side will be the inside of your sandwich. 3. On two of the slices, add the shredded mozzarella cheese. Sprinkle half of the grated parmesan cheese on top. 4. If you like, add minced garlic and sun-dried tomatoes. Then, finish with the rest of the parmesan cheese. 1. Grab a large skillet. Melt 1 tablespoon of unsalted butter over medium heat. 2. Wait until the butter is hot and bubbling. 3. Carefully place the sandwiches in the skillet. Grill each side for about 4-5 minutes. Look for a golden brown color. If they cook too fast, turn the heat down. 1. Once the bottom is toasted, flip the sandwiches using a spatula. 2. Add the last tablespoon of butter to the pan. Let it melt. 3. Grill the other side for another 4-5 minutes. The cheese should melt, and both sides need to be golden brown. 4. After cooking, remove the sandwiches from the skillet. Let them sit for a minute before slicing. 5. Cut the sandwiches diagonally. Serve them on a wooden board or plate. You can garnish with basil leaves and a small bowl of extra pesto for dipping. To make the best grilled cheese, keep an eye on two main things: heat and butter. - Key temperatures to monitor: Use medium heat. This helps the bread toast evenly while the cheese melts inside. Too high heat burns the bread fast. - Butter application techniques: Spread butter on the outside of the bread. This gives a nice, golden crust. You can also melt the butter in the pan first. Then, add the sandwich. This method helps with crispiness. You can boost the taste of your grilled cheese with some fun twists. - Suggestions for pesto variations: Try adding different herbs to your pesto. Cilantro or mint can create a fresh taste. You can also mix in nuts like walnuts or pecans for a richer flavor. - Cheese alternatives for different textures: If you want a change, use cheddar or gouda. These cheeses melt well and add new flavors to your sandwich. Mixing mozzarella with these cheeses brings both creaminess and sharpness. A beautiful plate makes your meal more inviting. Here are some simple tips. - Plating tips for a beautiful display: Cut the sandwiches diagonally to show off the melted cheese. Stack them on a rustic wooden board or a white plate for nice contrast. - Garnishing with herbs or dips: Add a few basil leaves on the side. You can also serve a small bowl of extra pesto for dipping. This adds color and extra flavor to your dish. {{image_2}} You can use different cheeses to spice up your grilled cheese. Cheddar adds a sharp, rich flavor. Gouda brings a creamy, smoky note that pairs well with pesto. Mixing mozzarella and parmesan gives a nice stretch and tang. Try blending different cheeses to find your perfect mix. If you're gluten-free, use gluten-free bread. It works great and still tastes delicious. You can also explore artisan breads. Focaccia, ciabatta, or even rye can change the taste and texture. Each bread type adds its own charm to the sandwich. For a plant-based twist, use plant-based cheese substitutes. There are many tasty vegan cheeses now available. They melt well, giving you that gooey texture you crave. You can also make your own vegan pesto. Use nuts, garlic, basil, and olive oil for a fresh spread. These easy swaps let everyone enjoy this treat. To keep your leftover sandwiches fresh, refrigerate them right away. Wrap each sandwich in plastic wrap or foil. This helps keep moisture in and prevents drying out. Store them in an airtight container for extra protection. The sandwiches can last up to three days in the fridge. When you’re ready to eat, reheating is simple. Use a skillet on medium heat for best results. Place the sandwich in the skillet without any oil. Heat for 3 to 4 minutes on each side. This helps the cheese melt and the bread crisp up again. You can also microwave, but the bread won’t get crispy. Homemade pesto tastes great, but it has a short shelf life. Store it in a jar in the fridge. Make sure to cover the top with a thin layer of olive oil. This keeps it from browning. Homemade pesto lasts about one week in the fridge. For store-bought pesto, check the date on the jar. Once opened, keep it in the fridge. Use it within a week for the best taste. If you see any mold, it’s time to toss it out. You can freeze the assembled sandwich, but it’s best to do it before cooking. Wrap each sandwich tightly in plastic wrap. Then, place them in a freezer bag. They can last up to three months in the freezer. When you’re ready to cook, let the sandwich thaw in the fridge overnight. If you want to freeze ingredients like pesto or cheese, keep them in airtight containers. Pesto can stay fresh for up to three months in the freezer. Just remember to label everything with dates. This helps you track freshness and avoid waste. If you need a substitute for sourdough bread, you have some tasty options. Here are a few: - Whole wheat bread - Ciabatta bread - Rye bread - White sandwich bread Each of these choices can give your sandwich a unique taste. Whole wheat adds a nutty flavor, while ciabatta offers a nice crust. Experiment to find the one you like best. Yes, you can make this sandwich without pesto. Here are some flavorful substitutes for pesto: - Spinach and ricotta spread - Hummus - Olive tapenade - Cream cheese with herbs These spreads can add creaminess and taste without the basil. They will still make your grilled cheese delicious. For grilling sandwiches, a non-stick skillet or cast-iron pan works best. Here are some reasons why: - Non-stick pans help prevent sticking and make flipping easy. - Cast-iron pans provide even heat and create a nice crust. Both options will help cook your sandwich well, ensuring it is crispy on the outside and cheesy on the inside. This blog post covered how to make a tasty grilled cheese sandwich using fresh ingredients. You learned about the key components, cooking steps, and tips to enhance flavor. Remember, the right ingredients, like sourdough and pesto, really boost the taste. Explore different cheese and bread options for fun variations. Lastly, proper storage techniques ensure your leftovers stay fresh. Now, you can enjoy a delicious grilled cheese with your unique twists!
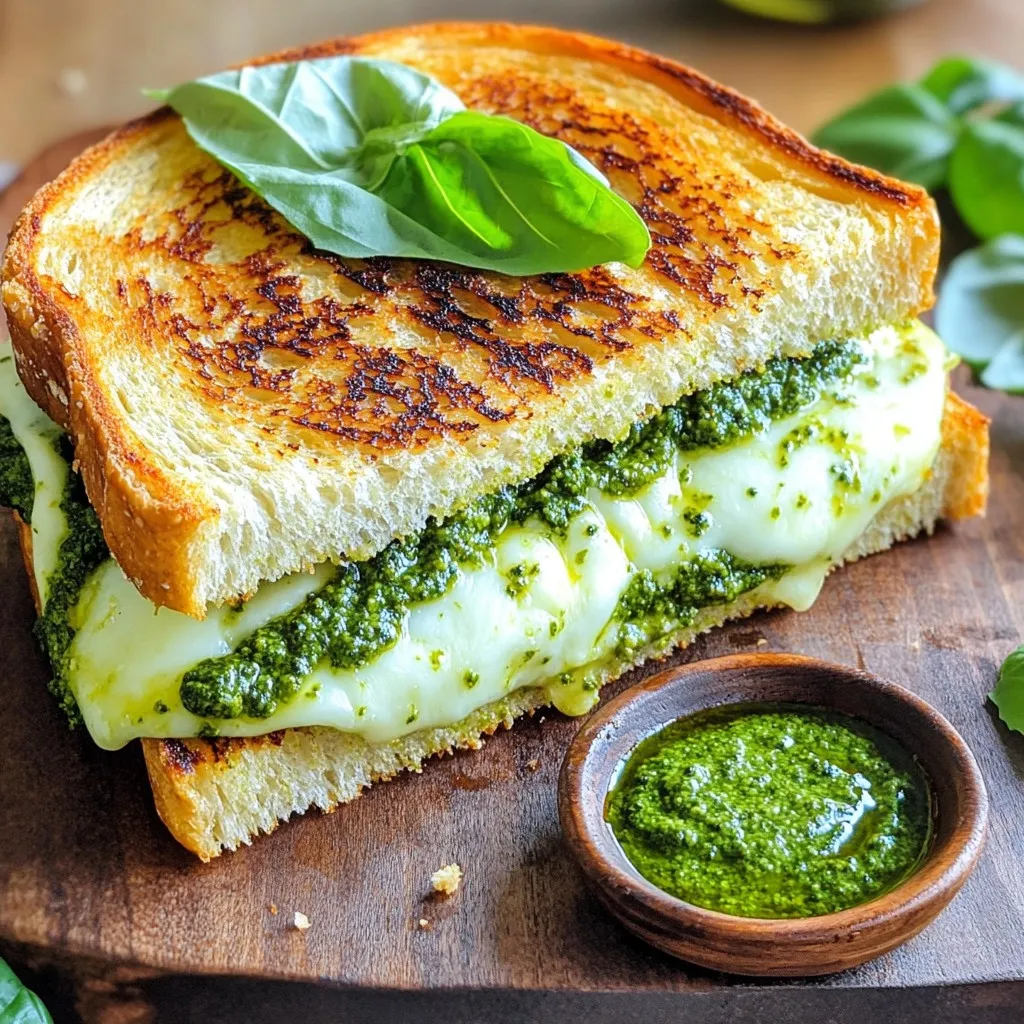
Ultimate Pesto Grilled Cheese Delightful and Cheesy Treat
Are you ready to elevate your grilled cheese game to new heights? This Ultimate Pesto Grilled Cheese combines fresh basil pesto, gooey mozzarella, and crispy