Dinner

To whip up a delightful Instant Pot Beef & Broccoli, you need the following ingredients: - 1 lb beef sirloin, thinly sliced - 1 cup broccoli florets - 1 bell pepper, sliced (any color) - 1 medium onion, sliced - 4 cloves garlic, minced - 1 tablespoon ginger, minced - 1/4 cup low-sodium soy sauce - 2 tablespoons honey or maple syrup - 1 tablespoon sesame oil - 1 tablespoon cornstarch - 2 tablespoons water - 1 tablespoon sesame seeds (for garnish) - Cooked rice or quinoa (for serving) These ingredients come together to create a savory dish. The beef sirloin gives you tender bites, while the broccoli adds crunch. The bell pepper and onion bring color and sweetness. Garlic and ginger give a tasty kick. The soy sauce, honey, and sesame oil create a rich sauce that ties it all together. Make sure to prep all your ingredients before you start. This will make the cooking process smooth and easy. Enjoy the vibrant flavors and health benefits of this meal! First, mix your sauce. In a bowl, combine soy sauce, honey or maple syrup, sesame oil, minced garlic, and ginger. Stir well and set it aside. This sauce adds great flavor to your dish. Now, let's sauté the beef. Turn the Instant Pot to the sauté setting. Add the sliced beef in a single layer. Sear it for 2-3 minutes until it’s browned. If you have a lot of beef, do this in batches. Remove it and set it aside. Next, we cook the veggies. In the same pot, add your sliced onion and bell pepper. Sauté for 2-3 minutes, stirring often, until they start to soften. This step brings out their natural sweetness. It’s time to combine everything. Add the beef back into the pot. Pour in the sauce you prepared earlier. Stir everything together until well mixed. This ensures that every piece of beef is coated in sauce. Now, seal the lid of the Instant Pot. Set it to cook on high pressure for 10 minutes. Make sure the valve is set to sealing. This will lock in the flavors and cook the beef perfectly. While the beef cooks, prepare the broccoli. Bring a pot of water to a boil. Blanch the broccoli florets for 2 minutes. Then, transfer them to a bowl of ice water. This keeps them bright green and crisp. After cooking, perform a quick release of pressure. Open the lid and add the blanched broccoli. In a small bowl, mix cornstarch with water to make a slurry. Stir this into the beef mixture. Press sauté and let it cook for another 2-3 minutes until the sauce thickens. For serving, place the beef and broccoli over cooked rice or quinoa. Garnish with sesame seeds for a nice touch. The colorful layers make it look great and taste even better! - Use beef sirloin for a tender bite. - Slice beef thinly against the grain. This helps keep it juicy. When you select beef, go for cuts like sirloin. This cut is tender and cooks well in the Instant Pot. If you slice beef thinly, it cooks faster and stays soft. Always cut against the grain to avoid chewiness. - Make it sweeter with honey or maple syrup. - Try coconut aminos if you want soy-free. You can adjust the flavor of your sauce. If you like it sweeter, add more honey or maple syrup. This gives a nice balance to the salty soy sauce. You can also swap soy sauce for coconut aminos. This will make the dish gluten-free and a bit sweeter. - Blanch broccoli in boiling water for 2 minutes. - Use fresh or frozen broccoli as you prefer. Blanching broccoli is key. Boil it for just 2 minutes, then cool it in ice water. This keeps the color bright and the crunch. You can use fresh or frozen broccoli. If using frozen, you may skip blanching, but fresh gives the best texture. {{image_2}} If you want to switch things up, try using other veggies. You can replace bell peppers with zucchini or snap peas. For onions, green onions or shallots work great too. You can also change the protein. Instead of beef, use chicken or tofu. Chicken thighs add richness, while tofu brings a nice texture. Both options soak up the sauce well. Want some heat? Add crushed red pepper or a splash of sriracha. This will give your dish a nice kick. You can also add more flavor by using mushrooms or carrots. These veggies add crunch and sweetness, making the dish even better. You can pair this dish with different grains. Quinoa is a great choice for extra protein. Cooked rice is a classic option. If you're looking for something low-carb, cauliflower rice is perfect. Another fun idea is to serve it over noodles. Rice noodles or udon noodles will soak up the sauce nicely. This gives you a new way to enjoy your beef and broccoli. To keep your beef and broccoli fresh, store leftovers in an airtight container. Let the dish cool first. Place it in the fridge within two hours of cooking. This helps prevent bacteria growth. Use the leftovers within three to four days for the best taste. When reheating, use the stove or microwave. Heat until hot all the way through. You can freeze beef and broccoli for later. To do this, cool the dish completely. Transfer it to a freezer-safe container or bag. Remove as much air as possible before sealing. It can last for up to three months in the freezer. When you’re ready to eat, let it thaw overnight in the fridge. Reheat it on the stove or microwave until hot. You may need to add a splash of water to restore moisture. Cooked beef and broccoli has a good shelf life. In the fridge, it will stay fresh for three to four days. If frozen, it can last for up to three months. After that, the taste may change. Always check for signs of spoilage before eating. If it smells off or looks strange, it’s best to throw it away. You can use gluten-free soy sauce. Look for brands like Tamari or coconut aminos. Both options give a great flavor without gluten. Make sure to check labels to avoid hidden gluten. Yes, this recipe is great for meal prep. You can slice the beef and chop the veggies a day ahead. Store them in the fridge in airtight containers. Just mix everything when you’re ready to cook. If you use frozen beef, cook it for 15 minutes instead of 10. The beef will take longer to heat through. Make sure the beef is in small pieces for even cooking. Cooked rice or quinoa pairs well with this dish. You can also serve steamed rice noodles or cauliflower rice for a low-carb option. Try adding a simple salad on the side for extra crunch and color. In this blog post, I shared a simple recipe for Instant Pot Beef and Broccoli. We covered key ingredients, step-by-step instructions, and tips for cooking and serving. I hope these ideas inspire you to cook this tasty dish at home. Feel free to mix in your favorite vegetables or proteins. Enjoy your meal, and don’t shy away from experimenting with flavors! Cooking should be fun and delicious.
Instant Pot Beef & Broccoli Savory and Simple Meal
Looking for a quick and tasty meal? Try my Instant Pot Beef & Broccoli! This dish is savory, simple, and ready in minutes. With tender
Choosing the right ingredients is key for a great stew. Here’s what you need: - 2 lbs beef stew meat, cut into 1-inch cubes - 4 medium potatoes, diced - 3 carrots, sliced - 1 zucchini, sliced - 1 yellow bell pepper, diced - 1 cup green beans, trimmed and cut into 2-inch pieces - 1 medium onion, chopped - 3 cloves garlic, minced - 4 cups low-sodium beef broth - 1 tablespoon tomato paste - 1 tablespoon Worcestershire sauce - 1 teaspoon dried thyme - 1 teaspoon dried oregano - Salt and pepper to taste - 2 tablespoons olive oil Each ingredient plays a role in making the stew tasty. The beef gives it a hearty base. I like to use stew meat because it gets tender and juicy after cooking. The potatoes and carrots add comfort and sweetness. Zucchini and bell pepper bring freshness and color. Green beans add a crunch. Onion and garlic create a strong flavor base. They build up the dish and make it smell amazing. The broth is the heart of this stew. Low-sodium beef broth keeps it savory without being too salty. Tomato paste and Worcestershire sauce add rich umami flavors. Dried thyme and oregano round out the taste with herb notes. Make sure to season with salt and pepper. Taste as you go to get just the right balance. Fresh parsley can be a lovely touch when serving. It brightens up the dish and makes it look nice. Gather these ingredients, and you’re ready to create a delicious meal! Conclusion Error: Connection error.
SEO Title Error: Connection error.
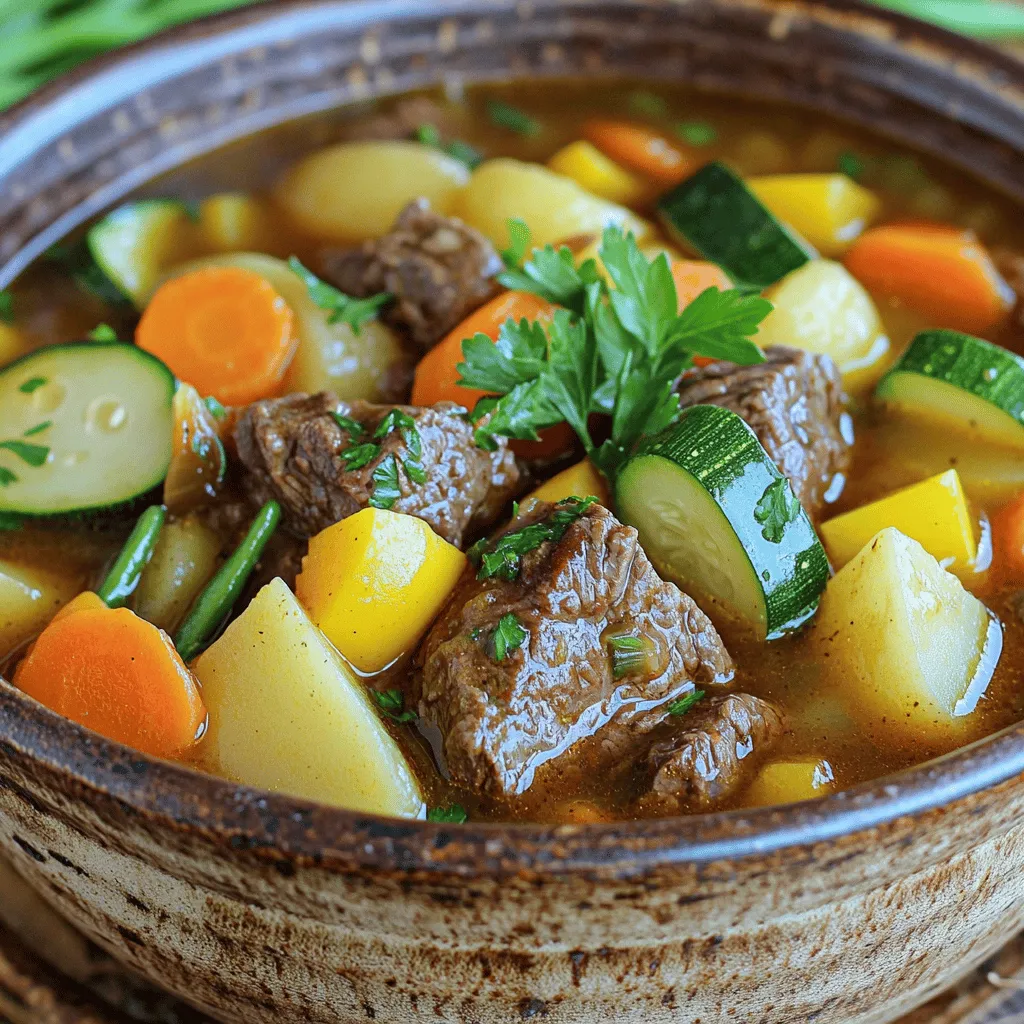
Intro Error: Connection error. Hearty Ingredients for Your Crockpot Summer Beef Stew Choosing the right ingredients is key for a great stew. Here’s what you
To make Baja fish tacos, you need simple, fresh ingredients: - 1 lb white fish fillets (like cod or tilapia) - 1 cup panko breadcrumbs - 1/2 cup all-purpose flour - 1 egg, beaten - 1 teaspoon paprika - 1 teaspoon garlic powder - 1 teaspoon cumin - 1/2 teaspoon salt - 1/4 teaspoon black pepper - 8 small corn tortillas These ingredients make the fish crunchy and flavorful. For delicious toppings, gather these ingredients: - 1 cup shredded cabbage - 1/4 cup fresh cilantro, chopped - 1 ripe avocado, sliced - 1 lime, cut into wedges - 1/2 cup Greek yogurt or sour cream - 1 tablespoon lime juice - 1 tablespoon chipotle sauce (optional for a kick) These toppings add freshness and creaminess to the tacos. Baja fish tacos taste great with these sides: - A fresh corn salad with lime - Chips and salsa for crunch - A light, zesty coleslaw These pairings bring out the flavors in the tacos. Enjoy! To start, gather your fish fillets. I like using cod or tilapia. They are mild and flaky. In a shallow bowl, mix flour, paprika, garlic powder, cumin, salt, and black pepper. This blend adds great flavor. Take each fish fillet and coat it in the flour mix. Shake off any extra flour. Next, dip the fish in a beaten egg. Finally, coat it with panko breadcrumbs. Set the fillets aside for now. Heat a non-stick skillet over medium-high heat. Add a light drizzle of oil to keep the fish from sticking. Once the skillet is hot, place the breaded fish fillets into the pan. Cook for 3-4 minutes on each side. You want them golden brown and flaky. Once done, remove them and let them rest on paper towels. This step helps drain any extra oil. Grab a small bowl. In this bowl, combine Greek yogurt or sour cream, lime juice, and chipotle sauce if you want a kick. Mix everything well until smooth. This sauce adds creaminess and a zesty touch to your tacos. Set it aside for later. Now it’s time to warm the tortillas. You can lightly toast them in a skillet or over a gas flame. This makes them soft and pliable. To assemble, take a tortilla and layer it with a piece of cooked fish. Then, add a handful of shredded cabbage, a few slices of avocado, and a sprinkle of chopped cilantro. Finish with a drizzle of the creamy sauce. Serve your tacos right away. Add lime wedges on the side for extra freshness. You can also pair these tacos with rice or beans for a complete meal. Enjoy every bite of your delicious Baja fish tacos! To make a great batter, use cold water or beer. Cold helps the batter crisp up. Mix flour, paprika, garlic powder, cumin, salt, and black pepper well. Dip your fish in this mix, then in the beaten egg. Finally, coat it in panko breadcrumbs. This method gives you a crunchy texture that you will love. For Baja fish tacos, I recommend white fish like cod or tilapia. These fish are mild and flaky. They hold up well when cooked in oil. Fresh fish is best, but frozen will also work fine. Just make sure to thaw it completely before cooking. Use fresh toppings to boost flavor. Shredded cabbage adds crunch. Fresh cilantro brings a bright taste. Slices of avocado give a creamy texture. Don't forget lime wedges! They add zing when squeezed over the tacos. You can prep some ingredients ahead of time. Make the sauce and chop veggies a day before. Store them in the fridge. This way, when it’s time to eat, you can quickly assemble. Warm the tortillas just before serving. This keeps them soft and tasty. {{image_2}} You can use different fish for Baja fish tacos. Cod and tilapia are common choices. However, you can try other white fish like halibut or mahi-mahi. Each fish brings a unique flavor and texture. Choose what you like best! Just make sure it is fresh. Fresh fish makes the best tacos. If you prefer a meat-free option, you can still enjoy Baja tacos. Try using crispy cauliflower or eggplant. Both can mimic the texture of fish when cooked. You can coat them similarly to how you prepare fish. Just follow the same steps with your chosen veggie. This way, you still get a tasty taco experience without the fish. Want to kick up the heat? You have options! Add sliced jalapeños or a sprinkle of cayenne pepper to your tacos. You can also mix some chipotle sauce into the yogurt sauce for an extra spicy twist. If you love heat, try adding hot sauce on top. Adjust the heat to fit your taste. Enjoy experimenting with flavors! You can store leftover fish tacos in the fridge. Wrap them tightly in plastic wrap or place them in an airtight container. They will stay fresh for up to two days. To keep the tortillas from getting soggy, store the fish and toppings separately. If you have extra fish fillets, you can freeze them. Wrap each fillet in plastic wrap, then place them in a freezer bag. Remove as much air as you can. Label the bag with the date. The fish will last for up to three months in the freezer. Thaw in the fridge before cooking again. When reheating, aim for crispy fish. You can use an oven or an air fryer. Preheat the oven to 375°F (190°C). Arrange the fish on a baking sheet and heat for about 10-12 minutes. For the air fryer, cook at 350°F (175°C) for about 5-7 minutes. This keeps the fish crispy and tasty. The best fish for Baja fish tacos is a white fish. Cod or tilapia works great. They are mild and flaky, making them perfect for tacos. You can also use other white fish like haddock or snapper. Yes, you can make Baja fish tacos gluten-free. Just swap the all-purpose flour with a gluten-free blend. You can also use gluten-free panko breadcrumbs. Check the labels to ensure they are truly gluten-free. Baja fish tacos go well with many sides. Here are some great options: - Mexican rice - Black beans - Grilled corn on the cob - Fresh salsa - Guacamole These sides add flavor and color to your meal. To add spice, use chipotle sauce in the creamy sauce. You can also add sliced jalapeños or hot sauce to the tacos. If you like heat, try using cayenne pepper in the flour mix. Adjust the spice to your taste. You can prepare some parts in advance. Bread the fish and store it in the fridge. You can also make the sauce ahead of time. Warm the tortillas just before serving for the best taste. Assemble the tacos just before eating for freshness. Baja fish tacos combine fresh fish, tasty toppings, and your favorite sides for a true feast. In this post, we covered key ingredients, step-by-step cooking, tips for success, and delicious variations. Remember, you can swap fish, make it vegetarian, or add heat for fun twists. Store leftovers properly for great taste later. Dive into these tacos, get creative, and share your flavors with family and friends. Enjoy every bite of your Baja fish taco adventure!
Baja Fish Tacos Flavorful and Easy Recipe Guide
Are you ready to dive into the bright, fresh world of Baja Fish Tacos? This guide will show you how to make flavorful, crispy tacos
Here’s what you need to make Bruschetta Chicken Pasta: - 2 boneless, skinless chicken breasts - 8 ounces pasta (fusilli or penne) - 2 cups cherry tomatoes, halved - 1 cup fresh basil leaves, chopped - 4 cloves garlic, minced - 1 tablespoon balsamic vinegar - 2 tablespoons olive oil - Salt and pepper to taste - 1 cup mozzarella cheese, shredded - Optional: grated Parmesan cheese for serving These ingredients come together to create a dish bursting with flavor. The chicken adds protein, while the pasta provides a hearty base. Cherry tomatoes bring sweetness, and fresh basil adds a bright touch. Garlic offers depth, and mozzarella gives a creamy finish. If you want a salty kick, Parmesan is a great option. Each ingredient plays a key role in making this meal both tasty and satisfying. Remember, fresh ingredients will always elevate your dish. {{ingredient_image_1}} To cook pasta al dente, bring salted water to a boil. Add the pasta and stir. Cook according to the package directions, usually about 8-10 minutes. Test the pasta before draining. It should be firm but not hard. Reserving pasta water is key. Before draining, save about 1/2 cup of the water. This water is starchy and helps thicken the sauce. It can add a nice texture to the dish. Start by seasoning the chicken breasts. Use salt and pepper for a simple taste. Heat 1 tablespoon of olive oil in a skillet over medium heat. Add the chicken to the pan. Cook each side for about 6-7 minutes. The chicken should be golden brown and cooked through. After cooking, let the chicken rest for 5 minutes. This helps the juices stay inside when you slice it. In the same skillet, add another tablespoon of olive oil. Then, add minced garlic and sauté it for about 1 minute. The garlic will smell great when it’s ready. Next, add halved cherry tomatoes and balsamic vinegar. Cook this mixture for about 3-4 minutes. You want the tomatoes to soften but not fall apart. Finally, return the sliced chicken to the skillet. Add the cooked pasta and chopped basil. Mix everything well. If the sauce is too thick, add some reserved pasta water to loosen it. Stir in the mozzarella cheese until it melts and combines. Adjust the flavor with more salt and pepper if needed. Enjoy your delicious Bruschetta Chicken Pasta! Timing is key when you cook Bruschetta Chicken Pasta. Add the pasta to the sauce at the right moment. This way, the pasta soaks up the flavors. To keep the sauce from drying out, use some reserved pasta water. This starchy water adds creaminess and holds the dish together. You can make this dish even more exciting. Try adding a pinch of red pepper flakes for heat. Fresh ingredients bring bright flavors, while dried herbs can work well too. If you have fresh basil, use it! It gives a nice pop. For a twist, add some oregano or thyme to boost the taste. Pair your Bruschetta Chicken Pasta with a simple green salad. A side of garlic bread is also a great choice. For a lovely presentation, serve it in a big bowl. Top with extra mozzarella and sprinkle fresh basil on top. This makes it look like a restaurant meal right at home. Pro Tips Perfectly Cooked Pasta: Always cook your pasta until al dente, which means it should still have a slight bite. This helps it hold its shape and texture in the dish. Resting the Chicken: Allow the chicken to rest for a few minutes after cooking. This allows the juices to redistribute, keeping the meat tender and flavorful. Fresh Basil Addition: Add the chopped basil at the end of cooking to preserve its vibrant flavor and bright color. This will enhance the dish's overall freshness. Moisture Control: If the pasta seems dry, gradually add the reserved pasta water until you reach your desired consistency. This water contains starch that helps bind the sauce to the pasta. {{image_2}} You can switch the chicken for other proteins. Shrimp or tofu works well. Both options add a unique taste and texture. For veggies, try adding zucchini or bell peppers. They bring color and nutrients. You could also use spinach for a nice twist. If you need gluten-free pasta, use rice or corn-based options. Many brands offer good choices that taste great. For a vegan dish, skip the chicken and cheese. You can use chickpeas for protein and nutritional yeast for a cheesy flavor. Want to change up the flavors? Add pesto for a fresh twist. You can also try a light cream sauce for richness. For cheese lovers, mix in feta or goat cheese. These can add a tangy depth to the dish. To keep your Bruschetta Chicken Pasta fresh, store it in an airtight container. This prevents moisture loss and keeps flavors intact. Place the pasta in the fridge within two hours of cooking. It will stay good for up to three days. If you want to keep it longer, freezing is a great option. When reheating, avoid the microwave if you can. Instead, use a skillet over medium heat. Add a splash of water or broth to keep it moist. Stir often to prevent sticking. If the flavors seem dull, add a little fresh basil or a drizzle of olive oil. If you want to freeze the pasta, let it cool completely first. Pack it in freezer-safe containers. Make sure to leave some space for expansion. It can last up to three months in the freezer. To thaw, move it to the fridge overnight before reheating. Yes, you can use many pasta shapes. Here are some great options: - Fusilli - Penne - Farfalle - Spaghetti These shapes hold the sauce well. They also make for fun bites. Enjoy experimenting with your favorite type! Bruschetta Chicken Pasta has many healthy ingredients. Here’s a quick breakdown: - Chicken breasts: Great source of lean protein. - Cherry tomatoes: Packed with vitamins A and C. - Basil: Adds flavor and antioxidants. - Olive oil: A healthy fat that supports heart health. - Mozzarella cheese: Provides calcium and protein. Overall, this dish can fit into a balanced diet. If you like heat, add some kick to this dish. Here are a few tips: - Red pepper flakes: Sprinkle them in while cooking. - Hot sauce: Mix it in the sauce for extra heat. - Jalapeños: Add diced jalapeños for a fresh spicy flavor. Use these ideas to adjust the spice level to your taste! Bruschetta Chicken Pasta combines fresh ingredients and simple steps for a tasty dish. We covered cooking tips, ingredient swaps, and serving ideas. This meal suits any occasion. Don't hesitate to experiment with flavors or adapt the recipe to your taste. Remember, the key is fresh ingredients and paying attention to cooking times. Enjoy making this dish, sharing it with loved ones, and creating your own take on it. Always feel free to get creative. Happy cooking!
Bruschetta Chicken Pasta Flavorful and Easy Recipe
If you crave a delicious pasta dish that’s simple to make, you’ve come to the right place! Bruschetta Chicken Pasta bursts with fresh flavors and
- 2 cups cooked brown rice - 1 pound chicken breast, diced - 1 tablespoon olive oil - 1 teaspoon ground cumin - 1 teaspoon chili powder - 1/2 teaspoon smoked paprika - Salt and pepper to taste - 1 can (15 oz) black beans, rinsed and drained - 1 cup corn (fresh or frozen) - 1 red bell pepper, diced - 1 avocado, diced - 1 cup cherry tomatoes, halved - 1/2 cup shredded cheese (cheddar or Mexican blend) - 1/4 cup fresh cilantro, chopped - Juice of 1 lime - Optional: Sour cream or Greek yogurt for topping You can add toppings to make your bowl even better. Here are some ideas: - Jalapeños for heat - Salsa for extra flavor - Lime wedges for freshness - Green onions for crunch - Lettuce for added greens This recipe is packed with nutrients. Here’s a quick look: - Chicken provides protein for muscle health. - Beans add fiber to help digestion. - Avocado gives healthy fats for energy. - Brown rice is a great source of complex carbs. - Vegetables add vitamins and minerals for overall health. These ingredients make the Mexican Chicken Burrito Bowls both tasty and good for you! Start with a large skillet. Heat one tablespoon of olive oil over medium heat. Once hot, add one pound of diced chicken breast. Season the chicken with one teaspoon of ground cumin, one teaspoon of chili powder, and half a teaspoon of smoked paprika. Add salt and pepper to taste. Cook the chicken for about 6 to 8 minutes. Stir it often until the chicken is fully cooked and slightly golden. This gives it a nice flavor and texture. While the chicken cooks, get the brown rice ready. Use two cups of cooked brown rice. You can follow the package instructions for cooking. This usually takes about 20 minutes. Once cooked, set the rice aside. It will be the base for your bowl. Now it's time to layer your burrito bowls. In the same skillet with the cooked chicken, add one can of rinsed and drained black beans, one cup of corn, and one diced red bell pepper. Stir this mixture and cook for another 3 to 4 minutes. This warms the veggies and mixes the flavors. In a large bowl, start with a generous scoop of brown rice at the bottom. Then add the chicken and vegetable mixture on top. Next, add diced avocado, halved cherry tomatoes, and half a cup of shredded cheese. Sprinkle with fresh chopped cilantro and squeeze juice from one lime over everything. For extra creaminess, add a dollop of sour cream or Greek yogurt on the side, if you like. Enjoy your delicious, colorful burrito bowls! To make the chicken tender, use fresh chicken breast. Cut it into small cubes for quick cooking. Heat olive oil in a skillet over medium heat. Add the chicken and stir often. Cook until it turns golden. This takes about 6-8 minutes. Make sure it reaches an internal temperature of 165°F. This ensures your chicken is safe to eat. Season your chicken for bursts of flavor. Use ground cumin, chili powder, and smoked paprika. These spices add warmth and depth. Don't forget to add salt and pepper to taste. Mix the seasonings well into the chicken as it cooks. This will help the flavors soak in. You can even try adding garlic powder for an extra kick. Cooking brown rice is simple, but it takes time. Follow the package instructions closely. Usually, you need 2 cups of water for 1 cup of rice. Bring the water to a boil, then add the rice. Reduce the heat and cover the pot. Let it simmer for about 30-40 minutes. Fluff it with a fork before serving. This keeps the rice light and fluffy, perfect for your burrito bowls. {{image_2}} You can easily make this dish vegetarian or vegan. Replace chicken with hearty veggies like mushrooms or zucchini. Use black beans and corn as your protein. For vegan cheese, try a nut-based option or skip it altogether. Swap sour cream for a plant-based yogurt, and you still get a tasty bowl. Not into chicken? Try other proteins! Ground turkey or beef works well with the same spices. For a lighter option, use shrimp. You can also opt for tofu. Just press it first to remove extra water. This adds flavor and keeps the dish healthy. Customizing toppings is easy! If you want a low-carb option, skip the rice. Use cauliflower rice instead. For a dairy-free option, skip cheese and sour cream. Avocado and fresh salsa bring a lot of flavor. You can also add jalapeños for a spicy kick. Make it your own! Store leftovers in airtight containers. Let them cool before sealing. Keep the bowls in the fridge. They stay fresh for up to three days. I recommend labeling the containers with the date. This way, you won’t forget when you made them. To reheat, use the microwave for quick meals. Place the bowl in a microwave-safe dish. Heat for 1-2 minutes, stirring midway. If you prefer, you can also use a skillet. Heat over medium heat for about 5 minutes, stirring often. This keeps the chicken juicy and the veggies crisp. You can freeze these burrito bowls for later. First, cool the bowls completely. Then, pack them in freezer-safe containers. They can last up to three months in the freezer. When you want to eat them, defrost in the fridge overnight. Reheat as mentioned above, and enjoy! Yes, you can use white rice. White rice cooks faster than brown rice. It has a softer texture. Just follow the package instructions for cooking. This change will still taste great in your burrito bowl. You can add many veggies! Try diced zucchini, spinach, or even sweet potatoes. You can also add black olives or jalapeños for a kick. Feel free to mix and match. This makes your bowl colorful and healthy. To spice things up, add more chili powder or diced jalapeños. You can also use hot salsa as a topping. For extra heat, try adding cayenne pepper when cooking the chicken. Adjust it to your taste for the perfect kick! We covered all key steps to make delicious burrito bowls. You learned about main ingredients, cooking methods, and tasty variations. There are tips for perfecting each element, from chicken to rice. Storing and reheating leftovers is simple for busy days. With these tools, you can create many flavorful meals. Enjoy making this dish and customizing it as you like!
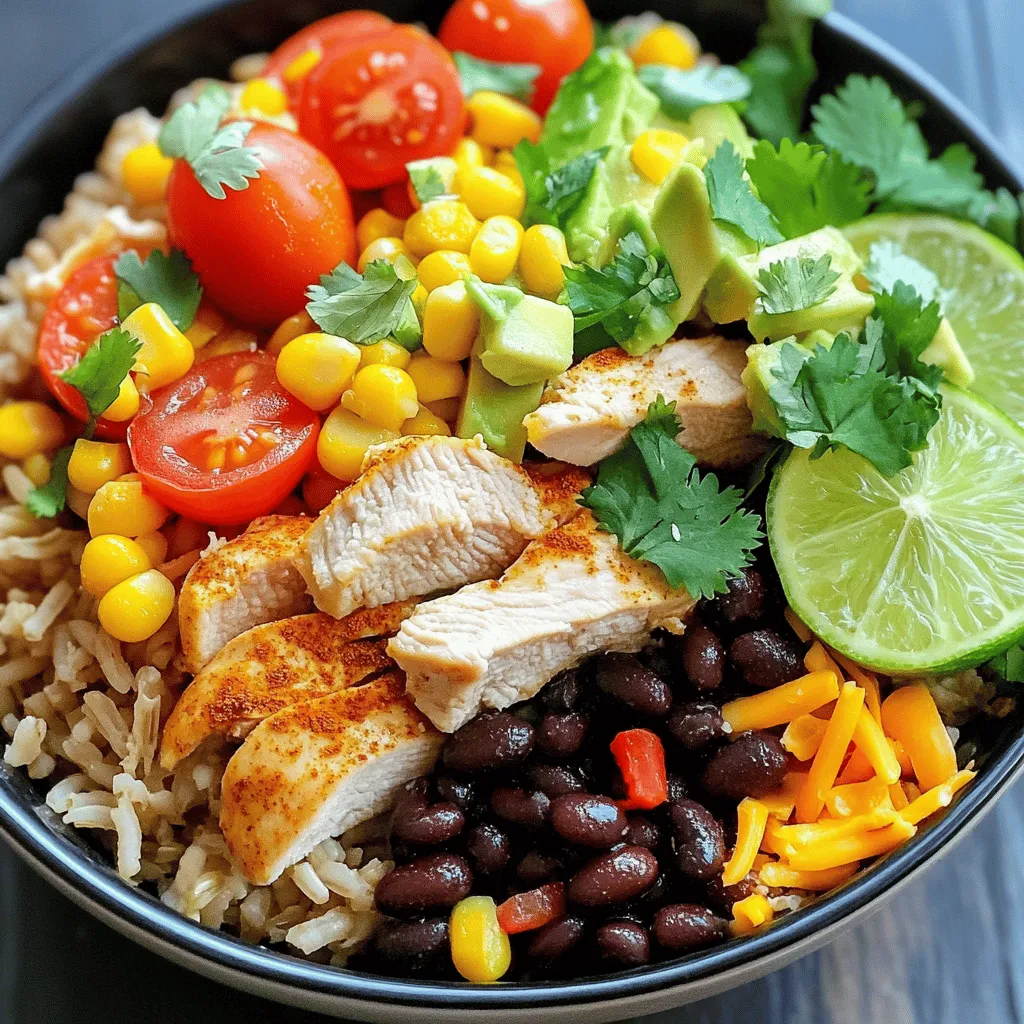
Mexican Chicken Burrito Bowls Simple and Tasty Recipe
Are you ready to enjoy a fresh and flavorful meal? My Mexican Chicken Burrito Bowls are here to spice up your dinner routine! This simple
To make the Iced Apple Crisp Macchiato, gather these fresh ingredients: - 1 cup freshly brewed coffee or espresso (cooled) - 1/2 cup milk (or milk alternative) - 1 tablespoon caramel syrup - 1 tablespoon apple pie spice - 1/4 cup apple cider - 1/2 teaspoon vanilla extract - Crushed ice - Whipped cream (optional) - Extra caramel drizzle (optional) - A sprinkle of cinnamon for garnish Each ingredient plays a key role in creating the perfect fall drink. The coffee or espresso gives it a strong base. Milk adds creaminess, while caramel syrup brings sweetness. Apple pie spice captures the essence of fall, making it warm and cozy. Apple cider adds a fruity touch, and vanilla extract enhances the flavors. Crushed ice keeps it refreshing on warm days. Whipped cream is a fun topping, and extra caramel drizzle makes it look fancy. A sprinkle of cinnamon adds a final touch that ties everything together. Enjoy this flavor-filled drink that feels like a warm hug in a glass! Making the Iced Apple Crisp Macchiato is simple and fun. You will need about 10 minutes. Gather your ingredients first. This drink is cool and comforting, perfect for fall. 1. Mix the apple cider and spice: In a small pot, mix apple cider and apple pie spice. Heat it on medium until warm. Do not let it boil. Once warm, take it off the heat. 2. Combine coffee and flavor: In a glass, mix cooled coffee or espresso with vanilla extract and caramel syrup. Stir well to blend the flavors. 3. Prepare the ice: Fill a tall glass with crushed ice. Pour the warm apple cider mixture over the ice. 4. Add coffee layer: Slowly pour the coffee mixture over the apple cider. Let it settle for a nice look. 5. Froth the milk: In another container, froth your milk until it is creamy. Carefully pour the frothed milk over the coffee layer. 6. Top it off: If you like, add whipped cream on top. Drizzle with extra caramel and sprinkle cinnamon for a touch of spice. 7. Serve and enjoy: Serve your Iced Apple Crisp Macchiato right away. It’s cool, sweet, and full of fall flavor. You can enjoy this drink on its own, or with some sweet snacks. It pairs well with cookies or muffins. Share it with friends at gatherings. It’s a great way to enjoy the flavors of fall! To get those pretty layers in your Iced Apple Crisp Macchiato, pour slowly. Start with the warm apple cider mix over ice. Next, carefully pour the coffee mix on top. Use the back of a spoon to help. This method keeps the layers separate. You want a mix of sweet and spicy in this drink. Use the right amount of apple pie spice to enhance the apple flavor. The caramel syrup adds sweetness, but don’t overdo it. A touch of vanilla extract adds depth. Adjust these to fit your taste. One common mistake is using hot coffee. It melts the ice too fast and mixes the layers. Let your coffee cool before mixing. Another mistake is not using enough apple pie spice. This can make your drink taste flat. Always taste and adjust as you go. {{image_2}} You can change the milk for your Iced Apple Crisp Macchiato. Here are some great choices: - Whole milk gives a rich and creamy taste. - Almond milk adds a light, nutty flavor. - Oat milk offers a smooth texture and sweetness. - Soy milk is a great choice for those who want a dairy-free option. Each type of milk brings its own twist to the drink. Try them all to find your favorite! You can switch up the caramel syrup for different flavors. Here are a few ideas: - Maple syrup adds a warm, earthy taste. - Vanilla syrup enhances the drink’s sweetness. - Hazelnut syrup gives a nutty depth. - Pumpkin spice syrup is perfect for fall lovers. These syrups can create a unique drink each time. Make your Iced Apple Crisp Macchiato special with seasonal touches. Here are some fun ideas: - Add pumpkin puree for a fall-inspired treat. - Use cinnamon sticks instead of ground cinnamon for a rustic feel. - Swap apple cider for pear cider in the fall for a twist. - Top with crushed candy canes during the winter holidays for a festive look. These twists will make your drink feel fresh and new every season. Enjoy creating your own version! If you have leftover ingredients, store them carefully. Keep apple cider in the fridge. Pour it into a sealed container. Milk should also go in the fridge. Make sure to cover it well. Store caramel syrup in a cool, dark place. When you mix the drink, do it fresh. This way, you get the best flavor. If you make it ahead, the layers will mix. Serve it right away for a pretty look. If you cannot drink it all, keep it in the fridge for later. You can store the prepared drink, but it is not ideal. The layers will blend together in the fridge. If you want to save it, use a sealed container. Drink it within one day for the best taste. An Iced Apple Crisp Macchiato is a delicious layered coffee drink. It blends coffee, apple cider, and spices. This drink captures the warm flavors of fall. You get a mix of sweet, creamy, and spiced notes. It’s refreshing and perfect for warm days. You can find this drink at many coffee shops. Popular chains often serve it during fall. Check your local café or coffee shop. If they have seasonal drinks, ask if they offer it. You can also make it at home with the recipe provided. Yes, you can easily make this drink dairy-free. Just use a milk alternative like almond or oat milk. These options will work well in the recipe. They still provide a creamy texture and taste. This way, everyone can enjoy the drink. The Iced Apple Crisp Macchiato has some health benefits. Coffee provides energy and focus. Apple cider adds vitamins and antioxidants. Spices like cinnamon can help with digestion. If you use low-fat milk, it can be lower in calories. Overall, it’s a tasty treat with some perks! This blog post covered how to make a delicious Iced Apple Crisp Macchiato. You learned about the key ingredients like coffee, milk, and caramel syrup. We broke down the steps to prepare it and shared tips for great flavor and layering. You can also explore variations and proper storage for leftovers. As you get creative with this drink, remember to enjoy each sip. The perfect blend of flavors awaits you. Happy brewing!
Iced Apple Crisp Macchiato Flavorful Fall Experience
Ready to sip into fall? The Iced Apple Crisp Macchiato is a delightful coffee treat packed with cozy flavors. With notes of caramel, apple spice,
- 1 lb large shrimp, peeled and deveined - 2 tablespoons olive oil - 2 teaspoons smoked paprika - 1 teaspoon garlic powder - Salt and pepper to taste The shrimp makes this dish shine. Start with large shrimp for a nice bite. Peel and devein them before marinating. This step ensures a clean taste. The olive oil keeps the shrimp moist. Smoked paprika adds a rich, smoky flavor. Garlic powder gives it a nice kick. Finally, salt and pepper enhance all these flavors. - 1 avocado, diced - 1 cup corn (fresh, frozen, or canned) - 1 medium red bell pepper, diced - 1/4 cup red onion, finely chopped - 1/4 cup cilantro, chopped - Juice of 2 limes The salsa brings freshness to the bowl. Use a ripe avocado for creaminess. Corn adds sweetness and crunch. Diced red bell pepper gives color and crispiness. The red onion adds a nice bite. Fresh cilantro provides a burst of flavor. Lime juice ties it all together with brightness. - 1 cup cooked rice (white, brown, or quinoa) Rice forms the base of the bowl. You can use white rice for a classic taste. Brown rice offers a nutty flavor and more fiber. Quinoa is a great gluten-free option. Choose what you like best! Each option pairs well with the shrimp and salsa. First, gather your shrimp and ingredients. In a medium bowl, add the shrimp. Pour in two tablespoons of olive oil. Add two teaspoons of smoked paprika and one teaspoon of garlic powder. Sprinkle in salt and pepper to taste. Mix it all well to coat the shrimp evenly. Next, preheat your grill or grill pan over medium-high heat. Once hot, carefully add the marinated shrimp. Let them cook for 2-3 minutes on each side. You know they are done when they turn pink and opaque. Remove the shrimp from the grill and set them aside. Now, grab another bowl to mix the salsa. Start by adding one diced avocado. Then, toss in one cup of corn, whether fresh, frozen, or canned. Next, add one medium diced red bell pepper, and a quarter cup of finely chopped red onion. Don’t forget a quarter cup of chopped cilantro! Squeeze the juice of two limes into the bowl. Season with salt and pepper to your taste. Gently toss all the ingredients together until they combine well. To assemble, take four serving bowls and divide the cooked rice among them. You can use white rice, brown rice, or quinoa. Next, top each bowl with the grilled shrimp. Finally, spoon the fresh avocado corn salsa over the shrimp. If you like, garnish with extra lime wedges and cilantro. Enjoy your colorful and tasty shrimp bowls! To cook shrimp well, start with fresh or thawed shrimp. Toss them in olive oil, smoked paprika, garlic powder, salt, and pepper. This mix adds great flavor. Preheat your grill to medium-high heat. Grill the shrimp for 2-3 minutes on each side. Look for a pink and opaque color. Remove them when done. Overcooking shrimp makes them tough, so watch them closely. For the best flavor, choose large shrimp. Look for bright shells and a fresh smell. Fresh corn gives a sweet crunch. If using frozen corn, thaw it before mixing. Pick ripe avocados that yield slightly when pressed. This ensures a creamy texture. A red bell pepper adds color and sweetness. Fresh cilantro and lime juice brighten the dish. Always taste and adjust salt and pepper. Serve the shrimp bowls with extra lime wedges on the side. This adds a zesty kick. Pair them with a light salad for freshness. You can also add tortilla chips for crunch. For drinks, try a cold lemonade or iced tea. These drinks balance the meal's flavors. Enjoy your vibrant, tasty shrimp bowls! {{image_2}} You can swap shrimp for other proteins. Chicken, beef, or tofu work great. Just adjust cooking times. For chicken, grill it for about 6-7 minutes per side. For beef, use flank steak; grill for 4-5 minutes per side. If you prefer tofu, press it to remove water. Marinate and grill it for 3-4 minutes per side. Each choice brings a new taste to your bowl. While rice is a classic base, you have many choices. Quinoa adds a nutty flavor and is packed with protein. Brown rice gives a hearty touch and a chewy texture. For a fun twist, try cauliflower rice. It’s light and low-carb, perfect for a fresh meal. Each grain gives a new texture and taste to your bowl, making it unique. The avocado corn salsa is so versatile. You can add black beans for extra protein and fiber. Diced tomatoes or mango can bring a sweet twist. If you like heat, add jalapeños or diced serrano peppers. Change up the herbs too; basil or parsley can brighten the flavor. These small tweaks let you create a salsa that fits your taste. To keep your grilled shrimp bowls fresh, place leftovers in an airtight container. Store in the fridge for up to three days. When storing, separate the shrimp and salsa from the rice. This helps maintain the texture and flavor of each component. You can freeze the shrimp and salsa for later use. Place cooked shrimp in a freezer-safe bag. Remove as much air as you can before sealing. The shrimp will keep for about three months. For the salsa, use a container that seals tightly. It can be frozen for up to two months. To reheat shrimp, thaw in the fridge overnight. Warm them in a skillet over medium heat for about three minutes. Stir gently to heat evenly. For the salsa, let it thaw in the fridge. Use it cold or warm it slightly in the microwave for about 30 seconds. Enjoy your delicious bowl again! Yes, you can use frozen shrimp. Just thaw them first. Place the shrimp in cold water for about 15 minutes. This helps them defrost quickly. Make sure to drain and pat them dry before marinating. This way, they will soak up the flavors better. To make this recipe gluten-free, choose gluten-free rice or quinoa. The other ingredients, such as shrimp and veggies, are naturally gluten-free. Just check the labels on any sauces or extras you add. Most spices, like smoked paprika and garlic powder, are gluten-free too. You can use lemon juice as a substitute for lime juice. It has a similar tangy taste. Another option is vinegar, like apple cider or white vinegar. These can add a nice zing to the salsa. Just use a little less, since vinegar is stronger. This article covered how to make delicious grilled shrimp bowls. You learned about the key ingredients, from shrimp to the avocado corn salsa. The step-by-step guide showed you how to prepare everything. I also shared tips to cook shrimp perfectly and offered variations to customize your bowl. For storage, I presented ways to save leftovers and reheat them. In conclusion, these bowls are a tasty way to mix fresh flavors. Enjoy trying out different ingredients and make this meal your own!
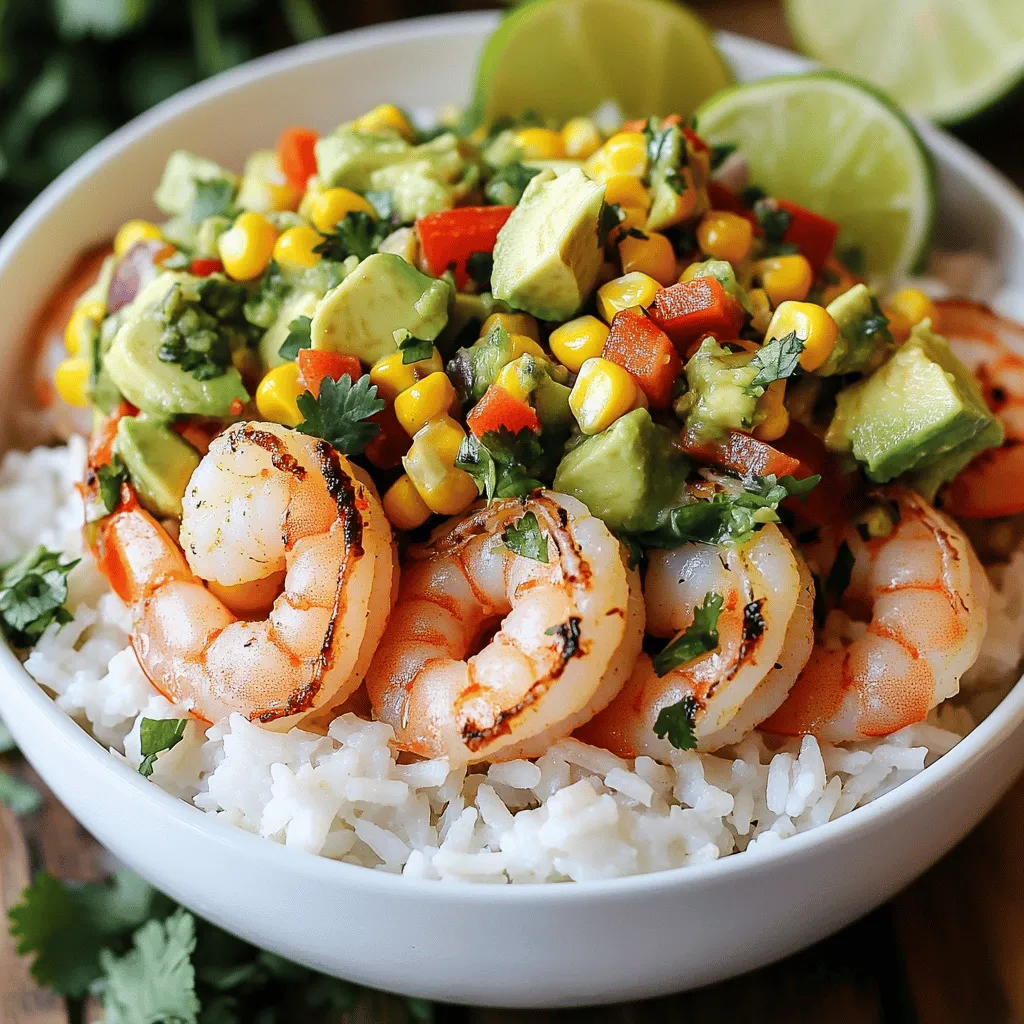
Grilled Shrimp Bowls with Avocado Corn Salsa Delight
Get ready to savor my Grilled Shrimp Bowls with Avocado Corn Salsa! This dish is fresh, vibrant, and packed with flavor. You’ll learn how to
To make this tasty dish, gather these main ingredients: - 12 oz penne pasta - 1 can (14 oz) crushed tomatoes - 1 cup heavy cream - 2 cups vegetable broth - 1 medium onion, finely chopped - 3 garlic cloves, minced - 1 teaspoon dried oregano - 1 teaspoon salt - ½ teaspoon black pepper - 1 cup fresh basil leaves, chopped (plus extra for garnish) - ½ cup grated Parmesan cheese (optional) - 2 tablespoons olive oil Each ingredient plays a key role. The penne pasta cooks well in the creamy sauce. Crushed tomatoes give a rich flavor. Heavy cream adds smoothness. Vegetable broth enhances the taste. Onion and garlic provide a good base. Oregano, salt, and pepper bring in spices. Fresh basil gives a bright note. Parmesan cheese adds a nice touch, but it’s optional. You can customize this recipe to fit your taste. Consider these options: - Protein: Add grilled chicken or shrimp for a heartier meal. - Pasta Type: Swap penne for fusilli or farfalle. - Cream Alternatives: Use coconut milk or cashew cream for a dairy-free option. - Veggies: Toss in spinach, bell peppers, or mushrooms for extra nutrition. These swaps keep the dish fresh and fun. Each change can lead to a new favorite. This dish is not only delicious but also offers good nutrition. Here’s the breakdown per serving: - Calories: Approximately 500 kcal - Protein: 14 grams - Fat: 25 grams - Carbohydrates: 60 grams - Fiber: 3 grams The creamy tomato basil pasta gives a balance of carbs and protein. It’s a filling meal without being too heavy. Start by heating two tablespoons of olive oil in a large pot over medium heat. Once the oil is hot, add one finely chopped medium onion. Sauté this for about three to four minutes until it turns soft and clear. Then, toss in three minced garlic cloves. Cook the garlic for one more minute. You want it fragrant but not burnt. This base adds depth to your dish. Next, add one can of crushed tomatoes, one cup of heavy cream, and two cups of vegetable broth to the pot. Sprinkle in one teaspoon of dried oregano, one teaspoon of salt, and half a teaspoon of black pepper. Stir everything well to combine. Bring this mixture to a gentle simmer. Now, it's time to add twelve ounces of penne pasta. Stir to coat the pasta in the sauce. Cover the pot and reduce the heat to low. Let the pasta cook for about twelve to fifteen minutes. Stir occasionally to prevent sticking. When done, the pasta should be al dente. After cooking, take the pot off the heat. Stir in one cup of chopped fresh basil. If you like, add half a cup of grated Parmesan cheese for extra creaminess. Let the pasta sit for a couple of minutes. This helps the sauce thicken slightly. Finally, taste your dish and adjust the seasoning. Add more salt or pepper if you need it. Your one-pot creamy tomato basil pasta is ready to serve! To get a creamy texture, use heavy cream. It adds richness and smoothness. Stir the cream in well after simmering the sauce. This helps it blend perfectly with the tomatoes. Make sure to let the pasta sit for a few minutes after cooking. This lets the sauce thicken up and coat the pasta well. If you want extra creaminess, add more cheese at the end. One common mistake is cooking the pasta too long. This can make it mushy instead of al dente. Keep an eye on the time and stir often. Another mistake is not tasting the sauce. Before serving, check the flavor. You might need more salt or pepper. Don’t forget to use fresh basil. Dried basil won’t give the same burst of flavor. Serve your creamy pasta in deep bowls. Garnish with fresh basil leaves for color and flavor. You can also sprinkle some grated Parmesan cheese on top. This adds a nice salty kick. Pair your dish with a simple green salad or garlic bread. This makes a complete meal that is tasty and satisfying. Enjoy every bite! {{image_2}} You can easily add protein to this dish. Chicken or shrimp works great. For chicken, use about one pound of boneless pieces. Cut the chicken into small cubes. Cook the chicken in the pot first. Sauté it in olive oil until it’s golden brown. This adds flavor to the meal. Then, remove the chicken and follow the recipe as usual. For shrimp, use about one pound of peeled shrimp. Add them in the last few minutes of cooking. They cook quickly and soak up the sauce. While penne pasta is a favorite, you can switch it up. Use any pasta you like. Bowtie, fusilli, or spaghetti all taste good. Just remember to adjust the cooking time. Thinner pasta cooks faster, while thicker pasta takes longer. Always check the package for cooking time. This way, your pasta will be just right in the dish. Adding veggies makes this dish even better. Spinach is a top choice. Toss in a few handfuls right before serving. The heat will wilt it down nicely. You can also try cherry tomatoes, bell peppers, or zucchini. Chop them small and add them with the onions. This adds color and boosts nutrition. Don’t be afraid to get creative with your favorite veggies! To keep your One-Pot Creamy Tomato Basil Pasta fresh, let it cool first. Use an airtight container. This helps prevent moisture loss and keeps flavors intact. Store it in the fridge if you plan to eat it within three days. For longer storage, consider freezing it. When reheating, use a pan on low heat. Add a splash of water or broth to avoid dryness. Stir often to ensure even heating. You can also use the microwave. Heat in short bursts and stir in between. This keeps the pasta creamy and tasty. To freeze, portion the pasta into freezer-safe containers. Leave some space at the top for expansion. Seal tightly and label with a date. It can last up to three months in the freezer. To enjoy, thaw overnight in the fridge and reheat as mentioned. Yes, you can make this meal ahead of time. Just cook the pasta and sauce as directed. Once done, let it cool. Store it in an airtight container in the fridge. When you're ready to eat, reheat it in a pot. Add a splash of broth to keep it creamy. Stir well to mix everything again. Yes, you can easily make this recipe vegan. Replace heavy cream with coconut cream or cashew cream. Use vegetable broth to keep the flavors strong. You can skip the Parmesan cheese or use a vegan version. The dish will still taste great! If you don’t have heavy cream, use alternatives like coconut milk or cashew cream. Both options add creaminess without losing flavor. You can also use a mix of almond milk and cornstarch for a lighter option. Just remember, adjust the amount to keep the sauce thick and rich. This blog post covered how to make One-Pot Creamy Tomato Basil Pasta. We explored key ingredients, simple steps, and helpful tips. You learned to avoid common mistakes and tried fun variations. Proper storage and reheating advice ensure tasty leftovers. Enjoy this easy dish any night of the week. Feel free to get creative with your ingredients. You'll love how quick and delicious it is!
One-Pot Creamy Tomato Basil Pasta Easy Comfort Meal
Looking for a quick and cozy meal? Try my One-Pot Creamy Tomato Basil Pasta! This dish is simple, tasty, and perfect for anyone. With easy
- Shrimp (1 pound, peeled and deveined) - Olive oil (2 tablespoons) - Honey (2 tablespoons) - Lime juice (1 tablespoon) - Chili powder (1 teaspoon) - Paprika (1/2 teaspoon) - Cayenne pepper (1/2 teaspoon) - Salt and pepper to taste - Corn tortillas (8 small) - Red cabbage (1 cup, shredded) - Avocado (1, sliced) - Fresh cilantro (for garnish) - Lime wedges (for serving) To make Spicy Honey Lime Shrimp Tacos, you need fresh and simple ingredients. Start with one pound of shrimp, peeled and deveined. This shrimp forms the base of your tacos. Olive oil adds richness, and two tablespoons will do. Honey gives a sweet touch, while lime juice adds a tangy kick. One tablespoon of lime juice is perfect. Next, gather your spices. One teaspoon of chili powder brings warmth. Half a teaspoon of paprika adds depth, and half a teaspoon of cayenne pepper will give it a slight heat. Adjust the cayenne to your taste. Finally, don't forget salt and pepper to enhance the flavors. For assembly, you'll need eight small corn tortillas. They are perfect for holding all the tasty fillings. One cup of shredded red cabbage adds crunch and color. You’ll also need one sliced avocado for creaminess. Fresh cilantro makes a lovely garnish, and lime wedges add extra zest. All these components come together to create a delicious meal that is sure to impress. - Combine honey, lime juice, olive oil, chili powder, paprika, cayenne pepper, salt, and pepper in a bowl. - Whisk until blended. This mixture gives the shrimp a sweet and spicy kick. - Toss shrimp into the marinade. Make sure each shrimp is well-coated. - Let it sit for 15-20 minutes. This helps the shrimp absorb all the flavors. - Heat a skillet over medium-high heat. Make sure it's hot before adding the shrimp. - Cook shrimp for 2-3 minutes on each side until pink and opaque. This step is key for juicy shrimp. - Warm corn tortillas in a skillet or oven. This makes them soft and easy to fold. - Layer shrimp on each tortilla. Add a handful of shredded cabbage and slices of avocado. - Garnish with fresh cilantro and serve with lime wedges. The lime adds a bright finish. - Adjust the cayenne pepper to suit your taste. More pepper means more heat! - Adding chopped garlic can boost the flavor. Garlic brings a nice depth to the dish. - Make sure the shrimp are well-coated in the marinade. This helps them cook evenly. - Watch the cooking time closely. Shrimp cook fast, so avoid overcooking. Tender shrimp are the goal. - Pair your tacos with a refreshing salsa or a creamy sauce. This adds extra flavor. - Serve the tacos right away. This keeps them fresh and tasty for everyone! {{image_2}} You can swap shrimp for other proteins. Chicken and tofu work well in this recipe. They soak up the flavors just like shrimp. If you want something lighter, try fish like tilapia. It adds a nice twist to your tacos. To make a vegan version, replace shrimp with grilled veggies or jackfruit. Both options bring great texture and flavor. You can also add avocado and beans for protein. This choice keeps your meal filling and tasty. If you prefer milder tacos, you can reduce or skip the cayenne pepper. This will tone down the heat. For those who love spice, feel free to add more chili powder or cayenne. It brings out bolder flavors in your dish. Store leftover shrimp in the fridge. They stay fresh for up to 2 days. Make sure to keep the shrimp and tacos separate. This way, the tortillas won’t get soggy from moisture. To reheat shrimp, use a skillet. Set it on low heat and warm the shrimp gently. For the tortillas, warm them in a dry skillet or quickly in the microwave. This keeps them soft and tasty. If you have extra shrimp, you can freeze them. Place the cooked shrimp in a freezer bag for up to 1 month. It’s best to store tortillas separately. This helps them keep their texture and flavor when thawed. Yes, but ensure to thaw properly before marinating. Frozen shrimp can work well. Just remember to place them in the fridge overnight or soak in cold water for quicker thawing. This step is key to making sure your shrimp absorbs all the tasty flavors. Substitute with agave syrup or maple syrup for a vegan option. Both options give a sweet touch without using honey. Agave syrup has a mild taste, while maple syrup adds a nice depth of flavor. Choose based on your preference! Add more cayenne pepper or a splash of hot sauce to the marinade. You can also try adding diced jalapeños for extra heat. Just be careful not to overpower the other flavors. Start with a little, then taste and adjust as you like. Yes, marinate shrimp in advance and store in the fridge for up to 2 hours before cooking. This makes it easier when you're ready to cook. The shrimp will soak up more flavor, making your tacos even tastier. Just remember to discard any leftover marinade before cooking! In this post, we covered how to make shrimp tacos using simple ingredients and clear steps. You learned about the marinade, cooking techniques, and taco assembly. We also discussed tips for perfecting your dish and storage options for leftovers. Remember, cooking is all about experimentation. Feel free to swap out proteins or tweak spices to match your taste. Enjoy your delicious tacos, and don’t hesitate to share this recipe with friends. Happy cooking!
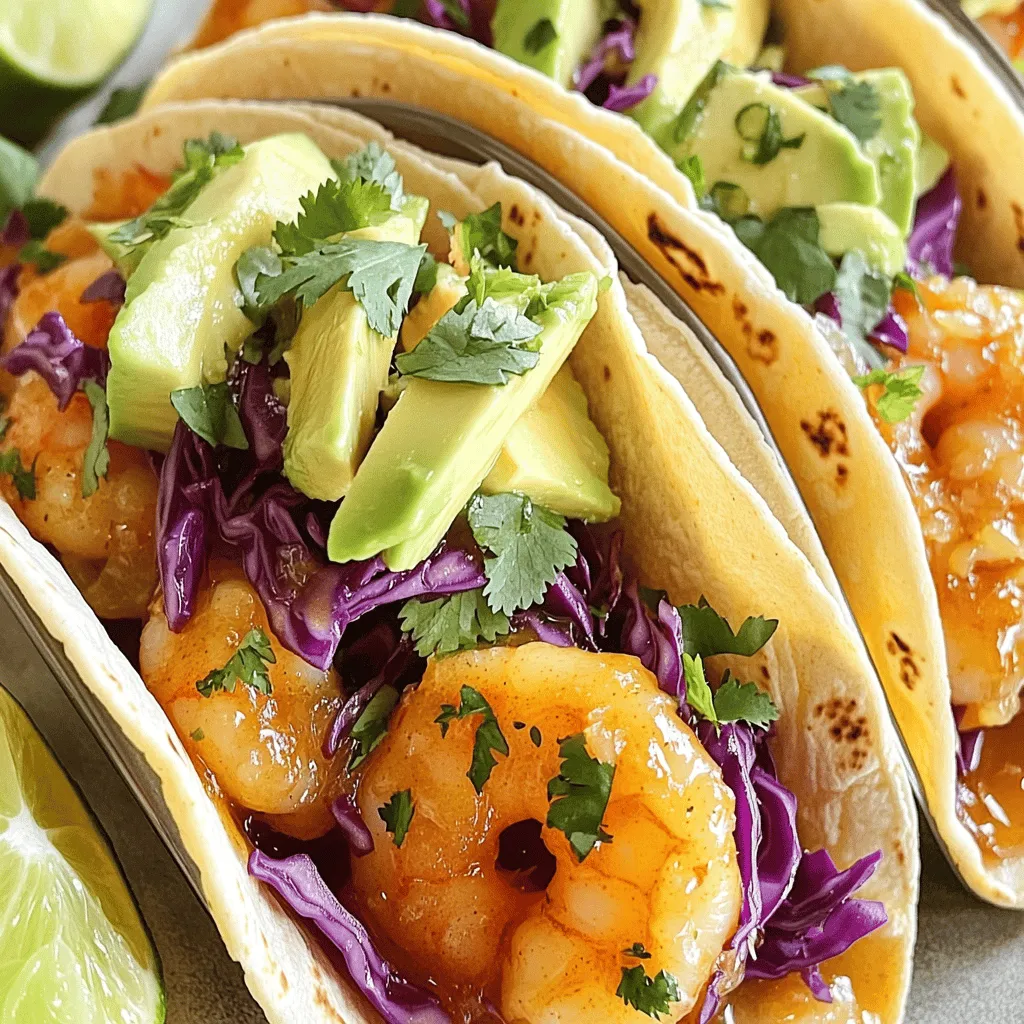
Spicy Honey Lime Shrimp Tacos Quick and Easy Recipe
Are you ready to spice up your taco night? These Spicy Honey Lime Shrimp Tacos are quick, easy, and full of flavor. With succulent shrimp
For this dish, you need these main items: - 4 salmon fillets - 2 tablespoons olive oil - 3 cloves garlic, minced - 1 cup cherry tomatoes, halved - 1 cup fresh spinach - 1 cup heavy cream - ½ cup grated Parmesan cheese These ingredients create a rich and tasty meal. The salmon gives a nice flavor, while the cream and cheese add creaminess. You will also need some simple seasonings: - 1 teaspoon Italian seasoning - Salt and pepper to taste - Fresh basil leaves for garnish - Lemon wedges for serving These seasonings bring the dish to life. Fresh basil adds a nice touch, and lemon wedges help brighten the meal. If you want to boost the flavor even more, consider these optional items: - Red pepper flakes for heat - Extra veggies like bell peppers or zucchini Adding red pepper flakes can give your dish a kick. More veggies make it colorful and healthy. Feel free to mix and match these options to suit your taste! First, season the salmon fillets. Use salt and pepper on both sides. This adds flavor to the fish. Make sure to cover every part evenly. You want the taste to shine through. Next, heat olive oil in a large skillet. Set the heat to medium-high. Once hot, add the salmon fillets skin-side down. Cook for about 4 to 5 minutes until they turn a nice brown. Flip the salmon gently and cook for another 3 to 4 minutes. The fish should be cooked all the way through. Remove the salmon from the skillet and set it aside on a plate. In the same skillet, add minced garlic. Sauté it for about 30 seconds until it smells nice. Then, add the halved cherry tomatoes. Cook them for 2 to 3 minutes until they soften. Lower the heat and pour in the heavy cream. Make sure to scrape the browned bits from the bottom of the skillet. This adds great flavor. Gradually stir in the grated Parmesan cheese until it melts and makes a creamy sauce. Now, stir in the fresh spinach and Italian seasoning. Cook until the spinach wilts. If the sauce gets too thick, add a splash of water or vegetable broth. Return the salmon fillets to the skillet. Spoon the creamy sauce over the fish to coat nicely. Heat everything for about a minute. Finally, plate the salmon, drizzle more sauce on top, and garnish with fresh basil leaves. Serve with lemon wedges for a bright finish. Enjoy your meal! To cook salmon perfectly, choose fillets that are even in size. This helps them cook at the same rate. Start with a hot skillet and add olive oil to prevent sticking. Place the salmon skin-side down and let it sear without moving it for the first few minutes. This creates a nice crust. Flip the fillet gently and cook on the other side until it flakes easily with a fork. A creamy sauce should be smooth and rich. To prevent graininess, add the Parmesan cheese slowly. Stir it in after the cream heats up. If you add it too fast or to cold cream, it may clump. If the sauce gets too thick, just add a splash of water or broth. This keeps the sauce silky and helps it cling to the salmon. You can easily adjust this recipe for different diets. For a lighter sauce, use half-and-half instead of heavy cream. If you are dairy-free, try coconut cream or a nut-based cream. You can also swap the salmon for chicken or tofu for a plant-based option. Each change will give you a fresh take on this dish while keeping it delicious. {{image_2}} You can add many veggies to this dish. Some great options include bell peppers, zucchini, or mushrooms. Just chop them up and sauté them with the garlic. This adds color and boosts flavor. Each vegetable brings its unique taste. Try mixing and matching to find your favorite combo! If you like heat, red pepper flakes are a perfect choice. Just sprinkle a pinch into the creamy sauce. Start with a little; you can always add more. This small change gives the dish a nice kick. It balances the creaminess of the sauce perfectly. Your taste buds will love the extra warmth! Not in the mood for salmon? You can swap it for chicken or tofu. If using chicken, cook it in the same way as the salmon. Just make sure it reaches the right temperature. For tofu, press it to remove extra water before cooking. This way, it will absorb all the flavors from the sauce. Both options work well and keep the meal delicious! After enjoying your creamy Tuscan salmon, store leftovers in a sealed container. Let the salmon cool to room temperature before sealing. This helps prevent condensation, which can make the fish soggy. Keep it in the fridge for up to 3 days. If you think you won’t eat it soon, consider freezing it instead. When you’re ready to enjoy the leftovers, reheat gently. Use a skillet over low heat. This way, the salmon warms without drying out. Add a splash of water or broth to help keep the sauce creamy. Avoid using a microwave, as it can make the salmon tough. Heat until it’s warmed through. You can freeze creamy Tuscan salmon for later use. Place it in an airtight container or freezer bag and remove as much air as possible. It will last for about 2 months. To thaw, move it to the fridge overnight. If you need it faster, you can use the defrost setting on the microwave. After thawing, reheat it gently in a skillet, as mentioned before. You can serve Creamy Tuscan Salmon with a few side dishes that complement its rich flavors. Here are some great options: - Rice: White or brown rice soaks up the creamy sauce well. - Pasta: Angel hair or fettuccine pairs nicely with the salmon. - Vegetables: Steamed broccoli or asparagus adds color and nutrients. - Salad: A fresh green salad with a light vinaigrette balances the richness. To lighten the sauce, you can swap some ingredients. Here are my top tips: - Use half-and-half: Replace heavy cream with half-and-half for a less rich sauce. - Greek yogurt: Stir in plain Greek yogurt for creaminess without the fat. - Broth: Replace some cream with vegetable or chicken broth for a thinner sauce. Yes, you can use frozen salmon fillets. Here’s how: - Thaw: Always thaw the salmon in the fridge overnight for even cooking. - Cooking time: You may need to cook it a bit longer to ensure it’s fully cooked through. You can customize the sauce to suit your taste. Consider these ideas: - Add herbs: Fresh dill or parsley can brighten the flavor. - Change cheese: Use feta or goat cheese for a different taste. - Add spice: Toss in red pepper flakes for a spicy kick. This blog covered everything you need for creamy Tuscan salmon. We discussed the main ingredients, cooking steps, and ways to perfect the dish. I shared tips for a creamy sauce and alternate options like chicken or tofu. You can store leftovers safely and enjoy them later. Embrace your creativity, and have fun adapting this meal to your taste. Enjoy cooking and savoring your delicious salmon!
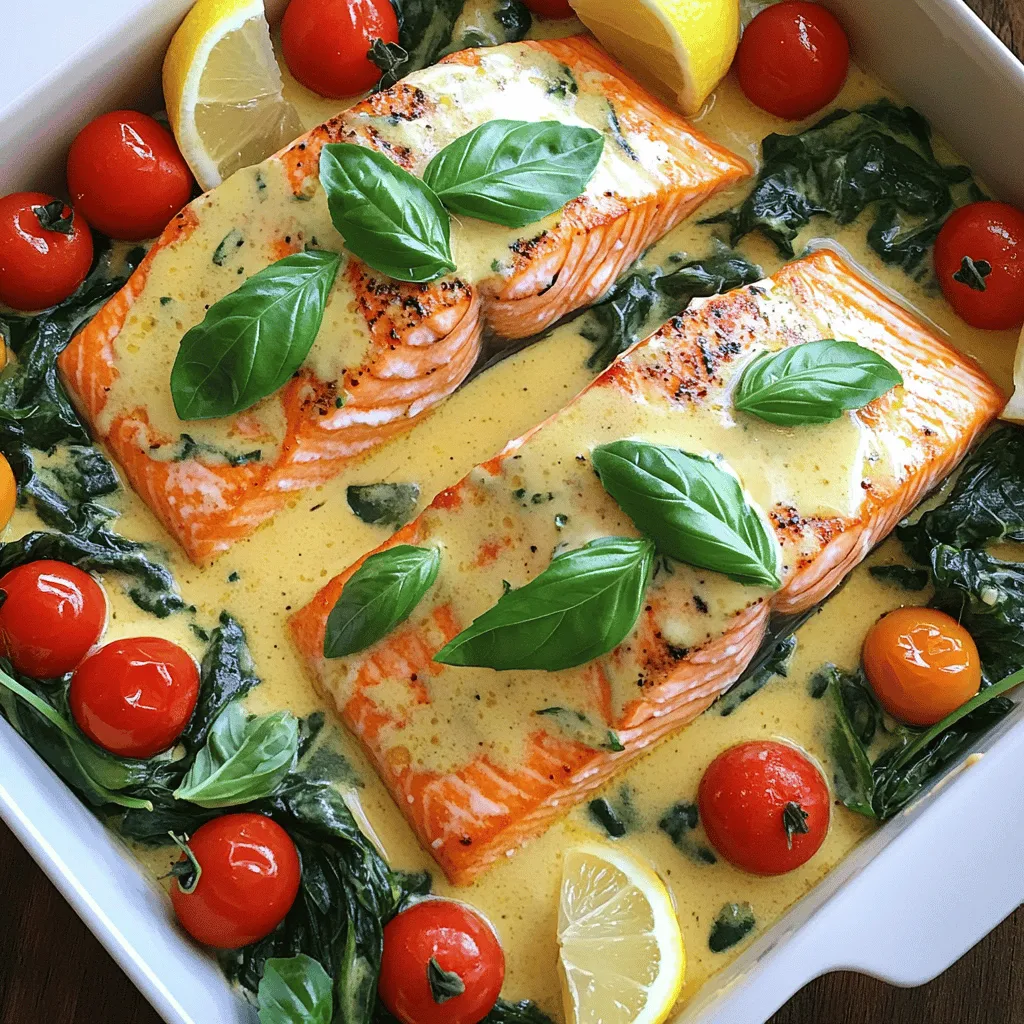
Creamy Tuscan Salmon Delightful and Flavorful Meal
Looking to impress your family or friends with a meal that bursts with flavor? Creamy Tuscan Salmon is the answer! This dish combines rich, creamy