Dinner

Chicken Enchilada Soup Flavorful Easy Cozy Meal
Looking for a cozy meal that’s both easy to make and full of flavor? You’ve come to the right place! This Chicken Enchilada Soup recipe
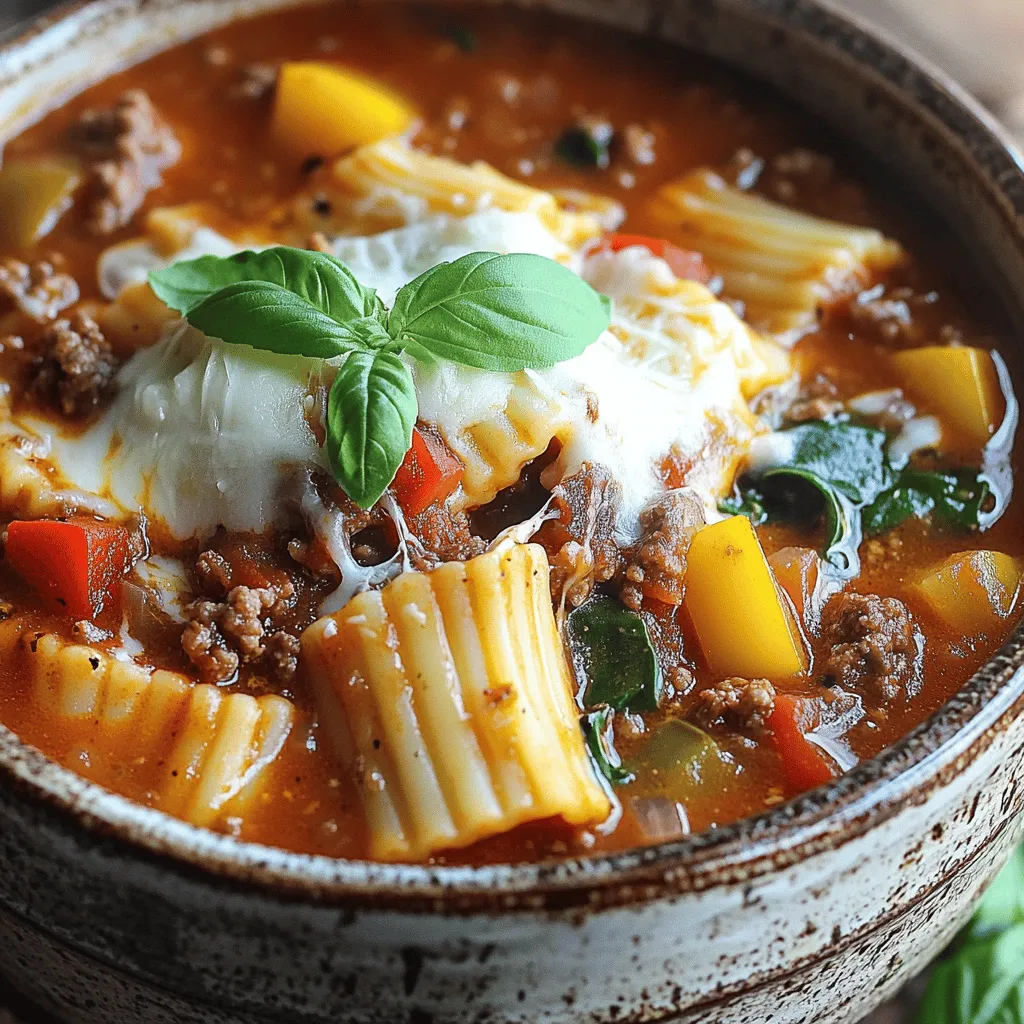
Crockpot Lasagna Soup Hearty and Simple Meal Recipe
If you love lasagna but want a simpler way to enjoy it, I’ve got just the recipe for you! This Crockpot Lasagna Soup is both
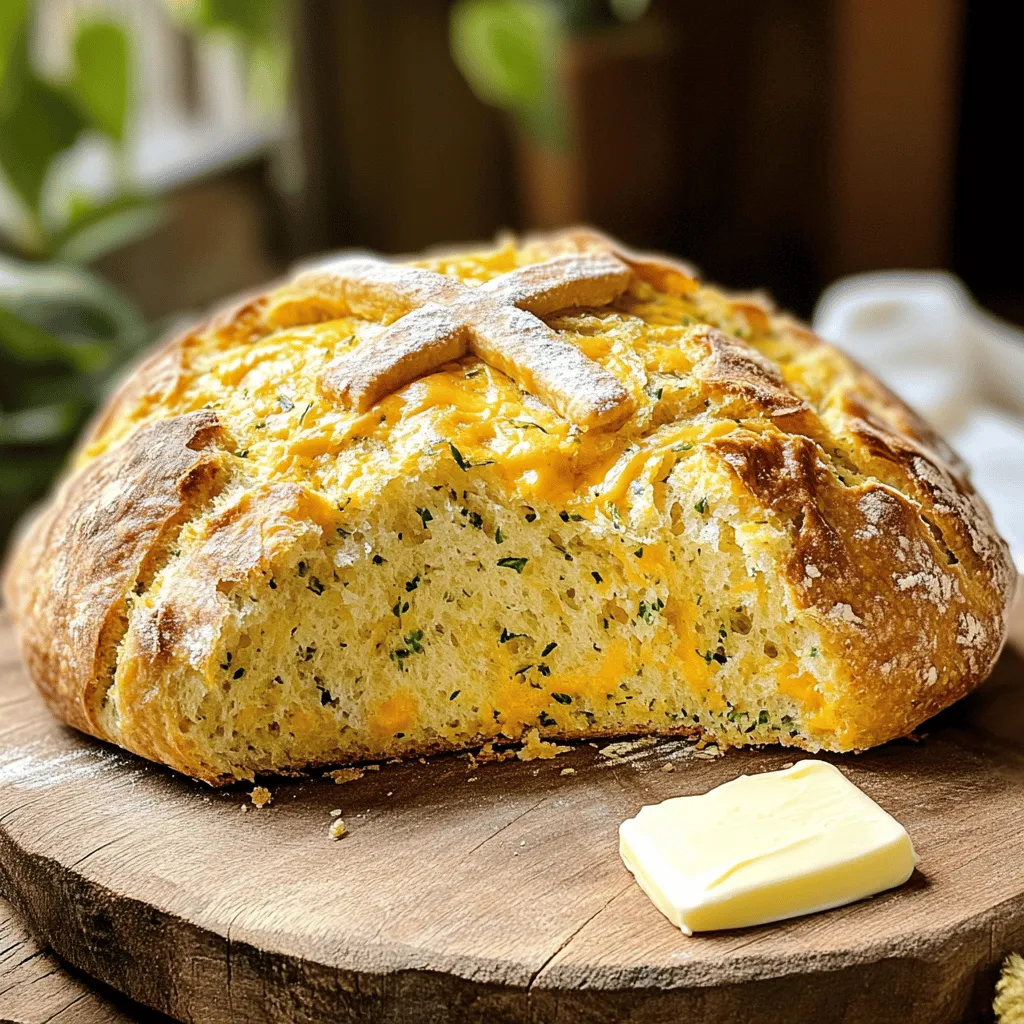
Cheddar and Herb Soda Bread Flavorful Baking Delight
Are you ready to bake a loaf that’s packed with flavor and easy to make? My Cheddar and Herb Soda Bread is the perfect addition

Hearty Crockpot Chicken Enchilada Casserole Delight
Get ready to enjoy a cozy meal with my Hearty Crockpot Chicken Enchilada Casserole Delight. This dish is easy to make and is perfect for

Vodka Pasta Delightful and Simple Comfort Meal
Are you ready to whip up a dish that oozes comfort and flavor? Vodka pasta blends creamy sauce with tender pasta for a delightful meal.
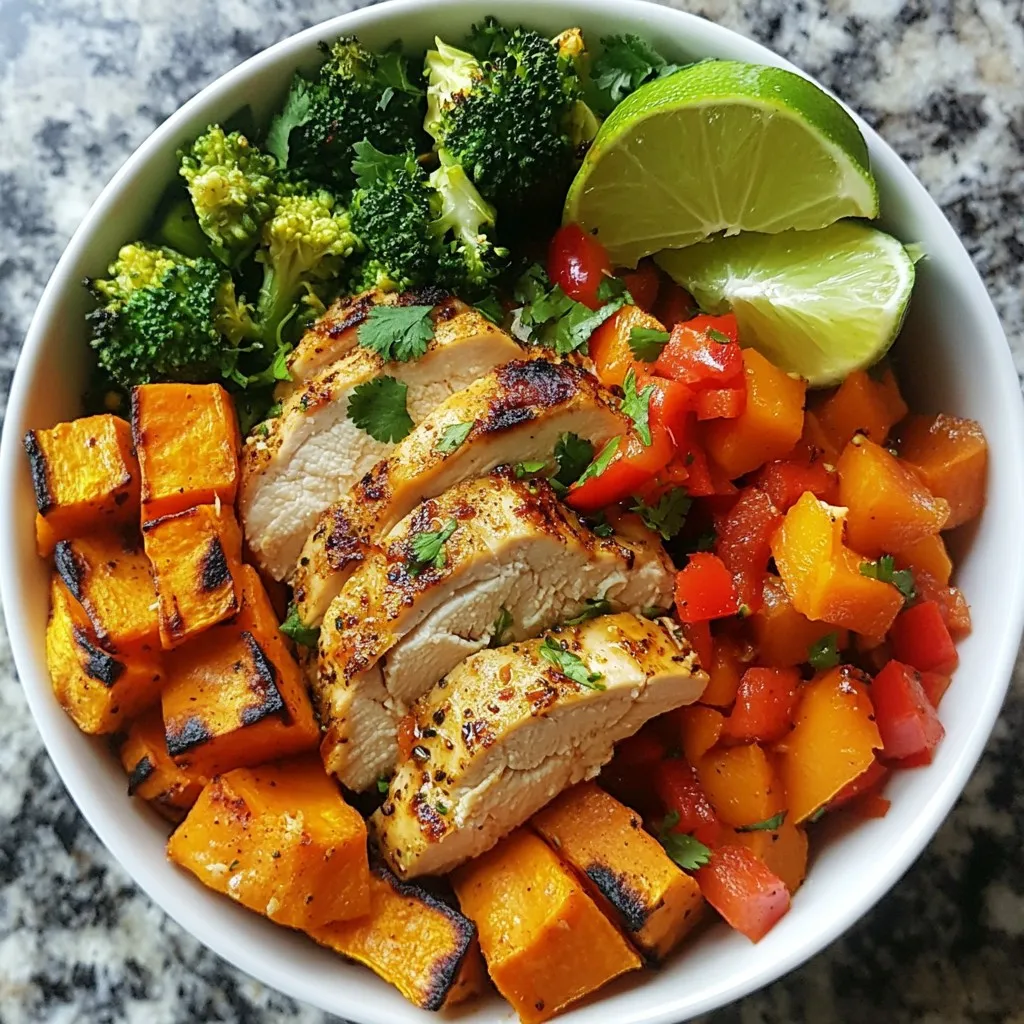
Meal Prep Chicken Sweet Potato Bowls Easy Recipe
Are you ready to simplify your weeknight dinners? Meal Prep Chicken Sweet Potato Bowls are delicious and easy to make. This recipe is perfect for
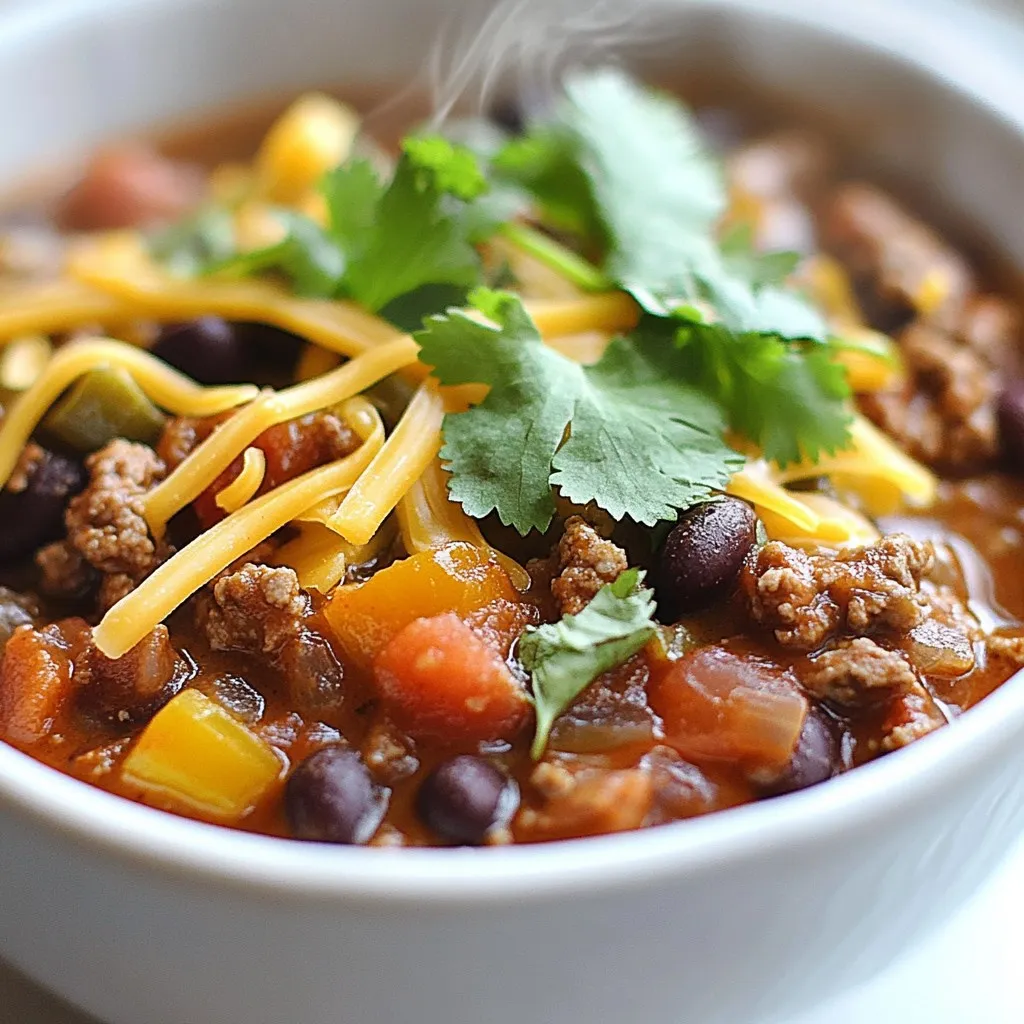
Homestyle Classic Chili Flavorful and Hearty Recipe
If you crave a warm, hearty dish that feels like a big hug, you’re in the right place! My Homestyle Classic Chili recipe combines ground
![This dish is warm and filling. You need fresh items and a few pantry staples. The mix of flavors makes every bite a delight. You can find the full recipe below. - 1 medium butternut squash, peeled and cubed - 1 small onion, diced - 2 garlic cloves, minced - 1 cup kale, chopped - Fresh parsley for garnish - 2 tablespoons olive oil - 4 cups vegetable broth - 1 teaspoon dried thyme - 1 teaspoon sage - 1/2 teaspoon nutmeg - Salt and pepper to taste - 1 package (16 oz) potato gnocchi - 1/2 cup heavy cream (optional for creaminess) When selecting your squash, look for a firm skin with a rich color. Fresh kale adds a nice crunch. You can use any vegetable broth for flavor. The gnocchi adds a soft, fluffy texture. Heavy cream is optional but adds a nice richness. Start by preheating your oven to 400°F (200°C). Peel and cube the butternut squash. Toss these cubes in one tablespoon of olive oil. Add a pinch of salt and pepper for flavor. Spread the squash on a baking sheet in a single layer. Roast for 25 to 30 minutes. You want the squash to be tender and slightly caramelized. While the squash roasts, heat the remaining olive oil in a large pot over medium heat. Add the diced onion and sauté for five minutes until it turns translucent. Then, add the minced garlic and cook for one more minute. You’ll smell the garlic becoming fragrant. Next, pour in the vegetable broth. Stir in the roasted butternut squash, dried thyme, sage, nutmeg, and more salt and pepper if needed. Bring this mixture to a simmer and cook for ten minutes. This lets all the flavors meld together. After simmering, blend the soup until smooth. You can use an immersion blender for ease, or blend in batches in a regular blender. If you like a chunkier soup, blend only half. Return the blended soup to a simmer. Add the gnocchi and cook according to package instructions. Usually, this takes about two to three minutes, or until they float to the top. Finally, stir in the chopped kale and heavy cream if you want a creamy touch. Cook for an additional two minutes until the kale is tender. When making savory butternut squash gnocchi soup, the right gnocchi matters. Fresh gnocchi offer a soft bite and rich flavor. You can find them in the refrigerated section of stores. Dried gnocchi work too, but they may need extra cooking time. Always check the package for cooking instructions. Spices bring life to your soup. I love using thyme and sage for a warm taste. Nutmeg adds a sweet touch, perfect for butternut squash. Don’t shy away from adding more seasoning as you taste. A pinch of red pepper flakes can give a nice kick. The consistency of your soup can change how it feels. For a thicker soup, blend all the mixture well. If you prefer it lighter, blend only half and leave some chunks. Adding cream makes it richer, but you can skip it for a lighter version. Always adjust with broth if it’s too thick. For the full recipe, refer to the [Full Recipe]. {{image_2}} To make this soup vegan, skip the heavy cream. You can use coconut milk instead. It adds a nice creaminess and a hint of sweetness. Use vegetable broth and check all labels for hidden animal products. This way, everyone can enjoy the soup. If you need a gluten-free option, choose gluten-free gnocchi. Many brands offer this now. You can also make your own gnocchi using gluten-free flour. It’s easy and a fun activity. Just follow the same steps in the full recipe. Feel free to add more veggies to your soup. Carrots and celery work well. You can also try diced potatoes for extra heartiness. Spinach or chard can replace kale if you prefer. All these options boost flavor and nutrients. Enjoy experimenting with your soup! To keep your butternut squash gnocchi soup fresh, store it in an airtight container. Make sure to let the soup cool down before sealing it. This way, it won’t trap steam and get soggy. It stays good in the fridge for about three to five days. You can also separate the gnocchi from the soup to maintain the right texture. Freezing this soup is easy and a great option for meal prep. Pour the cooled soup into freezer-safe bags or containers. Squeeze out as much air as possible before sealing. Label your containers with the date. This soup can last in the freezer for up to three months. When you’re ready to eat it, thaw it overnight in the fridge. To reheat your soup, you can use either the stovetop or microwave. If using the stovetop, pour the soup into a pot and heat over medium heat, stirring often. This helps it warm evenly. If you use the microwave, place the soup in a microwave-safe bowl and heat it in 1-minute intervals, stirring in between. Make sure it's hot all the way through before serving. Enjoy your delicious meal again! Yes, you can use frozen gnocchi. It saves time and effort. Just add it directly to the soup when it simmers. Frozen gnocchi cooks quickly, usually in 2-3 minutes. Make sure to check the package for specific cooking times. If you want a lighter soup, you can skip the heavy cream. You can use coconut milk for a creamy texture. Another option is to use non-dairy milk, like almond or soy milk. You can also blend some extra butternut squash to add creaminess without dairy. This soup stays fresh for about 3-5 days in the fridge. Store it in an airtight container to keep flavors intact. If you want to keep it longer, consider freezing it instead. Just remember to leave out the gnocchi before freezing, as it can become mushy. For the full recipe, check the earlier sections. This post covers all you need for a hearty gnocchi soup. We looked at key ingredients, from fresh produce to pantry staples. The step-by-step guide helps you roast squash, cook the soup base, and blend everything seamlessly. I shared tips to enhance flavor and ideas for variations, like vegan or gluten-free options. Finally, we discussed how to store leftovers and reheat them. With this recipe, you can enjoy a warm bowl of comfort anytime. Get cooking and enjoy every bite!](https://tossedrecipes.com/wp-content/uploads/2025/08/71274dd0-43f5-4799-8cf3-1ca14888070a.webp)
Savory Butternut Squash Gnocchi Soup Delightful Meal
If you crave a warm, hearty dish that’s both simple and rich in flavor, you’ll love this Savory Butternut Squash Gnocchi Soup. This delightful meal
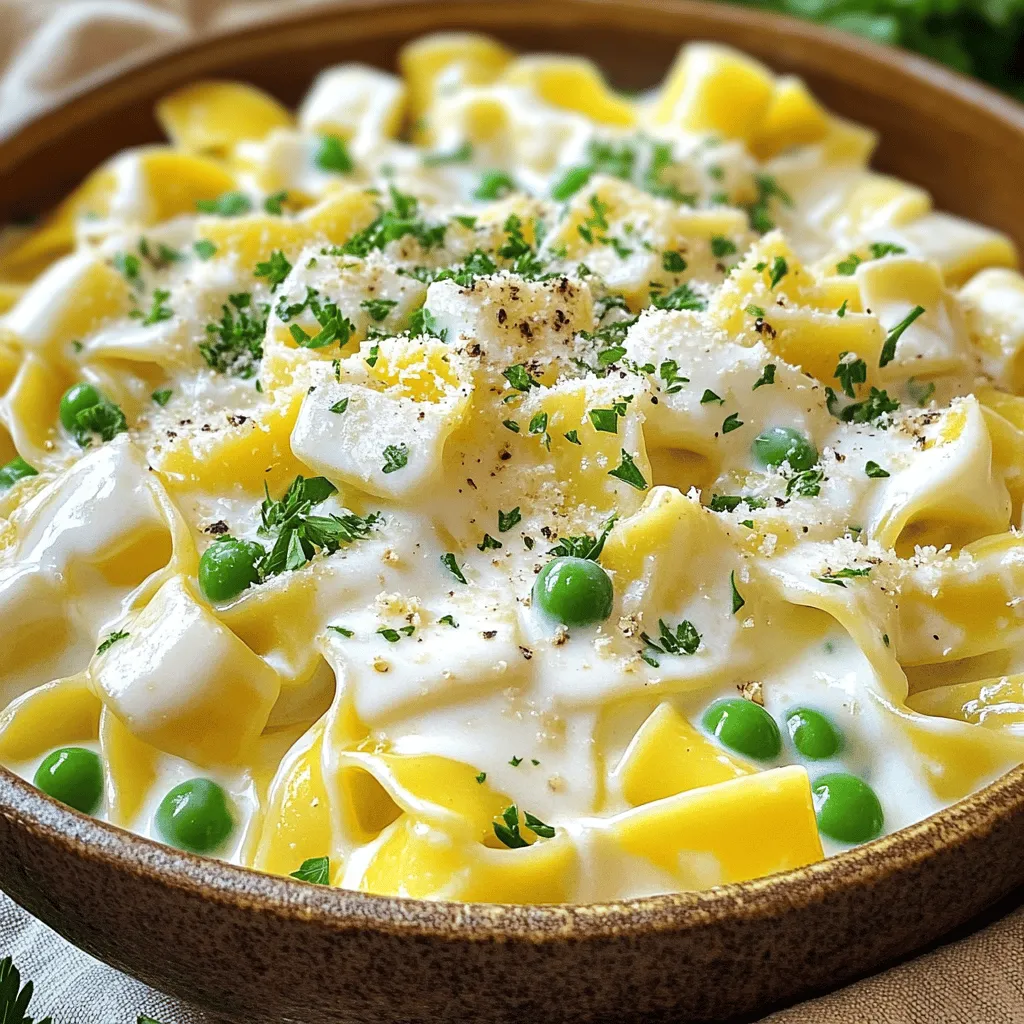
Creamy Cafeteria Noodles Simple and Tasty Dish
If you’re craving a quick and tasty meal, you’ve come to the right place! Creamy Cafeteria Noodles are simple, delicious, and sure to please everyone
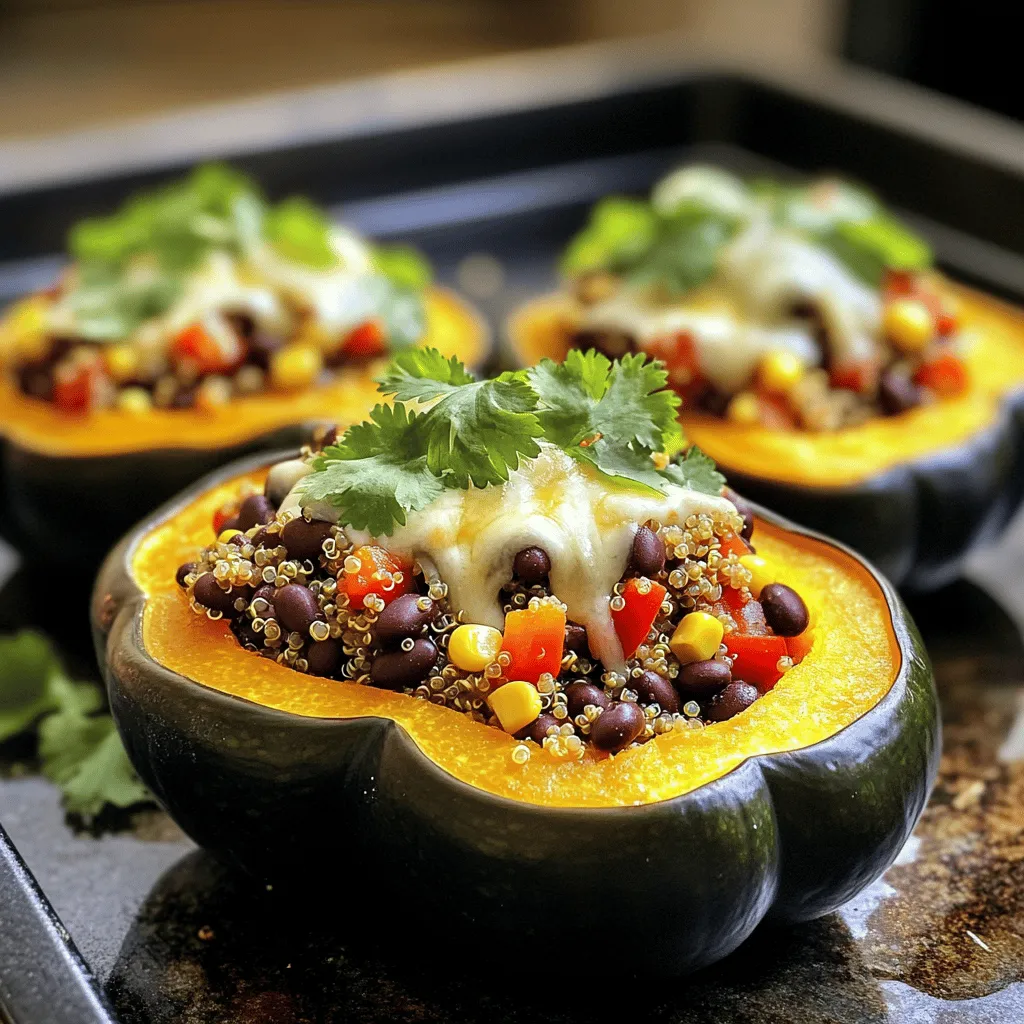
Stuffed Baked Acorn Squash Tasty and Simple Recipe
Looking for a tasty and simple recipe to impress your friends? Stuffed Baked Acorn Squash fits the bill perfectly! This dish is colorful, filled with