Dinner

- Chicken: You need 1.5 pounds of boneless, skinless chicken breasts. Slice them into thin strips for even cooking. This chicken brings the main protein and flavor to your fajitas. - Peppers and Onion: Use one red, one yellow, and one green bell pepper. Slice them thinly. Also, add one large red onion, sliced. These veggies add color and crunch to your dish. - Spices and Seasonings: Gather 3 tablespoons of olive oil, 2 teaspoons of chili powder, 1 teaspoon of cumin, and 1 teaspoon of smoked paprika. Add 1/2 teaspoon of salt and 1/2 teaspoon of black pepper. These spices elevate the flavor and aroma of the chicken and veggies. - Fresh Herbs and Vegetables: Fresh cilantro and avocado slices add a bright taste. Lime wedges help balance the flavors perfectly. - Dairy Options: Consider sour cream or shredded cheese for a creamy finish. These toppings bring richness to the fajitas. - Additional Flavor Enhancers: Try adding hot sauce or pickled jalapeños for extra heat. These options can personalize your meal and make it more exciting. With these ingredients, your sheet pan chicken fajitas will burst with flavor and color. Enjoy the ease of preparation while savoring the delicious results! {{ingredient_image_1}} Start by slicing 1.5 pounds of boneless, skinless chicken breasts into thin strips. This helps the chicken cook quickly and evenly. Next, slice one red bell pepper, one yellow bell pepper, and one green bell pepper. Add one large red onion, sliced as well. All these colors make your dish vibrant and tasty. In a small bowl, whisk together 3 tablespoons of olive oil, 2 teaspoons of chili powder, 1 teaspoon of cumin, 1 teaspoon of smoked paprika, 1/2 teaspoon of salt, and 1/2 teaspoon of black pepper. This spice blend gives your fajitas a rich, warm flavor. Pour the mix over the chicken and vegetables, then toss everything until well coated. Preheat your oven to 425°F (220°C). Spread the chicken and vegetable mixture in a single layer on a sheet pan lined with parchment paper. Bake for 20-25 minutes. Make sure to stir halfway through for even cooking. The chicken should be fully cooked, and the veggies should be tender. While the chicken and veggies bake, warm your tortillas. You can use 4-6 small flour or corn tortillas. Heat them in a dry skillet over medium heat for about 30 seconds on each side. Alternatively, wrap them in foil and place them in the oven for the last 5 minutes of cooking. This keeps them soft and ready for filling. Once your chicken and veggies are done, serve them straight from the sheet pan. This makes it fun and casual. You can let everyone help themselves to the warm fillings. To assemble your fajitas, place some chicken and veggies in a warm tortilla. Top with fresh cilantro, avocado slices, a squeeze of lime, sour cream, and shredded cheese. Let each person create their perfect bite. Ensuring Even Cooking To cook your fajitas evenly, spread the chicken and veggies in a single layer. Use a large sheet pan. This helps all the pieces get heat from the oven. Stir halfway through cooking to mix everything well. This step makes sure all the chicken cooks through and veggies soften properly. Adjusting Spice Levels If you want mild fajitas, use less chili powder. You can also skip the smoked paprika. For more heat, add sliced jalapeños or a pinch of cayenne pepper. Taste the spice mix before adding it to the chicken and veggies. This way, you can adjust the flavor to your liking. Complementary Dishes These fajitas go well with sides like black beans or rice. A fresh salad with lime vinaigrette adds a nice touch. You can also serve chips with salsa for a fun crunch. Recommended Beverages Pair your fajitas with a cold drink. A light beer or a fruity margarita works great. If you prefer non-alcoholic options, try a refreshing limeade or iced tea. Pro Tips Marinate for More Flavor: For an extra boost of flavor, marinate the chicken in the spice mixture for at least 30 minutes, or up to overnight, before cooking. Use Fresh Vegetables: Fresh bell peppers and onions not only taste better but also provide vibrant colors to your dish. Choose firm, brightly colored produce for the best results. Customize Your Spice Level: Adjust the amount of chili powder based on your spice preference. You can also add jalapeños or a dash of hot sauce for an extra kick. Keep it Warm: If serving for a gathering, keep the cooked fajitas warm in the oven at a low temperature while you prepare the tortillas and toppings. {{image_2}} Using Beef or Shrimp You can switch chicken for beef or shrimp. If using beef, choose flank steak or sirloin. Slice it thin for quick cooking. Marinate the beef in the same spice mix for flavor. For shrimp, use large, raw shrimp. Add them to the pan 10 minutes before cooking ends. They cook fast and stay juicy. Vegetarian Options To make this dish vegetarian, use tofu or beans. For tofu, press and cube it before cooking. Marinate it like chicken for the best taste. You can also use black beans or pinto beans. Add them to the pan for the last 10 minutes to heat through. Different Spice Blends Feel free to change the spice mix. Try adding garlic powder or oregano for extra depth. For a kick, add cayenne pepper or chipotle powder. These spices give your fajitas a new twist. You can also use taco seasoning for a quick option. Adding Fruits or Other Vegetables You can enhance the dish with fruits or veggies. Pineapple or mango adds sweetness. Dice them and mix in with the chicken. You can also add zucchini or corn for more color and texture. Experiment with what you like for a unique taste. Refrigeration Guidelines After enjoying your chicken fajitas, let them cool. Place leftovers in an airtight container. They will stay fresh for about 3-4 days in the fridge. Make sure to separate the chicken and veggies from the tortillas. This helps keep everything fresh and ready to eat. Freezing Method If you want to keep fajitas longer, freezing is a great option. Pack the chicken and veggies in freezer-safe bags. Remove as much air as you can. They can last up to 2-3 months in the freezer. Just remember to label the bags with the date! Best Ways to Reheat Fajitas To reheat, you can use a skillet or the oven. If using a skillet, heat it over medium heat. Add the chicken and veggies, stirring until hot. For the oven, preheat it to 350°F (175°C). Spread the fajitas on a baking sheet for about 10-15 minutes. How to Keep Tortillas Soft When reheating tortillas, use a dry skillet over medium heat. Warm each tortilla for about 30 seconds on each side. You can also wrap them in a damp paper towel and microwave them for 20-30 seconds. This keeps them soft and pliable for rolling! To tell if your chicken is cooked, check its internal temperature. It should reach 165°F (75°C). Use a meat thermometer for accuracy. If you don't have one, cut a piece of chicken. The meat should be white, not pink. Juices should run clear. This ensures it is safe to eat. Yes, you can make this recipe in advance. Prepare the chicken and veggies ahead of time. Store them in the fridge for up to two days. When you are ready, cook them in the oven. This makes for easy weeknight meals. You can also prepare the spice mix beforehand. Just keep it in a sealed container. You can use several options instead of tortillas. Lettuce leaves make a great low-carb wrap. You can also try pita bread or flatbreads. Rice paper wraps are tasty and fun too. Each option adds a unique twist to your meal. Choose what fits your taste and diet best. In this post, we covered how to make delicious fajitas. We started with the main ingredients like chicken, peppers, and spices. Then, we looked at step-by-step cooking and serving ideas. I shared tips for the best results and suggested tasty variations. Lastly, I explained how to store leftovers and reheat them. Fajitas are fun and easy to make. With these tips, you can impress family and friends with your cooking. Enjoy your great meal!
Sheet Pan Chicken Fajitas Flavorful and Easy Meal
Looking for a quick, tasty meal that everyone will love? You’re in the right place! This Sheet Pan Chicken Fajitas recipe is not only easy
To make creamy sweet potato and sausage soup, gather these ingredients: - 2 large sweet potatoes, peeled and diced - 1 pound chicken sausage, casings removed and crumbled - 1 medium onion, finely chopped - 3 cloves garlic, minced - 4 cups vegetable broth - 1 can (14 oz) coconut milk - 1 teaspoon ground cumin - 1 teaspoon smoked paprika - 1/2 teaspoon red pepper flakes (adjust to taste) - Salt and pepper to taste - 2 tablespoons olive oil - Fresh cilantro or parsley, for garnish Each ingredient plays a key role in flavor and texture. Sweet potatoes bring natural sweetness and creaminess. Chicken sausage adds a savory depth. Onions and garlic provide aromatic notes. The spices, especially cumin and smoked paprika, give warmth and complexity. Coconut milk creates a rich, velvety base. Using fresh herbs like cilantro or parsley brightens the dish. As you cook, feel free to adjust seasonings based on your taste. This soup is not only delicious but also comforting and satisfying. For the complete cooking steps, check out the Full Recipe. First, gather all your ingredients. You need sweet potatoes, chicken sausage, onion, garlic, vegetable broth, coconut milk, spices, and olive oil. Peel and dice the sweet potatoes into small cubes. Chop the onion finely and mince the garlic. This will help release their flavors. In a large pot, heat the olive oil over medium heat. Once hot, add the chopped onion. Sauté it for about 5 minutes until it softens and turns translucent. Now, stir in the minced garlic, ground cumin, smoked paprika, and red pepper flakes. Cook this for 1-2 minutes. You want to smell those spices! Next, add the crumbled chicken sausage. Break it up with a spoon and cook for 5-7 minutes. The sausage should turn brown and be fully cooked. Now, toss in the diced sweet potatoes and pour in the vegetable broth. Bring this mixture to a boil. Then, reduce the heat and let it simmer for about 15-20 minutes. You want the sweet potatoes to become tender. When the sweet potatoes are soft, use an immersion blender to puree the soup until smooth. If you don’t have one, carefully transfer it to a blender in small batches. Make sure to handle hot liquids with care! Once blended, return the soup to the pot if needed. Now, stir in the coconut milk and let it heat through for about 5 minutes. Season with salt and pepper to taste. Feel free to adjust the spices to your liking. Finally, serve the soup hot, garnished with fresh cilantro or parsley for a pop of color. Enjoy your creamy sweet potato and sausage soup! For the complete recipe, check [Full Recipe]. To make your soup super creamy, use coconut milk. This adds a rich texture and flavor. Blend the soup well after cooking. Use an immersion blender for ease. If you want a thicker soup, add less broth. For a lighter version, use low-fat coconut milk. Experiment until you find your favorite creaminess level. You can adjust the spice based on your taste. Start with a half teaspoon of red pepper flakes. This gives a mild kick. If you like more heat, add more flakes. You can also try cayenne pepper for a different flavor. Remember, you can always add spice, but you can't take it away! Don’t skip the sautéing step. Cooking the onion and garlic first builds great flavor. Avoid cooking the sweet potatoes too long. They should be tender but not mushy. Over-blending can make the soup too thin. Keep an eye on texture during blending. Lastly, taste as you go! Adjust salt and spices to your liking. For the full recipe, refer to the complete guide. {{image_2}} You can change the sausage in this soup to suit your taste. If you want a milder flavor, use turkey sausage. For a spicy kick, try chorizo. Each type brings its own charm. Remember to adjust cooking times if the sausage you choose needs it. The key is to pick a sausage you love. This soup is very flexible. You can add more veggies to boost nutrition. Try carrots, spinach, or kale. You can even add beans, like black beans or chickpeas, for extra protein. Just add them to the pot with the sweet potatoes. Cook until all are soft and tasty. This adds color and makes the soup heartier. To make this soup vegan, swap out the sausage and coconut milk. You can use plant-based sausage or skip it altogether. For creaminess, use cashew cream or oat milk. This keeps the soup rich and smooth without dairy. Make sure to use a vegetable broth that is vegan too. Enjoy a warm bowl that fits your diet! For the full recipe, check out the complete instructions to create this tasty dish. Store leftover soup in an airtight container. Make sure it cools down first. This keeps it fresh. Place it in the fridge if you plan to eat it soon. It should last for about three to four days. If you want it to last longer, freezing is a good option. If you have more soup than you can eat, freezing is best. Pour the soup into freezer-safe containers. Leave some space at the top for expansion. You can also use freezer bags. Lay them flat for easier storage. When frozen, the soup will keep well for up to three months. To reheat, you can use a pot or microwave. If using a pot, place it over low heat. Stir often to prevent burning. If using a microwave, heat in short bursts. Stir in between to ensure even heating. Always check the temperature before serving. Enjoy your creamy sweet potato and sausage soup hot! For the complete recipe, check out the full recipe. Yes, you can make this soup in a slow cooker. Start by browning the sausage and onions in a pan. After that, add all the ingredients to the slow cooker. Set it on low for about 6 hours or high for around 3 hours. This method makes the flavors blend nicely. If you want a substitute for coconut milk, try using whole milk or heavy cream. You can also use almond milk for a dairy-free option. Each choice will change the flavor and texture slightly, but the soup will still taste great. This soup can last for about 3 to 5 days in the fridge. Store it in an airtight container to keep it fresh. If you want to keep it longer, consider freezing it. Just remember to let it cool before freezing. For the full recipe, check the recipe section above. This blog post shared a simple and tasty soup recipe. We covered the key ingredients, easy steps, and helpful tips. You can adjust the spice or try different sausage types. Storing and reheating options make it easy to enjoy later. This soup is healthy and versatile. It's perfect for anyone looking for comfort and flavor. Try it out, and enjoy your cooking journey!
Creamy Sweet Potato and Sausage Soup Recipe Delight
Looking for a warm, delicious dish that makes your taste buds sing? My Creamy Sweet Potato and Sausage Soup combines tender sweet potatoes with savory
To make Crack Green Bean Casserole, you need some key ingredients. Here’s what you’ll use: - 2 cans (14.5 oz each) green beans, drained and rinsed - 1 can (10.5 oz) cream of mushroom soup - 1 cup sour cream - 1 tablespoon soy sauce - 1 teaspoon garlic powder - 1 cup sharp cheddar cheese, shredded - 1 cup crispy fried onions - 1/2 teaspoon black pepper - 1/4 teaspoon salt - Optional: 1/2 cup cooked and crumbled bacon These ingredients create a rich and creamy dish that everyone loves. The special ingredients in this casserole add depth to the taste. Cream of mushroom soup gives it a great base. Sour cream adds creaminess that is hard to beat. The soy sauce brings a salty note that works well with the green beans. Garlic powder adds a warm and savory flavor. Finally, sharp cheddar cheese makes the dish cheesy and rich. You can swap some ingredients if you need to. For a lighter option, use Greek yogurt instead of sour cream. If you don’t have cream of mushroom soup, try cream of chicken soup. You can also use fresh green beans if you prefer. Just make sure to cook them first. If you want a vegetarian dish, leave out the bacon or use a plant-based option. {{ingredient_image_1}} 1. Start by preheating your oven to 350°F (175°C). This step ensures the casserole cooks evenly. 2. Grab a large mixing bowl. Combine the cream of mushroom soup, sour cream, soy sauce, garlic powder, black pepper, and salt. Stir until the mixture is smooth. 3. Next, fold in the drained green beans. Add half of the crispy fried onions too. Mix until everything is well coated. 4. Now, add the shredded cheddar cheese to your mixture. Reserve a little cheese for topping later. 5. Transfer the mixture into a greased 9x13 inch baking dish. Spread it out evenly. 6. Sprinkle the reserved cheddar cheese over the top. This will create a tasty, cheesy crust. 7. Place the dish in the preheated oven. Bake for 25-30 minutes. You want it hot and bubbly. 8. After baking, remove the casserole from the oven. Top it with the remaining crispy fried onions. Return it to the oven for another 5-10 minutes. This step makes the onions golden brown. 9. Let the casserole sit for about 5 minutes before serving. This allows it to set slightly and makes it easier to serve. - Always wash your hands before cooking. Clean hands help prevent germs. - Rinse the green beans under cold water after draining. This removes any canning residue. - Keep your workspace clean. Wipe down counters and utensils as you go. - Store leftovers in an airtight container and refrigerate them promptly. This keeps your food safe to eat later. To make the best crack green bean casserole, start with quality ingredients. Use fresh green beans if you can, but canned ones work great too. Drain and rinse the beans well to remove any excess sodium. When mixing your sauce, blend the cream of mushroom soup, sour cream, soy sauce, garlic powder, black pepper, and salt until smooth. This base adds great flavor. Mix in half of the crispy fried onions for a nice crunch. Add sharp cheddar cheese for richness. Reserve some cheese for the top. This step ensures a cheesy, golden finish. Spread the mixture evenly in your baking dish. Bake until it’s hot and bubbly, then top with the remaining onions for an extra crunch. Crack green bean casserole is great for any meal. Serve it as a side dish for holidays or family dinners. Pair it with roast chicken or turkey for a hearty meal. You can also enjoy it with grilled meats. It adds a creamy texture that balances out rich meats. For a lighter option, serve it with a fresh salad. This helps cut through the creaminess. You can also offer it as a main dish for a vegetarian meal. Just add some crusty bread on the side. Pair your casserole with a light white wine or sparkling water. A crisp Sauvignon Blanc works well with the dish's rich flavors. If you prefer non-alcoholic options, try a refreshing lemonade or iced tea. For a cozy meal, serve it with mashed potatoes or rice. Both options absorb the sauce's flavor well. You could also include roasted vegetables for a colorful plate. Pro Tips Choose Fresh Beans: For the best flavor, use fresh green beans instead of canned. Blanch them briefly before adding to the casserole for a crispier texture. Customize Your Cheese: Experiment with different types of cheese like Monterey Jack or Pepper Jack for a unique flavor twist. Crunchy Topping: Add a mix of breadcrumbs and fried onions for an extra crunchy topping that contrasts beautifully with the creamy filling. Make Ahead: Prepare the casserole a day in advance and refrigerate it. Just bake it when you're ready to serve for a hassle-free meal. {{image_2}} You can easily make this dish vegetarian. Just skip the bacon. The base is rich and creamy, thanks to the cream of mushroom soup and sour cream. If you want a non-vegetarian twist, add crumbled bacon. It gives a smoky flavor that many love. Each option provides a unique taste while keeping the dish delicious. For a dairy-free version, swap sour cream with a plant-based yogurt. You can also use dairy-free cheese. Look for options that melt well. These changes keep the texture creamy without using dairy. Make sure to check the labels for any hidden dairy ingredients in soup and cheese. Feel free to get creative with extra ingredients! Adding cooked mushrooms or diced bell peppers can boost flavor. You might also try mixing in some cooked chicken for added protein. Some people enjoy a handful of nuts for crunch. Just remember, keep the balance of flavors in mind. Each addition should enhance the dish, not overpower it. After you enjoy your Crack Green Bean Casserole, let it cool down. Transfer any leftovers to an airtight container. Store it in the fridge for up to three days. If you have a large batch, you can divide it into smaller portions. This makes it easy to reheat later. When you're ready to eat the leftovers, preheat your oven to 350°F. Place the casserole in a safe dish. Cover it with foil to keep it moist. Heat for about 20 minutes or until it's hot. You can also use a microwave if you're in a hurry. Just heat it in short bursts to avoid overcooking. To freeze the casserole, make sure it's completely cool. Use a freezer-safe container or a heavy-duty freezer bag. It can last up to three months in the freezer. When you're ready to use it, thaw it overnight in the fridge. Then, reheat it in the oven for the best taste. Yes, you can make this casserole ahead of time. Mix all the ingredients together, but don’t bake it yet. Cover the dish and store it in the fridge for up to 24 hours. When ready, bake it as directed. You can store leftover casserole in the fridge for about 3 to 5 days. Make sure to cover it tightly. When you’re ready to eat it again, just reheat in the oven or microwave. If you want a substitute for cream of mushroom soup, you can use cream of chicken soup or a homemade white sauce. You can also use a can of cream of celery soup for a different twist. Yes, you can add other vegetables to the casserole! Some tasty options include chopped broccoli, carrots, or corn. These veggies will add flavor and color. Just be sure to adjust the cooking time if you add more ingredients. In this blog post, we explored the key ingredients and steps for making Crack Green Bean Casserole. We covered how to prepare it, bake it, and keep it safe to eat. I shared tips to make the dish shine and gave options for variations to suit diet needs. Remember, you can store leftovers and even freeze extra portions. This dish is flexible, tasty, and perfect for any meal. Enjoy making it your own!
Crack Green Bean Casserole Rich and Flavorful Dish
Looking for a dish that combines delicious flavors and a creamy texture? You’ve found it! My Crack Green Bean Casserole is not only easy to
For the 15 easy non-sandwich lunch ideas, you will need some key ingredients. Here’s a quick list: - Bell peppers - Quinoa - Black beans - Corn - Cheddar cheese - Chickpeas - Cherry tomatoes - Cucumbers - Feta cheese - Eggs - Spinach - Sushi rice - Avocados - Olive oil - Various herbs and spices Most of these items are common pantry staples. You might already have many in your kitchen. Always check your pantry before shopping! You can easily swap ingredients if you have specific needs. Here are some alternatives: - Quinoa: Use brown rice or couscous. - Black beans: Try kidney beans or lentils. - Cheddar cheese: Use mozzarella or a dairy-free cheese. - Chickpeas: Substitute with white beans or edamame. - Feta cheese: Goat cheese or tofu works well too. Feel free to adjust based on your dietary needs. If you're vegan or gluten-free, there are many options to make these recipes work for you! Here’s a brief breakdown of calories and nutrients for some of the lunch ideas: - Cheesy Quinoa Stuffed Peppers: About 350 calories, 15g protein, 15g fat, 45g carbs per serving. - Mediterranean Chickpea Salad: Roughly 250 calories, 10g protein, 12g fat, 30g carbs per serving. - Savory Egg Muffins: Around 200 calories, 12g protein, 14g fat, 6g carbs per serving. - Tasty Veggie Sushi Rolls: Approximately 300 calories, 8g protein, 5g fat, 55g carbs per serving. These numbers can vary based on your choices. Always check specific brands or ingredients to be sure! For detailed preparation of Cheesy Quinoa Stuffed Peppers, refer to the Full Recipe. Enjoy your healthy lunches! To make your non-sandwich lunches easy, start with some simple steps. First, gather all your ingredients. For each idea, you will prepare a base, like grains or veggies. Common bases are quinoa, rice, and pasta. Cook these bases first. You can boil quinoa or rice in water until soft. Pasta should cook until al dente. For veggies, steaming or roasting enhances their flavor. Let’s dive into the Cheesy Quinoa Stuffed Peppers. 1. Preheat your oven to 375°F (190°C). 2. Cut the tops off the bell peppers and remove the seeds. 3. In a large bowl, mix the cooked quinoa, black beans, corn, half of the cheese, cumin, paprika, olive oil, salt, and pepper. 4. Stuff each pepper with this mixture. 5. Place them upright in a baking dish and cover with foil. 6. Bake for 25 minutes. Remove the foil and add the rest of the cheese on top. 7. Bake for another 10 minutes until the cheese is melted and bubbly. 8. Garnish with fresh cilantro before serving. Other great recipes include Mediterranean Chickpea Salad, Savory Egg Muffins, and Tasty Veggie Sushi Rolls. Each one provides a unique flavor and easy prep. When cooking grains, rinse them before boiling to remove excess starch. This keeps them fluffy. For veggies, chop them into even pieces for uniform cooking. Roasting brings out natural sweetness, while steaming keeps them crisp. Tools can make cooking easier. A good knife helps with chopping. A rice cooker simplifies grain cooking. Use a baking dish for oven meals. Always keep your workspace clean to avoid mix-ups. Meal prep saves time and energy during busy days. Start by choosing a day to prepare meals. I often choose Sunday. Cook large batches of grains, proteins, and veggies. This way, you have a base ready for each lunch. For example, cook quinoa or rice in bulk. Store it in the fridge for easy access. Batch cooking helps you avoid stress. Make several servings of dishes like Mediterranean chickpea salad or cheesy quinoa stuffed peppers. These meals hold well in the fridge. You can mix and match them throughout the week. Grab-and-go lunches become a breeze when you have everything ready. Seasoning makes meals fun and tasty. Try using fresh herbs like basil or cilantro. They add freshness to any dish. Spices like cumin or paprika give warmth and depth. Don't forget to add salt and pepper to enhance flavors. Quick dressings or dips can transform a meal. For instance, mix olive oil with lemon juice for a simple salad dressing. You can also blend yogurt with herbs for a creamy dip. These little touches can change a basic dish into something special. Presentation makes meals more appealing. Use colorful plates to showcase your food. Arrange ingredients neatly to create a visual feast. Garnish with fresh herbs or a sprinkle of cheese for a pop of color. Pair your meals with refreshing drinks. A sparkling water with a slice of lemon complements many dishes. You can also serve sliced fruits as a side. They add sweetness and color to your lunch plate. {{image_2}} You can easily change these lunch ideas to fit your diet. For instance, if you want vegan meals, swap out cheese for nutritional yeast or avocado. For gluten-free options, use quinoa or brown rice instead of pasta. You can also explore flavors from different cultures. Try adding spices like curry for Indian flair or sesame oil for an Asian twist. The world of flavors awaits you! Using seasonal ingredients can make your meals fresh and tasty. Look for vegetables that are in season, like squash in fall or tomatoes in summer. You can also use leftovers creatively. For example, if you have grilled chicken, toss it into a salad or make a wrap. This not only reduces waste but also adds variety to your meals. Combining dishes can make lunch more exciting. Think about pairing a Mediterranean chickpea salad with savory egg muffins for a hearty meal. You could also create themed lunches. An Asian theme could feature veggie sushi rolls alongside a miso soup. It’s a fun way to try different flavors and keeps your lunch box interesting! Storing leftovers is key to keeping your meals fresh and tasty. For non-sandwich lunches, use airtight containers to lock in flavor. Glass or BPA-free plastic containers work best. Label each container with a date to track how long food lasts. For meals like Mediterranean chickpea salad, store it in a bowl with a lid. For cheesy quinoa stuffed peppers, wrap them tightly in foil before placing them in the fridge. Reheating meals can be tricky, but it is easy with the right tools. Use a microwave for quick meals like savory egg muffins. Heat them in short bursts for even warming. For dishes like creamy avocado pasta, use an oven to keep the texture. Preheat your oven to 350°F (175°C) and place the meal in a baking dish. Cover with foil to avoid drying out. Knowing how long your food lasts is important. In the fridge, most non-sandwich lunches last about 3-5 days. You can freeze meals like veggie sushi rolls for up to 3 months. Check for signs that food has gone bad. If it smells off or has changed color, it’s best to toss it. Always trust your senses when it comes to food safety. You can try a few of my favorite meals. The Mediterranean Chickpea Salad is bright and fresh. It has protein from chickpeas and fiber from veggies. Another great option is Savory Egg Muffins. They are easy to make and packed with spinach and cheese. Lastly, Tasty Veggie Sushi Rolls are fun and nutritious. You can fill them with fresh veggies like cucumber and avocado. These meals are quick and full of flavor. Yes, you can prepare many of these meals ahead of time. Meal prepping saves time on busy days. For example, you can make the Cheesy Quinoa Stuffed Peppers and store them in the fridge. Just reheat them when you’re ready to eat. The Mediterranean Chickpea Salad also keeps well for a few days. Make it on Sunday, and enjoy it all week. To make your lunches more filling, add protein or healthy fats. For instance, mix in some grilled chicken or chickpeas for extra protein. You can also top your dishes with avocado or nuts for healthy fats. These additions will help you feel satisfied longer. Yes, these recipes are quite budget-friendly. Most ingredients are easy to find and not too costly. For example, canned chickpeas and frozen corn are both affordable and healthy. You can also buy seasonal veggies to save more money. Planning meals around what’s on sale will help keep costs down. In this article, we explored simple non-sandwich lunch ideas, focusing on essential ingredients and their substitutes. You learned about nutritious options, cooking techniques, and meal prep tips to save time. Also, we discussed how to enhance flavors and store leftovers effectively. These strategies help you create tasty and satisfying lunches. So, dive in, get creative, and enjoy your meals! Remember, your kitchen is a space to experiment and have fun.
15 Easy Non-Sandwich Lunch Ideas for Busy Days
Are you tired of the same old sandwich routine for lunch? I feel you! In this post, I share 15 easy non-sandwich lunch ideas that
When you make bento lunches, having the right ingredients is key. Each bite needs to be fun and tasty. - Rice and Protein Choices - Start with 1 cup cooked jasmine rice. This rice is soft and sticky, perfect for packing. - Add a protein like 1/2 cup cooked chicken, diced. You can use grilled, baked, or even rotisserie chicken. - For a veggie option, try tofu or beans. They add protein and flavor. - Colorful Vegetables and Fruits - Use 1/2 cup cucumber, thinly sliced. Cucumbers add a nice crunch. - Include 1/2 cup cherry tomatoes, halved. These bring a burst of sweetness. - Add 1/4 cup baby carrots, cut into sticks. They are great for munching. - For a pop of color, toss in 1/4 cup sweet corn. This could be canned or fresh. - Optional Garnishes and Seasonings - Drizzle in 2 tablespoons soy sauce (low sodium) for flavor. - Add 1 tablespoon sesame oil for a rich taste. - Sprinkle 1 tablespoon sesame seeds for a nice touch. - Don’t forget 2 hard-boiled eggs, peeled and halved. They are filling and fun. - For a finishing touch, use seaweed sheets for decoration. You can cut these into fun shapes to make your bento lively. These ingredients combine to make a well-rounded bento lunch. You can mix and match to keep things exciting. Try the full recipe to see how everything comes together! 1. Cooking Instructions for Jasmine Rice: Start with one cup of jasmine rice. Rinse it well under cold water. Then, cook according to the package instructions. Usually, this involves a 1:1.5 rice-to-water ratio. Bring water to a boil and add the rice. Reduce heat, cover, and simmer until tender. 2. Mixing in Flavor Enhancers: Once the rice is cooked, fluff it with a fork. Add one tablespoon of sesame oil and one tablespoon of sesame seeds. This gives the rice a nice nutty flavor. 3. Cooling Tips for Rice: Spread the rice on a plate to cool it quickly. This prevents it from becoming sticky. Let it cool completely before packing it into the bento box. 1. Recommended Marinade Ingredients: For the chicken, use half a cup of diced cooked chicken. Mix it with two tablespoons of low-sodium soy sauce. This will add a savory taste that kids love. 2. Time Recommendations for Marination: Let the chicken marinate for about ten minutes. This short time allows the flavors to soak in without making it too salty. 1. Hard-Boiling Eggs Properly: To make two hard-boiled eggs, place them in a pot of cold water. Bring the water to a boil. Once boiling, cook for ten minutes. Then, move them to cold water for easy peeling. 2. Cutting and Preparing Vegetables: Prepare the veggies while the chicken marinates. Slice half a cucumber thinly. Halve the cherry tomatoes and cut baby carrots into sticks. If using fresh corn, cook it until tender and cool it down. 3. Assembling the Bento Box Efficiently: Start by adding the cooled rice to one compartment of the bento box. Next, place the marinated chicken beside it. In another section, arrange the cucumber, tomatoes, corn, and carrot sticks. Add the halved hard-boiled eggs and a portion of shelled edamame. Now you have a colorful and fun bento lunch ready to go! For the full recipe, check out Bento Bliss: Colorful Kids’ Lunchbox. Serving Sizes for Kids When packing bento lunches, keep portions small. Kids do best with smaller servings. Aim for about: - 1/2 cup of rice - 1/4 cup of protein - 1/2 cup of veggies These sizes help avoid waste and keep kids energized. Incorporating Food Groups A balanced bento includes all food groups. Include: - Grains (like rice or quinoa) - Proteins (like chicken or tofu) - Vegetables (like cucumbers or carrots) - Fruits (like berries or apple slices) Mixing these makes lunches healthy and tasty. Using Fun Shapes and Colors Kids love fun! Use cookie cutters to create shapes. Try making: - Star-shaped sandwiches - Heart-shaped fruit Colorful foods attract kids’ eyes too. Use bright veggies and fruits to make meals pop. Using Seaweed for Decoration Seaweed can add flair. Use it to: - Create funny faces on rice or eggs - Wrap around sushi rolls Kids enjoy the playful designs. Plus, seaweed adds flavor and nutrients. Prepping in Advance for Busy Days Make bento lunches easier by prepping ahead. Cook rice and proteins on the weekend. Store them in the fridge. Cut veggies and fruits the night before. This saves time on busy mornings. Storing Bento Components Separately Keep ingredients fresh by storing them apart. Use small containers for each food group. This way, flavors don’t mix, and everything stays crisp. It also makes assembly quick and easy. For more ideas, check out the Full Recipe for Bento Bliss: Colorful Kids’ Lunchbox. {{image_2}} When you make bento lunches, the protein choice can change the whole meal. - Vegetarian Choices: You can use tofu, chickpeas, or tempeh. These options add great taste and texture. Try marinating tofu in soy sauce for flavor. It’s also fun to shape it into cute forms. - Seafood Options: Fish like salmon or shrimp can add a twist to your bento. Cooked shrimp is easy to eat and packed with protein. You can also use canned tuna mixed with a little mayo for a tasty spread. Switching up your base can make each bento unique. - Quinoa or Brown Rice Variants: Quinoa is a great swap for rice. It cooks quickly and is full of nutrients. Brown rice is also a hearty option, giving a nutty flavor. Both grains work well with many toppings. - Noodle-based Bento Options: Try using soba or rice noodles as your base. They are fun and different. Add some veggies and protein on top for a colorful meal. Using seasonal ingredients keeps your bento fresh and exciting. - Summer Fruits and Vegetables: In summer, add fruits like strawberries or watermelon. They are sweet and refreshing. Vegetables like bell peppers and cucumbers are crunchy and fun to eat. - Winter Comfort Additions: In colder months, root vegetables like carrots or sweet potatoes are great. They add warmth and comfort. You can roast them for extra flavor. For a complete bento experience, check out the Full Recipe. It has a wonderful mix of flavors and colors! Temperature Control and Safety Keeping your bento lunch safe is key. Aim to keep your food below 40°F (4°C). Use ice packs if you pack your bento for school. This helps keep proteins and other perishables fresh. If your child eats lunch after a long break, this is especially important. Containers to Use for Max Freshness Choose airtight containers for your bento. These containers help keep moisture in and air out. Look for bento boxes with separate compartments. This keeps each food item separate and fresh. Silicone liners can also help keep foods from mixing. Tips on Keeping Vegetables Crisp To keep veggies fresh, wash and dry them before packing. Store cucumbers and carrots in a damp paper towel. This helps keep them crisp during the day. You can also pack them in a small container with a lid. This way, they stay crunchy and tasty. Preventing Rice from Drying Out To stop rice from drying out, keep it covered. Once it's cool, place it in your bento box right away. Add a small piece of damp paper towel on top. This will help lock in moisture. If you use jasmine rice, it stays moist longer. This makes it a great choice for your bento. Remember to check the full recipe for more tips! Bento lunches are Japanese-style meals packed in a box. They often feature rice, protein, and colorful veggies. The main goal is to create a balanced meal. Each section of the bento box holds different foods, making lunch fun and varied. You can customize bento boxes to fit your child’s tastes and preferences. They are great for school or picnics. To attract picky eaters, focus on color and shape. Use bright vegetables like carrots, bell peppers, and cherry tomatoes. Cut food into fun shapes using cookie cutters. This makes meals look exciting. You can also include dips, like ranch or hummus, to encourage kids to try new foods. Add familiar favorites alongside new items. Experiment with different combinations to find what works best. Yes, you can prepare bentos the night before. This saves time on busy mornings. Store each food in separate airtight containers to keep them fresh. Assemble the bento box in the morning for a quick grab-and-go option. Make sure to include cold packs if needed to keep food safe. Most bento boxes are not dishwasher safe. Check the care instructions for your specific box. Hand washing with mild soap is usually best. This helps maintain the box's shape and design. Avoid using harsh scrubbers that can scratch the surface. Proper care will keep your bento box looking new and lasting longer. In summary, making bento lunches involves key ingredients like rice and protein, plus colorful veggies. We discussed step-by-step tips for cooking rice, marinating chicken, and assembling your bento. Creative ideas will help make the lunches fun. Always remember to store your bentos properly to maintain freshness. Bento lunches can be healthy and exciting for everyone. With a little planning, you can enjoy a delicious and fun meal every day!
Bento Lunches for Kids Packed with Fun and Flavor
Are you tired of the same old lunch options for your kids? Let’s change that with fun and tasty bento lunches! In this guide, you’ll
Pumpkin recipes need some basic ingredients. These ingredients make your dishes tasty and fun. Here are the must-haves: - Pumpkin puree - All-purpose flour - Sugar - Baking powder - Spices (like cinnamon and nutmeg) - Eggs - Butter or oil - Vegetable broth These ingredients work well together, bringing out the pumpkin's sweet and savory notes. To make your pumpkin dishes stand out, consider adding unique ingredients. These can give your meals a twist. Here are some to try: - Coconut milk: Adds creaminess to soups and curries. - Chickpeas: Great for a hearty addition to savory dishes. - Cheese: Parmesan or cream cheese can enhance flavor. - Fresh herbs: Basil or sage can lift your dishes. - Nuts and seeds: Use for crunch and extra nutrition. These ingredients can change your pumpkin dish from good to great. Sometimes you may need to swap out ingredients. Here are some easy substitutions: - Use almond flour instead of all-purpose flour for gluten-free options. - Swap sugar for honey or maple syrup for natural sweetness. - Replace eggs with applesauce in muffins for a vegan option. - Use vegetable stock instead of chicken stock for a vegetarian dish. These alternatives can keep your pumpkin recipes delicious and fun, no matter your diet. Pumpkin Spice Pancakes 1. In a large bowl, mix: - 1 cup all-purpose flour - 2 tablespoons sugar - 1 tablespoon baking powder - 1 teaspoon pumpkin pie spice - 1/2 teaspoon salt 2. In another bowl, whisk together: - 1 cup milk - 1 large egg - 1/4 cup pumpkin puree - 2 tablespoons melted butter 3. Pour the wet mix into the dry mix. Stir gently until combined. 4. Heat a non-stick skillet over medium heat. Pour 1/4 cup batter per pancake. 5. Cook until bubbles form, then flip and brown the other side. 6. Serve warm with maple syrup and a dash of cinnamon. Creamy Pumpkin Risotto 1. In a large skillet, heat 2 tablespoons olive oil over medium heat. 2. Add 1 small finely chopped onion. Sauté until it turns translucent. 3. Stir in 2 minced garlic cloves and 1 cup Arborio rice. Cook for 1-2 minutes. 4. Gradually add 4 cups warm vegetable stock, one ladle at a time. Stir often. 5. After 15 minutes, mix in 1 can of pumpkin puree. Cook until creamy. 6. Stir in 1/2 cup grated Parmesan cheese. Season with salt and pepper. Savory Pumpkin Soup 1. In a large pot, heat 1 tablespoon olive oil over medium heat. 2. Add 1 chopped onion. Cook until it softens, then add 2 minced garlic cloves. 3. Stir in 1 teaspoon cumin and 1 teaspoon coriander. Cook for another minute. 4. Add 1 medium cubed pumpkin and 4 cups vegetable broth. Bring to a boil. 5. Reduce heat and simmer until the pumpkin is tender. 6. Blend the soup until smooth. Season with salt and pepper, then garnish with seeds. To get the best flavors from pumpkin, you need the right techniques. Start with fresh pumpkin. Cut it into small pieces for even cooking. Roasting enhances its sweetness. Use a sharp knife for clean cuts. Always season well. Salt brings out the flavor. Taste as you go for the best results. Pair pumpkin dishes with warm bread or salads. They work well with nuts like pecans or walnuts. For a sweet touch, try drizzling honey or maple syrup. A dollop of sour cream or yogurt can add creaminess. Fresh herbs like basil or parsley add color and taste. Enjoy experimenting with different flavors! When cooking with pumpkin, avoid these common mistakes: - Using the wrong pumpkin: Not all pumpkins are the same. Some are great for carving, while others are better for cooking. Look for sugar pumpkins or pie pumpkins for the best flavor. - Not seasoning enough: Pumpkin can taste bland without proper seasoning. Use spices like cinnamon, nutmeg, or ginger to enhance its flavor. - Overcooking: Cook pumpkin until tender, but don’t let it go mushy. It should still hold its shape in dishes. Here are some hacks to make cooking with pumpkins easier: - Roasting: Cut pumpkins into wedges, scoop out the seeds, and roast them for a sweet flavor. This makes them easy to mash or puree. - Use a blender: If you want a smooth texture, blend cooked pumpkin with a little water or broth. This works great for soups or sauces. - Freeze puree: Make extra pumpkin puree and freeze it in ice cube trays. This way, you can use it later in other recipes. Choosing the right pumpkin can make all the difference. Here are tips: - Look for a firm skin: A good pumpkin should feel heavy for its size and have a hard skin. This shows it is fresh. - Check for blemishes: Avoid pumpkins with soft spots or cuts. These can spoil quickly. - Size matters: Smaller pumpkins have sweeter flesh. Choose smaller pumpkins for desserts and larger ones for savory dishes. For more pumpkin recipes, check out the full recipe collection. {{image_2}} Pumpkin shines in both sweet and savory dishes. For sweet recipes, think of pumpkin spice pancakes or muffins. These dishes often use sugar and spices, creating a warm and comforting taste. Then, we have savory options like pumpkin risotto or soup. These meals highlight pumpkin’s natural flavor with herbs and spices. Each type brings out different sides of pumpkin, letting you enjoy its full range. You can make pumpkin recipes accessible for everyone. For gluten-free options, use almond flour or gluten-free blends instead of regular flour. Many pumpkin recipes can easily become vegan too. Swap eggs with flaxseed meal or applesauce. Use plant-based milk and oils to keep that rich flavor. This way, everyone can enjoy the tasty joys of pumpkin. As the seasons change, you can add new flavors to your pumpkin dishes. In fall, try adding apples, cinnamon, or nutmeg for warmth. As winter approaches, add spices like ginger or cardamom for a cozy touch. You can also mix in seasonal veggies like kale or sweet potatoes for a hearty meal. These additions help keep your pumpkin recipes fresh and exciting throughout the season. After you make your pumpkin dishes, cool them down first. Then, place them in airtight containers. You can keep them in the fridge for about three to five days. If you want to enjoy them later, freezing is a great option. Just remember to label your containers with the date. To store pumpkin purée, scoop it into a clean, dry container. Use an airtight lid to keep air out. You can keep it in the fridge for about one week. If you have extra purée, freeze it in ice cube trays. Once frozen, transfer the cubes to a freezer bag. This way, you can use small amounts later. When freezing pumpkin recipes, ensure they are completely cool. Portion the servings in freezer-safe bags. Squeeze out as much air as possible before sealing. For best taste, use them within three months. When ready to eat, thaw in the fridge overnight or use the microwave. Enjoy your fall flavors anytime! [Full Recipe] Pumpkin is a star ingredient in many meals. It adds a rich flavor and creamy texture. You can use it in both sweet and savory dishes. Pumpkin easily blends with spices like cinnamon and nutmeg for desserts. It also pairs well with herbs like sage and thyme for main courses. This flexibility makes pumpkin a favorite in many kitchens. It can be roasted, pureed, or even stuffed. The options are endless! Yes, you can use canned pumpkin in place of fresh. Canned pumpkin is often more convenient and saves time. It is also cooked and pureed, ready to use in recipes. Just make sure to choose 100% pumpkin, not pumpkin pie filling. Canned pumpkin works well in soups, pies, and muffins. It offers the same great taste and texture as fresh pumpkin. This makes it a smart choice for busy cooks. To check if pumpkin is cooked, pierce it with a fork. If it goes in easily, your pumpkin is done. For soups or purees, cook until it is soft all the way through. You can also check the color; it should be bright and vibrant. If using whole pumpkin, roasting it until soft yields the best flavor. Don't rush this step; fully cooked pumpkin enhances your dishes' taste. In this blog post, we explored essential ingredients for pumpkin recipes and their unique options. I shared step-by-step instructions for dishes like pancakes, risotto, and soup. We also covered helpful tips to avoid common mistakes and ways to choose the right pumpkin. Remember, pumpkin is versatile. Whether you make sweet or savory dishes, it’s easy to adapt. With the right storage, your pumpkin creations stay fresh longer. Now, go create tasty dishes and enjoy the flavors of pumpkin all season long!
15 Pumpkin Recipes for Fall Flavorful Delights
Fall is here, and it’s time to roll up your sleeves and dive into the cozy flavors of pumpkin! In my latest post, 15 Pumpkin
To make the best slow cooker burrito meat, gather these key items: - 2 lbs beef chuck roast, cut into chunks - 1 onion, diced - 4 cloves garlic, minced - 2 tablespoons chili powder - 1 teaspoon cumin - 1 teaspoon smoked paprika - 1 teaspoon oregano - 1 can (15 oz.) black beans, drained and rinsed - 1 can (15 oz.) diced tomatoes with green chilies - 1 cup beef broth - Salt and pepper to taste - 1 tablespoon olive oil These ingredients create a rich and savory flavor. Adding toppings can elevate your burrito meat. Consider these options: - Shredded cheese - Sour cream - Avocado - Fresh cilantro Each topping adds a unique taste and texture. For the best burrito experience, choose your tortillas wisely. You can use: - Flour tortillas for a soft, chewy texture - Corn tortillas for a gluten-free option Both types work well with the flavorful meat. Enjoy building your own burritos! For the full recipe, check out the Savory Slow Cooker Burrito Bliss section. To start, use 2 pounds of beef chuck roast. Cut it into chunks. This beef is perfect for slow cooking. Next, heat 1 tablespoon of olive oil in a skillet over medium-high heat. Once the oil is hot, add the beef chunks. Sear them for about 4-5 minutes. You want them browned on all sides. This step adds great flavor. After browning, transfer the beef to your slow cooker. Now, it's time for the vegetables. Dice 1 onion. Add it to the same skillet. Sauté for about 3 minutes until softened. After that, mince 4 cloves of garlic. Add the garlic to the onions and cook for another minute. This unlocks their flavors and makes your dish smell amazing. Next, take the onion and garlic mix and pour it over the beef in the slow cooker. Then, add the spices. You need 2 tablespoons of chili powder, 1 teaspoon each of cumin, smoked paprika, and oregano. Stir it all together. Now for the beans and tomatoes. Open a can of black beans (15 oz), drain and rinse them. Add them to the slow cooker. Then, open a can of diced tomatoes with green chilies (15 oz) and pour that in too. Don’t forget to add 1 cup of beef broth. This keeps everything moist. Finally, season with salt and pepper to taste. Stir well to combine. Cover the slow cooker and set it on low for 8 hours. If you're in a hurry, you can choose high for 4 hours. When it's done, shred the beef using two forks right in the slow cooker. Mix it back into the juices for added flavor. To serve, warm your tortillas. Place the shredded burrito meat in a bowl. Surround it with tortillas and your favorite toppings, like cheese or avocado. This recipe, known as Savory Slow Cooker Burrito Bliss, will wow your family. Enjoy! To keep your burrito meat tender, start by searing the beef. This step locks in moisture. Use a chuck roast for the best results. The slow cooker will do the rest. Cooking on low for 8 hours works wonders. If you're short on time, you can cook on high for 4 hours, but low is better. Always check the meat's doneness. It should shred easily with two forks when done. Flavor comes from the right spices. I love using chili powder, cumin, and smoked paprika. They add depth to the dish. Always sauté your onions and garlic before adding to the slow cooker. This brings out their sweetness. You can adjust the seasoning to your taste. If you like heat, add more chili powder or some diced jalapeños. Don't forget to season with salt and pepper before cooking! Having the right tools makes cooking easier. A good slow cooker is key for this recipe. I recommend a model with a timer. A large skillet is great for browning meat and softening veggies. Use sturdy tongs for shredding the beef. You’ll also want measuring spoons for accuracy. Lastly, a set of sharp knives makes chopping quick and safe. These tools help you create the best burrito meat with ease. If you follow the [Full Recipe], you'll find everything you need to know. {{image_2}} You can switch out beef for other proteins. Chicken thighs work great in burritos. They stay juicy and soak up flavors well. Pork shoulder is another option. It becomes tender and shreddable after cooking. Ground turkey or chicken is a leaner choice. Just remember to adjust cooking times. For a tasty vegetarian option, use jackfruit. This fruit shreds like meat and absorbs flavors well. Lentils are a protein-packed choice. Cook them until soft, then mix with spices. You can also use firm tofu. Press it to remove water, then cube and cook. Try adding different spices to enhance flavor. Chipotle peppers in adobo sauce add heat and smokiness. Fresh herbs like cilantro or parsley brighten up the dish. You can also toss in corn for sweetness and texture. If you want a twist, use a different broth. Vegetable broth works well for vegetarian dishes. Experimenting with flavors can lead to your own unique burrito meat! For the full recipe, check out Savory Slow Cooker Burrito Bliss. Enjoy the journey of flavor! To keep your burrito meat fresh, let it cool first. Use an airtight container. This will help it last longer in the fridge. You can store it for up to 3 days. If you want to keep it longer, consider freezing it. When you're ready to eat leftovers, reheat with care. Use the stove or microwave. If using the stove, add a splash of beef broth to keep it moist. Stir often to avoid burning. In the microwave, heat in short bursts. Stir every minute until heated through. Freezing is a great way to save extra burrito meat. Package it in a freezer-safe bag. Squeeze out the air before sealing. It can last up to 2 months in the freezer. When ready to use, thaw it in the fridge overnight. Reheat as mentioned above for the best taste. Using these storage tips ensures your savory slow cooker burrito meat stays tasty and ready for your next meal! For the full recipe, check out the details above. You can keep leftover burrito meat in the fridge for about 3 to 4 days. Make sure to store it in an airtight container. This keeps it fresh and safe to eat. If you notice any off smells or colors, it's best to throw it away. Yes, you can make Slow Cooker Burrito Meat ahead of time. In fact, it tastes even better the next day! Just cook it as usual and store it in the fridge. When you’re ready to eat, simply reheat it on the stove or in the microwave. Yes, you can cook burrito meat on high heat. It will take about 4 hours instead of 8. However, cooking on low heat gives the meat more time to get tender and soak in flavors. If you are short on time, high heat works fine! In this blog post, I covered how to make tasty slow cooker burrito meat. We explored main ingredients, optional toppings, and the best tortillas to use. I provided clear steps for preparation and offered tips to keep the meat juicy and flavorful. You learned about variations, storage tips, and answered common questions. With these insights, you can create a perfect burrito meal every time. Enjoy cooking and trying new flavors!
Savory Slow Cooker Burrito Meat Simple Recipe Guide
Welcome to my guide on making delicious Slow Cooker Burrito Meat! This simple recipe will bring bright flavors to your table. You’ll learn the main
To make fresh marinara sauce, you need simple, fresh ingredients. Here is what you will need: - 2 lbs ripe tomatoes, preferably Roma or vine-ripened - 4 cloves garlic, minced - 1 medium onion, finely chopped - 1/4 cup extra-virgin olive oil - 1 teaspoon dried oregano - Salt, to taste - Freshly cracked black pepper, to taste - Fresh basil leaves, roughly chopped (about 1/2 cup) These ingredients create a rich and flavorful sauce that enhances any dish. You can add a few optional ingredients to boost flavor. These include: - 1/2 teaspoon red pepper flakes (for heat) - 1 tablespoon sugar (to balance acidity) These ingredients let you customize the sauce to your taste. When choosing your ingredients, freshness is key. Here are some tips: - Tomatoes: Look for ripe tomatoes that feel heavy for their size. They should have a sweet smell. - Garlic: Choose firm bulbs with no soft spots. Fresh garlic adds great flavor. - Onion: Select onions that are firm and heavy. Avoid any with soft spots or blemishes. - Basil: Use fresh basil with vibrant green leaves. Avoid any yellow or wilting leaves. By selecting high-quality ingredients, you ensure your marinara sauce is the best it can be. Start by preparing the tomatoes. Fill a large pot with water and bring it to a boil. Take your ripe tomatoes, and make a small 'X' on the bottom of each. Once the water is boiling, carefully add the tomatoes. Blanch them for 30 seconds. This step helps with peeling. After that, transfer them to a bowl of ice water. Let them cool for a few minutes. Now, remove the skins. You can chop them roughly and remove the seeds if you want a smoother sauce. Next, heat a large skillet or saucepan over medium heat. Pour in the extra-virgin olive oil. Once hot, add the finely chopped onion. Stir and cook it until soft and translucent, about 5 to 7 minutes. It should smell sweet and fragrant. After the onion is ready, add minced garlic and red pepper flakes if you like heat. Cook for 1 to 2 minutes. Keep an eye on the garlic; you don’t want it to burn. Now it's time for the tomatoes. Pour the chopped tomatoes into the pan and stir. Bring the mix to a gentle simmer. After that, add dried oregano, salt, and black pepper. If you find the sauce too acidic, add a tablespoon of sugar. Let the sauce simmer uncovered for 20 to 30 minutes. Stir it occasionally. This will help it thicken nicely. In the last few minutes, add the roughly chopped fresh basil. Taste the sauce and adjust the seasoning if needed. Once done, let it cool slightly before serving or storing. This recipe is simple and packed with flavor. Enjoy your homemade marinara sauce! One common mistake is using low-quality tomatoes. Always choose ripe, fresh tomatoes. They give the best taste. Another mistake is adding too much garlic at once. Garlic can burn fast, which makes the sauce bitter. Stir it in just before the tomatoes. To enhance your sauce, balance the acidity. A pinch of sugar can help. Fresh herbs brighten the flavor. Add basil towards the end of cooking for a fresh taste. You can also mix in some red pepper flakes for heat, but keep it mild if you prefer. If your sauce is too thick, add a splash of water. For a thicker sauce, let it simmer longer. Stir often to prevent sticking. Blend the sauce if you want a smoother texture. Adjusting the consistency is easy once you know how! {{image_2}} To make spicy marinara, add more red pepper flakes. Start with one teaspoon. If you like it hotter, add more to taste. You can also use fresh chili peppers. Chop them finely and add them when cooking the onion. This gives your sauce a nice kick. Making a vegan version is easy! Simply use the basic fresh marinara recipe. All the ingredients are plant-based. Just ensure your sugar is vegan-friendly. Optional ingredients like nutritional yeast can add a cheesy flavor without using dairy. This keeps your sauce rich and tasty. You can enhance your marinara with extra ingredients. Try adding a splash of red wine. This gives depth to the flavor. Fresh herbs like thyme or parsley also work well. For a touch of sweetness, consider adding grated carrot. It blends well and boosts nutrition. Use the full recipe for classic fresh marinara sauce to get started. Mixing and matching these variations can help you find your perfect taste. To keep your fresh marinara sauce tasty, let it cool first. Once cool, transfer it to airtight containers. Glass jars or plastic containers work well. Store it in the fridge for up to five days. This way, you can enjoy it in pasta or on pizza anytime. Freezing is a great option for longer storage. Pour the sauce into freezer-safe containers, leaving space at the top. The sauce expands as it freezes. You can also use freezer bags, laying them flat to save space. Marinara sauce can stay fresh in the freezer for up to three months. To use, thaw it overnight in the fridge or place the bag in cold water. Reheating marinara sauce is simple. Use a pot on low heat, stirring often. You can also microwave it in short bursts, stirring in between. Add a splash of water or broth if it looks too thick. Leftover marinara sauce can be used in many meals. Try it with pasta, as a pizza base, or in meat dishes. The versatility makes it a kitchen staple. You can make marinara sauce using canned tomatoes. Start by draining the tomatoes. Crush them in a bowl or use a food processor for a smoother texture. Heat olive oil in a pan. Add chopped onions, cooking until soft. Then, add minced garlic and cook for a minute. Pour in the crushed tomatoes. Season with salt, pepper, and herbs. Let it simmer for about 20 minutes. This will give the sauce a rich flavor. Yes, you can use various tomatoes for marinara sauce. Roma tomatoes are common due to their low water content. However, you can also use vine-ripened, San Marzano, or even heirloom tomatoes. Each type brings a unique flavor. Just make sure they are ripe and sweet for the best taste. Marinara sauce pairs well with many dishes. Here are some ideas: - Pasta: Spaghetti or penne are classic choices. - Pizza: Use it as a base sauce for homemade pizza. - Dipping: Serve with garlic bread or mozzarella sticks. - Meatballs: A hearty addition to your meatball subs. - Veggies: Pour over roasted vegetables for a tasty twist. To make my classic fresh marinara, gather these ingredients: - 2 lbs ripe tomatoes, preferably Roma or vine-ripened - 4 cloves garlic, minced - 1 medium onion, finely chopped - 1/4 cup extra-virgin olive oil - 1 teaspoon dried oregano - 1/2 teaspoon red pepper flakes (optional for heat) - Fresh basil leaves, roughly chopped (about 1/2 cup) - Salt, to taste - Freshly cracked black pepper, to taste - 1 tablespoon sugar (optional, to balance acidity) Follow the cooking steps in the full recipe to enjoy a rich and vibrant marinara sauce. You learned how to make fresh marinara sauce from scratch. We covered essential and optional ingredients, cooking steps, and common mistakes. Remember to select fresh tomatoes for the best flavor. You can also try spicy or vegan variations to mix things up. Proper storage is key for keeping your sauce tasty. With all this, you'll create delicious marinara sauce every time. Enjoy experimenting and sharing your sauce with others. Trust your taste. Happy cooking!
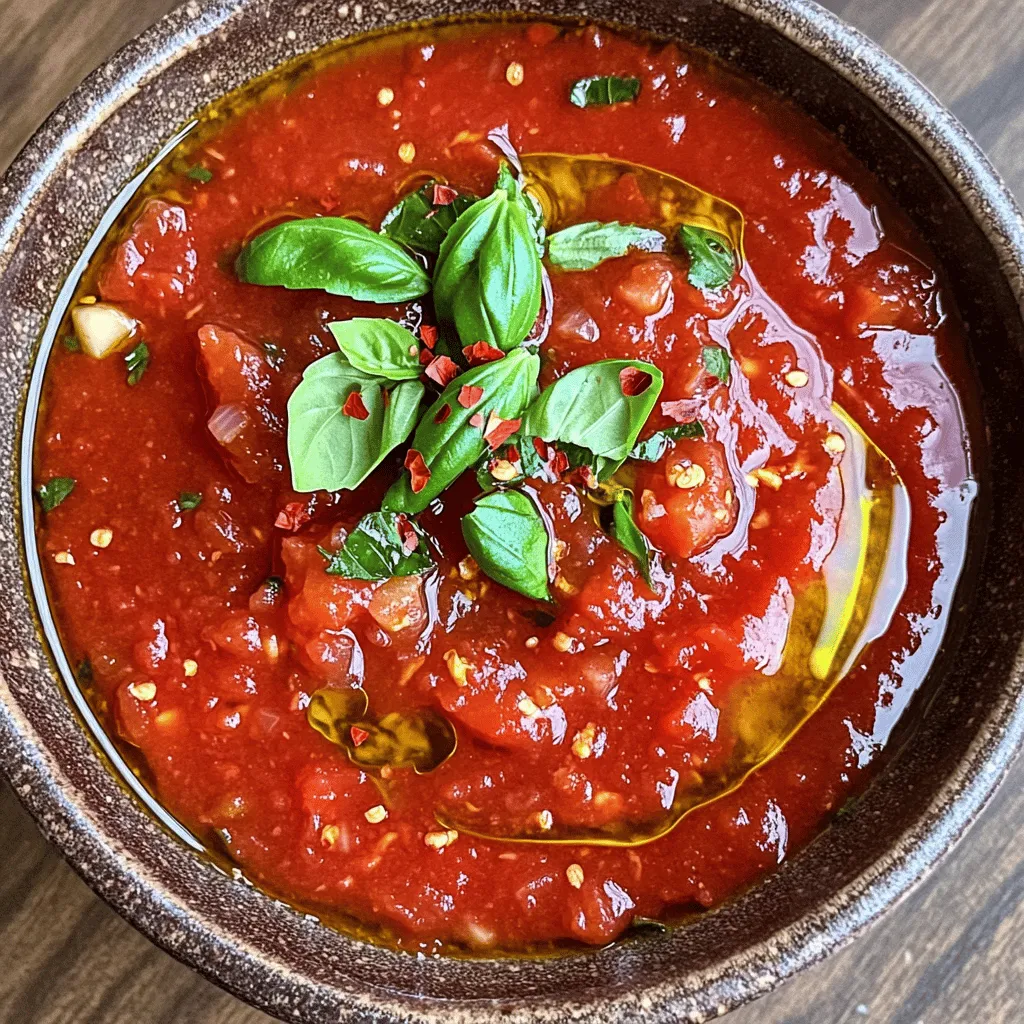
Fresh Marinara Sauce Simple and Flavorful Recipe
Are you ready to take your pasta nights to the next level? This Fresh Marinara Sauce recipe is simple and packed with flavor! I’ll guide
- 500g chicken breast, cut into bite-sized pieces - 1 bell pepper, sliced (red or yellow) - 1 medium onion, sliced - 2 cloves garlic, minced - 1 tablespoon ginger, minced - 1 cup broccoli florets - 1 carrot, julienned - 1 cup snap peas - ½ cup creamy peanut butter - 3 tablespoons soy sauce - 2 tablespoons honey - 1 tablespoon lime juice - 1 teaspoon chili paste (adjust to taste) - Fresh cilantro - Chopped peanuts - 2 tablespoons vegetable oil I love using chicken breast in this dish. It cooks fast and stays juicy. Choose a bell pepper, any color works great. The onion adds a sweet taste, while garlic and ginger give a nice kick. Broccoli, carrots, and snap peas add crunch and color. Peanut butter is the star of the sauce. It gives creaminess and richness. Soy sauce adds saltiness, and honey brings a touch of sweetness. Lime juice adds brightness, while chili paste gives it some heat. For garnishes, fresh cilantro adds a fresh flavor. Chopped peanuts add a nice crunch. You can mix and match veggies, too. Just make sure you enjoy what you put in your dish. {{ingredient_image_1}} Start with 500g of chicken breast. Cut it into bite-sized pieces. Heat 2 tablespoons of vegetable oil in a large skillet over medium-high heat. Add the chicken to the skillet. Stir-fry it for about 5 to 7 minutes. The chicken should turn golden brown and be fully cooked. Once done, remove it from the skillet and set it aside on a plate. Now, it's time for the veggies. In the same skillet, add sliced onion and bell pepper. Toss in 2 minced cloves of garlic and 1 tablespoon of minced ginger. Sauté these for 2 to 3 minutes until they are slightly tender. Then, add 1 cup of broccoli florets, julienned carrot, and 1 cup of snap peas. Stir-fry for another 3 to 4 minutes. This helps keep the veggies vibrant and crisp-tender. While the vegetables cook, let’s make the peanut sauce. In a bowl, mix ½ cup of creamy peanut butter, 3 tablespoons of soy sauce, 2 tablespoons of honey, 1 tablespoon of lime juice, and 1 teaspoon of chili paste. Whisk these together until smooth. If you like it spicier, add more chili paste to taste. Now, return the cooked chicken to the skillet with the vegetables. Pour the peanut sauce over everything. Stir it all together until well coated. Heat it for about 2 to 3 minutes until everything is warm and flavors blend nicely. Taste it and adjust the seasoning if needed. Add more soy sauce or chili paste to make it just right. - Use vegetable oil for frying. It has a high smoke point. - Avoid olive oil, as it can burn easily. - Keep your heat medium-high. This helps cook the chicken fast. - Don’t overcrowd the skillet. Cook in batches if needed. - For crisp veggies, cook them just until tender. - Sauté them in the right order. Start with onions, then add peppers. - For a thicker sauce, add more peanut butter. - To thin it out, add water or more lime juice. - Taste as you mix. This helps you adjust the flavor. - Want more heat? Add extra chili paste. - For a sweeter sauce, increase the honey amount. - Try adding a splash of coconut milk for a twist. - Serve over steamed rice or noodles for a complete meal. - For a fresh touch, add cucumber slices on the side. - Garnish with fresh cilantro and chopped peanuts for crunch. - Use a colorful plate to make your dish pop. - Arrange the chicken and veggies in a circle. - Drizzle extra sauce on top for a beautiful finish. Pro Tips Use Fresh Ingredients: Fresh vegetables will enhance the flavor and texture of your Thai peanut chicken, making it more vibrant and delicious. Adjust Spice Levels: Feel free to modify the amount of chili paste to suit your heat preference. Start with less and add more as needed. Meal Prep Friendly: This dish can be made in advance and stored in the refrigerator. Reheat it for a quick and tasty meal throughout the week. Garnish for Flavor: Don't skip the cilantro and chopped peanuts on top; they add freshness and a delightful crunch to the dish. {{image_2}} If you need gluten-free options, try tamari instead of regular soy sauce. Tamari is a great choice. It tastes similar but has no gluten. For those who follow a vegan or vegetarian diet, substitute chicken with tofu or tempeh. Both options soak up the peanut sauce well and add protein. To give your Thai peanut chicken a kick, add more chili paste. You can also sprinkle in some red pepper flakes for extra heat. If you prefer sweetness, add a bit more honey. Feel free to mix in different vegetables too! Zucchini, bell peppers, or bok choy can all work well. Just make sure to cook them until they are crisp-tender. You can serve Thai peanut chicken over rice or noodles for a filling meal. Both options soak up the sauce nicely. If you want something lighter, try it in wraps or lettuce cups. This makes for a fun, fresh way to enjoy the dish. Plus, it's perfect for sharing! Store leftover Thai peanut chicken in an airtight container. This keeps it fresh and tasty. Let it cool before sealing to avoid steam buildup. In the fridge, it lasts up to three days. When you want to reheat, use a skillet over medium heat. This helps keep the chicken and veggies tender. Add a splash of water or broth to prevent drying. Stir until heated through, about 5 minutes. You can freeze Thai peanut chicken for up to three months. Divide it into portions before freezing. Use freezer-safe bags or containers. Remove as much air as you can to avoid freezer burn. To thaw, place it in the fridge overnight. For a quick method, use the microwave on the defrost setting. Once thawed, reheat in a skillet for the best texture. In the fridge, Thai peanut chicken lasts about three days. If you freeze it, it can last up to three months. Always check for any off smells or changes in texture before eating. Thai Peanut Chicken is a tasty dish that features chicken and vegetables. It has a creamy peanut sauce that is both sweet and savory. You’ll enjoy flavors from garlic, ginger, and a hint of lime. The dish is colorful, easy to make, and great for family meals. Yes, you can! This recipe works well with pork, shrimp, or tofu. Each meat brings its own taste. Just adjust the cooking time. For shrimp, cook until pink. For tofu, choose firm or extra-firm and sauté until golden. The spice level can vary. This dish gets heat from chili paste. If you prefer less spice, use less chili paste. You can always add more later. Taste the sauce before serving to find your perfect heat. You can serve it with rice or noodles. Steamed jasmine rice goes well with it. You might also enjoy it with a fresh salad or spring rolls. These sides balance the rich flavors of the chicken. To make it healthier, you can use less peanut butter or choose a natural version. Swap regular soy sauce for low-sodium soy sauce. You can also add more vegetables, like spinach or zucchini, for extra nutrients. This article covers how to make Thai Peanut Chicken from scratch. We discussed essential ingredients, how to prep chicken, sauté vegetables, and create a smooth peanut sauce. You also learned tips for storing leftovers and meal variations. In conclusion, this dish is both fun and easy to make. Feel free to experiment with flavors and ingredients to match your taste. Enjoy your cooking adventure and delight in every bite of your Thai Peanut Chicken!
Thai Peanut Chicken Flavorful and Simple Recipe
Craving a dish that is both tasty and easy to make? Look no further! My Thai Peanut Chicken recipe combines juicy chicken with fresh veggies
When making my easy sweet potato soup, I focus on fresh and simple ingredients. Here’s what you need: - 2 medium sweet potatoes, peeled and diced - 1 tablespoon olive oil - 1 onion, chopped - 2 cloves garlic, minced - 1 inch ginger, grated - 4 cups vegetable broth - 1 teaspoon ground cumin - 1 teaspoon ground cinnamon - Salt and pepper to taste - 1/2 cup coconut milk (optional for creaminess) - Fresh cilantro, for garnish Sweet potatoes are the star of this soup. They add natural sweetness and creaminess. Onion, garlic, and ginger give the soup depth. Vegetable broth brings all the flavors together. Spice it up with cumin and cinnamon. Finally, coconut milk adds a smooth texture, making each bite delightful. I love using fresh cilantro as a garnish. It brightens the dish and adds a pop of color. This soup is both simple and satisfying. You can find the full recipe to make this comforting dish at home. To start, you need to chop and prepare the sweet potatoes, onion, garlic, and ginger. - Sweet Potatoes: Peel the sweet potatoes using a sharp knife or peeler. Then, cut them into small cubes, about one inch each. This helps them cook evenly. - Onion: Slice the onion in half. Lay it flat and slice it thinly. Make sure to keep your fingers tucked in while you chop! - Garlic: Take two garlic cloves. Smash them with the flat side of a knife and chop them finely. - Ginger: Grab a small piece of ginger. Use a spoon to peel the skin off. Then, grate it using a box grater or a microplane. Now, let’s sauté the aromatics. Heat one tablespoon of olive oil in a large pot over medium heat. Add the chopped onion and cook for about 5-7 minutes. Stir often until the onion turns soft and clear. Next, add the minced garlic and grated ginger. Cook for one more minute. You want to smell those lovely spices! Next, it’s time to cook the soup. Add the diced sweet potatoes to the pot. Sprinkle in one teaspoon of ground cumin and one teaspoon of ground cinnamon. Stir everything well to coat the sweet potatoes in spices. Now, pour in four cups of vegetable broth. Bring the mixture to a boil. Once it boils, turn the heat down and let it simmer for 20-25 minutes. You want the sweet potatoes to be tender. After cooking, it’s time to puree the soup. You can use an immersion blender directly in the pot. If you don’t have one, carefully transfer the soup to a regular blender in batches. Blend until the soup is smooth and creamy. To finish, stir in half a cup of coconut milk. This gives the soup a rich and creamy texture. Now, taste the soup and adjust the seasoning. Add salt and pepper to your liking. If the soup needs warming, heat it again over low heat. You want it nice and hot before serving. Enjoy your cozy sweet potato bliss soup! To make your sweet potato soup shine, start by sautéing the onion well. Cook it in olive oil until it’s soft and clear, about 5-7 minutes. This step adds depth and sweetness to your soup. After that, add garlic and ginger for extra flavor. Cook them for just a minute to keep their fresh taste. For the perfect soup texture, use an immersion blender. It’s easy and quick. If you use a regular blender, let the soup cool a bit first. Blend it in small batches to avoid spills. The goal is a smooth and creamy soup, so blend until there are no lumps. For a lovely presentation, serve the soup in bright bowls. Drizzle some coconut milk on top for a creamy swirl. Then, sprinkle fresh cilantro for a pop of color. It looks great and adds a fresh taste. Pair your sweet potato soup with crusty bread or a simple salad. A slice of sourdough or a green salad with lemon dressing complements the soup well. You can also serve it with a dollop of yogurt for creaminess and tang. One common mistake is overcooking the sweet potatoes. Cook them until they are just tender. If they become too soft, the soup may turn watery. Keep an eye on them while simmering. Another pitfall is not balancing spices. Too much cumin or cinnamon can overpower the dish. Start with the recommended amounts and taste as you go. Adjust as needed for a well-rounded flavor. This method keeps your soup delicious and enjoyable. {{image_2}} You can change the flavor of your sweet potato soup by using different herbs and spices. Try adding smoked paprika for a smoky taste or nutmeg for warmth. If you like it spicy, add a pinch of red pepper flakes. If you want to switch out the coconut milk, you can use almond milk or cashew cream. Both will keep the soup creamy. For broth, vegetable broth works best, but chicken broth is also a great choice if you want a richer flavor. This soup is easy to make vegan or vegetarian. It’s already vegan if you skip the coconut milk. You can add a scoop of plant-based yogurt for creaminess. For a vegetarian option, simply keep the coconut milk or add regular yogurt. If you need it gluten-free, you’re in luck! This soup is gluten-free as it stands. Just make sure any toppings or side dishes are also gluten-free. Use gluten-free bread or crackers for dipping alongside the soup. For a twist, you can serve this soup with a side salad or some fresh bread. These pair well and add a nice crunch to your meal. If you want to explore more variations, check the Full Recipe for creative ideas! To keep your sweet potato soup fresh, use airtight containers. Let the soup cool before sealing. Store it in the fridge for up to five days. If you want to keep it longer, freeze the soup in freezer-safe bags or containers. It can last up to three months in the freezer. When you reheat your soup, do it gently. For the stovetop, warm it in a pot over low heat. Stir often to avoid burning. This method keeps the flavors nice and rich. If you use a microwave, heat it in short bursts. Start with one minute, then stir and check. Repeat until hot. This way, the texture stays smooth and creamy. Yes, you can use canned sweet potatoes. They offer a quick option. However, canned sweet potatoes are softer than fresh ones. This means you won't need to cook them as long. You can skip the step of boiling them in broth. Just add them to the pot with the spices and broth. Blend everything until smooth. This will save time, but the flavor may be less fresh. Easy Sweet Potato Soup is very healthy. Sweet potatoes are rich in vitamins A and C. They also provide fiber, which is good for digestion. The soup has garlic and ginger, both known for their health benefits. Olive oil adds healthy fats. The coconut milk adds flavor and creaminess, but you can skip it for a lighter soup. Overall, this soup is nutritious and delicious. Absolutely! You can make this soup ahead of time. It stores well in the fridge for up to five days. Let the soup cool completely before placing it in an airtight container. If you want to keep it longer, freeze it for up to three months. When you are ready to eat it, just thaw and reheat it on the stove or in the microwave. To enhance the soup’s flavor, consider adding red pepper flakes for some heat. A splash of lemon juice can brighten the taste. You might also try adding a pinch of nutmeg for warmth. If you like herbs, fresh thyme or rosemary can add depth. Experiment with these options to find what you like best! For the full recipe, check out the Cozy Sweet Potato Bliss Soup. Easy Sweet Potato Soup provides a warm blend of flavors and nutrients. You learned about the key ingredients, from sweet potatoes to coconut milk. I explained preparation steps, cooking methods, and tips to enhance taste. I shared ways to modify the recipe for different diets. This soup is simple to make and enjoy. Remember to adjust spices and get creative with garnishes. Whether you share with friends or savor it alone, this soup is sure to please. Keep these tips handy for future meals!
Easy Sweet Potato Soup Flavorful and Creamy Recipe
Are you ready to make a comforting bowl of Easy Sweet Potato Soup? This rich and creamy recipe is packed with flavor and simple ingredients.