Dinner
![- 2 lbs boneless, skinless chicken thighs - 4 cups Hatch green chiles, roasted and chopped - 1 onion, diced - 4 cloves garlic, minced These main ingredients create the base of your dish. The chicken thighs are juicy and tender. The Hatch green chiles add a smoky flavor and a bit of heat. Diced onion and minced garlic bring depth and aroma to the pot. - 2 cups vegetable broth - 1 tablespoon ground cumin - 1 tablespoon dried oregano - 1 teaspoon smoked paprika - Salt and pepper to taste This mix of flavors enhances the dish. The vegetable broth keeps everything moist and adds richness. Cumin and oregano provide warmth and earthiness. Smoked paprika gives a unique twist. Adjust salt and pepper to your taste for the perfect balance. - 2 tablespoons lime juice - Fresh cilantro, chopped (for garnish) - Tortillas, for serving A splash of lime juice brightens the flavors. Fresh cilantro adds a burst of freshness to each bite. Serve with warm tortillas. You can use them to scoop or build your own tacos. For the full recipe, check out Slow Cooker Hatch Green Chile Verde. Enjoy cooking! - Place chicken thighs in the slow cooker. - Add onion and garlic on top. First, I start by placing the chicken thighs in the slow cooker. I like using boneless and skinless thighs. They cook well and stay moist. Next, I add the diced onion and minced garlic. This combination adds a strong base flavor to the dish. - Incorporate roasted Hatch green chiles. - Mix broth and spices, then pour over ingredients. Now, it’s time for the star of the show: the roasted Hatch green chiles. I use about four cups. They bring a unique flavor and mild heat. I pour them over the chicken and onions. Then, I mix the vegetable broth with ground cumin, dried oregano, and smoked paprika in a bowl. This mix gives a warm, earthy taste. After stirring, I pour the broth mixture over everything in the slow cooker. - Cover and set slow cooker (low for 6-8 hours or high for 3-4 hours). - Shred chicken and return to cooker, stir in lime juice. I cover the slow cooker and set it to cook. I choose low heat for 6 to 8 hours or high heat for 3 to 4 hours. I love the low setting for a richer flavor. When the chicken is tender, I take it out and shred it with two forks. I return the shredded chicken to the slow cooker and stir in lime juice for a fresh kick. This step brightens the flavors and makes the dish pop. For the full recipe, check [Full Recipe]. Choosing the best Hatch green chiles is key. Look for chiles that are firm and bright. They should smell fresh and earthy. If you can, roast them for a smoky flavor. This step enhances the dish's depth. Adjusting seasoning to taste can make a big difference. I often taste the dish near the end of cooking. If it needs more heat, add a pinch of chili powder. For added brightness, squeeze in lime juice. Cooking on low allows flavors to meld. Your dish will taste richer with longer cooking times. It’s perfect for busy days when you want a hearty meal ready when you are. Cooking on high is faster but may not blend flavors as well. If you’re short on time, set the slow cooker to high for a quicker meal. To ensure tender chicken, check the internal temperature. It should reach 165°F. After cooking, shred the chicken back into the sauce. This helps the meat soak up all the flavors. Presentation matters! Serve the Chile Verde in deep bowls for a cozy feel. Garnish with fresh cilantro for a pop of color. Warm tortillas make the perfect side. Guests can build their own tacos or use tortillas to scoop the verde. Other great sides include rice or a fresh salad. They balance the richness of the dish and add texture. For the full recipe, be sure to check the earlier section! {{image_2}} You can switch proteins in this dish. Beef or pork works well. For a vegetarian option, try beans or tofu. Both will soak up all the delicious flavors. Just add the same spices and chiles, and you’ll have a great meal. Want to kick up the flavor? Add more spices like chili powder. This will give your dish a nice heat. You can also mix in extra veggies like bell peppers. They add sweetness and color to your meal. Get creative with how you serve this dish! You can turn it into tacos, burritos, or nachos. Just pile the Chile Verde onto your favorite base. For toppings, consider adding avocado or sour cream. These will make each bite extra tasty. For the complete guide, check out the Full Recipe. To store leftovers, let them cool first. Place the Slow Cooker Hatch Green Chile Verde in an airtight container. This keeps it fresh. The dish lasts about 3 to 4 days in the fridge. Always check for any off smells before eating. For longer storage, freeze the chile verde. Use a freezer-safe container or bag. Remove as much air as possible before sealing. It can last up to 3 months in the freezer. To thaw, place it in the fridge overnight. You can also use the microwave for quick thawing. When reheating, you want to keep the flavor and texture. The slow cooker works best for this. Set it on low for about 1 to 2 hours. You can also use a stovetop. Heat it gently over low heat, stirring often. This way, you’ll enjoy every bite just like the first time. Hatch Green Chile Verde is a rich and spicy stew. It comes from Hatch, New Mexico, known for its unique green chiles. The dish typically features tender chicken simmered with roasted chiles, garlic, onion, and spices. This blend creates a warm, earthy flavor that fills your kitchen with an amazing aroma. The dish is perfect for tacos, burritos, or just enjoyed in a bowl. Yes, you can use other chiles if you can't find Hatch chiles. Some good options are poblano, Anaheim, or jalapeño. Poblano chiles offer a mild flavor, while jalapeños bring more heat. Be sure to adjust the amount based on your heat preference. Each type of chili brings a unique taste and depth to the dish. You’ll know the chicken is done when it is tender and easy to shred. After cooking, check the chicken with a fork. If it pulls apart easily, it’s ready. You can also use a meat thermometer; the chicken should reach an internal temperature of 165°F. Enjoy the tender chicken in your Hatch Green Chile Verde for the best flavor. This blog post covered all the key steps for making Slow Cooker Hatch Green Chile Verde. You learned about the main ingredients and how to prepare them. We discussed cooking times and tips to achieve great flavor. In the end, enjoy the dish your way, whether in tacos or burritos. Get creative with toppings and ingredients! With these tips, you’ll make this meal a hit every time.](https://tossedrecipes.com/wp-content/uploads/2025/07/390c8048-30f9-43a5-84cd-df9777bd54bb.webp)
Slow Cooker Hatch Green Chile Verde Flavorful Delight
If you’re looking for a hearty meal that bursts with flavor, look no further! Slow Cooker Hatch Green Chile Verde is a simple dish that

Award-Winning Chili Flavorful and Easy Recipe Guide
Looking for the perfect chili recipe that impresses every time? You’re in the right place. My guide to award-winning chili will walk you through easy

Chicken Avocado Wraps Fresh and Flavorful Recipe
Are you ready to enjoy a fresh and tasty meal? My Chicken Avocado Wraps recipe is packed with flavor and good-for-you ingredients. This easy-to-make dish

Creative Halloween Food Ideas to Impress Guests
Get ready to wow your friends this Halloween with creative food ideas that’ll impress everyone! You don’t need to be a chef to make delicious

Best Vegan and Gluten-free Mushroom Burgers Recipe
Are you ready to savor a delicious and hearty meal? In this article, I’ll share my best vegan and gluten-free mushroom burger recipe. With simple
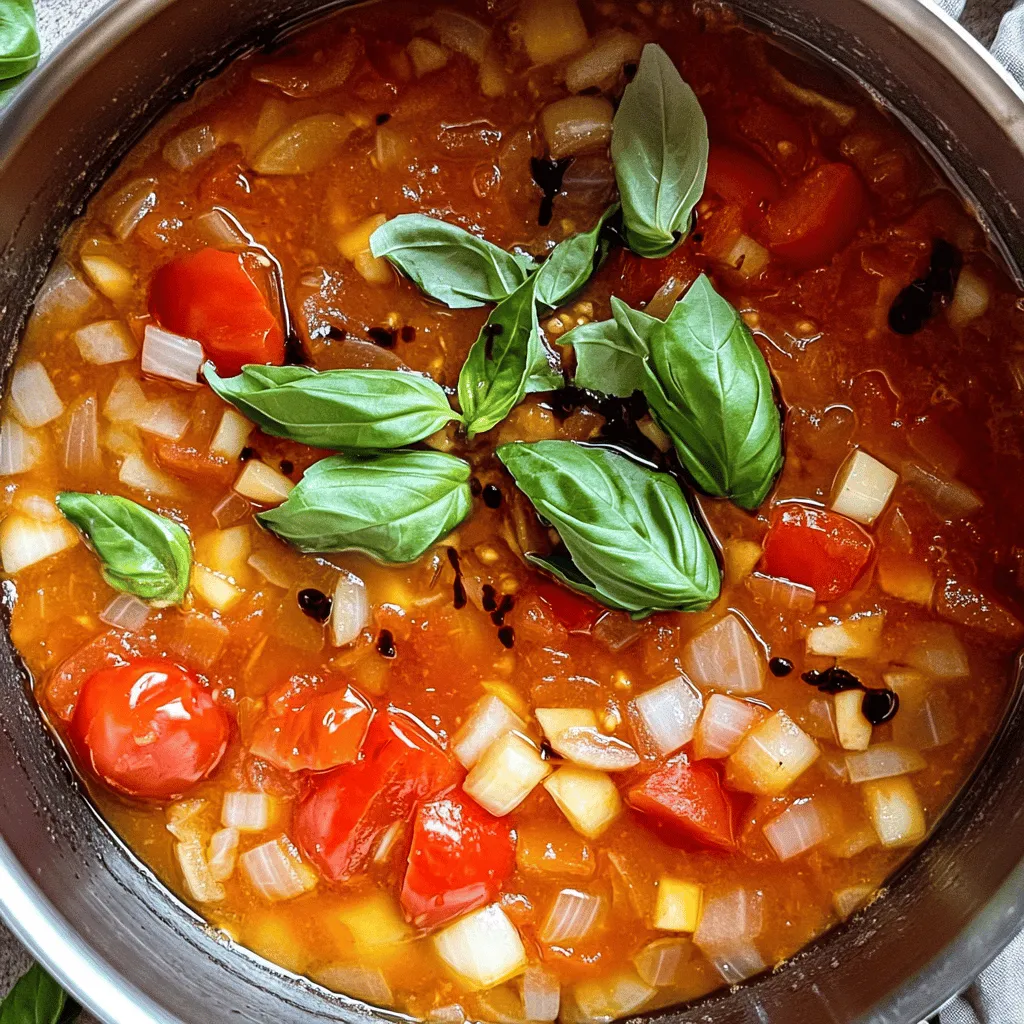
![- 2 pounds ripe tomatoes, halved - 1 medium onion, quartered - 4 cloves garlic, unpeeled - 2 tablespoons olive oil - 1 teaspoon dried oregano - 1 teaspoon sugar (optional) - Salt and pepper to taste - Fresh basil leaves for garnish Using ripe, fresh tomatoes is key for great flavor. Look for tomatoes that are firm yet slightly soft. They should have a rich color. This flavor will shine through in your sauce. Choose high-quality olive oil. A good olive oil adds depth and richness. It elevates the taste of your sauce. For seasoning, use fresh herbs when possible. If you use dried herbs, make sure they are fresh too. This small detail makes a big difference in your dish. For the sugar, it can help balance the sauce's acidity. This is optional, but it’s worth trying. You can adjust the taste to your liking. 1. Preheating the oven: Start by setting your oven to 400°F (200°C). This high heat helps caramelize the tomatoes and onions, bringing out their sweet flavor. 2. Preparing the vegetables: Take 2 pounds of ripe tomatoes and cut them in half. Quarter 1 medium onion. Don’t forget to keep 4 cloves of garlic unpeeled. Place all of these on a large baking sheet. This setup helps the veggies roast evenly. Roasting is key to making this sauce great. Once your oven is hot, put the baking sheet inside. Roast the vegetables for about 25-30 minutes. You want the tomatoes to be soft and a bit caramelized. The onions should be tender. Keep an eye on them. If they start to brown too much, you can take them out earlier. To blend your sauce, let the roasted vegetables cool for a few minutes. Squeeze the roasted garlic out of its skin and toss the skins. In your blender, add the roasted tomatoes, onion, and garlic. Pour in any juice from the pan. For a sweeter sauce, add 1 teaspoon of sugar. Blend until smooth. Taste your sauce now. If needed, adjust the seasoning with more salt and pepper. You can also add fresh basil leaves for extra flavor. This sauce can serve hot or cool down for later use. Check the [Full Recipe] for more details. To enhance flavor, consider adding fresh herbs. Basil, thyme, or parsley can work wonders. Chop them finely and stir them in just before serving. You can also mix in some red pepper flakes for a touch of spice. Perfect caramelization is key for this sauce. Spread the tomatoes and onions evenly on the baking sheet. Avoid overcrowding to ensure even cooking. Don’t rush the roasting; let them caramelize until they are browned. This brings out the natural sweetness. This sauce pairs well with many dishes. Toss it with your favorite pasta for a hearty meal. You can also use it as a topping for pizza. If you like snacks, serve it warm with some crusty bread for dipping. Making your own sauce has many benefits. You control the ingredients and add only what you like. Fresh sauce tastes better than any store-bought option. Plus, you avoid preservatives and additives. Homemade sauce is simple and rewarding, giving you a unique flavor that no jar can match. {{image_2}} You can switch up the flavors of your roasted tomato sauce. Different types of tomatoes work great. Try using cherry tomatoes for a sweet kick or heirloom tomatoes for a rich taste. You can also mix in fresh herbs. Basil adds a classic touch, while thyme gives a nice twist. Adding vegetables can enhance the flavor too. Bell peppers or zucchini can add depth. Just chop them up and roast them with your tomatoes. This makes the sauce even more delicious and unique. Want some heat? Add crushed red pepper flakes or a diced jalapeño. If you prefer sweetness, try a dash of honey or brown sugar. This can balance the tangy taste of tomatoes. Taste as you go to find your perfect flavor. This roasted tomato sauce is naturally vegan and gluten-free. Make sure the olive oil and spices are pure and free from additives. You can enjoy this sauce with pasta, on pizza, or as a dip without worry. It's a great choice for everyone! For the full recipe, try these ideas and make this dish your own! To keep your Easy Roasted Tomato Sauce fresh, store it in an airtight container. Let the sauce cool down before sealing it. Place it in the fridge if you plan to use it within a week. If you want to save it for longer, freezing is a great option. Pour it into freezer-safe bags or containers. Make sure to leave some space for expansion. Label your containers with the date, so you know when you made it. In the fridge, your sauce will last about 5 to 7 days. If frozen, it can stay good for about 3 months. To enjoy the best flavor, try to use it within that time frame. Always check for signs like off smells or colors before using it. To reheat your sauce, gently warm it on the stove over low heat. Stir it often to avoid sticking. You can also microwave it in short bursts. Remember to cover it to keep the moisture in. If the sauce seems thick, add a little water or broth to loosen it. This way, you’ll keep all the tasty flavors intact. Yes, you can use canned tomatoes. They are convenient and save time. Canned tomatoes often have a rich flavor. However, fresh tomatoes taste brighter and sweeter. If you choose canned, look for whole or crushed tomatoes in juice. Avoid those with added sugar or salt. To make a thicker sauce, cook it longer. Let it simmer to reduce the liquid. You can also add tomato paste for more thickness. Another option is to mash some of the tomatoes after blending for a chunkier texture. Absolutely! Ground beef, turkey, or sausage work well. Brown the meat in a pan before adding it to the sauce. You can also add cooked chicken or meatballs. These options add protein and depth to your sauce. Leftover sauce is very versatile. Use it on pasta, pizza, or in casseroles. You can also dip breadsticks in it. For a quick meal, add it to scrambled eggs or use it as a base for soups. Enjoy your homemade sauce in many ways! To make the best tomato sauce, start with fresh, ripe ingredients. Use quality tomatoes and olive oil for great flavor. Follow each step for prep, roasting, and blending to achieve a perfect consistency. Remember to adjust spices to suit your taste. You can also explore variations for unique twists. Homemade sauce beats store-bought every time. Store it well for future meals, and use leftovers creatively. With these tips, your sauce will impress every time you serve it. Enjoy making delicious meals!](https://tossedrecipes.com/wp-content/uploads/2025/07/ca374c2f-e09e-4a39-aabd-c83abfa90048.webp)
Easy Roasted Tomato Sauce Flavorful and Simple Recipe
Are you ready to elevate your dinner game? With my Easy Roasted Tomato Sauce, you can create a rich, flavorful, and simple dish that impresses.

Cajun Potato Soup Flavorful Comfort for Cold Days
When the cold weather hits, there’s nothing like a warm bowl of Cajun Potato Soup to wrap you in comfort. This dish is packed with
Homemade Tomato Sauce Flavorful and Simple Recipe
Are you ready to elevate your meals with a vibrant homemade tomato sauce? Fresh tomatoes can turn any dish into a flavor masterpiece. In this

Buffalo Chicken Stuffed Sweet Potatoes Flavorful Dish
Are you craving a dish that’s both bold and comforting? Buffalo Chicken Stuffed Sweet Potatoes pack a flavor punch and are easy to make. Imagine
![To make Tuscan chickpea soup, gather these simple ingredients: - 2 cups cooked chickpeas (canned or cooked from dry) - 1 large onion, finely chopped - 2 cloves garlic, minced - 2 medium carrots, diced - 2 stalks celery, diced - 1 yellow bell pepper, diced - 4 cups vegetable broth - 1 can (14 oz) diced tomatoes (with their juice) - 1 teaspoon dried oregano - 1 teaspoon dried basil - 1/2 teaspoon red pepper flakes (adjust for spice level) - Salt and pepper to taste - 2 cups fresh spinach or kale - 2 tablespoons olive oil - Grated Parmesan cheese (optional, for serving) - Fresh basil leaves (for garnish) Choosing fresh ingredients makes a big difference in flavor. Here are my tips: - Chickpeas: If using canned, check the label for low sodium options. If cooking from dry, soak them overnight for the best texture. - Vegetables: Look for firm carrots, vibrant bell peppers, and crisp celery. They should feel heavy for their size. - Herbs: Fresh herbs add depth. If you can, pick fresh basil instead of dried. It adds a bright note to the soup. - Broth: Choose a vegetable broth that’s low in sodium. This helps you control the salt in your dish. Personalizing your soup can elevate your experience. Here are some ideas: - Protein: Add cooked chicken or turkey for extra heartiness. - Beans: Try adding white beans for a different texture. - Spices: A pinch of smoked paprika can add a nice depth. - Lemon Juice: A squeeze at the end brightens the soup’s flavor. - Herbs: Experiment with fresh thyme or rosemary for a unique twist. For the full recipe, check out the detailed steps to create this hearty and wholesome delight. Enjoy making your Tuscan chickpea soup! To make Tuscan chickpea soup, gather all your ingredients first. This soup is quick and easy. You will need cooked chickpeas, fresh veggies, and herbs. Chop your onion, garlic, carrots, celery, and bell pepper. This will help the soup cook evenly. 1. Heat the Oil: Use a large pot and heat 2 tablespoons of olive oil over medium heat. 2. Sauté the Onion: Add the chopped onion. Cook for 3-4 minutes until it is soft and clear. 3. Add the Garlic and Veggies: Stir in 2 minced garlic cloves, diced carrots, celery, and bell pepper. Cook for another 5-7 minutes. 4. Combine Ingredients: Add the 2 cups of chickpeas, 14 oz can of diced tomatoes, 4 cups of vegetable broth, and herbs. Mix well. 5. Bring to a Boil: Increase the heat until the soup boils. Then, lower the heat to simmer for 20-25 minutes. 6. Add Greens: In the last 5 minutes, stir in 2 cups of fresh spinach or kale. Cook until wilted. 7. Taste and Adjust: Taste the soup and add salt and pepper to your liking. This simple cooking process brings out rich flavors. Serve the soup hot for the best taste. You can add grated Parmesan cheese on top for creaminess. Fresh basil leaves make a lovely garnish. Pair this soup with crusty bread for a filling meal. For a fun twist, try adding a drizzle of olive oil on top before serving. This brings extra flavor and looks nice. Enjoy your hearty bowl of Tuscan chickpea soup! You can find the Full Recipe for more details. When making Tuscan chickpea soup, avoid overcooking the vegetables. They should be soft but not mushy. Always check the seasoning before serving. Adding salt too early can make the soup taste flat. If you use canned chickpeas, rinse them well. This helps remove excess sodium and improves taste. To boost flavors, use fresh herbs. Adding fresh basil at the end brightens the dish. You can also add a splash of lemon juice for a zesty kick. For a smoky flavor, try adding smoked paprika. Adjust the red pepper flakes for your spice level. More heat makes it exciting! For a creamy texture, blend a portion of the soup. This gives a smooth base while keeping some whole chickpeas intact. Adding spinach or kale in the last few minutes keeps them vibrant and fresh. If the soup seems too thick, adjust with more broth. You want a hearty yet pourable consistency. This Tuscan chickpea soup is a warm hug in a bowl. Find the full recipe to enjoy this delightful dish! {{image_2}} Tuscan chickpea soup is naturally gluten-free. You don't need to change anything to make it safe for those who avoid gluten. Just check your vegetable broth. Some brands add gluten. Always read labels to ensure safety. If you want more protein, consider adding meats. Cooked chicken or sausage works well. You can even use pancetta for a rich flavor. For a plant-based option, try adding tofu or tempeh. Both will soak up the soup's taste. Feel free to swap veggies based on your taste. You can use zucchini instead of carrots. Bell peppers can change, too. Try using red or green peppers. You might also enjoy adding mushrooms or sweet potatoes. Each option gives the soup a new twist. Get creative with your choices! For the complete recipe, check out the [Full Recipe]. To keep your Tuscan chickpea soup fresh, store it in an airtight container. Make sure it cools down first. This way, the flavors stay locked in. If you plan to eat it in a few days, keep it in the fridge. It should last 3 to 5 days in there. If you want to store it longer, freezing is a great option. When you reheat the soup, do it slowly on the stove. Pour the soup into a pot and heat it over low to medium heat. Stir it often to prevent burning. You can also use a microwave. Just heat it in short bursts, stirring in between. This helps it warm evenly. To freeze your Tuscan chickpea soup, let it cool completely. Then, pour it into freezer bags or containers. Leave some space at the top, as the soup will expand when frozen. It can stay good for up to three months in the freezer. When you’re ready to eat, thaw it overnight in the fridge. Then, reheat as mentioned above. Enjoy your meal later! You can find a full recipe for Tuscan chickpea soup in the main article. To make Tuscan chickpea soup vegan, skip the Parmesan cheese. This cheese adds a creamy taste, but you can use nutritional yeast instead for a cheesy flavor. The rest of the recipe is already plant-based. The soup is loaded with veggies and chickpeas, making it hearty and rich. Yes, you can use dried chickpeas. You need to soak them overnight first. After soaking, cook them until tender before adding to the soup. This may take longer, about 1-2 hours. Using dried chickpeas can give your soup a fresher taste. Pair this soup with crusty bread or a fresh salad. Garlic bread adds a nice crunch and flavor. A simple arugula salad with lemon dressing complements the soup well. These sides enhance the meal and make it feel more complete. For more flavors, you can add a dollop of pesto on top of the soup. For the full recipe, check the section above. In this blog post, we explored how to make Tuscan Chickpea Soup. We covered the ingredients needed and tips for choosing fresh ones. You now know the step-by-step cooking process and how to present your soup beautifully. We also shared common mistakes to avoid and ways to enhance the flavor. Finally, we looked at variations and storage tips. Remember, using the right ingredients and practices makes all the difference. Enjoy your cooking and share this delightful recipe with others!](https://tossedrecipes.com/wp-content/uploads/2025/07/19d20004-260f-4ee9-84dd-e984f7f1f448.webp)
Tuscan Chickpea Soup Hearty and Wholesome Delight
If you’re looking for a soup that warms your soul and fills your belly, you’ve found it! Tuscan Chickpea Soup is hearty, wholesome, and packed